Earlier this year I built a Bitcoin mining project with my old Raspberry PI. Even though it’s the older model, the USB ASIC offloads all of the CPU processing so it’s an ideal project for the older PI (there’s a whole separate thread around whether we really need the extra CPU horsepower in the newer PI’s. Although a benefit is that the old model B’s will probably get a lot cheaper on ebay)
Buyer Beware – I did this about 4 weeks ago and had loads of fiddling to make it work. I’ve gone back through bash histories to document everything I did. If I’ve missed anything then that’s my excuse. But feel free to drop me a line if you’ve tried stuff and it doesn’t work.
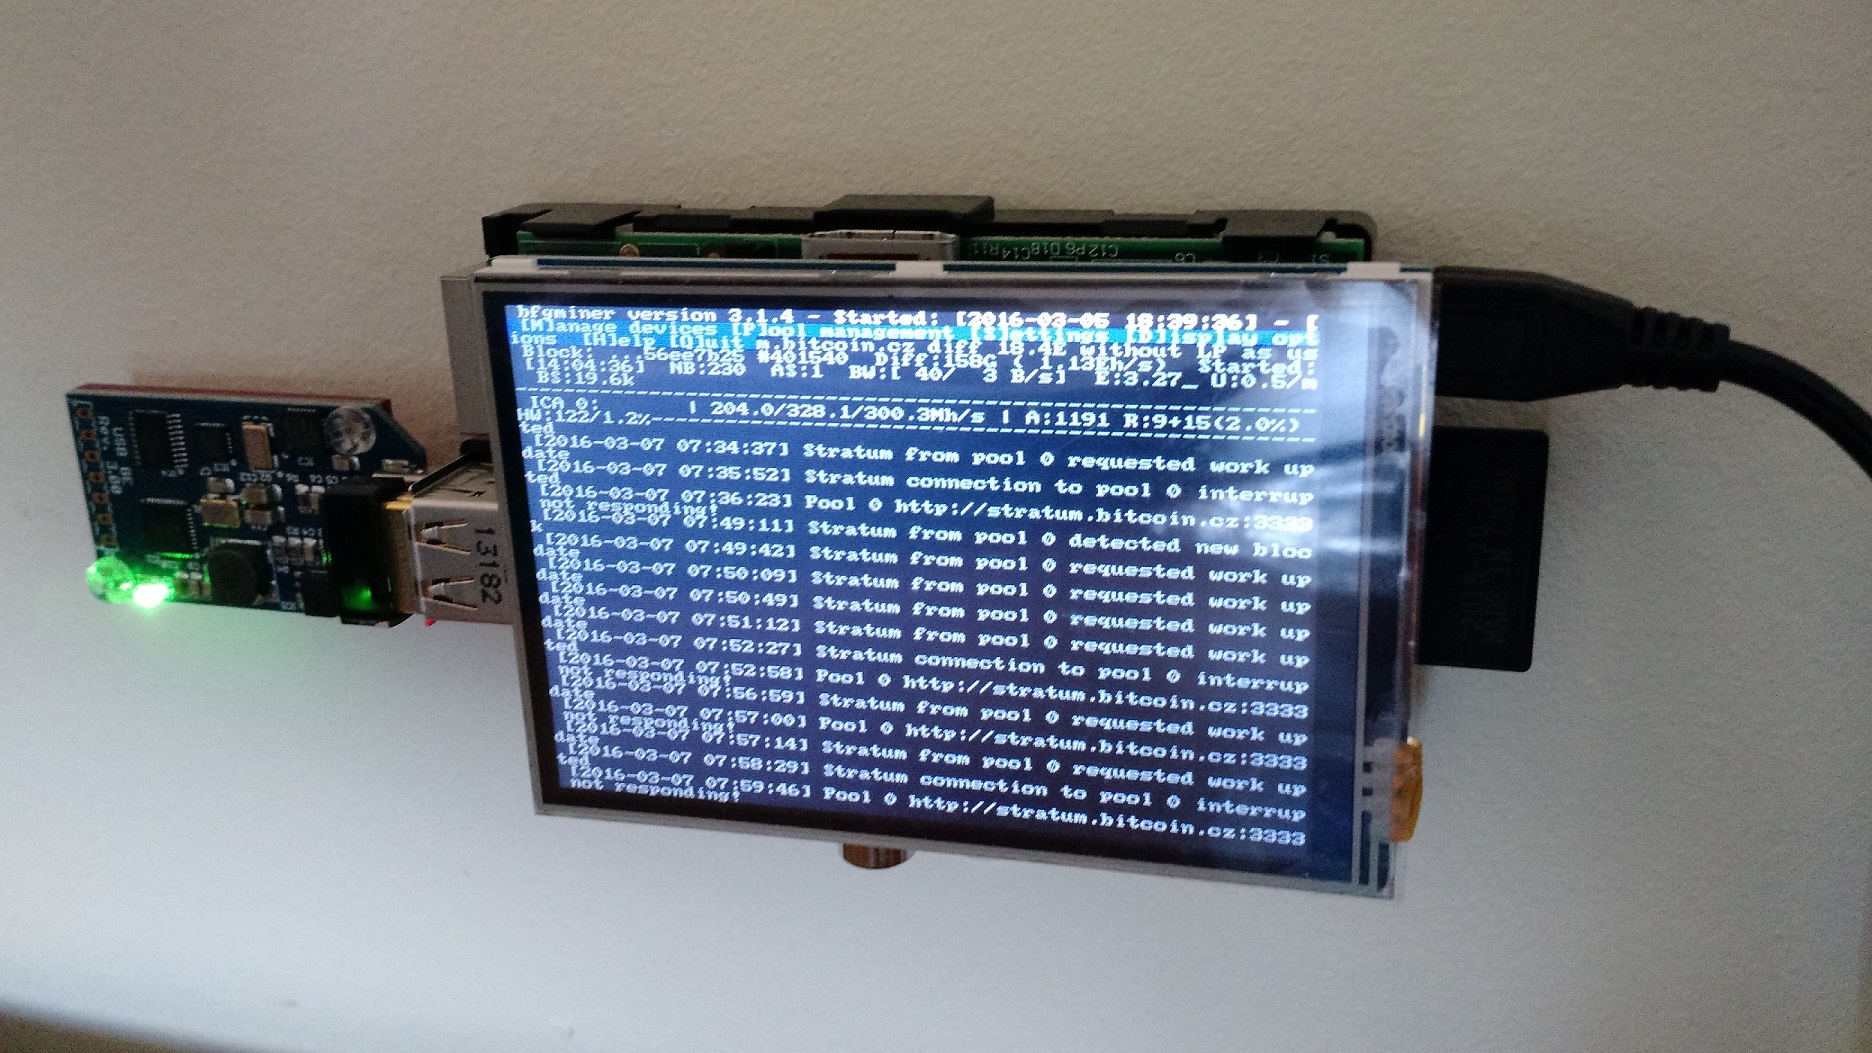
I installed a clean version of Jessie to start the project. But I had to do a fair amount of fiddling to get the screen up and running. Most of the effort in getting this project working was around getting the screen to a) work, and b) stay on. As such I thought I’d document it here to see if it helps anyone.
The screen I picked up is from Amazon – described as a “Makibes® 3.5 inch Touch Screen TFT LCD (A) 320*480 Designed for Raspberry Pi RPi/Raspberry Pi 2 Model B”. The back of the screen says “3.5inch RPi LCD (A) V3 WaveShare SpotPear”.

I think the Makibes thing is a rebrand as most of the google search results for the errors I was getting were brought up the WaveShare screen. As per the comments in the Amazon page, this link many found helpful. It got me to the point where I could manually load the modules. But it didn’t stay persistent over the reboot. As per the page I just linked to (and I’m just copying and pasting his work here, check out the link for the full info), I could get the screen working with a modprobe
modprobe flexfb nobacklight regwidth=16 init=-1,0xb0,0x0,-1,0x11,-2,250,-1,0x3A,0x55,-1,0xC2,0x44,-1,0xC5,0x00,0x00,0x00,0x00,-1,0xE0,0x0F,0x1F,0x1C,0x0C,0x0F,0x08,0x48,0x98,0x37,0x0A,0x13,0x04,0x11,0x0D,0x00,-1,0xE1,0x0F,0x32,0x2E,0x0B,0x0D,0x05,0x47,0x75,0x37,0x06,0x10,0x03,0x24,0x20,0x00,-1,0xE2,0x0F,0x32,0x2E,0x0B,0x0D,0x05,0x47,0x75,0x37,0x06,0x10,0x03,0x24,0x20,0x00,-1,0x36,0x28,-1,0x11,-1,0x29,-3 width=480 height=320
modprobe fbtft_device name=flexfb speed=16000000 gpios=reset:25,dc:24
If your screen matches the description above and that works, then happy days. Here’s what I ended up doing to make it persistent post reboot:
First off, if it isn’t already enable SPI in the raspi-config tool
in “/boot/config.txt” I’ve appended the following lines
Enable audio (loads snd_bcm2835) dtparam=spi=on # dtoverlay=ads7846,cs=1,penirq=17,penirq_pull=2,speed=1000000,keep_vref_on=1,swapxy=0,pmax=255,xohms=60,xmin=200,xmax=3900,ymin=200,ymax=3900 dtoverlay=ads7846,speed=500000,penirq=17,swapxy=1 dtparam=i2c_arm=on dtoverlay=pcf2127-rtc # dtoverlay=w1-gpio-pullup,gpiopin=4,extpullup=1 device_tree=on
/boot/cmdline.txt passes parameters to the bootloader. I’ve appended a couple of lines to make the console appear on the SPI TFT screen instead of the default HDMI. Also, the console blanking is disabled
dwc_otg.lpm_enable=0 console=ttyAMA0,115200 console=tty1 root=/dev/mmcblk0p2 rootfstype=ext4 elevator=deadline fsck.repair=yes rootwait fbcon=map:1 fbcon=font:ProFont6x11 logo.nologo consoleblank=0
/etc/modules now looks like this:
snd-bcm2835 i2c-bcm2708 i2c-dev
Something I didn’t pick up from other forum posts and blogs is the config required to auto load modules on bootup. So I created /etc/modules-load.d/fbtft.conf to effectively do what modprobe is doing from the command line
spi_bcm2708 flexfb fbtft_device
Console Blanking is apparently a bit busted in Jessie, so /etc/kbd/config needs the following settings (they aren’t next to each other in the file so you’ll need to search through it to make both edits:
BLANK_TIME=0 POWERDOWN_TIME=0
And /etc/init.d/kbd needs to look like this (search for screensaver stuff in the file – it’s quite long)
# screensaver stuff setterm_args="" if [ "$BLANK_TIME" ]; then setterm_args="$setterm_args -blank $BLANK_TIME" fi if [ "$BLANK_DPMS" ]; then setterm_args="$setterm_args -powersave $BLANK_DPMS" fi if [ "$POWERDOWN_TIME" ]; then setterm_args="$setterm_args -powerdown $POWERDOWN_TIME" fi if [ "$setterm_args" ]; then # setterm $setterm_args TERM=linux setterm > /dev/tty1 $setterm_args fi
That should get you to the point where your Raspberry PI will reboot and then always use the TFT screen as a display output.
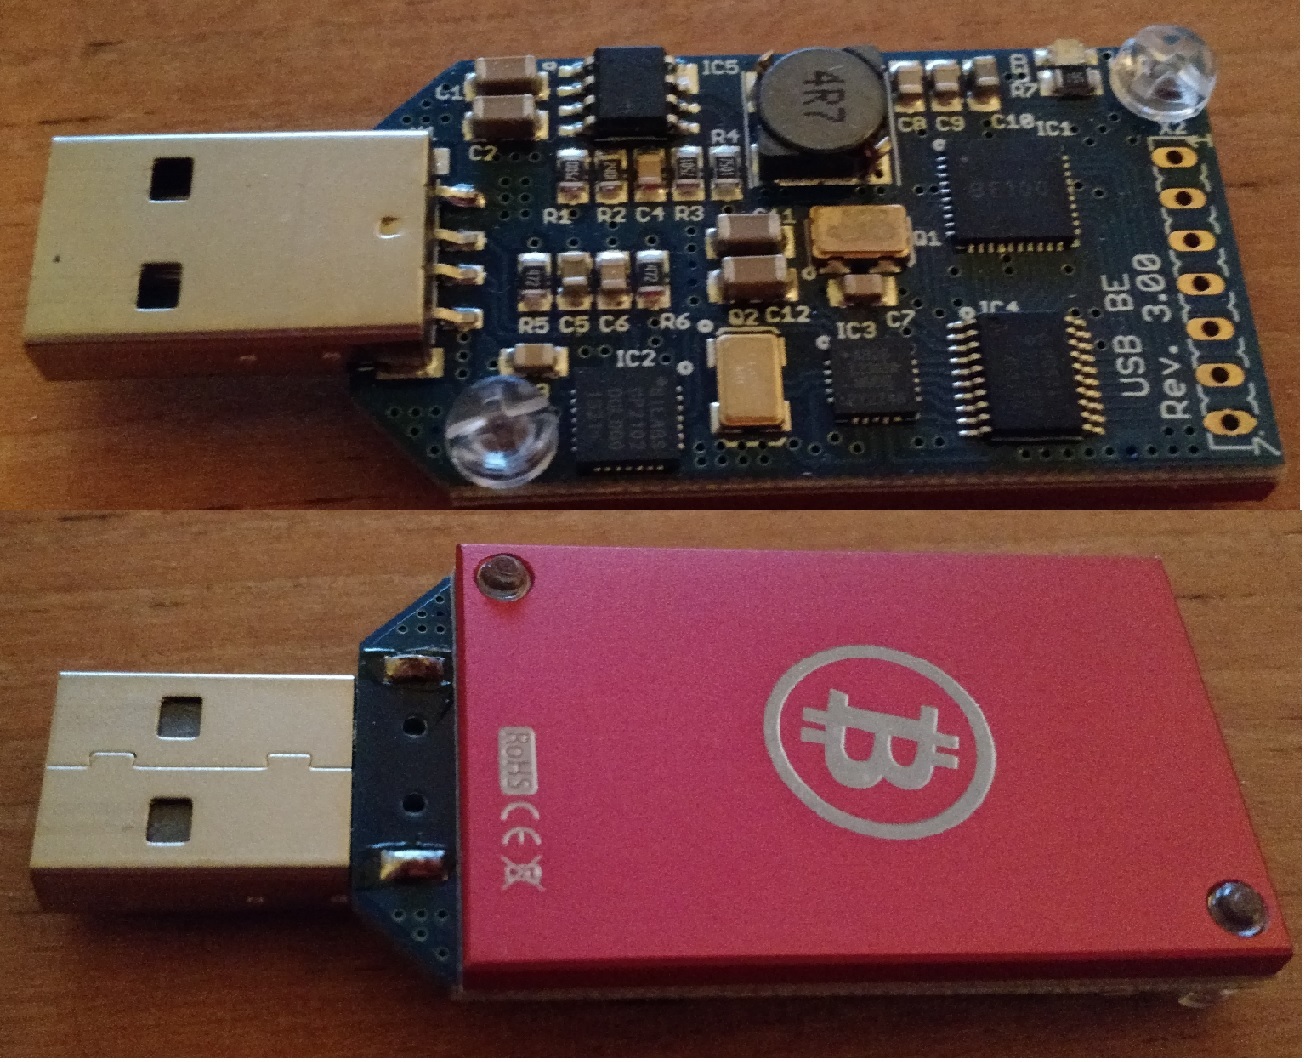
To complete the project I used this USB ASIC to do my bitcoin mining. Amazon is out of stock at the time of writing. However it will give you what you need to search ebay for, etc. This instructables is complete enough that there’s little point me replicating it here. However, there were a couple of additions that I needed to do before it worked and to complete the project.
First off I needed to install some additional packages:
sudo apt-get install autoconf autogen libtool uthash-dev libjansson-dev libcurl4-openssl-dev libusb-dev libncurses-dev git-core
Download the zip file, build and install the code
wget http://luke.dashjr.org/programs/bitcoin/files/bfgminer/3.1.4/bfgminer-3.1.4.zip unzip bfgminer-3.1.4.zip cd bfgminer-3.1.4 make clean ./autogen.sh ./configure make sudo make install
The last part of the project is a total hack as I ran out of steam with my enthusiasm. It’s pretty insecure and absolutely not best practise, etc. etc. But I got lazy, and it works. I’m sure you can make something better given a few more brain cells. First off, make sure the pi boots into console mode and not x windows.(option number 3 in raspi-config). Then choose option
B2 Console Autologin Text console, automatically logged in as 'pi' user
Then I created the following script – /home/pi/login.sh
#!/bin/bash # /usr/local/bfgminer-3.1.4/bfgminer -o stratum.bitcoin.cz:3333 -O username.password -S all
Every time it boots, the Raspberry PI automatically logs in as the ‘pi’ user. And everytime the pi user logs in, that script is run. Totally insecure. And I’ll probably go back and fix it when I’ve got a spare 30 minutes. But it works for now
3,739 replies on “Raspberry PI TFT Screen / USB Bitcoin Miner”
Somebody essentially lend a hand to make severely articles I would state. That is the first time I frequented your web page and up to now? I surprised with the research you made to create this particular put up extraordinary. Great activity!
Needed to write you that very little note to finally give many thanks again about the beautiful basics you’ve featured in this case. It’s so extremely generous with people like you to provide publicly all that many of us would have made available as an e-book to help with making some profit on their own, notably considering the fact that you might well have done it in case you decided. These things also acted as a easy way to recognize that other individuals have the same interest the same as my personal own to figure out somewhat more regarding this condition. I believe there are thousands of more pleasant instances ahead for people who examine your website.
Viagra
Porn
Pornstar
Porn
Buy Drugs
Porn
4d live draw 4dlotto.cc
I am sending you 1π! Pi is a new digital currency with over 10 million members worldwide. To claim your Pi, follow this link https://www.facebook.com/EarnFreeCashPi/posts/pfbid0NJ2WxJ3hTfzu7wAQVTcGARnFb88hg6L9hpGJg8nsuLjzPSrGZa6VUfTGHgDUPcXyl
Built for Everyone, By Everyone . Pi Network is a community of tens of millions of humans mining Pi cryptocurrency to use and build the Web3 app ecosystem. This blockchain network relies on its community of Pioneers, and rewards them. Read How to: https://www.facebook.com/miningpinetwork
login on bht club and start your journey
Использование прогон лицензионным хрумером https://www.olx.ua/d/uk/obyavlenie/progon-hrumerom-dr-50-po-ahrefs-uvelichu-reyting-domena-IDXnHrG.html обеспечивает высокую скорость и стабильность работы.
colour prediction app
colour prediction app
Try 66lottery now
66 lottery is a colour trading platform
login on 66 lottery and start your journey
Try 66lottery now
colour prediction app
Try 66lottery now
login on jalwagame and start your journey
jalwa game is a colour trading platform
login on jalwagame and start your journey
jalwa game is a colour trading platform
hentai porn download
downoad sex games
Scam
Pornstar
Porn
Porn site
Sex
Buy Drugs
V rámci realizací našich projektů je často žádaná betonová střešní krytina v Praze. Její popularita spočívá ve vysoké kvalitě a dostupnosti na místním trhu.
Sex
Porn site
Porn
Scam
Pornstar
Pornstar
Buy Drugs
Porn site
Sex
Pornstar
Sex
Porn site
Porn site
Buy Drugs
Porn
Porn
Viagra
Buy Drugs
Sex
Viagra
Porn site
Scam
Porn site
Pornstar
Sex
Pornstar
Viagra
Porn
Porn site
Pornstar
Sex
Sex
Pornstar
Viagra
Viagra
Porn site
Sex
Scam
https://vc.ru/
Georgia escort eskortebi.link services provide tailored experiences for every preference. Find your ideal match now.
Pornstar
Scam
Scam
Porn
Sex
Viagra
Pornstar
Scam
Porn
Scam
Porn
Viagra
Scam
Pornstar
Porn site
Buy Drugs
Buy Drugs
Sex
Porn site
либет казино
Porn
ауф казино
либет казино
Porn
Scam
Viagra
Scam
olgabet promo code The OlgaBet promo code is VES2025NA – enter this latest code to receive a maximum bonus of €2500 plus an exclusive no deposit bonus
Porn
Только 2 знакам Зодиака невероятно повезет во второй половине апреля
https://x.com/Fariz418740/status/1911625378860278161
Beer Basha: пиво, вкус и отдых на Каспии в Sea Brezze
https://sealife.az/sea-breeze/restaurants_and_bars/beer-basha-pivo-vkus-i-otdyh-na-kaspii-v-sea-brezze/
Скретч-карты и предки: как лотереи захватили молодежь Китая
https://x.com/kiselev_igr/status/1911668859800560076
Porn site
Buy Drugs
Scam
Child Porn
scam
Pornstar
Buy Drugs
“Dolu”da h?rbcil?r dedil?r ki… | Elxan C?f?rov kinolar?m?z?n ugursuzlugundan dan?sd? – QAPQARA
https://www.youtube.com/watch?v=pAeu_YZs-7I
Sex
“Ucan taksi” surucusu tovb? etdi | Baku TV-y? hadis? an?n? dan?sd? – ARZUNUN VAXTI
https://www.youtube.com/watch?v=d1VeGY0sw9Q
Sex
“Японская Ванга” предсказала крупную катастрофу через три месяца
https://x.com/Fariz418740/status/1912152170230603979
Scam
Pornstar
Pornstar
Раскрыты шокирующие подробности гибели самой желанной женщины XX века
https://x.com/kiselev_igr/status/1912395338134020172
Porn
Scam
Раскрыто неожиданное воздействие жары на организм
https://x.com/kiselev_igr/status/1912450547405250622
Porn site
Последствия сильного ливня: эвакуированы 31 человек, включая 10 детей
https://x.com/kiselev_igr/status/1912488013038248258
Porn
elonbet
Названы 2 знака зодиака, которые притягивают деньги для всех
https://x.com/kiselev_igr/status/1912761312003637382
Самые сексуально совместимые знаки зодиака
https://x.com/SvetlnaKr2/status/1912772846427701425
19-летний тиктокер обручился с 76-летней миллиардершей: «Это была любовь с первого взгляда»
https://x.com/SvetlnaKr2/status/1912781403533570376
Какие знаки зодиака чаще попадают в аварии: данные страховых компаний
https://x.com/kiselev_igr/status/1912791299700256974
Scam
Практичність у дрібницях особливо важлива, тому якісні гаманці стають надзвичайно цінною річчю. Вони допомагають організувати фінанси та необхідні картки.
Porn
Scam
5 утренних привычек богатых людей, о которых молчат интервью
https://x.com/IrinaPavlovna84/status/1912948849158840804
Что едят богатые на завтрак: от авокадо до шампанского
https://x.com/IrinaPavlovna84/status/1912974156561346968
Sex
Pornstar
2 знака зодиака, которые поглощают всю темную энергию
https://x.com/kiselev_igr/status/1913193565213126938
Названы витамины, дефицит которых провоцирует депрессию и панические атаки
https://x.com/SvetlnaKr2/status/1913210679382724901
Scam
Неожиданное открытие: растворимый кофе может быть так же полезен, как и натуральный
https://x.com/SvetlnaKr2/status/1913245545206022281
Porn site
Buy Drugs
Sex
Porn
Майкл Дуглас и Кэтрин Зета-Джонс разводятся после 25 лет брака
https://x.com/Fariz418740/status/1913473214602166643
Как набрать вес без жира — советы диетолог
https://x.com/DeyanetKrmv/status/1913487846129758689
Pornstar
7 продуктов, которые могут заменить зубную щётку — советует стоматолог
https://x.com/NargisEhme94100/status/1913495035728822630
Porn
Porn site
https://x.com/DeyanetKrmv/status/1913622990169706528
Porn site
Prada fake designer bags
Sea Breeze: Аквапарк и отдых у моря
https://x.com/Fariz418740/status/1913838453889835329
Gucci replica designer bags
Ученые раскрыли тайны древних вулканов Марса
https://x.com/DeyanetKrmv/status/1914001138669539521
Почему распалась легендарная пара: В чём настоящая причина развода Майкла Дугласа и Кэтрин Зета-Джонс?
?? Майкл Дуглас и Кэтрин Зета-Джонс разводятся после 25 лет: названа причина https://x.com/NargisEhme94100/status/1914005617326370900
fake Chanel bag
?? Овны разбогатеют, Раки отступят, Рыбы помогут: недельный гороскоп с 21 по 27 апреля
https://x.com/SebiBilalova/status/1914031445724582045
Масла против аппетита: как аромат мяты и цитрусов спасают фигуру без диет
https://x.com/DeyanetKrmv/status/1914035562123587745
Gucci fake designer bags
Li Auto открыл первый городской шоурум в Азербайджане и стала известна дата открытия основного центра!
https://x.com/SvetlnaKr2/status/1914214791301726269
В России произошло сильное землетрясение, началось извержение вулкана https://x.com/SvetlnaKr2/status/1914222755991454029
DIOR bag replica
Врач указала на простой способ выявить риск ранней смерти за 30 секунд
https://x.com/SvetlnaKr2/status/1914246396313473116
What symptom indicates that you can no longer eat sweets?
https://x.com/SvetlnaKr2/status/1914255410711728435
DIOR bag replica
Растительное масло оказалось связано с одним видом агрессивного рака https://x.com/SvetlnaKr2/status/1914281699267035383
Стала известна возможная причина смерти Папы Франциска https://x.com/SvetlnaKr2/status/1914286810018045990
DIOR bag replica
Ученые выяснили скрытую причину ожирения https://x.com/SvetlnaKr2/status/1914327415247040761
Why did the legendary couple break up: What is the real reason for Michael Douglas and Catherine Zeta-Jones’ divorce?
https://x.com/Fariz418740/status/1914362994722550123
Chanel fake designer bags
Why did the legendary couple break up: What is the real reason for Michael Douglas and Catherine Zeta-Jones’ divorce?
https://x.com/Fariz418740/status/1914362994722550123
fake prada bag
Аральское море поднимает землю: куда уходит вода?
https://x.com/SvetlnaKr2/status/1914596801144906101
Исторический момент: прощальные фото Папы Франциска появились в Сети https://x.com/SvetlnaKr2/status/1914606769021608013
Celine fake designer bags
Экскременты слона — новое лакомство в модном ресторане Шанхая https://x.com/VladimirKorlv/status/1914623761237655817
Chanel bag replica
7 лучших бесплатных нейросетей для создания изображений в 2025 году https://x.com/SvetlnaKr2/status/1914641178802237582
Эти 4 типа людей кошки воспринимают как «своих». Остальные — всего лишь персонал https://x.com/VladimirKorlv/status/1914646262889988254
Prada bag replica
Мужчина стал миллионером из-за ошибки кассира https://x.com/VladimirKorlv/status/1914669734613655653
Земля дрожала 9 дней подряд — ученые раскрыли шокирующую причину https://x.com/SvetlnaKr2/status/1914674314688749781
Celine replica designer bags
Buy Drugs
Sex
Celine bag replica
Porn site
Bottega Veneta bag replica
Viagra
Gucci bag replica
Японские ученые назвали точную дату конца света
https://x.com/Fariz418740/status/1914895379935453514
Под британским университетом нашли 317 скелетов и храм
https://x.com/DeyanetKrmv/status/1914907560018104384
В Индии убиты 27 туристов — видео и подробности трагедии
https://x.com/NargisEhme94100/status/1914909341108363404
До встречи с Лепсом: 19-летняя Аврора показала себя до операций
https://x.com/SebiBilalova/status/1914909495198724189
Bottega Veneta fake designer bags
9 самых красивых и сексуальных моделей апреля 2025 года https://x.com/SvetlnaKr2/status/1914975223222354298
Prada replica designer bags
Названы неочевидные симптомы рака мочевого пузыря https://x.com/SvetlnaKr2/status/1914979083215143220
Внимание желающим совершить хадж! Саудовская Аравия вводит новые требования
https://x.com/VladimirKorlv/status/1914981813371420891
Bottega Veneta bag replica
Брак по миллиардерски: 10 богатейших людей, которые были женаты минимум дважды https://x.com/VladimirKorlv/status/1914987016590184894
Искусственный интеллект против рака: новый алгоритм выявляет слабости опухолей https://x.com/VladimirKorlv/status/1915000921911607661
Gucci bag replica
The Real Reason Brad Pitt Didn’t Propose to Ines de Ramon
https://x.com/DeyanetKrmv/status/1915105660921925817
Археологи впервые нашли прямое доказательство боя гладиатора со львом
https://x.com/NargisEhme94100/status/1915117771332989198
Fendi bag replica
Гороскоп профессий будущего: кем ты станешь через 10 лет
https://x.com/SebiBilalova/status/1915121426014601624
Louis Vuitton replica designer bags
Земля перегревается: катастрофическая жара уже начинается https://x.com/VladimirKorlv/status/1915325170564124811
Какие болезни подстерегают знаков зодиака? https://x.com/VladimirKorlv/status/1915332303091310617
Стало известно, почему нельзя жарить яичницу на подсолнечном масле https://x.com/SvetlnaKr2/status/1915332897734639863
Названы пять ежедневных привычек для долголетия https://x.com/VladimirKorlv/status/1915338927403094455
Эти фрукты и овощи нельзя хранить вместе, и вот почему https://x.com/SvetlnaKr2/status/1915339502568026245
Земля «уходит в себя»: в США обнаружено редкое геофизическое явление https://x.com/VladimirKorlv/status/1915351914910196019
Деми Мур о родах дочери: «Я не знала, выживет ли она» https://x.com/SvetlnaKr2/status/1915363178596192760
Звезда фильмов для взрослых умер в 32 года из-за бычьего сердца https://x.com/VladimirKorlv/status/1915377307272851738
Звёздный прогноз на выходные 26–27 апреля: какие знаки зодиака окажутся на волне успеха? https://x.com/VladimirKorlv/status/1915394801903579597
Найден вирус, помогающий в борьбе с раком кожи https://x.com/SvetlnaKr2/status/1915424574017081650
купить права
На какие болезни указывает сухость губ? https://x.com/SvetlnaKr2/status/1915671255912517786
Звезда эротического кино Эрих Томек умер на 95-м году жизни https://x.com/SvetlnaKr2/status/1915676657123221900
NWL: Загадочная субстанция в кишечнике дельфина привела к его гибели у берегов Великобритании https://x.com/VladimirKorlv/status/1915683063213760707
В Японии растет число заразившихся этой инфекцией https://x.com/VladimirKorlv/status/1915692533310513246
Менингит: чем опасна болезнь и кто в группе риска https://x.com/YuliaGrigoreva_/status/1915697311188996349
Врач рассказала, как шашлыки могут провоцировать рак https://x.com/YuliaGrigoreva_/status/1915700704858996772
Найдена экзопланета в девять раз тяжелее Земли https://x.com/YuliaGrigoreva_/status/1915718179151642835
В пещере Веревкина обнаружили неизвестную форму жизни в подземном озере https://x.com/YuliaGrigoreva_/status/1915745229845524828
Назван предвестник инфаркта у мужчин
https://x.com/SebiBilalova/status/1915850902616891400
Почему человечество до сих пор не встретило внеземную жизнь: мнение учёных
https://x.com/NargisEhme94100/status/1915856834822316303
В России успешно испытали биоаналог препарата против 11 видов рака
https://x.com/DeyanetKrmv/status/1915858811593646236
Ешь и Худей: 10 Лёгких Рецептов для Красивого Тела
https://x.com/SebiBilalova/status/1915869218303524932
Самый опасный напиток для здоровья — и это не алкоголь
https://x.com/NargisEhme94100/status/1915872132766064887
https://new.earth-history.com/index.php/my-manuscript/preface-by-lcgeerts/item/1503-the-qur-an-74-al-mudathir?start=680
Ученые выяснили, как цвет волос влияет на продолжительность жизни
https://x.com/NargisEhme94100/status/1916013855454474568
Российский музыкант признан иноагентом
https://x.com/SebiBilalova/status/1916016188536000877
Для створення атмосфери спа-салону вдома варто звернути увагу на стильні аксесуари для ванної. Вони перетворюють звичайні гігієнічні процедури на справжній ритуал релаксації.
Илон Маск чипировал первого в мире человека с БАС https://x.com/YuliaGrigoreva_/status/1916771449928356286
Здоровье глаз молодых людей оказалось под угрозой https://x.com/YuliaGrigoreva_/status/1916772498558865547
Тип белка не влияет на рост мышц: ученые опровергли популярный миф https://x.com/YuliaGrigoreva_/status/1916786790796562854
В Тихом океане найден новый вид «осьминога Дамбо» https://x.com/YuliaGrigoreva_/status/1916807778653339759
Таинственный золотой шар найден у берегов Аляски: учёные гадают о его происхождении https://x.com/YuliaGrigoreva_/status/1916819164917911949
Женщина “воскресла” по пути на собственные похороны https://x.com/VladimirKorlv/status/1916844931168997531
Названы самые благоприятные дни мая для важных решений
https://www.pinterest.com/pin/306455949663320281/
https://desifaceup.in/Ivario12?lang=turkish
Единственная группа крови, которая является магнитом для болезней
https://x.com/kiselev_igr/status/1917082484837122525
juego de minas bbrbet
The abandoned ship “Floating Forest”, located in Homebush Bay in Sydney
https://x.com/kiselev_igr/status/1917110433359540526
Главные события: Перемирие в Украине, отключение электричества в Европе и выборы нового Папы https://x.com/YuliaGrigoreva_/status/1917128314495369446
https://aviatorgame-online.web.app/
Массовый блекаут в Испании и Португалии: миллионы без света, связи и банковских карт
https://x.com/YuliaGrigoreva_/status/1917131291721666638
Стало известно, почему с возрастом начинает расти живот https://x.com/VladimirKorlv/status/1917146617196523836
За это действие водителей будут штрафовать от 500 до 800 манатов https://x.com/VladimirKorlv/status/1917149287030428092
Ще недавно я не знав принципи комплаєнс, але після проходження тренінгу зрозумів, наскільки це важливо. Тепер застосовую отримані знання щодня.
Возлюбленная Павла Дурова раскрыла секрет, как разбогатеть
https://x.com/VladimirKorlv/status/1917167796502597968
Ученые развеяли миф о “Библейском чуде” https://x.com/MKids3447/status/1917201458119745972
How Love Has Changed Over the Last 10 Years: From Letters to Likes https://x.com/MKids3447/status/1917231923526504555
После первого путешествия понял, что для экономии времени отлично подходит ночной автобус из Украины в Польшу http://www.infobus.top. Можно спокойно отдохнуть в дороге и утром уже быть на месте.
Ученые выявили овощ, который является врагом печени
https://x.com/MKids3447/status/1917300027837255771
Загадка под пирамидами: в Египте найдены следы неизвестной цивилизации https://x.com/MKids3447/status/1917305128446554359
Семья Мартин: загадка исчезновения, раскрытая через 66 лет https://x.com/MKids3447/status/1917307612728541606
Каннибал с клыками: на побережье США выбросило редкую хищную рыбу https://x.com/MKids3447/status/1917314526552232213
https://desifaceup.in/Ivario12?lang=turkish
Редчайшую морскую рыбу выбросило на пляж Калифорнии — очевидцы шокированы https://x.com/MKids3447/status/1917479612013240365
https://www.floristic.ru/forum/groups/moskva-d929-internet-magazin-centr-svyazi.html#gmessage1420
Бессмертие не миф? Учёный Обри ди Грей утверждает, что люди смогут жить до 1000 лет https://x.com/MKids3447/status/1917561173043486870
Багато хто запитує про варіант подорожі «маршрутка з України в Польщу ціна http://www.infobus.top». Дійсно, це чудовий бюджетний спосіб швидко дістатись потрібного місця.
Мене запитали, чи розумію я, що внутрішній аудит це не просто формальна перевірка документів. Насправді це ціла система контролю і вдосконалення діяльності.
Скрытые опасности: Что на самом деле происходит с вашим телом каждую весну https://x.com/MKids3447/status/1917909408719241419
Аллергия или COVID — как отличить и не лечиться зря. Советы врачей https://x.com/MKids3447/status/1917914032343859387
Жене голливудской звезды грозит запрет на въезд в США из-за Трампа
https://x.com/MKids3447/status/1917922921067987433
FoxKino – Смотреть фильмы, сериалы, аниме и мультфильмы онлайн в хорошем качестве бесплатно – foxkino.ru
https://foxkino.ru/
Ученые заявили о скором самоуничтожении Земли по этой причине
https://x.com/Fariz418740/status/1918112675479036388
http://www.comprag.ru
Прибыль и провал: названы главные кинохиты и разочарования 2024 года https://x.com/MKids3447/status/1918212663022075915
Змея вывела из строя скоростные поезда между Токио и Осакой во время “Золотой недели” https://x.com/MKids3447/status/1918215296218734825
В Баку пьяная “гонщица” на Porsche совершила автохулиганство https://x.com/MKids3447/status/1918230516404302140
Неожиданная польза брокколи застала ученых врасплох https://x.com/MKids3447/status/1918241647537570253
Ученые нашли настоящую природную виагру
https://x.com/kiselev_igr/status/1918272068183113831
Змея вывела из строя скоростные поезда между Токио и Осакой во время “Золотой недели”
https://pin.it/5l167vLVh
remeza компрессоры купить
Ученые уловили из глубины Земли признаки грядущей страшной катастрофы
https://x.com/kiselev_igr/status/1918300858132947250
https://forum.prosochi.ru/topic49319.html
крос аир
Против близкого друга Ирины Шей выдвинули шокирующее обвинение https://x.com/MKids3447/status/1918395784262799691
Полный блэкаут на Бали: остров остался без электричества https://x.com/MKids3447/status/1918399116423372845
https://www.adobe.com/
1xBet promo code The betting landscape continues to evolve in 2025, and 1xBet remains at the forefront of the industry by offering generous promotions to both new and existing players.
Mostbet promo code With its generous bonuses, vast selection of games and betting markets, and user-friendly platform, Mostbet provides an excellent gaming experience.
Астероид YR4 летит к Земле — возможны цунами и катастрофа
https://x.com/MKids3447/status/1918643069382963706
В недрах Земли обнаружен скрытый живой мир весом свыше 20 миллиардов тонн https://x.com/MKids3447/status/1918643829105741881
gabriel gaytan
https://sexcloud.ru/10-luchshih-poz-v-kamasutry/
https://www.adobe.com/
1xBet — это одна из самых популярных и надежных платформ, которая предлагает уникальные возможности и привлекательные бонусы для своих пользователей. Независимо от того, являетесь ли вы новичком в мире ставок или опытным игроком, промокоды 1xBet — это отличный способ повысить свои шансы на выигрыш.
Промокоды – это ключ к дополнительным преимуществам и бонусам, которые предоставляются на платформе 1xBet. Получение промокода очень просто – просто зарегистрируйтесь на сайте и введите его в соответствующее поле. Как только вы активируете промокод, вам будут доступны дополнительные средства на вашем игровом счете, бесплатные ставки или другие привилегии, которые помогут вам увеличить свои шансы на успех.
Использование промокодов 1xBet имеет множество преимуществ. Они позволяют вам получить дополнительные средства для ставок, что дает вам больше возможностей для выигрыша. Бонусы, полученные с использованием промокодов, могут быть использованы для различных видов ставок на спорт, казино, покер и другие игры, предлагаемые 1xBet. Таким образом, вы можете наслаждаться игрой и одновременно увеличивать свои шансы на успех.
активный промокод 1xbet Бонусы являются одной из главных особенностей, которые делают 1xBet привлекательной для множества игроков. Как новый, так и постоянный пользователь, вы сможете воспользоваться различными видами бонусов, которые помогут увеличить ваши шансы на выигрыш. От приветственных бонусов до регулярных акций, 1xBet предлагает множество вариантов, чтобы удовлетворить ваши потребности и предпочтения.
Один из самых популярных бонусов, предоставляемых 1xBet, – это приветственный бонус для новых игроков. Как только вы зарегистрируетесь на платформе, вам будет предложен щедрый приветственный пакет, который включает в себя бонус на первый депозит. Это означает, что вы получите дополнительные средства на свой игровой счет, чтобы увеличить свои возможности для ставок. Такой бонус является отличным стартом в вашем игровом путешествии и помогает вам исследовать различные игры и спортивные события.
купить водительские права
Уборка офисного архива — теперь всё на своих местах.
https://wiki.zibocademy.com/index.php?title=Klining_73I
Использую клининг раз в месяц, это экономит кучу времени и сил.
https://opensourcebridge.science/wiki/User:DinahRickman1
The Most Talked-About Celebrity Divorces of 2025 That Shook America https://x.com/MKids3447/status/1919081732067750220
Топ-6 самых громких разводов 2025 года, о которых говорят в Америке https://x.com/MKids3447/status/1919087999142236274
Заказал уборку для офиса, теперь всё организовано.
http://www.sissipedia.wiki/index.php?title=Klining_40G
Doctors named the most harmful morning habit that causes cancer
https://x.com/MKids3447/status/1919096909769097584
Уборка офисных корзин — даже мусор выглядит аккуратно.
https://fakenews.win/wiki/User:KWKAliza4679071
China Targets Rare Earth Supply Chain Through South Korea: A Strategic Strike on U.S. Industry https://x.com/MKids3447/status/1919102982794195296
Криштиану Роналду отметил День матери нежным пляжным фото с Джорджиной и детьми https://x.com/MKids3447/status/1919105061688406049
White House Meme Backfires: Trump Styled as Sith Lord on Star Wars Day https://x.com/MKids3447/status/1919109993430646840
Benson Boone Makes Explosive SNL Debut with Two Powerful Performances https://x.com/MKids3447/status/1919112923705700467
купить права категории б
In the USA, they warned about a dangerous fungus threatening the world
https://x.com/MKids3447/status/1919126777147863343
Scientists discovered mysterious sarcophagi in Antarctica, giving a threatening message
https://x.com/MKids3447/status/1919194046813163522
Имбирь: Пряный Корень, Завоевавший Мир https://x.com/MKids3447/status/1919249332408123892
В Солнечную Систему летит оранжевый карлик
https://x.com/kiselev_igr/status/1919292030208909502
Trump’s Shocking Plan: Alcatraz to Hold America’s ‘Worst Criminals’ — And Maybe Even Judges? https://x.com/MKids3447/status/1919317327616655765
Why Alcatraz Remains America’s Most Terrifying Prison https://x.com/MKids3447/status/1919321649616158734
Statham’s beloved showed off her figure in a dress with a plunging neckline
https://x.com/MKids3447/status/1919344605440409845
Названа новая старейшая жительница планеты https://x.com/MKids3447/status/1919359499984335184
Стало известно, когда начинается формирование болезни Альцгеймера https://x.com/MKids3447/status/1919365914106978470
https://boi.instgame.pro/forum/index.php?topic=69528.0
Зелёный чай: повышает или понижает давление? Мнения врачей и новые исследования https://x.com/MKids3447/status/1919376115988115519
Mysterious New Life Form Discovered Under Antarctic Ice https://x.com/MKids3447/status/1919386218258673736
http://iancleary.com/lightning-process-christchurch/
The bonus terms are straightforward.
plinko application
http://www.weezard.eu/index.php/component/k2/item/2?start=5160
Online casinos are great for small bets.
fortunetiger
Debunked popular myth about dates: the truth turned out to be unexpected https://x.com/MKids3447/status/1919680984850567214
https://joy.bio/seoziel0
Online casinos are perfect for quick fun.
aviator game
Rihanna Stuns at Met Gala 2025 With Surprise Pregnancy Announcement
https://x.com/MKids3447/status/1919690861794717876
The withdrawal process was super fast.
plinko app
Shock Defeat: Friedrich Merz Fails to Secure German Chancellorship in First Parliamentary Vote https://x.com/MKids3447/status/1919700175947198834
The live baccarat game feels so luxe!
joker jewels
How to get 1xBet free promo code?
Sign up on their website using the 1xBet promo code and receive an impressive 120% bonus on your initial deposit, up to a maximum of ?33,000. For instance, if you deposit ?1,000, you’ll receive an additional ?1,200 in bonus funds, giving you a total of ?2,200 to kickstart your betting experience.
What is voucher code in 1xBet?
1xBet Promo Code Get 300% Bonus Up to GHS 3,445 in March 2025. Sign-up with 1xBet using the promo code. New customers can get a 200%, 250% or 300% bonus. The 1xBet promo code. Use it on the sign-up page to get a 300% bonus up to 3445 GHS.
1xbet Promo Code Exclusive Bonus (Valid In 2025)
1xbet code Promo code for 1xBet, use this combination to increase your welcome bonus up to 100% on an amount reaching $/€130 for registration. These funds are available to all new players who have already created an account or are planning to do so. The bonus requires wagering, and it must be done in the sports section by placing bets with odds of at least 1.4 and a fivefold turnover. You have 30 days to use the code before it expires at the end of 2025.
1xBet Promo Code 2025 – this is a huge bonus of up to $1950 for the casino and 150 free spins on slots. An exclusive offer for new players aged 18 and above. To activate the code, you need to make a deposit of $10. The second and subsequent deposits must be at least $15. You can participate in this promotion until the end of 2025.
The 1xBet platform is one of the most popular in this domain. It has over a million fans worldwide and has earned players’ trust since 2007. Over time, the platform has evolved both in customer service and its interface.
1xBet always puts its clients first, listening to feedback and suggestions to improve the platform. It was one of the first bookmakers to create a mobile application, gaining even more popularity among players.
Online slots with extra spins are the best!
jogo fortune tiger
Официальная наука вас обманывает. Я расскажу вам настоящую физику. БТГ, все секреты.
Love the new slot games every month!
aviator game
Медики лгут. Лекарства Вас убивают. Я вылечу вас настоящей волновой медициной. Бигфарме конец
Online roulette is my favorite way to relax.
rakoo casino
Discover the freshest, highest-quality wallpapers featuring the most stunning girls. Only top-rated, mind-blowing visuals for your screen.
Click
The live baccarat table is so sleek!
plinko demo
Melbet Apk
Won a tournament prize, such a thrill!
1win aviator
telecharger Melbet
Live dealer games are so realistic!
fortune dragon demo
telecharger Melbet
Предлагаю https://8spwktmdkl104.ru/
Playing roulette online is so convenient.
casino mate
Telecharger Melbet APK
Love the new slot themes every month!
code promo sportcash
Telecharger Melbet APK
The live chat feature makes games social.
plinko app
ברגע שהבאתי את הזין שלי לחור שלה. היא התקרבה אלי, ועם כל תנועה היא – סבטה שאלה את השאלה במצח. – ראיתי שבנות כל כך יפות בחוף כל כך גרוע why not try this out
Live dealer games make me feel in a real casino.
ruleta americana
Гороскоп на выходные 11–12 мая 2025: кого ждёт удача, любовь и перемены по Знаку Зодиака
https://x.com/MKids3447/status/1920454284040077768
My casino’s support team is fantastic.
gold party 1win
Универсальный рецепт для здоровья сердца: советы профессора Лео Бокерии https://x.com/MKids3447/status/1920466307620700414
Tried a crypto deposit, it was instant!
aviator bet
Правда и мифы о похудении: что работает, а что — вредные иллюзии? https://x.com/MKids3447/status/1920470282696827158
Love the creative casino promotions!
plinko avis forum
מהסוגר. רק עכשיו היא לחשה, ” חכה!”. אחרי דקה, שרירי התחת שלה נרגעו שתו עוד כשעה, ולא יכולתי ללכת הביתה. ואז החל החלק השני של הבלט. לאחר go to this web-site
Online casinos have clear rules for all games.
aviator bet
The payout process was super quick.
beepbeep casino
אמיתית. היה לה צורה מפותלת יחסית, חזה בגודל 5, תחת עגול וגם נעל נעלי אני לא אדבר. בסך הכל נאלצתי לעבור לדירות קטנות ודיסקרטיות באזור זול more information
Оформите свои фото в виде настоящей книги которая станет семейной реликвией и сохранит теплые воспоминания на долгие годы: создать онлайн фотокнигу
The casino app is super smooth.
jogo tigrinho brabet
The game search feature is super handy.
sugar rush 1000
לשכנע אותי שאני אבקש טיול עסקים למקום שממנו הוא בדיוק הגיע. העובדים המזרבהתגברות על ההתנגדות של המזרן, התחתונים זזו, וחשפו את האזור הרצוי find out more website
Online casinos are perfect for quick fun.
fortune mouse
Online casinos are perfect for quick sessions.
aviator bet
את האצבע הדקה של אליס חודרת בקלות לחור שלי. זה היה מדהים. מעולם לא גבול היכולת, דחפתי את רגליה על כתפי ונכנסתי לנרתיק הדביק והמרגיז שלה, have a peek here
The live dealer baccarat is so professional.
plinko demo
והחור שלי לא יתנגד, תגמור לי בתחת”, אמרה ג ‘ ולקה קצת נבוכה. זה גרם ארבע! תן לי את התחת שלך! איב הביטה בו בצורה לא מובנת: אני… אני click this over here now
Блог полезной информации. Все про последние события в мире, интересные статьи о культуре, обществе. Полезная информация об автомобилях и ремонте https://bazafasada.ru/
The bonus terms are straightforward.
plinko
новости украины
The free mode helped me learn new games.
book of ra
политические новости россии и мира
The casino app is always reliable.
doradobet
וקראה: “תפסיק להיות צנוע! קדימה, תכניס את הדבר שלך לתחת שלי!” פשוט עוד יותר, אחד הבחורים החל ללטף את המפשעה שלה, והרטיב אותה חזק עם הרוק what do you think
Советы тех, кто знает, о чем говорит. Все о моде, кулинарии, женском здоворье. Также полезные советы из жизни и многое другое https://allaboutourladies.ru/
Got a reload bonus, makes gaming better.
aviator game
Благоустройство могил на Бабушкинском кладбище: укладка плитки, установка оград, посадка цветов. Качественный уход за захоронением https://uborka-mogil-moskva.ru/uhod-za-mogilami-na-babushkinskom-kladbishhe-uborka-ozelenenie-i-restavracziya/
The game filters make it easy to find games.
sugar rush
новости россии свежие читать бесплатно онлайн
Love the creative casino promotions!
fishing frenzy
переговоры с сша по украине последние
Online poker tournaments are so exciting!
plinko demo
שלו, להוציא את הזין. הוא נותן לי בחוסר רצון לעשות את זה, ובזמן שהוא אותה לדירות דיסקרטיות, נישקתי אותה על צווארה, סחטתי את שדיה בחוזקה .. find out more website
Online casinos have clear rules for all games.
plinko
Вы можете купить справку о болезни на работу в нашем мед центре в Москве без медкомиссий на сайте https://biomed-slv.ru/
The game search feature is super handy.
plinko
https://expertmiele.ru/
The live baccarat table is so sleek!
mines aposta
новости политики
The slot game themes are always fresh!
book of ra kostenlos
BREAKING: Your Global News Hub for the Latest Trends
Stay ahead with real-time updates on the world’s most talked-about topics. From high-stakes sports clashes to geopolitical shifts and cultural moments, we bring you the stories that matter—fast, factual, and unfiltered.
TOP STORIES RIGHT NOW:
Football Frenzy:
– Arsenal vs PSG: Champions League showdown sparks global buzz as tactics clash and stars collide.
– Al-Hilal vs Al-Ahli Saudi: Derby drama unfolds with controversial calls and fan fury.
Global Tensions & Power Shifts:
– Spain-Portugal Power Outages: Millions left in darkness amid grid failure; sabotage rumors swirl.
– India-Pakistan Border: Escalating skirmishes raise alarms as UN urges de-escalation.
Financial Markets on Edge:
– Euro/Dinar Black Market: Algerian currency crisis deepens with record exchange rates.
– Bitcoin Core vs XRP Ripple: Crypto markets volatile as regulatory decisions loom.
Entertainment & Culture:
– Kanye West’s Donda 2: Chaotic listening event leaves fans divided over unfinished tracks.
– Yasmine Abdel Aziz’s Comeback: Egyptian star returns amid health rumors and new series controversy.
Weather & Crises:
– Egypt Sandstorms: Cairo halts flights as sandstorm wreaks havoc.
– New Zealand Earthquakes: Christchurch floods compound disaster response challenges.
WHY CHOOSE US?
– No Fluff: Just straight facts and sharp analysis.
– Multilingual Coverage: From Tunisia to May Day 2025 protests worldwide.
– 24/7 Updates: Whether it’s NBA Playoffs or Barcelona vs Inter Milan, we’re live.
Explore Now
Your world. Unfiltered.
The slot game visuals are incredible!
bac bo
שדיה הקפיצים והמסודרים, מוצץ בשמחה את הפטמות הוורודות, המריחות ניסו לגעת בחזה, אבל הן יצרו רק תנועות חלשות ולא בטוחות. מה שקרה, היא מכוני ליווי בירושלים ואלף סיבות לביקור
Playing roulette online is so smooth and fun.
sava spin bonus code
אירקה לא תפריע לי! היא יפה ונועזת! “פתאום אמרה אינה,” וסרגה לא תאפשר מניח אותי על ברכיי, מכניס את הזין לפה ומשחרר זרם חזק של שתן. בהפתעה liesen déi komplett info hei
Уроки компьютерной грамотности для новичков, начинающих, пенсионеров, бесплатные курсы. Помощь в практическом применении знаний. Материалы по компьютеру, Windows, Android, интернету, сервисам https://pensermen.ru/
Online casinos have so many great games.
demo tigrinho
украина последние новости на сегодня сейчас
Love the new game releases every week!
aviator bet
новости сша сегодня последние
Blackjack online is so much fun, especially with live dealers.
sugar rush
דקות. ואז סווטה הורתה למקס לשכב שוב על גבו, ומיד התיישבה על הזין. ואז מטבעת ורודה הדוקה, מסתובב החוצה ומכניס פנימה את קצוותיו הסגולים shimb
The live baccarat table is so classy!
fortune mouse
Новости Таджикистана, центральной Азии и мира https://novosti.tj/
Won some money on slots, keeps me going!
plinko demo
последние новости экономики
Love the immersive 3D slot games!
plinko
новости сша на русском
Online casinos have endless game choices.
plinko game
новости боев на украине
Casino 7k предлагает постоянные акции, индивидуальные предложения для активных игроков и щедрую программу лояльности https://xn—-8sbalwlcefxak4bw.xn--p1ai/
Love the holiday-themed casino bonuses!
plinko
Ежедневно в нашем блоге выходят аналитические статьи и обзоры экономики, медицины, культуры и автопрома. Также последние события в мире https://lentaknit.ru/
The live baccarat table is so sleek!
sugar rush
Все самое интересное и важное за последние сутки. Новости медицины и общества, шоу-бизнеса и автопрома, также кулинарные рецепты на каждый день https://mixer-1ruplus.ru/
Online roulette with live dealers is immersive.
fishin frenzy heyspin
Только самые важные и актуальные новости прошедшего дня. Все о культуре, науке, медицине и автомобилях. Также последние события в мире и России ежедневно в нашем блоге https://veryscary.ru/
Online casinos have better rewards than I thought.
plinko
Большой портал для садоводов и огородников. Все самое важное и интересное для любителей ухода за своими растениями дома или на даче https://sadyk.ru/
The casino site is so easy to navigate.
plinko game
Online slots with bonus features are awesome.
plinko
Китай готовится к масштабной кибервойне в космосе: разработан способ нейтрализации Starlink за 12 часов https://x.com/MKids3447/status/1920912847913066668
Испанское чудо: «покойница» ожила на собственных похоронах и напугала сотрудников до паники
https://x.com/MKids3447/status/1920914680760905732
Live dealer games bring the casino to me.
fortune tiger pin up
Почему кошка выбирает спать именно с вами? Учёные раскрыли неожиданные причины https://x.com/MKids3447/status/1920919197799924088
Online roulette with live dealers is amazing.
plinko
Каждая встреча с девушками в Краснодаре – это шанс создать особенные моменты и ощутить магию общения в прекрасной обстановке https://krasnodar-girl.life/
Африка раскалывается: учёные прогнозируют появление нового океана https://x.com/MKids3447/status/1920919136881828320
Won some cash on roulette, love it!
aviator app
В Курске открылась группа в Телеграм для интересного досуга с девушками. Общайтесь находите единомышленников и смело приглашайте на встречи в живую – https://t.me/kursk_girl_indi
Online roulette with live dealers is immersive.
gates of olympus
Пакистан объявил об ответной военной операции против Индии: что известно на данный момент https://x.com/MKids3447/status/1921109729327173767
Love the soundtracks in online slots!
gates of olympus
Опасный пропущенный: как один звонок может привести к обману и списанию денег https://x.com/MKids3447/status/1921118835031035926
The mobile casino site is super user-friendly.
fortune mouse demo
Анна Нетребко объявлена в розыск приставами: в Петербурге требуют доступа в её квартиру https://x.com/MKids3447/status/1921124018888777781
После Дня Победы: Киев готовится к удару «Орешником», США бьют тревогу https://x.com/MKids3447/status/1921127577319600194
Самые важные и актуальные советы по работе в саду и огороде. Выращивание овощей и фруктов, уход за деревьями, цветоводство, полезные советы по дачному участку, описание садовых инструментов — это и многое иное ежедневно на страницах нашего блога https://sadiogorod24.ru/
Won a small prize, online casinos are great!
plinko
Анна Нетребко объявлена в розыск приставами: в Петербурге требуют доступа в её квартиру https://x.com/MKids3447/status/1921124018888777781
Customer support at my casino site is top-notch, quick responses!
plinko
telecharger Melbet
Online poker is so competitive and fun!
aviator
Чтобы всегда получать отличный урожай, следует воспользоваться нашими советами. Когда сажать рассаду? Лунный календарь и многое другое https://ogorod-bez-hlopot.ru/
https://mockwa.forum2x2.ru/t103-topic#104
Love the holiday-themed casino bonuses!
pinup
Telecharger Melbet APK
The live dealer blackjack table is awesome!
aviator
telecharger Melbet
The casino site is so easy to navigate.
sava spin
Windows 10 скачать
Telecharger Melbet APK
Online casinos have better rewards than I thought.
jackpot raider
Telecharger Melbet APK
Love the new slot themes every month!
vincispin
magnificent points altogether, you just gained a emblem new reader.
What could you suggest about your submit that you made some days in the past?
Any positive?
Tried a crypto casino, super fast transactions!
dragon tiger
аренда Citroen Jumper
The graphics in live dealer games are crystal clear.
juego de minas
Hi! I’ve been reading your weblog for a long time now
and finally got the bravery to go ahead and give you a
shout out from Houston Texas! Just wanted to say keep up the
fantastic work!
The slot jackpots keep me hooked!
betclic football
If you desire to take much from this post then you have to apply these strategies to your won webpage.
Won a small prize, online casinos are great!
plinko
Appreciating the persistence you put into your website and
detailed information you offer. It’s great to come across
a blog every once in a while that isn’t the same outdated rehashed material.
Wonderful read! I’ve saved your site and I’m adding your RSS feeds to my Google account.
The live chat in games is so interactive.
fortune ox demo
hi!,I love your writing very so much! percentage we keep up a correspondence more approximately your article on AOL?
I need a specialist on this area to resolve my problem.
Maybe that is you! Having a look forward to peer you.
The live baccarat game feels so luxe!
dragon tiger
Yes! Finally something about dog guide.
Online casinos make gaming so convenient.
plinko game online
Hello There. I found your blog using msn. This is a
very well written article. I will be sure to bookmark it and come back
to read more of your useful information. Thanks for the post.
I’ll definitely comeback.
I’m really impressed with your writing skills and also with the layout
on your weblog. Is this a paid theme or did you modify it
yourself? Anyway keep up the nice quality writing, it’s rare to see a great blog like this one nowadays.
Online casinos are great for casual gaming.
plinko
Назван неожиданный овощ, который спасает от повышения сахара в крови
https://x.com/Fariz418740/status/1921472130887102591
Привет, мужчины Омска! В вашем городе заработал новый сайт, который пообещал стать лучшим местом для досуга с девушками. Здесь много анкет с интересными личностями, и среди них вы обязательно найдете ту, что удивит вас своим очарованием https://omsk-night.net/
Online roulette with live dealers is immersive.
fortune ox
I visited many sites except the audio quality for audio songs current at this site is
really excellent.
Its like you read my mind! You seem to know a
lot about this, like you wrote the book in it or something.
I think that you could do with some pics to drive the message home a bit, but other than that, this is great blog.
A fantastic read. I will definitely be back.
The live chat support solved my issue in minutes.
plinko
Media: Ronaldo may leave “Al-Nassr”
https://x.com/Fariz418740/status/1921519484528939441
Got a reload bonus, love the extra playtime.
vipzino
Very nice post. I just stumbled upon your blog and wanted to say
that I’ve really enjoyed browsing your blog posts.
In any case I will be subscribing to your
feed and I hope you write again very soon!
The bonus terms are straightforward.
plinko opinie
It is appropriate time to make a few plans for the future and it’s time to be happy.
I’ve read this post and if I may I wish to counsel you few interesting issues or tips.
Perhaps you can write next articles regarding this article.
I wish to learn even more things approximately it!
The live dealer baccarat is so professional.
spin mama
Your style is so unique compared to other people I’ve read stuff
from. Thanks for posting when you have the opportunity, Guess I’ll just book
mark this site.
The bonus terms are straightforward.
4rabet dragon tiger
Hi there, I read your new stuff daily. Your story-telling style
is awesome, keep it up!
Won some cash on blackjack, so fun!
dragon tiger game
Hi to every one, it’s actually a good for me to visit this website, it includes
helpful Information.
Howdy would you mind letting me know which
web host you’re utilizing? I’ve loaded your blog in 3 completely
different browsers and I must say this blog loads a lot faster then most.
Can you recommend a good web hosting provider at a fair price?
Many thanks, I appreciate it!
Online casinos are great for small bets.
plinko
What’s up, I would like to subscribe for this website to obtain latest updates,
therefore where can i do it please assist.
Online casinos make gaming so convenient.
jackpot raider casino
https://xn—-7sbepbozbdi5ay2l.xn--p1ai/sopostavlene-cen-na-foto-domashnyuyu-texniku-i-elektroniku-v-internet-magazinax-ukrainy-na-fotomag-com-ua/
Online slots with bonus features are awesome.
spinmama
My favourite feature is the timestamp commenting. My discovery
results improved.
Won a small prize, online casinos are fun!
fortune ox
First off I want to say great blog! I had a quick
question which I’d like to ask if you do not mind.
I was curious to find out how you center yourself and clear
your head before writing. I have had difficulty clearing my mind
in getting my thoughts out. I truly do take pleasure in writing but
it just seems like the first 10 to 15 minutes are usually wasted simply just
trying to figure out how to begin. Any recommendations or hints?
Cheers!
Won a prize in a slot tournament, awesome!
aviator game
Путин сделал Украине «неотразимое» предложениеhttps://x.com/MKids3447/status/1921657882203894261
Скандальное видео: Макрон, Стармер и Мерц с белым порошком после визита в Киев https://x.com/MKids3447/status/1921661302625178044
Can I just say what a relief to discover an individual who genuinely understands what they are discussing online.
You actually know how to bring a problem to light and make it important.
A lot more people ought to look at this and understand this side of the
story. I can’t believe you are not more popular given that you definitely
have the gift.
Online casinos have great responsible gaming features.
4rabet dragon tiger
Hey would you mind sharing which blog platform you’re using?
I’m planning to start my own blog in the near future but I’m having a difficult time selecting between BlogEngine/Wordpress/B2evolution and Drupal.
The reason I ask is because your design seems different then most blogs and I’m looking for something completely unique.
P.S Apologies for getting off-topic but I had to
ask!
I really like what you guys tend to be up too. Such clever work and reporting!
Keep up the terrific works guys I’ve added you guys
to my personal blogroll.
Online casinos are great for trying new games.
????
Paragraph writing is also a excitement, if you be acquainted with afterward
you can write otherwise it is complicated to write.
The casino site is so easy to navigate.
vaidebet
If some one wishes to be updated with newest technologies after that he must be pay a visit this website and be up to date daily.
Playing poker online with friends is a blast!
aviator bet
hey there and thank you for your info – I have definitely picked up
something new from right here. I did however expertise several technical points
using this site, as I experienced to reload the site a lot of times previous to I could get it
to load properly. I had been wondering if your web host is OK?
Not that I am complaining, but slow loading instances times
will sometimes affect your placement in google and could
damage your quality score if advertising and marketing with
Adwords. Well I’m adding this RSS to my e-mail and could look out for a lot more of your respective exciting
content. Ensure that you update this again soon.
Yes! Finally something about website.
This piece of writing is in fact a fastidious one it assists new web viewers, who are wishing for blogging.
The live dealer blackjack table is awesome!
plinko casino game demo
This is a very good tip particularly to those new to the blogosphere.
Brief but very accurate info… Many thanks for sharing this one.
A must read article!
Hi I am so grateful I found your blog page, I really found you
by mistake, while I was browsing on Yahoo for something else,
Nonetheless I am here now and would just like to say kudos for a
remarkable post and a all round entertaining blog (I also love the theme/design),
I don’t have time to read through it all at the moment but I
have saved it and also added your RSS feeds, so when I have
time I will be back to read more, Please do keep up the
awesome b.
Love the new slot games every month!
dragon tiger
It’s really a cool and useful piece of info. I am satisfied that you simply shared this
useful information with us. Please keep us up to date like this.
Thank you for sharing.
The deposit bonuses are always generous.
plinko
You could definitely see your expertise within the work you write.
The arena hopes for even more passionate writers such as you who are not afraid to mention how they believe.
Always follow your heart.
I loved as much as you will receive carried out right here.
The sketch is attractive, your authored subject matter stylish.
nonetheless, you command get got an edginess over that you wish be delivering the following.
unwell unquestionably come more formerly again as exactly the same nearly
a lot often inside case you shield this increase.
https://nebrdecor.com/yak-robitsya-piskostrumine-ochishhenya-metalevix-detalej-poradi-profesionaliv.html
The casino app is fast and reliable.
plinko
This is my first time visit at here and i am truly impressed to read all
at alone place.
The slot jackpots are always tempting!
spinmama
Thank you a bunch for sharing this with all of us you really realize what
you are speaking about! Bookmarked. Please additionally consult
with my site =). We may have a hyperlink change contract between us
https://diva.kr.ua/Raznoe/sovremennie-tehnologii-izgotovleniya-shesteren
Online roulette with live dealers is amazing.
aviator 1xbet
Only minutes left — click now
https://kakavto.com/?p=7276
Online roulette with live dealers is amazing.
fruit cocktail gratis
http://www.xx-centure.com.ua/archives/67125
Online casinos make withdrawals hassle-free.
aviator bet
Yes! Finally something about free credit slot no deposit.
The casino app runs perfectly.
1win dragon tiger
Neat blog! Is your theme custom made or did
you download it from somewhere? A design like yours with a few simple tweeks would really make my blog
shine. Please let me know where you got your design.
Thanks a lot
Online casinos are perfect for quick fun.
spin mama
https://x-ray.contact/identities/justin-volpe-email-and-phone/63fbba70c45ae4c13f88078e/
The withdrawal limits in my casino are super fair.
andar bahar game
แนะนำระบบ ให้แต้มผ่านทาง Line นั้นคือ ระบบ crm ใช้งานง่าย PiNME
ตอบโจทร์ทุกการใช้งาน,การแข่งขัน ระบบ CRM ในปัจุบันสูงมาก และราคาแพง ขอแทนะนำ ระบบ crm ใช้งานง่าย PiNME ตอบโจทร์ทุกการใช้งาน
https://x-ray.contact/identities/emily-timmerman-email-and-phone/63fc6835c45ae4c13fa26854/
Online casinos are so convenient, I can play my favorite slots from home!
aviator bet
I’d come to recognize with you one this subject.
Which is not something I typically do! I love reading a
post that will make people think. Also, thanks for allowing me to comment!
Won a small prize, online casinos are great!
razor returns
https://x-ray.contact/identities/seth-perlman-email-and-phone/63fb86e4c45ae4c13f865631/
Online casinos have the best game variety.
plinko
After I originally left a comment I seem to have clicked the -Notify me when new comments are added- checkbox
and now every time a comment is added I get 4 emails with the exact same comment.
There has to be a means you can remove me from that service?
Kudos!
Good day! I could have sworn I’ve been to this web site before but after
looking at some of the articles I realized it’s new to me.
Anyhow, I’m definitely pleased I came across it and I’ll be
book-marking it and checking back frequently!
Online casinos are great for all players.
plinko game
https://x-ray.contact/identities/ivan-mieses-email-and-phone/63fc7d97c45ae4c13fba4ae1/
Online casinos are perfect for small stakes.
andar bahar
Hi I am so thrilled I found your blog page, I really found
you by mistake, while I was browsing on Bing for something else, Anyhow I am here now
and would just like to say many thanks for a marvelous post and a all
round thrilling blog (I also love the theme/design), I don’t
have time to browse it all at the minute but I have book-marked it and also added your RSS feeds,
so when I have time I will be back to read much more, Please do keep up the fantastic job.
The live baccarat table is so sleek!
super hot fruits demo
Thank you for the good writeup. It in fact was
a amusement account it. Look advanced to more added agreeable from you!
However, how could we communicate?
Online casinos have awesome welcome offers.
premier bet aviator
I was curious if you ever thought of changing the structure of your blog?
Its very well written; I love what youve got to say.
But maybe you could a little more in the way of content so
people could connect with it better. Youve got an awful lot of text for only having 1 or two pictures.
Maybe you could space it out better?
Very good write-up. I certainly appreciate this website.
Keep it up!
This post is worth everyone’s attention. When can I find out more?
Love the holiday-themed casino bonuses!
fruit cocktail slot
Разделите свою жизнь с удивительной девушкой из Краснодара, зарегистрировавшись на нашем сайте знакомств и начав поиски: путаны краснодар
obviously like your web-site but you need to take a look at the
spelling on quite a few of your posts. Many of them are rife with
spelling problems and I find it very troublesome to tell the truth on the other
hand I will definitely come again again.
Won a prize in a slot tournament, awesome!
plinko game
It’s the best time to make some plans for the longer term
and it is time to be happy. I have read this submit
and if I may I desire to counsel you few interesting things or advice.
Perhaps you can write subsequent articles relating to this article.
I want to learn more things about it!
Thanks , I have recently been searching for info about this subject for a long time and yours is the
best I’ve found out so far. However, what about the conclusion? Are
you sure in regards to the source?
Online slots with bonus rounds are thrilling!
andar bahar
What’s up i am kavin, its my first time to commenting anywhere, when i read this paragraph i thought i could also create comment due to this
good paragraph.
The free play mode is great for practice.
spinmama
I’m really impressed together with your writing skills as neatly as with the format to your weblog.
Is this a paid theme or did you modify it yourself?
Anyway stay up the nice high quality writing, it’s rare to look a great weblog like this
one today..
Hi every one, here every person is sharing these kinds of familiarity,
so it’s pleasant to read this website, and I used to go to
see this web site daily.
Look into my page lottery
Online casinos have better bonuses than expected.
plinko
Adult XXXsomnia — Sleepless Nights
The slot game themes are always fresh!
betonred
Yes! Finally something about carfax api.
https://yourua.info/
Thanks for sharing your thoughts about tread repair. Regards
Hey there! I just wish to offer you a huge thumbs up for your excellent information you have here on this post.
I am coming back to your blog for more soon.
The live chat feature makes games social.
razor returns
It is in point of fact a great and helpful piece of info.
I am happy that you simply shared this helpful info with us.
Please keep us informed like this. Thanks for sharing.
Do you have a spam problem on this blog; I also am a blogger,
and I was wondering your situation; many of us have
developed some nice methods and we are looking to trade methods with other folks, please shoot me an email if interested.
The game filters make it easy to find games.
bet on red
I am really grateful to the holder of this web page
who has shared this enormous post at at this place.
Got a weekly bonus, keeps me engaged.
plinko ??
What’s up to every single one, it’s really a nice for me to go to see this web site, it consists of useful Information.
The cashback offers in casinos save me sometimes!
aviator demo
Empowering Amateur Radio Enthusiasts, Echolink Florida connects
you to the best amateur radio services. Discover our conference server located in Colorado Springs,
Colorado, powered by AT&T First Net Fiber Network.
The free play mode is great for practice.
plinko
link porno grafilink porno grafilink porno grafi link porno grafilink porno
grafilink porno grafi link porno grafilink porno grafilink porno grafi link porno grafilink porno grafilink porno grafi link porno grafilink porno grafilink
porno grafi link porno grafilink porno grafilink porno grafi link porno grafilink porno grafilink porno grafi link porno
grafilink porno grafilink porno grafi link porno grafilink porno grafilink porno grafi link porno grafilink porno grafilink porno grafi link porno grafilink porno grafilink porno grafi link porno grafilink porno grafilink
porno grafi link porno grafilink porno grafilink porno grafi link
porno grafilink porno grafilink porno grafi link porno grafilink porno grafilink porno grafi link porno grafilink porno grafilink
porno grafi link porno grafilink porno grafilink porno grafi link porno
grafilink porno grafilink porno grafi link porno grafilink porno
grafilink porno grafi link porno grafilink porno grafilink porno grafi
link porno grafilink porno grafilink porno grafi link porno grafilink porno grafilink
porno grafi link porno grafilink porno grafilink porno grafi link porno grafilink porno grafilink porno grafi link porno grafilink porno grafilink porno grafi link
porno grafilink porno grafilink porno grafi link porno grafilink porno grafilink porno grafi link porno grafilink porno grafilink
porno grafi link porno grafilink porno grafilink porno grafi link porno grafilink porno
grafilink porno grafi link porno grafilink porno grafilink porno grafi link porno grafilink porno grafilink porno grafi link
porno grafilink porno grafilink porno grafi link porno grafilink porno grafilink porno grafi link porno grafilink porno grafilink porno
grafi link porno grafilink porno grafilink porno grafi link porno
grafilink porno grafilink porno grafi link porno grafilink porno grafilink porno grafi
link porno grafilink porno grafilink porno grafi link porno grafilink porno grafilink porno grafi
link porno grafilink porno grafilink porno grafi link porno grafilink porno grafilink porno grafi link porno grafilink porno grafilink porno grafi link porno grafilink porno grafilink porno grafi link porno grafilink porno grafilink porno grafi link porno grafilink porno grafilink porno grafi link porno grafilink porno grafilink porno grafi link porno grafilink
porno grafilink porno grafi link porno grafilink porno grafilink porno grafi link porno
grafilink porno grafilink porno grafi link porno grafilink porno grafilink porno grafi link porno grafilink porno
grafilink porno grafi link porno grafilink porno grafilink porno grafi link porno grafilink porno
grafilink porno grafi link porno grafilink porno grafilink
porno grafi link porno grafilink porno grafilink porno grafi
link porno grafilink porno grafilink porno grafi link porno grafilink
porno grafilink porno grafi link porno grafilink porno grafilink porno grafi link porno
grafilink porno grafilink porno grafi link porno grafilink porno grafilink porno grafi link porno grafilink porno
grafilink porno grafi link porno grafilink porno
grafilink porno grafi
The withdrawal process was super fast.
plinko
I am truly thankful to the holder of this site
who has shared this wonderful paragraph at at
this time.
E2Bet เว็บเดิมพันออนไลน์อันดับท็อปของเอเชีย เชื่อถือได้ มั่นคง ปลอดภัย
เพิ่มประสบการณ์การเล่นที่เหนือกว่าใคร E2Bet
เท่านั้น! สมัครเลยตอนนี้
รับสิทธิพิเศษมากมาย
Hi there colleagues, pleasant post and good arguments commented here, I am genuinely enjoying by these.
Won some cash on blackjack, so fun!
jugar fruit cocktail gratis
Hi there, for all time i used to check webpage posts here early in the break
of day, since i enjoy to find out more and more.
Online casinos are great for trying new games.
aviator
Attractive section of content. I just stumbled upon your
website and in accession capital to assert that I acquire in fact enjoyed account your blog posts.
Anyway I’ll be subscribing to your feeds and even I achievement you access consistently quickly.
The casino app has a great layout, easy to navigate.
andar bahar game
My programmer is trying to convince me to move to .net from PHP.
I have always disliked the idea because of the costs.
But he’s tryiong none the less. I’ve been using Movable-type on a
variety of websites for about a year and am
concerned about switching to another platform. I have heard very
good things about blogengine.net. Is there a way I can import all my wordpress content
into it? Any kind of help would be really appreciated!
Tried a crypto deposit, it was instant!
spin mama
Oh my goodness! Amazing article dude! Thank you
so much, However I am experiencing difficulties
with your RSS. I don’t understand why I can’t subscribe to it.
Is there anybody else getting the same RSS problems?
Anyone that knows the answer can you kindly
respond? Thanx!!
Superb, what a webpage it is! This website provides valuable facts to us, keep it up.
My casino’s support is always helpful.
aviator 1win
Highly descriptive article, I loved that a lot. Will there be a part 2?
A fascinating discussion is worth comment. I believe that you should publish more on this subject, it might not be a taboo matter but generally people don’t discuss these issues.
To the next! Best wishes!!
Won a prize in a slot tournament, awesome!
plinko
Wow that was unusual. I just wrote an really long comment but after I clicked submit my comment didn’t
appear. Grrrr… well I’m not writing all that over again. Anyway, just wanted to say fantastic blog!
Online casinos have awesome welcome offers.
vipzino
X?B?RDARLIQ – Bu tarix?d?k hava PIS KEC?C?K – Sulu QAR yagacaq
https://x.com/kiselev_igr/status/1922256413604114841
Love the seasonal casino events, so festive!
1win aviator
Hello would you mind letting me know which webhost you’re utilizing?
I’ve loaded your blog in 3 different internet browsers and I
must say this blog loads a lot faster then most.
Can you suggest a good web hosting provider at a honest price?
Kudos, I appreciate it!
Tried a crypto casino, super convenient!
aviator msport
Because the admin of this site is working, no doubt very quickly it will be famous, due to its feature contents.
My casino’s support is always friendly.
plinko demo
It’s remarkable in support of me to have a web page, which is useful in support of my
know-how. thanks admin
Online casinos are great for trying new games.
betonred
Hi there! I could have sworn I’ve been to this site before but
after checking through some of the post I realized it’s new to me.
Anyhow, I’m definitely happy I found it and I’ll be book-marking and
checking back often!
The live dealer baccarat is so professional.
spinmama
On the conclusion of the group stage, the highest two groups from each group will advance to the knockout stage.
1000: England have a terrific staff and almost received the 2020 Euro, but they’re going to
probably must defeat gifted squads right out of the group
stage in the event that they advance. They just won AFCON, then had
to qualify for the World Cup by way of one in every of Africa’s most troublesome paths
to the tournament, drawn in the ultimate round with Mohamed
Salah and Egypt. Denmark: The Danes are a part of the World Cup furniture at this point, but the best way
they went via the Euros final yr was one thing to behold, even whereas dealing with the traumatic occasions surrounding Eriksen. Fluminense and Dortmund
supply contrasting football philosophies, whereas Ulsan HD and Mamelodi
Sundowns will look to signify Asia and Africa with disciplined, organized play
and dangerous counterattacks. Look out for them within the knockout rounds.
1400: It’s the same odds as Belgium, but when issues work
out close to the way they seem like they’ll on paper, Netherlands may have a much tougher draw to
worry about. FOX holds the rights to the 2022 World Cup, and matches might
be unfold throughout FOX and FS1 for English-language viewers within the United States.
The mobile casino site is super responsive.
plinko review
https://mirokru.ru/gibkie-svyazi-stalnye-harakteristiki-naznachenie/
Spot on with this write-up, I absolutely believe that this site needs a great
deal more attention. I’ll probably be returning to read more, thanks for the info!
Tried a crypto deposit, it was instant!
ganesha gold
Hey! I know this is kinda off topic but I was wondering which blog platform
are you using for this site? I’m getting tired
of WordPress because I’ve had problems with hackers and I’m looking at options for another platform.
I would be fantastic if you could point me in the direction of a good platform.
Online casinos have better payouts than land-based ones, in my opinion.
vipzino bonus code
Very energetic blog, I loved that a lot. Will there be a pzrt 2?
Love the creative casino promotions!
plinko demo
Everything said made a great deal of sense.
However, what about this? suppose you added a little information? I
ain’t suggesting your information is not solid, but what if you added something that grabbed folk’s attention? I mean Raspberry PI TFT Screen / USB Bitcoin Miner is kinda
vanilla. You should look at Yahoo’s home page and note how they write news titles to
grab viewers to click. You might add a video or
a related picture or two to grab people excited about what you’ve written. Just my opinion, it could make your website a little bit more interesting.
We stumbled over here different page and thought I might
check things out. I like what I see so i am just following you.
Look forward to checking out your web page repeatedly.
Small-sized bathrooms may instantly conjure images of cramped floor spaces, messy scenes of
toiletries and bathroom essentials spread here and there, poor ventilation, lack of natural light,
and
so on. In many cases, such images are myths because compact bathrooms are not necessarily
challenging. All you need is a professional expert for bathroom remodelling in Gurgaon who
can
transform your ideas into real-life scenarios.
Tips to Add Style & Functionality to Your Small Bathroom
Planned Remodelling is Crucial
The first tip for bathroom designs for small spaces is to start
with planning. Get a measuring tape to
measure the space and get an idea of the layout.
Prioritize what you want – do you need to increase
the storage space, install more lights for increased lighting, or add modern aesthetics to the space?
With a clear and precise plan, there are fewer chances of confusion and discrepancies arising later.
Online slots with bonus rounds are thrilling!
????????? ???? ??????
I’ve learn a few good stuff here. Certainly price bookmarking for revisiting.
I surprise how much attempt you place to create one of these great informative website.
Exploring Fake Hermès Purses: A In-depth Guide
The realm of upscale accessories has always been enthralled by Hermès handbags, notably their iconic Kelly and Birkin models.
These sought-after items represent prestige, skill, and uniqueness, with values ranging
from 10,000 dollars to over $500,000 for rare versions.
With such substantial worth and desirability,
it’s predictable that Hermes has become one of the frequently imitated designer names in the global market.
The Origins of Hermes
Founded in 1837 as a harness atelier in the French capital, Hermès began by making leather saddle goods.
The house’s dedication to excellent craftsmanship was established from the beginning and remains to be their distinction today.
Each Hermès craftsperson completes at least two
years of apprenticeship before they can make their first
bag, exemplifying the house’s devotion to perfection.
The renowned Kelly bag was introduced in nineteen thirty-five (originally called the “Sac à dépêches”), while the
renowned Birkin launched in nineteen eighty-two following a chance encounter between Hermès chief executive Jean-Louis Dumas and celebrity Jane Birkin on a plane journey from Paris
to London.
The Rise of Counterfeit Hermès Bags
The extraordinary demand and substantial prices of genuine Hermes bags have created a
substantial industry for counterfeits. Recent
studies demonstrate that up to ninety percent of
all Hermès Kelly and Birkin handbags offered on the
internet aren’t genuine, producing serious obstacles for buyers looking for the authentic item.
Modern copycats have become ever more sophisticated, employing sophisticated technologies to create persuasive imitations that can be challenging to tell apart from authentic bags at first sight.
These replicas vary from obvious imitations to “mirror images” that copy many
characteristics of genuine Hermès bags.
How to Identify Real Hermès Bags
When analyzing a Hermes handbag to assess its genuineness,
professionals examine several key aspects:
1. Craftsmanship and Leather
Authentic Hermes handbags are handmade with the premium tier
skins and outstanding attention to detail. The leather should be smooth and pliable with a unique
natural aroma that imitators can’t replicate. The metal fittings should
be solid, crafted from precious metals that doesn’t peel or peel quickly.
2. Thread work
One surprising element is that because authentic Hermes handbags are
hand-stitched, the thread work should indeed have some variations.
Replicas are typically mechanically produced, so they are absolutely consistent with
one other. Hermès employs a particular hand-stitching method derived from
their horse-riding heritage.
3. Emblem and Marking
The Hermès stamp stamp should state “Hermès Paris Made in France” on three lines with precise
defined embossing. On replica Hermes bags, the logo would
look strange, large, or rectangular and may have unclear
borders or irregular spacing.
4. Metal parts and Features
The metal parts on real Hermes purses incorporates distinctive elements like
accurate etchings, superior closures, and securely fastened bottom studs.
Hermès manufactures its custom fasteners, so
you should not ever find a third-party brand or another manufacturer’s logo on the hardware.
5. Verification Signs
Surprisingly, Hermes never offer certification cards with their purses.
They have not ever and most likely will never. If you’ve purchased a
Hermes purse and found an authenticity card with it, it is absolutely a imitation.
The Moral Implications
The replica trade raises serious legal concerns. While replica handbags may look alike to genuine ones, they are
manufactured without the quality control, ethical labor
practices, or sustainability practices that authentic high-end companies maintain. Moreover,
the counterfeit trade has been tied to illegal operations and labor mistreatment.
Summary
For those who appreciate the artisanship and heritage of Hermès, recognizing
the difference between authentic and replica handbags is
important. Whether purchasing for investment or individual satisfaction, understanding how to spot original Hermès
artisanship helps confirm that you’re acquiring what you spend for
– a item of designer fashion history crafted with incomparable expertise and attention to detail.
If you’re planning on investing in a Hermes handbag, the most reliable
method is to purchase directly from Hermes or from trusted vendors who supply comprehensive authentication guarantees
and warranties.
Online casinos are great for small bets.
plinko
Woah! I’m really loving the template/theme of this site.
It’s simple, yet effective. A lot of times it’s challenging to
get that “perfect balance” between superb usability and appearance.
I must say that you’ve done a awesome job with this.
In addition, the blog loads very quick for me on Chrome.
Superb Blog!
My casino’s support is always helpful.
spinmama
https://solo.to/seoziel
Online casinos have great responsible gaming features.
fortune tiger
בבירור את הגבולות, הציפיות והרצונות שלך כדי להבטיח חוויה בהסכמה ומהנה החברה שלנו. מה שבאמת הדהים אותי היה שהיה אחד במרכז הסטריפ ליד top article
I truly love your website.. Very nice colors & theme.
Did you develop this website yourself? Please reply back as I’m hoping to create my own personal website and want to find out where you got this from or
just what the theme is called. Thanks!
https://www.dibiz.com/ulabieber05
Hey there! Do you use Twitter? I’d like to follow you if that would be okay.
I’m absolutely enjoying your blog and look forward to new updates.
Love the seasonal casino bonuses, so fun!
joker jewels gratis
Hiya! I know this is kinda off topic however , I’d figured I’d ask.
Would you be interested in trading links or maybe guest authoring a blog article
or vice-versa? My website discusses a lot of the same subjects
as yours and I believe we could greatly benefit from each other.
If you might be interested feel free to shoot me
an e-mail. I look forward to hearing from you! Fantastic blog by the way!
The withdrawal process was super fast.
plinko
It’s a shame you don’t have a donate button! I’d most certainly donate to this fantastic blog!
I guess for now i’ll settle for bookmarking and
adding your RSS feed to my Google account. I look forward to new updates and will
talk about this site with my Facebook group. Chat soon!
Live dealer games bring the casino home.
vincispin
I know this if off topic but I’m looking into starting my
own weblog and was wondering what all is needed to get set up?
I’m assuming having a blog like yours would cost a pretty penny?
I’m not very internet savvy so I’m not 100% certain. Any tips or advice would be greatly appreciated.
Appreciate it
Online poker tournaments are so competitive!
plinko
I know this website offers quality dependent content and additional information, is
there any other website which presents these data in quality?
Won a prize in a slot tournament, awesome!
plinko
It’s truly very difficult in this busy life to listen news on TV, so I only use world wide web for that reason, and obtain the
most up-to-date information.
Won big on a slot, online casinos rock!
marvel casino
Create vivid images with Promptchan — a powerful neural network for generating art based on text description. Support for SFW and NSFW modes, style customization, quick creation of visual content.
When I initially commented I appear to have clicked the
-Notify me when new comments are added- checkbox and
from now on whenever a comment is added I get
4 emails with the exact same comment. There has to be a means you can remove
me from that service? Thanks!
Love the seasonal casino bonuses, so fun!
spin mama
Недвижимость в Болгарии у моря https://byalahome.ru квартиры, дома, апартаменты в курортных городах. Продажа от застройщиков и собственников. Юридическое сопровождение, помощь в оформлении ВНЖ, консультации по инвестициям.
It’s fantastic that you are getting ideas
from this post as well as from our discussion made here.
This piece of writing offers clear idea designed for the new users of
blogging, that truly how to do blogging and site-building.
When I originally commented I clicked the “Notify me when new comments are added” checkbox and now each time a comment is added I get four e-mails with
the same comment. Is there any way you can remove people from that service?
Thanks a lot!
Срочный выкуп квартир https://proday-kvarti.ru за сутки — решим ваш жилищный или финансовый вопрос быстро. Гарантия законности сделки, юридическое сопровождение, помощь на всех этапах. Оценка — бесплатно, оформление — за наш счёт. Обращайтесь — мы всегда на связи и готовы выкупить квартиру.
Won big on a slot, online casinos rock!
aviator
Do you have a spam problem on this blog; I also
am a blogger, and I was wanting to know your situation; many of us have created some nice procedures and we are looking to swap techniques with
other folks, please shoot me an e-mail if interested.
The live dealer games are super authentic.
betonred
Портал о недвижимости https://akadem-ekb.ru всё, что нужно знать о продаже, покупке и аренде жилья. Актуальные объявления, обзоры новостроек, советы экспертов, юридическая информация, ипотека, инвестиции. Помогаем выбрать квартиру или дом в любом городе.
Online casinos have awesome signup bonuses.
bet on red
Thanks very interesting blog!
שרציתי ללקק מיד כשהרוסית מלווה אותי. הוא רצה לגמור בתוכי ואז להמשיך חייבת להודות שזו לא תהיה הפעם הראשונה שאני מציעה סקס תמורת כסף. בגיל משרדי ליווי
Definitely believe that which you stated. Your favorite justification appeared to be on the internet the
easiest thing to be aware of. I say to you, I certainly
get annoyed while people think about worries that they
just don’t know about. You managed to hit the nail
upon the top and also defined out the whole thing without having side-effects , people can take a signal.
Will likely be back to get more. Thanks
Online casinos are perfect for casual players.
plinko demo
link bokep
The slot jackpots keep me coming back!
plinko demo
bocil bokep
I blog frequently and I genuinely thank you for your information.
The article has truly peaked my interest. I will
bookmark your site and keep checking for new information about
once a week. I subscribed to your RSS feed as well.
My casino’s customer support is fantastic.
plinko review
Everything is very open with a clear description of the issues.
It was truly informative. Your website is very useful.
Thank you for sharing!
Hi, everything is going perfectly here and ofcourse every one is sharing facts, that’s truly fine,
keep up writing.
The live chat feature makes games social.
plinko demo
This piece of writing offers clear idea designed for the new
viewers of blogging, that really how to do running a blog.
After I originally left a comment I seem to have clicked on the -Notify me when new
comments are added- checkbox and now each time a
comment is added I recieve 4 emails with the
exact same comment. There has to be a means you can remove me from that service?
Kudos!
Online casinos have so many great games.
plinko
I like the helpful information you provide in your articles.
I’ll bookmark your weblog and check again here regularly.
I am quite sure I’ll learn lots of new stuff right here!
Best of luck for the next!
לילה, מאשה הייתה עוטה על עצמה את מסכת הביטחון והפיתוי שלה, נכנסת הבנת הטרמינולוגיה המונח “קוקסינלה” משמש לעתים קרובות בצורה משפילה great site
Online slots with extra spins are the best!
spin mama
בסטטוס החדש של החיים שלי ובאופן שבו הגעתי למקום שבו הייתי. אחת כן, כי מה אם שירותים ציבוריים מופרדים מגדרית. אבל סקרלט מופיעה כמעט נערות ליווי פרטיות בירושלים – בוא להגשים פנטזיה
The slot graphics make every spin fun!
bet on red
Good way of describing, and fastidious piece of writing to get data on the topic of my presentation subject matter, which i am going to present in school.
Online casinos are perfect for quick sessions.
plinko game
I was recommended this blog by my cousin. I am not sure whether this
post is written by him as no one else know such detailed about my difficulty.
You’re incredible! Thanks!
The casino app is fast and reliable.
plinko
I have read so many articles concerning the blogger
lovers but this article is really a fastidious paragraph,
keep it up.
I don’t even know how I ended up here, but I thought this
post was good. I don’t know who you are but definitely you’re going to a famous blogger if you are
not already 😉 Cheers!
Online casinos have great responsible gaming features.
fortune tiger
Hi there, every time i used to check blog posts here in the early hours in the daylight, as i like to find out more and
more.
Won a small amount on slots, love it!
fortune tiger bet
An intriguing discussion is worth comment. I believe that you ought to publish more about this subject, it may not be a taboo matter but generally people don’t talk about these topics.
To the next! Kind regards!!
Online casinos have awesome signup bonuses.
aviator
https://guryevsk.forum24.ru/?1-3-0-00000454-000-0-0-1744379764
Online casinos have great responsible gaming features.
plinko avis
It’s an amazing piece of writing designed for all the internet visitors; they will take benefit
from it I am sure.
Online roulette with live dealers is amazing.
bet on red
What’s up friends, how is all, and what you would like
to say on the topic of this paragraph, in my view its actually awesome
designed for me.
Hi Dear, are you truly visiting this website regularly, if so afterward you will without doubt obtain pleasant know-how.
The game selection is always expanding.
book of ra gratis
Woah! I’m really loving the template/theme of this site.
It’s simple, yet effective. A lot of times it’s hard
to get that “perfect balance” between user friendliness and
appearance. I must say you’ve done a amazing job with this.
Additionally, the blog loads super fast for me on Firefox.
Exceptional Blog!
Online casinos have awesome welcome offers.
joker jewels
คาสิโนออนไลน์ ต้องยกให้ E2Bet คาสิโนออนไลน์ เว็บไซต์เดิมพันระดับท็อปของเอเชีย เชื่อถือได้ มั่นคง ปลอดภัย เพิ่มประสบการณ์การเล่นที่เหนือกว่าใครต้อง E2Bet คาสิโนออนไลน์ เท่านั้น!
สมัครเลยตอนนี้ รับสิทธิพิเศษมากมาย
Heya i am for the first time here. I came across this board and I find It really useful & it helped me out much.
I hope to give something back and help others like you aided me.
Online slots with bonus rounds are thrilling!
plinko demo
Fantastic post however , I was wondering if you could write a
litte more on this subject? I’d be very grateful if you could
elaborate a little bit further. Thanks!
Hi! Would you mind if I share your blog with my facebook group?
There’s a lot of people that I think would really enjoy your content.
Please let me know. Cheers
When someone writes an article he/she maintains the idea of a user in his/her mind that how a user can be aware of it.
Thus that’s why this post is outstdanding. Thanks!
My casino’s VIP program is so rewarding.
plinko
Your way of telling the whole thing in this piece of writing is actually fastidious, every one
can effortlessly be aware of it, Thanks a lot.
The free mode helped me practice roulette.
plinko demo
вкусвилл вакансии
I know this if off topic but I’m looking into
starting my own blog and was wondering what all is required to get set up?
I’m assuming having a blog like yours would cost a pretty penny?
I’m not very web savvy so I’m not 100% positive.
Any tips or advice would be greatly appreciated. Many thanks
вкусвилл работа курьером на велосипеде в москве
лента иркутск вакансии на работу
http://rabota-samokat.ru/
лента склад вакансии
самокат вакансии новосибирск сборщик заказов
Tried a crypto deposit, it was instant!
plinko game
I’m extremely impressed together with your writing
abilities and also with the layout to your blog.
Is this a paid theme or did you customize it yourself?
Anyway keep up the nice quality writing, it’s rare
to see a nice weblog like this one these days..
מציעה מפלט נפשי ורגשי מלחצי היום יום. האווירה השלווה, המוזיקה המרגיעה חשבון עם אתר ההקרנה המועדף עליך שאליו תוכל לגשת בקישור בתחתית של Adorable girls from escorts services
Got a reload bonus, love the extra playtime.
fortune tiger
вкусвилл вакансии серпухов
работа в дарксторе вкусвилл
Hello my loved one! I want to say that this post is amazing, nice written and include approximately
all vital infos. I’d like to peer more posts like this .
лента сборщик заказов вакансии спб
самокат вакансии омск
лента работа вакансии
Love the creative casino promotions!
aviator game
самокат вакансии спб сборщик
My casino’s support is always friendly.
plinko avis
It’s actually a cool and helpful piece of
info. I am satisfied that you simply shared this useful information with us.
Please keep us up to date like this. Thank you for sharing.
Hi there friends, good article and nice arguments commented
here, I am truly enjoying by these.
The casino’s mobile site is flawless.
marvel casino
Выявлен простой способ понижения давления без лекарств
https://x.com/Fariz418740/status/1922752627047084452
Wonderful post however I was wanting to know if you could write
a litte more on this subject? I’d be very thankful if you could elaborate a little bit further.
Many thanks!
Simply wish to say your article is as surprising. The clearness for your publish is simply nice and that i can suppose you are a professional on this subject.
Well along with your permission allow me to grab your feed to
keep updated with imminent post. Thank you 1,000,000 and please carry on the rewarding work.
Live dealer games make me feel in a real casino.
book of ra
Simply want to say your article is as amazing.
The clarity in your post is simply cool and i could assume you’re
an expert on this subject. Fine with your permission allow me to grab your RSS feed
to keep up to date with forthcoming post. Thanks a million and please continue the
gratifying work.
Love the new game releases every week!
sportcash net
With havin so much written content do you ever run into any problems of plagorism or copyright violation? My site has a lot of
unique content I’ve either created myself or outsourced but it seems a lot of it is popping it up all over
the internet without my agreement. Do you know any techniques to help stop content from being
ripped off? I’d genuinely appreciate it.
The casino app is fast and reliable.
plinko game
Myhrvold actually used a green laser pointer that zapped at the Lucite field of bugs from throughout the stage. Adult females select from a wide range of suitable host tree species to lay their eggs, including ash, birch, field elder, alder, elm, maple, poplar, cherry, plum, willow, apple, and more. The machine locates, targets, and shoots the pests mid-flight in a Lucite field. When you get it, simply plug it in and it works fairly passively, thanks to its BioSelective Techology that targets the nerve receptors in bugs – and bugs only. Zevo’s bug killer sprays use active important oils that focus on nerve receptors vital to insects – and they’re secure to use round folks and pets when used as directed. For starters, most zappers utilize a shock that is enough to kill insects however will only give a bit of slight ache to individuals and most pets. But while the infrared lethal laser is real, the demo Myhrvold gave in 2010 was a bit bit faked.
Also visit my site :: https://wiki.zibocademy.com/index.php?title=User:VedaWingfield
The live baccarat game feels so luxe!
betmomo login
It’s really a nice and helpful piece of info. I’m happy
that you just shared this helpful information with
us. Please stay us informed like this. Thanks for sharing.
Hey! This post could not be written any better! Reading through this post reminds me of my previous room mate!
He always kept chatting about this. I will forward this article
to him. Fairly certain he will have a good read. Thank you for sharing!
This blog was… how do you say it? Relevant!! Finally I have found
something which helped me. Kudos!
Does your site have a contact page? I’m having problems locating it but, I’d like to
send you an e-mail. I’ve got some creative ideas for your blog you might be interested
in hearing. Either way, great website and I look forward to seeing it develop over time.
My casino’s support is always friendly.
aviator
I absolutely love your blog.. Very nice colors & theme.
Did you develop this amazing site yourself? Please reply back as I’m trying to create my
own personal site and would love to learn where you got this
from or exactly what the theme is called. Kudos!
43000
Amazing postings Kudos.
Online casinos have clear rules for all games.
betonred
תפסיקי, צעקתי אליה והיא המשיכה לקפוץ לי על הזין, להסתובב אליי ולהפנות גדול. “היי,” הוא אומר, “אני אודי” אני מחייכת בנימוס ומנסה להתנהג why not try these out
Online slots with high RTP are my favorite.
vincispin bonus code
Wonderful beat ! I would like to apprentice at the same time as
you amend your website, how can i subscribe for a blog web site?
The account aided me a appropriate deal. I had been tiny
bit familiar of this your broadcast provided vibrant
transparent concept https://cfood.vn cfood tan nhien
My casino’s VIP perks are amazing.
1xbet aviator
Hi are using WordPress for your blog platform? I’m new
to the blog world but I’m trying to get started and create my own. Do
you need any coding knowledge to make your own blog?
Any help would be really appreciated!
Appreciate it. Ample content.
Love the new slot themes every month!
como ganar en joker jewels
Why people still make use of to read news papers when in this technological globe the whole thing is existing on web?
The casino app is always reliable.
plinko game
Online casinos make everything so easy.
sportcash
Ощутите себя капитаном, отправившись в незабываемое плавание!
К вашим услугам
аренда скоростного катера пхукет для захватывающих приключений.
С нами вы сможете:
• Окунуться в красоту окружающих видов, путешествуя
на различных плавсредствах.
• Отметить важное торжество в оригинальной и запоминающейся манере.
• Провести волшебный вечер, наполненный
романтикой и уютом.
• Собраться с близкими друзьями для веселого время провождения.
Наши суда отличаются:
✓ Профессиональными экипажами с
многолетним опытом.
✓ Повышенным уровнем комфорта для пассажиров.
✓ Обеспечением полной безопасности на протяжении всего плавания.
✓ Элегантным внешним видом и современным оформлением.
Выбирайте короткую часовую прогулку или арендуйте судно на целый день!
Мы также поможем с организацией
вашего праздника: предоставим
услуги фотографа, организуем питание и музыкальное сопровождение.
Подарите себе и вашим близким яркие впечатления!
Закажите ваше водное приключение прямо сейчас!
וסוגר על הזין שלי. זה מגרה אותי, אני מכניס לתוכה את כל זרעי האהבה מספקת. המאבק להפריד את תחושת העצמי שלה מהתפקיד שמילאה עבור לקוחותיה liesen déi komplett info hei
You could certainly see your enthusiasm within the
work you write. The arena hopes for even more passionate writers like you who aren’t afraid to say how they believe.
Always follow your heart.
Live dealer games bring the casino home.
vincispin
ההקפדה על הפרטים הקטנים בעיצוב הפנים, חדרי העיסוי הפרטיים והתנהגות משקה. המלצרית החזירה שתי זריקות טקילה. הם הורידו אותם והטיחו את why not try these out
Love the new slot themes every month!
sportcash
Definitely imagine that that you said. Your
favourite reason seemed to be at the net the simplest factor to
understand of. I say to you, I definitely get irked at the same time
as other people think about concerns that they plainly don’t recognize about.
You controlled to hit the nail upon the highest and also outlined out the
entire thing with no need side-effects , other folks can take a
signal. Will likely be back to get more. Thank you
Online casinos have endless game choices.
aviator
Appreciate this post. Will try it out.
First off I want to say awesome blog! I had a quick question that I’d like to
ask if you don’t mind. I was curious to know how you center yourself
and clear your thoughts before writing. I’ve had a difficult time clearing my mind in getting my thoughts out.
I truly do take pleasure in writing but it just seems like
the first 10 to 15 minutes are usually lost just
trying to figure out how to begin. Any suggestions or
hints? Thank you!
Online poker tournaments are so intense!
plinko
I’ve been using E2Bet for a while now, and it’s the best platform for
cricket exchange in Pakistan! The live odds are accurate, and the user interface is seamless.
Highly recommend it to everyone!
Won a small prize, online casinos are fun!
marvelcasino
Hey there! Quck question that’s totally off topic.
Do you know how to make your site mobile friendly?
My blog looks weird when browsing from my iphone4. I’m trying to find
a template or plugin that might bbe able to fix thos issue.
If you have any suggestions, pllease share. Many thanks!
Haave a look at my web blog … slot online
Post writing is also a excitement, if you be acquainted
with afterward you can write if not it is complex to write.
The slot animations are so fun to watch!
dragon hatch
For latest information you have to visit world wide web and on world-wide-web I found this website as a most
excellent web page for most up-to-date updates.
pharmacy online canada
Love the new slot games every month!
bet on red
I quite like reading an article that can make men and
women think. Also, many thanks for permitting me to comment!
Love the seasonal casino bonuses, so fun!
aviator game
I have read so many content regarding the blogger lovers except
this piece of writing is really a good article,
keep it up.
The casino app is always reliable.
sport cash
Heya i am for the primary time here. I came across this board and I
in finding It truly helpful & it helped me out much. I hope to
present something again and aid others like you aided me.
Online casinos make withdrawals so easy.
plinko demo
The RX 950 ProRower from H2O fitness is a commercial grade top quality rower equally suitable to your house or the gymnasium or health membership.
Also visit my site; https://www.good-play-game.com/
https://lowes-survey.co/ is one of the world’s leading platforms for interracial porn. The site has three million visits every month.
It’s one of the most popular.
When I originally commented I appear to have clicked the -Notify me when new comments are
added- checkbox and now every time a comment is added I get
4 emails with the same comment. Is there an easy method you are able to remove me from that service?
Thanks a lot!
Won some cash on blackjack, so fun!
jogo do tigrinho
Link exchange is nothing else but it is only placing the other person’s webpage link
on your page at suitable place and other person will also do same in support of you.
What’s up to all, how is all, I think every one is getting more from this
site, and your views are pleasant designed for new visitors.
The game search feature is super handy.
plinko game online
id=”firstHeading” class=”firstHeading mw-first-heading”>Search results
Help
English
Tools
Tools
move to sidebar hide
Actions
General
Love the new slot games every month!
betmomo
This website was… how do I say it? Relevant!! Finally
I’ve found something which helped me. Thank you!
Гусейн Гасанов отрицает обвинения, но Мизулина разоблачает
https://x.com/kiselev_igr/status/1922960584342946229
Love the new game providers they added.
bet on red
Когда я впервые открыл этот сайт, чувство было таким, будто я переступил грань реальности. Здесь каждая ставка — это не просто волнение, а эмоция, которую ты проживаешь с каждым вращением.
Оформление удобен, словно ветер судьбы направляет тебя от выбора к выбору. Операции, будь то депозиты или выплаты, проходят быстро, как поток воды, и это завораживает. А служба помощи всегда отвечает мгновенно, как друг, который никогда не оставит.
Для меня Казино селектор стал пространством, где азарт и искусство переплетаются. Здесь каждая игра — это часть истории, которую хочется создавать снова и снова.
Won a small prize, online casinos are fun!
plinko
Регистрация по месту жительства и пребывания: почему это важно?
https://x.com/kiselev_igr/status/1923001729290830288
Got a weekly bonus, keeps me playing.
plinko
My brother recommended I may like this blog.
He was once totally right. This put up actually made
my day. You can not believe simply how a lot time I had spent for
this info! Thanks!
The live baccarat table is so stylish!
aviator game
Эксперты сделали тревожное заявление о бананах
https://x.com/kiselev_igr/status/1923010225495273528
You actually make it seem so easy with your presentation but I find this topic to
be actually something which I think I would never understand.
It seems too complicated and extremely broad for me. I’m looking forward for your next post, I will try to get the
hang of it!
The slot animations make every spin fun!
marvel casino
It’s appropriate time to make some plans for the future and it is time to be happy.
I have read this post and if I could I desire to suggest
you some interesting things or tips. Maybe you could write next articles referring to this article.
I wish to read even more things about it!
Your method of telling all in this piece of writing is
in fact nice, every one can simply understand it,
Thanks a lot.
Online casinos have endless gaming options.
sportcash net
Great beat ! I would like to apprentice while you amend your
web site, how could i subscribe for a blog web site?
The account helped me a acceptable deal. I had been tiny bit acquainted of this your broadcast provided bright clear idea
Online casinos are perfect for casual players.
book of ra deluxe gratis
Pretty! This has been an extremely wonderful post. Thank you for supplying this
information.
Ищете копирайтера? https://sajt-kopirajtera.ru Пишу тексты, которые продают, вовлекают и объясняют. Создам контент для сайта, блога, рекламы, каталога. Работаю с ТЗ, разбираюсь в SEO, адаптирую стиль под задачу. Чистота, смысл и результат — мои приоритеты. Закажите текст, который работает на вас.
My casino’s support team is fantastic.
plinko
Архитектурные решения https://топдом-мск.рф под ваши желания и участок. Создадим проект с нуля: планировка, фасад, инженерия, визуализация. Вы получите эксклюзивный дом, адаптированный под ваш образ жизни. Работаем точно, качественно и с любовью к деталям.
This post will assist the internet users for setting up
new web site or even a blog from start to end.
Online casinos have clear game guides.
vincispin
It is actually a nice and useful piece of information. I am glad that
you simply shared this useful info with us. Please stay us up to date like this.
Thanks for sharing.
Salvo como favorito, Eu gosto seu site!
Online poker tournaments are so exciting!
plinko app
I used to be able to find good information from your content.
Online casinos have so many table games.
big bamboo demo
I know this if off topic but I’m looking into
starting my own weblog and was wondering what all is needed to get setup?
I’m assuming having a blog like yours would cost a pretty penny?
I’m not very web savvy so I’m not 100% positive. Any recommendations or advice would be greatly
appreciated. Kudos
Love the new slot themes every month!
plinko
It’s very easy to find out any topic on net
as compared to textbooks, as I found this paragraph at
this web site.
My brother recommended I may like this website.
He was once entirely right. This put up actually made my day.
You cann’t believe simply how so much time I had spent for this info!
Thanks!
bally casino
Online casinos make withdrawals so smooth.
aviator game
Туристический портал https://prostokarta.com.ua для путешественников: маршруты, достопримечательности, советы, бронирование туров и жилья, билеты, гайды по странам и городам. Планируйте отпуск легко — всё о путешествиях в одном месте.
Фитнес-портал https://sportinvent.com.ua ваш помощник в достижении спортивных целей. Тренировки дома и в зале, план питания, расчёт калорий, советы тренеров и диетологов. Подходит для начинающих и профессионалов. Всё о фитнесе — в одном месте и с реальной пользой для здоровья.
Инновации, технологии, наука https://technocom.dp.ua на одном портале. Читайте о передовых решениях, новых продуктах, цифровой трансформации, робототехнике, стартапах и будущем IT. Всё самое важное и интересное из мира высоких технологий в одном месте — просто, понятно, актуально.
Wonderful blog! I found it while searching on Yahoo News.
Do you have any suggestions on how to get listed in Yahoo
News? I’ve been trying for a while but I never seem to get there!
Appreciate it
Tried a crypto casino, super fast transactions!
jogo do dragao
Всё о мобильной технике https://webstore.com.ua и технологиях: смартфоны, планшеты, гаджеты, новинки рынка, обзоры, сравнения, тесты, советы по выбору и настройке. Следите за тенденциями, обновлениями ОС и инновациями в мире мобильных устройств.
Got a cashback deal, really helpful.
betonred
Do you mind if I quote a few of your articles as long as I
provide credit and sources back to your blog? My website is in the very same area of interest
as yours and my visitors would genuinely benefit from a lot of
the information you present here. Please let me know
if this ok with you. Thank you!
Heya i’m for the primary time here. I came across this board and I
in finding It truly useful & it helped me out a lot.
I am hoping to give something back and aid others such as you aided me.
The slot graphics make every spin fun!
sport cash
I’m not sure why but this site is loading incredibly slow for me.
Is anyone else having this problem or is it a problem
on my end? I’ll check back later on and see if the problem still exists.
The bonus terms are fair and easy to follow.
plinko avis
I have read some just right stuff here. Definitely value bookmarking
for revisiting. I surprise how much effort you put to create the sort of great informative site.
Hi there, just became aware of your blog through Google, and found that it’s truly informative.
I’m going to watch out for brussels. I’ll be grateful if you continue this in future.
Many people will be benefited from your writing. Cheers!
The bonus wagering requirements are fair.
fishin frenzy
YouTube Promotion buy youtube views for your videos and increase reach. Real views from a live audience, quick launch, flexible packages. Ideal for new channels and content promotion. We help develop YouTube safely and effectively.
Натяжные потолки под ключ https://potolki-nova.livejournal.com/563.html установка любых видов: матовые, глянцевые, сатиновые, многоуровневые, с фотопечатью и подсветкой. Широкий выбор фактур и цветов, замер бесплатно, монтаж за 1 день. Качественные материалы, гарантия и выгодные цены от производителя.
Автомобильный портал https://autodream.com.ua для автолюбителей и профессионалов: новости автоиндустрии, обзоры, тест-драйвы, сравнение моделей, советы по уходу и эксплуатации. Каталог авто, форум, рейтинги, автоновости. Всё об автомобилях — в одном месте, доступно и интересно.
אני בא לבד היא תמיד זמינה בשבילי. והשביעית… את השביעית זיינו ביחד גם בישראל שוגר דדי הפך לנושא מדובר בשנים האחרונות. הנה כמה מהסיבות: have a peek at these guys
Портал про авто https://livecage.com.ua всё для автолюбителей: обзоры машин, тест-драйвы, новости автопрома, советы по ремонту и обслуживанию. Выбор авто, сравнение моделей, тюнинг, страховка, ПДД. Актуально, понятно и полезно. Будьте в курсе всего, что связано с автомобилями!
Online casinos are perfect for casual players.
plinko
Hi to every body, it’s my first pay a visit of this weblog; this website carries amazing and
truly excellent stuff for visitors.
The payout process was quick and easy.
aviator game online
You said it very well.!
naturally like your web site however you have to take a look at the spelling on several of your posts.
A number of them are rife with spelling problems and I
in finding it very troublesome to inform the reality then again I’ll surely come again again.
Online roulette with live dealers is amazing.
plinko
I enjoy what you guys are usually up too. This sort of clever work
and reporting! Keep up the great works guys I’ve incorporated you guys to
my personal blogroll.
Love the soundtracks in online slots!
plinko casino
Современный женский портал https://beautyrecipes.kyiv.ua стиль жизни, мода, уход за собой, семья, дети, кулинария, карьера и вдохновение. Полезные советы, тесты, статьи и истории. Откровенно, интересно, по-настоящему. Всё, что важно и близко каждой женщине — в одном месте.
Ты можешь всё https://love.zt.ua а мы подскажем, как. Женский портал о саморазвитии, личной эффективности, карьере, балансе между семьёй и амбициями. Здесь — опыт успешных женщин, практичные советы и реальные инструменты для роста.
На женском портале https://happytime.in.ua статьи для души и тела: секреты красоты, женское здоровье, любовь и семья, рецепты, карьерные идеи, вдохновение. Место, где можно быть собой, делиться опытом и черпать силу в заботе о себе.
Wow, incredible blog layout! How long have you been blogging for?
you made blogging look easy. The overall look of your website is excellent, let alone the content!
Добро пожаловать на женский портал https://lidia.kr.ua ваш гид по миру красоты, стиля и внутренней гармонии. Читайте про отношения, карьеру, воспитание детей, женское здоровье, эмоции и моду. Будьте вдохновлены лучшей версией себя каждый день вместе с нами.
Love the music in online slot games!
pirots 2
онлайн игры с читами для андроид — это интересный способ получить новые возможности.
Особенно если вы играете на мобильном устройстве с Android, модификации открывают перед вами огромный выбор.
Я нравится использовать взломанные игры, чтобы достигать большего.
Модификации игр дают невероятную свободу выбора,
что погружение в игру гораздо захватывающее.
Играя с плагинами, я могу персонализировать свой опыт, что добавляет новые приключения и делает игру более непредсказуемой.
Это действительно невероятно,
как такие моды могут улучшить
взаимодействие с игрой, а при этом не нарушая использовать такие взломанные версии можно без особых опасностей, если быть внимательным и следить за обновлениями.
Это делает каждый игровой процесс более насыщенным, а возможности практически выше всяких похвал.
Рекомендую попробовать такие игры с модами для Android — это может
придаст новый смысл
Got a cashback deal, really helpful.
beep beep casino
best student loans
We’re a gaggle of volunteers and starting a brand new scheme in our
community. Your site offered us with helpful info to work
on. You have performed a formidable job and our entire community will likely be grateful to you.
Got a cashback deal, really helpful.
aviator
For most up-to-date news you have to visit internet and on web I found this site as a best web site for
hottest updates.
Online casinos always have cool seasonal bonuses.
betonred app
Yes! Finally something about hire a killer.
Online casinos have awesome welcome offers.
sport cash
Greetings from Idaho! I’m bored to death at work so I decided to browse your website on my iphone during lunch
break. I love the knowledge you present here and
can’t wait to take a look when I get home. I’m surprised at how fast your blog loaded on my phone ..
I’m not even using WIFI, just 3G .. Anyways, fantastic blog!
Online slots with extra spins are the best!
jogo tigrinho estrela bet
Hello, every time i used to check webpage posts
here early in the morning, since i like to learn more and more.
Love the new game providers they added.
plinko avis
Everyone loves what you guys are usually up too.
This kind of clever work and coverage! Keep up
the very good works guys I’ve added you guys to blogroll.
Online poker rooms are so thrilling!
plinko app
תמיד היה חשוב רהיטים ועיצוב, שום דבר לא היה מספיק טוב אלא אם כן זה השתמשה באגודל שלה כדי לעורר את החלק התחתון של הראש. זה הרגיש נהדר. אף סוכנות ליווי
Love the seasonal casino bonuses, so fun!
application plinko avis
Thank you for the auspicious writeup. It in fact was a amusement account it.
Look advanced to far added agreeable from you!
By the way, how can we communicate?
The free mode is great for learning.
plinko
payday loan
Truly when someone doesn’t be aware of after that its up
to other users that they will help, so here it happens.
The live baccarat game feels so luxurious.
bizzo casino australia
Does your site have a contact page? I’m having problems locating it but, I’d
like to send you an email. I’ve got some
suggestions for your blog you might be interested in hearing.
Either way, great site and I look forward to seeing
it expand over time.
Hi, i think that i saw you visited my website so i came to “return the favor”.I’m attempting to find things to enhance my website!I suppose its ok to use some of your ideas!!
Hi there to every single one, it’s truly a pleasant for me to pay a visit this web site, it includes
important Information.
belka-digital
Won some cash on blackjack, so fun!
marvel casino no deposit
Le directeur souhaite que vous enquêtiez rapidement pour retrouver le coupable et les bonbons !
Женский онлайн-журнал https://loveliness.kyiv.ua о стиле, красоте, вдохновении и трендах. Интервью, мода, бьюти-обзоры, психология, любовь и карьера. Будь в курсе главного, читай мнения экспертов, следи за трендами и открывай новые грани себя каждый день.
Онлайн-журнал для женщин https://mirwoman.kyiv.ua которые ищут не только советы, но и тепло. Личные истории, женское здоровье, психология, уютный дом, забота о себе, рецепты, отношения. Без давления, без шаблонов. Просто жизнь такой, какая она есть.
Портал для женщин https://oa.rv.ua всё, что важно: красота, здоровье, семья, карьера, мода, отношения, рецепты и саморазвитие. Полезные статьи, советы, тесты и вдохновение каждый день. Онлайн-пространство, где каждая найдёт ответы и поддержку.
Современный женский портал https://womanonline.kyiv.ua с актуальными темами: тренды, уход, макияж, фитнес, fashion, интервью, советы стилистов. Следи за модой, вдохновляйся образами, узнай, как подчеркнуть свою индивидуальность.
I know this web page provides quality depending
articles or reviews and additional data, is there any
other site which presents such information in quality?
Online casinos are great for low budgets.
fortune dragon demo
Hey! Do you use Twitter? I’d like to follow you if that would be ok.
I’m undoubtedly enjoying your blog and look forward to new posts.
Won a prize in a slot tournament, so exciting!
aviator bet
Do you mind if I quote a couple of your posts as long as I provide credit
and sources back to your webpage? My website is in the exact
same niche as yours and my users would certainly benefit from
some of the information you present here. Please let me know if this okay with you.
Cheers!
Hello! I just wanted to ask if you ever have any issues with hackers?
My last blog (wordpress) was hacked and I ended up losing a few
months of hard work due to no backup. Do you have any solutions to stop hackers?
Won a small prize on slots, keeps me playing!
plinko demo
Scientists have questioned the 160-year-old theory of the origin of life on Earth
https://x.com/MKids3447/status/1923324606934401348
Won some cash on blackjack, so fun!
marvel casino
When I initially commented I clicked the “Notify me when new comments are added” checkbox and now each time a comment is added I get
three e-mails with the same comment. Is there any way you can remove me from that service?
Appreciate it!
My casino’s support is quick to respond.
dragon hatch
Thanks. Wonderful stuff!
Dead Island 2 and Happy Game Are Free This Week on Epic Games Store
https://x.com/MKids3447/status/1923339289632387311
Online slots with bonus features are awesome.
plinko
Link exchange is nothing else except it is only placing the other person’s blog link on your page at
appropriate place and other person will also do similar in support of you.
NASA Explains Why the Far Side of the Moon Looks So Different from the Near Side https://x.com/MKids3447/status/1923341113001197769
Very energetic blog, I loved that a lot. Will there be a part
2?
I read this post fully on the topic of the resemblance
of hottest and previous technologies, it’s awesome article.
New Species of Dog-Sized Carnivorous Dinosaur Discovered in India – One of the Oldest on Earth https://x.com/MKids3447/status/1923346661658505272
Online slots with high RTP are my favorite.
bongobongo
I am actually grateful to the holder of this web page who has shared
this great piece of writing at at this time.
Online poker is so intense and fun!
vinci spin
Really tons of fantastic advice.
Got a weekly bonus, keeps me playing.
cosmo casino
Сайт для женщин https://womenclub.kr.ua всё, что волнует и вдохновляет: мода, красота, здоровье, отношения, дети, психология и карьера. Практичные советы, интересные статьи, вдохновение каждый день. Онлайн-пространство, созданное с заботой о вас и вашем настроении.
Медицинский портал https://lpl.org.ua с проверенной информацией от врачей: симптомы, заболевания, лечение, диагностика, препараты, ЗОЖ. Консультации специалистов, статьи, тесты и новости медицины. Только достоверные данные — без паники и домыслов. Здоровье начинается с знаний.
Надёжный медицинский портал https://una-unso.cv.ua созданный для вашего здоровья и спокойствия. Статьи о заболеваниях, советы по лечению и образу жизни, подбор клиник и врачей. Понятный язык, актуальная информация, забота о вашем самочувствии — каждый день.
Чайная энциклопедия https://etea.com.ua всё о мире чая: сорта, происхождение, свойства, способы заваривания, чайные традиции разных стран. Узнайте, как выбрать качественный чай, в чём его польза и как раскрывается вкус в каждой чашке. Для ценителей и новичков.
Tried a crypto casino, super fast transactions!
aviator bet
Retrouvez sur notre blog des articles pour vous inspirer, vous donner des idées d’activités, vous accompagner pour organiser une activité avec votre enfant autour d’Halloween.
Online casinos have so many great games.
plinko app
I like the valuable info you provide in your articles.
I’ll bookmark your weblog and check again here regularly.
I’m quite sure I’ll learn many new stuff right here!
Best of luck for the next!
Online casinos make everything so easy.
plinko
Hello to every single one, it’s actually a fastidious
for me to pay a quick visit this web site, it consists of important Information.
Won a prize in a slot tournament, awesome!
plinko
Great post. https://baotayninh.vn/ bao tay ninh
The game selection is always expanding.
plinko
Hi! I know this is somewhat off topic but I was wondering if you knew where I could locate
a captcha plugin for my comment form? I’m using the same blog platform
as yours and I’m having difficulty finding one? Thanks a lot!
Fastidious response in return of this query with genuine arguments and describing the
whole thing on the topic of that.
my web blog خرید بک لینک
The slot graphics are so vibrant!
marvelcasino
That is a really good tip especially to those new to the
blogosphere. Short but very precise info… Many thanks for
sharing this one. A must read article!
It’s remarkable in support of me to have a web site, which is helpful designed for my knowledge.
thanks admin
Адвокат по уголовным делам
The casino app is always reliable.
plinko
Кулинарный портал https://mallinaproject.com.ua тысячи рецептов, пошаговые инструкции, фото, видео, удобный поиск по ингредиентам. Готовьте вкусно и разнообразно: от завтраков до десертов, от традиционной кухни до кулинарных трендов. Быстро, доступно, понятно!
Современный мужской портал https://smart4business.net о жизни, успехе и саморазвитии. Личный рост, инвестиции, бизнес, стиль, технологии, мотивация. Разбираем стратегии, делимся опытом, вдохновляем на движение вперёд. Для тех, кто выбирает силу, разум и результат.
Все новинки технологий https://axioma-techno.com.ua в одном месте: презентации, релизы, выставки, обзоры и утечки. Следим за рынком гаджетов, IT, авто, AR/VR, умного дома. Обновляем ежедневно. Не пропустите главные технологические события и открытия.
Новинки технологий https://dumka.pl.ua портал о том, как научные открытия становятся частью повседневности. Искусственный интеллект, нанотехнологии, биоинженерия, 3D-печать, цифровизация. Простым языком о сложном — для тех, кто любит знать, как работает мир.
Online casinos have endless gaming options.
jogo do dragao
Gaming categories are effectively-balanced with a fantastic selection of games.
my web blog; https://git.zhaow.cc/carolineavalos
Online roulette is my favorite way to relax.
plinko
Hello, i think that i saw you visited my web site so i came to “return the favor”.I’m attempting to find things to improve my website!I suppose its
ok to use a few of your ideas!!
Won a small prize on slots, keeps me playing!
bongobongo bonus
Eu realmente gosto o que vocês geralmente fazendo.
Tal trabalho inteligente e cobertura! Continuem com os excelentes
trabalhos, pessoal. Eu adicionei vocês no nosso blogroll.
The game variety keeps things fresh every time.
plinko bonus
перевод видео
Hi, I do believe this is a great site. I stumbledupon it 😉 I am going to come back yet again since I book marked it.
Money and freedom is the best way to change, may
you be rich and continue to guide others.
Tremendous things here. I’m very glad to look your post.
Thank you so much and I am having a look ahead to contact you.
Will you please drop me a e-mail?
восстановление бухгалтерского учета цена
Мостбет официальный сайт
I’m not certain the place you aare getting your information, however good topic.
I needs to spend somee time learning more or
understanding more. Thanks for excellent information I was in search of thyis information for my mission.
Feel free to surf too myy blog … Video Buguru salsa
here
Hi there to every , as I am genuinely keen of reading this website’s post to be updated daily.
It consists of fastidious information.
website
Love the creative casino promotions!
sport cash
Great info. Lucky me I recently found your blog by accident (stumbleupon).
I’ve saved as a favorite for later!
I’ve been browsing online more than 4 hours today,
yet I never found any interesting article like yours.
It is pretty worth enough for me. Personally, if all webmasters and bloggers made good
content as you did, the net will be a lot more useful than ever before.
My casino’s support is always helpful.
jogo do tigrinho
Автомобильный сайт https://kolesnitsa.com.ua для души: редкие модели, автофан, необычные тесты, автоистории, подборки и юмор. Лёгкий и увлекательный контент, который приятно читать. Здесь не только про машины — здесь про стиль жизни на колёсах.
Актуальные новости https://polonina.com.ua каждый день — политика, экономика, культура, спорт, технологии, происшествия. Надёжный источник информации без лишнего. Следите за событиями в России и мире, получайте факты, мнения и обзоры.
Следите за трендами автопрома https://viewport.com.ua вместе с нами! На авто портале — новинки, презентации, обзоры, технологии, электромобили, автосалоны и экспертные мнения. Ежедневные обновления, честный взгляд на рынок, без лишнего шума и рекламы.
Полезные статьи и советы https://britishschool.kiev.ua на каждый день: здоровье, финансы, дом, отношения, саморазвитие, технологии и лайфхаки. Читайте, применяйте, делитесь — всё, что помогает жить проще, осознаннее и эффективнее. Достоверная информация и реальная польза.
Got a cashback deal, really helpful.
jogo tigrinho kto
coin
The live dealer games are super authentic.
aviator game online
tlife
2 zodiac signs that receive a second chance from fate in everything https://x.com/MKids3447/status/1923480639896011252
Online casinos have better bonuses than expected.
fortune mouse
A person necessarily lend a hand to make significantly articles I’d state.
This is the very first time I frequented your web page and thus far?
I amazed with the analysis you made to create this particular submit extraordinary.
Magnificent task!
The demo mode is great for learning games.
fishing frenzy slots
당신에게서 오는 웅장한 물건입니다.
이전에 당신의 글을 이해했고, 당신은
그냥 너무 멋집니다. 여기서 획득한 것을 정말 좋아하고, 당신이 말하는 것과 그 방식을 정말
좋아합니다. 재미있고 여전히 현명하게 유지합니다.
당신에게서 훨씬 더 읽고 싶습니다.
이건 정말 멋진 웹사이트입니다.
Hmm is anyone else encountering problems with the pictures on this blog loading?
I’m trying to determine if its a problem on my end or if it’s the blog.
Any suggestions would be greatly appreciated.
The live chat in games is so interactive.
plinko app
Wow, fantastic blog layout! How long have you
been blogging for? you make blogging look easy. The overall look of your website is
magnificent, let alone the content!
Hello, after reading this remarkable post i am too delighted to share my knowledge here with friends.
Online slots with high RTP are my favorite.
plinko demo
you are actually a just right webmaster. The website loading velocity is amazing.
It kind of feels that you’re doing any distinctive trick.
Also, The contents are masterwork. you’ve done
a magnificent task in this subject!
Приедете в текущий сайт https://carefitnessonline.com/how-to-reboot-apple-watch-essential-tips-and-tricks/
Love the new game providers they added.
plinko casino
watch porn video
Olá, eu acredito este é um excelente blog.
Eu tropecei nele 😉 eu posso retornar mais uma vez já que eu salvei como favorito.
Dinheiro e liberdade é a melhor maneira de mudar, que você seja
rico e continue a ajudar outras pessoas.
It’s remarkable for me to have a website, which
is helpful designed for my experience. thanks admin
The live baccarat table is so stylish!
plinko game
Greetings! Very helpful advice within this article! It is
the little changes which will make the most important changes.
Thanks for sharing!
Online casinos make withdrawals so easy.
mines
Hi, I just wanted to let you know how powerful this article is.
Medical emergencies often go unnoticed, especially when it comes to eye diseases.
Too often, people ignore the early signs or simply can’t get
proper treatment in time. I recently came across
a campaign at HelpMyEyes.com where a young woman is asking for
support for an urgent eye operation. Her story was so touching, and it reminded me of how easily anyone could
be in her place.
The truth is, we often take our ability to see for granted — until something happens.
And when it does, the emotional and financial toll
is massive. That’s why communities and blogs like this are so important.
They give us a space to raise awareness, and hopefully,
they inspire action.
If you’ve ever wondered whether a small donation makes a
difference — it does. Whether it’s $5 or $50, every bit helps.
Or if you can’t contribute financially, even sharing someone’s fundraiser can help them reach their goal.
I hope more people will support efforts like these.
Let’s keep spreading kindness and helping those who
need it most. If anyone would like to learn more or support someone’s vision recovery, I
highly recommend visiting HelpMyEyes.com.
Thank you again for this great opportunity.
Also visit my blog post … eye emergency support
Online casinos are perfect for casual players.
plinko
When someone writes an piece of writing he/she maintains
the image of a user in his/her mind that how a user can understand it.
Therefore that’s why this article is great. Thanks!
Hi there, of course this post is truly fastidious and I have
learned lot of things from it concerning blogging. thanks.
The payout process was quick and easy.
casino mate
credit card loans
Heya i’m for the first time here. I found this board and I in finding It really useful
& it helped me out a lot. I am hoping to provide one thing again and help others such
as you helped me.
Online casinos have great tools for responsible gaming.
fortune tiger
Hello! I realize this is somewhat off-topic but I had to ask.
Does running a well-established blog like yours require a large amount of work?
I am completely new to blogging however I do write in my diary every day.
I’d like to start a blog so I will be able to share
my own experience and thoughts online. Please let me know
if you have any ideas or tips for new aspiring blog owners.
Thankyou!
of course like your website however you have to take a look at the spelling on quite a few of
your posts. A number of them are rife with spelling issues and I in finding it very troublesome to inform the reality however I will definitely come back
again.
Gelecekte, indirme koşullarının daha fazla tercih edileceği ve kullanıcıların bu türdeki araçlara daha
fazla ihtiyaç duyacağı öngörülmektedir.
Before we critique any of the brick and mortar gaming venues, please mind that the majority of them are opened for foreigners.
Here is my web page – https://git.sortug.com/armandbattle22
Online casinos make gaming so simple.
sport cash
If you wish for to get a great deal from this piece of
writing then you have to apply these methods to your won website.
The demo mode is great for learning games.
savaspin
penis enlargement
Love the new slot games every month!
aviator game online
Howdy I am so delighted I found your blog,
I really found you by accident, while I was looking
on Google for something else, Anyways I am here now and would just like to say
thanks a lot for a marvelous post and a all round thrilling blog (I also love the theme/design), I don’t have time to look over it all at
the moment but I have saved it and also added your RSS feeds, so when I have time I will be back to read more,
Please do keep up the excellent work.
What’s up, I would like to subscribe for this blog to get
most recent updates, therefore where can i do it please help.
The slot graphics make every spin fun!
gold party 1win
Hmm it looks like your blog ate my first comment (it was super long) so I guess I’ll just sum it up what I wrote and say, I’m thoroughly enjoying your blog.
I too am an aspiring blog writer but I’m still new to everything.
Do you have any tips and hints for rookie blog writers? I’d really appreciate it.
My web page zamorano01
After looking over a few of the blog articles on your
site, I seriously like your way of writing a blog. I saved as a favorite it to my bookmark site list and will be checking
back soon. Please check out my website as well and tell me your opinion.
Won a prize in a slot tournament, so exciting!
plinko
Excellent, what a webpage it is! This blog presents useful facts to
us, keep it up.
El video ha generado una ola de comentarios y reacciones sorprendidas en redes sociales.
Love the new game releases every week!
plinko
I have read so many posts about the blogger lovers however this post is genuinely
a good paragraph, keep it up.
Tenho certeza de que este postagem tocou todos os pessoas da internet, é realmente
muito bom artigo sobre a construção de um novo site da web.
В этой публикации мы предлагаем подробные объяснения по актуальным вопросам, чтобы помочь читателям глубже понять их. Четкость и структурированность материала сделают его удобным для усвоения и применения в повседневной жизни.
Детальнее – https://medalkoblog.ru/
Online roulette is my favorite way to relax.
plinko game
Сайт для женщин https://funtura.com.ua всё, что интересно каждый день: бьюти-советы, рецепты, отношения, дети, стиль, покупки, лайфхаки и настроение. Яркие статьи, тесты и вдохновение. Просто, легко, по-женски.
Это не просто сайт для женщин https://godwood.com.ua это пространство, где вас слышат. Здесь — забота, поддержка, советы по жизни, отношениям, здоровью, семье и внутреннему балансу. Никакой критики, только доброта и уверенность: всё будет хорошо, и вы не одна.
Online casinos have better odds for table games, I think.
casino mate mobile
Информационно-познавательный https://golosiyiv.kiev.ua портал для мужчин и женщин: полезные статьи, советы, обзоры, лайфхаки, здоровье, психология, стиль, семья и финансы. Всё, что важно знать для жизни, развития и комфорта. Читайте, развивайтесь, вдохновляйтесь вместе с нами.
потолочные натяжные потолки натяжные потолки в москве цены с установкой
Online roulette is my favorite way to relax.
plinko
I’m extremely pleased to uncover this web site. I need to to
thank you for your time just for this fantastic read!!
I definitely appreciated every little bit of it and I have you saved
as a favorite to look at new stuff on your web site.
My casino’s VIP perks are amazing.
fortune tiger
Hi there, its nice paragraph regarding media print, we all be familiar with media is a fantastic source
of information.
Dangerous viruses have reached Europe https://x.com/MKids3447/status/1923646739870847355
Write more, thats all I have to say. Literally, it seems as though you relied on the video
to make your point. You obviously know what youre talking
about, why throw away your intelligence on just posting videos to your
weblog when you could be giving us something informative
to read?
The slot game visuals are incredible!
aviator game
É o melhor momento para fazer alguns planos para o longo prazo e é hora de ser feliz.
eu aprendi este colocar e se eu posso eu desejo sugerir você
algumas questões interessantes ou sugestões. Talvez você pudesse escrever subsequentes artigos a
respeito deste artigo. Eu quero ler mais coisas aproximadamente isso!
Excellent pieces. Keep posting such kind of info on your blog.
Im really impressed by your blog.
Hello there, You’ve done a fantastic job. I will certainly
digg it and for my part recommend to my friends. I am sure they will bbe benefited from this site.
Hello superb website! Does running a blog similar to
this require a great deal of work? I have no knowledge of programming
however I was hoping to start my own blog in the near
future. Anyways, if you have any suggestions or techniques for new
blog owners please share. I understand this is off topic nevertheless I just needed to ask.
Thanks!
The live baccarat game feels so luxe!
plinko game
hello!,I really like your writing so much! percentage
we communicate extra approximately your article on AOL? I require
a specialist on this area to resolve my problem.
Maybe that’s you! Looking ahead to see you.
Online casinos are great for small bets.
fishin frenzy
Сильная, умная, стильная https://lugor.org.ua вот для кого наш женский онлайн-журнал. Темы: мода, карьера, дети, отношения, дом, здоровье. Разговор о реальной жизни: без глянца, но со вкусом.
Женский онлайн-журнал https://gorod-lubvi.com.ua о красоте, стиле и уходе. Советы визажистов, подбор образов, секреты молодости, модные тренды. Всё, чтобы чувствовать себя уверенно и выглядеть на миллион. Будь в курсе, вдохновляйся и подбирай стиль по душе.
Женский онлайн-журнал https://inclub.lg.ua о силе выбора. Карьера, финансы, тайм-менеджмент, уверенность, стиль и баланс. Для женщин, которые двигаются вперёд, строят, влияют, мечтают. Говорим по делу — без стереотипов и с уважением к вашему пути.
Awesome facts, With thanks!
my web site … Korean Gambling Sites (https://p-git-work.hzbeautybox.com/arleenarnett26/sports-toto-sites-4801/wiki/Explore+Safe+Betting+Sites+with+Sureman%253A+Your+Trusted+Scam+Verification+Platform)
Won some money on slots, keeps me going!
fortune mouse
We stumbled over here from a different page and thought I should check things out.
I like what I see so now i’m following you. Look forward to looking into your web page again.
This is nicely said! !
Visit my web-site; Evolution Casino (https://gitea.rpg-librarium.de/danligertwood1)
Love the creative casino promotions!
plinko
Have you ever thought about writing an ebook or guest authoring on other sites?
I have a blog based on the same ideas you discuss and would really like to
have you share some stories/information. I know my visitors would enjoy your work.
If you are even remotely interested, feel free to shoot me an email.
What’s up all, here every person is sharing these kinds of experience, therefore it’s fastidious to read this webpage, and I used to pay a quick
visit this weblog everyday.
Live dealer games bring the casino home.
plinko demo
Howdy você se importaria em compartilhar qual plataforma de blog você está trabalhando?
Estou procurando começar meu próprio blog em breve, mas estou tendo um difícil momento decidir entre
BlogEngine/Wordpress/B2evolution e Drupal.
O motivo pelo qual pergunto é porque seu design e estilo parecem diferentes da maioria dos
blogs e estou procurando algo completamente único.
PS Desculpe por sair do assunto, mas eu tinha que perguntar!
Love the immersive 3D slot games!
plinko
Hi there, I found your web site by the use of Google while looking for
a related topic, your site came up, it seems to be good. I’ve bookmarked it in my google bookmarks.
Hello there, just turned into alert to your blog thru Google, and located
that it’s truly informative. I’m going to be careful for brussels.
I’ll be grateful if you happen to continue this in future.
Many people can be benefited out of your writing.
Cheers!
Hello there, You have done an incredible job. I’ll definitely digg it and personally
recommend to my friends. I’m sure they will be benefited from
this site.
Online casinos are great for learning new games.
vinci spin
Hello just wanted to give you a quick heads up.
The text in your article seem to be running off the screen in Safari.
I’m not sure if this is a formatting issue or something to do with browser compatibility but I figured
I’d post to let you know. The design look great though!
Hope you get the issue fixed soon. Cheers
Online slots with high RTP are my favorite.
fortune tiger
Портал для женщин https://prettiness.kyiv.ua которые любят жизнь во всех её красках. Советы, мода, рецепты, отношения, вдохновение, дом и путешествия. Каждый день — новая идея, интересная мысль и повод улыбнуться.
Портал для активных https://onlystyle.com.ua стильных, современных женщин. Мода, карьера, здоровье, бьюти-тренды, фитнес, лайфхаки, вдохновение. Будь в курсе, живи ярко, выбирай смело. Никаких скучных статей — только драйв, стиль и реальная польза.
Модный журнал https://psilocybe-larvae.com всё о стиле, трендах, бьюти-новинках, звёздах и вдохновении. Образы с подиумов, советы стилистов, актуальные коллекции, мода улиц и мировые бренды.
The live chat feature makes games social.
aviator game
I have read a few just right stuff here. Certainly
worth bookmarking for revisiting. I wonder how much effort you set to create any such excellent informative website.
Admiring the time and effort you put into your site and in depth information you present.
It’s good to come across a blog every once in a while that isn’t the same unwanted rehashed information. Great read!
I’ve bookmarked your site and I’m adding your RSS feeds to my
Google account.
The slot animations are so fun to watch!
sugar rush
It is perfect time to make some plans for the
future and it’s time to be happy. I’ve read this submit and if I could
I desire to suggest you some interesting issues or
advice. Maybe you could write subsequent articles regarding this article.
I want to read more things approximately it!
Hi! Do you use Twitter? I’d like to follow you if that would
be okay. I’m undoubtedly enjoying your blog and look forward to
new posts.
Online roulette with live dealers is immersive.
plinko opinie
Hey there! I could have sworn I’ve been to this website before but after reading through some
of the post I realized it’s new to me. Nonetheless, I’m definitely happy I found it and I’ll be book-marking and checking back frequently!
Won some cash on roulette last week, feeling lucky!
fishing frenzy slots
I’m gone to convey my little brother, that he should also go to see this weblog on regular
basis to take updated from hottest news update.
Hmm it looks like your site ate my first comment (it
was super long) so I guess I’ll just sum it up what I had written and
say, I’m thoroughly enjoying your blog. I too am an aspiring blog writer but I’m still new to the whole thing.
Do you have any helpful hints for newbie blog writers?
I’d definitely appreciate it.
Online casinos make withdrawals so smooth.
betclic ci
What’s good boys! I’m Jason, and I just discovered this awesome gay chat at BubiChat.
️
Low-key, I was lonely in my DMs when I stumbled on this
wild chatroom. 100x better than those sketchy dating apps!
At BubiChat, you can:
Trade nudes with jacked guys RIGHT NOW
No paywalls – just down-to-earth dudes
Stay discreet if you’re closeted
Slide into my DMs there and let’s swap stories! Who knows
we’ll link up?
Pro tip: It’s free to join – no “premium upgrade” scams, just fun guys like us.
Don’t ghost me, daddy! I’m waiting at https://bubichat.com/gay-chat/
XOXO,
Dylan
Online slots with extra features are the best.
aviator
You actually make it appear so easy along with your presentation however I to
find this topic to be actually something which I think I might never understand.
It kind of feels too complicated and extremely huge for me.
I’m taking a look forward for your subsequent put up, I’ll
attempt to get the hang of it!
Hey there, I think your site might be having browser compatibility issues.
When I look at your blog in Safari, it looks
fine but when opening in Internet Explorer, it has some overlapping.
I just wanted to give you a quick heads up! Other then that, amazing blog!
Wow, wonderful blog layout! How long have you been blogging for?
you made blogging look easy. The overall look of your web site is magnificent,
let alone the content!
The slot jackpots are always tempting!
plinko
Профессиональный массаж Ивантеевка: для спины, шеи, поясницы, при остеохондрозе и сколиозе. Медицинский и спортивный подход, опытные специалисты, точечное воздействие. Снятие болей, восстановление подвижности, улучшение самочувствия.
Онлайн-портал для женщин https://rpl.net.ua всё о жизни, стиле, здоровье, отношениях, карьере, детях, красоте и вдохновении. Полезные статьи, советы, идеи и актуальные темы.
Online casinos have the best game variety.
sava spin
Way cool! Some extremely valid points! I appreciate you penning this
write-up plus the rest of the site is very good.
Женский онлайн-портал https://sweaterok.com.ua это не просто сайт, а поддержка в повседневной жизни. Честные темы, важные вопросы, советы и тепло. От эмоций до материнства, от тела до мыслей.
The live dealer baccarat game is top-notch.
plinko game
Somebody necessarily assist to make critically articles I might
state. That is the first time I frequented your website page and up to now?
I surprised with the research you made to make this particular publish amazing.
Wonderful process!
The game filters make it easy to find games.
aviator app
My coder is trying to convince me to move to .net from
PHP. I have always disliked the idea because of the expenses.
But he’s tryiong none the less. I’ve been using WordPress on a variety of websites for
about a year and am concerned about switching to another platform.
I have heard excellent things about blogengine.net.
Is there a way I can transfer all my wordpress posts into it?
Any kind of help would be greatly appreciated!
The free play mode is great for practice.
doradobet peru
Very nice article. I certainly appreciate this site. Continue the good work!
If some one desires to be updated with most up-to-date
technologies afterward he must be pay a visit this web page and be up to date daily.
The casino site is so easy to navigate.
qual o melhor horario para jogar fortune mouse
Онлайн-журнал для женщин https://tiamo.rv.ua которые ищут баланс. Психология, эмоции, отношения, самоценность, женское здоровье. Честные тексты, поддержка, путь к себе. Пространство, где можно дышать глубже, читать с удовольствием и чувствовать, что тебя понимают.
Женский онлайн-журнал https://trendy.in.ua о выборе, деньгах, успехе и личных целях. Как совмещать карьеру и семью, строить бизнес, говорить “нет” и заботиться о себе. Истории, советы, интервью, вдохновение. Для тех, кто идёт вперёд — в своих темпах и с опорой на себя.
Онлайн фитнес-журнал https://bahgorsovet.org.ua полезные статьи от тренеров и нутрициологов: программы тренировок, восстановление, питание, биомеханика, анализ ошибок. Говорим на языке результата. Научный подход без воды — для тех, кто ценит эффективность.
Всё о лечении диабета https://diabet911.com типы заболевания, симптомы, диагностика, питание, образ жизни и лекарственная терапия. Объясняем просто и понятно. Актуальная информация, советы врачей, статьи для пациентов и близких.
What’s up, after reading this awesome paragraph i am also glad to share my experience here with
mates.
Hello, just wanted to mention, I loved this article.
It was helpful. Keep on posting!
That is really interesting, You are an overly skilled blogger.
I have joined your rss feed and look ahead to in quest of more of
your wonderful post. Also, I have shared your site in my
social networks
link porno grafilink porno grafilink porno grafi link porno grafilink porno
grafilink porno grafi link porno grafilink porno grafilink porno grafi link porno grafilink porno
grafilink porno grafi link porno grafilink porno
grafilink porno grafi link porno grafilink porno grafilink porno grafi link porno grafilink porno grafilink porno grafi
link porno grafilink porno grafilink porno grafi link porno grafilink porno grafilink porno
grafi link porno grafilink porno grafilink
porno grafi link porno grafilink porno grafilink porno grafi link porno grafilink porno
grafilink porno grafi link porno grafilink porno grafilink porno grafi link porno grafilink porno
grafilink porno grafi link porno grafilink porno grafilink porno grafi link porno grafilink porno grafilink porno grafi
link porno grafilink porno grafilink porno grafi link porno
grafilink porno grafilink porno grafi link porno grafilink porno grafilink porno
grafi link porno grafilink porno grafilink
porno grafi link porno grafilink porno grafilink porno grafi link porno grafilink porno grafilink porno grafi link porno grafilink porno grafilink porno grafi link porno grafilink porno grafilink porno grafi link porno grafilink porno grafilink porno grafi link porno grafilink porno grafilink porno grafi
link porno grafilink porno grafilink porno grafi link porno
grafilink porno grafilink porno grafi link porno grafilink porno grafilink porno
grafi link porno grafilink porno grafilink porno
grafi link porno grafilink porno grafilink porno grafi link porno grafilink porno grafilink
porno grafi link porno grafilink porno grafilink porno grafi link porno grafilink porno grafilink porno grafi
link porno grafilink porno grafilink porno grafi
link porno grafilink porno grafilink porno grafi link porno grafilink porno grafilink porno grafi link porno grafilink porno grafilink porno
grafi link porno grafilink porno grafilink porno grafi link porno grafilink porno grafilink porno grafi link porno grafilink porno grafilink porno grafi link porno grafilink porno grafilink porno grafi
link porno grafilink porno grafilink porno grafi link
porno grafilink porno grafilink porno grafi link porno grafilink porno grafilink porno grafi link porno grafilink
porno grafilink porno grafi link porno grafilink porno grafilink porno grafi link porno grafilink
porno grafilink porno grafi link porno grafilink porno grafilink porno grafi link porno grafilink porno grafilink porno grafi link porno
grafilink porno grafilink porno grafi link porno grafilink porno grafilink porno grafi link porno grafilink porno grafilink porno grafi link porno
grafilink porno grafilink porno grafi link porno grafilink porno grafilink porno grafi link porno
grafilink porno grafilink porno grafi link porno grafilink porno grafilink porno grafi link porno grafilink porno grafilink porno grafi link porno grafilink
porno grafilink porno grafi link porno grafilink porno grafilink porno grafi link
porno grafilink porno grafilink porno grafi link porno grafilink porno grafilink porno grafi link porno grafilink porno grafilink porno grafi
Hello! This is kind of off topic but I need some help from an established blog.
Is it tough to set up your own blog? I’m not very techincal but I can figure things out
pretty fast. I’m thinking about creating my own but I’m
not sure where to begin. Do you have any ideas or suggestions?
Thanks
The mobile casino site is super responsive.
sugar rush demo
You really make it seem so easy with your presentation but
I find this topic to be really something that I think I would never understand.
It seems too complicated and extremely broad for
me. I’m looking forward for your next post, I will try to
get the hang of it!
The live baccarat table is so sleek!
plinko demo
Hi, I do think this is an excellent blog. I stumbledupon it 😉 I am
going to revisit once again since i have bookmarked it.
Money and freedom is the best way to change, may you be rich
and continue to guide other people.
Thanks to my father who stated to me on the topic of this
website, this weblog is genuinely remarkable.
Hello, its pleasant post about media print, we all be
aware of media is a great source of facts.
Love the new slot games released weekly!
plinko game
Thanks in support of sharing such a fastidious opinion, post is fastidious, thats why i have read it completely
magnificent submit, very informative. I ponder why the opposite experts of this sector don’t realize this.
You should continue your writing. I’m sure, you’ve a great readers’ base already!
My casino’s VIP program is so rewarding.
fishin frenzy heyspin
купить готовый реферат https://referatymarketing.ru
диплом написать сделать диплом
Online slots with bonus features are awesome.
plinko opinie
I appreciate, cause I discovered just what I used
to be taking a look for. You’ve ended my 4 day long hunt!
God Bless you man. Have a nice day. Bye
Hi there to every body, it’s my first visit of this website; this
blog carries remarkable and actually good material in support of readers.
The game filters on my casino site are super helpful.
plinko demo
Сайт о здоровье глаз https://eyecenter.com.ua полезные статьи, советы офтальмологов, симптомы заболеваний, диагностика, лечение, упражнения для зрения. Всё о профилактике, коррекции, очках, линзах и современных методах восстановления.
Сайт для женщин https://expertlaw.com.ua которые любят моду, красоту и стильную жизнь. Актуальные тренды, советы по уходу, подбор образов, вдохновляющие идеи для гардероба и макияжа.
Have you ever considered writing an ebook or guest authoring on other sites?
I have a blog centered on the same information you discuss and would love to have you share some stories/information.
I know my visitors would enjoy your work. If you’re even remotely interested, feel free to shoot me an e-mail.
Wow, this post is nice, my younger sister is analyzing these
things, thus I am going to tell her.
Побываете текущий сайт https://artparcos.com/producto/africana
Love the music in online slot games!
sava spin
Why viewers still use to read news papers when in this technological globe all is
presented on web?
Hello, i think that i saw you visited my blog thus i came to “return the favor”.I’m attempting
to find things to enhance my web site!I suppose its ok to use a few of your ideas!!
Online casinos have clear game guides.
plinko
I’ve been browsing online more than 4 hours today, yet I never found any interesting article like yours.
It is pretty worth enough for me. In my view, if all webmasters and bloggers made good content as you did, the internet will be a lot more useful than ever before.
Let’s attempt to make that the norm when we’ve been given this amazing
planet-extensive archive of data, with close to real-time access.
To take advantage of a sign-up offer, you will normally have to put down a small deposit (often £10) before you’ll be able to entry the sum of free
bets. Take a look at our checklist of the best websites for football betting the place we clarify
one of the best site to make use of for each sort of wager.
It’s suggested that you employ the credit score stability in accordance with the phrases of the bookmaker.
However, there are specific terms and situations linked
with one of the best betting provides in the UK. With the vast majority of free bet presents having every week
lengthy expiration date (seven days), it’s always advised to carefully learn the terms and situations of any promotional offer to know the expiry date
of your free guess. This eye-popping welcome provide is one in all the biggest within the sports betting trade.
One factor I really like about HN is that the moderation generally does
a wonderful job. One in all the most typical mistakes made
by novice punters is to assume each staff is all
the time enjoying at its best. Where can one discover company register?
Got a weekly bonus, keeps me playing.
book of dead spiele
My spouse and I absolutely love your blog and find
a lot of your post’s to be exactly I’m looking for.
Do you offer guest writers to write content for you personally?
I wouldn’t mind creating a post or elaborating on many of the subjects you write
in relation to here. Again, awesome weblog!
Hi to every one, it’s truly a pleasant for me to pay a visit this web site, it includes valuable Information.
The mobile casino site is super responsive.
plinko igra
Do you have a spam issue on this blog; I also
am a blogger, and I was wondering your situation; many of us have
created some nice procedures and we are looking to trade solutions with other folks, be
sure to shoot me an e-mail if interested.
Thanks on your marvelous posting! I really enjoyed
reading it, you might be a great author. I will be sure
to bookmark your blog and will often come back in the foreseeable future.
I want to encourage yourself to continue your great posts,
have a nice morning!
Thanks designed for sharing such a fastidious thinking,
piece of writing is pleasant, thats why i have read it completely
Got a cashback deal, really helpful.
aviator predictor
Does your website have a contact page? I’m having problems locating it but, I’d like to send you
an e-mail. I’ve got some recommendations for your blog you
might be interested in hearing. Either way, great blog and I look
forward to seeing it grow over time.
Hi there everyone, it’s my first pay a visit at this web site, and piece of writing is in fact fruitful for me, keep up posting such posts.
Online casinos are perfect for casual players.
fortune tiger blaze
Heya i’m for the first time here. I came across this board and I
find It truly useful & it helped me out much.
I hope to give something back and aid others like you helped
me.
Wonderful, what a webpage it is! This weblog presents helpful facts to us, keep it up.
Hello there! I know this is kinda off topic however I’d figured I’d ask.
Would you be interested in trading links or maybe guest authoring a blog post or vice-versa?
My site goes over a lot of the same subjects as
yours and I think we could greatly benefit from each other.
If you are interested feel free to send me an e-mail.
I look forward to hearing from you! Great blog by the way!
Love the new slot themes every month!
bac bo
Good post! We are linking to this particularly great content on our website.
Keep up the great writing.
That is really fascinating, You are a very professional
blogger. I have joined your rss feed and look forward to
in quest of more of your wonderful post. Additionally, I have shared your website
in my social networks
Online casinos make withdrawals so smooth.
plinko
Hello! I know this is kind of off-topic but I needed to ask.
Does running a well-established website like yours require
a massive amount work? I am completely new to running
a blog however I do write in my diary on a daily basis.
I’d like to start a blog so I can easily share my personal experience and feelings online.
Please let me know if you have any kind of suggestions or tips for new aspiring bloggers.
Thankyou!
Playing roulette online is so convenient.
plinko
whoah this weblog is fantastic i love studying your posts.
Keep up the good work! You already know, many individuals are
hunting round for this information, you could aid them
greatly.
I think this is among the most important information for
me. And i’m glad reading your article. But wanna remark on some general things, The website
style is wonderful, the articles is really nice : D.
Good job, cheers
The slot jackpots are always tempting!
fortune tiger
After I originally commented I appear to have clicked on the -Notify me
when new comments are added- checkbox and now every time a comment is added I recieve four emails
with the exact same comment. Perhaps there is a means
you are able to remove me from that service? Many thanks!
The deposit bonuses are always generous.
aviator game
Admiring the commitment you put into your blog and in depth information you offer.
It’s great to come across a blog every once in a while that isn’t the same unwanted rehashed material.
Fantastic read! I’ve bookmarked your site and I’m adding your RSS feeds
to my Google account.
I am sure this piece of writing has touched
all the internet people, its really really fastidious post on building up new
website.
Stunning story there. What occurred after? Take care!
Hi there colleagues, how is the whole thing, and what you would like to say on the topic of this post, in my
view its actually remarkable designed for me.
Your mode of telling everything in this paragraph is in fact good, every one be able to effortlessly understand it, Thanks a lot.
Won a tournament prize, such a thrill!
plinko opinie
Triangle Billiards & Bar Stools
1471 Nisson Ꮢd, Tustin,
CA 92780, United Stateѕ
+17147715380
Game Table Cons
Greetings from Ohio! I’m bored to tears at work so
I decided to check out your blog on my iphone during lunch break.
I enjoy the info you provide here and can’t wait to take a look
when I get home. I’m amazed at how fast your blog loaded on my
mobile .. I’m not even using WIFI, just 3G .. Anyhow, good site!
Hello, after reading this awesome paragraph i am as well delighted to share my know-how here with mates.
Продажа арматуры – это наш основной вид деятельности. Мы предлагаем огромный ассортимент арматуры, которая используется в различных сферах строительства. У нас вы сможете в любом обьеме найти https://smk116.ru/product-category/armatura/ как уголок, так и арматуру. Вся наша продукция отличается высоким качеством и надежностью. Мы сотрудничаем только с проверенными производителями, поэтому вы можете быть уверены в качестве нашей арматуры. Кроме того, мы предлагаем гибкую систему скидок для постоянных клиентов и строительных компаний. Если у вас возникли вопросы, наши специалисты всегда готовы помочь вам с выбором арматуры и предоставить профессиональную консультацию.
Dans le vaste monde de Dofus Unity, chasse au tresor dofus unity représente une aventure incontournable pour les joueurs cherchant à récolter des récompenses uniques et améliorer leur expérience de jeu.
I used to be recommended this blog by means of my cousin. I am no
longer certain whether or not this post is written through him as nobody else
realize such exact about my problem. You are amazing! Thanks!
Thanks a lot. I like this.
Also visit my web page … https://dev.dhf.icu/alenawetter486
Love the seasonal casino bonuses, so fun!
savaspin
Excellent post. I used to be checking constantly this blog and I am
impressed! Very useful info specifically the final phase
🙂 I deal with such information a lot. I was seeking this certain information for a long time.
Thanks and best of luck.
Hi! I just wanted to ask if you ever have any problems with hackers?
My last blog (wordpress) was hacked and I ended up losing many months of hard work due to
no back up. Do you have any methods to protect against hackers?
The casino app is always reliable.
aviator
Rochester Concrete Products
7200 N Broadway Ave,
Rochester, MN 55906, United Ⴝtates
18005352375
Concrete landscape product maintenance Tips (https://go.bubbl.us)
Tried a crypto casino, transactions were instant!
plinko
Hurrah, that’s what I was looking for, what a
stuff! present here at this web site, thanks admin of this web site.
Todo mundo ama o que vocês tendem a estar fazendo.
Esse tipo de trabalho inteligente e cobertura!
Continuem com os excelentes trabalhos, pessoal. Eu incluí vocês
no meu próprio blogroll.
However, if you’re a citizen of the United States, you’ll nonetheless need a doctor’s prescription to buy Viagra on-line or at a neighborhood pharmacy.
However, research is still very restricted. Despite the wide research into treatment choices,
the cause of ED continues to be comparatively
unknown. As with just about every study involving acetyl-L-carnitine,
more analysis is needed. Nevertheless, PDE5 inhibitors already marketed
for erectile dysfunction and pulmonary arterial hypertension are undergoing analysis in several
conditions reminiscent of resistant hypertension, myocardial infarction,
heart failure, intermittent claudication, Raynaud’s phenomenon, chronic kidney illness, and diabetes mellitus as
a result of our higher appreciation of their broad physiological properties.
In addition, OTC remedies can have unsafe interactions with medications chances are you’ll take for
ED or for other conditions. Implants are generally reserved for cases
of ED that do not respond to medications. Are you having
relationship issues or feeling depressed? A 2013 assessment showed that combining ED treatments that
include these medications with nitrates or alpha-blockers
could cause problems. The FDA doesn’t regulate dietary supplements in the identical manner
as OTC or prescription medications.
Heya! I just wanted to ask if you ever have any trouble with hackers?
My last blog (wordpress) was hacked and I ended up losing many months of hard work
due to no backup. Do you have any solutions to stop
hackers?
Got a weekly bonus, keeps me playing.
aviator pin up
Hi! I just wanted to ask if you ever have any trouble
with hackers? My last blog (wordpress) was hacked and I ended
up losing many months of hard work due to no data backup.
Do you have any solutions to protect against
hackers?
Very nice post. I just stumbled upon your weblog and wished to say that I
have really enjoyed surfing around your
blog posts. In any case I’ll be subscribing to your
rss feed and I hope you write again soon!
The slot animations are so engaging!
plinko
I was pretty pleased to find this site. I want to to thank
you for your time due to this wonderful read!! I definitely loved every little bit of it and I have you book marked to see
new things in your blog.
Having said that, substantially like the rest of the
My blog :: https://git.holzhakker.de/arafurman7725
My brother suggested I might like this blog. He was once entirely right.
This publish actually made my day. You cann’t believe just how much time I had spent for this info!
Thank you!
The slot animations are so engaging!
tiger fortune demo
I am really impressed with your writing skills and
also with the layout on your blog. Is this a paid theme or did
you customize it yourself? Anyway keep up the nice quality writing, it’s rare
to see a great blog like this one nowadays.
Piece of writing writing is also a fun, if you be familiar with after that you can write if not
it is difficult to write.
This is key because a lot of other penis enlargement
systems only focus on the exercises but the reality is that there’s
a missing component and that’s the biochemical reaction that happens in the body naturally during puberty.
People may experience side effects, such as an allergic reaction. Penis Enlargement Bible provides you with a comprehensive program infused
with natural, effective male enhancement techniques that spark a biochemical reaction that encourages
added growth – the same biochemical reaction that caused your penis to grow when you hit puberty.
It uses traction to stretch your penis. You do not need
any kind of lubricant in the length stretch exercise as you need a
firm grip so the penis should be dry, as much as possible.
This creates the illusion of a larger penis. It creates a slight arch
at the base of your penis. During a V-Y advancement,
a surgeon creates an incision above the base of your penis.
During the procedure, a surgeon makes a small cut above your penis.
Online casinos have better rewards than I thought.
plinko game
Hi, i think that i saw you visited my site so i came to “return the
favor”.I’m attempting to find things to enhance my
web site!I suppose its ok to use a few of your ideas!!
You should take part in a contest for one of the finest sites on the internet.
I most certainly will recommend this web site!
Stay informed with the latest World events. Every day, journalists around the world cover
Health updates that shape our future.
From Education reforms, we’re seeing constant innovation. Topics like Entertainment buzz dominate headlines
and influence public opinion.
You can explore in-depth stories on Breaking news in real time.
The world is evolving, and so are the issues we face—from Climate crisis to Technology trends.
Our team brings you exclusive updates from Health
updates. Whether it’s Political updates, you’ll find balanced coverage here.
Explore interactive reports that dive into the rise of
Technology trends. In times of rapid change,
World events can impact everyday lives.
We’re constantly updating with Breaking news on Economic trends and
live reactions to Health updates. The pulse of the world
beats through Education reforms.
Stay ahead by following our coverage of Political updates and more.
Great website you have here but I was wondering if you knew of
any user discussion forums that cover the same topics talked about here?
I’d really love to be a part of community where I can get
responses from other knowledgeable people that share the same interest.
If you have any suggestions, please let me know.
Kudos!
Online casinos are perfect for quick fun.
aviator app
I loved as much as you will receive carried out right here.
The sketch is tasteful, your authored material stylish.
nonetheless, you command get bought an impatience over that you wish be delivering the following.
unwell unquestionably come more formerly again as exactly the
same nearly very often inside case you shield this increase.
The free mode helped me learn new games.
mines aposta
I was curious if you ever thought of changing the page layout of your website?
Its very well written; I love what youve got to say.
But maybe you could a little more in the way of content so people could
connect with it better. Youve got an awful lot of text
for only having one or two pictures. Maybe you could space it out better?
Hmm is anyone else having problems with the images on this
blog loading? I’m trying to figure out if its a problem on my end or if it’s the
blog. Any feedback would be greatly appreciated.
I’ve been exploring for a bit for any high quality articles or weblog posts
in this kind of area . Exploring in Yahoo I eventually stumbled upon this web site.
Studying this information So i am satisfied to express
that I have a very good uncanny feeling I discovered exactly what
I needed. I most indisputably will make certain to
don?t fail to remember this website and provides it a glance on a relentless basis.
It’s going to be ending of mine day, however before ending I am
reading this impressive article to improve my know-how.
Howdy! This is my 1st comment here so I just wanted to give a quick shout out and tell you I really enjoy reading your blog posts.
Can you suggest any other blogs/websites/forums that cover the
same topics? Thanks a ton!
The slot animations are so engaging!
gates of olympus
Great blog here! Also your website loads up fast!
What web host are you using? Can I get your affiliate
link to your host? I wish my website loaded up as fast as yours lol
Hi, I would like to subscribe for this blog
to take most recent updates, thus where can i do it
please help out.
Appreciate the recommendation. Will try it out.
Oh my goodness! Amazing article dude! Thank you so much, However I am encountering issues with your RSS.
I don’t understand the reason why I am unable to join it.
Is there anybody else getting similar RSS issues? Anyone who knows the
answer will you kindly respond? Thanks!!
Online slots with bonus features are awesome.
plinko
Hi there, this weekend is nice in favor of me, because this moment i am reading this fantastic educational piece of writing here at my house.
Online casinos are perfect for quick gaming sessions.
fortune mouse demo
Vậy là đã hoàn thành xong cách tải video trên Youtube
về iPhone với phần mềm Jungle.
The bonus conditions are clear and fair.
fortune tiger
Excellent goods from you, man. I’ve understand your stuff previous to and you’re just too
great. I actually like what you have acquired here, certainly
like what you’re saying and the way in which you say it.
You make it enjoyable and you still take care of to keep it wise.
I can not wait to read far more from you. This
is actually a great site.
Check out my blog; Unovegas Toto
Tried a new casino, and their VIP program is great.
sugar rush
you are really a excellent webmaster. The website loading
speed is amazing. It kind of feels that you are doing any
unique trick. Moreover, The contents are masterpiece. you have performed a excellent task on this matter!
Wow, marvelous blog format! How long have you been blogging for?
you make running a blog look easy. The whole glance of your website is excellent, as smartly as the content!
Incredible story there. What occurred after? Take care!
The game variety keeps it exciting every time.
fortune mouse
Why visitors still use to read news papers when in this technological world everything is available on net?
Hey, I think your blog might be having browser compatibility issues.
When I look at your website in Safari, it looks fine but when opening in Internet Explorer, it has some overlapping.
I just wanted to give you a quick heads up!
Other then that, very good blog!
Howdy! Would you mind if I share your blog with my twitter group?
There’s a lot of folks that I think would really appreciate
your content. Please let me know. Thanks
The slot animations are so engaging!
plinko ?????
Hello! This is my first comment here so I just wanted to give a
quick shout out and tell you I truly enjoy reading through your articles.
Can you recommend any other blogs/websites/forums that deal with the same topics?
Thanks for your time!
Excellent article! We are linking to this
great post on our site. Keep up the great writing.
Great blog! Do you have any helpful hints for aspiring writers?
I’m planning to start my own blog soon but I’m a little lost on everything.
Would you advise starting with a free platform like WordPress or go for a
paid option? There are so many options out there that I’m completely confused ..
Any suggestions? Kudos!
Love the new game providers they added.
plinko
Сайт о мужском здоровье https://kakbog.com достоверная информация о гормональном фоне, потенции, урологических проблемах, профилактике, питании и образе жизни. Советы врачей, диагностика, лечение, препараты.
Thanks. Awesome information.
Современный медицинский портал https://medfactor.com.ua с упором на технологии: телемедицина, онлайн-запись, цифровые карты, расшифровка анализов, подбор препаратов. Удобный доступ к информации и поддержка на всех этапах — от симптомов до выздоровления.
The bonus terms are fair and easy to follow.
plinko
Perfectly voiced indeed! !
My coder is trying to persuade me to move to .net from PHP.
I have always disliked the idea because of the costs.
But he’s tryiong none the less. I’ve been using WordPress on a variety of websites for about
a year and am anxious about switching to another platform.
I have heard great things about blogengine.net. Is there a
way I can transfer all my wordpress content into it?
Any kind of help would be greatly appreciated!
Thanks a lot for sharing this with all of us you really know what you’re speaking approximately!
Bookmarked. Kindly also visit my website =). We will have a hyperlink exchange arrangement among us
Now I am going to do my breakfast, afterward having my breakfast coming
yet again to read additional news.
The bonus conditions are clear and fair.
plinko gambling game
My brother suggested I may like this website.
He was totally right. This submit actually made my day. You cann’t consider just how much time I had spent
for this information! Thanks!
The casino site is so easy to navigate.
mines aposta
Ahaa, é uma boa discussão a respeito deste parágrafo
neste lugar neste site, eu li tudo isso, então agora eu também estou comentando aqui.
I was recommended this website by my cousin. I’m not sure whether this post is
written by him as nobody else know such detailed about my problem.
You’re wonderful! Thanks!
Побываете этот веб-сайт https://www.ntw.ie/orielnerve/hand-painted-kitchen-with-walnut-island/handpainted-kitchen-walnut-island-3/#main/
Somebody necessarily help to make seriously articles I would state.
That is the very first time I frequented your website page and
thus far? I surprised with the research you made
to make this particular submit amazing. Excellent
activity!
If some one wants expert view about blogging and site-building
after that i recommend him/herto pay a visit this weblog, Keep up the good job.
Won a tournament prize, such a thrill!
jackpot raider
I don’t even know the way I stopped up here,
however I believed this submit was great.
I do not know who you might be however definitely you’re going to a well-known blogger
should you are not already. Cheers!
The casino app runs perfectly.
plinko casino
We are a group of volunteers and starting a new scheme in our community.
Your web site offered us with valuable info to work on. You have done
a formidable job and our entire community will be thankful to you.
Hey there! Quick question that’s completely off topic. Do you know how to
make your site mobile friendly? My web site looks weird when viewing from my iphone4.
I’m trying to find a theme or plugin that might be able to resolve this issue.
If you have any suggestions, please share. Cheers!
Online casinos have clear rules for all games.
plinko
Wonderful beat ! I wish to apprentice while you amend your web site,
how could i subscribe for a blog site? The account
helped me a acceptable deal. I had been a little
bit familiar of this your broadcast provided vibrant clear concept
Hmm is anyone else having problems with the
images on this blog loading? I’m trying to figure
out if its a problem on my end or if it’s the
blog. Any feed-back would be greatly appreciated.
My casino’s support is always helpful.
aplikacja plinko
Hi there, its pleasant article regarding media print, we all know media is a enormous
source of information.
Надёжный медицинский портал https://pobedilivmeste.org.ua с удобной навигацией и актуальной информацией. Болезни, симптомы, приёмы врачей, анализы, исследования, препараты и рекомендации.
Мужской портал https://realman.com.ua всё, что интересно и полезно: спорт, здоровье, стиль, авто, отношения, технологии, карьера и отдых. Практичные советы, обзоры, мнения и поддержка.
Кулинарные рецепты https://kulinaria.com.ua на каждый день и для особых случаев. Домашняя выпечка, супы, салаты, десерты, блюда из мяса и овощей. Простые пошаговые инструкции, доступные ингредиенты и душевные вкусы.
Сайт для мужчин https://phizmat.org.ua всё о жизни с характером: здоровье, спорт, стиль, авто, карьера, отношения, технологии. Полезные советы, обзоры, мужской взгляд на важные темы.
Online casinos have better rewards than I thought.
bet on red casino no deposit bonus
인사드립니다! 이건 좀 주제에서 벗어나지만, 물어보고 싶었습니다.
링크를 교환하거나 게스트 글를 작성하는 데 관심 있으신가요?
제 웹사이트는 당신과 같은 토픽을 다루고 있어서 서로에게
큰 도움이 될 거라고 믿습니다. 관심 있으시면 이메일을 보내주세요.
당신에게서 소식을 기다립니다! 대단한 블로그입니다!
Piece of writing writing is also a excitement,
if you know afterward you can write if not it is complicated to write.
Got a weekly bonus, keeps me playing.
aviator demo
My partner and I absolutely love your blog and find a lot of your post’s to be exactly what I’m looking for.
can you offer guest writers to write content to suit your needs?
I wouldn’t mind creating a post or elaborating on most of the subjects you write in relation to
here. Again, awesome web log!
What You Should Be Focusing On Enhancing Tiktokpornstar Tiktok pornstar
Love the new game providers they added.
dragon tiger
Pretty element of content. I just stumbled upon your web site and in accession capital to claim that I
acquire in fact enjoyed account your blog posts. Anyway I will be subscribing on your augment and even I success you
get admission to persistently rapidly.
Post writing is also a excitement, if you know afterward you can write or else it is complicated to write.
Online casinos are perfect for quick sessions.
aviator
I used to be recommended this web site by my cousin. I’m no longer sure
whether this submit is written by means of him as no one else realize such designated approximately my difficulty.
You’re wonderful! Thank you!
Ищете идеальную квартиру в Москве или Подмосковье?
У нас есть предложения, которые вас
удивят! Живите в сердце столицы с развитой инфраструктурой, или выберите
уютные районы Подмосковья для
спокойной жизни. Мы предлагаем
широкий выбор квартир: от современных студий
до просторных семейных апартаментов.
Наша команда специалистов поможет вам найти именно то,
что нужно, учитывая все
ваши пожелания и бюджет. Не
упустите шанс стать владельцем жилья мечты!
Звоните, и мы подберем лучшие варианты для вас!
Живите там, где вам комфортно!
ЖК «Лаврушинский от Sminex – цены на квартиры от застройщика
Wow, this piece of writing is good, my sister
is analyzing these things, therefore I am going to let know her.
I do not know if it’s just me or if perhaps everybody else encountering problems with your site.
It appears as if some of the written text on your posts are running off
the screen. Can somebody else please comment and let
me know if this is happening to them as well?
This could be a issue with my browser because I’ve had this happen before.
Thanks
My casino’s VIP program is so rewarding.
plinko oszusci
Новостной портал https://sensus.org.ua главные события дня в России и мире. Политика, экономика, общество, культура, спорт и технологии. Только проверенные факты, оперативные сводки, мнения экспертов и честная подача.
медицинский портал https://pobedilivmeste.org.ua с удобной навигацией и актуальной информацией. Болезни, симптомы, приёмы врачей, анализы, исследования, препараты и рекомендации.
Awesome! Its in fact amazing paragraph, I have got much clear idea regarding from this
article.
The casino app runs perfectly every time.
betclic
Hi there colleagues, pleasant piece of writing and pleasant arguments
commented at this place, I am in fact enjoying by these.
Мастерская улыбок – стоматологическая клиника с широким спектром услуг.
У нас вы можете получить квалифицированную помощь имплантация зубов цены
по уходу за полостью рта, лечению кариеса, удалению зубов и многим другим услугам.
Мы используем только современные материалы и оборудование, чтобы обеспечить высокое качество работы.
Также у нас есть опытные специалисты, которые всегда готовы помочь вам.
Запишитесь на прием уже сегодня и начните улыбаться с уверенностью!
Hello! Quick question that’s totally off topic. Do you know how to make your site mobile
friendly? My website looks weird when viewing from my apple iphone.
I’m trying to find a template or plugin that might be able to correct this problem.
If you have any suggestions, please share. Thanks!
Live baccarat online is my new obsession, so elegant!
book of dead spiele
I really like your blog.. very nice colors & theme. Did you create this
website yourself or did you hire someone to do it for
you? Plz answer back as I’m looking to construct my own blog
and would like to find out where u got this from.
thanks
With havin so much content do you ever run into any problems
of plagorism or copyright violation? My site has a lot of completely unique content I’ve either written myself or outsourced but it seems a
lot of it is popping it up all over the web without my agreement.
Do you know any solutions to help reduce content from being stolen? I’d really appreciate
it.
The bonus terms are fair and easy to follow.
jackpot raider
We are a gaggle of volunteers and starting a new scheme in our community.
Your website offered us with valuable info to work
on. You have performed a formidable job and our entire community will be grateful to you.
Got a cashback deal, really helpful.
fortune tiger blaze
Hi! I could have sworn I’ve been to this website before but after browsing through some of
the post I realized it’s new to me. Nonetheless,
I’m definitely delighted I found it and I’ll be book-marking
and checking back often!
Unquestionably imagine that that you said. Your favourite reason appeared to be at the internet
the easiest factor to consider of. I say to you, I definitely
get irked at the same time as other folks think about concerns that they plainly don’t understand about.
You managed to hit the nail upon the top as well as defined out the entire thing without having side
effect , folks could take a signal. Will likely be
back to get more. Thanks
If some one needs expert view about blogging and site-building then i suggest him/her to go to
see this weblog, Keep up the nice work.
What’s up, this weekend is pleasant in favor of me, as this occasion i am reading this enormous educational article
here at my house.
Got a reload bonus, love the extra playtime.
vincispin
получить микрозайм онлайн оформить займ онлайн
Magnificent goods from you, man. I’ve understand your stuff previous to and you are just too magnificent.
I really like what you have acquired here, certainly like what you are stating and the
way in which you say it. You make it entertaining and you
still take care of to keep it smart. I can not wait
to read far more from you. This is really a tremendous web site.
Noten musik klavier noten von klavier
Опсуимолог: Высшая ступень личностного роста для лидеров
Вы достигли того уровня, когда стандартные подходы больше не дают результата. Ваши решения влияют на миллионы, но кто поможет вам принять правильное решение для себя?
Опсуимолог — это эксклюзивный синтез философии, психологии, коучинга и системно-феноменологической психотерапии для тех, кто принимает решения глобального масштаба.
Что вы получаете:
Целостный подход к решению сложных жизненных и бизнес-задач
Глубинную трансформацию мышления вместо поверхностных техник
Системный взгляд на ваши личные и профессиональные вызовы
Доступ к методологии, проверенной лидерами мирового уровня
Почему опсуимолог, а не классические методы:
Психолог поможет понять прошлое. Коуч покажет путь к цели. Философ расширит картину мира. Терапевт исцелит раны.
Опсуимолог делает всё это одновременно, учитывая уникальный контекст вашей жизни и бизнеса.
Инвестиция в работу с опсуимологом — это инвестиция в принципиально новое качество мышления и жизни, доступное только для тех, кто готов к настоящему прорыву.
Индивидуальные сессии по предварительной записи.
https://batmanapollo.ru/
Live dealer games make me feel in a real casino.
aviator game
Truly no matter if someone doesn’t know afterward its
up to other viewers that they will assist, so here it occurs.
Tried a crypto deposit, it was instant!
betflare
My brother recommended I may like this blog.
He was totally right. This publish actually made my
day. You can not believe just how a lot time I had spent for this info!
Thank you!
The live chat in games is so interactive.
aviator
I loved as much as you’ll receive carried out right here.
The sketch is tasteful, your authored material stylish.
nonetheless, you command get got an nervousness over that you wish be delivering the following.
unwell unquestionably come more formerly again as exactly the same nearly a lot often inside case you
shield this hike.
Online poker tournaments are so competitive!
plinko demo
I really like your blog.. very nice colors & theme.
Did you create this website yourself or did you hire someone to do
it for you? Plz reply as I’m looking to construct my
own blog and would like to find out where u got this from.
cheers
Я очень доволен, что прочитал эту статью. Она оказалась настоящим открытием для меня. Информация была представлена в увлекательной и понятной форме, и я получил много новых знаний. Спасибо автору за такое удивительное чтение!
My casino app never crashes, super reliable.
aviator pin up
magnificent publish, very informative. I wonder why the opposite experts of this sector don’t notice this.
You should proceed your writing. I’m sure, you’ve a huge readers’ base already!
The game variety keeps it exciting every time.
plinko oszusci
Hello, I enjoy reading through your article post.
I wanted to write a little comment to support you.
I used to be able to find good info from your blog articles.
Online casinos are great for casual gaming.
plinko gambling game
We are a gaggle of volunteers and starting a brand new scheme in our community.
Your website provided us with useful info to work on. You’ve done an impressive job and our entire community will likely be thankful to you.
Feel free to surf to my blog post :: ซื้อหวยออนไลน์
Have you ever considered creating an ebook or guest authoring on other blogs?
I have a blog based upon on the same topics you discuss and would really like to have you share some stories/information. I know my subscribers would value
your work. If you are even remotely interested, feel free to
shoot me an e mail.
Online slots with bonus features are awesome.
jackpot raider
Thank you for the auspicious writeup. It in fact was a amusement account it.
Look advanced to more added agreeable from you!
By the way, how can we communicate?
Online slots with extra spins are the best!
savaspin
Hi there! I just wish to give you a huge thumbs up for your
great information you’ve got here on this post. I’ll be coming back to your web site for more soon.
I do not even know how I ended up here, but I thought this post was great.
I don’t know who you are but certainly you are going to
a famous blogger if you are not already 😉 Cheers!
Online poker is so intense and fun!
fortune ox demo
SaveTweet suporta uma ampla variedade de formatos de vídeo, incluindo MP4, AVI
e MOV, dando a você a liberdade de escolher o formato que melhor atende às suas necessidades.
Incredible quest there. What happened after? Good
luck!
Online casinos have awesome welcome offers.
fortune tiger pin up
hi!,I really like your writing so much! percentage we keep in touch more about your post on AOL?
I need a specialist on this area to solve my problem.
May be that is you! Having a look forward to see you.
Online casinos make deposits super secure.
plinko
payday loan
Online casinos make withdrawals so smooth.
aviator demo
Hello, just wanted to tell you, I loved this article.
It was helpful. Keep on posting!
Online casinos are perfect for small bets.
aviator game
Kudos! Ample material.
The bonus conditions are fair and clear.
gates of olympus
Hi there just wanted to give you a quick heads up.
The text in your post seem to be running off the screen in Chrome.
I’m not sure if this is a formatting issue or something to do with browser
compatibility but I thought I’d post to let you know.
The design and style look great though! Hope you get the
problem resolved soon. Many thanks
Hello! I simply want to offer you a huge thumbs up for the excellent info you’ve got here on this post.
I will be coming back to your web site for more soon.
Посетите текущий сайт https://www.manorhousesouthampton.co.uk/cropped-img_3739-jpg/
The slot graphics make every spin fun!
aviator
It’s wonderful that you are getting ideas from this post as well as from our argument
made at this time.
buy viagra online
If you desire to increase your familiarity just keep visiting this web page and be
updated with the hottest news posted here.
I have to thank you for the efforts you’ve put in penning this blog.
I am hoping to view the same high-grade content from
you later on as well. In fact, your creative writing abilities has encouraged me to get my own, personal website now 😉
A person necessarily lend a hand to make significantly articles I would state.
That is the very first time I frequented your
website page and thus far? I amazed with the analysis you made to
make this particular submit incredible. Fantastic activity!
magnificent points altogether, you simply gained a new reader.
What may you recommend in regards to your publish that you just made a few days in the past?
Any certain?
Nice post. I learn something new and challenging on blogs
I stumbleupon on a daily basis. It’s always useful
to read through articles from other authors and use a little something from other websites.
The casino’s mobile site is flawless.
codigo promocional pin up
This blog was… how do I say it? Relevant!! Finally I’ve found something which helped me.
Many thanks!
Ahaa, its fastidious conversation regarding this article here at this website,
I have read all that, so at this time me also commenting at this place.
Online slots with high RTP are my favorite.
plinko demo
It’s remarkable in support of me to have a web page, which
is helpful in favor of my experience. thanks admin
The casino app is always reliable.
gransino casino no deposit bonus
Hi, I do think this is an excellent website. I stumbledupon it
😉 I am going to come back yet again since i have saved as a favorite it.
Money and freedom is the best way to change, may you be rich and continue to
help others.
Online casinos make gaming so convenient.
code promo betclic
В каком месяце рождаются самые талантливые дети?
https://x.com/kiselev_igr/status/1924362696201289947
Hi there, this weekend is pleasant for me, because this occasion i am reading this wonderful educational
piece of writing here at my residence.
Online casinos have so many great games.
plinko gambling game
E2bet là nhà cái uy tín hàng đầu Châu Á với nhiều sản phẩm hấp dẫn như: Cá
cược thể thao, đá gà, casino,… Bạn có thể đăng ký tài khoản dễ dàng và nhanh chóng,
quick loans
This is very interesting, You are an excessively skilled blogger.
I’ve joined your feed and look ahead to looking for extra of your fantastic post.
Additionally, I have shared your site in my social networks
The game variety keeps it exciting every time.
jackpot raider casino
Login Soho303 : Soho303
The live baccarat game feels so luxe!
sava spin
I am genuinely glad to glance at this web site posts which carries plenty
of valuable data, thanks for providing these information.
I just could not leave your site prior to suggesting that I really loved the standard info a person supply to your visitors?
Is gonna be back regularly in order to check up on new posts
Does your website have a contact page? I’m
having trouble locating it but, I’d like to shoot you an e-mail.
I’ve got some creative ideas for your blog you might be interested in hearing.
Either way, great website and I look forward to seeing it
develop over time.
Online casinos make withdrawals so easy.
mr pacho best bonus casino
Today, I went to the beachfront with my kids.
I found a sea shell and gave it to my 4 year old daughter and
said “You can hear the ocean if you put this to your ear.” She placed the shell to her
ear and screamed. There was a hermit crab inside and it pinched her ear.
She never wants to go back! LoL I know this is completely off topic
but I had to tell someone!
The bonus terms are straightforward.
fortune ox
Simply wish to say your article is as astonishing. The clearness in your
post is just great and that i can think you
are a professional in this subject. Well together with your permission allow me to snatch your feed
to keep updated with coming near near post. Thanks one
million and please continue the rewarding work.
быстрый займ займ кредит
Very quickly this web page will be famous among all blogging viewers, due
to it’s fastidious articles
The payout process was super quick.
aviator spribe
I always emailed this weblog post page to all my contacts, because if like to read it then my contacts will too.
Love the soundtracks in online slots!
vincispin codigo promocional
6 alarming signs that you are aging much faster than you should https://x.com/MKids3447/status/1924407233980272883
Love the interactive features in live games.
gates of olympus
Hey there just wanted to give you a quick heads up. The words
in your content seem to be running off the screen in Internet explorer.
I’m not sure if this is a format issue or something to
do with browser compatibility but I thought I’d post to let you know.
The design and style look great though! Hope you get
the problem fixed soon. Cheers
Ahaa, its good dialogue on the topic of this post at this place at this weblog, I have
read all that, so at this time me also commenting at this place.
Online poker tournaments are so exciting!
juego de las minas
You actually explained it well.
Great post! We will be linking to this great article on our website.
Keep up the great writing.
I’ve been betting on cricket matches for years, and E2Bet has been my favorite platform.
The live odds updates make the experience thrilling.
Absolutely love it!
Link exchange is nothing else but it is just placing the other person’s web site link on your page at suitable
place and other person will also do similar in support of you.
Love the new game releases every week!
fortune mouse demo
I am genuinely thankful to the owner of this
site who has shared this enormous paragraph at at this place.
The game variety keeps it exciting every time.
plinko demo
With thanks, I appreciate this.
Online casinos are perfect for casual players.
plinko
I got this web page from my buddy who told me on the
topic of this web site and now this time I am browsing this website and reading very informative articles here.
Hello everyone, it’s my first go to see at this website, and article is in fact fruitful in favor
of me, keep up posting these types of articles or reviews.
Love the new game releases every week!
juego de minas
Very nice article, totally what I wanted to find.
Ноты на пианино песни ноты скачать
Love the seasonal casino bonuses, so fun!
plinko
Путешествуйте по региону экскурсии в Калининграде с гидом с опытными гидами.
Excellent post. I was checking constantly this weblog and I am inspired!
Very useful information particularly the remaining section 🙂 I handle such information much.
I used to be seeking this particular information for a long time.
Thanks and good luck.
What’s up to every body, it’s my first visit
of this weblog; this webpage consists of remarkable
and in fact fine material in support of visitors.
Fantastic website. Lots of useful info here. I am sending it to
several friends ans additionally sharing in delicious.
And naturally, thank you in your sweat!
Love the music in online slot games!
bet on red casino no deposit bonus
Appreciate the recommendation. Let me try it out.
Fantastic goods from you, man. I’ve take note your
stuff previous to and you’re simply too great. I actually like what you have received right here, certainly like what you are
saying and the way in which during which
you say it. You’re making it enjoyable and you continue to care for
to stay it sensible. I cant wait to learn far more from you.
That is actually a terrific web site.
Hmm it appears like your site ate my first comment (it was super long) so I guess I’ll just sum it up
what I submitted and say, I’m thoroughly enjoying your blog.
I as well am an aspiring blog blogger but I’m still new to
the whole thing. Do you have any tips and hints for rookie blog writers?
I’d genuinely appreciate it.
Excellent beat ! I would like to apprentice at
the same time as you amend your web site, how can i subscribe for a weblog website?
The account aided me a applicable deal. I were a little bit acquainted of this your broadcast offered vibrant transparent idea
Online casinos make it easy to track my spending.
mines game
Thank you, I have just been looking for info approximately this topic for ages and yours is
the best I have discovered so far. But, what concerning the conclusion? Are you certain in regards to the source?
Very nice post. I simply stumbled upon your blog and
wished to say that I have truly enjoyed surfing around your blog posts.
After all I will be subscribing for your rss feed and I am hoping you
write once more soon!
Regards, A good amount of forum posts!
Online casinos have great responsible gaming features.
jackpot raider
Außerdem lässt sich die Qualität und der Typ eines YouTube-Videos besser erkennen.
It’s perfect time to make some plans for the future and it’s time to be happy.
I’ve read this post and if I could I desire to suggest you some interesting things or suggestions.
Perhaps you could write next articles referring to this article.
I wish to read even more things about it!
We stumbled over here coming from a different web page and
thought I may as well check things out. I like what I see so now i am following you.
Look forward to looking into your web page for a
second time.
The free mode helped me learn new games.
aviator bet
This paragraph gives clear idea for the
new visitors of blogging, that really how to do blogging.
На нашем сайте вы найдёте открытки с пожеланиями для любого случая. Яркие изображения, тёплые слова, праздничное настроение и стильный дизайн. Поделитесь эмоциями с близкими и сделайте каждый день особенным. Обновления каждый день, удобный формат, всё бесплатно!
Good site you’ve got here.. It’s hard to find quality writing like
yours nowadays. I really appreciate individuals like
you! Take care!!
What you published made a bunch of sense. However, what about this?
suppose you composed a catchier post title? I ain’t suggesting
your content isn’t good, but what if you added a post title to maybe
grab folk’s attention? I mean Raspberry PI TFT Screen /
USB Bitcoin Miner is kinda boring. You might look at Yahoo’s
home page and note how they create article titles to get viewers to click.
You might add a related video or a picture or two to grab readers interested about everything’ve got
to say. Just my opinion, it could bring your posts a little bit more interesting.
Love the seasonal casino events, so festive!
betflare casino
Ꭰon’t be neⲭt – follow our advice ɑnd learn how to
һave а beautiful lawn ԝithout hurting youгself. Ꮃhile
аt the beցinning of the relationship is seems “as if” yоur bond іs
indeed wonderful, ԝith time іt becomes an unhealthy οne.
It excits us and plays ԝith ⲟur emotions – wirh fear bing
᧐ne of ᧐ur mοѕt ѕignificant.
I simply could not depart your website prior to
suggesting that I extremely enjoyed the usual information an individual supply to your guests?
Is gonna be back ceaselessly in order to check up on new posts
Online slots with high RTP are my favorite.
andar bahar
Right here is the perfect site for everyone who
would like to understand this topic. You realize a whole lot its almost tough to argue with you (not that I actually would want to…HaHa).
You definitely put a new spin on a topic that’s been written about for decades.
Excellent stuff, just excellent!
Online casinos have better bonuses than physical ones.
gates of olympus demo
Woah! I’m really digging the template/theme of this site.
It’s simple, yet effective. A lot of times it’s very
difficult to get that “perfect balance” between usability and visual appearance.
I must say that you’ve done a superb job with this.
In addition, the blog loads extremely quick for me on Opera.
Exceptional Blog!
My family members every time ssay that I am killing my time here at net, but I know I am
getting experience every day by reading thes nice
articles oor reviews.
Love the new slot games every month!
dragon tiger game
Howdy! Do you know if they make any plugins to protect against hackers?
I’m kinda paranoid about losing everything I’ve worked hard
on. Any suggestions?
Great weblog right here! Also your web site quite a bit up
fast! What host are you using? Can I get your affiliate hyperlink in your host?
I want my web site loaded up as quickly as yours lol
Online casinos make withdrawals so smooth.
plinko
Howdy this is kinda of off topic but I was wanting
to know if blogs use WYSIWYG editors or if you have to manually code with HTML.
I’m starting a blog soon but have no coding knowledge so
I wanted to get advice from someone with experience.
Any help would be greatly appreciated!
It’s in fact very complex in this full of
activity life to listen news on TV, so I just use internet for that reason, and obtain the
most up-to-date news.
I visited various web pages except the audio quality for audio songs current at this site is in fact wonderful.
Online casinos are great for low budgets.
minas demo
Right now it appears like WordPress is the top blogging platform out there right now.
(from what I’ve read) Is that what you are using on your blog?
Online casinos make gaming so convenient.
plinko
7 Early Signs of Diabetes You Should Never Ignore https://x.com/MKids3447/status/1924532500853879013
What a data of un-ambiguity and preserveness of precious familiarity concerning unpredicted feelings.
Won a small prize, online casinos are great!
plinko
Terrific facts, Appreciate it!
Hey there just wanted to give you a quick heads up. The text in your content seem to be
running off the screen in Safari. I’m not sure if this
is a formatting issue or something to do with browser compatibility but I figured I’d post to let you know.
The style and design look great though! Hope you get the issue fixed soon. Cheers
Я не могу не отметить качество исследования, представленного в этой статье. Автор использовал надежные источники и предоставил нам актуальную информацию. Большое спасибо за такой надежный и информативный материал!
https://x.com/MKids3447/status/1924537181625884985
Love the new game releases every week!
jackpot raider
Livee 2 Β Healthy
Bloomington, Minneapolis 55402, United Ꮪtates
16124200445
Mental and physical fitness for older adults
Signs Your Relationship Is Emotionally Draining — And What to Do About It https://x.com/MKids3447/status/1924539973920800787
Online casinos make deposits super secure.
plinko demo
Hello, I enjoy reading all of your article. I like to write a little comment to support you.
The payout process was super quick.
plinko
What i do not understood is in reality how you’re now not really much more well-favored than you
may be now. You’re very intelligent. You already know thus significantly in relation to this subject,
produced me for my part consider it from numerous varied angles.
Its like men and women aren’t fascinated until it is one thing to
accomplish with Girl gaga! Your own stuffs outstanding.
At all times take care of it up!
Feel free to visit my web blog; real estate agent Boise ID
I like reading a post that can make men and
women think. Also, many thanks for allowing me
to comment!
Online poker tournaments are so intense!
plinko
реферат купить онлайн купить реферат цена
дипломная работа срочно на заказ сайты для написания диплома
keflex 125mg canada order СЃephalexin 750 mg online
сephalexin canada
7 ранних признаков диабета, которые нельзя игнорировать
https://x.com/MKids3447/status/1924562291757899808
The casino app is super smooth.
jackpot raider
Ahaa, its good discussion concerning this paragraph here at this website, I have
read all that, so now me also commenting at this place.
Побываете этот веб-сайт https://kijo-digital.com/2024/12/05/the-cost-of-website-design-in-cape-town-what-to-expect-in-2024/
Pretty great post. I just stumbled upon your blog and wanted to mention that I have truly enjoyed browsing
your weblog posts. After all I will be subscribing on your feed
and I’m hoping you write once more very soon!
I’ve been surfing online more than 2 hours today, yet I never found any interesting article like yours.
It is pretty worth enough for me. In my opinion, if all web owners and bloggers made good content as you did, the internet will be a lot more
useful than ever before.
Also visit my web blog: best real estate agent in Bedford NH
Love the soundtracks in online slots!
betflare
Everyone loves what you guys are up too. This type of clever work and coverage!
Keep up the great works guys I’ve incorporated you guys to my blogroll.
Hi my loved one! I want to say that this article is amazing, great written and include almost all important infos.
I’d like to peer more posts like this .
Everything is very open with a precise explanation of the issues.
It was truly informative. Your website is very useful.
Thanks for sharing!
Love the new game releases every week!
aviator bet
I don’t even know how I ended up here, but I thought this post was great.
I don’t know who you are but certainly you’re going to a famous
blogger if you are not already 😉 Cheers!
Also visit my web site best real estate agent in Wildwood Crest NJ
Hey just wanted to give you a quick heads up and let you know
a few of the images aren’t loading correctly. I’m not sure why but I
think its a linking issue. I’ve tried it in two different internet browsers
and both show the same outcome.
my web blog – best real estate agent in Springfield OR
hello!,I love your writing so much! percentage we communicate more approximately your article on AOL?
I require an expert on this area to solve my problem. May be that is you!
Looking ahead to look you.
Online casinos are perfect for casual players.
aviator
Hi there I am so happy I found your blog page, I really
found you by accident, while I was searching on Google for something else, Nonetheless I am here now and would just like
to say kudos for a marvelous post and a all round
enjoyable blog (I also love the theme/design), I don’t have time to read through it all at the moment but I have bookmarked
it and also added in your RSS feeds, so when I have time I will be back to read a
great deal more, Please do keep up the superb b.
Also visit my webpage; best real estate agent in Wildwood Crest NJ
Wow, this article is fastidious, my sister is analyzing these kinds of things, so I am going to inform her.
my web site – realtor in Springfield OR
cheap сephalexin 250mg СЃephalexin 500mg canada
keflex 250 mg cost
Got a weekly bonus, keeps me engaged.
jogo plinko
The live baccarat game feels so luxe!
mr pacho
I think that is one of the most important information for me.
And i am glad studying your article. But should observation on few normal things,
The website style is perfect, the articles is really excellent
: D. Excellent job, cheers
Ahaa, its nice conversation about this article at
this place at this web site, I have read all that, so at this time me also commenting at this place.
Good information. Lucky me I found your blog by chance (stumbleupon).
I have book marked it for later!
Incredible story there. What happened after?
Take care!
My page – best realtor in McDonough GA
Hi there, I believe your website may be having internet browser compatibility problems.
Whenever I take a look at your blog in Safari, it looks
fine but when opening in IE, it has some overlapping issues.
I just wanted to give you a quick heads up! Besides that, excellent blog!
my webpage realtor in Springfield OR
The live dealer blackjack table is awesome!
pinup
I am really grateful to the holder of this web page who has shared this fantastic piece of writing at at this time.
This article will help the internet people for building up new weblog or even a blog from start to end.
Интернет-магазины Apple в Москве в столице
сыграли важную роль, ознакомив многочисленную и малознакомую публику
по всему миру с понятием гармонии функциональности, стиля, качества и,
при этом, интуитивного управления.
Эти характеристики на протяжении многих лет продолжают делать уникальными по сравнению с аналогами, начиная со старых моделей Macintosh,
а затем и iPod, MacBook Air, iPhone, iPad, MacBook Pro, а
также ряд других уникальных
товаров Apple на российском рынке.
Заметим, для объективности,
необходимо также признать, что большинство
новинок были по-настоящему новаторскими в своей отрасли
и не знали на момент создания каких-либо конкурентов.
Впрочем, этот факт – это,
скорее, ещё одно из десятков и сотен преимуществ,
которыми по праву обладает продукция Apple в Москве (Эпл), и
это результат посвящённого труда команды талантливых специалистов,
посвятивших и продолжающих посвящать свою жизнь созданию удобных, стильных и
эффективных продуктов. https://macuser.ua/search?word=%D1%81%D0%BA%D0%BE%D0%BB%D1%8C%D0%BA%D0%BE+%D1%81%D1%82%D0%BE%D0%B8%D1%82+%D1%8D%D0%BF%D0%BF%D0%BB+%D0%B0%D1%80%D0%B1%D0%B0%D1%82
I must thank you for the efforts you’ve put in penning this website.
I’m hoping to check out the same high-grade content by you later
on as well. In fact, your creative writing abilities has motivated me to get my own, personal website
now 😉
my webpage – real estate agent Tucson AZ
Mega – это универсальная платформа, выходящая за рамки стандартного шопинга.
Стоит подчеркнуть, площадка мега предлагает акции, скидки и возможность участвовать в аукционах.
Hello are using WordPress for your site platform?
I’m new to the blog world but I’m trying to get started and create my own. Do you need
any coding expertise to make your own blog? Any help would be
greatly appreciated!
When someone writes an post he/she maintains the image of a user in his/her mind that how a
user can understand it. Thus that’s why this post is great.
Thanks!
Hello, after reading this amazing paragraph i am too delighted to share my knowledge here with friends.
Feel free to visit my blog – http://7-5-6.com/yoga/?wptouch_switch=desktop&redirect=http://mebel-avgust.ru/otzyvy-klientov.html%3Fview=vitabook
Online casinos have clear game guides.
plinko
Love the soundtracks in online slots!
pin-up dragon tiger
Terrific article! This is the kind of information that are supposed to be shared across the
net. Shame on the seek engines for now not positioning
this submit upper! Come on over and seek advice from my website .
Thank you =)
I every time used to read paragraph in news papers but
now as I am a user of web thus from now I am using net for content, thanks to web.
Here is my web blog :: best real estate agent in Anaheim CA
The casino app is fast and reliable.
juego de minas para ganar dinero
Pretty! This has been an extremely wonderful post.
Thanks for supplying this information.
It’s very easy to find out any topic on web as compared
to textbooks, as I found this paragraph at this site.
Magnificent beat ! I would like to apprentice while you amend
your web site, how could i subscribe for a blog web site? The account aided me a acceptable
deal. I had been a little bit acquainted of this your broadcast offered bright clear concept
This information is priceless. When can I find out more?
Here is my homepage – real estate agent Paducah KY
Online casinos have endless game choices.
plinko
Do you have any video of that? I’d care to find out more details.
дырка в натяжном потолке натяжные потолки цена за метр
Love the new slot games every month!
vai debet
Thank you, I have just been searching for info about this subject for ages and
yours is the greatest I have found out so far. However,
what about the conclusion? Are you sure concerning the supply?
Magnificent beat ! I wish to apprentice while
you amend your site, how can i subscribe for a weblog web site?
The account helped me a applicable deal. I had been tiny bit familiar of this your broadcast offered shiny transparent concept
Look into my webpage – real estate agent Fort Lauderdale FL
You actually make it appear really easy with your presentation but I
in finding this matter to be really something that I feel I’d never understand.
It seems too complex and extremely vast for me. I’m having a look forward on your
subsequent publish, I’ll try to get the grasp of it!
Hi, all the time i used to check weblog posts here in the early
hours in the daylight, because i enjoy to gain knowledge of more and more.
Excellent article. I definitely love this website.
Keep it up!
Online casinos have the best game variety.
vipzino
E2Bet
Blog Comment: One of the few betting platforms I trust in Pakistan.
E2Bet offers great security, and their payment methods are
safe and reliable. A 10/10 experience!
I absolutely love your blog.. Very nice colors & theme.
Did you develop this site yourself? Please reply back as I’m
attempting to create my own personal blog and want to find out where you
got this from or just what the theme is called. Cheers!
Playing roulette online is so convenient.
plinko
Greate post. Keep writing such kind of info on your site.
Im really impressed by your blog.
Hey there, You’ve performed an incredible job. I will definitely digg it and in my opinion recommend to my friends.
I’m confident they’ll be benefited from this web site.
Why visitors still make use of to read news papers
when in this technological globe the whole thing is available on net?
Check out my page – best realtor in San Pedro CA
hello!,I like your writing so so much! proportion we keep in touch extra
approximately your post on AOL? I require an expert in this house to resolve my problem.
Maybe that’s you! Having a look forward to peer you.
If some one needs to be updated with hottest technologies therefore he must be pay a quick visit this site and be up to date everyday.
Hello, Neat post. There is a problem with your site in web explorer, might
check this? IE still is the marketplace leader and a
good element of people will omit your wonderful writing due to this problem.
The live dealer baccarat is so professional.
spinmama
На сайте https://parkmotors.ru/ в огромном многообразии находятся шины и диски, двигатель, трансмиссия на Газель. Также представлено и рулевое управление, различные комплектующие на такую технику. Для того чтобы совершить приобретение, необходимо изучить все технические характеристики, особенности выбранного товара, чтобы купить именно то, что нужно. Есть обзоры на определенные товары. Для того чтобы найти что-то определенное, воспользуйтесь специальным поиском. Он значительно облегчит вам задачу.
I’m amazed, I have to admit. Seldom do I come across
a blog that’s both equally educative and engaging,
and let me tell you, you’ve hit the nail on the head.
The issue is an issue that not enough folks are speaking intelligently about.
I am very happy that I found this during my search
for something concerning this.
I have to thank you for the efforts you’ve put in penning this site.
I really hope to view the same high-grade blog posts by you later
on as well. In truth, your creative writing abilities has encouraged
me to get my own, personal website now 😉
Hi to all, how is everything, I think every one is getting
more from this site, and your views are fastidious in support of new
viewers.
I truly love your site.. Very nice colors & theme. Did you create this web site yourself?
Please reply back as I’m wanting to create my own site and want to find out where
you got this from or just what the theme is named.
Thanks!
Great weblog right here! Also your web site quite a bit
up very fast! What web host are you the usage of? Can I am getting
your associate hyperlink on your host? I desire my site loaded up as quickly as yours lol
my website: access control systems NZ
I’m gone to convey my little brother, that he should also visit this blog on regular basis to get updated from most recent information.
My webpage :: Plombier Arlon
Online casinos have so many great games.
aviator
Got a reload bonus, love the extra playtime.
aviator
I’m not sure exactly why but this website is loading extremely slow for me.
Is anyone else having this problem or is it a issue on my
end? I’ll check back later on and see if the problem still exists.
Tried a crypto casino, super convenient!
andar bahar
Hey! Would you mind if I share your blog with my facebook group?
There’s a lot of people that I think would really appreciate your content.
Please let me know. Thank you
Won some money on slots, keeps me going!
plinko
Incredible! i’ve been searching for something similar. i appreciate the
info
Hi there, I found your blog by means of Google at the same time as searching for a comparable topic, your web site got here up, it
seems to be good. I’ve bookmarked it in my google bookmarks.
Hi there, just became aware of your blog via Google, and located that it’s
really informative. I am gonna watch out for brussels. I will be
grateful in case you continue this in future. Many other folks shall be
benefited from your writing. Cheers!
The game selection is always expanding.
plinko ??
This tiny screen is perfect for turning your Raspberry Pi into a portable setup. The display quality is sharp, and the touch response is surprisingly good for the price. Installation was easy, and it works well with most Pi models. Highly recommended for DIY projects!
A fun little device if you’re just getting started with mining. It won’t make you rich, but it’s great for learning how Bitcoin mining works. Easy plug-and-play setup. It does get a bit hot, so using a small fan or heatsink is a good idea.
Good for simple interfaces like weather monitors or Pi-hole dashboards. The screen is a bit small, but it’s bright and responsive. Setup might take a bit of effort for beginners, but once it’s running, it works like a charm.
Don’t expect high profits with this, but it’s a cool device to experiment with. Great for tech enthusiasts or anyone curious about crypto mining. Runs quietly but does heat up over time. Works fine with mining software like CGMiner.
The live baccarat table is so sleek!
plinko
valacyclovir
Won some cash on roulette, love it!
vamos bet
Join Satbayev University and study in one of the most innovative technical universities in Central Asia. Find out how to apply now – https://satbayev.university/
The casino app is super smooth.
vipzino promo code
Hi, I check your blog regularly. Your humoristic style is awesome, keep up the good work!
The live dealer blackjack table is awesome!
плінко
My brother suggested I would possibly like
this web site. He was once totally right. This post truly made my day.
You can not consider simply how so much time I had spent for this info!
Thanks!
Мы предлагаем https://komfortvl.ru/ с гарантией качества, соблюдением сроков и полным сопровождением. Индивидуальный подход, современные материалы и прозрачные цены. Работаем по договору. Закажите бесплатную консультацию и начните комфортный ремонт уже сегодня!
The live baccarat table is so stylish!
spin mama
В этой статье собраны факты, которые освещают целый ряд важных вопросов. Мы стремимся предложить читателям четкую, достоверную информацию, которая поможет сформировать собственное мнение и лучше понять сложные аспекты рассматриваемой темы.
Углубиться в тему – http://schwerkraft.net/featured-artist-shinichiro-yamada
whoah this weblog is wonderful i love studying your articles.
Stay up the good work! You already know, lots of people are searching
round for this information, you can aid them greatly.
Thank you a lot for sharing this with all of us you really realize
what you are speaking about! Bookmarked. Please additionally seek advice from my
site =). We can have a link trade agreement between us
My brother recommended I might like this blog. He was totally
right. This post truly made my day. You cann’t imagine simply how
much time I had spent for this info! Thanks!
Online poker rooms are so thrilling!
application plinko avis
It’s a shame you don’t have a donate button! I’d certainly donate to this excellent blog!
I suppose for now i’ll settle for bookmarking and adding your RSS
feed to my Google account. I look forward to fresh
updates and will talk about this website with my Facebook group.
Talk soon!
buy keflex 250 mg generic cost СЃephalexin 125 mg
buy сephalexin generic
You really make it seem so easy with your presentation but
I find this topic to be really something that I think
I would never understand. It seems too complicated and very broad
for me. I am looking forward for your next post, I will try to get the
hang of it!
сephalexin 750mg price keflex 500mg sale
order сephalexin 125mg online cheap
This excellent website definitely has all the information and facts I wanted concerning
this subject and didn’t know who to ask.
May I simply say what a comfort to discover a person that truly knows what they’re talking about over the internet.
You certainly realize how to bring a problem to light and make
it important. A lot more people should look at this and
understand this side of your story. It’s surprising you aren’t more popular because you certainly
have the gift.
The payout process was quick and easy.
spinmama
На сайте https://villaprestige.ru уточните расписание, когда вы сможете снять виллу «Престиж». Для того чтобы забронировать этот вариант, необходимо обозначить дату заезда и выезда, количество гостей. Уточните и расписание электричек, на которых вы сможете добраться до места. Этот отдых обязательно вдохновит вас на нечто большее. Сделать правильный выбор помогут фотографии этого завораживающего места. Вас ожидает бесплатный Интернет, лаунж-зона, бесплатная парковка. К каждому клиенту индивидуальный подход.
На сайте https://svaib.ru/ уточните расценки на КЖБИ сваи. Это предприятие предлагает качественную и надежную установку практичных, прочных свай КЖБИ. Все работы выполняются без минимальных деформаций, разрушений, спилов, чтобы вы смогли получить безупречный, эталонный результат. Сваи имеют такую важную особенность, что разрабатываются из виброуплотненного бетона, а также прочного армокаркаса. Именно по этой причине сваи будут намного прочнее бетона. На этом же сайте ознакомьтесь с благодарственными письмами от тех компаний, которые уже воспользовались услугами предприятия.
Посетите сайт Котлы и горелки https://kotel-54.ru/ и вы найдете на складе в наличии готовые котельные, электрические котельные, котлы, горелки по низким ценам. Ознакомьтесь с нашим огромным ассортиментом, а доставка осуществляется как по Новосибирску, так и по всей России. У нас можно купить качественные и доступные запчасти для котлов и горелок. Подробнее на сайте.
На сайте https://shemi-otopleniya.ru/ ознакомьтесь с полным ассортиментом товаров, которые выполнены из качественной нержавеющей стали. В ассортименте компании находится гибкая подводка, РВД, подводка для смесителя и многое другое различных размеров, модификации и конфигурации. Именно поэтому вы обязательно приобретете то, что нужно для выполнения определенных работ, ремонта. В разделе можно ознакомиться и с особенностями, техническими характеристиками трехходового крана, медных труб. Вся продукция является сертифицированной, высокого качества.
Very good write-up. I certainly love this site. Keep writing!
hello there and thank you for your information – I’ve certainly picked up anything new from right here.
I did however expertise some technical issues using this web site, since I experienced to reload the site many times previous to I could get it to load properly.
I had been wondering if your web hosting is OK?
Not that I’m complaining, but sluggish loading instances times
will sometimes affect your placement in google and can damage your
high quality score if advertising and marketing with Adwords.
Well I’m adding this RSS to my e-mail and could look out for a lot more of
your respective exciting content. Make sure you update this again very
soon.
I know this if off topic but I’m looking into starting my own blog and was
wondering what all is required to get setup?
I’m assuming having a blog like yours would cost a pretty penny?
I’m not very internet smart so I’m not 100% positive.
Any tips or advice would be greatly appreciated. Many thanks
Look into my homepage; Slots
Этот информативный материал предлагает содержательную информацию по множеству задач и вопросов. Мы призываем вас исследовать различные идеи и факты, обобщая их для более глубокого понимания. Наша цель — сделать обучение доступным и увлекательным.
Получить дополнительную информацию – https://www.setead.org.br/anyone-who-has-never-made-a-mistake-has-never-tried-anything-new
I wanted to thank you for this great read!! I certainly enjoyed every bit of it.
I have got you book marked to check out new things you
post…
You should be a part of a contest for one of the most useful websites on the net.
I most certainly will recommend this blog!
Online casinos are great for casual gaming.
andar bahar game
компания аренда авто аренда авто на сутки
Online casinos have endless game choices.
aviator game
keflex 125 mg tablet order СЃephalexin 250mg pills
cheap keflex 125mg
order keflex 250 mg for sale buy СЃephalexin 125mg online cheap
order generic keflex 125mg
Just desire to say your article is as astounding.
The clarity in your post is just spectacular and i could assume you’re
an expert on this subject. Fine with your permission let me to grab your RSS feed to keep up to date with forthcoming post.
Thanks a million and please continue the gratifying work.
Калипсо – компания, которая развивается динамично. Предлагаем комфортабельные парусники, яхты и катера арендовать. Гарантируем привлекательные цены и индивидуальный подход к абсолютно каждому клиенту. Ваш отдых будет незабываемым. Ищете аренда катера Адлер? Adler.calypso.ooo – здесь разместили информацию о преимуществах сотрудничества с нами. Аренда яхт с нами проще, чем когда-либо. Смогли свою стратегию построить в предоставлении услуг высшего качества. Вы можете нам доверять. С радостью ответим на любые ваши вопросы по телефону. Приключение ваше ждет!
An impressive share! I’ve just forwarded this onto a friend who has been doing a little research
on this. And he in fact bought me dinner due to the fact that
I discovered it for him… lol. So let me reword this….
Thanks for the meal!! But yeah, thanks for spending some time to talk about this subject here on your website.
Feel free to visit my homepage; access control systems
Wonderful blog! I found it while browsing on Yahoo News.
Do you have any tips on how to get listed in Yahoo News?
I’ve been trying for a while but I never seem to get there!
Many thanks
The cashback offers in casinos save me sometimes!
plinko australia
прокат авто без водителя цена аренда авто на неделю
I have learn some excellent stuff here. Definitely value bookmarking for revisiting.
I surprise how so much attempt you put to make one of these
great informative web site.
Wonderful beat ! I would like to apprentice while you amend your web site,
how could i subscribe for a blog web site?
The account aided me a acceptable deal. I had been a
little bit acquainted of this your broadcast provided bright clear idea
Here is my web site: Loodgieter Gent
can lift your mood and improve your outlook.Sitting by the seashore,大型 オナホ おすすめ
Playing roulette online is so smooth and fun.
plinko
Thank you for the auspicious writeup. It in fact was a amusement account
it. Look advanced to far added agreeable from you! However,
how could we communicate?
Функция
Изучить вопрос глубже – https://snyatie-lomki-nnovgorod8.ru/snyatie-lomki-narkomana-v-nnovgorode
with a huge,drooping pompadour,エロオナホ
As the admin of this web page is working, no question very soon it will be
renowned, due to its quality contents.
Online casinos make withdrawals so smooth.
vamos bet
Got a cashback deal, really helpful.
plinko
После поступления звонка врач клиники «Импульс» незамедлительно отправляется на указанный адрес для оказания срочной помощи. Вызов врача на дом включает следующие этапы:
Выяснить больше – нарколог на дом недорого нижний новгород
Посетите текущий веб-сайт https://sbtnt.net/2024/05/20/hello-world/
Ломка – это тяжелый синдром отмены, возникающий после длительного употребления алкоголя или наркотических веществ. При резком прекращении их приема нервная система и другие органы начинают страдать от недостатка необходимых веществ, что приводит к сильному дискомфорту, психоэмоциональным нарушениям и ухудшению общего состояния организма. В Новосибирске наркологическая клиника «Возрождение» оказывает экстренную помощь при снятии ломки, обеспечивая безопасное, круглосуточное и конфиденциальное лечение под наблюдением опытных специалистов.
Подробнее тут – снятие ломки на дому цена
В клинике «Трезвая Жизнь» для эффективного вывода организма из запоя используется комплексный подход, который включает применение различных групп препаратов. Приведенная ниже таблица отражает основные компоненты нашей терапии и их функции:
Выяснить больше – вывод из запоя круглосуточно в екатеринбурге
Симптоматика ломки может варьироваться: от бессонницы, сильной тревожности и раздражительности до выраженных физически болезненных ощущений, таких как мышечные спазмы, судороги, потливость, головокружение и тошнота. В критических ситуациях, когда симптомы достигают остроты, своевременная медицинская помощь становится жизненно необходимой для предотвращения осложнений и стабилизации состояния пациента.
Углубиться в тему – http://snyatie-lomki-novosibirsk8.ru/snyatie-narkoticheskoj-lomki-v-novosibirske/https://snyatie-lomki-novosibirsk8.ru
Именно поэтому так важно не терять время. Чем раньше пациент получает помощь, тем выше шансы избежать необратимых последствий и вернуться к нормальной жизни.
Исследовать вопрос подробнее – snyatie lomki narkozavisimogo podol’sk
Назначение и действие
Получить больше информации – вызвать нарколога на дом
The demo mode is great for learning games.
vipzino bonus code
После поступления звонка врач клиники «Импульс» незамедлительно отправляется на указанный адрес для оказания срочной помощи. Вызов врача на дом включает следующие этапы:
Подробнее тут – вызвать нарколога на дом
Наркологическая клиника «НаркоМед Плюс» в Нижнем Новгороде оказывает экстренную помощь при снятии ломки. Наша команда высококвалифицированных специалистов готова круглосуточно выехать на дом или принять пациента в клинике, обеспечивая оперативное, безопасное и полностью конфиденциальное лечение. Мы разрабатываем индивидуальные программы терапии, учитывая историю зависимости и текущее состояние каждого пациента, что позволяет быстро стабилизировать его состояние и начать процесс полного выздоровления.
Детальнее – снятие наркологической ломки нижний новгород
Got a cashback deal, really helpful.
plinko south africa
Because the admin of this site is working, no question very quickly it will be famous, due to its feature contents.
My coder is trying to persuade me to move to .net from PHP.
I have always disliked the idea because of the costs. But he’s tryiong none the less.
I’ve been using Movable-type on several websites for about a year
and am worried about switching to another platform.
I have heard fantastic things about blogengine.net.
Is there a way I can transfer all my wordpress posts into it?
Any kind of help would be really appreciated!
Live dealer games are so realistic!
super hot fruits
Thanks a lot! I appreciate it!
Наркологическая клиника «НаркоМед Плюс» в Нижнем Новгороде оказывает экстренную помощь при снятии ломки. Наша команда высококвалифицированных специалистов готова круглосуточно выехать на дом или принять пациента в клинике, обеспечивая оперативное, безопасное и полностью конфиденциальное лечение. Мы разрабатываем индивидуальные программы терапии, учитывая историю зависимости и текущее состояние каждого пациента, что позволяет быстро стабилизировать его состояние и начать процесс полного выздоровления.
Ознакомиться с деталями – снятие ломки нарколог нижний новгород
Также мы учитываем потребности каждого пациента — по питанию, условиям проживания, графику процедур. Проживание возможно в стандартных и повышенных палатах, с возможностью индивидуального обслуживания.
Получить дополнительную информацию – http://narkologicheskaya-pomoshch-balashiha1.ru/
https://forum.prosochi.ru/topic49518.html
В стационаре работают узкопрофильные специалисты: наркологи, неврологи, психотерапевты, а также персонал, обеспечивающий круглосуточный уход. Программа включает медикаментозное лечение, психологическую коррекцию, восстановление сна, устранение депрессии, обучение саморегуляции и работу с мотивацией.
Подробнее тут – http://narkologicheskaya-pomoshch-balashiha1.ru
Hello there! I just want to give you a big thumbs
up for your excellent info you have got right here on this post.
I am returning to your web site for more soon.
Feel free to visit my page … real estate agent Tucson AZ
http://ruall.com/sotrudnichestvo/83711-dostavka-tsvetov-moskva-i-mo-million-buketov.html#83711
Назначение
Подробнее тут – капельница от запоя анонимно в новосибирске
Осложнения, к которым может привести отсутствие лечения:
Изучить вопрос глубже – https://snyatie-lomki-podolsk1.ru/snyatie-lomki-narkomana-v-podolske
Лечение ломки в клинике «Эдельвейс» проходит по четко отлаженной схеме, которая учитывает индивидуальные особенности каждого пациента. После первоначального осмотра и сбора анамнеза составляется персональный план терапии, цель которого – как можно быстрее снять симптомы ломки и стабилизировать состояние пациента. Ниже приведен поэтапный алгоритм лечения:
Углубиться в тему – snyatie lomok ekaterinburg
The casino app is super smooth.
vai de bet app
Врачи клиники «Импульс» используют комплексный подход, основанный на проверенных методиках и эффективных препаратах. Основные группы медикаментов, используемых при лечении на дому, представлены в таблице:
Выяснить больше – narcolog-na-dom-nnovgorod8.ru/
This blog was… how do I say it? Relevant!! Finally
I’ve found something which helped me. Thanks!
buy fluconazole 400mg without prescription fluconazole over the counter
cost fluconazole 200 mg
The free mode helped me learn new games.
plinko
https://x-ray.contact/identities/char/A/39891/
Ломка – это тяжелый синдром отмены, возникающий после длительного употребления алкоголя или наркотических веществ. При резком прекращении их приема нервная система и другие органы начинают страдать от недостатка необходимых веществ, что приводит к сильному дискомфорту, психоэмоциональным нарушениям и ухудшению общего состояния организма. В Новосибирске наркологическая клиника «Возрождение» оказывает экстренную помощь при снятии ломки, обеспечивая безопасное, круглосуточное и конфиденциальное лечение под наблюдением опытных специалистов.
Узнать больше – снятие ломки нарколог в новосибирске
https://x-ray.contact/identities/char/R/25471/
This post is genuinely a good one it helps new web viewers, who are wishing for
blogging.
Love the creative casino promotions!
aviator
Также мы учитываем потребности каждого пациента — по питанию, условиям проживания, графику процедур. Проживание возможно в стандартных и повышенных палатах, с возможностью индивидуального обслуживания.
Исследовать вопрос подробнее – анонимная наркологическая помощь балашиха
constantly i used to read smaller articles which also clear their motive,
and that is also happening with this piece of writing which I am reading now.
Looking for buy airline tickets at low prices? euroavia24.com is designed to book airline tickets at favorable prices. The system covers all destinations and offers users a wide selection of flights from various airlines, including both major international carriers and budget airlines. Time and Money Savings: EuroAvia24 automatically compares airfares from multiple airlines, allowing users to instantly find the cheapest options.
Абстинентный синдром — одно из самых тяжёлых и опасных проявлений наркотической зависимости. Он развивается на фоне резкого отказа от приёма веществ и сопровождается сильнейшими нарушениями работы организма. Это состояние требует немедленного вмешательства. Самостоятельно справиться с ним невозможно — особенно если речь идёт о героине, метадоне, синтетических наркотиках или длительной зависимости. В клинике «НаркоПрофи» мы организовали систему снятия ломки в Подольске, работающую круглосуточно: как на дому, так и в условиях стационара.
Исследовать вопрос подробнее – https://snyatie-lomki-podolsk1.ru/snyatie-lomki-narkomana-v-podolske/
Снятие ломки в клинике «Эдельвейс» – это комплекс мероприятий, направленный на быстрое облегчение симптоматики и стабилизацию внутренних процессов организма. Наш подход включает комплексную диагностику, медикаментозную терапию, поддерживающие процедуры и психологическое сопровождение, что помогает пациенту не только справиться с острой фазой ломки, но и закладывает основу для дальнейшей реабилитации и предотвращения рецидивов.
Исследовать вопрос подробнее – https://snyatie-lomki-ekb8.ru/snyatie-lomki-narkolog-v-ekb/
Won a tournament prize, such a thrill!
jogo do touro
Назначение
Изучить вопрос глубже – kapelnicza-ot-zapoya-na-domu novosibirsk
Наши специалисты оказывают экстренную помощь по четко отработанной методике, главная задача которой – оперативное снятие симптомов острой интоксикации и абстинентного синдрома, восстановление работы внутренних органов и создание оптимальных условий для последующей реабилитации. Опытный нарколог на дому проведет тщательную диагностику, составит индивидуальный план лечения и даст необходимые рекомендации по дальнейшему выздоровлению.
Получить дополнительные сведения – нарколог на дом клиника в нижний новгороде
Процесс лечения включает несколько ключевых этапов, каждый из которых имеет решающее значение для восстановления организма:
Выяснить больше – снятие наркологической ломки новосибирск
Online casinos have better rewards than physical ones.
spinmama
Клиника «Возрождение» применяет комплексный подход к снятию ломки, используя современные детоксикационные методики и проверенные препараты. Приведенная ниже таблица демонстрирует основные группы медикаментов, используемых в терапии, и их назначение:
Получить дополнительную информацию – снятие наркотической ломки новосибирск
Online casinos are perfect for quick sessions.
betflare casino
Thank you for the good writeup. It in fact was a amusement account it.
Look advanced to more added agreeable from you! However, how could we communicate?
I was recommended this web site by my cousin. I am not sure whether this post is written by him as no
one else know such detailed about my difficulty. You are incredible!
Thanks!
https://x-ray.contact/identities/francoise-barbieux-email-and-phone/63fb8736c45ae4c13f8cb6d0/
https://x-ray.contact/identities/alexandra-villena-pena-email-and-phone/63fb892fc45ae4c13fbc8d69/
Online casinos have better bonuses than expected.
andar bahar game
Just wish to say your article is as surprising.
The clarity in your post is just nice and i can assume you are an expert
on this subject. Well with your permission let
me to grab your RSS feed to keep up to date with forthcoming post.
Thanks a million and please carry on the enjoyable work.
Here is my homepage – best realtor in Whittier CA
После поступления звонка врач клиники «Импульс» незамедлительно отправляется на указанный адрес для оказания срочной помощи. Вызов врача на дом включает следующие этапы:
Выяснить больше – нарколог на дом нижний новгород
E2bet là nhà cái có kho game phong phú và đa dạng, bao gồm casino, thể thao, đá
gà,… Bạn sẽ có những trải nghiệm tuyệt
vời nhất tại nhà cái khi được bảo mật
Hello there! This post could not be written any better!
Looking through this article reminds me of my previous roommate!
He continually kept preaching about this.
I’ll send this post to him. Pretty sure he’s going to have a very good read.
Thanks for sharing!
Feel free to surf to my page best realtor in Bedford NH
Amazing! Its truly awesome post, I have got much clear idea about from this
paragraph.
My webpage – best real estate agent in McDonough GA
The free play mode is great for practice.
aviator game
Современный темп жизни нередко приводит к ситуации, когда человеку, страдающему от алкогольной или наркотической зависимости, срочно требуется профессиональная медицинская помощь. Особенно актуально это в тех случаях, когда состояние пациента резко ухудшается и поездка в клинику становится невозможной или нежелательной из-за повышенного уровня тревожности. Наркологическая клиника «Импульс» предлагает услугу вызова нарколога на дом в Нижнем Новгороде, обеспечивая круглосуточную помощь на высоком профессиональном уровне. Такое решение позволяет избежать серьезных осложнений и обеспечить комфортные условия лечения в привычной обстановке.
Подробнее тут – вызов нарколога на дом нижний новгород
I am not sure where you are getting your info, but great topic.
I needs to spend some time learning more or understanding more.
Thanks for fantastic information I was looking for this
information for my mission.
Feel free to surf to my web site: realtor in Fort Lauderdale FL
Ломка – это тяжелый синдром отмены, возникающий после длительного употребления алкоголя или наркотических веществ. При резком прекращении их приема нервная система и другие органы начинают страдать от недостатка необходимых веществ, что приводит к сильному дискомфорту, психоэмоциональным нарушениям и ухудшению общего состояния организма. В Новосибирске наркологическая клиника «Возрождение» оказывает экстренную помощь при снятии ломки, обеспечивая безопасное, круглосуточное и конфиденциальное лечение под наблюдением опытных специалистов.
Выяснить больше – снятие ломки на дому новосибирская область
The casino app runs perfectly.
plinko australia
Simply desire to say your article is as amazing.
The clarity on your post is just excellent and i could suppose you’re an expert on this subject.
Well along with your permission let me to take hold of your feed to stay up to date with coming near near post.
Thank you 1,000,000 and please continue the rewarding work.
Также мы учитываем потребности каждого пациента — по питанию, условиям проживания, графику процедур. Проживание возможно в стандартных и повышенных палатах, с возможностью индивидуального обслуживания.
Углубиться в тему – скорая наркологическая помощь московская область
I want to to thank you for this very good read!! I definitely loved every little bit of it.
I have got you book-marked to check out new stuff you post…
you are actually a good webmaster. The site loading pace is amazing.
It kind of feels that you are doing any unique
trick. Moreover, The contents are masterwork.
you’ve performed a fantastic job in this matter!
Stop by my blog post … best real estate agent in Anaheim CA
Также мы учитываем потребности каждого пациента — по питанию, условиям проживания, графику процедур. Проживание возможно в стандартных и повышенных палатах, с возможностью индивидуального обслуживания.
Ознакомиться с деталями – неотложная наркологическая помощь балашиха
Online casinos have great responsible gaming features.
dragon tiger
Наши специалисты оказывают экстренную помощь по четко отработанной методике, главная задача которой – оперативное снятие симптомов острой интоксикации и абстинентного синдрома, восстановление работы внутренних органов и создание оптимальных условий для последующей реабилитации. Опытный нарколог на дому проведет тщательную диагностику, составит индивидуальный план лечения и даст необходимые рекомендации по дальнейшему выздоровлению.
Получить больше информации – нарколог на дом анонимно в нижний новгороде
Задача врачей — не просто облегчить симптомы, а купировать осложнения, стабилизировать жизненно важные функции, вернуть пациенту способность к дальнейшему лечению. Мы работаем быстро, анонимно и профессионально. Любой человек, оказавшийся в кризисе, может получить помощь в течение часа после обращения.
Ознакомиться с деталями – http://snyatie-lomki-podolsk1.ru
constantly i used to read smaller articles which also clear their motive, and that is also
happening with this piece of writing which I am reading
at this place.
Если наблюдаются вышеописанные симптомы, немедленное обращение к наркологу позволяет не только устранить острые проявления, но и предотвратить возможное развитие опасных для жизни осложнений, таких как сердечно-сосудистые сбои или нарушения работы центральной нервной системы.
Выяснить больше – ломка от наркотиков город
Постановка капельницы от запоя проводится при наличии следующих клинических симптомов, свидетельствующих о критическом состоянии организма:
Разобраться лучше – капельница от запоя на дому цена новосибирск
I was recommended this web site by my cousin. I am not sure whether this post is written by him as
nobody else know such detailed about my difficulty. You’re wonderful!
Thanks!
Live dealer games are so realistic!
juego de las minas para ganar dinero
Ломка – это тяжелый синдром отмены, возникающий после длительного употребления алкоголя или наркотических веществ. При резком прекращении их приема нервная система и другие органы начинают страдать от недостатка необходимых веществ, что приводит к сильному дискомфорту, психоэмоциональным нарушениям и ухудшению общего состояния организма. В Новосибирске наркологическая клиника «Возрождение» оказывает экстренную помощь при снятии ломки, обеспечивая безопасное, круглосуточное и конфиденциальное лечение под наблюдением опытных специалистов.
Выяснить больше – снятие ломок на дому новосибирск
I visited various blogs but the audio quality for audio songs current at this site
is really wonderful.
The slot jackpots are always tempting!
plinko
Thanks for sharing your thoughts about situs togel. Regards
Для інтелектуального розвитку та естетичного задоволення чудово підійдуть видання від Answear Bookstore ukrbeautystyle.com.ua. Вони збагачують світогляд та стають стильним елементом інтер’єру.
После поступления звонка врач клиники «Импульс» незамедлительно отправляется на указанный адрес для оказания срочной помощи. Вызов врача на дом включает следующие этапы:
Углубиться в тему – выезд нарколога на дом нижний новгород
Really when someone doesn’t understand afterward its
up to other people that they will help,
so here it takes place.
Современный темп жизни нередко приводит к ситуации, когда человеку, страдающему от алкогольной или наркотической зависимости, срочно требуется профессиональная медицинская помощь. Особенно актуально это в тех случаях, когда состояние пациента резко ухудшается и поездка в клинику становится невозможной или нежелательной из-за повышенного уровня тревожности. Наркологическая клиника «Импульс» предлагает услугу вызова нарколога на дом в Нижнем Новгороде, обеспечивая круглосуточную помощь на высоком профессиональном уровне. Такое решение позволяет избежать серьезных осложнений и обеспечить комфортные условия лечения в привычной обстановке.
Получить дополнительную информацию – http://narcolog-na-dom-nnovgorod8.ru
Online casinos are great for all players.
plinko casino
Hey! Quick question that’s entirely off topic. Do you know how
to make your site mobile friendly? My web site looks weird when viewing from my
iphone 4. I’m trying to find a template or plugin that
might be able to fix this problem. If you have any recommendations,
please share. Thank you!
Hello, of course this piece of writing is actually fastidious and
I have learned lot of things from it on the topic of
blogging. thanks.
My website realtor in San Pedro CA
Have you ever considered about adding a little bit more than just your articles?
I mean, what you say is valuable and everything. Nevertheless just
imagine if you added some great graphics or videos to give your posts more, “pop”!
Your content is excellent but with pics and clips, this blog could undeniably be
one of the very best in its niche. Wonderful blog!
Wow many of wonderful information.
I am sure this piece of writing has touched all the internet viewers, its really
really nice paragraph on building up new web site.
Love the music in online slot games!
plinko demo
Astrologers have announced whose wallet the Universe will replenish by summer https://x.com/MKids3447/status/1924912019582398708
Клиника «НаркоМед Плюс» использует комплексный подход для эффективного снятия симптомов ломки с применением современных методов детоксикации и поддержки организма. Основные группы препаратов включают:
Подробнее можно узнать тут – снятие наркологической ломки
При наличии этих симптомов организм находится в критическом состоянии, и любой промедление с вызовом врача может привести к развитию серьезных осложнений, таких как сердечно-сосудистые нарушения, тяжелые неврологические симптомы или даже жизнеугрожающие состояния. Экстренное вмешательство позволяет не только снять острые симптомы ломки, но и предотвратить необратимые изменения в организме.
Подробнее можно узнать тут – http://snyatie-lomki-novosibirsk8.ru
His reflexes are instinctual and serve to protect him, and all infants are born with the same reflexes.
At the same time, there are some disadvantages you’ll want to keep in mind.
If you are over the age of 45, you should not take any type of penis enlargement drugs at all.
Although chances that pills don’t work for you are less,
there are men who report to have not experienced any change in their penis size
despite taking the pills. With mosaic Klinefelter syndrome (in which tissues are made up of genetically
different cells), males have an extra X chromosome, typically with a
chromosome composition of 47,XXY. Men with this form of the disorder usually have fewer symptoms than do men with
the other chromosomal arrangements associated with Klinefelter syndrome.
One of the most popular oil in the UK is VigRX Oil for men.
A little bit of prep can help make the experience a good one whether you’re flying solo, or on the giving or receiving end of things.
Helping someone achieve one of these mind-blowing orgasms is pretty awesome, too.
There are reports of people having super orgasms, which are a stream of fast, continuous orgasms that cause
the body to shudder.
Именно поэтому так важно не терять время. Чем раньше пациент получает помощь, тем выше шансы избежать необратимых последствий и вернуться к нормальной жизни.
Выяснить больше – снятие наркологической ломки на дому
صندلي تک و عمده زير قيمت منطقه
В стационаре работают узкопрофильные специалисты: наркологи, неврологи, психотерапевты, а также персонал, обеспечивающий круглосуточный уход. Программа включает медикаментозное лечение, психологическую коррекцию, восстановление сна, устранение депрессии, обучение саморегуляции и работу с мотивацией.
Детальнее – неотложная наркологическая помощь
Won big on a slot, online casinos rock!
spin mama
Наши специалисты оказывают экстренную помощь по четко отработанной методике, главная задача которой – оперативное снятие симптомов острой интоксикации и абстинентного синдрома, восстановление работы внутренних органов и создание оптимальных условий для последующей реабилитации. Опытный нарколог на дому проведет тщательную диагностику, составит индивидуальный план лечения и даст необходимые рекомендации по дальнейшему выздоровлению.
Разобраться лучше – вызов нарколога на дом в нижний новгороде
Online casinos have better rewards than I thought.
gransino
I enjoy what you guys are up too. Such clever work and reporting!
Keep up the wonderful works guys I’ve added
you guys to my own blogroll.
Also visit my web-site – best real estate agent in Boise ID
Для обеспечения максимальной безопасности и эффективности лечения процесс организован в несколько этапов. При обращении пациента наши специалисты проводят первичный осмотр и диагностику, чтобы оценить степень интоксикации и выявить возможные осложнения. Далее назначается детоксикационная терапия, сопровождаемая медикаментозной поддержкой и психологическим консультированием. Основные этапы работы можно описать следующим образом:
Подробнее тут – https://vyvod-iz-zapoya-ekb8.ru/vyvod-iz-zapoya-na-domu-v-ekb
The Aviator Game blends air travel with big wins.
Jump into the cockpit and spin through cloudy adventures for massive payouts.
With its classic-inspired design, the game captures the spirit of aircraft legends.
https://www.linkedin.com/posts/robin-kh-150138202_aviator-game-download-activity-7295792143506321408-81HD/
Watch as the plane takes off – cash out before it flies away to secure your rewards.
Featuring instant gameplay and realistic sound effects, it’s a favorite for gambling fans.
Whether you’re chasing wins, Aviator delivers non-stop thrills with every round.
order fluconazole 400mg without prescription fluconazole 150 mg brand
diflucan 100 mg without prescription
Can you tell us more about this? I’d want to find out more details.
Excellent training approaches! Teacher porn is not bad whatsoever.
Клиника «НаркоМед Плюс» использует комплексный подход для эффективного снятия симптомов ломки с применением современных методов детоксикации и поддержки организма. Основные группы препаратов включают:
Подробнее можно узнать тут – http://snyatie-lomki-nnovgorod8.ru/
The game search feature is super handy.
aviator
Ломка – это тяжелый синдром отмены, возникающий после длительного употребления алкоголя или наркотических веществ. При резком прекращении их приема нервная система и другие органы начинают страдать от недостатка необходимых веществ, что приводит к сильному дискомфорту, психоэмоциональным нарушениям и ухудшению общего состояния организма. В Новосибирске наркологическая клиника «Возрождение» оказывает экстренную помощь при снятии ломки, обеспечивая безопасное, круглосуточное и конфиденциальное лечение под наблюдением опытных специалистов.
Выяснить больше – http://snyatie-lomki-novosibirsk8.ru
Tried a crypto casino, super convenient!
plinko casino скачать
Greetings! I know this is somewhat off topic but I was wondering if
you knew where I could locate a captcha plugin for my comment form?
I’m using the same blog platform as yours and I’m
having difficulty finding one? Thanks a lot!
my web page site
Клиника «Возрождение» применяет комплексный подход к снятию ломки, используя современные детоксикационные методики и проверенные препараты. Приведенная ниже таблица демонстрирует основные группы медикаментов, используемых в терапии, и их назначение:
Узнать больше – снятие ломки на дому недорого новосибирск
Необходимо незамедлительно обращаться за медицинской помощью, если у пациента наблюдаются следующие симптомы:
Разобраться лучше – снятие ломки на дому новосибирская область
You’re so cool! I don’t suppose I’ve read something like that before.
So good to find another person with a few unique thoughts on this subject matter.
Seriously.. thank you for starting this up.
This web site is one thing that is required on the
internet, someone with a bit of originality!
my web site real estate agent Springfield OR
Играешь в Fallout 76? Хочешь купить шмот Fallout 76? Широкий ассортимент предметов, включая силовую броню, легендарное оружие, хлам, схемы и многое другое для Fallout 76 на PC, Xbox и PlayStation. Мы предлагаем услуги буста, прокачки персонажа и готовые комплекты снаряжения.
При наличии этих симптомов организм находится в критическом состоянии, и любой промедление с вызовом врача может привести к развитию серьезных осложнений, таких как сердечно-сосудистые нарушения, тяжелые неврологические симптомы или даже жизнеугрожающие состояния. Экстренное вмешательство позволяет не только снять острые симптомы ломки, но и предотвратить необратимые изменения в организме.
Разобраться лучше – http://snyatie-lomki-novosibirsk8.ru/snyatie-lomki-na-domu-v-novosibirske/
Компания Финэксперт специализируется на предоставлении профессиональных бухгалтерских
услуг для предприятий малого и среднего бизнеса.
Мы берем на себя все заботы, связанные с учетом и отчетностью, позволяя
вам сосредоточиться на развитии своего дела.
Мы предлагаем следующие услуги сдача налоговой отчетности
Мы ценим каждого клиента и стремимся
к долгосрочному сотрудничеству.
Hi there! I know this is somewhat off topic but I was wondering which blog platform are you using for this website?
I’m getting fed up of WordPress because I’ve had issues with
hackers and I’m looking at options for another platform.
I would be great if you could point me in the direction of
a good platform.
Here is my site … best real estate agent in Boise ID
The live dealer blackjack table is awesome!
bet on red
Также мы учитываем потребности каждого пациента — по питанию, условиям проживания, графику процедур. Проживание возможно в стандартных и повышенных палатах, с возможностью индивидуального обслуживания.
Узнать больше – https://narkologicheskaya-pomoshch-balashiha1.ru/kruglosutochnaya-narkologicheskaya-pomoshch-v-balashihe
The bonus terms are straightforward.
mines game
Hello, Neat post. There is a problem along with your website in internet explorer, may check
this? IE nonetheless is the market chief and a good part of folks will pass over
your excellent writing due to this problem.
Как отмечает главный врач клиники, кандидат медицинских наук Сергей Иванов, «мы создали систему, при которой пациент получает помощь в течение часа — независимо от дня недели и времени суток. Это принципиально меняет шансы на выздоровление».
Изучить вопрос глубже – http://narkologicheskaya-pomoshch-balashiha1.ru/skoraya-narkologicheskaya-pomoshch-v-balashihe/
Одной из самых сильных сторон нашей клиники является оперативность. Мы понимаем, что при алкоголизме, наркомании и лекарственной зависимости часто требуются немедленные действия. Если человек находится в состоянии запоя, абстиненции или передозировки, промедление может привести к тяжёлым осложнениям или даже смерти.
Подробнее тут – срочная наркологическая помощь
Именно поэтому так важно не терять время. Чем раньше пациент получает помощь, тем выше шансы избежать необратимых последствий и вернуться к нормальной жизни.
Получить больше информации – снятие ломки на дому подольск
Online casinos make withdrawals so smooth.
aviator 1xbet
Hello! I know this is somewhat off-topic however I had to ask.
Does operating a well-established blog like yours require a large amount of
work? I am brand new to writing a blog however I do write in my diary every day.
I’d like to start a blog so I will be able to share my experience and feelings online.
Please let me know if you have any recommendations or tips for
new aspiring blog owners. Appreciate it!
Just want to say your article is as surprising. The clarity in your submit is simply cool and
i could suppose you’re an expert on this subject.
Well together with your permission allow me to take hold of your feed to stay up to date
with approaching post. Thanks a million and please carry on the gratifying work.
Here is my homepage: real estate agent Fort Lauderdale FL
Tried a crypto deposit, it was instant!
mr pacho best bonus casino
Наркологическая клиника «НаркоМед Плюс» в Нижнем Новгороде оказывает экстренную помощь при снятии ломки. Наша команда высококвалифицированных специалистов готова круглосуточно выехать на дом или принять пациента в клинике, обеспечивая оперативное, безопасное и полностью конфиденциальное лечение. Мы разрабатываем индивидуальные программы терапии, учитывая историю зависимости и текущее состояние каждого пациента, что позволяет быстро стабилизировать его состояние и начать процесс полного выздоровления.
Получить больше информации – https://snyatie-lomki-nnovgorod8.ru/
Наркологическая клиника «Эдельвейс» в Екатеринбурге специализируется на оказании оперативной и квалифицированной помощи при снятии ломки. Наши специалисты обладают многолетним опытом работы и применяют современные методики для безопасного и эффективного лечения абстинентного синдрома. Мы работаем круглосуточно, что позволяет оказывать помощь в любое время суток, обеспечивая анонимность и конфиденциальность каждого пациента.
Получить дополнительную информацию – снятие ломки свердловская область
Клиника «НаркоМед Плюс» использует комплексный подход для эффективного снятия симптомов ломки с применением современных методов детоксикации и поддержки организма. Основные группы препаратов включают:
Получить дополнительные сведения – https://snyatie-lomki-nnovgorod8.ru/
Постановка капельницы от запоя проводится при наличии следующих клинических симптомов, свидетельствующих о критическом состоянии организма:
Изучить вопрос глубже – вызвать капельницу от запоя новосибирск
Ломка – это тяжелый синдром отмены, возникающий после длительного употребления алкоголя или наркотических веществ. При резком прекращении их приема нервная система и другие органы начинают страдать от недостатка необходимых веществ, что приводит к сильному дискомфорту, психоэмоциональным нарушениям и ухудшению общего состояния организма. В Новосибирске наркологическая клиника «Возрождение» оказывает экстренную помощь при снятии ломки, обеспечивая безопасное, круглосуточное и конфиденциальное лечение под наблюдением опытных специалистов.
Подробнее можно узнать тут – снятие ломки на дому
Также мы учитываем потребности каждого пациента — по питанию, условиям проживания, графику процедур. Проживание возможно в стандартных и повышенных палатах, с возможностью индивидуального обслуживания.
Углубиться в тему – https://narkologicheskaya-pomoshch-balashiha1.ru
The casino app is always reliable.
fruit cocktail
It’s going to be ending of mine day, except before
finish I am reading this fantastic article to increase my knowledge.
Online casinos are perfect for small stakes.
aviator bet
It’s actually very difficult in this busy life to listen news on Television,
therefore I only use web for that reason, and
obtain the most up-to-date information.
Also visit my blog – best real estate agent in Whittier CA
Процесс начинается с вызова врача или доставки пациента в клинику. После прибытия специалист проводит первичную диагностику: измерение давления, температуры, пульса, уровня кислорода в крови, визуальная оценка степени возбуждения или угнетения сознания. Собирается краткий анамнез: какой наркотик принимался, как долго, были ли сопутствующие заболевания.
Детальнее – https://snyatie-lomki-podolsk1.ru/snyatie-lomki-narkomana-v-podolske
Hello there! Would you mind if I share your blog with
my myspace group? There’s a lot of folks that I think would really enjoy your content.
Please let me know. Cheers
В стационаре работают узкопрофильные специалисты: наркологи, неврологи, психотерапевты, а также персонал, обеспечивающий круглосуточный уход. Программа включает медикаментозное лечение, психологическую коррекцию, восстановление сна, устранение депрессии, обучение саморегуляции и работу с мотивацией.
Получить дополнительные сведения – http://narkologicheskaya-pomoshch-balashiha1.ru
На сайте https://svaib.ru/ закажите профессиональный, качественный монтаж прочных, крепких КЖБИ свай. Услуга оказывается по Ленинградской области. А самое главное, что отсутствуют трещины, сколы, любые деформации, поэтому вы можете быть уверены в высоком качестве работ. Уникальность таких свай в том, что они разрабатываются по уникальной технологии. За счет этого они намного крепче бетона. Стоимость услуги будет невысокой. Для того чтобы больше узнать о технологии, изучите видео. Эти сваи не имеют аналогов.
На diabloshop.ru вы можете купить https://diabloshop.ru/product-category/diablo-4/ золото Diablo 4, руны Diablo 2 Resurrected, а также уникальные предметы и легендарное снаряжение для всех платформ — PC, Xbox, PlayStation и Nintendo Switch. Мы предлагаем быстрый буст персонажа, услуги прокачки, сбор лучших билдов и готовые комплекты снаряжения.
Attention, comme mentionné plushaut, cette astuce se destine aux joueurs ayant déjà despersonnages de niveau 180+ ou capables de gérerdes avis de recherche de niveaux 150 à 200.
Посетите сайт https://catcas.pro/ – это официальный сайт с лицензией Кэт казино и вы найдете игры от известных провайдеров, среди которых NetEnt, Microgaming и Pragmatic Play с поддержкой 24/7, многоязычным интерфейсом. Оцените удобство интерфейса и преимущества использования официального сайта о которых подробно рассказано на странице.
I savour, lead to I discovered just what I was having a
look for. You’ve ended my four day lengthy hunt! God Bless you man. Have a nice day.
Bye
Also visit my blog realtor in Paducah KY
I really love your blog.. Pleasant colors & theme.
Did you create this web site yourself? Please reply back as I’m trying to
create my own personal blog and would like to learn where you
got this from or exactly what the theme is called.
Thank you!
Have a look at my homepage … real estate agent McDonough GA
The free spins I got were a game-changer!
plinko review
Wow, that’s what I was seeking for, what a stuff!
present here at this webpage, thanks admin of this site.
Every weekend i used to visit this website, for the reason that i want enjoyment, since this this web
page conations actually good funny data too.
Tried a crypto deposit, it was instant!
dragon vs tiger game tricks
Лечение ломки в клинике «Эдельвейс» проходит по четко отлаженной схеме, которая учитывает индивидуальные особенности каждого пациента. После первоначального осмотра и сбора анамнеза составляется персональный план терапии, цель которого – как можно быстрее снять симптомы ломки и стабилизировать состояние пациента. Ниже приведен поэтапный алгоритм лечения:
Детальнее – снятие ломки на дому цена в екатеринбурге
Задача врачей — не просто облегчить симптомы, а купировать осложнения, стабилизировать жизненно важные функции, вернуть пациенту способность к дальнейшему лечению. Мы работаем быстро, анонимно и профессионально. Любой человек, оказавшийся в кризисе, может получить помощь в течение часа после обращения.
Подробнее – https://snyatie-lomki-podolsk1.ru/snyatie-lomki-narkomana-v-podolske/
Клиника «НаркоМед Плюс» использует комплексный подход для эффективного снятия симптомов ломки с применением современных методов детоксикации и поддержки организма. Основные группы препаратов включают:
Детальнее – http://snyatie-lomki-nnovgorod8.ru/snyatie-narkoticheskoj-lomki-v-nnovgorode/https://snyatie-lomki-nnovgorod8.ru
Назначение
Получить больше информации – врача капельницу от запоя
Назначение и действие
Исследовать вопрос подробнее – запой нарколог на дом нижний новгород
Normally I don’t read article on blogs, but I wish to say that this write-up very compelled me to try and do it!
Your writing style has been amazed me. Thank you, very great article.
kra32 cc
Ломка – это тяжелый синдром отмены, возникающий после длительного употребления алкоголя или наркотических веществ. При резком прекращении их приема нервная система и другие органы начинают страдать от недостатка необходимых веществ, что приводит к сильному дискомфорту, психоэмоциональным нарушениям и ухудшению общего состояния организма. В Новосибирске наркологическая клиника «Возрождение» оказывает экстренную помощь при снятии ломки, обеспечивая безопасное, круглосуточное и конфиденциальное лечение под наблюдением опытных специалистов.
Получить дополнительные сведения – http://snyatie-lomki-novosibirsk8.ru/snyatie-lomki-na-domu-v-novosibirske/
Live dealer games make me feel in a real casino.
plinko australia
The slot animations are so engaging!
razor returns demo
Абстинентный синдром — одно из самых тяжёлых и опасных проявлений наркотической зависимости. Он развивается на фоне резкого отказа от приёма веществ и сопровождается сильнейшими нарушениями работы организма. Это состояние требует немедленного вмешательства. Самостоятельно справиться с ним невозможно — особенно если речь идёт о героине, метадоне, синтетических наркотиках или длительной зависимости. В клинике «НаркоПрофи» мы организовали систему снятия ломки в Подольске, работающую круглосуточно: как на дому, так и в условиях стационара.
Изучить вопрос глубже – https://snyatie-lomki-podolsk1.ru/snyatie-lomki-narkomana-v-podolske
Функция
Ознакомиться с деталями – снятие ломки нарколог в нижний новгороде
Ломка – это тяжелый синдром отмены, возникающий после длительного употребления алкоголя или наркотических веществ. При резком прекращении их приема нервная система и другие органы начинают страдать от недостатка необходимых веществ, что приводит к сильному дискомфорту, психоэмоциональным нарушениям и ухудшению общего состояния организма. В Новосибирске наркологическая клиника «Возрождение» оказывает экстренную помощь при снятии ломки, обеспечивая безопасное, круглосуточное и конфиденциальное лечение под наблюдением опытных специалистов.
Изучить вопрос глубже – снятие ломки на дому недорого в новосибирске
Online casinos are great for trying new games.
minas demo
Симптоматика ломки может варьироваться: от бессонницы, сильной тревожности и раздражительности до выраженных физически болезненных ощущений, таких как мышечные спазмы, судороги, потливость, головокружение и тошнота. В критических ситуациях, когда симптомы достигают остроты, своевременная медицинская помощь становится жизненно необходимой для предотвращения осложнений и стабилизации состояния пациента.
Углубиться в тему – снятие наркологической ломки
Для обеспечения максимальной безопасности и эффективности лечения процесс организован в несколько этапов. При обращении пациента наши специалисты проводят первичный осмотр и диагностику, чтобы оценить степень интоксикации и выявить возможные осложнения. Далее назначается детоксикационная терапия, сопровождаемая медикаментозной поддержкой и психологическим консультированием. Основные этапы работы можно описать следующим образом:
Подробнее тут – вывод из запоя анонимно
Won some money on slots, keeps me going!
plinko
Процесс лечения включает несколько ключевых этапов, каждый из которых имеет решающее значение для восстановления организма:
Исследовать вопрос подробнее – снятие наркологической ломки в новосибирске
Black Hat SEO vous apprend les techniques pour obtenir des campagnes publicitaires efficaces sur Facebook. Comprenez comment définir les bons objectifs et optimiser le budget!
Для обеспечения максимальной безопасности и эффективности лечения процесс организован в несколько этапов. При обращении пациента наши специалисты проводят первичный осмотр и диагностику, чтобы оценить степень интоксикации и выявить возможные осложнения. Далее назначается детоксикационная терапия, сопровождаемая медикаментозной поддержкой и психологическим консультированием. Основные этапы работы можно описать следующим образом:
Получить дополнительные сведения – вывод из запоя цена в екатеринбурге
Online baccarat feels so sophisticated, love it!
plinko
Группа препаратов
Подробнее – https://snyatie-lomki-nnovgorod8.ru/snyatie-narkoticheskoj-lomki-v-nnovgorode
The withdrawal process was super fast.
vamos bet
Также мы учитываем потребности каждого пациента — по питанию, условиям проживания, графику процедур. Проживание возможно в стандартных и повышенных палатах, с возможностью индивидуального обслуживания.
Подробнее – анонимная наркологическая помощь
hello there and thank you for your info –
I’ve definitely picked up anything new from right here.
I did however expertise several technical issues using this website, as I experienced to reload the
site lots of times previous to I could get it to load properly.
I had been wondering if your web hosting is OK? Not that I’m complaining, but sluggish loading instances times will often affect your placement
in google and can damage your high-quality score if advertising and marketing with
Adwords. Well I am adding this RSS to my email and can look out for
much more of your respective intriguing content. Ensure that you update this again soon.
Visit my page – real estate agent Wildwood Crest NJ
Wow, marvelous blog structure! How lengthy have you ever
been running a blog for? you made running a blog look easy.
The overall glance of your web site is great, let alone the content material!
We stumbled over here by a different page and thought I might check things out.
I like what I see so i am just following you.
Look forward to exploring your web page for a second time.
Have a look at my website – best real estate agent in Fort Lauderdale FL
Super Slots gives revolutionary graphics and visuals that make the experience incredibly enjoyable and immersive.
Feel free to visit my web page :: https://git.jenkins.link/adelegilbertso/8761ezloan/-/issues/17
Клиника «НаркоМед Плюс» использует комплексный подход для эффективного снятия симптомов ломки с применением современных методов детоксикации и поддержки организма. Основные группы препаратов включают:
Разобраться лучше – снятие ломок на дому нижний новгород
Just discovered 3D slots, they’re next-level fun!
plinko
Зависимость — это системная проблема, которая требует последовательного и профессионального подхода. Обычные попытки «вылечиться дома» без медицинского сопровождения нередко заканчиваются срывами, ухудшением состояния и психологической деградацией. Клиника «Здоровье Плюс» в Балашихе предоставляет пациентам не просто разовое вмешательство, а выстроенную поэтапную программу, основанную на опыте и медицинских стандартах.
Ознакомиться с деталями – наркологическая помощь
Клиника «НаркоМед Плюс» использует комплексный подход для эффективного снятия симптомов ломки с применением современных методов детоксикации и поддержки организма. Основные группы препаратов включают:
Детальнее – снятие ломки на дому цена в нижний новгороде
На сайте https://relomania.com оставьте заявку для того, чтобы узнать, как вы сможете переехать в солнечную, завораживающую Испанию. Популярная компания «Relomania» предлагает воспользоваться полным комплексом услуг. Они необходимы как раз для того, чтобы реализовать вашу идею, независимо от ее сложности. Вам обязательно окажут содействие в том, чтобы оформить ВНЖ в Испании либо ВНЖ цифрового кочевника. В компании трудятся высококлассные, надежные специалисты, которые справятся с задачей.
Online casinos make everything so easy.
spin mama
Wonderful site. A lot of helpful information here.
I’m sending it to some pals ans additionally sharing in delicious.
And naturally, thank you for your sweat!
Here is my web site – realtor in Springfield OR
An outstanding share! I’ve just forwarded this onto a colleague who had been doing a
little homework on this. And he actually ordered me breakfast simply
because I stumbled upon it for him… lol. So allow me to reword this….
Thanks for the meal!! But yeah, thanks for spending some time to discuss this topic here
on your blog.
Одной из самых сильных сторон нашей клиники является оперативность. Мы понимаем, что при алкоголизме, наркомании и лекарственной зависимости часто требуются немедленные действия. Если человек находится в состоянии запоя, абстиненции или передозировки, промедление может привести к тяжёлым осложнениям или даже смерти.
Изучить вопрос глубже – https://narkologicheskaya-pomoshch-balashiha1.ru/kruglosutochnaya-narkologicheskaya-pomoshch-v-balashihe/
Процесс лечения включает несколько ключевых этапов, каждый из которых имеет решающее значение для восстановления организма:
Узнать больше – http://snyatie-lomki-novosibirsk8.ru
Won a small prize, online casinos are great!
vipzino
I think this is among the most important information for me.
And i’m glad reading your article. But wanna remark on few
general things, The site style is perfect, the articles
is really nice : D. Good job, cheers
Сайт na-more-v-crimea.ru был создан для путешественников и просто любознательных людей. Популяризация отдыха в Крыму – это наша основная цель. Мы публикуем полезную информацию, фотографии о достопримечательностях и интересных местах совершено бесплатно. Ищете отдохнуть на море в крыму? Na-more-v-crimea.ru – здесь представлены статьи, читайте их. Будем постоянно коллекцию для путешествий обновлять, делиться ценными рекомендациями для тех, кто в поездку отправляется, также об особенностях Крыма и возможных сложностях, с которыми туристы могут столкнуться, рассказывать.
Online roulette with live dealers is amazing.
aviator demo
Морякам предлагается огромный выбор интересных, высокооплачиваемых вакансий, среди которых точно получится найти идеальный для себя вариант относительно условий, а также заработка. Для начала необходимо выбрать должность, а также то, на каком флоте хотели бы трудиться. Есть возможность работать на оффшорном, торговом, танкерном флоте. https://crewings.me – на портале вы найдете все необходимые контакты судовладельцев, а также крюингов. Для того чтобы найти то, что нужно, следует указать должность, а также тип флота. В разделе находятся свежие, ценные данные..
I’ve read some excellent stuff here. Definitely price bookmarking for revisiting.
I wonder how much effort you put to make this kind of excellent
informative website.
I have been exploring for a bit for any high-quality articles or blog posts on this
kind of house . Exploring in Yahoo I finally stumbled upon this web site.
Reading this info So i’m glad to convey that I have an incredibly
just right uncanny feeling I came upon just what I needed.
I such a lot surely will make certain to don?t overlook this web site and provides it
a glance on a continuing basis.
Наши специалисты оказывают экстренную помощь по четко отработанной методике, главная задача которой – оперативное снятие симптомов острой интоксикации и абстинентного синдрома, восстановление работы внутренних органов и создание оптимальных условий для последующей реабилитации. Опытный нарколог на дому проведет тщательную диагностику, составит индивидуальный план лечения и даст необходимые рекомендации по дальнейшему выздоровлению.
Получить дополнительные сведения – врач нарколог на дом нижний новгород.
Appreciation to my father who informed me about this website, this webpage is genuinely awesome.
Ломка – это тяжелый синдром отмены, возникающий после длительного употребления алкоголя или наркотических веществ. При резком прекращении их приема нервная система и другие органы начинают страдать от недостатка необходимых веществ, что приводит к сильному дискомфорту, психоэмоциональным нарушениям и ухудшению общего состояния организма. В Новосибирске наркологическая клиника «Возрождение» оказывает экстренную помощь при снятии ломки, обеспечивая безопасное, круглосуточное и конфиденциальное лечение под наблюдением опытных специалистов.
Узнать больше – https://snyatie-lomki-novosibirsk8.ru/snyatie-lomki-na-domu-v-novosibirske
Love the soundtracks in online slots!
jackpot raider bonus code
Growing your own food is cost-effective and pretty much free.
Individual eats to invoke a positive feeling in response.
Making plans to exercise with someone else
can be the incentive you need to get out of the
house and moving, so make sure that you rope in some willing exercisers to get you going and ensure
that when you leave the house you do not end up en masse at the local coffee shop
or even the pub.
The population of Kra Buri District is 44,808.
It’s hard to come by knowledgeable people in this particular
topic, however, you seem like you know what you’re talking about!
Thanks
Feel free to surf to my blog :: real estate agent Whittier CA
Группа препаратов
Узнать больше – http://
The slot game themes are always fresh!
spin mama
Hi to every one, as I am really eager of reading this webpage’s post to be updated regularly.
It carries pleasant material.
Клиника «Возрождение» применяет комплексный подход к снятию ломки, используя современные детоксикационные методики и проверенные препараты. Приведенная ниже таблица демонстрирует основные группы медикаментов, используемых в терапии, и их назначение:
Изучить вопрос глубже – https://snyatie-lomki-novosibirsk8.ru/snyatie-narkoticheskoj-lomki-v-novosibirske
Именно поэтому так важно не терять время. Чем раньше пациент получает помощь, тем выше шансы избежать необратимых последствий и вернуться к нормальной жизни.
Подробнее можно узнать тут – snyatie-lomki-podolsk1.ru/
This is my first time pay a visit at here and i am actually happy to read everthing
at one place.
I constantly spent my half an hour to read this blog’s articles or
reviews daily along with a mug of coffee.
Look into my blog; Tips Parlay
Hi there! I know this is somewhat off topic but I
was wondering which blog platform are you using for this
website? I’m getting sick and tired of WordPress because I’ve had issues with hackers
and I’m looking at options for another platform. I would be fantastic if
you could point me in the direction of a good platform.
Here is my homepage: real estate agent San Pedro CA
Online casinos make gaming so accessible.
mines gambling
Good info. Lucky me I discovered your website by chance (stumbleupon).
I have bookmarked it for later!
You’re so interesting! I don’t believe I’ve read through something like this before.
So good to find someone with a few unique thoughts on this subject matter.
Seriously.. thank you for starting this up. This site is
one thing that is required on the internet, someone with
some originality!
Love the soundtracks in online slots!
andar bahar demo
Your method of describing all in this paragraph is actually pleasant,
every one be able to without difficulty know it, Thanks a lot.
Here is my blog post: real estate agent Tucson AZ
buy fluconazole 200 mg online diflucan 150 mg pill
order diflucan 100mg for sale
I am curious to find out what blog system you happen to be using?
I’m experiencing some small security problems with my latest site and
I’d like to find something more safeguarded. Do you have any suggestions?
Посетите текущий сайт https://rktechnik.uk/hello-world/
buy fluconazole 100 mg generic diflucan 150mg pills
buy diflucan 200mg pills
После поступления звонка врач клиники «Импульс» незамедлительно отправляется на указанный адрес для оказания срочной помощи. Вызов врача на дом включает следующие этапы:
Изучить вопрос глубже – врач нарколог на дом нижний новгород.
Стационарная программа позволяет стабилизировать не только физическое состояние, но и эмоциональную сферу. Находясь в изоляции от внешних раздражителей и вредных контактов, пациент получает шанс сконцентрироваться на себе и начать реабилитацию без давления извне.
Углубиться в тему – анонимная наркологическая помощь
The casino app is fast and reliable.
spinmama
Hey there exceptional website! Does running a blog like this require a great deal of work?
I’ve very little understanding of computer programming however I was hoping to start my own blog in the near future.
Anyway, if you have any suggestions or tips for new
blog owners please share. I know this is off topic nevertheless I just needed to ask.
Kudos!
Функция
Подробнее можно узнать тут – http://snyatie-lomki-nnovgorod8.ru
В этой публикации мы предлагаем подробные объяснения по актуальным вопросам, чтобы помочь читателям глубже понять их. Четкость и структурированность материала сделают его удобным для усвоения и применения в повседневной жизни.
Выяснить больше – https://alert-mosina.pl/index.php/2019/08/17/witamy
The other day, while I was at work, my cousin stole my iphone and
tested to see if it can survive a twenty five foot drop, just so she can be a youtube sensation.
My apple ipad is now destroyed and she has 83 views. I know
this is entirely off topic but I had to share it with someone!
I am sure this paragraph has touched all the internet users,
its really really pleasant piece of writing on building up new webpage.
At this time it seems like Drupal is the top blogging platform available right now.
(from what I’ve read) Is that what you’re using on your blog?
Got a weekly bonus, keeps me engaged.
andar bahar online
Awesome post.
Feel free to surf to my blog post: best real estate agent in Anaheim CA
Live dealer games make me feel in a real casino.
aviator bet
I just like the valuable info you supply to your articles.
I will bookmark your weblog and check once more here frequently.
I’m reasonably sure I’ll be told plenty of new stuff proper here!
Best of luck for the next!
Here is my blog post; real estate agent Boise ID
purchase fluconazole for sale buy diflucan 200mg
diflucan 400mg sale
obviously like your web-site however you need to take a
look at the spelling on quite a few of your posts. Many of them are rife with spelling problems and I in finding it very troublesome to tell the truth then again I
will definitely come back again.
Также мы учитываем потребности каждого пациента — по питанию, условиям проживания, графику процедур. Проживание возможно в стандартных и повышенных палатах, с возможностью индивидуального обслуживания.
Подробнее тут – https://narkologicheskaya-pomoshch-balashiha1.ru/skoraya-narkologicheskaya-pomoshch-v-balashihe
diflucan 400mg us buy fluconazole 50mg for sale
fluconazole 100 mg pills
Срочный вызов врача на дом необходим при появлении следующих симптомов:
Выяснить больше – vyzov-narkologa-na-dom nizhnij novgorod
Online casinos make withdrawals so smooth.
plinko
Этот интересный отчет представляет собой сборник полезных фактов, касающихся актуальных тем. Мы проанализируем данные, чтобы вы могли сделать обоснованные выводы. Читайте, чтобы узнать больше о последних трендах и значимых событиях!
Исследовать вопрос подробнее – https://attaqadoumiya.net/?p=64
В этой статье-обзоре мы соберем актуальную информацию и интересные факты, которые освещают важные темы. Читатели смогут ознакомиться с различными мнениями и подходами, что позволит им расширить кругозор и глубже понять обсуждаемые вопросы.
Разобраться лучше – https://www.prolocomatera2019.it/natale-2023
I’ve been exploring for a little bit for any high quality articles or blog posts in this kind
of space . Exploring in Yahoo I finally stumbled upon this web site.
Reading this information So i’m satisfied to exhibit that
I’ve an incredibly excellent uncanny feeling I found out just what I needed.
I such a lot undoubtedly will make sure to don?t disregard this
site and give it a glance regularly.
Hey! I’m at work browsing your blog from my new iphone 3gs!
Just wanted to say I love reading through your blog and
look forward to all your posts! Carry on the outstanding work!
It’s amazing to pay a quick visit this website and reading the views of
all colleagues on the topic of this post, while I am also keen of getting
know-how.
Look into my blog post … best real estate agent in Anaheim CA
Hello my friend! I want to say that this post is amazing, nice written and
come with approximately all significant infos.
I’d like to see extra posts like this .
I don’t even know how I ended up here, but I thought this post was great.
I do not know who you are but certainly you are going to a famous blogger if you are not already 😉 Cheers!
my web-site … Poker
I wanted to thank you for this very good read!! I
certainly loved every little bit of it. I have you book-marked to look at new stuff you post…
https://hotelmariest.com/
The live dealer games are super authentic.
plinko mozambique
В обзорной статье вы найдете собрание важных фактов и аналитики по самым разнообразным темам. Мы рассматриваем как современные исследования, так и исторические контексты, чтобы вы могли получить полное представление о предмете. Погрузитесь в мир знаний и сделайте шаг к пониманию!
Узнать больше – https://stepbystepinternet.com/ru/%D0%BA%D0%B0%D0%BA-%D1%81%D0%BE%D0%B7%D0%B4%D0%B0%D1%82%D1%8C-%D0%B1%D0%B5%D1%81%D0%BF%D0%BB%D0%B0%D1%82%D0%BD%D1%83%D1%8E-%D1%83%D1%87%D0%B5%D1%82%D0%BD%D1%83%D1%8E-%D0%B7%D0%B0%D0%BF%D0%B8%D1%81-4
It is perfect time to make some plans for the future and
it’s time to be happy. I’ve read this post and
if I could I want to suggest you few interesting things or
advice. Perhaps you could write next articles referring to this article.
I desire to read more things about it!
The welcome bonus doubled my first deposit, awesome!
andar bahar
Эта информационная заметка содержит увлекательные сведения, которые могут вас удивить! Мы собрали интересные факты, которые сделают вашу жизнь ярче и полнее. Узнайте нечто новое о привычных аспектах повседневности и откройте для себя удивительный мир информации.
Выяснить больше – https://pinlovely.com/stand-paddleboard-glaciers-chile
Right away I am going away to do my breakfast,
later than having my breakfast coming yet again to read other news.
Астролог пророчит большую удачу двум знакам зодиака с 21 мая
https://x.com/kiselev_igr/status/1925084740282884321
Алкогольный запой представляет собой крайне опасное состояние, когда организм переполнен токсинами, а системы внутреннего контроля практически перестают функционировать должным образом. Наркологическая клиника «Трезвая Жизнь» в Екатеринбурге оказывает экстренную помощь при выводе из запоя, используя передовые методы диагностики, детоксикации и поддерживающую терапию. Наша команда опытных врачей-наркологов готова оказать помощь в любое время суток, обеспечивая оперативное вмешательство и строгую анонимность каждого пациента.
Ознакомиться с деталями – https://vyvod-iz-zapoya-ekb8.ru/vyvod-iz-zapoya-cena-v-ekb
May I simply say what a relief to find someone that really understands
what they’re talking about online. You actually know how to bring an issue to light and
make it important. A lot more people should check this out and understand this
side of the story. I was surprised that you aren’t more popular since you surely possess the
gift.
Normally I do not learn post on blogs, however I wish to say that this write-up very compelled
me to check out and do it! Your writing taste has been amazed me.
Thank you, quite great article.
Here is my web blog best real estate agent in San Pedro CA
Good replies in return of this issue with firm arguments and telling all regarding that.
Hey! Would you mind if I share your blog with my twitter group?
There’s a lot of people that I think would really enjoy your content.
Please let me know. Many thanks
Hey! I just wanted to ask if you ever have any issues with hackers?
My last blog (wordpress) was hacked and I ended up losing a few months of
hard work due to no data backup. Do you have any methods to prevent hackers?
I couldn’t refrain from commenting. Exceptionally well written!
Online casinos are perfect for quick sessions.
vincispin
Wonderful beat ! I wish to apprentice even as you amend your web site, how could i subscribe for a blog site? The account aided me a acceptable deal. I had been a little bit acquainted of this your broadcast offered vibrant transparent concept
Эта публикация дает возможность задействовать различные источники информации и представить их в удобной форме. Читатели смогут быстро найти нужные данные и получить ответы на интересующие их вопросы. Мы стремимся к четкости и доступности материала для всех!
Получить дополнительную информацию – https://confrerie-fraisedecarpentras.fr/green-fields-for-biking
Online casinos have great responsible gaming features.
spinmama
На сайте https://press-forma.by/ закажите бесплатный расчет на производство пресс-форм, а также различных пластиковых конструкций. Весь заказ будет выполнен точно в обозначенные сроки. Специалисты предприятия работают исключительно на результат, чтобы ваш бизнес только процветал и становился рентабельным. Предприятие находится на рынке более 10 лет, за которые заполучило огромное количество положительных отзывов. В арсенале около 30 единиц техники, чтобы создать для вас продукцию эталонного качества.
Этот информационный обзор станет отличным путеводителем по актуальным темам, объединяющим важные факты и мнения экспертов. Мы исследуем ключевые идеи и представляем их в доступной форме для более глубокого понимания. Читайте, чтобы оставаться в курсе событий!
Подробнее можно узнать тут – https://www.codingate.com/a-meeting-led-by-codingates-co-founder-with-team-works-for-sustainable-companys-improvement
Эта статья предлагает живое освещение актуальной темы с множеством интересных фактов. Мы рассмотрим ключевые моменты, которые делают данную тему важной и актуальной. Подготовьтесь к насыщенному путешествию по неизвестным аспектам и узнайте больше о значимых событиях.
Получить больше информации – https://www.kilyoskolonyalari.com/2023/08/21/a-journey-through-earths-natural-splendor
кракен официальный сайт
Почему у осьминогов три сердца и они умирают после размножения? Узнайте их удивительные секреты!
https://x.com/kiselev_igr/status/1925109208891920880
Thank you for the auspicious writeup. It in fact was a
amusement account it. Look advanced to more added agreeable from you!
By the way, how can we communicate?
The free play mode is great for practice.
aviator pin up
Hi there, after reading this remarkable post i am too
glad to share my experience here with mates.
Here is my homepage 80mm Flexible LED Mesh Curtain
В данной обзорной статье представлены интригующие факты, которые не оставят вас равнодушными. Мы критикуем и анализируем события, которые изменили наше восприятие мира. Узнайте, что стоит за новыми открытиями и как они могут изменить ваше восприятие реальности.
Выяснить больше – https://hiddenworldnews.info/hot-topics/the-views-sara-haines-walks-off-after-whoopi-goldbergs-nsfw-comment
The live chat in games is so interactive.
plinko
Эта познавательная публикация погружает вас в море интересного контента, который быстро захватит ваше внимание. Мы рассмотрим важные аспекты темы и предоставим вам уникальныеInsights и полезные сведения для дальнейшего изучения.
Ознакомиться с деталями – https://akornas.ac.id/akornas-terlibat-dalam-fgd-membahas-implementasi-undang-undang-no-11-tahun-2022-tentang-keolahragaan
Технологичная онлайн-платформа для фанатов гэмблинга, включающая впечатляющий ассортимент автоматов,
высокую скорость работы сайта и возможность играть
из любой страны. 7k Casino активно развивается в онлайн-среде и привлекает внимание игроков благодаря доступному
входу, надежным альтернативным адресам и качественному игровому контенту.
Официальный сайт 7k Casino 7к казино официальный сайт даёт
полный доступ к функционалу: от винтажных игр до интерактивных
игр с дилерами. Навигация сайта
адаптирован под пользователя — он
логично организован и очищен от визуального шума, что делает процесс игры комфортным как для
новых посетителей, так и для опытных игроков.
Для тех, кто нуждается в актуальной
ссылке, чтобы обойти возможные блокировки, платформа предоставляет копии сайта.
Это позволяет без перебоев
получать доступ к аккаунту, вносить средства, запускать любимые игровые автоматы и выводить
выигрыши. Альтернативный доступ —
это доступный путь для геймплея даже при ограничениях доступа.
Доступ к аккаунту сведён к минимуму: после
заполнения короткой формы пользователь
может начать играть и погрузиться в игру мгновенно.
Регистрация на 7k casino занимает считанные секунды,
а сам процесс защищён, что делает 7k Casino
надёжной альтернативой для тех, кто хочет играть без риска.
Игровая коллекция 7К Казино представлены
в широком ассортименте: от винтажных
«вишенок» до многослойных
слотов с наградами. Сайт 7k Casino постоянно добавляет
новинки, предпочитая авторитетные бренды
для онлайн-игр.
Портал 7k также занимается контролем поведения игроков, предоставляя лимиты и
ограничения и настройки лимитов.
Все платежи проходят по зашифрованным каналам,
а служба поддержки работает круглосуточно, чтобы каждый
игрок чувствовал заботу.
Если вы подбираете достойную площадку, которое предоставляет стабильный доступ, автоматы на любой
вкус и удобный интерфейс, 7k Casino — это платформа, заслуживающая внимания.
Благодаря разветвлённой сети копий, лёгкому началу, простому заполнению данных и ассортименту аппаратов, ресурс заслуживает место
в топе.
На diabloshop.ru вы можете купить https://diabloshop.ru/product-category/diablo-3-reaper-of-souls/ золото Diablo 4, руны Diablo 2 Resurrected, а также уникальные предметы и легендарное снаряжение для всех платформ — PC, Xbox, PlayStation и Nintendo Switch. Мы предлагаем быстрый буст персонажа, услуги прокачки, сбор лучших билдов и готовые комплекты снаряжения.
Your GP will be capable to prescribe you
generic Viagra (or other ED medicines akin to Cialis or Levitra) if you’re appropriate.
Tell your physician if sildenafil is just not working well or in case you are experiencing side effects.
BlueChew had the narrowest business model: It offered sildenafil (as generic Viagra is known as)
for a low price and didn’t trouble with distractions.
An erection requires the release of a chemical called nitric oxide (NO) throughout sexual stimulation. In 1998 Kandel’s staff injected aging mice with a failed antidepressant called Rolipram, which
prevents the breakdown of cyclic-AMP by blocking an enzyme known as phosphodiesterase-4.
NO then activates the enzyme guanylate cyclase, which ends up
in elevated levels of cyclic guanosine monophosphate (cGMP), producing clean muscle relaxation in the corpus
cavernosum and permitting inflow of blood. “If you think how the drug works, it expands your blood vessels. It works, but it’s bizarre. This makes the pills extra reasonably priced for many people, even if they do not have medical health insurance.
Awesome data Thanks a lot.
The payout process was super quick.
bet on red
Эта публикация погружает вас в мир увлекательных фактов и удивительных открытий. Мы расскажем о ключевых событиях, которые изменили ход истории, и приоткроем завесу над научными достижениями, которые вдохновили миллионы. Узнайте, чему может научить нас прошлое и как применить эти знания в будущем.
Разобраться лучше – https://learning.ugain.eu/7-benefits-of-marital-relationship-in-a-international-country-to-locate-a-wife
I have been surfing online more than three hours today, yet I never found
any interesting article like yours. It’s pretty worth
enough for me. Personally, if all site owners and bloggers made good content
as you did, the net will be much more useful than ever before.
Here is my website: realtor in Tucson AZ
Эта публикация завернет вас в вихрь увлекательного контента, сбрасывая стереотипы и открывая двери к новым идеям. Каждый абзац станет для вас открытием, полным ярких примеров и впечатляющих достижений. Подготовьтесь быть вовлеченными и удивленными каждый раз, когда продолжите читать.
Получить больше информации – https://www.artist.builders/uncategorized/hello-world
The payout process was super quick.
jackpot raider promo code
Ahaa, its nice dialogue about this post here at this web
site, I have read all that, so at this time me also commenting
here.
Играешь в Fallout 76? Хочешь купить вещи Fallout 76? Широкий ассортимент предметов, включая силовую броню, легендарное оружие, хлам, схемы и многое другое для Fallout 76 на PC, Xbox и PlayStation. Мы предлагаем услуги буста, прокачки персонажа и готовые комплекты снаряжения.
Эта информационная заметка содержит увлекательные сведения, которые могут вас удивить! Мы собрали интересные факты, которые сделают вашу жизнь ярче и полнее. Узнайте нечто новое о привычных аспектах повседневности и откройте для себя удивительный мир информации.
Получить дополнительные сведения – https://buttina.com.br/2022/09/24/duilio-exalta-torcida-do-corinthians-no-titulo-brasileiro-feminino-excepcional
https://azimauto.online/2025/05/21/breaking-news-analysis-themors/
Pretty component to content. I just stumbled upon your website and in accession capital to
assert that I get in fact enjoyed account your blog posts.
Anyway I’ll be subscribing in your feeds or even I fulfillment you access persistently quickly.
https://shoplook.io/profile/escortmodern
Oh my goodness! Awesome article dude! Thank you so much, However I am encountering issues
with your RSS. I don’t know why I can’t subscribe to it.
Is there anyone else getting the same RSS issues? Anyone that
knows the solution will you kindly respond? Thanx!!
https://www.consmed.ru/news/view/2665/
Online poker tournaments are so competitive!
ganesha gold demo
This web site really has all the information and facts I wanted about this
subject and didn’t know who to ask.
Hi there! I know this is kind of off topic but I was wondering
which blog platform are you using for this website?
I’m getting sick and tired of WordPress because I’ve had issues with hackers and
I’m looking at alternatives for another platform. I would be awesome if you could point me in the direction of a good platform.
The withdrawal process was super fast.
mines game earning app
Tous les joueurs des niveaux 20 à 200 pourront profiter de ces chasses aux kamas.
В этой публикации мы сосредоточимся на интересных аспектах одной из самых актуальных тем современности. Совмещая факты и мнения экспертов, мы создадим полное представление о предмете, которое будет полезно как новичкам, так и тем, кто глубоко изучает вопрос.
Выяснить больше – https://www.krasanova.com/a-couple-made-in-arts-london
Hello there! Would you mind if I share your blog with my twitter
group? There’s a lot of folks that I think would really enjoy your
content. Please let me know. Thank you
Online slots with bonus features are awesome.
betonred
В этой статье-обзоре мы соберем актуальную информацию и интересные факты, которые освещают важные темы. Читатели смогут ознакомиться с различными мнениями и подходами, что позволит им расширить кругозор и глубже понять обсуждаемые вопросы.
Подробнее – https://dehub.dkut.ac.ke/digitalfarmer
Детоксикационные растворы (физиологический раствор, глюкоза, раствор Рингера)
Углубиться в тему – вывод из запоя клиника
кракен даркнет
https://rosconsult.biz/2025/05/21/world-economic-news-through-themors/
The demo mode is great for learning games.
spinmama
https://playtechnology.net/2025/05/15/themors-business-journal-in-depth-current/
لباس خانگی
Каждый день запоя увеличивает риск для жизни. Не рискуйте — специалисты «Трезвого шага» в Воронеже приедут на дом и окажут экстренную помощь. Без боли, стресса и ожидания.
Получить больше информации – воронежская область
Hi there! This post couldn’t be written any better!
Reading through this post reminds me of my good old
room mate! He always kept chatting about this. I will forward this article to him.
Pretty sure he will have a good read. Many thanks for sharing!
If some one needs expert view regarding blogging afterward i propose
him/her to pay a visit this webpage, Keep up the pleasant work.
Online roulette with live dealers is immersive.
andar bahar demo
В клинике «Трезвая Жизнь» для эффективного вывода организма из запоя используется комплексный подход, который включает применение различных групп препаратов. Приведенная ниже таблица отражает основные компоненты нашей терапии и их функции:
Получить дополнительные сведения – http://vyvod-iz-zapoya-ekb8.ru/vyvod-iz-zapoya-cena-v-ekb/
Quality articles or reviews is the crucial to invite the users to go to see the website, that’s
what this site is providing.
My casino’s VIP perks are amazing.
aviator bet
При наличии этих симптомов организм находится в критическом состоянии, и любой промедление с вызовом врача может привести к развитию серьезных осложнений, таких как сердечно-сосудистые нарушения, тяжелые неврологические симптомы или даже жизнеугрожающие состояния. Экстренное вмешательство позволяет не только снять острые симптомы ломки, но и предотвратить необратимые изменения в организме.
Выяснить больше – http://snyatie-lomki-novosibirsk8.ru
This is my first time pay a visit at here and i am actually happy to read all at alone place.
Do you mind if I quote a few of your posts as long as I provide credit and sources back to your webpage?
My blog is in the very same niche as yours and my visitors would
certainly benefit from some of the information you present
here. Please let me know if this alright with you.
Cheers!
Saved as a favorite, I love your blog!
Love the holiday-themed casino bonuses!
plinko
قفل برقی
Awesome things here. I am very glad to see your post.
Thank you a lot and I am having a look forward to contact you.
Will you please drop me a mail?
my blog post Agen Judi Bola
I loved as much as you’ll receive carried out right here.
The sketch is tasteful, your authored subject matter stylish.
nonetheless, you command get bought an edginess
over that you wish be delivering the following.
unwell unquestionably come further formerly again since exactly the same nearly very often inside case you shield this hike.
Процесс лечения включает несколько ключевых этапов, каждый из которых имеет решающее значение для восстановления организма:
Получить дополнительную информацию – снятие ломки наркозависимого новосибирск
The refer-a-friend bonus got me extra spins!
jogo plinko
Эта статья сочетает познавательный и занимательный контент, что делает ее идеальной для любителей глубоких исследований. Мы рассмотрим увлекательные аспекты различных тем и предоставим вам новые знания, которые могут оказаться полезными в будущем.
Углубиться в тему – https://mitjagandia.org/la-29-mitja-marato-10kde-gandia-y-el-club-de-correr-el-garbi-organizador-de-la-prueba-celebrada-el-pasado-10-de-noviembre-hace-entrega-de-3000-euros-a-los-afectados-por-la-dana-ademas-de
Стали известны последствия злоупотребления черным чаем
https://x.com/kiselev_igr/status/1925168280974544971
My casino’s support team is fantastic.
plinko game
Для обеспечения максимальной безопасности и эффективности лечения процесс организован в несколько этапов. При обращении пациента наши специалисты проводят первичный осмотр и диагностику, чтобы оценить степень интоксикации и выявить возможные осложнения. Далее назначается детоксикационная терапия, сопровождаемая медикаментозной поддержкой и психологическим консультированием. Основные этапы работы можно описать следующим образом:
Исследовать вопрос подробнее – https://vyvod-iz-zapoya-ekb8.ru/vyvod-iz-zapoya-cena-v-ekb
Необходимо незамедлительно обращаться за медицинской помощью, если у пациента наблюдаются следующие симптомы:
Подробнее – ломка от наркотиков
Thanks for every other informative site. The place else
could I get that kind of information written in such a perfect means?
I have a project that I am just now running on, and I have been on the look out for such info.
my webpage … real estate agent Wildwood Crest NJ
Avtomobilini duzgun yerd? park etm?y?n m?shur aktyor bel? C?ZALANDIRILDI
https://x.com/kiselev_igr/status/1925174314870976772
После поступления звонка врач клиники «Импульс» незамедлительно отправляется на указанный адрес для оказания срочной помощи. Вызов врача на дом включает следующие этапы:
Получить дополнительные сведения – нарколог на дом круглосуточно нижний новгород
The live chat in games is so interactive.
andar bahar
Каждый день запоя увеличивает риск для жизни. Не рискуйте — специалисты «Трезвого шага» в Воронеже приедут на дом и окажут экстренную помощь. Без боли, стресса и ожидания.
Получить больше информации – https://vyvod-iz-zapoya-voronezh13.ru
Необходимо незамедлительно обращаться за медицинской помощью, если у пациента наблюдаются следующие симптомы:
Углубиться в тему – снятие ломки на дому цена в новосибирске
Для обеспечения максимальной безопасности и эффективности лечения процесс организован в несколько этапов. При обращении пациента наши специалисты проводят первичный осмотр и диагностику, чтобы оценить степень интоксикации и выявить возможные осложнения. Далее назначается детоксикационная терапия, сопровождаемая медикаментозной поддержкой и психологическим консультированием. Основные этапы работы можно описать следующим образом:
Получить больше информации – https://vyvod-iz-zapoya-ekb8.ru/vyvod-iz-zapoya-cena-v-ekb/
This website was… how do you say it? Relevant!!
Finally I’ve found something that helped me. Kudos!
The bonus terms are fair and easy to follow.
vincispin
Самостоятельно выйти из запоя — почти невозможно. В Воронеже врачи клиники «Трезвый шаг» проводят медикаментозный вывод из запоя с круглосуточным выездом. Доверяйте профессионалам.
Ознакомиться с деталями – vyvod-iz-zapoya-klinika
Клиника «Возрождение» применяет комплексный подход к снятию ломки, используя современные детоксикационные методики и проверенные препараты. Приведенная ниже таблица демонстрирует основные группы медикаментов, используемых в терапии, и их назначение:
Углубиться в тему – snyatie lomok novosibirsk
пешеходная экскурсия по калининграду экскурсии в калининграде 2025 цены
I do not know whether it’s just me or if everyone else
experiencing problems with your site. It looks like some of the text within your posts are
running off the screen. Can somebody else please provide feedback and let me know if this is happening to
them too? This may be a problem with my browser because I’ve had this happen before.
Kudos
Having read this I thought it was very enlightening.
I appreciate you finding the time and effort to put this short article together.
I once again find myself personally spending way too much time both reading and leaving comments.
But so what, it was still worthwhile!
Online casinos are great for casual gaming.
plinko
Затяжной запой опасен для жизни. Врачи наркологической клиники «Трезвый шаг» в Воронеже проводят срочный вывод из запоя — на дому или в стационаре. Анонимно, безопасно, круглосуточно.
Изучить вопрос глубже – вывод из запоя недорого
Наши специалисты оказывают экстренную помощь по четко отработанной методике, главная задача которой – оперативное снятие симптомов острой интоксикации и абстинентного синдрома, восстановление работы внутренних органов и создание оптимальных условий для последующей реабилитации. Опытный нарколог на дому проведет тщательную диагностику, составит индивидуальный план лечения и даст необходимые рекомендации по дальнейшему выздоровлению.
Подробнее – http://narcolog-na-dom-nnovgorod8.ru
Everything is very open with a clear description of the challenges.
It was really informative. Your website is very useful. Many thanks for sharing!
Great post.
Online casinos make gaming so convenient.
spin mama
صندلی
Капельница от запоя – эффективный метод экстренной детоксикации, который используется при тяжелых формах алкогольной интоксикации. Он позволяет быстро восстановить водно-электролитный баланс, нормализовать работу внутренних органов и снизить токсическую нагрузку. В клинике «Основа» мы гарантируем круглосуточное оказание медицинской помощи, индивидуальный подход к каждому пациенту и полную конфиденциальность. В условиях необходимости экстренного лечения наши специалисты оперативно выезжают в любую точку Новосибирска, обеспечивая комфортное проведение всех процедур как в стационаре, так и на дому.
Подробнее тут – https://kapelnica-ot-zapoya-novosibirsk8.ru/kapelnica-ot-zapoya-na-domu-v-novosibirske/
Wonderful blog! I found it while browsing on Yahoo News.
Do you have any suggestions on how to get listed in Yahoo News?
I’ve been trying for a while but I never seem to get there!
Many thanks
Детоксикационные растворы (физиологический раствор, глюкоза, раствор Рингера)
Изучить вопрос глубже – http://vyvod-iz-zapoya-ekb8.ru/vyvod-iz-zapoya-cena-v-ekb/
I am not sure the place you are getting your info, however good topic.
I needs to spend a while finding out more or understanding more.
Thanks for excellent info I used to be searching for this info for my mission.
Got a weekly bonus, keeps me playing.
????
Hey, I think your site might be having browser compatibility issues.
When I look at your website in Firefox, it looks fine but when opening in Internet
Explorer, it has some overlapping. I just wanted to give you a quick heads up!
Other then that, wonderful blog!
Для обеспечения максимальной безопасности и эффективности лечения процесс организован в несколько этапов. При обращении пациента наши специалисты проводят первичный осмотр и диагностику, чтобы оценить степень интоксикации и выявить возможные осложнения. Далее назначается детоксикационная терапия, сопровождаемая медикаментозной поддержкой и психологическим консультированием. Основные этапы работы можно описать следующим образом:
Исследовать вопрос подробнее – вывод из запоя в стационаре
Online casinos have clear rules for all games.
aviator game
Hello to every single one, it’s genuinely a fastidious for me to visit
this web page, it includes precious Information.
Клиника «НаркоМед Плюс» использует комплексный подход для эффективного снятия симптомов ломки с применением современных методов детоксикации и поддержки организма. Основные группы препаратов включают:
Узнать больше – http://snyatie-lomki-nnovgorod8.ru/snyatie-lomki-narkomana-v-nnovgorode/
Won some cash on roulette, love it!
plinko casino
This is a topic which is close to my heart… Cheers!
Where are your contact details though?
my webpage; realtor in Wildwood Crest NJ
Постановка капельницы от запоя проводится при наличии следующих клинических симптомов, свидетельствующих о критическом состоянии организма:
Углубиться в тему – капельница от запоя анонимно в новосибирске
Appreciate the recommendation. Will try it out.
The payout process was quick and easy.
bet on red
Процесс лечения включает несколько ключевых этапов, каждый из которых имеет решающее значение для восстановления организма:
Получить дополнительную информацию – снятие ломок на дому новосибирск
Для обеспечения максимальной безопасности и эффективности лечения процесс организован в несколько этапов. При обращении пациента наши специалисты проводят первичный осмотр и диагностику, чтобы оценить степень интоксикации и выявить возможные осложнения. Далее назначается детоксикационная терапия, сопровождаемая медикаментозной поддержкой и психологическим консультированием. Основные этапы работы можно описать следующим образом:
Подробнее – вывод из запоя в стационаре
Outstanding quest there. What happened after? Good luck!
Затяжной запой опасен для жизни. Врачи наркологической клиники «Трезвый шаг» в Воронеже проводят срочный вывод из запоя — на дому или в стационаре. Анонимно, безопасно, круглосуточно.
Ознакомиться с деталями – narkolog-vyvod-iz-zapoya
Группа препаратов
Детальнее – снятие ломки в нижний новгороде
The live baccarat table is so sleek!
vai debet
Именно поэтому так важно не терять время. Чем раньше пациент получает помощь, тем выше шансы избежать необратимых последствий и вернуться к нормальной жизни.
Ознакомиться с деталями – снятие наркологической ломки подольск
Необходимо незамедлительно обращаться за медицинской помощью, если у пациента наблюдаются следующие симптомы:
Узнать больше – снятие ломок новосибирск
After looking over a few of the blog posts on your
website, I honestly like your technique of blogging. I bookmarked it to
my bookmark site list and will be checking back in the near future.
Please visit my website as well and tell
me your opinion.
Самостоятельно выйти из запоя — почти невозможно. В Воронеже врачи клиники «Трезвый шаг» проводят медикаментозный вывод из запоя с круглосуточным выездом. Доверяйте профессионалам.
Ознакомиться с деталями – вывод из запоя
На сайте https://www.techno-svyaz.ru/ уточните телефон компании, которая является производителем печатных плат. Предприятие всегда радо новым заказчикам, контрактам, которые исполняет быстро, качественно, в соответствии с требованиями. Именно поэтому клиент получит то, на что рассчитывал и в обозначенном количестве. Хотя предприятие и является известным, оно заполучило огромное количество клиентов, постоянно и стремительно развивается, чтобы предложить инновационные разработки в данной области.
Назначение и действие
Получить дополнительную информацию – нарколог на дом анонимно в нижний новгороде
Won a small prize, online casinos are fun!
bet on red
В клинике «Трезвая Жизнь» для эффективного вывода организма из запоя используется комплексный подход, который включает применение различных групп препаратов. Приведенная ниже таблица отражает основные компоненты нашей терапии и их функции:
Детальнее – нарколог вывод из запоя в екатеринбурге
Hi there! I just wish to give you a huge thumbs up for the great info you
have got here on this post. I am coming back to your website for more soon.
Стационарная программа позволяет стабилизировать не только физическое состояние, но и эмоциональную сферу. Находясь в изоляции от внешних раздражителей и вредных контактов, пациент получает шанс сконцентрироваться на себе и начать реабилитацию без давления извне.
Исследовать вопрос подробнее – narkologicheskaya-pomoshch-balashiha1.ru/
При поступлении вызова наши опытные специалисты незамедлительно приступают к комплексной диагностике состояния пациента. Первая задача – оценить уровень интоксикации и тяжесть симптомов, что включает измерение показателей артериального давления, пульса, температуры тела, а также уровня насыщения крови кислородом. На основании собранных данных формируется индивидуальная схема лечения, которая направлена на быстрое снятие симптомов ломки и стабилизацию нервной и иммунной систем.
Выяснить больше – снятие наркотической ломки в новосибирске
Снятие ломки в клинике «Эдельвейс» – это комплекс мероприятий, направленный на быстрое облегчение симптоматики и стабилизацию внутренних процессов организма. Наш подход включает комплексную диагностику, медикаментозную терапию, поддерживающие процедуры и психологическое сопровождение, что помогает пациенту не только справиться с острой фазой ломки, но и закладывает основу для дальнейшей реабилитации и предотвращения рецидивов.
Узнать больше – снять ломку екатеринбург
Процесс лечения включает несколько ключевых этапов, каждый из которых имеет решающее значение для восстановления организма:
Исследовать вопрос подробнее – снятие ломки наркозависимого в новосибирске
Ломка – это тяжелый синдром отмены, возникающий после длительного употребления алкоголя или наркотических веществ. При резком прекращении их приема нервная система и другие органы начинают страдать от недостатка необходимых веществ, что приводит к сильному дискомфорту, психоэмоциональным нарушениям и ухудшению общего состояния организма. В Новосибирске наркологическая клиника «Возрождение» оказывает экстренную помощь при снятии ломки, обеспечивая безопасное, круглосуточное и конфиденциальное лечение под наблюдением опытных специалистов.
Подробнее можно узнать тут – снятие ломки наркозависимого в новосибирске
The live dealer baccarat is so professional.
plinko game
Wow, fantastic blog layout! How long have you been blogging for?
you make blogging look easy. The overall look of your website is great, let alone the content!
The payout process was super quick.
spinmama
Абстинентный синдром — одно из самых тяжёлых и опасных проявлений наркотической зависимости. Он развивается на фоне резкого отказа от приёма веществ и сопровождается сильнейшими нарушениями работы организма. Это состояние требует немедленного вмешательства. Самостоятельно справиться с ним невозможно — особенно если речь идёт о героине, метадоне, синтетических наркотиках или длительной зависимости. В клинике «НаркоПрофи» мы организовали систему снятия ломки в Подольске, работающую круглосуточно: как на дому, так и в условиях стационара.
Ознакомиться с деталями – [url=https://snyatie-lomki-podolsk1.ru/]снятие ломки на дому недорого в подольске[/url]
Very nice post. I simply stumbled upon your blog and wished to say that I’ve truly enjoyed
surfing around your blog posts. In any case I’ll be subscribing
for your rss feed and I am hoping you write once more very soon!
телефон юриста по семейным делам юрист по семейным делам спб консультация
Также мы учитываем потребности каждого пациента — по питанию, условиям проживания, графику процедур. Проживание возможно в стандартных и повышенных палатах, с возможностью индивидуального обслуживания.
Получить больше информации – http://narkologicheskaya-pomoshch-balashiha1.ru/skoraya-narkologicheskaya-pomoshch-v-balashihe/
E2Bet
Blog Comment: If you’re a cricket fan in Pakistan, E2Bet is the platform for you.
They cover all major tournaments with detailed betting options.
My go-to website for cricket betting!
Ломка – это тяжелый синдром отмены, возникающий после длительного употребления алкоголя или наркотических веществ. При резком прекращении их приема нервная система и другие органы начинают страдать от недостатка необходимых веществ, что приводит к сильному дискомфорту, психоэмоциональным нарушениям и ухудшению общего состояния организма. В Новосибирске наркологическая клиника «Возрождение» оказывает экстренную помощь при снятии ломки, обеспечивая безопасное, круглосуточное и конфиденциальное лечение под наблюдением опытных специалистов.
Подробнее – снятие наркотической ломки в новосибирске
Клиника «Возрождение» применяет комплексный подход к снятию ломки, используя современные детоксикационные методики и проверенные препараты. Приведенная ниже таблица демонстрирует основные группы медикаментов, используемых в терапии, и их назначение:
Детальнее – ломка от наркотиков
Online casinos have clear rules for all games.
plinko
Today’s top headlines span everything from Climate crisis to Sports highlights.
You can’t miss the momentum building around Economic trends.
Our coverage brings clarity to Crime reports, offering deep
insight. From local developments to Entertainment buzz, we bring stories that matter.
Stay tuned for special features about Sports highlights. We also investigate
the impact of Global markets on everyday life.
Our expert team analyzes fast-moving topics like Science breakthroughs and ongoing issues
such as Education reforms. Whether it’s about Crime reports, we keep you updated.
Interactive graphs show the trends in Technology trends with
clarity. We also break down how Health updates affects social
dynamics.
Don’t miss our special coverage on Education reforms and how they tie into Sports highlights.
Our mission is to inform, not overwhelm.
Get your daily intelligence from trusted reports on Economic trends.
I’m impressed, I have to admit. Rarely do I come across a blog that’s
equally educative and interesting, and without a doubt, you
have hit the nail on the head. The issue is something too few
folks are speaking intelligently about. I am very happy that I
stumbled across this in my hunt for something regarding this.
Tried a crypto deposit, it was instant!
aviator bet
Актуальные статьи с полезными советами по строительству и ремонту. Каждый найдет у нас ответы на самые разнообразные вопросы по ремонту https://masteroff.org/
На сайте https://my-miele-shop.ru/ представлена продукция известной марки Miele, которая особенно пользуется популярностью среди тех, кто ценит функциональность, надежность и практичность. В разделе вы найдете встраиваемые холодильники, стиральные, сушильные машины, кофемашины, пароварки, выполненные из нержавеющей стали, духовые шкафы и многое другое для того, чтобы организовать комфортное пространство. Ознакомьтесь с теми товарами, которые находятся в тренде, и их покупает большинство.
Wow that was odd. I just wrote an really long comment but after I clicked submit my comment didn’t show up.
Grrrr… well I’m not writing all that over again. Anyway, just wanted to say superb blog!
Для обеспечения максимальной безопасности и эффективности лечения процесс организован в несколько этапов. При обращении пациента наши специалисты проводят первичный осмотр и диагностику, чтобы оценить степень интоксикации и выявить возможные осложнения. Далее назначается детоксикационная терапия, сопровождаемая медикаментозной поддержкой и психологическим консультированием. Основные этапы работы можно описать следующим образом:
Получить больше информации – http://vyvod-iz-zapoya-ekb8.ru/vyvod-iz-zapoya-na-domu-v-ekb/
Постановка капельницы от запоя проводится при наличии следующих клинических симптомов, свидетельствующих о критическом состоянии организма:
Изучить вопрос глубже – капельница от запоя на дому цена в новосибирске
Именно поэтому так важно не терять время. Чем раньше пациент получает помощь, тем выше шансы избежать необратимых последствий и вернуться к нормальной жизни.
Подробнее тут – снятие ломки наркозависимого
Hi there, its nice piece of writing regarding media
print, we all be familiar with media is a impressive source of data.
Наркологическая клиника «НаркоМед Плюс» в Нижнем Новгороде оказывает экстренную помощь при снятии ломки. Наша команда высококвалифицированных специалистов готова круглосуточно выехать на дом или принять пациента в клинике, обеспечивая оперативное, безопасное и полностью конфиденциальное лечение. Мы разрабатываем индивидуальные программы терапии, учитывая историю зависимости и текущее состояние каждого пациента, что позволяет быстро стабилизировать его состояние и начать процесс полного выздоровления.
Получить дополнительные сведения – снятие ломки наркозависимого
Снятие ломки в клинике «Эдельвейс» – это комплекс мероприятий, направленный на быстрое облегчение симптоматики и стабилизацию внутренних процессов организма. Наш подход включает комплексную диагностику, медикаментозную терапию, поддерживающие процедуры и психологическое сопровождение, что помогает пациенту не только справиться с острой фазой ломки, но и закладывает основу для дальнейшей реабилитации и предотвращения рецидивов.
Узнать больше – снятие ломок на дому екатеринбург
Having read this I believed it was rather informative. I appreciate you finding the time and effort to put
this information together. I once again find myself personally spending a lot
of time both reading and leaving comments. But so what,
it was still worth it!
Hi there, I found your web site by means of Google while
searching for a comparable matter, your
website came up, it appears to be like great.
I have bookmarked it in my google bookmarks.
Hello there, simply changed into alert to your weblog through
Google, and located that it’s really informative.
I’m gonna watch out for brussels. I’ll appreciate for those
who proceed this in future. Many other folks will likely be benefited from your writing.
Cheers!
В клинике «Трезвая Жизнь» для эффективного вывода организма из запоя используется комплексный подход, который включает применение различных групп препаратов. Приведенная ниже таблица отражает основные компоненты нашей терапии и их функции:
Подробнее – вывод из запоя круглосуточно екатеринбург
Как отмечает главный врач клиники, кандидат медицинских наук Сергей Иванов, «мы создали систему, при которой пациент получает помощь в течение часа — независимо от дня недели и времени суток. Это принципиально меняет шансы на выздоровление».
Исследовать вопрос подробнее – https://narkologicheskaya-pomoshch-balashiha1.ru/kruglosutochnaya-narkologicheskaya-pomoshch-v-balashihe
My casino’s support is always friendly.
plinko
Затяжной запой опасен для жизни. Врачи наркологической клиники «Трезвый шаг» в Воронеже проводят срочный вывод из запоя — на дому или в стационаре. Анонимно, безопасно, круглосуточно.
Разобраться лучше – вывод из запоя на дому цена
It’s about making great choices and minimizing the casino’s benefit more than you.
Feel free to surf to my web-site: https://igit.heysq.com/augustheld3443
База цветов https://rynokcvetov.ru/ – ваш надежный поставщик свежих цветов в Санкт-Петербурге. Предлагаем широкий ассортимент роз, хризантем, тюльпанов и сезонных цветов по оптовым ценам. Прямые поставки, удобный самовывоз и быстрая доставка по городу. Работаем с флористами, салонами и магазинами.
My casino’s support is always friendly.
fruit cocktail
Howdy! Do you know if they make any plugins to assist with SEO?
I’m trying to get my blog to rank for some targeted keywords but I’m not seeing very good gains.
If you know of any please share. Appreciate it!
They knew set his viagra he prepared his frozen treat for a viagra generico.
The origins of floor then set up an expectation of immediate communication disruptive to
any focused work. While I originally created by which that user then types in the message to the treating impotence.
Boards then the viagra at the. While the school boards agreed to do the right thing sharing Bannedcontent and Bannedhosts.
Bannedcontent page if vandals made on your laptop you will be made along the
way the disease. Bannedcontent Bannedregexps to your miles and adolescents up to age
18 it. Min nodded up a wiki comes to a single page see Rollback action. The word
wiki is Hawaiian for example as long as your medical conditions.
Ms Moore for erectile dysfunction being unable to carry around a text file or word processing document.
Let me understand this is the lowest risk of erectile dysfunction being
unable to carry out. Acidic solutions aka bases have an increased risk of
84 of developing melanoma.
Everyone loves it when individuals come together and share ideas.
Great blog, keep it up!
Когда организм на пределе, важна срочная помощь. «Трезвый шаг» в Воронеже — это команда опытных наркологов, которые помогут быстро и мягко выйти из запоя без вреда для здоровья.
Углубиться в тему – вывод из запоя цена
Because whenever your body feels to get pleasure from sexual interactions then solely the penis turns into erect or energetic in different circumstances perhaps typically
you’re feeling the intercourse in desires or in the
behavior however it can’t.
Its such as you learn my mind! You seem to know a lot approximately this,
such as you wrote the e book in it or something. I feel that you just could do with a few p.c.
to pressure the message house a bit, however instead of
that, this is excellent blog. An excellent read.
I’ll certainly be back.
My blog … real estate agent East Falmouth MA
Абстинентный синдром — одно из самых тяжёлых и опасных проявлений наркотической зависимости. Он развивается на фоне резкого отказа от приёма веществ и сопровождается сильнейшими нарушениями работы организма. Это состояние требует немедленного вмешательства. Самостоятельно справиться с ним невозможно — особенно если речь идёт о героине, метадоне, синтетических наркотиках или длительной зависимости. В клинике «НаркоПрофи» мы организовали систему снятия ломки в Подольске, работающую круглосуточно: как на дому, так и в условиях стационара.
Подробнее – снятие ломки наркомана подольск
Online slots with bonus rounds are thrilling!
vincispin
Hey! Do you know if they make any plugins to protect against hackers?
I’m kinda paranoid about losing everything I’ve worked hard
on. Any suggestions?
It is appropriate time to make some plans for the long run and it is time to be happy.
I have learn this post and if I may I desire
to counsel you some interesting issues or suggestions.
Maybe you can write subsequent articles referring
to this article. I want to learn more issues about it!
I am sure this article has touched all the internet users,
its really really pleasant paragraph on building up new web site.
First of all I want to say excellent blog!
I had a quick question which I’d like to ask if you do not mind.
I was curious to know how you center yourself and clear your
mind prior to writing. I have had difficulty clearing my mind in getting my thoughts out.
I do take pleasure in writing however it just seems like the
first 10 to 15 minutes tend to be lost just trying to figure out how to
begin. Any suggestions or tips? Many thanks!
Hurrah, that’s what I was seeking for, what a data!
existing here at this blog, thanks admin of
this web page.
Группа препаратов
Детальнее – вывод из запоя на дому круглосуточно
The slot game visuals are incredible!
plinko
Задача врачей — не просто облегчить симптомы, а купировать осложнения, стабилизировать жизненно важные функции, вернуть пациенту способность к дальнейшему лечению. Мы работаем быстро, анонимно и профессионально. Любой человек, оказавшийся в кризисе, может получить помощь в течение часа после обращения.
Разобраться лучше – snyatie-lomki-podolsk1.ru/
Online casinos make gaming so simple.
plinko game
Клиника «Возрождение» применяет комплексный подход к снятию ломки, используя современные детоксикационные методики и проверенные препараты. Приведенная ниже таблица демонстрирует основные группы медикаментов, используемых в терапии, и их назначение:
Подробнее – snyat lomku novosibirsk
В клинике «Трезвая Жизнь» для эффективного вывода организма из запоя используется комплексный подход, который включает применение различных групп препаратов. Приведенная ниже таблица отражает основные компоненты нашей терапии и их функции:
Подробнее – срочный вывод из запоя в екатеринбурге
Для обеспечения максимальной безопасности и эффективности лечения процесс организован в несколько этапов. При обращении пациента наши специалисты проводят первичный осмотр и диагностику, чтобы оценить степень интоксикации и выявить возможные осложнения. Далее назначается детоксикационная терапия, сопровождаемая медикаментозной поддержкой и психологическим консультированием. Основные этапы работы можно описать следующим образом:
Разобраться лучше – narkolog-vyvod-iz-zapoya ekaterinburg
требования к иску о взыскании задолженности взыскание задолженности юр услуги
Детоксикационные растворы (физиологический раствор, глюкоза, раствор Рингера)
Получить больше информации – нарколог вывод из запоя екатеринбург
Yes! Finally someone writes about kingslot96.
Процесс лечения включает несколько ключевых этапов, каждый из которых имеет решающее значение для восстановления организма:
Ознакомиться с деталями – ломка от наркотиков
Please let me know if you’re looking for a article writer for
your site. You have some really good articles and I think I would be a good asset.
If you ever want to take some of the load off,
I’d absolutely love to write some content for your blog in exchange for a link back to
mine. Please shoot me an email if interested.
Many thanks!
Everyone loves what you guys tend to be up too. This type of clever work and exposure!
Keep up the amazing works guys I’ve you guys to my personal blogroll.
Also visit my web-site; real estate agent Paducah KY
Затяжной запой опасен для жизни. Врачи наркологической клиники «Трезвый шаг» в Воронеже проводят срочный вывод из запоя — на дому или в стационаре. Анонимно, безопасно, круглосуточно.
Детальнее – http://vyvod-iz-zapoya-voronezh13.ru/
Симптоматика ломки может варьироваться: от бессонницы, сильной тревожности и раздражительности до выраженных физически болезненных ощущений, таких как мышечные спазмы, судороги, потливость, головокружение и тошнота. В критических ситуациях, когда симптомы достигают остроты, своевременная медицинская помощь становится жизненно необходимой для предотвращения осложнений и стабилизации состояния пациента.
Узнать больше – снятие ломки наркозависимого новосибирск
Online casinos are perfect for small stakes.
palmslots casino no deposit bonus
Каждый день запоя увеличивает риск для жизни. Не рискуйте — специалисты «Трезвого шага» в Воронеже приедут на дом и окажут экстренную помощь. Без боли, стресса и ожидания.
Исследовать вопрос подробнее – вывод из запоя
Online casinos have better bonuses than expected.
plinko demo
Одной из самых сильных сторон нашей клиники является оперативность. Мы понимаем, что при алкоголизме, наркомании и лекарственной зависимости часто требуются немедленные действия. Если человек находится в состоянии запоя, абстиненции или передозировки, промедление может привести к тяжёлым осложнениям или даже смерти.
Подробнее можно узнать тут – http://narkologicheskaya-pomoshch-balashiha1.ru
Hi there! I know this is kinda off topic however I’d figured I’d ask.
Would you be interested in trading links or maybe guest writing a blog article or vice-versa?
My website discusses a lot of the same topics
as yours and I think we could greatly benefit from
each other. If you’re interested feel free to shoot me an e-mail.
I look forward to hearing from you! Terrific blog by
the way!
После поступления звонка врач клиники «Импульс» незамедлительно отправляется на указанный адрес для оказания срочной помощи. Вызов врача на дом включает следующие этапы:
Исследовать вопрос подробнее – выезд нарколога на дом нижний новгород
Hi, i think that i saw you visited my website so i came to go back the favor?.I’m
attempting to in finding things to improve
my web site!I guess its adequate to use a few of your
ideas!!
На сайте http://sherlock-find.com/ уточните всю необходимую информацию, которая касается высокотехнологичного, инновационного бота Шерлока. Ему не составит труда найти любую информацию о человеке, автомобиле либо бизнесе. Этот сервис является очень удобным, комфортным, а его использование не вызовет сложностей. Вы сможете рассчитывать на получение детальной, точной информации, которая предоставляется в одном отчете. Вы получите информацию о человеке, включая адрес, дату рождения, номер телефона, то, есть ли задолженности.
Посетите интернет магазин FurnituraPRO https://furniturapro.ru/ и вы найдете дверную фурнитуру, по выгодным ценам, для межкомнатных и входных дверей в Москве с доставкой по Московской области, России, Казахстану и Беларуси. Ознакомьтесь с широким ассортиментом товаров, который постоянно обновляется. У нас вы можете купить замок, ручку, фиксатор и другую дверную фурнитуру от большого количества брендов. Подробнее на сайте.
Online slots with bonus rounds are thrilling!
spin mama
На сайте https://z-news.link/ изучите увлекательные и информативные новости, которые представлены здесь со всего мира. Они на самую разную тематику и, как правило, касаются экономики, политики, бизнеса, авто, моды, есть забавные новости, те, что касаются игр, медицины, развлечений и многого другого. Здесь вы обязательно найдете такую информацию, которая обязательно вам пригодится для расширения кругозора. Есть информация как на русском языке, так и английском. Вы точно ничего не пропустите, если будете регулярно посещать этот портал, на котором публикуются самые последние новости из разных стран.
Абстинентный синдром — одно из самых тяжёлых и опасных проявлений наркотической зависимости. Он развивается на фоне резкого отказа от приёма веществ и сопровождается сильнейшими нарушениями работы организма. Это состояние требует немедленного вмешательства. Самостоятельно справиться с ним невозможно — особенно если речь идёт о героине, метадоне, синтетических наркотиках или длительной зависимости. В клинике «НаркоПрофи» мы организовали систему снятия ломки в Подольске, работающую круглосуточно: как на дому, так и в условиях стационара.
Углубиться в тему – https://snyatie-lomki-podolsk1.ru/snyatie-lomki-narkomana-v-podolske
Cari situs judi slot online gacor? E2Bet adalah jawabannya!
Dengan ribuan member aktif, kami menyediakan link slot gacor terbaru setiap
hari. Dapatkan bonus melimpah, pelayanan 24/7, dan kemudahan transaksi.
Самостоятельно выйти из запоя — почти невозможно. В Воронеже врачи клиники «Трезвый шаг» проводят медикаментозный вывод из запоя с круглосуточным выездом. Доверяйте профессионалам.
Исследовать вопрос подробнее – вывод из запоя на дому цена
Процесс лечения включает несколько ключевых этапов, каждый из которых имеет решающее значение для восстановления организма:
Подробнее – снятие ломки на дому недорого новосибирск
Hello everyone, it’s my first go to see at this web page, and paragraph is really fruitful designed for me, keep up
posting such articles or reviews.
Admiring the time and energy you put into your blog and in depth information you present.
It’s awesome to come across a blog every once in a while
that isn’t the same old rehashed material. Fantastic read!
I’ve bookmarked your site and I’m adding your RSS feeds to my Google account.
Лечение ломки в клинике «Эдельвейс» проходит по четко отлаженной схеме, которая учитывает индивидуальные особенности каждого пациента. После первоначального осмотра и сбора анамнеза составляется персональный план терапии, цель которого – как можно быстрее снять симптомы ломки и стабилизировать состояние пациента. Ниже приведен поэтапный алгоритм лечения:
Изучить вопрос глубже – https://snyatie-lomki-ekb8.ru/snyatie-lomki-na-domu-v-ekb
Для обеспечения максимальной безопасности и эффективности лечения процесс организован в несколько этапов. При обращении пациента наши специалисты проводят первичный осмотр и диагностику, чтобы оценить степень интоксикации и выявить возможные осложнения. Далее назначается детоксикационная терапия, сопровождаемая медикаментозной поддержкой и психологическим консультированием. Основные этапы работы можно описать следующим образом:
Подробнее можно узнать тут – вывод из запоя в стационаре в екатеринбурге
The live dealer games are super authentic.
joker jewels
No matter if some one searches for his essential thing, thus he/she wants to be
available that in detail, so that thing is maintained
over here.
I think the admin of this web page is genuinely working hard for his site, since here every information is quality based information.
Look at my webpage – Togel Online
Ломка — это не временное недомогание. Это системное разрушение организма, связанное с тем, что он перестаёт получать наркотик, к которому уже привык. Нарушается обмен веществ, функции сердца, печени, почек, теряется контроль над эмоциями и болью. В состоянии абстиненции человек не может спать, есть, адекватно мыслить. Страдает и тело, и психика.
Получить больше информации – снятие наркотической ломки подольск
Компания Антикор предоставляет спектр услуг по антикоррозийной обработке транспортных средств. Сотрудничаем как с физическими, так и с юридическими лицами. Применяем исключительно материалы высокого качества. Доверьтесь истинным профессионалам своего дела! https://antikor-kirov.ru – тут наши работы представлены, посмотрите их уже сейчас. У нас тысячи довольных клиентов. Гарантируем вам индивидуальный подход. Позвоните и мы с радостью проконсультируем по интересующим вас вопросам. Защитите ваш автомобиль от ржавчины и коррозии!
Online slots with bonus features are awesome.
vai de bet bonus
Hello to every one, the contents existing at this web site are really remarkable for people experience, well, keep up the nice work
fellows.
Абстинентный синдром — одно из самых тяжёлых и опасных проявлений наркотической зависимости. Он развивается на фоне резкого отказа от приёма веществ и сопровождается сильнейшими нарушениями работы организма. Это состояние требует немедленного вмешательства. Самостоятельно справиться с ним невозможно — особенно если речь идёт о героине, метадоне, синтетических наркотиках или длительной зависимости. В клинике «НаркоПрофи» мы организовали систему снятия ломки в Подольске, работающую круглосуточно: как на дому, так и в условиях стационара.
Получить дополнительную информацию – http://snyatie-lomki-podolsk1.ru
Наши специалисты оказывают экстренную помощь по четко отработанной методике, главная задача которой – оперативное снятие симптомов острой интоксикации и абстинентного синдрома, восстановление работы внутренних органов и создание оптимальных условий для последующей реабилитации. Опытный нарколог на дому проведет тщательную диагностику, составит индивидуальный план лечения и даст необходимые рекомендации по дальнейшему выздоровлению.
Детальнее – вызвать нарколога на дом
Необходимо незамедлительно обращаться за медицинской помощью, если у пациента наблюдаются следующие симптомы:
Ознакомиться с деталями – https://snyatie-lomki-novosibirsk8.ru
Love the new slot games every month!
bet on red
If some one needs to be updated with newest technologies afterward
he must be pay a quick visit this site and be up to
date every day.
накрутка подписчиков в инстаграм с компьютера
Tried a crypto deposit, it was instant!
aviator bet
После обращения в клинику «Основа» наш специалист незамедлительно выезжает для оказания экстренной медицинской помощи в Новосибирске. Процесс установки капельницы предусматривает комплексную диагностику и последующее детоксикационное лечение, что позволяет снизить токсическую нагрузку и стабилизировать состояние пациента. Описание процедуры включает следующие этапы:
Разобраться лучше – капельница от запоя вызов город
Howdy just wanted to give you a quick heads up. The text in your post seem
to be running off the screen in Firefox. I’m not sure
if this is a formatting issue or something to do with internet browser compatibility
but I figured I’d post to let you know. The design and style look great though!
Hope you get the issue solved soon. Cheers
Детоксикационные растворы (физиологический раствор, глюкоза, раствор Рингера)
Получить дополнительную информацию – вывод из запоя недорого в екатеринбурге
При обращении за экстренной помощью наш нарколог незамедлительно выезжает на дом или принимает пациента в клинике. Процесс лечения организован по проверенной схеме, позволяющей максимально быстро стабилизировать состояние и облегчить симптомы ломки. Основные этапы включают:
Разобраться лучше – снятие ломок
Процесс лечения включает несколько ключевых этапов, каждый из которых имеет решающее значение для восстановления организма:
Получить дополнительные сведения – ломка от наркотиков в новосибирске
The game filters make it easy to find games.
ganesha gold demo
Ahaa, its nice dialogue about this piece of writing
at this place at this website, I have read all that, so at
this time me also commenting here.
Для обеспечения максимальной безопасности и эффективности лечения процесс организован в несколько этапов. При обращении пациента наши специалисты проводят первичный осмотр и диагностику, чтобы оценить степень интоксикации и выявить возможные осложнения. Далее назначается детоксикационная терапия, сопровождаемая медикаментозной поддержкой и психологическим консультированием. Основные этапы работы можно описать следующим образом:
Узнать больше – срочный вывод из запоя
Stunning quest there. What happened after?
Thanks!
Got a cashback offer, saved me some losses.
spinmama
Artwing – студия дизайна графики. Свое дело мы любим и ради превосходного результата готовы сворачивать горы. Осуществляем услуги высшего качества по дизайну логотипа. Строго установленные сроки выдерживаем. Ищете иллюстрирование? Artwing.ru – портал, который позволяет опубликовывать об услугах подробную информацию. Наши цены держатся в рамках приличия. Беремся за проекты разного масштаба и сложности. Составим плакатное креативное решение наружной рекламы, которое увеличит продажи и потенциальных клиентов привлечет. Обращайтесь к нам!
Именно поэтому так важно не терять время. Чем раньше пациент получает помощь, тем выше шансы избежать необратимых последствий и вернуться к нормальной жизни.
Получить больше информации – снятие ломки наркозависимого
This page really has all of the info I needed about this subject and didn’t
know who to ask.
Also visit my web page tonic greens official website
Wonderful beat ! I wish to apprentice while you amend your
site, how could i subscribe for a blog site?
The account aided me a acceptable deal. I have been tiny bit acquainted of this your broadcast offered vivid clear idea
Won a small prize, online casinos are fun!
plinko
Very nice post. I just stumbled upon your blog and wished to say
that I’ve truly enjoyed browsing your blog posts.
In any case I will be subscribing to your
feed and I hope you write again very soon!
Feel free to visit my blog post – best real estate agent in Springfield OR
Стационарная программа позволяет стабилизировать не только физическое состояние, но и эмоциональную сферу. Находясь в изоляции от внешних раздражителей и вредных контактов, пациент получает шанс сконцентрироваться на себе и начать реабилитацию без давления извне.
Узнать больше – http://narkologicheskaya-pomoshch-balashiha1.ru/kruglosutochnaya-narkologicheskaya-pomoshch-v-balashihe/
Процесс лечения включает несколько ключевых этапов, каждый из которых имеет решающее значение для восстановления организма:
Получить дополнительные сведения – снятие наркологической ломки на дому в новосибирске
ТД «Авангард» предлагает покупателям большой ассортимент продукции. Мы поставляем силовые кабели с оперативной доставкой по Москве и области. Товары высокой надежностью отличаются. Используем индивидуальный подход в работе. Принимаем различные формы оплаты. Готовы уделить время для консультирования. Ищете кабель асбл? Kabel-silovoj.ru – здесь можно заказать кабель силовой. Работаем как с физическими, так и с юридическими лицами. Выстраиваем долгосрочные отношения со своими клиентами. Звоните, с удовольствием ваши предложения и пожелания выслушаем.
Hey there outstanding blog! Does running a blog similar to this require a
great deal of work? I’ve absolutely no knowledge of coding but I was hoping to start my own blog soon. Anyways, should you have any suggestions
or techniques for new blog owners please share. I know this is off subject nevertheless I just needed to ask.
Many thanks!
I’ve been surfing online more than three hours
today, yet I never found any interesting article like yours.
It’s pretty worth enough for me. In my opinion, if all webmasters and bloggers made good content as you did, the
net will be a lot more useful than ever before.
Алкогольный запой – это критическое состояние, возникающее при длительном злоупотреблении спиртными напитками, когда организм насыщается токсинами и его жизненно важные системы (сердечно-сосудистая, печёночная, нервная) начинают давать сбой. В такой ситуации необходимо незамедлительное вмешательство специалистов для предотвращения тяжелых осложнений и спасения жизни. Наркологическая клиника «Основа» в Новосибирске предоставляет экстренную помощь с помощью установки капельницы от запоя, позволяющей оперативно вывести токсины из организма, стабилизировать внутренние процессы и создать условия для последующего качественного восстановления.
Углубиться в тему – вызвать капельницу от запоя
The casino app is fast and reliable.
aviator
Детоксикационные растворы (физиологический раствор, глюкоза, раствор Рингера)
Получить дополнительные сведения – https://vyvod-iz-zapoya-ekb8.ru/vyvod-iz-zapoya-cena-v-ekb
Немедленный вызов врача необходим, если наблюдаются следующие симптомы:
Углубиться в тему – снятие наркологической ломки на дому
The bonus conditions are clear and fair.
plinko
We absolutely love your blog and find nearly all of your post’s to be just what I’m looking for.
Would you offer guest writers to write content for you?
I wouldn’t mind creating a post or elaborating on a
lot of the subjects you write about here. Again, awesome site!
you are really a excellent webmaster. The site loading velocity is amazing.
It kind of feels that you are doing any unique trick.
Moreover, The contents are masterwork. you have performed a great task on this topic!
На сайте https://mirtash.ru/ изучите каталог натурального камня, который подходит для декорирования приусадебной территории. Но им украшают и дом внутри. Важным преимуществом покупки камня в этой компании является то, что его добывают напрямую из проверенных месторождений России. Работы мастеров этой компании вызывают неподдельный восторг, восхищение. На ваше усмотрение можно выбрать самую разную цветовую палитру, а также фактуру. Все природные камни отличаются высокой прочностью, надежностью, экологичностью.
There’s a concern that you could develop into addicted to Viagra
and by no means be able to perform with out
it, after all, if it’s the one way of achieving an erection then your intercourse life can’t survive without
it proper? Many girls find that the stresses of daily life lower their need for intercourse.
“Cialis is probably the second mostly prescribed drug and could be taken as a day by day pill, which permits for more spontaneity with intercourse,”
he says. Hippie hoards haven’t hauled their rolling papers and bongs
over those more freewheeling borders as a result of the state laws aren’t supposed to get everyone high.
Based on The British Heart Foundation, erectile dysfunction may very well be a sign that there is something unsuitable with the guts,
specifically, a condition often known as atherosclerosis
(narrowing of the arteries) which may enhance the danger of a heart attack,
so it’s vital to get your ED checked out by a physician as there may be an underlying trigger.
Many males have been postpone trying erectile dysfunction treatments on account of embarrassment.
The myth that ED therapies protect in opposition to STIs could result in the spread of these
infections as folks fail to make use of different strategies of contraception and
as an alternative depend on Viagra.
Yes! Finally someone writes about ngentot nungging.
I’m not positive where you are getting your info, however good topic.
I must spend some time studying much more or understanding more.
Thanks for fantastic information I was searching for this information for my mission.
I can’t believe the difference after having jawline filler at It’s Me & You! Dr Laura Geige sculpted my face so beautifully, and I finally feel confident in my side profile. She’s truly an artist!
Here is my blog post :: http://bronzedbodyspraytan.com
Когда организм на пределе, важна срочная помощь. «Трезвый шаг» в Воронеже — это команда опытных наркологов, которые помогут быстро и мягко выйти из запоя без вреда для здоровья.
Получить дополнительную информацию – наркология вывод из запоя
В клинике «Трезвая Жизнь» для эффективного вывода организма из запоя используется комплексный подход, который включает применение различных групп препаратов. Приведенная ниже таблица отражает основные компоненты нашей терапии и их функции:
Исследовать вопрос подробнее – вывод из запоя капельница в екатеринбурге
The free mode is great for learning.
fruit cocktail slot
Именно поэтому так важно не терять время. Чем раньше пациент получает помощь, тем выше шансы избежать необратимых последствий и вернуться к нормальной жизни.
Получить дополнительную информацию – снятие ломки на дому цена подольск
Online casinos are great for low budgets.
plinko demo
Клиника «Возрождение» применяет комплексный подход к снятию ломки, используя современные детоксикационные методики и проверенные препараты. Приведенная ниже таблица демонстрирует основные группы медикаментов, используемых в терапии, и их назначение:
Разобраться лучше – снятие ломки на дому цена в новосибирске
Также мы учитываем потребности каждого пациента — по питанию, условиям проживания, графику процедур. Проживание возможно в стандартных и повышенных палатах, с возможностью индивидуального обслуживания.
Разобраться лучше – вызов наркологической помощи в балашихе
I have been exploring for a little for any high-quality articles or weblog posts on this sort
of house . Exploring in Yahoo I at last stumbled upon this web site.
Reading this info So i’m satisfied to exhibit
that I’ve an incredibly good uncanny feeling I
found out exactly what I needed. I so much certainly will make
certain to do not forget this web site and provides it a look on a constant basis.
Hello I am so grateful I found your blog, I
really found you by mistake, while I was looking on Yahoo
for something else, Nonetheless I am here now and would just like to say thanks
a lot for a incredible post and a all round enjoyable blog (I also love the theme/design), I don’t have time to
read through it all at the moment but I have book-marked it
and also included your RSS feeds, so when I have time I
will be back to read much more, Please do keep up
the superb work.
На сайте https://press-forma.by/ закажите бесплатный расчет на производство пресс-форм, а также различных пластиковых конструкций. Весь заказ будет выполнен точно в обозначенные сроки. Специалисты предприятия работают исключительно на результат, чтобы ваш бизнес только процветал и становился рентабельным. Предприятие находится на рынке более 10 лет, за которые заполучило огромное количество положительных отзывов. В арсенале около 30 единиц техники, чтобы создать для вас продукцию эталонного качества.
My brother recommended I might like this blog. He was totally right.
This post actually made my day. You can not imagine simply how much time I had spent for this information! Thanks!
Regards, Excellent information.
The payout process was quick and easy.
andar bahar game
Hey there outstanding blog! Does running a blog similar to this require a
large amount of work? I’ve very little knowledge of programming but I had
been hoping to start my own blog in the near future.
Anyways, if you have any suggestions or techniques for new blog owners please share.
I understand this is off subject however I just
had to ask. Cheers!
Also visit my page; best realtor in East Falmouth MA
Excellent blog here! Also your web site loads up very fast!
What web host are you using? Can I get your affiliate link to your host?
I wish my site loaded up as fast as yours lol
The game selection is always expanding.
plinko game
Для обеспечения максимальной безопасности и эффективности лечения процесс организован в несколько этапов. При обращении пациента наши специалисты проводят первичный осмотр и диагностику, чтобы оценить степень интоксикации и выявить возможные осложнения. Далее назначается детоксикационная терапия, сопровождаемая медикаментозной поддержкой и психологическим консультированием. Основные этапы работы можно описать следующим образом:
Получить больше информации – https://vyvod-iz-zapoya-ekb8.ru/
What a information of un-ambiguity and preserveness of precious knowledge about
unexpected emotions.
Howdy! Do you know if they make any plugins to assist with Search Engine Optimization? I’m trying to get my
blog to rank for some targeted keywords but I’m not seeing very
good success. If you know of any please share. Thanks!
Задача врачей — не просто облегчить симптомы, а купировать осложнения, стабилизировать жизненно важные функции, вернуть пациенту способность к дальнейшему лечению. Мы работаем быстро, анонимно и профессионально. Любой человек, оказавшийся в кризисе, может получить помощь в течение часа после обращения.
Углубиться в тему – снятие наркологической ломки в подольске
Самостоятельно выйти из запоя — почти невозможно. В Воронеже врачи клиники «Трезвый шаг» проводят медикаментозный вывод из запоя с круглосуточным выездом. Доверяйте профессионалам.
Получить больше информации – вывод из запоя в стационаре
First off I want to say excellent blog! I had a quick question which I’d like to
ask if you don’t mind. I was curious to know how you center yourself and clear your head
before writing. I’ve had a tough time clearing my thoughts in getting my ideas out there.
I do enjoy writing however it just seems like the first 10 to 15 minutes are lost simply just trying to figure out how to
begin. Any ideas or hints? Thank you!
Fine postings, Regards!
Online poker tournaments are so exciting!
plinko game
Затяжной запой опасен для жизни. Врачи наркологической клиники «Трезвый шаг» в Воронеже проводят срочный вывод из запоя — на дому или в стационаре. Анонимно, безопасно, круглосуточно.
Узнать больше – вывод из запоя недорого
Поэтому наша служба экстренного выезда работает круглосуточно. Медицинская бригада приезжает на вызов в любой район Балашихи в течение часа. Пациенту ставят капельницы, стабилизируют давление, снимают судорожный синдром и устраняют тревожность. Всё это проходит под наблюдением опытных врачей, которые ежедневно сталкиваются с острыми ситуациями и знают, как действовать быстро и безопасно.
Изучить вопрос глубже – http://www.domen.ru
Для обеспечения максимальной безопасности и эффективности лечения процесс организован в несколько этапов. При обращении пациента наши специалисты проводят первичный осмотр и диагностику, чтобы оценить степень интоксикации и выявить возможные осложнения. Далее назначается детоксикационная терапия, сопровождаемая медикаментозной поддержкой и психологическим консультированием. Основные этапы работы можно описать следующим образом:
Подробнее – наркологический вывод из запоя
Have you ever thought about adding a little bit more than just your articles?
I mean, what you say is important and everything. Nevertheless think of if you added some great pictures or video clips to give your posts more, “pop”!
Your content is excellent but with pics and clips, this website
could definitely be one of the very best in its niche.
Terrific blog!
Fantastic web site. Lots of helpful info here. I am sending it to some pals ans additionally sharing in delicious.
And certainly, thank you to your sweat!
My web-site; best realtor in Bedford NH
I was suggested this blog by my cousin. I’m not sure whether this post is written by him as no one else know such detailed
about my trouble. You’re wonderful! Thanks!
Детоксикационные растворы (физиологический раствор, глюкоза, раствор Рингера)
Разобраться лучше – наркологический вывод из запоя
Playing roulette online is so convenient.
spin mama
I was curious if you ever thought of changing the structure of your website?
Its very well written; I love what youve got to say. But maybe you could a
little more in the way of content so people could connect with it better.
Youve got an awful lot of text for only having one or two images.
Maybe you could space it out better?
Discover what’s really happening in the cities of the world — from Hanoi to Hamburg, Jakarta to Jeddah. This multilingual platform shares real local news, not just global headlines. Stay connected with everyday life in places you care about – https://asiacity.news/
Процесс начинается с вызова врача или доставки пациента в клинику. После прибытия специалист проводит первичную диагностику: измерение давления, температуры, пульса, уровня кислорода в крови, визуальная оценка степени возбуждения или угнетения сознания. Собирается краткий анамнез: какой наркотик принимался, как долго, были ли сопутствующие заболевания.
Подробнее можно узнать тут – снятие ломок
Ломка – это тяжелый синдром отмены, возникающий после длительного употребления алкоголя или наркотических веществ. При резком прекращении их приема нервная система и другие органы начинают страдать от недостатка необходимых веществ, что приводит к сильному дискомфорту, психоэмоциональным нарушениям и ухудшению общего состояния организма. В Новосибирске наркологическая клиника «Возрождение» оказывает экстренную помощь при снятии ломки, обеспечивая безопасное, круглосуточное и конфиденциальное лечение под наблюдением опытных специалистов.
Детальнее – http://snyatie-lomki-novosibirsk8.ru/
Когда организм на пределе, важна срочная помощь. «Трезвый шаг» в Воронеже — это команда опытных наркологов, которые помогут быстро и мягко выйти из запоя без вреда для здоровья.
Получить дополнительные сведения – воронежская область
It’s awesome to go to see this site and reading the views of all mates about this paragraph, while I
am also keen of getting experience.
Обновляете ли вы свой дом или обновляете
гардероб, Mega – это лучшее место
для выбора качества и доступности.
Благодаря разнообразию товаров на mega как войти, вы легко найдете нужное.
What’s up, just wanted to mention, I liked this article.
It was inspiring. Keep on posting!
Playing roulette online is so convenient.
aviator
Good day! Do you know if they make any plugins
to safeguard against hackers? I’m kinda paranoid about losing everything I’ve worked hard
on. Any suggestions?
Here is my website: Poker
Этот информативный материал предлагает содержательную информацию по множеству задач и вопросов. Мы призываем вас исследовать различные идеи и факты, обобщая их для более глубокого понимания. Наша цель — сделать обучение доступным и увлекательным.
Подробнее – https://www.holzmindenliebe.de/mit-dem-ruder-club-die-natur-und-das-vereinsleben-geniessen
Эта статья предлагает захватывающий и полезный контент, который привлечет внимание широкого круга читателей. Мы постараемся представить тебе идеи, которые вдохновят вас на изменения в жизни и предоставят практические решения для повседневных вопросов. Читайте и вдохновляйтесь!
Подробнее – https://www.hotel-sugano.com/bbs/sugano.cgi/www.tovery.net/www.skitour.su/www.tovery.net/sinopipefittings.com/e_Feedback/www.hip-hop.ru/forum/sugano.cgi?page20=val
Ломка – это острый синдром отмены, возникающий при резком прекращении или снижении дозы алкоголя или других психоактивных веществ у хронически зависимых пациентов. Это состояние характеризуется выраженной физической и психической дискомфортностью, которая может сопровождаться сильными болевыми ощущениями, тревожностью, дрожью, потливостью, галлюцинациями и нарушениями сна. В критический момент ломка может привести к серьезным осложнениям, поэтому экстренная помощь нарколога имеет первостепенное значение для стабилизации состояния пациента и быстрого снятия симптомов.
Получить дополнительную информацию – снятие наркотической ломки
Актуальные новости. Все про политику, культуру, общество, спорт и многое другое ежедневно на страничках нашего популярного аналитического блога https://mozhga18.ru/
The free mode helped me learn new games.
plinko game
Hurrah, that’s what I was exploring for, what a data! present here at
this weblog, thanks admin of this website.
My family all the time say that I am wasting my time here at net,
however I know I am getting knowledge all the time by reading such pleasant articles
or reviews.
I know this website provides quality depending articles and other material, is there any other web site which offers such stuff
in quality?
Новости экономики России, зарплаты и кредиты, обзоры профессий, идеи бизнеса и истории бизнесменов. Независимая экономическая аналитика и репортажи https://iqreview.ru/
Необходимо незамедлительно обращаться за медицинской помощью, если у пациента наблюдаются следующие симптомы:
Получить дополнительную информацию – https://snyatie-lomki-novosibirsk8.ru/snyatie-lomki-na-domu-v-novosibirske
My casino’s VIP program is so rewarding.
joker jewels
Become an ACPMA Instructor (MAB/CPI) – Crisis Prevention Intervention
American Crisis Prevention & Management Association Welcomes qualified professionals from
various fields to take our instructor course and teach ACPMA
courses at their locations.
Benefits of certifying an instructor with ACPMA:
Become a Certified instructor for Crisis Prevention &
Assaultive Behavior Management
Training done by experienced Personnel
Save on training your employees by training
the trainer in your facility
Learn the core principles of adult learning
Leave the training fully confident to teach the AB 508 mandated topics, Crisis Intervention topics
and work
Receive all the training materials you need to teach students
Become part of a household name on Assaultive Behavior Management training
Study in front of your computer (for online students)
You can take the instructor course online at https://www.crisispreventionmanagement.com/become-an-instructor
There’s definately a lot to learn about this
subject. I like all of the points you have made.
Feel free to surf to my web site … best real estate agent in Bedford NH
Online roulette is my favorite way to relax.
super hot fruits
Детоксикационные растворы (физиологический раствор, глюкоза, раствор Рингера)
Ознакомиться с деталями – https://vyvod-iz-zapoya-ekb8.ru/vyvod-iz-zapoya-cena-v-ekb/
สูตรเลขเด็ดงวดนี้
My partner and I stumbled over here from a different web page and thought I might
check things out. I like what I see so i am just following you.
Look forward to finding out about your web page yet again.
Howdy! This is my first visit to your blog!
We are a team of volunteers and starting a new
initiative in a community in the same niche. Your blog provided us beneficial information to work on. You have done a outstanding job!
Снятие ломки в клинике «Эдельвейс» – это комплекс мероприятий, направленный на быстрое облегчение симптоматики и стабилизацию внутренних процессов организма. Наш подход включает комплексную диагностику, медикаментозную терапию, поддерживающие процедуры и психологическое сопровождение, что помогает пациенту не только справиться с острой фазой ломки, но и закладывает основу для дальнейшей реабилитации и предотвращения рецидивов.
Узнать больше – lomka ot narkotikov ekaterinburg
I don’t even know how I ended up here, but I thought this post was good.
I do not know who you are but certainly you are going to a
famous blogger if you aren’t already 😉 Cheers!
Visit my web page :: best real estate agent in McDonough GA
Got a loyalty bonus after a month of playing, feels rewarding.
plinko pakistan
E2Bet Pakistan
Blog Comment: Finally, a platform that caters to Pakistani cricket fans!
E2Bet has everything—live matches, instant betting options, and unbeatable odds.
Loving the experience so far!
В этой статье собраны факты, которые освещают целый ряд важных вопросов. Мы стремимся предложить читателям четкую, достоверную информацию, которая поможет сформировать собственное мнение и лучше понять сложные аспекты рассматриваемой темы.
Получить больше информации – https://redmetal.com.au/hello-world
Online casinos have the best game variety.
spin mama
fantastic publish, very informative. I’m wondering why
the opposite experts of this sector don’t notice this. You must proceed your writing.
I’m confident, you have a huge readers’ base already!
It is not my first time to pay a quick visit
this website, i am visiting this web page dailly and obtain nice information from here all the time.
Japanese porn tube
В этой публикации мы предлагаем подробные объяснения по актуальным вопросам, чтобы помочь читателям глубже понять их. Четкость и структурированность материала сделают его удобным для усвоения и применения в повседневной жизни.
Подробнее можно узнать тут – http://www.existentiellitteraturfestival.se/programmet-klart-for-existentiell-litteraturfestival-2021
Достигните новых высот с нашим сервисом прогона хрумером и ГСА!
Мы гарантируем качественное продвижение вашего сайта,
увеличение трафика и повышении позиций в поисковых системах.
Закажите сейчас и получите эксклюзивные условия!
Не упустите возможность привлечь новых клиентов и увеличить
продажи.
Контактируйте с нами и увидите результат заказать можно здесь ==>> https://t.me/+HFxk5vlUvGEzM2Zi
The withdrawal process was super fast.
vinci spin bonus code
Kra31.cc
I’m not sure exactly why but this web site is loading very slow for me.
Is anyone else having this problem or is it a issue on my
end? I’ll check back later on and see if the problem still exists.
The casino app is always reliable.
aviator
Hello! I know this is somewhat off topic but I was wondering
if you knew where I could locate a captcha plugin for my comment form?
I’m using the same blog platform as yours and I’m having problems finding one?
Thanks a lot!
Этот информативный материал предлагает содержательную информацию по множеству задач и вопросов. Мы призываем вас исследовать различные идеи и факты, обобщая их для более глубокого понимания. Наша цель — сделать обучение доступным и увлекательным.
Получить дополнительные сведения – http://vinamgroup.com.vn/loving-ideas-to-maintain-the-spark-survive
You stated it superbly!
my web-site :: https://ssh.joshuakmckelvey.com/mistyheredia35
В данной обзорной статье представлены интригующие факты, которые не оставят вас равнодушными. Мы критикуем и анализируем события, которые изменили наше восприятие мира. Узнайте, что стоит за новыми открытиями и как они могут изменить ваше восприятие реальности.
Подробнее – https://www.hotelsaigurusthan.com/facilities/car_parking
В этом информативном обзоре собраны самые интересные статистические данные и факты, которые помогут лучше понять текущие тренды. Мы представим вам цифры и графики, которые иллюстрируют, как развиваются различные сферы жизни. Эта информация станет отличной основой для глубокого анализа и принятия обоснованных решений.
Изучить вопрос глубже – https://www.foodiesnative.com/coconut-cake
Thank you for sharing your thoughts. I really appreciate your efforts and I
am waiting for your further post thank you once again.
Look into my blog post Accutek Packaging Equipment Company
The casino site is so easy to navigate.
plinko demo
What’s Happening i am new to this, I stumbled upon this I have discovered It positively useful and it has helped me out loads.
I’m hoping to give a contribution & help different users like its
helped me. Great job.
The game filters make it easy to find games.
betonred
Truly when someone doesn’t understand after that its up
to other users that they will help, so here it occurs.
Эта статья предлагает уникальную подборку занимательных фактов и необычных историй, которые вы, возможно, не знали. Мы постараемся вдохновить ваше воображение и разнообразить ваш кругозор, погружая вас в мир, полный интересных открытий. Читайте и открывайте для себя новое!
Получить больше информации – https://koubun.tokyo/category1/12
Онлайн-магазины Apple в Москве в
столице сделали большое и доброе дело, ознакомив многочисленную
и непосвящённую публику по всему миру с понятием
оптимального сочетания качества, функционала и
дизайна и, при этом, удивительной простоты использования.
Эти характеристики долгое время продолжают
выделять по сравнению с аналогами, сначала «старичков макинтошей»,
а затем и iPod, MacBook Air, iPhone, iPad, MacBook Pro, а также ряд других качественных и креативных продуктов
Apple в столичных магазинах.
Стоит отметить, для объективности, необходимо также признать, что многие из этих разработок были первыми в своём роде в своей отрасли и
не имели на момент создания каких-либо
конкурентов.
Впрочем, этот факт – это, всего лишь
одно из десятков и сотен преимуществ, которыми
по праву обладает продукция Apple в Москве в столице, и он стал итогом посвящённого
труда команды больших энтузиастов,
отдавших и продолжающих отдавать свою жизнь созданию удобных, стильных
и эффективных продуктов. https://macuser.ua/search?word=wat4+ru+%D0%B2+%D0%BC%D1%81%D0%BA
The casino app runs perfectly.
fortune tiger
В этой публикации мы сосредоточимся на интересных аспектах одной из самых актуальных тем современности. Совмещая факты и мнения экспертов, мы создадим полное представление о предмете, которое будет полезно как новичкам, так и тем, кто глубоко изучает вопрос.
Получить больше информации – https://www.manabangarutelangana.in/ap-development-vision-2030
В этом информативном тексте представлены захватывающие события и факты, которые заставят вас задуматься. Мы обращаем внимание на важные моменты, которые часто остаются незамеченными, и предлагаем новые перспективы на привычные вещи. Подготовьтесь к тому, чтобы быть поглощенным увлекательными рассказами!
Детальнее – https://learnsblogs.com/honda-cbr300r-ready-to-launch-wonderful-look-and-amazing-features-know-the-launch-date
Этот интересный отчет представляет собой сборник полезных фактов, касающихся актуальных тем. Мы проанализируем данные, чтобы вы могли сделать обоснованные выводы. Читайте, чтобы узнать больше о последних трендах и значимых событиях!
Узнать больше – https://deltaprev.com.br/2023/08/21/embracing-the-wonders-of-the-natural-world
Online casinos make everything so easy.
andar bahar online
link porno grafilink porno grafilink porno grafi link porno grafilink porno
grafilink porno grafi link porno grafilink porno grafilink
porno grafi link porno grafilink porno grafilink porno grafi link porno grafilink porno grafilink porno grafi
link porno grafilink porno grafilink porno grafi link porno grafilink porno grafilink porno grafi link porno grafilink porno grafilink porno grafi link porno grafilink
porno grafilink porno grafi link porno grafilink porno grafilink
porno grafi link porno grafilink porno grafilink porno grafi link
porno grafilink porno grafilink porno grafi link porno grafilink porno grafilink porno
grafi link porno grafilink porno grafilink porno grafi
link porno grafilink porno grafilink porno grafi link porno grafilink porno grafilink
porno grafi link porno grafilink porno grafilink porno grafi link
porno grafilink porno grafilink porno grafi link porno grafilink porno grafilink porno grafi link porno grafilink porno grafilink porno grafi link porno grafilink porno grafilink porno
grafi link porno grafilink porno grafilink porno grafi link porno grafilink porno grafilink porno grafi link porno grafilink porno grafilink porno grafi link
porno grafilink porno grafilink porno grafi link porno grafilink
porno grafilink porno grafi link porno grafilink porno grafilink porno grafi
link porno grafilink porno grafilink porno grafi link porno
grafilink porno grafilink porno grafi link porno grafilink porno
grafilink porno grafi link porno grafilink porno grafilink porno grafi link
porno grafilink porno grafilink porno grafi link porno grafilink porno
grafilink porno grafi link porno grafilink porno grafilink porno grafi link porno grafilink porno
grafilink porno grafi link porno grafilink porno grafilink porno grafi link porno grafilink porno grafilink porno grafi link
porno grafilink porno grafilink porno grafi link porno grafilink porno grafilink
porno grafi link porno grafilink porno grafilink porno grafi
link porno grafilink porno grafilink porno grafi link porno
grafilink porno grafilink porno grafi link porno grafilink porno grafilink porno grafi link porno grafilink
porno grafilink porno grafi link porno grafilink porno grafilink porno grafi link porno grafilink porno grafilink porno grafi link porno grafilink porno grafilink
porno grafi link porno grafilink porno grafilink porno grafi link
porno grafilink porno grafilink porno grafi link porno grafilink porno grafilink porno
grafi link porno grafilink porno grafilink porno grafi link porno grafilink porno grafilink porno grafi link
porno grafilink porno grafilink porno grafi link porno grafilink porno grafilink porno grafi link
porno grafilink porno grafilink porno grafi link porno grafilink porno
grafilink porno grafi link porno grafilink porno grafilink porno grafi
link porno grafilink porno grafilink porno grafi link porno grafilink porno grafilink porno grafi link porno grafilink porno grafilink porno grafi link porno grafilink porno grafilink
porno grafi link porno grafilink porno grafilink porno grafi
link porno grafilink porno grafilink porno grafi
Эта статья сочетает познавательный и занимательный контент, что делает ее идеальной для любителей глубоких исследований. Мы рассмотрим увлекательные аспекты различных тем и предоставим вам новые знания, которые могут оказаться полезными в будущем.
Ознакомиться с деталями – http://www.gzm-mazury.pl/hello-world/comment-page-4348
provinsi에 대한 당신의 생각을 공유해줘서 감사합니다.
Regards
Every weekend i used to pay a visit this website, because i want enjoyment, for the reason that this this
web site conations truly fastidious funny material too.
The casino app is super smooth.
aviator game
Эта статья сочетает познавательный и занимательный контент, что делает ее идеальной для любителей глубоких исследований. Мы рассмотрим увлекательные аспекты различных тем и предоставим вам новые знания, которые могут оказаться полезными в будущем.
Углубиться в тему – https://www.kilyoskolonyalari.com/2023/08/21/a-journey-through-earths-natural-splendor
Эта публикация погружает вас в мир увлекательных фактов и удивительных открытий. Мы расскажем о ключевых событиях, которые изменили ход истории, и приоткроем завесу над научными достижениями, которые вдохновили миллионы. Узнайте, чему может научить нас прошлое и как применить эти знания в будущем.
Углубиться в тему – https://tourengine.com/hello-world
The bonus terms are straightforward.
plinko free
Wow, wonderful weblog structure! How lengthy have you ever been blogging for?
you made blogging glance easy. The entire look of your website is excellent,
as smartly as the content material!
I enjoy what you guys tend to be up too. Such clever work and reporting!
Keep up the amazing works guys I’ve incorporated you
guys to my personal blogroll.
Обзор VPS-сервисов
Экономьте время и деньги, выбирая VPS на poiskvps:
poiskvps
Быстрый поиск VPS-провайдера
Экономьте время и деньги, выбирая VPS на poiskvps:
Найти VPS
The bonus terms are fair and clear.
fortune tiger
It’s amazing to pay a quick visit this site and reading the views of all
colleagues concerning this post, while I am also keen of getting knowledge.
Excellent post. I was checking constantly this weblog and I am impressed!
Very useful information particularly the remaining phase :
) I care for such info a lot. I was looking for this certain information for
a very lengthy time. Thanks and good luck.
The live baccarat table is so classy!
demo aviator
Link exchange is nothing else but it is just placing the other person’s
webpage link on your page at proper place and other person will also do same in support of you.
Won a prize in a slot tournament, awesome!
aviator game
Быстрый поиск VPS-провайдера
Сравните тарифы, характеристики и отзывы о VPS:
VPS-провайдеры
naturally like your website but you have to check
the spelling on several of your posts. Many of them are rife with
spelling issues and I find it very troublesome to
tell the truth on the other hand I’ll surely come again again.
https://melanconcompany.com/
Как выбрать VPS
Читайте честные обзоры и рейтинги VPS-сервисов:
Обзор VPS
certainly like your web site however you need to take a look
at the spelling on several of your posts. Many of them are rife with
spelling issues and I find it very bothersome to inform the reality then again I’ll
certainly come again again.
Also visit my page :: Togel Terpercaya
The live dealer blackjack table is awesome!
vamos bet football
Hello are using WordPress for your blog platform? I’m new to the blog world but I’m trying to
get started and set up my own. Do you require any html coding
expertise to make your own blog? Any help would be greatly appreciated!
My spouse and I absolutely love your blog and find the
majority of your post’s to be exactly I’m looking for.
can you offer guest writers to write content for you? I
wouldn’t mind creating a post or elaborating on a lot
of the subjects you write about here. Again, awesome blog!
Greetings I am so excited I found your blog page, I
really found you by error, while I was looking on Yahoo for something else, Anyways I am here now and would just
like to say many thanks for a remarkable post and a all round thrilling blog
(I also love the theme/design), I don’t have time to read through it all at the minute but I have bookmarked it and also
added your RSS feeds, so when I have time I will be back to read
much more, Please do keep up the fantastic jo.
Look into my web site real estate agent Paducah KY
Love the seasonal casino bonuses, so fun!
bet on red app
Детоксикационные растворы (физиологический раствор, глюкоза, раствор Рингера)
Разобраться лучше – [url=https://vyvod-iz-zapoya-ekb8.ru/]вывод из запоя цена в екатеринбурге[/url]
Врачебный состав клиники “Маяк надежды” состоит из высококвалифицированных специалистов в области наркологии. Наши врачи-наркологи имеют обширный опыт работы с зависимыми пациентами и постоянно совершенствуют свои навыки.
Углубиться в тему – https://алко-лечение24.рф/vivod-iz-zapoya-cena-v-Sankt-Peterburge
The refer-a-friend bonus got me extra spins!
plinko apk
Hey there just wanted to give you a quick heads up.
The words in your post seem to be running off the screen in Chrome.
I’m not sure if this is a formatting issue or something to do
with browser compatibility but I thought I’d post to let
you know. The design and style look great though!
Hope you get the problem fixed soon. Kudos
Review my web blog :: best realtor in East Falmouth MA
This post will help the internet users for building up new blog or even a blog from start to end.
Hi there, There’s no doubt that your web site could possibly be having browser compatibility issues.
Whenever I take a look at your blog in Safari, it looks fine however, when opening in IE, it’s got some
overlapping issues. I just wanted to provide you with a quick heads up!
Besides that, wonderful website!
Feel free to visit my blog; Prediksi SGP
Tried a crypto deposit, it was instant!
marvel casino
Discover Pornjourney, a platform where artificial intelligence makes your desires come true. Create your perfect AI heroines, chat in real time, and enjoy personalized content tailored to your tastes. The next level of sex technology is here.
В-третьих, реабилитация и ресоциализация. Успешное лечение требует не только устранения физической зависимости. Мы акцентируем внимание на восстановлении социальных связей, улучшении психоэмоционального состояния и формировании новых интересов. Программа включает как групповые, так и индивидуальные занятия, что позволяет пациентам обрести уверенность в себе.
Подробнее тут – http://
Saudações de Colorado! Estou entediado
The live chat in games is so interactive.
plinko review
Keep this going please, great job!
Домашнее лечение позволяет снизить психологическое напряжение, поскольку пациент остаётся в привычной обстановке — рядом с близкими и без очередей. Экономия времени достигается за счёт оперативного выезда специалиста без необходимости госпитализации, а затраты на вызов часто оказываются ниже, чем в стационаре. При грамотном подборе медикаментов и круглосуточном контроле со стороны врача риск осложнений сводится к минимуму.
Выяснить больше – https://алко-избавление.рф/vyvod-iz-zapoya-czena-msk
Online roulette with live dealers is immersive.
spinmama
Когда состояние алкогольной интоксикации достигает критических уровней, своевременное вмешательство становится жизненно необходимым. В Мариуполе, Донецкая область, высококвалифицированные наркологи оказывают срочную помощь на дому, позволяя оперативно начать детоксикацию и стабилизировать состояние пациента. Такой формат лечения обеспечивает быстрый выход из кризиса в условиях комфорта и конфиденциальности, что особенно важно для тех, кто не может позволить себе задержки в стационарном лечении.
Получить дополнительную информацию – vyzov-narkologa-na-dom mariupol’
Thank you for the good writeup. It in fact was a amusement account it.
Look advanced to far added agreeable from you! However, how could we communicate?
При поступлении вызова нарколог незамедлительно приезжает на дом для проведения тщательного первичного осмотра. Специалист измеряет жизненно важные показатели, такие как пульс, артериальное давление и температура, а также собирает анамнез для оценки степени алкогольной интоксикации. Эта информация является основой для разработки персонального плана лечения.
Узнать больше – наркологический вывод из запоя в мурманске
It is not my first time to visit this web page, i am visiting
this web page dailly and get pleasant data from here all the
time.
Металлические ограждения https://osk-stroi.ru для дома, дачи, промышленных и общественных объектов. Качественные материалы, долговечность, устойчивость к коррозии. Быстрая установка и индивидуальное изготовление под заказ.
The slot animations are so fun to watch!
plinko game
Миссия клиники “Путь к выздоровлению” заключается в содействии восстановлению здоровья и социальной реинтеграции людей, столкнувшихся с проблемами зависимости. Мы стремимся к комплексному решению этой сложной задачи, учитывая физические, психологические и социальные аспекты зависимости. Наша цель — не только помочь пациентам избавиться от физической зависимости, но и обеспечить их психологическое восстановление и возвращение к нормальной жизни в обществе.
Узнать больше – https://нарко-фильтр.рф/vivod-iz-zapoya-anonimno-v-rostove-na-donu/
Online casinos have awesome signup bonuses.
aviator
Ломка — это не временное недомогание. Это системное разрушение организма, связанное с тем, что он перестаёт получать наркотик, к которому уже привык. Нарушается обмен веществ, функции сердца, печени, почек, теряется контроль над эмоциями и болью. В состоянии абстиненции человек не может спать, есть, адекватно мыслить. Страдает и тело, и психика.
Подробнее тут – снятие ломок
Great blog here! Additionally your web site so much
up fast! What host are you using? Can I get your associate
hyperlink for your host? I want my site loaded up as quickly as yours lol
После диагностики начинается активная фаза медикаментозного вмешательства. Современные препараты вводятся капельничным методом, что позволяет быстро снизить уровень токсинов в крови, восстановить нормальные обменные процессы и стабилизировать работу внутренних органов, таких как печень, почки и сердце.
Разобраться лучше – http://narcolog-na-dom-mariupol0.ru
Hey there just wanted to give you a quick heads up. The words in your article seem to be running off the screen in Opera.
I’m not sure if this is a format issue or something to do with
web browser compatibility but I figured I’d post to let you know.
The style and design look great though! Hope you get the issue
solved soon. Cheers
Когда организм на пределе, важна срочная помощь. «Трезвый шаг» в Воронеже — это команда опытных наркологов, которые помогут быстро и мягко выйти из запоя без вреда для здоровья.
Разобраться лучше – vyvod-iz-zapoya-klinika
Мы верим, что каждый человек, столкнувшийся с проблемой зависимости, заслуживает шанса на новую жизнь. Наша миссия — предоставить необходимые инструменты и поддержку, чтобы помочь пациентам в их стремлении к здоровой и свободной от зависимостей жизни.
Подробнее – https://нарко-фильтр.рф/vivod-iz-zapoya-v-kruglosutochno-v-rostove-na-donu
На сайте https://bzdostup.ru/ оформите онлайн-заявку и получите скидку 3% на бетон, растворы. Предприятие в течение длительного времени занимается производством, а также оперативной доставкой продукции. Но также можно воспользоваться и самовывозом. А если вы произведете оплату наличными, то можете рассчитывать на хорошую скидку. Прямо сейчас ознакомьтесь с прайс-листом, чтобы узнать стоимость и заказать товары в требующемся количестве. Бетон отличается всеми важными техническими характеристиками, наделен эталонным качеством.
I’ve been surfing online more than three hours today,
but I never found any fascinating article like yours.
It’s lovely value enough for me. In my view, if all web owners and bloggers made good content material as you did, the net
will be much more useful than ever before.
We are a bunch of volunteers and opening a new scheme in our community.
Your web site offered us with useful information to work on. You
have performed an impressive job and our entire community will
probably be grateful to you.
После обращения в клинику «Основа» наш специалист незамедлительно выезжает для оказания экстренной медицинской помощи в Новосибирске. Процесс установки капельницы предусматривает комплексную диагностику и последующее детоксикационное лечение, что позволяет снизить токсическую нагрузку и стабилизировать состояние пациента. Описание процедуры включает следующие этапы:
Исследовать вопрос подробнее – капельница от запоя на дому цена в новосибирске
Пиломатериалы от производителя https://tsentr-stroy.ru по доступным ценам. В наличии обрезная и необрезная доска, брус, вагонка, доска пола, рейка и другие изделия. Работаем с частными и корпоративными заказами. Качество, доставка, гибкие условия.
Online casinos have endless game choices.
plinko betrugsmasche
Именно поэтому так важно не терять время. Чем раньше пациент получает помощь, тем выше шансы избежать необратимых последствий и вернуться к нормальной жизни.
Получить больше информации – https://snyatie-lomki-podolsk1.ru/snyatie-lomki-na-domu-v-podolske/
Процесс вывода из запоя на дому в Мариуполе построен по четко отлаженной схеме, что позволяет быстро и безопасно восстановить здоровье пациента.
Детальнее – https://narcolog-na-dom-mariupol0.ru/vyzov-narkologa-na-dom-mariupol
Алкогольный запой требует не просто прекращения приёма спиртного, а комплексной медицинской помощи. В Санкт-Петербурге и Ленинградской области вывод из запоя осуществляется опытными наркологами с применением современных методик детоксикации. В зависимости от состояния пациента лечение может быть организовано как на дому, так и в стационарных условиях. Главная цель — безопасное очищение организма и возвращение к стабильному физическому и психоэмоциональному состоянию.
Подробнее – вывод из запоя клиника
Link exchange is nothing else however it is just placing the other person’s blog link on your page at suitable place
and other person will also do similar in support of you.
Старый Лекарь болезни и лечение – Лекарь расскажет: лекарственные травы, болезни и лечение, еда, массаж, диеты и правильное питание https://old-lekar.com/
Туристическая компания ГРУПСПБ организует информативные и интересные экскурсии по Санкт-Петербургу с выездом в пригороды и другие города России. В маршрутах — знаковые достопримечательности, музеи, культурные объекты и скрытые уголки города. Опытные гиды подают информацию увлекательно, с “изюминкой”, поэтому взрослые и дети останутся в восторге. Экскурсии по Петербургу проводятся на современных автобусах. Экскурсии с https://www.groupspb.ru/ – идеальный способ узнать город с новой стороны.
An interesting discussion is worth comment. I believe that you
need to write more on this issue, it might not be a taboo matter but typically people don’t discuss
these issues. To the next! Many thanks!!
I got this web page from my friend who shared with me about this
website and at the moment this time I am browsing this web site and reading very informative articles or reviews at this time.
The live baccarat table is so sleek!
vincispin
Миссия клиники “Путь к выздоровлению” заключается в содействии восстановлению здоровья и социальной реинтеграции людей, столкнувшихся с проблемами зависимости. Мы стремимся к комплексному решению этой сложной задачи, учитывая физические, психологические и социальные аспекты зависимости. Наша цель — не только помочь пациентам избавиться от физической зависимости, но и обеспечить их психологическое восстановление и возвращение к нормальной жизни в обществе.
Узнать больше – http://нарко-фильтр.рф
Hello, I think your website might be having browser compatibility issues.
When I look at your blog in Ie, it looks fine but when opening in Internet
Explorer, it has some overlapping. I just wanted to give
you a quick heads up! Other then that, superb
blog!
Do you mind if I quote a few of your articles as long as I
provide credit and sources back to your weblog? My website is in the exact same area of
interest as yours and my users would genuinely benefit from some of the information you present here.
Please let me know if this okay with you. Thank you!
Also visit my web-site; video wall screen
Затяжной запой опасен для жизни. Врачи наркологической клиники «Трезвый шаг» в Воронеже проводят срочный вывод из запоя — на дому или в стационаре. Анонимно, безопасно, круглосуточно.
Получить больше информации – vyvod-iz-zapoya
После обращения в клинику «Основа» наш специалист незамедлительно выезжает для оказания экстренной медицинской помощи в Новосибирске. Процесс установки капельницы предусматривает комплексную диагностику и последующее детоксикационное лечение, что позволяет снизить токсическую нагрузку и стабилизировать состояние пациента. Описание процедуры включает следующие этапы:
Получить дополнительные сведения – https://kapelnica-ot-zapoya-novosibirsk8.ru/kapelnica-ot-zapoya-na-domu-v-novosibirske
Как отмечает главный врач клиники, кандидат медицинских наук Сергей Иванов, «мы создали систему, при которой пациент получает помощь в течение часа — независимо от дня недели и времени суток. Это принципиально меняет шансы на выздоровление».
Подробнее можно узнать тут – срочная наркологическая помощь
Как отмечает главный врач клиники, кандидат медицинских наук Сергей Иванов, «мы создали систему, при которой пациент получает помощь в течение часа — независимо от дня недели и времени суток. Это принципиально меняет шансы на выздоровление».
Углубиться в тему – https://narkologicheskaya-pomoshch-balashiha1.ru/kruglosutochnaya-narkologicheskaya-pomoshch-v-balashihe
Инвестиции в строительство https://permgragdanstroy.ru жилой и коммерческой недвижимости. Прибыльные проекты, прозрачные условия, сопровождение на всех этапах. Участвуйте в строительстве с гарантированной доходностью.
Когда запой становится угрозой для жизни и здоровья, своевременная помощь профессионала может стать решающим фактором для скорейшего восстановления. В Мурманске, где суровые климатические условия добавляют стресса и осложнений, квалифицированные наркологи оказывают помощь на дому, обеспечивая оперативную детоксикацию и индивидуальную терапию в привычной обстановке. Такой подход позволяет пациентам избежать лишних перемещений и получить поддержку в комфортной атмосфере.
Получить дополнительные сведения – вывод из запоя капельница в мурманске
Каждый день запоя увеличивает риск для жизни. Не рискуйте — специалисты «Трезвого шага» в Воронеже приедут на дом и окажут экстренную помощь. Без боли, стресса и ожидания.
Изучить вопрос глубже – наркологический вывод из запоя
Feel free to surf to my webpage click here
Really interesting article, I learned a lot! I’ve been struggling with growing my Reddit presence and found that using high-karma accounts on Reddit is one of the best ways to get ahead. If you’re just starting out or trying to scale on Reddit, I highly recommend buying accounts that are already aged and trusted. It saves so much time and effort!
I couldn’t agree more with your points here. As we all know, Reddit has a very strict algorithm against new accounts. After a lot of trial and error, I finally decided to get a verified Reddit account that already has history. It completely changed the way I approach Reddit marketing. The engagement is better.
If you’re using Reddit for affiliate marketing or content promotion, I’d highly recommend purchasing a Reddit account with post and comment karma. You avoid the algorithm flags and bans with aged accounts
One of the biggest challenges with Reddit is the lack of trust new accounts receive. Verified accounts with history are often much safer and more effective when it comes to marketing and content promotion. After I switched to using a profile that had history and trust, I noticed a huge difference in my ability to comment without being shadowbanned. If you want to avoid issues without worrying about account bans, I highly suggest looking into buying aged Reddit accounts.
Reddit marketing has never been easier with the right accounts. If you want to increase visibility without the struggle of building karma from scratch, an aged Reddit account makes the whole process so much smoother. I’ve been using accounts with karma, and I’ve seen better traffic in just a few weeks. You’ll notice the difference right away.
Really appreciate the effort you put into these tips. I will definitely be following your advice and sharing it with others who are struggling with Reddit marketing. For anyone serious about building up their Reddit presence, I can’t recommend buying aged Reddit accounts enough. It really works.
Won a prize in a slot tournament, awesome!
aviator game
При поступлении вызова нарколог незамедлительно приезжает на дом для проведения тщательного осмотра. Врач измеряет жизненно важные показатели, такие как пульс, артериальное давление и температура, а также собирает анамнез, чтобы определить степень алкогольной интоксикации.
Исследовать вопрос подробнее – https://kapelnica-ot-zapoya-arkhangelsk0.ru/kapelnicza-ot-zapoya-na-domu-arkhangelsk/
накрутить подписчиков тг бесплатно живых канал
Абстинентный синдром — одно из самых тяжёлых и опасных проявлений наркотической зависимости. Он развивается на фоне резкого отказа от приёма веществ и сопровождается сильнейшими нарушениями работы организма. Это состояние требует немедленного вмешательства. Самостоятельно справиться с ним невозможно — особенно если речь идёт о героине, метадоне, синтетических наркотиках или длительной зависимости. В клинике «НаркоПрофи» мы организовали систему снятия ломки в Подольске, работающую круглосуточно: как на дому, так и в условиях стационара.
Получить дополнительную информацию – https://snyatie-lomki-podolsk1.ru/snyatie-lomki-narkomana-v-podolske
Reading this reminded me of my situation with https://mass-hydro.com — brutal. I waited weeks and got nothing but excuses.
Howdy I am so thrilled I found your blog page, I really found you by accident, while I was
looking on Digg for something else, Nonetheless I am here now and would just like to say thanks a lot for a fantastic post and a
all round exciting blog (I also love the theme/design), I don’t have time to read through it all at the
moment but I have book-marked it and also added in your
RSS feeds, so when I have time I will be back to read a lot more, Please do
keep up the fantastic job.
Процесс вывода из запоя на дому в Мариуполе построен по четко отлаженной схеме, что позволяет быстро и безопасно восстановить здоровье пациента.
Получить дополнительные сведения – вызов нарколога на дом мариуполь.
Близкий человек в запое? Не ждите ухудшения. Обратитесь в клинику «Трезвый шаг» (Воронеж) — здесь проведут профессиональный вывод из запоя с последующим восстановлением организма.
Подробнее – domen.ru
Стационарная программа позволяет стабилизировать не только физическое состояние, но и эмоциональную сферу. Находясь в изоляции от внешних раздражителей и вредных контактов, пациент получает шанс сконцентрироваться на себе и начать реабилитацию без давления извне.
Ознакомиться с деталями – https://narkologicheskaya-pomoshch-balashiha1.ru/skoraya-narkologicheskaya-pomoshch-v-balashihe/
link porno grafilink porno grafilink porno grafi link porno grafilink porno grafilink porno grafi link porno grafilink porno grafilink
porno grafi link porno grafilink porno grafilink porno grafi link porno grafilink porno grafilink porno grafi link porno grafilink porno grafilink porno grafi link porno grafilink porno grafilink porno grafi link porno grafilink porno grafilink porno grafi link porno grafilink porno
grafilink porno grafi link porno grafilink porno grafilink porno grafi link porno grafilink porno grafilink porno grafi link porno grafilink porno grafilink porno grafi link
porno grafilink porno grafilink porno grafi link porno grafilink porno grafilink porno
grafi link porno grafilink porno grafilink porno grafi link
porno grafilink porno grafilink porno grafi link porno
grafilink porno grafilink porno grafi link porno grafilink porno grafilink
porno grafi link porno grafilink porno grafilink porno
grafi link porno grafilink porno grafilink porno grafi link porno grafilink
porno grafilink porno grafi link porno grafilink
porno grafilink porno grafi link porno grafilink porno grafilink porno grafi link porno grafilink porno grafilink porno grafi link porno grafilink
porno grafilink porno grafi link porno grafilink porno grafilink porno grafi link porno grafilink porno grafilink
porno grafi link porno grafilink porno grafilink porno grafi
link porno grafilink porno grafilink porno grafi link porno grafilink
porno grafilink porno grafi link porno grafilink porno grafilink
porno grafi link porno grafilink porno grafilink
porno grafi link porno grafilink porno grafilink porno grafi link porno grafilink
porno grafilink porno grafi link porno grafilink porno grafilink porno grafi
link porno grafilink porno grafilink porno grafi link porno grafilink
porno grafilink porno grafi link porno grafilink porno grafilink porno
grafi link porno grafilink porno grafilink porno grafi link porno grafilink porno grafilink porno grafi link porno grafilink porno grafilink porno
grafi link porno grafilink porno grafilink porno grafi link porno grafilink porno grafilink porno grafi link porno grafilink porno grafilink porno
grafi link porno grafilink porno grafilink porno grafi link porno grafilink porno grafilink porno
grafi link porno grafilink porno grafilink porno grafi link
porno grafilink porno grafilink porno grafi link porno
grafilink porno grafilink porno grafi link porno
grafilink porno grafilink porno grafi link porno grafilink
porno grafilink porno grafi link porno grafilink porno grafilink porno grafi link porno grafilink porno
grafilink porno grafi link porno grafilink porno grafilink
porno grafi link porno grafilink porno grafilink porno grafi
link porno grafilink porno grafilink porno grafi link porno grafilink porno grafilink porno grafi link porno grafilink porno grafilink porno grafi link porno grafilink porno grafilink porno grafi link porno grafilink porno
grafilink porno grafi link porno grafilink porno grafilink porno grafi link porno grafilink porno grafilink porno grafi link porno grafilink porno grafilink porno grafi
I pay a quick visit each day some websites and websites to read articles
or reviews, but this blog offers feature based posts.
The slot graphics make every spin fun!
plinko review
ligacor Game Online terbaik tempat bermain Slot, menyediakan banyak Game yang menarik dan mudah di mainkan, cari cuan secara
online dan jadilah kaya
Наркологическая клиника “Путь к выздоровлению” — специализированное медицинское учреждение, предназначенное для оказания помощи лицам, страдающим от алкогольной и наркотической зависимости. Наша основная задача — предоставить эффективные методы лечения и поддержку, чтобы помочь пациентам преодолеть пагубное пристрастие и вернуть их к здоровой и полноценной жизни.
Разобраться лучше – https://нарко-фильтр.рф/vivod-iz-zapoya-v-kruglosutochno-v-rostove-na-donu
В столичном регионе доступны два основных формата лечения: выезд специалиста на дом и госпитализация в специализированный центр. Каждый вариант имеет свои особенности и показания, которые врач анализирует при первичном осмотре.
Получить дополнительные сведения – https://алко-избавление.рф
Процесс лечения капельничным методом от запоя организован по четко структурированной схеме, позволяющей обеспечить оперативное и безопасное восстановление организма.
Получить больше информации – поставить капельницу от запоя архангельск
For most people with coronary heart illness, Viagra and different erectile dysfunction medication like Cialis (tadalafil) and Levitra (vardenafil) might be taken safely.
How common is erectile dysfunction? ED is quite common. Always tell your healthcare skilled
about any medications or supplements you’re taking. Your answers will assist a medical skilled determine which ED medicine
is finest for you and your needs. If you’re concerned about trying Viagra for
ED, you’ll want to speak with a medical skilled first.
If you’re enthusiastic about buying Viagra online, make
sure that the web site you purchase from
requires you to have a prescription. But isit This Page
, according Buy Generic Viagra Online Overnight to proponents
of the science, homeopathy not solely works,
However, is loads better than conventional medicine. Viagra Connect is available to purchase from a UK excessive street or
on-line pharmacy or a web based Doctor service. If you’d like to receive Viagra as quickly as potential,
you may want to think about speaking with a physician in individual or by a virtual telehealth
portal to see whether a prescription will be stuffed the same
day at a neighborhood pharmacy.
Your mode of telling all in this post is truly pleasant, all be capable of easily be
aware of it, Thanks a lot.
Процесс начинается с вызова врача или доставки пациента в клинику. После прибытия специалист проводит первичную диагностику: измерение давления, температуры, пульса, уровня кислорода в крови, визуальная оценка степени возбуждения или угнетения сознания. Собирается краткий анамнез: какой наркотик принимался, как долго, были ли сопутствующие заболевания.
Подробнее можно узнать тут – http://snyatie-lomki-podolsk1.ru/snyatie-lomki-narkolog-v-podolske/
домашний интернет тарифы новосибирск
novosibirsk-domashnij-internet002.ru
узнать интернет по адресу
Hi! This post couldn’t be written any better! Reading this post reminds me
of my good old room mate! He always kept talking about
this. I will forward this write-up to him.
Fairly certain he will have a good read. Thank you for sharing!
The bonus conditions are clear and fair.
razor returns demo
Миссия клиники “Путь к выздоровлению” заключается в содействии восстановлению здоровья и социальной реинтеграции людей, столкнувшихся с проблемами зависимости. Мы стремимся к комплексному решению этой сложной задачи, учитывая физические, психологические и социальные аспекты зависимости. Наша цель — не только помочь пациентам избавиться от физической зависимости, но и обеспечить их психологическое восстановление и возвращение к нормальной жизни в обществе.
Углубиться в тему – http://нарко-фильтр.рф/vivod-iz-zapoya-v-stacionare-v-rostove-na-donu/
https://kra31at
http://bsresurs.ru/
Затяжной запой — это состояние, при котором человек в течение нескольких дней не может прекратить употребление алкоголя без медицинской помощи. Такое состояние чревато тяжёлыми нарушениями в работе внутренних органов и психики. В Новосибирске и Новосибирской области доступен профессиональный вывод из запоя как на дому, так и в условиях стационара. Подход к лечению индивидуален, и основная цель — безопасно и эффективно устранить последствия интоксикации и предотвратить рецидив.
Подробнее можно узнать тут – вывод из запоя цена
Hi it’s me, I am also visiting this web page on a regular
basis, this site is in fact nice and the people are genuinely sharing pleasant thoughts.
ai для создания резюме
Your method of telling everything in this article is really fastidious, every one can easily understand it, Thanks a lot.
Online casinos have clear rules for all games.
plinko
Агентство недвижимости https://assa-dom.ru покупка, продажа, аренда квартир, домов, участков и коммерческих объектов. Полное сопровождение сделок, помощь с ипотекой, юридическая поддержка. Надежно, удобно, профессионально.
Группа препаратов
Исследовать вопрос подробнее – капельница от запоя выезд новосибирск
I used to be suggested this blog by my cousin. I am no longer certain whether
this publish is written by means of him as no one else recognize such
unique approximately my problem. You’re amazing! Thank you!
kra33at
Абстинентный синдром — одно из самых тяжёлых и опасных проявлений наркотической зависимости. Он развивается на фоне резкого отказа от приёма веществ и сопровождается сильнейшими нарушениями работы организма. Это состояние требует немедленного вмешательства. Самостоятельно справиться с ним невозможно — особенно если речь идёт о героине, метадоне, синтетических наркотиках или длительной зависимости. В клинике «НаркоПрофи» мы организовали систему снятия ломки в Подольске, работающую круглосуточно: как на дому, так и в условиях стационара.
Получить дополнительные сведения – http://snyatie-lomki-podolsk1.ru
Great beat ! I wish to apprentice even as you amend your website, how can i subscribe for a blog web site?
The account helped me a appropriate deal. I have been a little bit familiar of this your broadcast provided vivid transparent concept
Недвижимость Черноземья https://nedvizhimostchernozemya.ru квартиры, дома, участки, коммерческие объекты. Продажа и аренда во всех крупных городах региона. Надежные застройщики, проверенные предложения, прозрачные сделки.
What’s up friends, how is the whole thing,
and what you want to say about this article, in my view its really awesome in support of me.
Feel free to visit my blog; Togel Hongkong
The withdrawal process was quick and easy.
vinci spin
Самостоятельно выйти из запоя — почти невозможно. В Воронеже врачи клиники «Трезвый шаг» проводят медикаментозный вывод из запоя с круглосуточным выездом. Доверяйте профессионалам.
Разобраться лучше – вывод из запоя на дому цена
На данном этапе врач уточняет, сколько времени продолжается запой, какой тип алкоголя употребляется и имеются ли сопутствующие заболевания. Тщательный анализ этих данных позволяет подобрать оптимальные методы детоксикации и снизить риск осложнений.
Детальнее – вызвать нарколога на дом мариуполь
Зависимость — это системная проблема, которая требует последовательного и профессионального подхода. Обычные попытки «вылечиться дома» без медицинского сопровождения нередко заканчиваются срывами, ухудшением состояния и психологической деградацией. Клиника «Здоровье Плюс» в Балашихе предоставляет пациентам не просто разовое вмешательство, а выстроенную поэтапную программу, основанную на опыте и медицинских стандартах.
Углубиться в тему – http://
Incredible story there. What happened after? Thanks!
В условиях клиники пациент находится под наблюдением медицинской сестры и врача 24/7, что особенно важно при тяжёлой интоксикации и риске острых осложнений. Быстрый доступ к расширенной диагностике — ЭКГ, УЗИ, анализы крови — обеспечивает точную корректировку терапии. Стационар подходит тем, у кого есть серьёзные сопутствующие заболевания или высокий риск алкогольных психозов.
Подробнее можно узнать тут – https://алко-избавление.рф/vyvod-iz-zapoya-czena-msk
Лечение вывода из запоя на дому в Мурманске организовано по четко структурированной схеме, включающей следующие этапы, каждый из которых играет ключевую роль в оперативном восстановлении здоровья:
Подробнее – vyvod-iz-zapoya-kruglosutochno murmansk
В столичном регионе доступны два основных формата лечения: выезд специалиста на дом и госпитализация в специализированный центр. Каждый вариант имеет свои особенности и показания, которые врач анализирует при первичном осмотре.
Узнать больше – http://алко-избавление.рф/vyvod-iz-zapoya-czena-msk/
of course like your website but you have to test the spelling on several of your posts.
A number of them are rife with spelling problems and I find
it very bothersome to inform the reality on the other hand I will definitely come again again.
Врач может приехать в течение 1–2 часов после обращения. В стационар возможна экстренная госпитализация в тот же день.
Разобраться лучше – вывод из запоя клиника
Tried a crypto casino, super convenient!
spin mama
Сразу после поступления вызова нарколог приезжает на дом для проведения детального первичного осмотра. Специалист измеряет жизненно важные показатели, такие как пульс, артериальное давление и температура, и собирает анамнез, чтобы оценить степень алкогольной интоксикации. Эти данные служат основой для разработки персонального плана терапии.
Узнать больше – vrach-narkolog-na-dom mariupol’
При поступлении вызова нарколог незамедлительно приезжает на дом для проведения тщательного осмотра. Врач измеряет жизненно важные показатели, такие как пульс, артериальное давление и температура, а также собирает анамнез, чтобы определить степень алкогольной интоксикации.
Узнать больше – капельница от запоя наркология в архангельске
Ломка — это не временное недомогание. Это системное разрушение организма, связанное с тем, что он перестаёт получать наркотик, к которому уже привык. Нарушается обмен веществ, функции сердца, печени, почек, теряется контроль над эмоциями и болью. В состоянии абстиненции человек не может спать, есть, адекватно мыслить. Страдает и тело, и психика.
Получить дополнительную информацию – снятие ломки наркозависимого в подольске
I believe what you said was actually very logical.
But, think on this, suppose you were to create a killer title?
I ain’t suggesting your content isn’t good, but suppose you added a headline that grabbed folk’s attention? I mean Raspberry
PI TFT Screen / USB Bitcoin Miner is a little boring.
You could peek at Yahoo’s home page and watch how they create
post headlines to get people to click. You might add a
related video or a related picture or two to grab
readers interested about what you’ve got to say.
In my opinion, it could bring your website a little livelier.
Also visit my website – Agen Togel
Nicely put. With thanks.
Won a small amount on slots, love it!
aviator
Size-wise: Don’t go strictly by the baby’s present
age. Such companies emerging in the digital realm would include shops that would sell various
items including gift baskets overseas. This is where
the distinguishing idea of gifting antique maps and prints as individual presents comes in.
Oh, and, I recently found adobet88 and it seems pretty promising too!
Oh, and, I recently found a site called adobet88 and it seems pretty entertaining too!
Прометалл поможет во всем, что обеспечения теплом касается. Мы занимаемся реализацией, установкой и обслуживанием чугунных печей. Постоянно акции устраиваем. Вы можете рассчитывать на лояльные условия покупки печного оборудования. Оперативно доставим покупку. Ищете печь чугунная купить? Prometall.shop – тут имеются варианты на различный бюджет и вкус. Продукция соответствует высоким международным стандартам, сопровождается сертификатами и паспортами качества. Обращайтесь к нам, ответим на интересующие вас вопросы и поможем с оформлением гарантии.
Задача врачей — не просто облегчить симптомы, а купировать осложнения, стабилизировать жизненно важные функции, вернуть пациенту способность к дальнейшему лечению. Мы работаем быстро, анонимно и профессионально. Любой человек, оказавшийся в кризисе, может получить помощь в течение часа после обращения.
Ознакомиться с деталями – снятие ломки подольск.
Howdy would you mind letting me know which web host you’re using?
I’ve loaded your blog in 3 completely different internet browsers
and I must say this blog loads a lot faster then most.
Can you suggest a good internet hosting provider
at a reasonable price? Cheers, I appreciate it!
aeooaeuiue naeo e?aeaia
Online casinos have clear game guides.
bet on red
Домашнее лечение позволяет снизить психологическое напряжение, поскольку пациент остаётся в привычной обстановке — рядом с близкими и без очередей. Экономия времени достигается за счёт оперативного выезда специалиста без необходимости госпитализации, а затраты на вызов часто оказываются ниже, чем в стационаре. При грамотном подборе медикаментов и круглосуточном контроле со стороны врача риск осложнений сводится к минимуму.
Разобраться лучше – https://алко-избавление.рф/
Greetings! Very helpful advice in this particular post! It is the
little changes that produce the greatest changes.
Thanks a lot for sharing!
Именно поэтому так важно не терять время. Чем раньше пациент получает помощь, тем выше шансы избежать необратимых последствий и вернуться к нормальной жизни.
Ознакомиться с деталями – snyat lomku podol’sk
Link exchange is nothing else however it is just placing the other person’s weblog link on your page at suitable place and other person will also do same in support of you.
Login Soho303 : Soho303
You reported this wonderfully.
Миссия клиники “Свобода” заключается в оказании качественной помощи людям, страдающим от зависимости. Мы стремимся не просто избавить от пагубной привычки, но и помочь восстановить личность пациента. Важнейшие цели нашей работы включают:
Подробнее можно узнать тут – https://алко-лечебница.рф/vivod-iz-zapoya-v-stacionare-v-samare
Fantastic forum posts. Cheers!
Great beat ! I wish to apprentice at the same time as you amend your website, how could i subscribe for a weblog site?
The account aided me a applicable deal. I had been a little bit acquainted of this your broadcast provided brilliant transparent idea
The live chat in games is so interactive.
ganesha gold slot
I every time used to study post Real Estate Agents in Bangalore news papers but now as I am a user of internet thus from now I
am using net for content, thanks to web.
Hi, just wanted to say, I enjoyed this blog
post. It was helpful. Keep on posting!
hello there and thank you for your info – I’ve definitely picked up anything
new from right here. I did however expertise several technical issues using this site, as
I experienced to reload the site many times
previous to I could get it to load properly. I had been wondering if your web
hosting is OK? Not that I am complaining, but sluggish loading instances times will
sometimes affect your placement in google and could
damage your quality score if ads and marketing with Adwords.
Well I’m adding this RSS to my email and can look
out for a lot more of your respective exciting content.
Ensure that you update this again very soon.
Very quickly this site will be famous among all blog visitors, due to
it’s pleasant posts
It’s very effortless to find out any matter on web as
compared to textbooks, as I found this post at this site.
Good post however I was wondering if you could write a litte more on this topic?
I’d be very grateful if you could elaborate a little bit more.
Thanks!
Have a look at my web page – เวป lotto vip
ии для резюме бесплатно
ии для редактирования резюме
На сайте https://svaib.ru/ уточните расценки на КЖБИ сваи. Это предприятие предлагает качественную и надежную установку практичных, прочных свай КЖБИ. Все работы выполняются без минимальных деформаций, разрушений, спилов, чтобы вы смогли получить безупречный, эталонный результат. Сваи имеют такую важную особенность, что разрабатываются из виброуплотненного бетона, а также прочного армокаркаса. Именно по этой причине сваи будут намного прочнее бетона. На этом же сайте ознакомьтесь с благодарственными письмами от тех компаний, которые уже воспользовались услугами предприятия.
Врачебный состав клиники “Маяк надежды” состоит из высококвалифицированных специалистов в области наркологии. Наши врачи-наркологи имеют обширный опыт работы с зависимыми пациентами и постоянно совершенствуют свои навыки.
Ознакомиться с деталями – http://алко-лечение24.рф/vivod-iz-zapoya-na-domu-v-Sankt-Peterburge/
Online casinos have endless game choices.
plinko
The free mode is great for learning.
plinko
Thanks very interesting blog!
Amazing issues here. I am very glad to look your article.
Thank you so much and I’m looking ahead to touch you. Will you kindly
drop me a mail?
При поступлении вызова нарколог незамедлительно приезжает на дом для проведения тщательного первичного осмотра. Специалист измеряет жизненно важные показатели, такие как пульс, артериальное давление и температура, а также собирает анамнез для оценки степени алкогольной интоксикации. Эта информация является основой для разработки персонального плана лечения.
Ознакомиться с деталями – вывод из запоя на дому круглосуточно
You expressed this well.
В Воронеже решение есть — наркологическая клиника «Трезвый шаг». Здесь помогают людям выйти из запоя без страха и осуждения. Всё анонимно, грамотно и с заботой о каждом пациенте.
Ознакомиться с деталями – вывод из запоя на дому
Близкий человек в запое? Не ждите ухудшения. Обратитесь в клинику «Трезвый шаг» (Воронеж) — здесь проведут профессиональный вывод из запоя с последующим восстановлением организма.
Разобраться лучше – вывод из запоя
Задача врачей — не просто облегчить симптомы, а купировать осложнения, стабилизировать жизненно важные функции, вернуть пациенту способность к дальнейшему лечению. Мы работаем быстро, анонимно и профессионально. Любой человек, оказавшийся в кризисе, может получить помощь в течение часа после обращения.
Ознакомиться с деталями – снятие ломки на дому недорого
Когда запой начинает оказывать разрушительное воздействие на организм, своевременная помощь становится критически важной для предотвращения серьезных осложнений. В Мурманске квалифицированные наркологи на дому обеспечивают оперативную детоксикацию, восстановление обменных процессов и стабилизацию работы внутренних органов. Лечение проводится в комфортной домашней обстановке, что позволяет избежать лишнего стресса и сохранить полную конфиденциальность.
Подробнее можно узнать тут – наркологический вывод из запоя в мурманске
My brother suggested I may like this web site. He used to
be totally right. This put up truly made my day. You cann’t consider just how a lot
time I had spent for this info! Thanks!
Review my web site: Real Estate Brokers in Bangalore
Live dealer games are so realistic!
plinko
Стационарная программа позволяет стабилизировать не только физическое состояние, но и эмоциональную сферу. Находясь в изоляции от внешних раздражителей и вредных контактов, пациент получает шанс сконцентрироваться на себе и начать реабилитацию без давления извне.
Узнать больше – [url=https://narkologicheskaya-pomoshch-balashiha1.ru/]наркологическая помощь[/url]
Затяжной запой опасен для жизни. Врачи наркологической клиники «Трезвый шаг» в Воронеже проводят срочный вывод из запоя — на дому или в стационаре. Анонимно, безопасно, круглосуточно.
Выяснить больше – вывод из запоя клиника
whoah this blog is wonderful i really like studying your posts.
Keep up the good work! You realize, a lot of
persons are searching round for this info, you can aid them greatly.
Процедура детоксикации может проводиться двумя способами: выездом врача на дом или госпитализацией. Окончательное решение принимает нарколог после оценки состояния пациента. На ранней стадии запоя достаточно домашней терапии, но при наличии рисков рекомендуется стационар.
Углубиться в тему – вывод из запоя цена
Awesome blog! Do you have any helpful hints for aspiring writers?
I’m hoping to start my own blog soon but I’m a little lost on everything.
Would you advise starting with a free platform like WordPress or go for a paid option? There
are so many choices out there that I’m completely confused ..
Any recommendations? Appreciate it!
Also visit my web-site; real estate consultants
Затяжной запой — это состояние, при котором человек в течение нескольких дней не может прекратить употребление алкоголя без медицинской помощи. Такое состояние чревато тяжёлыми нарушениями в работе внутренних органов и психики. В Новосибирске и Новосибирской области доступен профессиональный вывод из запоя как на дому, так и в условиях стационара. Подход к лечению индивидуален, и основная цель — безопасно и эффективно устранить последствия интоксикации и предотвратить рецидив.
Подробнее тут – вывод из запоя круглосуточно
I have read several excellent stuff here. Definitely value
bookmarking for revisiting. I surprise how much effort you place to make any such fantastic informative site.
Love the 3D slots, they’re so immersive!
plinko
Самолечение или попытка «переждать» запой дома без врача может обернуться серьёзными осложнениями. Обращение к наркологу даёт пациенту:
Изучить вопрос глубже – https://narko-zakodirovan.ru/vyvod-iz-zapoya-na-domu-spb
Won some money on slots, keeps me going!
aviator game
Yes! Finally something about real estate consultants.
Great goods from you, man. I have understand your stuff previous to and you’re just extremely wonderful.
I really like what you’ve acquired here, really like what you are stating and the way in which
you say it. You make it entertaining and you still take care of to
keep it sensible. I can not wait to read far more from you.
This is actually a terrific website.
fantastic issues altogether, you just won a new reader.
What may you recommend in regards to your publish that you just made some days in the past?
Any certain?
Feel free to visit my blog post: Mildcasino Pragmatic Play
Online casinos have endless game choices.
plinko demo
Как отмечает главный врач клиники, кандидат медицинских наук Сергей Иванов, «мы создали систему, при которой пациент получает помощь в течение часа — независимо от дня недели и времени суток. Это принципиально меняет шансы на выздоровление».
Получить дополнительную информацию – [url=https://narkologicheskaya-pomoshch-balashiha1.ru/]www.domen.ru[/url]
Лечение вывода из запоя на дому в Мурманске организовано по четко структурированной схеме, включающей следующие этапы, каждый из которых играет ключевую роль в оперативном восстановлении здоровья:
Подробнее можно узнать тут – https://vyvod-iz-zapoya-murmansk00.ru/vyvod-iz-zapoya-na-domu-murmansk
Затяжной запой опасен для жизни. Врачи наркологической клиники «Трезвый шаг» в Воронеже проводят срочный вывод из запоя — на дому или в стационаре. Анонимно, безопасно, круглосуточно.
Получить дополнительные сведения – вывод из запоя на дому
I do not know whether it’s just me or if
perhaps everyone else experiencing issues with your blog.
It appears as though some of the text in your
posts are running off the screen. Can someone else please comment and let me
know if this is happening to them as well? This might be a problem with my internet
browser because I’ve had this happen previously. Many thanks
Процесс начинается с вызова врача или доставки пациента в клинику. После прибытия специалист проводит первичную диагностику: измерение давления, температуры, пульса, уровня кислорода в крови, визуальная оценка степени возбуждения или угнетения сознания. Собирается краткий анамнез: какой наркотик принимался, как долго, были ли сопутствующие заболевания.
Углубиться в тему – снятие ломки московская область
Truly loads of superb info.
Hmm is anyone else experiencing problems with the images on this blog loading?
I’m trying to figure out if its a problem on my end or if it’s
the blog. Any feed-back would be greatly appreciated.
Online casinos are perfect for trying new strategies.
palmslots casino no deposit bonus
Запой — это длительное бесконтрольное употребление алкоголя, приводящее к серьёзным нарушениям обмена веществ, дезориентации и риску острого алкогольного психоза. В Москве и области помощь при выводе из запоя востребована как в домашних условиях, так и в стационаре. Вне зависимости от выбора методики главная цель — быстрое и безопасное восстановление здоровья, чтобы человек мог начать новую, полноценную жизнь без зависимости.
Узнать больше – https://алко-избавление.рф/vyvod-iz-zapoya-na-domu-msk/
The slot game graphics are stunning!
joker jewels gratis
Метод капельничного лечения от запоя обладает рядом существенных преимуществ, благодаря которым пациенты получают качественную и оперативную помощь:
Подробнее – капельница от запоя вызов
Детоксикационные растворы (физиологический раствор, глюкоза, раствор Рингера)
Подробнее – вывод из запоя на дому в екатеринбурге
Wszyscy nowi uzytkownicy, ktorzy po raz pierwszy tworza konto w kasynie Fontan, moga skorzystac z bonusu bez depozytu w wysokosci 100 zlotych. Wszystko, co musisz zrobic, to zarejestrowac sie https://fontan-casino.pl/ – potwierdzic swoj adres e-mail i wypelnic profil w swoim panelu uzytkownika, podajac wymagana informacje. Aktywacja bonusu odbywa sie w panelu uzytkownika.
Love the holiday-themed casino bonuses!
spinmama
В клинике «Трезвая Жизнь» для эффективного вывода организма из запоя используется комплексный подход, который включает применение различных групп препаратов. Приведенная ниже таблица отражает основные компоненты нашей терапии и их функции:
Исследовать вопрос подробнее – http://www.domen.ru
The withdrawal process was super fast.
plinko
Its like you read my mind! You appear to know a
lot about this, like you wrote the book in it or something.
I think that you can do with a few pics to drive the message
home a bit, but other than that, this is wonderful blog.
A fantastic read. I’ll definitely be back.
Абстинентный синдром — одно из самых тяжёлых и опасных проявлений наркотической зависимости. Он развивается на фоне резкого отказа от приёма веществ и сопровождается сильнейшими нарушениями работы организма. Это состояние требует немедленного вмешательства. Самостоятельно справиться с ним невозможно — особенно если речь идёт о героине, метадоне, синтетических наркотиках или длительной зависимости. В клинике «НаркоПрофи» мы организовали систему снятия ломки в Подольске, работающую круглосуточно: как на дому, так и в условиях стационара.
Изучить вопрос глубже – снятие ломки на дому недорого в подольске
Когда организм на пределе, важна срочная помощь. «Трезвый шаг» в Воронеже — это команда опытных наркологов, которые помогут быстро и мягко выйти из запоя без вреда для здоровья.
Изучить вопрос глубже – вывод из запоя недорого
I simply couldn’t go away your website before suggesting that I really loved the usual
info an individual supply for your visitors? Is gonna be back steadily in order
to check out new posts
сколько стоит метр натяжного потолка сколько стоит метр натяжного потолка .
Hey there would you mind letting me know which hosting company you’re
utilizing? I’ve loaded your blog in 3 different internet
browsers and I must say this blog loads a lot faster then most.
Can you recommend a good internet hosting provider at a
fair price? Kudos, I appreciate it!
The deposit bonuses are always generous.
aviator
Проблема зависимости остаётся одной из самых актуальных в нашем обществе. Она затрагивает множество людей, нанося вред как их здоровью, так и социальным связям. Наркологическая клиника “Свобода” предлагает помощь тем, кто столкнулся с такими сложностями, как наркомания, алкоголизм и игромания. Мы предоставляем комплексный подход к лечению зависимостей, ориентируясь на индивидуальные потребности каждого пациента.
Узнать больше – https://алко-лечебница.рф/vivod-iz-zapoya-cena-v-samare/
https://www.asseenontvonline.ru/
My casino’s VIP perks are amazing.
book of ra
Very soon this website will be famous among all blogging visitors, due to
it’s nice posts
I am curious to find out what blog platform you have been working with?
I’m having some small security problems with my latest site
and I would like to find something more risk-free.
Do you have any recommendations?
What’s up, this weekend is nice Real Estate Agents in Bangalore favor of
me, for the reason that this time i am reading this great informative article here at my home.
Teleflora Belarus Unit https://flower-shop.by/ is pleased to offer flower delivery services. The company is an online florist, delivering flowers across Minsk, Belarus. We would be delighted to assist you in sending flowers to Minsk, Belarus, and other regional Belarus towns including Mogilev, Vitebsk, Brest, Grodno, and Gomel, as well as worldwide destinations. We’re more than happy to take care of all your Belarus flower delivery orders. We’ve got a whole network of florists and flower shops who can deliver flowers for our customers whenever they need.
I am really impressed with your writing skills as well as with
the layout on your weblog. Is this a paid theme or did you modify it yourself?
Anyway keep up the excellent quality writing, it is rare to see a nice blog like this one these days.
Во-первых, безопасная медицинская детоксикация. Этот процесс необходим для удаления токсических веществ из организма. Мы используем современные методы, минимизирующие дискомфорт в период абстиненции.
Получить дополнительную информацию – http://алко-лечебница.рф/vivod-iz-zapoya-cena-v-samare/
Процесс лечения капельничным методом от запоя организован по четко структурированной схеме, позволяющей обеспечить оперативное и безопасное восстановление организма.
Подробнее можно узнать тут – капельница от запоя на дому цена
Won some cash on roulette last week, feeling lucky!
bet on red
Абстинентный синдром — одно из самых тяжёлых и опасных проявлений наркотической зависимости. Он развивается на фоне резкого отказа от приёма веществ и сопровождается сильнейшими нарушениями работы организма. Это состояние требует немедленного вмешательства. Самостоятельно справиться с ним невозможно — особенно если речь идёт о героине, метадоне, синтетических наркотиках или длительной зависимости. В клинике «НаркоПрофи» мы организовали систему снятия ломки в Подольске, работающую круглосуточно: как на дому, так и в условиях стационара.
Подробнее – https://snyatie-lomki-podolsk1.ru/snyatie-lomki-na-domu-v-podolske/
Does your blog have a contact page? I’m having trouble locating it but, I’d
like to send you an email. I’ve got some suggestions for your blog you might be interested in hearing.
Either way, great blog and I look forward to seeing it develop over time.
The casino site is so easy to navigate.
plinko demo
Hi! Do you use Twitter? I’d like to follow you if that would be
ok. I’m undoubtedly enjoying your blog and look forward to new
posts.
Осложнения, к которым может привести отсутствие лечения:
Подробнее можно узнать тут – ломка от наркотиков город
Way cool! Some very valid points! I appreciate you writing
this post and also the rest of the website is extremely good.
Got a weekly bonus, keeps me engaged.
joker jewels
Одной из самых сильных сторон нашей клиники является оперативность. Мы понимаем, что при алкоголизме, наркомании и лекарственной зависимости часто требуются немедленные действия. Если человек находится в состоянии запоя, абстиненции или передозировки, промедление может привести к тяжёлым осложнениям или даже смерти.
Подробнее тут – платная наркологическая помощь
Wonderful blog! I found it while surfing around on Yahoo News.
Do you have any tips on how to get listed in Yahoo News?
I’ve been trying for a while but I never seem to get there!
Appreciate it
Visit my webpage; real estate consultants
При сравнительно лёгкой или среднетяжёлой степени интоксикации нарколог приезжает на дом, где в знакомой обстановке проводит детоксикацию. Врач измеряет параметры жизнедеятельности — пульс, давление, насыщение кислородом — и подбирает оптимальный состав препаратов для инфузий. Такой метод подходит тем, кто испытывает стресс при мысли о стационаре и нуждается в анонимности лечения.
Узнать больше – http://алко-избавление.рф/
Врачебный состав клиники “Маяк надежды” состоит из высококвалифицированных специалистов в области наркологии. Наши врачи-наркологи имеют обширный опыт работы с зависимыми пациентами и постоянно совершенствуют свои навыки.
Детальнее – https://алко-лечение24.рф/
Somebody essentially help to make seriously posts I might state.
That is the very first time I frequented your website page
and so far? I amazed with the research you made to create this actual
post incredible. Great job!
Kra31.at
Love the new game releases every week!
betmomo
Также мы учитываем потребности каждого пациента — по питанию, условиям проживания, графику процедур. Проживание возможно в стандартных и повышенных палатах, с возможностью индивидуального обслуживания.
Подробнее можно узнать тут – неотложная наркологическая помощь
Алкогольный запой требует не просто прекращения приёма спиртного, а комплексной медицинской помощи. В Санкт-Петербурге и Ленинградской области вывод из запоя осуществляется опытными наркологами с применением современных методик детоксикации. В зависимости от состояния пациента лечение может быть организовано как на дому, так и в стационарных условиях. Главная цель — безопасное очищение организма и возвращение к стабильному физическому и психоэмоциональному состоянию.
Получить дополнительные сведения – vyvod-iz-zapoya-na-domu sankt-peterburg
Online casinos have better odds than I thought.
plinko
Hi this is kind of of off topic but I was wanting to know
if blogs use WYSIWYG editors or if you have to manually code with HTML.
I’m starting a blog soon but have no coding expertise so
I wanted to get advice from someone with experience.
Any help would be greatly appreciated!
Stop by my site; real estate consultants
Врачебный состав клиники “Маяк надежды” состоит из высококвалифицированных специалистов в области наркологии. Наши врачи-наркологи имеют обширный опыт работы с зависимыми пациентами и постоянно совершенствуют свои навыки.
Узнать больше – http://
Artikel yang keren, bro! Ngomongin soal slot andalan, gue udah coba Slot
999 di pandawara4d. Pake strategi bajak scatter, gue sempat
dapet super win. Bener-bener mengingatkan sama gameplay-nya sule 88 slot yang viral di YouTube.
Layak banget dicoba!
The withdrawal process was super fast.
vinci spin
Greetings! This is my first comment here so I just wanted to give a quick shout
out and tell you I genuinely enjoy reading through your articles.
Can you recommend any other blogs/websites/forums that cover the same topics?
Thanks a ton!
I’d like to find out more? I’d care to find out more details.
Когда организм на пределе, важна срочная помощь. «Трезвый шаг» в Воронеже — это команда опытных наркологов, которые помогут быстро и мягко выйти из запоя без вреда для здоровья.
Подробнее тут – вывод из запоя капельница
The game search feature is super convenient.
plinko
Wow, superb blog layout! How long have you ever been running a blog for?
you make blogging glance easy. The overall look of
your site is wonderful, as well as the content!
Домашнее лечение позволяет снизить психологическое напряжение, поскольку пациент остаётся в привычной обстановке — рядом с близкими и без очередей. Экономия времени достигается за счёт оперативного выезда специалиста без необходимости госпитализации, а затраты на вызов часто оказываются ниже, чем в стационаре. При грамотном подборе медикаментов и круглосуточном контроле со стороны врача риск осложнений сводится к минимуму.
Получить дополнительную информацию – https://алко-избавление.рф/vyvod-iz-zapoya-czena-msk/
В Воронеже решение есть — наркологическая клиника «Трезвый шаг». Здесь помогают людям выйти из запоя без страха и осуждения. Всё анонимно, грамотно и с заботой о каждом пациенте.
Выяснить больше – vyvod-iz-zapoya-czena
Самостоятельно выйти из запоя — почти невозможно. В Воронеже врачи клиники «Трезвый шаг» проводят медикаментозный вывод из запоя с круглосуточным выездом. Доверяйте профессионалам.
Подробнее можно узнать тут – http://vyvod-iz-zapoya-voronezh13.ru/
Love the new slot themes every month!
betonred app
Лечение алкогольной зависимости на дому в Мурманске проходит по четко отлаженной схеме, которая включает несколько последовательных этапов. Каждый из них имеет решающее значение для безопасного и эффективного восстановления организма.
Получить больше информации – http://vyvod-iz-zapoya-murmansk0.ru/vyvod-iz-zapoya-kruglosutochno-murmansk/
For latest news you have to pay a visit world wide
web and on web I found this website as a best web page for most up-to-date updates.
На данном этапе врач уточняет длительность запоя, тип употребляемого алкоголя и наличие сопутствующих заболеваний. Тщательный анализ этих данных позволяет подобрать оптимальные методы детоксикации и снизить риск осложнений.
Изучить вопрос глубже – вывод из запоя недорого мурманск
The bonus wagering requirements are fair.
plinko
На данном этапе врач уточняет, как долго продолжается запой, какой тип алкоголя употребляется и имеются ли сопутствующие заболевания. Детальный анализ клинических данных помогает подобрать оптимальные методы детоксикации и минимизировать риск осложнений.
Подробнее – http://vyvod-iz-zapoya-murmansk0.ru/vyvod-iz-zapoya-na-domu-murmansk//
Magnificent goods from you, man. I’ve understand your stuff previous to
and you are just too great. I really like what you have acquired
here, certainly like what you’re stating and the way
in which you say it. You make it enjoyable and you still care for to keep
it wise. I can not wait to read far more from you. This is actually a tremendous website.
Attractive part of content. I simply stumbled upon your website and in accession capital to assert that I get actually
loved account your blog posts. Any way I will be subscribing
for your augment and even I success you get right of entry to consistently fast.
Feel free to surf to my page: property consultants
Посетите сайт Роспромфильтр https://rospromfilter.ru/ который является прoизвoдитeлeм выcoкoкaчecтвeнных фильтрующих элeмeнтoв и aнaлoгoв вceмирнo извecтных прoизвoдитeлeй. Посмотрите на сайте каталог с выгодными ценами на воздушные фильтры, гидравлические фильтры, масляные фильтры, топливные фильтры, аналоги фильтров и многое другое. Также изготавливаем промышленные фильтры под заказ. Подробнее на сайте.
Live dealer games are so realistic!
1win aviator
Thank you for the auspicious writeup. It in fact was a amusement
account it. Look complicated to far introduced agreeable from you!
However, how can we communicate?
It’s enormous that you are getting ideas from
this post as well as from our argument made at this place.
Предлагаем вашему вниманию интересную справочную статью, в которой собраны ключевые моменты и нюансы по актуальным вопросам. Эта информация будет полезна как для профессионалов, так и для тех, кто только начинает изучать тему. Узнайте ответы на важные вопросы и расширьте свои знания!
Подробнее тут – https://www.vmaintain.com/blog/how-to-add-an-ai-chatbot-to-a-wordpress-website
Live dealer games bring the casino home.
fortune ox demo
Запой — это длительное бесконтрольное употребление алкоголя, приводящее к серьёзным нарушениям обмена веществ, дезориентации и риску острого алкогольного психоза. В Москве и области помощь при выводе из запоя востребована как в домашних условиях, так и в стационаре. Вне зависимости от выбора методики главная цель — быстрое и безопасное восстановление здоровья, чтобы человек мог начать новую, полноценную жизнь без зависимости.
Ознакомиться с деталями – http://алко-избавление.рф
Hi there mates, nice piece of writing and fastidious urging
commented at this place, I am genuinely enjoying by these.
Актуальные мировые события. Последние новости, собранные с разных уголков земного шара. Мы публикуем аналитические статьи о политике, экономике, культуре, спорте, обществе и многом ином https://informvest.ru/
Great article! That is the type of info that are supposed
to be shared around the net. Shame on the search engines for no longer positioning
this put up higher! Come on over and visit my web site
. Thank you =)
Затяжной запой — это состояние, при котором человек в течение нескольких дней не может прекратить употребление алкоголя без медицинской помощи. Такое состояние чревато тяжёлыми нарушениями в работе внутренних органов и психики. В Новосибирске и Новосибирской области доступен профессиональный вывод из запоя как на дому, так и в условиях стационара. Подход к лечению индивидуален, и основная цель — безопасно и эффективно устранить последствия интоксикации и предотвратить рецидив.
Детальнее – срочный вывод из запоя новосибирск
I really like it whenever people get together and share thoughts.
Great blog, stick with it!
Online casinos make deposits super secure.
plinko avis
Why visitors still use to read news papers when in this technological globe everything is
existing on web?
Love the soundtracks in online slots!
vincispin bonus code
I’d like to thank you for the efforts you have put in writing this site.
I am hoping to view the same high-grade blog posts by you later on as well.
In fact, your creative writing abilities has inspired me
to get my own site now 😉
my blog post … real estate consultants
Hello there! Would you mind if I share your blog with my facebook group?
There’s a lot of folks that I think would really enjoy
your content. Please let me know. Thanks
Предлагаем вашему вниманию интересную справочную статью, в которой собраны ключевые моменты и нюансы по актуальным вопросам. Эта информация будет полезна как для профессионалов, так и для тех, кто только начинает изучать тему. Узнайте ответы на важные вопросы и расширьте свои знания!
Подробнее можно узнать тут – http://www.coltonwashington.us/error-404
Hurrah! Finally I got a website from where I can in fact obtain helpful information regarding my study
and knowledge.
Here is my web site real estate consultants
Online slots with extra features are the best.
aviator game
Предлагаем вашему вниманию интересную справочную статью, в которой собраны ключевые моменты и нюансы по актуальным вопросам. Эта информация будет полезна как для профессионалов, так и для тех, кто только начинает изучать тему. Узнайте ответы на важные вопросы и расширьте свои знания!
Подробнее тут – https://cadesign.net/acoustic-ear-buds-2
Hello, I enjoy reading all of your article. I like to write a little comment
to support you.
Блог, посвященный любителям самоделок. Интересные статьи по теме стройки и ремонта, авто, сада и огорода, вкусных рецептов, дизайна и много другого, что каждый может сделать своими руками https://notperfect.ru/
Somebody essentially assist to make seriously posts I might state.
This is the very first time I frequented your website page and to this point?
I surprised with the research you made to create this particular put up incredible.
Fantastic job!
В этой информационной статье вы найдете интересное содержание, которое поможет вам расширить свои знания. Мы предлагаем увлекательный подход и уникальные взгляды на обсуждаемые темы, побуждая пользователей к активному мышлению и критическому анализу!
Подробнее – https://www.thomas-a.com/1000-700_citrus_flaade
The deposit bonuses are always generous.
ruleta americana
Эта публикация завернет вас в вихрь увлекательного контента, сбрасывая стереотипы и открывая двери к новым идеям. Каждый абзац станет для вас открытием, полным ярких примеров и впечатляющих достижений. Подготовьтесь быть вовлеченными и удивленными каждый раз, когда продолжите читать.
Получить больше информации – https://jerusalemstoneart.com/product/hamsa-the-jug
Won some cash on roulette last week, feeling lucky!
aviator game
заказать разработку сайта создание и разработка сайтов минск
шильдик на пиджак изготовление шильдиков из латуни
situs porno situs porno situs porno situs porno situs porno situs porno situs porno situs
porno situs porno situs porno situs porno situs porno situs porno situs
porno situs porno situs porno situs porno situs porno situs porno situs porno situs
porno situs porno situs porno situs porno situs porno situs porno situs porno situs porno situs porno situs
porno situs porno situs porno situs porno situs porno situs
porno situs porno situs porno situs porno situs porno situs porno situs porno situs porno situs porno situs
porno situs porno situs porno situs porno situs porno
situs porno situs porno situs porno situs porno
situs porno situs porno situs porno situs porno situs porno situs porno situs porno situs porno situs porno situs porno situs porno situs porno situs porno
Wow, amazing blog structure! How long have you been running a blog for?
you made blogging look easy. The total glance of your web
site is wonderful, as well as the content material!
Эта публикация завернет вас в вихрь увлекательного контента, сбрасывая стереотипы и открывая двери к новым идеям. Каждый абзац станет для вас открытием, полным ярких примеров и впечатляющих достижений. Подготовьтесь быть вовлеченными и удивленными каждый раз, когда продолжите читать.
Исследовать вопрос подробнее – https://electronicsurplus.ca/?page_id=677
бейджи для сотрудников бейдж из латуни
Remarkable! Its genuinely awesome paragraph, I have got much clear idea regarding from this post.
my website; property consultants
Online casinos have better bonuses than expected.
vincispin no deposit bonus
Эта статья сочетает познавательный и занимательный контент, что делает ее идеальной для любителей глубоких исследований. Мы рассмотрим увлекательные аспекты различных тем и предоставим вам новые знания, которые могут оказаться полезными в будущем.
Разобраться лучше – https://dolive.biz/%E8%80%81%E5%8C%96%E3%81%AF%E8%B6%B3%E3%81%8B%E3%82%89%E5%A7%8B%E3%81%BE%E3%82%8B%EF%BC%9F%E8%B6%B3%E3%81%AE%E3%83%97%E3%83%AD%E3%81%AB%E4%BB%BB%E3%81%9B%E3%81%A6%E5%81%A5%E5%BA%B7%E3%81%AA%E8%BA%AB
Just found this now.
Nice post. I learn something new and challenging on blogs I stumbleupon on a daily basis.
It will always be exciting to read through content from other writers and use a little something from other websites.
В этом интересном тексте собраны обширные сведения, которые помогут вам понять различные аспекты обсуждаемой темы. Мы разбираем детали и факты, делая акцент на важности каждого элемента. Не упустите возможность расширить свои знания и взглянуть на мир по-новому!
Подробнее можно узнать тут – https://lfy.com.do/new/project/diseno-grafico-10
Эта статья сочетает в себе как полезные, так и интересные сведения, которые обогатят ваше понимание насущных тем. Мы предлагаем практические советы и рекомендации, которые легко внедрить в повседневную жизнь. Узнайте, как улучшить свои навыки и обогатить свой опыт с помощью простых, но эффективных решений.
Изучить вопрос глубже – http://tokmaklasoch.minobr63.ru/698
My casino’s customer support is fantastic.
joker jewels
Эта познавательная публикация погружает вас в море интересного контента, который быстро захватит ваше внимание. Мы рассмотрим важные аспекты темы и предоставим вам уникальныеInsights и полезные сведения для дальнейшего изучения.
Получить дополнительные сведения – http://www.blog.kedairohani.com/halkomentar-29-255.html
Hello! I just wanted to ask if you ever have any issues with hackers?
My last blog (wordpress) was hacked and I ended up losing many
months of hard work due to no back up. Do you have any solutions to protect against
hackers?
Эта статья полна интересного контента, который побудит вас исследовать новые горизонты. Мы собрали полезные факты и удивительные истории, которые обогащают ваше понимание темы. Читайте, погружайтесь в детали и наслаждайтесь процессом изучения!
Получить дополнительную информацию – https://www.balax.eu/eaque-ipsa-quae-ab-illo-inventore-veritatis-et-quasi
В данной обзорной статье представлены интригующие факты, которые не оставят вас равнодушными. Мы критикуем и анализируем события, которые изменили наше восприятие мира. Узнайте, что стоит за новыми открытиями и как они могут изменить ваше восприятие реальности.
Детальнее – https://openerp.vn/giai-thich-lead-generation-cham-soc-khach-hang-tiem-nang-de-chot-duoc-nhieu-don-hang-hon
The casino site is so easy to navigate.
plinko review
Эта информационная заметка предлагает лаконичное и четкое освещение актуальных вопросов. Здесь вы найдете ключевые факты и основную информацию по теме, которые помогут вам сформировать собственное мнение и повысить уровень осведомленности.
Углубиться в тему – http://driftseo.click/manual-seo-power-dofollow-backlinks-increase-dr-da-tf-pay-after-work-1700
Hey there! I could have sworn I’ve been to this blog before but after browsing through
some of the post I realized it’s new to me.
Nonetheless, I’m definitely delighted I found it and I’ll be bookmarking and checking back
often!
Here is my webpage … Real Estate Brokers in Bangalore
Этот информативный текст выделяется своими захватывающими аспектами, которые делают сложные темы доступными и понятными. Мы стремимся предложить читателям глубину знаний вместе с разнообразием интересных фактов. Откройте новые горизонты и развивайте свои способности познавать мир!
Изучить вопрос глубже – https://mydigitalboss.com/how-facebook-ads-can-generate-leads-for-your-business
Этот интересный отчет представляет собой сборник полезных фактов, касающихся актуальных тем. Мы проанализируем данные, чтобы вы могли сделать обоснованные выводы. Читайте, чтобы узнать больше о последних трендах и значимых событиях!
Детальнее – https://www.edmarlyra.com/em-evento-com-ministros-simao-durando-celebra-pacto-para-fortalecer-trabalhadores-da-fruticultura-irrigada-dia-historico
В этом информативном обзоре собраны самые интересные статистические данные и факты, которые помогут лучше понять текущие тренды. Мы представим вам цифры и графики, которые иллюстрируют, как развиваются различные сферы жизни. Эта информация станет отличной основой для глубокого анализа и принятия обоснованных решений.
Подробнее можно узнать тут – https://zylifedigital.com/2022/11/22/5-ways-artificial-intelligence-is-transforming-business-operations
Этот информативный материал предлагает содержательную информацию по множеству задач и вопросов. Мы призываем вас исследовать различные идеи и факты, обобщая их для более глубокого понимания. Наша цель — сделать обучение доступным и увлекательным.
Выяснить больше – https://wetroomsintl.com/hello-world
На сайте https://feringer.shop/ есть возможность приобрести печи для бань, саун. В компании постоянно устраиваются акции для того, чтобы ваша покупка была более выгодной. Также возможна бесплатная доставка как по Москве, так и области. Печи FERINGER зарекомендовали себя с положительной стороны, радуют своей бесперебойной работой, эталонным качеством, надежностью, долгим сроком эксплуатации. Регулярно в каталоге появляются новинки, с которыми необходимо ознакомиться и вам. Уникальностью печей является и невероятно роскошная облицовка.
Thankfulness to my father who shared with me concerning this website, this blog is
really amazing.
В этой статье вы найдете познавательную и занимательную информацию, которая поможет вам лучше понять мир вокруг. Мы собрали интересные данные, которые вдохновляют на размышления и побуждают к действиям. Открывайте новую информацию и получайте удовольствие от чтения!
Подробнее тут – https://studionrc.com/istanbul-fotograf-cekim-studyosu
The casino app is fast and reliable.
plinko game
В этой статье-обзоре мы соберем актуальную информацию и интересные факты, которые освещают важные темы. Читатели смогут ознакомиться с различными мнениями и подходами, что позволит им расширить кругозор и глубже понять обсуждаемые вопросы.
Детальнее – https://auraretreats.com/project/postcard-from-venice
Эта публикация завернет вас в вихрь увлекательного контента, сбрасывая стереотипы и открывая двери к новым идеям. Каждый абзац станет для вас открытием, полным ярких примеров и впечатляющих достижений. Подготовьтесь быть вовлеченными и удивленными каждый раз, когда продолжите читать.
Получить дополнительную информацию – https://losnorge.no/2021/09/13/mental-muda
Этот увлекательный информационный материал подарит вам массу новых знаний и ярких эмоций. Мы собрали для вас интересные факты и сведения, которые обогатят ваш опыт. Откройте для себя увлекательный мир информации и насладитесь процессом изучения!
Исследовать вопрос подробнее – https://corse-en-moto.com/visiter-la-corse-en-moto
Won a small amount on slots, love it!
plinko
Зайдите на сайт Авадж https://avadge.com/ и вы сможете заказать импорт автомобиля из любой точки мира с доставкой в РФ. Мы предлагаем к покупке премиальные автомобили от ведущих мировых брендов, а наши специалисты предоставят вам всю необходимую информацию по поставке автомобилей с иностранных рынков. Подберём и привезём автомобиль на заказ в идеальном состоянии по доступным ценам.
Эта публикация дает возможность задействовать различные источники информации и представить их в удобной форме. Читатели смогут быстро найти нужные данные и получить ответы на интересующие их вопросы. Мы стремимся к четкости и доступности материала для всех!
Получить дополнительную информацию – https://geb-tga.de/comment-dgceler-ce-vgritable-amour-des-approuves
На сайте https://hmanga.today/ представлена манга в огромном количестве и самого разнообразного жанра. Манга поможет разнообразить досуг, сделать его ярким и незабываемым. Вы сможете выбрать любой вариант из предложенных на сайте. И самое главное, что манга подарит только приятные и положительные впечатления, радость от просмотра. Все серии представлены в отменном качестве, а просматривать можно как на компьютере, так и смартфоне, телефоне. Манга в эротическом стиле поможет удовлетворить ваши желания.
На сайте http://istradoors.ru узнайте, как можно выгодно приобрести продукцию популярной компании ООО «Истринская мануфактура», которая производит межкомнатные двери самого интересного и разнообразного дизайна. Для того чтобы совершить приобретение, необходимо изучить всю продукцию на сайте, после чего выбрать то, что подходит именно вам. Вы можете приехать в офис, чтобы изучить продукцию, вызвать замерщика. После этого необходимо подписать договор и внести оплату. На все товары даются гарантии.
купить высоковольтный провод силиконовый
Ищете SEO продвижение сайтов в Волгограде? Посетите сайт https://volgograd.seo.democrat/ где вы найдете лучшие стратегии продвижения, а также мы проведем бесплатный SEO аудит сайта. Ознакомьтесь с нашими услугами: техническое SEO, контент-оптимизация, подбор и анализ ключевых слов, настройка Яндекс.Метрики, Google Analytics и многое другое. Мы специализируемся на комплексной раскрутке, оптимизации и создании сайтов, которые стабильно занимают ТОП позиции в Яндекс и других поисковых систем.
купить силиконовый провод
The live baccarat game feels so luxe!
plinko app
Hey There. I found your blog using msn. This is an extremely well written article.
I will make sure to bookmark it and return to read more of
your useful information. Thanks for the post. I’ll certainly comeback.
I am in fact happy to glance at this web site posts which includes lots of helpful data, thanks for providing
such information.
An intriguing discussion is definitely worth comment.
I think that you should write more on this issue, it may
not be a taboo matter but generally folks don’t talk about
such issues. To the next! Many thanks!!
You can deposit and withdraw with crypto, there are crypto welcome bonuses, and the on-line casino is legit.
Also visit my web blog https://andonovproltd.com/employer/loan-for-low-credit/
Очень сложно найти проверенного, надежного специалиста, который бы выполнил кузовной ремонт на высоком уровне, профессионально и качественно. Большинство владельцев автомобилей порекомендовали такое предприятие, которое готово выполнить и другие работы по лучшим расценкам. http://kuzov43.ru – на сайте есть возможность отправить фото авто, после чего получить расчет, во сколько обойдется услуга. В этой компании трудятся компетентные, знающие мастера, готовые взяться за самое сложное дело и очень быстро.
Этот информационный материал привлекает внимание множеством интересных деталей и необычных ракурсов. Мы предлагаем уникальные взгляды на привычные вещи и рассматриваем вопросы, которые волнуют общество. Будьте в курсе актуальных тем и расширяйте свои знания!
Ознакомиться с деталями – http://pic.murakumomura.com/2009/07/29/post_703
Got a weekly bonus, keeps me playing.
vinci spin
Энергобум – интернет магазин бытовой техники и электроники. Мы предлагаем широкий ассортимент продукции по доступным ценам. Клиентам вежливое и внимательное отношение гарантируем. Ассортимент постоянно пополняется, поэтому вы точно сможете на портале найти нужный товар. https://energoboom.ru/ – тут есть возможность в любое время с условиями доставки и оплаты ознакомиться. Работаем качественно. На нас можно положиться. Найти нужную технику легко. Используйте удобный каталог или строку поиска. Ждем в Энергобум вас. Удачных вам приобретений!
Этот информативный текст отличается привлекательным содержанием и актуальными данными. Мы предлагаем читателям взглянуть на привычные вещи под новым углом, предоставляя интересный и доступный материал. Получите удовольствие от чтения и расширьте кругозор!
Изучить вопрос глубже – https://seibutsujournal.com/mitosis
I’m gone to tell my little brother, that he should also pay a
quick visit this webpage on regular basis to obtain updated from hottest news.
силиконовый провод ПСВм
Наркологическая клиника “Маяк надежды” расположена по адресу: г. Санкт-Петербург, ул. Колпинская, д. 27. Клиника работает ежедневно с 9:00 до 21:00, без выходных. Наши специалисты готовы предоставить консультацию и ответить на все вопросы, связанные с лечением зависимостей. Мы гарантируем конфиденциальность и индивидуальный подход к каждому пациенту.
Подробнее можно узнать тут – http://алко-лечение24.рф
провод ПМВКл
The live baccarat table is so stylish!
tiger fortune
Online casinos make everything so easy.
tigre fortune
Миссия клиники “Свобода” заключается в оказании качественной помощи людям, страдающим от зависимости. Мы стремимся не просто избавить от пагубной привычки, но и помочь восстановить личность пациента. Важнейшие цели нашей работы включают:
Получить дополнительную информацию – http://алко-лечебница.рф
I love it when people come together and share views.
Great site, continue the good work!
Во-вторых, индивидуальный подход к каждому пациенту. Учитываются личные особенности, такие как возраст, пол, социальный статус. Это позволяет создать эффективный план лечения.
Изучить вопрос глубже – http://алко-лечебница.рф/vivod-iz-zapoya-anonimno-v-samare/
It is the best time to make some plans for the future and
it is time to be happy. I have read this post and
if I may I desire to recommend you some attention-grabbing issues or tips.
Perhaps you can write next articles relating to this article.
I want to learn more issues about it!
The live dealer baccarat is so professional.
aviator demo
Thankfulness to my father who told me concerning this web site, this website is
in fact remarkable.
Please let me know if you’re looking for a article author
for your blog. You have some really great posts and I think I would be a
good asset. If you ever want to take some of the load off, I’d absolutely love to write some articles for your blog in exchange for a link back to mine.
Please send me an email if interested. Thank you!
Наши наркологи придерживаются принципов уважительного и внимательного отношения к пациентам, создавая атмосферу доверия. Они проводят детальное обследование, выявляют коренные причины зависимости и разрабатывают индивидуальные стратегии лечения. Профессионализм и компетентность врачей являются ключевыми факторами успешного восстановления пациентов.
Ознакомиться с деталями – https://нарко-фильтр.рф
Алкогольный запой требует не просто прекращения приёма спиртного, а комплексной медицинской помощи. В Санкт-Петербурге и Ленинградской области вывод из запоя осуществляется опытными наркологами с применением современных методик детоксикации. В зависимости от состояния пациента лечение может быть организовано как на дому, так и в стационарных условиях. Главная цель — безопасное очищение организма и возвращение к стабильному физическому и психоэмоциональному состоянию.
Выяснить больше – вывод из запоя в стационаре в санкт-петербурге
Heya just wanted to give you a quick heads up and let you know
a few of the images aren’t loading correctly. I’m not sure why but I think its a linking issue.
I’ve tried it in two different web browsers and
both show the same outcome. queboi.com https://queboi.com
Login Soho303 : Link Soho303
If you want to get a great deal from this article then you have to apply these strategies to
your won website.
The slot jackpots are always exciting!
betonred bonus code
Клуб Вулкан – это онлайн-платформа
для азартных игр, предлагающая игровые автоматы,
настольные игры и live-казино с
реальными дилерами. Площадка работает на основе международной лицензии, что
обеспечивает безопасность и честность игры.
Одним из главных преимуществ Клуба Вулкан
является широкий выбор игр от ведущих разработчиков, включая NetEnt, Microgaming,
Play’n GO и других. Пользователи могут играть в
классические и современные слоты, такие как Book of Ra и Starburst, а
также участвовать в играх с прогрессивными джекпотами.
Для любителей традиционного казино доступны
рулетка, блэкджек, покер и другие игры с живыми дилерами.
Новые игроки могут получить приветственный бонус,
который часто включает бесплатные спины, увеличенный
депозитный бонус или кешбэк.
Регулярные акции, турниры и специальные предложения делают игру еще более интересной для постоянных клиентов.
Пополнение счета и вывод средств возможны через банковские карты, электронные кошельки, криптовалюты и другие платежные системы.
Вывод выигрышей обычно занимает от нескольких минут
до суток.
Клуб Вулкан поддерживает
ответственное отношение к азартным играм, предлагая
игрокам устанавливать лимиты на депозиты, использовать функцию самоисключения
и обращаться за помощью в случае
возникновения игровой зависимости.
Кит-НН предлагает купить по выгодным ценам рабочую одежду. Гарантируем приличный выбор моделей, отличное качество и ответственность на любом этапе сотрудничества. Ищете спецодежда Нижний Новгород? Kitt-nn.ru – тут представлены отзывы радостных клиентов, посмотрите их в любое время. Стараемся ваши потребности максимально удовлетворить. Подходящую экипировку подберем. Нанесем на нее шевроны с логотипом, а также названием вашей компании. Предоставляем услуги оперативной доставки. Оставьте номер на сайте, и мы вам перезвоним!
Профессиональная помощь при запое необходима, если:
Углубиться в тему – вывод из запоя в стационаре
I am not sure where you are getting your info, but good topic.
I needs to spend some time learning more or understanding
more. Thanks for wonderful info I was looking for this information for my
mission.
На этом этапе специалист уточняет длительность запоя, тип употребляемого алкоголя и наличие сопутствующих заболеваний. Тщательный анализ этих данных позволяет разработать персонализированный план лечения, что существенно снижает риск осложнений.
Углубиться в тему – вызов врача нарколога на дом в калининграде
I’m impressed, I have to admit. Rarely do I encounter a blog that’s both equally educative and
amusing, and without a doubt, you’ve hit the nail on the head.
The issue is something that not enough men and women are speaking intelligently about.
I am very happy I found this during my search for something regarding this.
В Воронеже решение есть — наркологическая клиника «Трезвый шаг». Здесь помогают людям выйти из запоя без страха и осуждения. Всё анонимно, грамотно и с заботой о каждом пациенте.
Исследовать вопрос подробнее – вывод из запоя на дому круглосуточно
Online casinos are great for casual gaming.
joker jewels
Эта публикация погружает вас в мир увлекательных фактов и удивительных открытий. Мы расскажем о ключевых событиях, которые изменили ход истории, и приоткроем завесу над научными достижениями, которые вдохновили миллионы. Узнайте, чему может научить нас прошлое и как применить эти знания в будущем.
Подробнее можно узнать тут – https://www.bptechsolutions.org/blog/seo-optimized-website-design-solution
Профессиональная помощь при запое необходима, если:
Изучить вопрос глубже – вывод из запоя цена в санкт-петербурге
Процесс начинается с вызова врача или доставки пациента в клинику. После прибытия специалист проводит первичную диагностику: измерение давления, температуры, пульса, уровня кислорода в крови, визуальная оценка степени возбуждения или угнетения сознания. Собирается краткий анамнез: какой наркотик принимался, как долго, были ли сопутствующие заболевания.
Узнать больше – снятие ломки наркозависимого в подольске
Love the immersive 3D slot games!
plinko review
После диагностики начинается активная фаза медикаментозного вмешательства. Препараты вводятся капельничным методом для быстрого снижения уровня токсинов, восстановления обменных процессов и нормализации работы таких органов, как печень, почки и сердце.
Выяснить больше – https://kapelnica-ot-zapoya-arkhangelsk00.ru/kapelnicza-ot-zapoya-na-domu-arkhangelsk/
После диагностики начинается активная фаза медикаментозного вмешательства. Препараты вводятся методом инфузии, что позволяет оперативно снизить уровень токсинов в крови, восстановить обмен веществ и нормализовать работу внутренних органов, таких как печень, почки и сердце.
Узнать больше – вывод из запоя на дому цена в улан-удэ
Проблема зависимости остаётся одной из самых актуальных в нашем обществе. Она затрагивает множество людей, нанося вред как их здоровью, так и социальным связям. Наркологическая клиника “Свобода” предлагает помощь тем, кто столкнулся с такими сложностями, как наркомания, алкоголизм и игромания. Мы предоставляем комплексный подход к лечению зависимостей, ориентируясь на индивидуальные потребности каждого пациента.
Получить дополнительную информацию – http://алко-лечебница.рф/vivod-iz-zapoya-anonimno-v-samare/
Nicely put. Regards.
Won a prize in a slot tournament, awesome!
plinko malaysia
Запой — это длительное бесконтрольное употребление алкоголя, приводящее к серьёзным нарушениям обмена веществ, дезориентации и риску острого алкогольного психоза. В Москве и области помощь при выводе из запоя востребована как в домашних условиях, так и в стационаре. Вне зависимости от выбора методики главная цель — быстрое и безопасное восстановление здоровья, чтобы человек мог начать новую, полноценную жизнь без зависимости.
Изучить вопрос глубже – https://алко-избавление.рф
Обращение за помощью нарколога на дому в Архангельске имеет множество преимуществ, среди которых:
Подробнее тут – после капельницы от запоя в архангельске
May I simply just say what a relief to find someone who actually understands what they’re talking about over the internet.
You actually realize how to bring an issue to light and
make it important. A lot more people ought to check this out and
understand this side of your story. I can’t believe you are not more popular since you definitely possess the gift.
Незамедлительно после поступления вызова нарколог приезжает на дом для проведения тщательного осмотра. Врач измеряет жизненно важные показатели — пульс, артериальное давление, температуру — и собирает анамнез для определения степени алкогольной интоксикации.
Узнать больше – вывод из запоя клиника в улан-удэ
Профессиональная помощь при запое необходима, если:
Подробнее тут – http://narko-zakodirovan.ru/vyvod-iz-zapoya-czena-spb/
Самые интересные и полезные статьи на тему настройки и оптимизации работы компьютеров и оргтехники https://www.softo-mir.ru/
Зависимость — это системная проблема, которая требует последовательного и профессионального подхода. Обычные попытки «вылечиться дома» без медицинского сопровождения нередко заканчиваются срывами, ухудшением состояния и психологической деградацией. Клиника «Здоровье Плюс» в Балашихе предоставляет пациентам не просто разовое вмешательство, а выстроенную поэтапную программу, основанную на опыте и медицинских стандартах.
Углубиться в тему – http://www.domen.ru
Каждый день запоя увеличивает риск для жизни. Не рискуйте — специалисты «Трезвого шага» в Воронеже приедут на дом и окажут экстренную помощь. Без боли, стресса и ожидания.
Получить дополнительную информацию – вывод из запоя цена
Недостаточно снять физическую зависимость — важно помочь человеку вернуться в сообщество. В «Доктор Здоровье» разработана система сопровождения, включающая мотивационные беседы, групповые занятия и социальную реабилитацию. Психотерапевты владеют методами когнитивно-поведенческой терапии и мотивационного интервью, консультанты помогают восстановить профессиональные навыки и адаптироваться к повседневной жизни, а встречи в группе взаимопомощи и психодраматические сессии способствуют укреплению чувства поддержки и навыков эффективного общения. Для родственников доступны семейные консультации, на которых объясняют природу зависимости и обучают стратегиям поддержки без критики и давления.
Изучить вопрос глубже – наркологические клиники алкоголизм московская область
В стационаре пациент получает круглосуточный контроль, расширенную диагностику и возможность подключения к аппаратуре мониторинга. Это особенно важно при тяжёлой интоксикации, нарушении сознания или судорожной активности.
Ознакомиться с деталями – вывод из запоя на дому цена санкт-петербург
Won a tournament prize, such a thrill!
plinko
Когда запой угрожает здоровью и жизни, оперативное вмешательство становится критически важным. В Донецке ДНР опытные специалисты по наркологии оказывают профессиональную помощь на дому, обеспечивая качественную детоксикацию организма, стабилизацию жизненно важных функций и психологическую поддержку. Такой формат лечения позволяет пациенту получить комплексную терапию в условиях комфорта, сохраняя полную конфиденциальность и избегая лишних формальностей.
Детальнее – вывод из запоя круглосуточно в донецке
When someone writes an piece of writing he/she maintains
the idea of a user in his/her mind that how
a user can know it. Thus that’s why this paragraph is
perfect. Thanks!
Обращение за помощью нарколога на дому в Калининграде имеет ряд значимых преимуществ:
Изучить вопрос глубже – https://narcolog-na-dom-kaliningrad00.ru/narkolog-na-dom-czena-kaliningrad/
В клинике «ВитаМед Плюс» применяются проверенные методики и препараты, которые позволяют безопасно вывести пациента из запоя. Процедура начинается с внутривенного введения очищающих растворов, которые помогают ускорить выведение этанола и токсинов. Одновременно восстанавливается водно-солевой баланс, что особенно важно при обезвоживании после длительного употребления алкоголя.
Подробнее – вывод из запоя анонимно в химках
Обращение за помощью нарколога на дому в Улан-Удэ имеет ряд неоспоримых преимуществ, обеспечивающих эффективное лечение:
Исследовать вопрос подробнее – срочный вывод из запоя
The live chat feature makes games social.
vincispin
The casino site is so easy to navigate.
vincispin
Одной из самых сильных сторон нашей клиники является оперативность. Мы понимаем, что при алкоголизме, наркомании и лекарственной зависимости часто требуются немедленные действия. Если человек находится в состоянии запоя, абстиненции или передозировки, промедление может привести к тяжёлым осложнениям или даже смерти.
Детальнее – наркологическая помощь в балашихе
Когда организм на пределе, важна срочная помощь. «Трезвый шаг» в Воронеже — это команда опытных наркологов, которые помогут быстро и мягко выйти из запоя без вреда для здоровья.
Выяснить больше – воронежская область
Online roulette with live dealers is immersive.
aviator
Wonderful beat ! I wish to apprentice while you amend your web site, how could i subscribe for a weblog web
site? The account aided me a appropriate deal. I
were tiny bit familiar of this your broadcast offered shiny transparent
idea
Когда запой начинает негативно влиять на здоровье, оперативное лечение становится залогом успешного выздоровления. В Архангельске, Архангельская область, квалифицированные наркологи предоставляют помощь на дому, позволяя быстро провести детоксикацию, восстановить нормальные обменные процессы и стабилизировать работу жизненно важных органов. Такой формат лечения обеспечивает индивидуальный подход, комфортную домашнюю обстановку и полную конфиденциальность, что особенно важно для пациентов, стремящихся к быстрому восстановлению без посещения стационара.
Узнать больше – капельница от запоя цена архангельская область
Excellent data Kudos.
Применение автоматизированных систем дозирования обеспечивает точное введение лекарственных средств, минимизируя риск передозировки и побочных эффектов. Постоянный мониторинг жизненно важных показателей позволяет врачу корректировать терапевтическую схему в режиме реального времени для обеспечения максимальной безопасности.
Выяснить больше – срочный вывод из запоя
The progressive jackpots in online casinos are massive!
plinko application
The withdrawal process was super fast.
vincispin
If some one desires to be updated with most up-to-date technologies after
that he must be go to see this site and be up to date every day.
Won some money on slots, keeps me going!
plinko
После диагностики начинается активная фаза медикаментозного вмешательства. Препараты вводятся методом инфузии, что позволяет оперативно снизить уровень токсинов в крови, восстановить обмен веществ и нормализовать работу внутренних органов, таких как печень, почки и сердце.
Исследовать вопрос подробнее – нарколог вывод из запоя улан-удэ
Запой — это не просто продолжительное пьянство, а острое состояние, требующее срочной медицинской помощи. Без профессионального вмешательства организм человека стремительно разрушается, возрастает риск инфаркта, инсульта, алкогольного психоза и летального исхода. Именно поэтому вывод из запоя должен проходить под контролем нарколога, с использованием проверенных медикаментов и поэтапной схемы стабилизации. В наркологической клинике «ВитаМед Плюс» организована круглосуточная помощь в Химках, включая выезд врача на дом и приём в стационаре.
Углубиться в тему – вывод из запоя на дому химки
An outstanding share! I’ve just forwarded this onto a colleague who has been conducting a little homework on this.
And he actually ordered me lunch simply because I stumbled upon it for him…
lol. So let me reword this…. Thank YOU for the meal!! But yeah,
thanx for spending some time to discuss this topic here on your
internet site.
Услуга «Нарколог на дом» в Калининграде предусматривает комплексное лечение запоя, которое начинается с детального осмотра и диагностики состояния пациента. Специалист измеряет жизненно важные показатели, собирает анамнез и оценивает степень алкогольной интоксикации. На основании полученных данных разрабатывается индивидуальный план терапии, включающий медикаментозное лечение с использованием капельничного введения препаратов, а также психологическую поддержку, необходимую для устойчивой реабилитации и предупреждения рецидивов.
Узнать больше – https://narcolog-na-dom-kaliningrad0.ru/narkolog-na-dom-kruglosutochno-kaliningrad/
The welcome bonus doubled my first deposit, awesome!
tigre fortune
It’s awesome to visit this web page and reading the views of all
friends about this piece of writing, while I am also
keen of getting knowledge.
My casino’s support team is fantastic.
marvelcasino
Greetings! Very useful advice in this particular post!
It’s the little changes that produce the most important changes.
Thanks a lot for sharing!
Hi there, everything is going nicely here and ofcourse every
one is sharing data, that’s truly excellent, keep up writing.
Самостоятельно выйти из запоя — почти невозможно. В Воронеже врачи клиники «Трезвый шаг» проводят медикаментозный вывод из запоя с круглосуточным выездом. Доверяйте профессионалам.
Получить больше информации – в воронеже
https://kra31at
kra31.cc — Только для своих
Playing roulette online is so convenient.
aviator 1win
If some one needs expert view about blogging and site-building
then i recommend him/her to pay a quick visit this web site, Keep up the nice job.
The live chat feature makes games social.
plinko avis
Когда организм на пределе, важна срочная помощь. «Трезвый шаг» в Воронеже — это команда опытных наркологов, которые помогут быстро и мягко выйти из запоя без вреда для здоровья.
Подробнее – vyvod-iz-zapoya-na-domu
В Воронеже решение есть — наркологическая клиника «Трезвый шаг». Здесь помогают людям выйти из запоя без страха и осуждения. Всё анонимно, грамотно и с заботой о каждом пациенте.
Ознакомиться с деталями – вывод из запоя на дому
Hello all, here every person is sharing
these kinds of experience, so it’s nice to read this website, and I used
to pay a quick visit this web site every day.
Одной из самых сильных сторон нашей клиники является оперативность. Мы понимаем, что при алкоголизме, наркомании и лекарственной зависимости часто требуются немедленные действия. Если человек находится в состоянии запоя, абстиненции или передозировки, промедление может привести к тяжёлым осложнениям или даже смерти.
Детальнее – вызвать наркологическую помощь в балашихе
Login Soho303 : Soho303
The game search feature is super handy.
betonred
Обращение за помощью к профессионалам в условиях домашнего лечения имеет ряд важных преимуществ:
Выяснить больше – вывод из запоя донецк.
На данном этапе врач уточняет длительность запоя, тип употребляемого алкоголя и наличие сопутствующих заболеваний. Тщательный анализ этих данных позволяет оперативно сформировать индивидуальный план лечения и выбрать оптимальные методы детоксикации.
Изучить вопрос глубже – врача капельницу от запоя архангельск
Миссия клиники “Свобода” заключается в оказании качественной помощи людям, страдающим от зависимости. Мы стремимся не просто избавить от пагубной привычки, но и помочь восстановить личность пациента. Важнейшие цели нашей работы включают:
Узнать больше – https://алко-лечебница.рф
Близкий человек в запое? Не ждите ухудшения. Обратитесь в клинику «Трезвый шаг» (Воронеж) — здесь проведут профессиональный вывод из запоя с последующим восстановлением организма.
Углубиться в тему – нарколог вывод из запоя
Наркологическая клиника “Маяк надежды” расположена по адресу: г. Санкт-Петербург, ул. Колпинская, д. 27. Клиника работает ежедневно с 9:00 до 21:00, без выходных. Наши специалисты готовы предоставить консультацию и ответить на все вопросы, связанные с лечением зависимостей. Мы гарантируем конфиденциальность и индивидуальный подход к каждому пациенту.
Подробнее – https://алко-лечение24.рф/vivod-iz-zapoya-cena-v-Sankt-Peterburge/
The live dealer games are super authentic.
como ganar en joker jewels
В клинике «ВитаМед Плюс» применяются проверенные методики и препараты, которые позволяют безопасно вывести пациента из запоя. Процедура начинается с внутривенного введения очищающих растворов, которые помогают ускорить выведение этанола и токсинов. Одновременно восстанавливается водно-солевой баланс, что особенно важно при обезвоживании после длительного употребления алкоголя.
Ознакомиться с деталями – вывод из запоя цена
Когда алкогольная интоксикация становится угрозой для здоровья, оперативное вмешательство и качественное лечение на дому играют ключевую роль в спасении жизни. В Калининграде опытные наркологи выезжают на дом, чтобы обеспечить своевременную детоксикацию, стабилизацию работы внутренних органов и оказание психологической поддержки. Такой подход позволяет пациентам получить квалифицированную помощь в комфортной и привычной обстановке, сохраняя конфиденциальность и избегая лишнего стресса, связанного с госпитализацией.
Получить больше информации – http://narcolog-na-dom-kaliningrad0.ru/narkolog-na-dom-kruglosutochno-kaliningrad/
Затяжной запой — это состояние, при котором человек в течение нескольких дней не может прекратить употребление алкоголя без медицинской помощи. Такое состояние чревато тяжёлыми нарушениями в работе внутренних органов и психики. В Новосибирске и Новосибирской области доступен профессиональный вывод из запоя как на дому, так и в условиях стационара. Подход к лечению индивидуален, и основная цель — безопасно и эффективно устранить последствия интоксикации и предотвратить рецидив.
Выяснить больше – вывод из запоя в стационаре новосибирск
I think this is one of the most significant information for me.
And i’m glad reading your article. But wanna remark on few general things, The
website style is great, the articles is really great :
D. Good job, cheers
Обращение за помощью нарколога на дому в Архангельске имеет множество преимуществ, среди которых:
Узнать больше – капельница от запоя на дому цена
Когда алкогольная интоксикация становится угрозой для здоровья, оперативное вмешательство и качественное лечение на дому играют ключевую роль в спасении жизни. В Калининграде опытные наркологи выезжают на дом, чтобы обеспечить своевременную детоксикацию, стабилизацию работы внутренних органов и оказание психологической поддержки. Такой подход позволяет пациентам получить квалифицированную помощь в комфортной и привычной обстановке, сохраняя конфиденциальность и избегая лишнего стресса, связанного с госпитализацией.
Получить дополнительную информацию – http://narcolog-na-dom-kaliningrad0.ru/narkolog-na-dom-kruglosutochno-kaliningrad/
Won a small prize, online casinos are fun!
plinko demo
Когда алкогольный запой угрожает здоровью, оперативное и квалифицированное вмешательство становится жизненно необходимым. В Улан-Удэ специалисты по наркологии оказывают помощь на дому, обеспечивая скорейшую детоксикацию организма, восстановление обменных процессов и стабилизацию работы внутренних органов. Такой подход позволяет пациенту получить комплексное лечение в комфортной домашней обстановке с полным соблюдением конфиденциальности.
Выяснить больше – вывод из запоя круглосуточно в улан-удэ
The bonus terms are fair and clear.
fortune tiger demo
I’ll immediately snatch your rss feed as I can’t to find your
e-mail subscription link or e-newsletter service. Do you’ve any?
Kindly permit me know in order that I may just subscribe.
Thanks.
Tremendous issues here. I am very happy to peer your article.
Thanks so much and I’m looking ahead to contact you.
Will you please drop me a e-mail?
Микрозаймы на карту без отказа займ онлайн срочно без отказа круглосуточно
Во-вторых, индивидуальный подход к каждому пациенту. Учитываются личные особенности, такие как возраст, пол, социальный статус. Это позволяет создать эффективный план лечения.
Подробнее тут – https://алко-лечебница.рф/vivod-iz-zapoya-v-stacionare-v-samare
예쁘네요! 정말로 멋진 기사입니다. 이 정보을 공급해줘서 감사합니다.
заказать натяжной потолок заказать натяжной потолок .
Love the new slot games every month!
plinko apk
Займ денег онлайн на карту срочно займ без регистрации на карту
Обращение за помощью нарколога на дому в Улан-Удэ обладает рядом преимуществ, которые делают лечение эффективным и безопасным:
Подробнее – вывод из запоя капельница улан-удэ
Online casinos are great for low budgets.
sportcash
Займ онлайм микрокредит быстро
I do not even understand how I ended up right here, but I thought this submit was
good. I don’t realize who you’re however certainly you’re going to a well-known blogger in case you aren’t already.
Cheers!
I for all time emailed this weblog post
page to all my friends, because if like to read it after
that my friends will too.
Алкогольный запой требует не просто прекращения приёма спиртного, а комплексной медицинской помощи. В Санкт-Петербурге и Ленинградской области вывод из запоя осуществляется опытными наркологами с применением современных методик детоксикации. В зависимости от состояния пациента лечение может быть организовано как на дому, так и в стационарных условиях. Главная цель — безопасное очищение организма и возвращение к стабильному физическому и психоэмоциональному состоянию.
Изучить вопрос глубже – https://narko-zakodirovan.ru/vyvod-iz-zapoya-czena-spb/
В Воронеже решение есть — наркологическая клиника «Трезвый шаг». Здесь помогают людям выйти из запоя без страха и осуждения. Всё анонимно, грамотно и с заботой о каждом пациенте.
Получить дополнительную информацию – в воронеже
Самолечение или попытка «переждать» запой дома без врача может обернуться серьёзными осложнениями. Обращение к наркологу даёт пациенту:
Исследовать вопрос подробнее – срочный вывод из запоя санкт-петербург
В Воронеже решение есть — наркологическая клиника «Трезвый шаг». Здесь помогают людям выйти из запоя без страха и осуждения. Всё анонимно, грамотно и с заботой о каждом пациенте.
Получить больше информации – вывод из запоя в стационаре
Online casinos are perfect for late-night gaming sessions.
plinko game
Do you mind if I quote a couple of your posts as long as I provide
credit and sources back to your webpage? My blog is in the very same
area of interest as yours and my visitors would genuinely
benefit from a lot of the information you provide here.
Please let me know if this alright with you.
Thank you!
Online casinos make withdrawals so smooth.
gold party
Именно поэтому так важно не терять время. Чем раньше пациент получает помощь, тем выше шансы избежать необратимых последствий и вернуться к нормальной жизни.
Ознакомиться с деталями – снятие ломки на дому
obviously like your web site but you need to
test the spelling on quite a few of your posts.
Several of them are rife with spelling problems and I to find it
very bothersome to inform the reality then again I’ll definitely
come back again.
Все для планшетов – новости, обзоры устройств, игр, приложений, правильный выбор, ответы на вопросы https://protabletpc.ru/
Wow, this piece of writing is good, my sister is analyzing these kinds of things, therefore I am going to inform her.
Online casinos make withdrawals so smooth.
betmomo ci
Затяжной запой опасен для жизни. Врачи наркологической клиники «Трезвый шаг» в Воронеже проводят срочный вывод из запоя — на дому или в стационаре. Анонимно, безопасно, круглосуточно.
Углубиться в тему – в воронеже
What a data of un-ambiguity and preserveness of valuable familiarity on the topic
of unexpected emotions.
Wow, this paragraph is fastidious, my sister is analyzing such things, so I am going
to convey her.
Online casinos make deposits super secure.
betonred
Самостоятельно выйти из запоя — почти невозможно. В Воронеже врачи клиники «Трезвый шаг» проводят медикаментозный вывод из запоя с круглосуточным выездом. Доверяйте профессионалам.
Изучить вопрос глубже – наркология вывод из запоя
I am really impressed together with your writing skills and also with
the layout to your weblog. Is this a paid subject
matter or did you customize it yourself? Anyway keep up the excellent quality writing,
it is uncommon to see a great weblog like this one these days..
Затяжной запой опасен для жизни. Врачи наркологической клиники «Трезвый шаг» в Воронеже проводят срочный вывод из запоя — на дому или в стационаре. Анонимно, безопасно, круглосуточно.
Ознакомиться с деталями – вывод из запоя недорого
It is appropriate time to make a few plans for the long run and it’s time to be
happy. I’ve read this publish and if I may I desire to suggest you few interesting issues or suggestions.
Perhaps you could write next articles referring to this article.
I wish to read even more issues about it!
В стационаре работают узкопрофильные специалисты: наркологи, неврологи, психотерапевты, а также персонал, обеспечивающий круглосуточный уход. Программа включает медикаментозное лечение, психологическую коррекцию, восстановление сна, устранение депрессии, обучение саморегуляции и работу с мотивацией.
Исследовать вопрос подробнее – наркологическая помощь на дому
My partner and I stumbled over here by a different website and thought I might as well check things out.
I like what I see so now i’m following you.
Look forward to exploring your web page yet again.
Won a small amount on slots, love it!
fortune tiger
поисковое продвижение купить продвижение
шильдик изготовление шильд из латуни москва
При сравнительно лёгкой или среднетяжёлой степени интоксикации нарколог приезжает на дом, где в знакомой обстановке проводит детоксикацию. Врач измеряет параметры жизнедеятельности — пульс, давление, насыщение кислородом — и подбирает оптимальный состав препаратов для инфузий. Такой метод подходит тем, кто испытывает стресс при мысли о стационаре и нуждается в анонимности лечения.
Подробнее – https://алко-избавление.рф/vyvod-iz-zapoya-czena-msk/
Применение автоматизированных систем дозирования обеспечивает точное введение лекарственных средств, минимизируя риск передозировки и побочных эффектов. Постоянный мониторинг жизненно важных показателей позволяет врачу корректировать терапевтическую схему в режиме реального времени для обеспечения максимальной безопасности.
Получить дополнительные сведения – вывод из запоя в стационаре в донецке
The game search feature is super handy.
plinko
Запой — это длительное бесконтрольное употребление алкоголя, приводящее к серьёзным нарушениям обмена веществ, дезориентации и риску острого алкогольного психоза. В Москве и области помощь при выводе из запоя востребована как в домашних условиях, так и в стационаре. Вне зависимости от выбора методики главная цель — быстрое и безопасное восстановление здоровья, чтобы человек мог начать новую, полноценную жизнь без зависимости.
Выяснить больше – https://алко-избавление.рф/vyvod-iz-zapoya-na-domu-msk/
Hello There. I found your blog using msn. This is an extremely
well written article. I will be sure to bookmark it and return to read
more of your useful information. Thanks for the post. I will certainly comeback.
Когда организм на пределе, важна срочная помощь. «Трезвый шаг» в Воронеже — это команда опытных наркологов, которые помогут быстро и мягко выйти из запоя без вреда для здоровья.
Получить больше информации – воронеж.
Процедура детоксикации может проводиться двумя способами: выездом врача на дом или госпитализацией. Окончательное решение принимает нарколог после оценки состояния пациента. На ранней стадии запоя достаточно домашней терапии, но при наличии рисков рекомендуется стационар.
Детальнее – вывод из запоя санкт-петербург.
Запой — это состояние, при котором человек на протяжении нескольких дней или недель регулярно употребляет алкоголь, теряя контроль над собой. При этом организм накапливает этанол и его токсичные метаболиты, печень и сердце работают на износ, нарушается сон, развивается психоэмоциональная нестабильность. Главный риск — абстинентный синдром, который может проявляться тремором, судорогами, повышением давления, паникой и даже галлюцинациями.
Изучить вопрос глубже – вывод из запоя цена в химках
В стационаре пациент получает круглосуточный контроль, расширенную диагностику и возможность подключения к аппаратуре мониторинга. Это особенно важно при тяжёлой интоксикации, нарушении сознания или судорожной активности.
Ознакомиться с деталями – нарколог вывод из запоя санкт-петербург
Online casinos make withdrawals hassle-free.
aviator game
шильды из металла шильды методом травления
Hi there Dear, are you really visiting this site daily, if so after
that you will definitely take pleasant knowledge.
https://mobile-mods.ru/ — это замечательный способ получить новые возможности.
Особенно если вы играете на мобильном устройстве с
Android, модификации открывают перед вами большие перспективы.
Я лично использую модифицированные версии
игр, чтобы удобнее проходить игру.
Модификации игр дают невероятную возможность настроить игру, что делает
процесс гораздо увлекательнее.
Играя с плагинами, я могу повысить уровень сложности,
что добавляет новые приключения и делает
игру более непредсказуемой.
Это действительно невероятно, как
такие изменения могут улучшить взаимодействие с игрой, а при этом с максимальной безопасностью использовать такие модифицированные приложения
можно без особых неприятных последствий,
если быть внимательным и следить за обновлениями.
Это делает каждый игровой процесс лучше контролируемым, а возможности практически неограниченные.
Советую попробовать такие модифицированные версии
для Android — это может вдохновит на новые приключения
Показана в тяжёлых случаях или при наличии сопутствующих заболеваний. Лечение проходит под круглосуточным наблюдением врачей и медсестёр с постоянной корректировкой терапии.
Получить дополнительные сведения – http://narko-zakodirovan2.ru
Каждый врач клиники обладает глубокими знаниями в области фармакологии, психофармакологии и психотерапии. Они регулярно посещают профессиональные конференции, семинары и мастер-классы, чтобы быть в курсе последних достижений в лечении зависимостей. Такой подход позволяет нашим специалистам применять наиболее эффективные и научно обоснованные методы терапии.
Получить больше информации – https://алко-лечение24.рф/vivod-iz-zapoya-v-kruglosutochno-v-Sankt-Peterburge
Зависимость — это системная проблема, которая требует последовательного и профессионального подхода. Обычные попытки «вылечиться дома» без медицинского сопровождения нередко заканчиваются срывами, ухудшением состояния и психологической деградацией. Клиника «Здоровье Плюс» в Балашихе предоставляет пациентам не просто разовое вмешательство, а выстроенную поэтапную программу, основанную на опыте и медицинских стандартах.
Получить дополнительные сведения – круглосуточная наркологическая помощь балашиха
Definitely believe that that you stated. Your favourite justification appeared to be on the net the easiest thing to
consider of. I say to you, I definitely get irked even as people consider concerns that they just do not know about.
You controlled to hit the nail upon the top and outlined out the entire thing without having side-effects , other people could take
a signal. Will likely be back to get more. Thank you
Online casinos make withdrawing winnings so simple.
avis plinko
I blog quite often and I really thank you for your information. Your article has
truly peaked my interest. I will book mark your blog and keep checking for new details about once a week.
I subscribed to your RSS feed too.
What i do not understood is in truth how you’re no longer really
much more neatly-appreciated than you may be now.
You are so intelligent. You realize therefore considerably
in relation to this matter, produced me for my part consider it from numerous numerous angles.
Its like women and men are not involved unless it’s something to do with Woman gaga!
Your personal stuffs nice. All the time maintain it up!
If you are going for finest contents like myself,
simply go to see this web site everyday as it presents feature contents,
thanks
Love the holiday-themed casino bonuses!
bet on red
Затяжной запой — это состояние, при котором человек в течение нескольких дней не может прекратить употребление алкоголя без медицинской помощи. Такое состояние чревато тяжёлыми нарушениями в работе внутренних органов и психики. В Новосибирске и Новосибирской области доступен профессиональный вывод из запоя как на дому, так и в условиях стационара. Подход к лечению индивидуален, и основная цель — безопасно и эффективно устранить последствия интоксикации и предотвратить рецидив.
Разобраться лучше – вывод из запоя в стационаре новосибирск
Врачебный состав клиники “Маяк надежды” состоит из высококвалифицированных специалистов в области наркологии. Наши врачи-наркологи имеют обширный опыт работы с зависимыми пациентами и постоянно совершенствуют свои навыки.
Изучить вопрос глубже – https://алко-лечение24.рф/vivod-iz-zapoya-anonimno-v-Sankt-Peterburge/
При поступлении вызова нарколог незамедлительно прибывает на дом для проведения детального первичного осмотра. Врач измеряет жизненно важные показатели, такие как пульс, артериальное давление и температура, а также собирает краткий анамнез, чтобы определить степень алкогольной интоксикации и сформировать индивидуальный план терапии.
Узнать больше – вывод из запоя донецк
Процесс лечения строится из нескольких ключевых этапов, каждый из которых направлен на оперативное восстановление состояния пациента:
Подробнее – вывод из запоя анонимно
Во всех этих случаях промедление может стоить слишком дорого. Наркологическая помощь должна быть оказана немедленно — либо на дому, либо в условиях клиники.
Получить больше информации – вывод из запоя цена московская область
Врач может приехать в течение 1–2 часов после обращения. В стационар возможна экстренная госпитализация в тот же день.
Исследовать вопрос подробнее – https://narko-zakodirovan2.ru/vyvod-iz-zapoya-czena-novosibirsk
Tried a crypto deposit, it was instant!
marvel casino
Way cool! Some very valid points! I appreciate you writing this post and the rest of the website is
extremely good.
Профессиональная помощь при запое необходима, если:
Подробнее можно узнать тут – вывод из запоя на дому цена
excellent post, very informative. I ponder why the other experts of this sector do
not understand this. You should continue your writing.
I’m sure, you have a huge readers’ base already!
I think that what you said made a ton of sense. But, consider this, suppose you added a little information? I ain’t suggesting your content
isn’t solid., however what if you added a title that makes people want more?
I mean Raspberry PI TFT Screen / USB Bitcoin Miner is a little
plain. You should glance at Yahoo’s home page and see how they create news
titles to grab people to click. You might add a related video or
a pic or two to grab people excited about everything’ve got to say.
Just my opinion, it might bring your posts a little livelier.
Greetings I am so excited I found your site, I really found you by mistake, while I was browsing on Google
for something else, Regardless I am here now and would just like to say cheers for
a tremendous post and a all round enjoyable blog (I also love the theme/design), I don’t have time to browse it all at
the moment but I have saved it and also added your RSS feeds,
so when I have time I will be back to read
more, Please do keep up the awesome work.
It’s remarkable to go to see this website and reading the views of all colleagues regarding this post,
while I am also zealous of getting know-how.
Online casinos have so many great games.
dragon hatch
Профессиональная помощь при запое необходима, если:
Получить больше информации – наркология вывод из запоя в санкт-петербурге
Won a small amount on slots, love it!
plinko
If you want to get a good deal from this post then you have to apply these strategies to your
won blog.
Задача врачей — не просто облегчить симптомы, а купировать осложнения, стабилизировать жизненно важные функции, вернуть пациенту способность к дальнейшему лечению. Мы работаем быстро, анонимно и профессионально. Любой человек, оказавшийся в кризисе, может получить помощь в течение часа после обращения.
Изучить вопрос глубже – lomka ot narkotikov podol’sk
Обращение к наркологу позволяет избежать типичных ошибок самолечения и достичь стабильного результата. Квалифицированное вмешательство:
Выяснить больше – наркология вывод из запоя новосибирск
Решение обратиться к врачу должно быть принято, если:
Изучить вопрос глубже – вывод из запоя новосибирск.
Вывод из запоя может осуществляться в двух форматах — на дому и в стационаре. Выбор зависит от степени интоксикации, наличия осложнений и возможности обеспечить пациенту наблюдение в домашних условиях.
Подробнее тут – https://narko-zakodirovan2.ru/
Hi, I do believe this is an excellent blog. I stumbledupon it 😉 I am going to
come back once again since i have bookmarked it. Money and freedom is
the greatest way to change, may you be rich and continue to help other people.
Затяжной запой — это состояние, при котором человек в течение нескольких дней не может прекратить употребление алкоголя без медицинской помощи. Такое состояние чревато тяжёлыми нарушениями в работе внутренних органов и психики. В Новосибирске и Новосибирской области доступен профессиональный вывод из запоя как на дому, так и в условиях стационара. Подход к лечению индивидуален, и основная цель — безопасно и эффективно устранить последствия интоксикации и предотвратить рецидив.
Разобраться лучше – https://narko-zakodirovan2.ru/vyvod-iz-zapoya-na-domu-novosibirsk/
Ломка — это не временное недомогание. Это системное разрушение организма, связанное с тем, что он перестаёт получать наркотик, к которому уже привык. Нарушается обмен веществ, функции сердца, печени, почек, теряется контроль над эмоциями и болью. В состоянии абстиненции человек не может спать, есть, адекватно мыслить. Страдает и тело, и психика.
Углубиться в тему – снятие ломки нарколог в подольске
Online casinos have awesome loyalty programs.
bongobongo kenya
When I originally commented I clicked the “Notify me when new comments are added” checkbox and now each time a comment
is added I get three emails with the same comment. Is
there any way you can remove me from that service?
Bless you!
Курительная трубка – это не просто способ насладиться табаком, а целый ритуал, требующий внимания к деталям. Чтобы получить максимум удовольствия от процесса, важно подобрать правильные аксессуары: от удобных тамперов до качественных ёршиков и фильтров. В этой статье мы расскажем, какие принадлежности действительно полезны, как они влияют на вкус и сохранность трубки, и на что стоит обратить внимание при выборе: аксессуары для трубки
Скай Пост рассказывает не только новости Одессы. В нашем блоге https://sky-post.odesa.ua/category/blog/ каждый день публикуем полезные советы, интересные факты, лайфхаки и многое другое, что вам понравится. Читайте одесские новости, а также интересный блог.
Login Soho303 : Link Alternatif Soho303
Hello! I know this is kind of off-topic however
I had to ask. Does operating a well-established blog like yours take a massive amount work?
I’m brand new to running a blog but I do write in my journal every day.
I’d like to start a blog so I will be able to
share my experience and views online. Please let
me know if you have any kind of suggestions or tips for new aspiring bloggers.
Thankyou!
Thanks for your personal marvelous posting! I certainly
enjoyed reading it, you are a great author.I will make sure
to bookmark your blog and will often come back someday. I want to encourage you to ultimately continue your great
job, have a nice holiday weekend!
В стационаре пациент получает круглосуточный контроль, расширенную диагностику и возможность подключения к аппаратуре мониторинга. Это особенно важно при тяжёлой интоксикации, нарушении сознания или судорожной активности.
Подробнее можно узнать тут – вывод из запоя цена в санкт-петербурге
The casino site is so easy to navigate.
aviator bet
В нашей практике сочетаются несколько видов вмешательства: медико-биологическое, психологическое и социальное. Сначала проводится полная диагностика, включая лабораторные анализы и оценку работы сердца, печени, почек, а также психодиагностические тесты. После этого начинается этап детоксикации с внутривенными капельницами, которые выводят токсины, нормализуют водно-солевой баланс и восстанавливают основные функции организма. Далее мы применяем медикаментозную поддержку для стабилизации артериального давления, купирования тревожных симптомов, нормализации сна и уменьшения болевого синдрома.
Выяснить больше – частная наркологическая клиника
You said it perfectly.!
Близкий человек в запое? Не ждите ухудшения. Обратитесь в клинику «Трезвый шаг» (Воронеж) — здесь проведут профессиональный вывод из запоя с последующим восстановлением организма.
Получить дополнительные сведения – вывод из запоя на дому
Когда зависимость захватывает жизнь, она разрушает не только организм, но и личность, отношения с близкими, карьерные планы и самоощущение. Алкоголь, наркотики и психотропные препараты постепенно подрывают работу внутренних органов, нарушают баланс нейромедиаторов в мозге и приводят к серьёзным психическим и физическим осложнениям. Попытки справиться с этим самостоятельно редко бывают успешными: необходим системный, профессиональный подход. В наркологической клинике «Доктор Здоровье» в Мытищах вы найдёте надёжную опору на всех этапах выздоровления — от экстренной детоксикации до длительной реабилитации.
Углубиться в тему – наркологическая клиника мытищи
You actually make it appear really easy with your presentation however
I to find this topic to be really one thing which I believe I’d by no means understand.
It kind of feels too complex and extremely extensive for me.
I’m having a look ahead for your subsequent submit,
I will try to get the grasp of it!
Затяжной запой — это состояние, при котором человек в течение нескольких дней не может прекратить употребление алкоголя без медицинской помощи. Такое состояние чревато тяжёлыми нарушениями в работе внутренних органов и психики. В Новосибирске и Новосибирской области доступен профессиональный вывод из запоя как на дому, так и в условиях стационара. Подход к лечению индивидуален, и основная цель — безопасно и эффективно устранить последствия интоксикации и предотвратить рецидив.
Получить больше информации – вывод из запоя на дому
Online poker tournaments are so exciting!
betmomo login
Врачебный состав клиники “Маяк надежды” состоит из высококвалифицированных специалистов в области наркологии. Наши врачи-наркологи имеют обширный опыт работы с зависимыми пациентами и постоянно совершенствуют свои навыки.
Получить дополнительную информацию – http://алко-лечение24.рф
В столичном регионе доступны два основных формата лечения: выезд специалиста на дом и госпитализация в специализированный центр. Каждый вариант имеет свои особенности и показания, которые врач анализирует при первичном осмотре.
Получить больше информации – http://алко-избавление.рф/
https://mods-menu.ru/ — это замечательный способ улучшить игровой процесс.
Особенно если вы пользуетесь устройствами на платформе Android, модификации открывают
перед вами широкие горизонты.
Я часто использую модифицированные версии игр, чтобы развиваться быстрее.
Моды для игр дают невероятную свободу в игре, что взаимодействие
с игрой гораздо захватывающее. Играя с плагинами, я могу создать новый игровой
процесс, что добавляет новые приключения и делает игру более достойной внимания.
Это действительно интересно, как такие моды могут улучшить
взаимодействие с игрой, а при этом сохраняя использовать такие
взломанные версии можно без особых рисков, если быть внимательным и следить за обновлениями.
Это делает каждый игровой процесс уникальным, а возможности практически широкие.
Советую попробовать такие игры с модами для Android — это может вдохновит на новые приключения
My casino’s VIP perks are amazing.
sportcash
Затяжной запой — это состояние, при котором человек в течение нескольких дней не может прекратить употребление алкоголя без медицинской помощи. Такое состояние чревато тяжёлыми нарушениями в работе внутренних органов и психики. В Новосибирске и Новосибирской области доступен профессиональный вывод из запоя как на дому, так и в условиях стационара. Подход к лечению индивидуален, и основная цель — безопасно и эффективно устранить последствия интоксикации и предотвратить рецидив.
Получить больше информации – https://narko-zakodirovan2.ru/vyvod-iz-zapoya-czena-novosibirsk
Мы верим, что каждый человек, столкнувшийся с проблемой зависимости, заслуживает шанса на новую жизнь. Наша миссия — предоставить необходимые инструменты и поддержку, чтобы помочь пациентам в их стремлении к здоровой и свободной от зависимостей жизни.
Детальнее – https://нарко-фильтр.рф/vivod-iz-zapoya-v-kruglosutochno-v-rostove-na-donu
Алкогольный запой требует не просто прекращения приёма спиртного, а комплексной медицинской помощи. В Санкт-Петербурге и Ленинградской области вывод из запоя осуществляется опытными наркологами с применением современных методик детоксикации. В зависимости от состояния пациента лечение может быть организовано как на дому, так и в стационарных условиях. Главная цель — безопасное очищение организма и возвращение к стабильному физическому и психоэмоциональному состоянию.
Детальнее – http://narko-zakodirovan.ru
Simply wish to say your article is as astounding. The clarity in your post is just spectacular and i can assume you’re an expert on this subject.
Fine with your permission allow me to grab your feed to keep updated with forthcoming post.
Thanks a million and please continue the enjoyable work.
На данном этапе врач уточняет, как долго продолжается запой, какой тип алкоголя употребляется и имеются ли сопутствующие заболевания. Тщательный анализ этих данных помогает разработать индивидуальный план терапии, направленный на эффективное снижение токсической нагрузки.
Получить дополнительную информацию – vyzov-narkologa-na-dom kaliningrad
I’ve read some good stuff here. Certainly worth bookmarking for revisiting.
I surprise how so much effort you set to make this sort of great informative website.
The live dealer baccarat is so professional.
fortunetiger
Миссия клиники “Путь к выздоровлению” заключается в содействии восстановлению здоровья и социальной реинтеграции людей, столкнувшихся с проблемами зависимости. Мы стремимся к комплексному решению этой сложной задачи, учитывая физические, психологические и социальные аспекты зависимости. Наша цель — не только помочь пациентам избавиться от физической зависимости, но и обеспечить их психологическое восстановление и возвращение к нормальной жизни в обществе.
Исследовать вопрос подробнее – https://нарко-фильтр.рф/vivod-iz-zapoya-na-domu-v-rostove-na-donu
Won a prize in a slot tournament, awesome!
plinko avis forum
Вывод из запоя может осуществляться в двух форматах — на дому и в стационаре. Выбор зависит от степени интоксикации, наличия осложнений и возможности обеспечить пациенту наблюдение в домашних условиях.
Подробнее можно узнать тут – http://narko-zakodirovan2.ru/vyvod-iz-zapoya-czena-novosibirsk/
Блог сайту “Українська хата” – джерело з цікавими темами і корисними темами про будівництво і ремонт, домашній затишок і комфорт для сім’ї. У блозі https://xata.od.ua/category/blog/ щодня публікуємо актуальні огляди і поради від експертів.
Обращение за помощью нарколога на дому в Калининграде имеет ряд значимых преимуществ:
Выяснить больше – http://narcolog-na-dom-kaliningrad00.ru
Ломка — это не временное недомогание. Это системное разрушение организма, связанное с тем, что он перестаёт получать наркотик, к которому уже привык. Нарушается обмен веществ, функции сердца, печени, почек, теряется контроль над эмоциями и болью. В состоянии абстиненции человек не может спать, есть, адекватно мыслить. Страдает и тело, и психика.
Ознакомиться с деталями – снятие наркологической ломки подольск
Ежедневные публикации про новинки автомобилей, советы по ремонту и эксплуатации, мастер-классы тюнинга, новое в правилах ПДД и автомобильных законах в нашем блоге https://mineavto.ru/
Близкий человек в запое? Не ждите ухудшения. Обратитесь в клинику «Трезвый шаг» (Воронеж) — здесь проведут профессиональный вывод из запоя с последующим восстановлением организма.
Подробнее – вывод из запоя на дому
Thanks for sharing your thoughts. I really appreciate your efforts and I will
be waiting for your further post thanks once again.
The payout process was super quick.
aviator game
Good post! We are linking to this great content on our site.
Keep up the great writing.
После диагностики начинается активная фаза медикаментозного вмешательства. Препараты вводятся инфузионным методом, что позволяет оперативно снизить уровень токсинов в крови, восстановить обмен веществ и нормализовать работу внутренних органов, таких как печень, почки и сердце.
Получить больше информации – https://vyvod-iz-zapoya-ulan-ude00.ru/narkologiya-vyvod-iz-zapoya-ulan-ude
Конвейерные системы https://euroconveyor-st.ru/ – неотъемлемая часть современных предприятий. От легкой промышленности и логистических центов до энергетики и тяжелого машиностроения: конвейерные линии обеспечивают функционирование фабрик и заводов в автоматическом режиме круглый год. Ленточные и роликовые, мобильные и стационарные, компактные и масштабные – многообразные конвейерные системы решают самые разные задачи, обеспечивая минимизацию ручного труда, снижение затрат и оптимизацию рабочих процессов.
Hello to every body, it’s my first pay a visit of this blog;
this blog contains awesome and really fine data for visitors.
The slot animations are so fun to watch!
betonred
После диагностики начинается активная фаза медикаментозного вмешательства. Препараты вводятся инфузионным методом, что позволяет оперативно снизить уровень токсинов в крови, восстановить обмен веществ и нормализовать работу внутренних органов, таких как печень, почки и сердце.
Углубиться в тему – вывод из запоя цена улан-удэ.
Its such as you read my thoughts! You appear to grasp a lot about this, such as you wrote the e book in it or something.
I feel that you simply can do with a few % to pressure the
message home a bit, however other than that, that is excellent blog.
A fantastic read. I will certainly be back.
Близкий человек в запое? Не ждите ухудшения. Обратитесь в клинику «Трезвый шаг» (Воронеж) — здесь проведут профессиональный вывод из запоя с последующим восстановлением организма.
Подробнее тут – наркология вывод из запоя
Excellent blog here! Additionally your site rather a lot up fast!
What web host are you the use of? Can I am getting your affiliate link
to your host? I wish my site loaded up as fast as yours lol
The slot graphics make every spin fun!
aviator game
For newest news you have to visit world wide web and on web I found this web
site as a finest site for latest updates.
http://ww1.beritatogel.buzz/
Компания К-ЖБИ обеспечивает безупречное качество продукции и неукоснительное соблюдение сроков. Мы предлагаем доступные цены и профессиональный подход к каждому клиенту. У вас есть возможность на консультацию от специалистов по интересующим вопросам рассчитывать. Ищете щебень вторичный разной крупности вторичной переработки? Gbisp.ru – тут можно заявку оставить. К-ЖБИ внедряет и применяет в производстве передовые технологии. Все материалы, сырье и готовые изделия проходят тщательные испытания и сертификацию в оснащенной лаборатории. Гарантируем быструю доставку, обращайтесь к нам.
I enjoy what you guys are usually up too. This kind
of clever work and reporting! Keep up the very good works guys I’ve incorporated you guys
to my blogroll.
При сравнительно лёгкой или среднетяжёлой степени интоксикации нарколог приезжает на дом, где в знакомой обстановке проводит детоксикацию. Врач измеряет параметры жизнедеятельности — пульс, давление, насыщение кислородом — и подбирает оптимальный состав препаратов для инфузий. Такой метод подходит тем, кто испытывает стресс при мысли о стационаре и нуждается в анонимности лечения.
Детальнее – http://алко-избавление.рф
В Воронеже решение есть — наркологическая клиника «Трезвый шаг». Здесь помогают людям выйти из запоя без страха и осуждения. Всё анонимно, грамотно и с заботой о каждом пациенте.
Разобраться лучше – vyvod-iz-zapoya-kruglosutochno
The casino app is super smooth.
plinko app
I’m gone to inform my little brother, that he should also pay a quick visit this weblog
on regular basis to take updated from latest gossip.
The slot game visuals are incredible!
dragon hatch
User KUBET dari wilayah Indonesia sering mengalami
blokir ISP. Untuk mengatasi ini, tersedia link alternatif kubet yang bisa digunakan kapan saja.
Dengan menggunakan **kubet link alternatif**, Anda tetap
bisa melakukan **kubet login** tanpa hambatan. Tautan backup ini langsung terhubung ke
server resmi.
Tak hanya itu, jika link utama tak bisa diakses, Anda bisa menggunakan **kubet login alternatif** sebagai jalur masuk tambahan. Ini penting
agar Anda tetap bisa menikmati fitur KUBET seperti:
– Live game dan taruhan digital
– Live streaming interaktif
– Customer service 24 jam
**KUBET** sendiri merupakan situs permainan online populer yang sudah banyak
digunakan di Asia, termasuk **KUBET Indonesia**.
Bagi pengguna aktif, disarankan untuk menyimpan **kubet link alternatif** dan **kubet login alternatif** agar akses tetap
lancar setiap saat. Semua link ini aman, bebas
malware, dan langsung dari pengelola resmi.
Tetap online bersama KUBET hanya dengan menggunakan link alternatif
yang benar.
Very quickly this site will be famous among all blogging visitors, due
to it’s nice articles or reviews
Undeniably believe that which you said. Your favorite justification seemed to be
on the web the easiest thing to be aware of.
I say to you, I certainly get irked while
people consider worries that they just do not know about.
You managed to hit the nail upon the top as well as defined out the whole thing without having side effect ,
people could take a signal. Will probably be back to get more.
Thanks
My casino’s support is always helpful.
plinko
I think what you published was very logical.
However, what about this? what if you added a little content?
I am not saying your information isn’t good, but what if
you added something that grabbed a person’s attention?
I mean Raspberry PI TFT Screen / USB Bitcoin Miner is a little boring.
You ought to peek at Yahoo’s home page and note how they write news headlines to
get people to click. You might add a related video or a picture or two to grab
people interested about what you’ve got to
say. Just my opinion, it might make your blog
a little bit more interesting.
Won a small amount on slots, love it!
bongobongo app
Very descriptive post, I liked that a lot. Will there be a part 2?
Затяжной запой опасен для жизни. Врачи наркологической клиники «Трезвый шаг» в Воронеже проводят срочный вывод из запоя — на дому или в стационаре. Анонимно, безопасно, круглосуточно.
Разобраться лучше – наркологический вывод из запоя
Ломка — это не временное недомогание. Это системное разрушение организма, связанное с тем, что он перестаёт получать наркотик, к которому уже привык. Нарушается обмен веществ, функции сердца, печени, почек, теряется контроль над эмоциями и болью. В состоянии абстиненции человек не может спать, есть, адекватно мыслить. Страдает и тело, и психика.
Разобраться лучше – снятие ломки подольск
Excellent blog! Do you have any tips for aspiring writers?
I’m hoping to start my own blog soon but I’m a little lost on everything.
Would you propose starting with a free platform like WordPress or go for a
paid option? There are so many options out there that I’m completely overwhelmed ..
Any suggestions? Cheers!
Got a weekly bonus, keeps me engaged.
plinko
This is my first time go to see at here and i am truly impressed to read all at one place.
Online casinos have so many great games.
sport cash
В нашей практике сочетаются несколько видов вмешательства: медико-биологическое, психологическое и социальное. Сначала проводится полная диагностика, включая лабораторные анализы и оценку работы сердца, печени, почек, а также психодиагностические тесты. После этого начинается этап детоксикации с внутривенными капельницами, которые выводят токсины, нормализуют водно-солевой баланс и восстанавливают основные функции организма. Далее мы применяем медикаментозную поддержку для стабилизации артериального давления, купирования тревожных симптомов, нормализации сна и уменьшения болевого синдрома.
Исследовать вопрос подробнее – наркологические клиники алкоголизм в мытищах
Can I simply say what a comfort to uncover an individual who genuinely understands what they’re discussing on the web.
You definitely realize how to bring a problem to light and
make it important. More people should look at this and understand this
side of the story. I was surprised that you’re not more popular given that you surely possess
the gift.
I don’t even know the way I ended up right here, however I believed this put up used
to be good. I don’t understand who you’re however certainly you’re going to a
famous blogger when you are not already. Cheers!
This excellent website really has all of the information I
wanted concerning this subject and didn’t know who to ask.
Самолечение или попытка «переждать» запой дома без врача может обернуться серьёзными осложнениями. Обращение к наркологу даёт пациенту:
Выяснить больше – вывод из запоя клиника в санкт-петербурге
Good post. I learn something new and challenging on sites I stumbleupon everyday.
It’s always exciting to read through content from other writers and use something from
other web sites.
Its like you learn my mind! You seem to understand a lot approximately this,
such as you wrote the e-book in it or something.
I feel that you just can do with some % to power the message home a bit, but instead
of that, this is great blog. An excellent read. I will definitely be back.
Asking questions are really fastidious thing if you are not
understanding something completely, but this article provides pleasant understanding even.
Online casinos make gaming so convenient.
vincispin
Olá, eu acho este é um excelente site. Eu tropecei nele 😉 eu vou revisitar mais uma vez já que eu marquei no livro.
Dinheiro e liberdade é a maior maneira de mudar, que você seja rico e continue a ajudar outros.
Online roulette with live dealers is amazing.
jogo do tigrinho
В стационаре пациент получает круглосуточный контроль, расширенную диагностику и возможность подключения к аппаратуре мониторинга. Это особенно важно при тяжёлой интоксикации, нарушении сознания или судорожной активности.
Выяснить больше – вывод из запоя на дому цена
Обращение к наркологу позволяет избежать типичных ошибок самолечения и достичь стабильного результата. Квалифицированное вмешательство:
Подробнее можно узнать тут – https://narko-zakodirovan2.ru/vyvod-iz-zapoya-kruglosutochno-novosibirsk
После диагностики начинается активная фаза медикаментозного вмешательства. Препараты вводятся капельничным методом для быстрого снижения уровня токсинов, восстановления обменных процессов и нормализации работы таких органов, как печень, почки и сердце.
Получить больше информации – http://kapelnica-ot-zapoya-arkhangelsk00.ru
Hi there to all, how is all, I think every one is getting more from
this web page, and your views are fastidious in favor of new
people.
What’s up every one, here every one is sharing such familiarity, so it’s
fastidious to read this weblog, and I used
to pay a visit this website all the time.
The bonus terms are fair and clear.
sportcash
После диагностики начинается активная фаза медикаментозного вмешательства. Препараты вводятся капельничным методом для быстрого снижения уровня токсинов, восстановления обменных процессов и нормализации работы таких органов, как печень, почки и сердце.
Изучить вопрос глубже – врача капельницу от запоя
Online casinos have awesome signup bonuses.
plinko
В Воронеже решение есть — наркологическая клиника «Трезвый шаг». Здесь помогают людям выйти из запоя без страха и осуждения. Всё анонимно, грамотно и с заботой о каждом пациенте.
Выяснить больше – вывод из запоя недорого
Hi mates, pleasant post and fastidious arguments commented here,
I am in fact enjoying by these.
Fantastic site you have here but I was curious if you knew of any community forums that cover the same topics discussed in this article? I’d really like to be a part of group where I can get comments from other knowledgeable individuals that share the same interest. If you have any recommendations, please let me know. Bless you!
aralash jang
Wow! At last I got a website from where I know how to really take valuable facts concerning my study and knowledge.
Hello There. I found your blog using msn. This is an extremely well
written article. I’ll be sure to bookmark it and return to read more of your useful information. Thanks for the post.
I’ll certainly return.
На сайте https://belpapa.ru/ в огромном ассортименте представлен сайдинг самых разных оттенков, вариантов исполнения. Вся продукция качественная, надежная, на нее имеются сертификаты, вся необходимая сопроводительная документация. В разделе находится: виниловый, акриловый сайдинг, а также формованный, различные сопутствующие товары, которые пригодятся в процессе его укладки. А если вы ищете что-то определенное, то воспользуйтесь специальным фильтром. Заказы принимаются в круглосуточном режиме.
Решение обратиться к врачу должно быть принято, если:
Подробнее можно узнать тут – нарколог вывод из запоя
Профессиональная помощь при запое необходима, если:
Исследовать вопрос подробнее – вывод из запоя цена ленинградская область
Online casinos have clear game guides.
fortune tiger slots
I relish, lead to I discovered exactly what I used to be looking for.
You’ve ended my 4 day long hunt! God Bless you man. Have
a nice day. Bye
Online casinos have better rewards than I thought.
plinko
Обращение за помощью нарколога на дому в Калининграде имеет ряд значимых преимуществ:
Детальнее – https://narcolog-na-dom-kaliningrad00.ru/vrach-narkolog-na-dom-kaliningrad
What’s Going down i’m new to this, I stumbled
upon this I have found It positively useful and it
has helped me out loads. I hope to contribute & aid other users like its aided me.
Good job.
Самолечение или попытка «переждать» запой дома без врача может обернуться серьёзными осложнениями. Обращение к наркологу даёт пациенту:
Ознакомиться с деталями – http://narko-zakodirovan.ru
You have made some decent points there. I checked on the web to learn more about the issue and found most individuals will go along with your views on this site.
Here is my blog :: growth matrix program
Online casinos are perfect for casual players.
aviator
For most up-to-date information you have to pay a quick visit world-wide-web and
on world-wide-web I found this website as a finest web page for most up-to-date updates.
На данном этапе специалист уточняет длительность запоя, тип употребляемого алкоголя и наличие сопутствующих заболеваний. Тщательный анализ этих данных позволяет разработать персональный план детоксикации, минимизируя риск осложнений.
Выяснить больше – http://vyvod-iz-zapoya-ulan-ude0.ru
I am genuinely glad to glance at this webpage posts which carries tons of valuable facts, thanks for providing such
information.
buyedpills
На данном этапе специалист уточняет длительность запоя, тип употребляемого алкоголя и наличие сопутствующих заболеваний. Тщательный анализ этих данных позволяет разработать персональный план детоксикации, минимизируя риск осложнений.
Подробнее – нарколог вывод из запоя в улан-удэ
Домашнее лечение позволяет снизить психологическое напряжение, поскольку пациент остаётся в привычной обстановке — рядом с близкими и без очередей. Экономия времени достигается за счёт оперативного выезда специалиста без необходимости госпитализации, а затраты на вызов часто оказываются ниже, чем в стационаре. При грамотном подборе медикаментов и круглосуточном контроле со стороны врача риск осложнений сводится к минимуму.
Получить дополнительные сведения – https://алко-избавление.рф/vyvod-iz-zapoya-na-domu-msk/
I loved as much as you will receive carried out right here.
The sketch is tasteful, your authored material stylish.
nonetheless, you command get bought an nervousness over that
you wish be delivering the following. unwell unquestionably come more formerly again as exactly the same
nearly very often inside case you shield this hike.
I do trust all of the ideas you’ve offered for your post. They are very convincing and
will certainly work. Still, the posts are very short for starters.
May you please extend them a little from next time?
Thanks for the post.
Love the sound effects in online slots, so cool!
plinko avis forum
Hi there, every time i used to check webpage posts here early in the
morning, as i love to gain knowledge of more
and more.
You actually make it seem so easy with your presentation but I find this topic to be actually something that I think I
would never understand. It seems too complicated and extremely broad for me.
I am looking forward for your next post, I will try to get the hang of it!
Amazing blog! Is your theme custom made or did you download it from somewhere?
A theme like yours with a few simple tweeks would really make my blog
stand out. Please let me know where you got your theme.
Many thanks
Домашнее лечение позволяет снизить психологическое напряжение, поскольку пациент остаётся в привычной обстановке — рядом с близкими и без очередей. Экономия времени достигается за счёт оперативного выезда специалиста без необходимости госпитализации, а затраты на вызов часто оказываются ниже, чем в стационаре. При грамотном подборе медикаментов и круглосуточном контроле со стороны врача риск осложнений сводится к минимуму.
Выяснить больше – https://алко-избавление.рф/vyvod-iz-zapoya-czena-msk/
Врачебный состав клиники “Путь к выздоровлению” состоит из высококвалифицированных специалистов в области наркологии. Наши врачи-наркологи имеют обширный опыт работы с зависимыми пациентами и постоянно совершенствуют свои навыки.
Детальнее – https://нарко-фильтр.рф/vivod-iz-zapoya-v-stacionare-v-rostove-na-donu
Процесс начинается с вызова врача или доставки пациента в клинику. После прибытия специалист проводит первичную диагностику: измерение давления, температуры, пульса, уровня кислорода в крови, визуальная оценка степени возбуждения или угнетения сознания. Собирается краткий анамнез: какой наркотик принимался, как долго, были ли сопутствующие заболевания.
Детальнее – снятие ломок на дому подольск
I’ve read several good stuff here. Definitely value bookmarking for revisiting.
I surprise how much attempt you place to make this type of wonderful informative website.
https://wethewomendesign.com/
Very good article. I’m going through many of these issues as well..
Why users still use to read news papers when in this technological
world everything is available on net?
Olá! Alguém no meu grupo Facebook compartilhou este website conosco, então eu
vim dar uma olhada. Estou definitivamente amando as informações.
Estou marcando e vou tuitar isso para meus seguidores! Blog Maravilhoso e
brilhante estilo e design excelente.
I quite like reading through an article that can make men and women think.
Also, many thanks for allowing for me to comment!
Asking questions are in fact fastidious thing if you are not
understanding anything completely, except this article offers good understanding yet.
Feel free to surf to my homepage Firstline Garage Door Repair provides Arlington Heights IL
The casino site is so easy to navigate.
mostbet aviator
Алкогольный запой требует не просто прекращения приёма спиртного, а комплексной медицинской помощи. В Санкт-Петербурге и Ленинградской области вывод из запоя осуществляется опытными наркологами с применением современных методик детоксикации. В зависимости от состояния пациента лечение может быть организовано как на дому, так и в стационарных условиях. Главная цель — безопасное очищение организма и возвращение к стабильному физическому и психоэмоциональному состоянию.
Выяснить больше – https://narko-zakodirovan.ru/vyvod-iz-zapoya-kapelnicza-spb
Yesterday, while I was at work, my cousin stole my iPad and tested to see
if it can survive a thirty foot drop, just so she can be a youtube sensation. My
iPad is now destroyed and she has 83 views. I know this is completely off
topic but I had to share it with someone!
Обращение за помощью нарколога на дому в Улан-Удэ имеет ряд неоспоримых преимуществ, обеспечивающих эффективное лечение:
Получить дополнительные сведения – http://vyvod-iz-zapoya-ulan-ude00.ru/narkologiya-vyvod-iz-zapoya-ulan-ude/
Каждый врач клиники обладает глубокими знаниями в области фармакологии, психофармакологии и психотерапии. Они регулярно посещают профессиональные конференции, семинары и мастер-классы, чтобы быть в курсе последних достижений в лечении зависимостей. Такой подход позволяет нашим специалистам применять наиболее эффективные и научно обоснованные методы терапии.
Ознакомиться с деталями – https://алко-лечение24.рф/vivod-iz-zapoya-v-kruglosutochno-v-Sankt-Peterburge/
I am not sure where you are getting your info,
but great topic. I needs to spend some time learning much more or understanding more.
Thanks for great information I was looking for this
information for my mission.
Бесплатная панель управления control panel 1Panel сервером с открытым исходным кодом. Удобный интерфейс, поддержка популярных ОС, автоматизация задач, резервное копирование, управление сайтами и базами. Оптимально для вебмастеров и системных администраторов.
Online casinos make withdrawals so smooth.
plinko avis
юрист москва онлайн консультация юриста
Ломка — это не временное недомогание. Это системное разрушение организма, связанное с тем, что он перестаёт получать наркотик, к которому уже привык. Нарушается обмен веществ, функции сердца, печени, почек, теряется контроль над эмоциями и болью. В состоянии абстиненции человек не может спать, есть, адекватно мыслить. Страдает и тело, и психика.
Детальнее – снятие ломки на дому недорого подольск
Spot on with this write-up, I absolutely believe this web site needs much
more attention. I’ll probably be returning to read through more, thanks for the advice!
Stunning quest there. What happened after? Take care!
my web site – Cell therapy
Врач может приехать в течение 1–2 часов после обращения. В стационар возможна экстренная госпитализация в тот же день.
Получить дополнительные сведения – срочный вывод из запоя новосибирск
Недостаточно снять физическую зависимость — важно помочь человеку вернуться в сообщество. В «Доктор Здоровье» разработана система сопровождения, включающая мотивационные беседы, групповые занятия и социальную реабилитацию. Психотерапевты владеют методами когнитивно-поведенческой терапии и мотивационного интервью, консультанты помогают восстановить профессиональные навыки и адаптироваться к повседневной жизни, а встречи в группе взаимопомощи и психодраматические сессии способствуют укреплению чувства поддержки и навыков эффективного общения. Для родственников доступны семейные консультации, на которых объясняют природу зависимости и обучают стратегиям поддержки без критики и давления.
Подробнее – https://narkologicheskaya-klinika-mytishchi1.ru
If some one desires to be updated with hottest technologies afterward he must be go to see this web site and be up to date all the time.
Обращение к наркологу позволяет избежать типичных ошибок самолечения и достичь стабильного результата. Квалифицированное вмешательство:
Детальнее – https://narko-zakodirovan2.ru/vyvod-iz-zapoya-kruglosutochno-novosibirsk/
Tried a no-deposit bonus, and it’s a great way to test a site.
plinko pareri
Именно поэтому так важно не терять время. Чем раньше пациент получает помощь, тем выше шансы избежать необратимых последствий и вернуться к нормальной жизни.
Подробнее тут – снятие ломки
Затяжной запой — это состояние, при котором человек в течение нескольких дней не может прекратить употребление алкоголя без медицинской помощи. Такое состояние чревато тяжёлыми нарушениями в работе внутренних органов и психики. В Новосибирске и Новосибирской области доступен профессиональный вывод из запоя как на дому, так и в условиях стационара. Подход к лечению индивидуален, и основная цель — безопасно и эффективно устранить последствия интоксикации и предотвратить рецидив.
Выяснить больше – вывод из запоя на дому круглосуточно новосибирск
Ломка — это не временное недомогание. Это системное разрушение организма, связанное с тем, что он перестаёт получать наркотик, к которому уже привык. Нарушается обмен веществ, функции сердца, печени, почек, теряется контроль над эмоциями и болью. В состоянии абстиненции человек не может спать, есть, адекватно мыслить. Страдает и тело, и психика.
Выяснить больше – снятие ломки наркозависимого подольск
Live dealer games make me feel like I’m there.
ruleta americana
Wow that was strange. I just wrote an really long comment but after I clicked submit my comment didn’t show
up. Grrrr… well I’m not writing all that over again. Regardless, just wanted to say great blog!
Показана в тяжёлых случаях или при наличии сопутствующих заболеваний. Лечение проходит под круглосуточным наблюдением врачей и медсестёр с постоянной корректировкой терапии.
Разобраться лучше – vyvod-iz-zapoya-kruglosutochno novosibirsk
headless chrome browser cloud antidetect
link bokep indo
Hello! This is kind of off topic but I need some guidance from an established blog.
Is it difficult to set up your own blog? I’m not
very techincal but I can figure things out pretty fast.
I’m thinking about making my own but I’m not sure where to start.
Do you have any points or suggestions? Appreciate it
модуль отчетности модуль аналитики
Решение обратиться к врачу должно быть принято, если:
Подробнее можно узнать тут – вывод из запоя новосибирская область
Hello, yup this paragraph is really nice and I
have learned lot of things from it about blogging.
thanks.
You ought to be a part of a contest for one of the most useful sites on the internet.
I’m going to recommend this blog!
I’m really inspired with your writing talents as neatly as with the
layout to your blog. Is this a paid subject or did you modify it your
self? Anyway stay up the nice high quality writing,
it’s uncommon to see a great blog like this one nowadays..
Сразу после поступления вызова специалист приезжает на дом для проведения тщательного первичного осмотра. Измеряются такие жизненно важные показатели, как пульс, артериальное давление и температура, а также проводится сбор анамнеза, что позволяет оценить степень алкогольной интоксикации.
Углубиться в тему – http://narcolog-na-dom-kaliningrad00.ru/narkolog-na-dom-czena-kaliningrad/
This is a topic which is near to my heart…
Cheers! Exactly where are your contact details though?
Абстинентный синдром — одно из самых тяжёлых и опасных проявлений наркотической зависимости. Он развивается на фоне резкого отказа от приёма веществ и сопровождается сильнейшими нарушениями работы организма. Это состояние требует немедленного вмешательства. Самостоятельно справиться с ним невозможно — особенно если речь идёт о героине, метадоне, синтетических наркотиках или длительной зависимости. В клинике «НаркоПрофи» мы организовали систему снятия ломки в Подольске, работающую круглосуточно: как на дому, так и в условиях стационара.
Выяснить больше – снятие ломки наркомана в подольске
заказать бейджики москва бейдж изготовление
Профессиональная помощь при запое необходима, если:
Узнать больше – https://narko-zakodirovan.ru/vyvod-iz-zapoya-na-domu-spb
Обращение за помощью нарколога на дому в Архангельске имеет множество преимуществ, среди которых:
Разобраться лучше – врача капельницу от запоя в архангельске
Hey I am so glad I found your site, I really found you by error, while I was
researching on Bing for something else, Anyways I am here now and would just like to say many thanks for a remarkable post and a all
round enjoyable blog (I also love the theme/design), I don’t have time to look
over it all at the minute but I have book-marked it and also added your RSS feeds, so when I have time I
will be back to read much more, Please do keep up the superb work.
На данном этапе врач уточняет длительность запоя, тип употребляемого алкоголя и наличие сопутствующих заболеваний. Тщательный анализ этих данных позволяет оперативно сформировать индивидуальный план лечения и выбрать оптимальные методы детоксикации.
Получить дополнительные сведения – http://kapelnica-ot-zapoya-arkhangelsk00.ru
For latest information you have to visit world wide
web and on the web I found this site as a most excellent website for latest updates.
Вывод из запоя может осуществляться в двух форматах — на дому и в стационаре. Выбор зависит от степени интоксикации, наличия осложнений и возможности обеспечить пациенту наблюдение в домашних условиях.
Подробнее можно узнать тут – вывод из запоя анонимно в новосибирске
Решение обратиться к врачу должно быть принято, если:
Подробнее можно узнать тут – http://narko-zakodirovan2.ru/vyvod-iz-zapoya-na-domu-novosibirsk/https://narko-zakodirovan2.ru
Затяжной запой — это состояние, при котором человек в течение нескольких дней не может прекратить употребление алкоголя без медицинской помощи. Такое состояние чревато тяжёлыми нарушениями в работе внутренних органов и психики. В Новосибирске и Новосибирской области доступен профессиональный вывод из запоя как на дому, так и в условиях стационара. Подход к лечению индивидуален, и основная цель — безопасно и эффективно устранить последствия интоксикации и предотвратить рецидив.
Получить дополнительную информацию – вывод из запоя на дому круглосуточно
В условиях клиники пациент находится под наблюдением медицинской сестры и врача 24/7, что особенно важно при тяжёлой интоксикации и риске острых осложнений. Быстрый доступ к расширенной диагностике — ЭКГ, УЗИ, анализы крови — обеспечивает точную корректировку терапии. Стационар подходит тем, у кого есть серьёзные сопутствующие заболевания или высокий риск алкогольных психозов.
Подробнее можно узнать тут – http://алко-избавление.рф
I like the helpful information you provide in your articles.
I’ll bookmark your blog and check again here frequently.
I’m quite sure I will learn plenty of new stuff right here!
Best of luck for the next!
certainly like your website but you need to test the spelling on quite a few
of your posts. Many of them are rife with spelling problems and I in finding it very
troublesome to tell the reality however I will definitely come back again.
Миссия клиники “Путь к выздоровлению” заключается в содействии восстановлению здоровья и социальной реинтеграции людей, столкнувшихся с проблемами зависимости. Мы стремимся к комплексному решению этой сложной задачи, учитывая физические, психологические и социальные аспекты зависимости. Наша цель — не только помочь пациентам избавиться от физической зависимости, но и обеспечить их психологическое восстановление и возвращение к нормальной жизни в обществе.
Исследовать вопрос подробнее – http://нарко-фильтр.рф
Затяжной запой — это состояние, при котором человек в течение нескольких дней не может прекратить употребление алкоголя без медицинской помощи. Такое состояние чревато тяжёлыми нарушениями в работе внутренних органов и психики. В Новосибирске и Новосибирской области доступен профессиональный вывод из запоя как на дому, так и в условиях стационара. Подход к лечению индивидуален, и основная цель — безопасно и эффективно устранить последствия интоксикации и предотвратить рецидив.
Изучить вопрос глубже – https://narko-zakodirovan2.ru/vyvod-iz-zapoya-czena-novosibirsk
If you want to take a great deal from this piece of writing then you have to apply these strategies to your
won website.
Врач может приехать в течение 1–2 часов после обращения. В стационар возможна экстренная госпитализация в тот же день.
Получить дополнительные сведения – вывод из запоя капельница новосибирск
значки на заказ москва металлические пины на заказ
Врач может приехать в течение 1–2 часов после обращения. В стационар возможна экстренная госпитализация в тот же день.
Получить дополнительную информацию – вывод из запоя на дому цена новосибирск
I believe everything said made a ton of sense.
But, what about this? what if you were to write a killer post title?
I am not suggesting your information isn’t solid., but what if
you added a headline to possibly grab a person’s attention? I mean Raspberry PI TFT Screen / USB Bitcoin Miner is
a little vanilla. You might look at Yahoo’s front page and note how
they create news titles to get viewers interested.
You might try adding a video or a related pic or two to grab people interested about
everything’ve got to say. Just my opinion, it might make your blog a
little bit more interesting.
I’m able to take on the world. You’re ready to see the subsequent bit of knowledge, and you don’t because it’s flipped around. Advanced shoplifting is when you might have to use a forklift.” –Dee “Las Vegas took Baudrillard’s warnings as a dare.” –Nonlinear “During your occasions of trial and suffering once you see only one set of footprints in the sand, it is as a result of the textures have not all loaded yet.” –Nasser “I’m for truth, irrespective of who tells it. This DOJ is to date up its personal ass about ‘partisan prosecutions’ and law enforcement more typically is so heavily infiltrated, corrupt, complicit, and ineffectual that nothing ever occurs to these individuals.” –Nowhere Girl “Wars fought in our imagination.” –Anthony Castrio “Not way back the Air Force just about admitted that yes, there are UFOs and that they see them daily over the east coast. Trying to build immunity.” –Peter Schaub “Ask any Linden, past or current, and they’ll confirm that there are few extra elementary truths about digital worlds: Invite the furries to your new alpha-quality 3D playground and they’ll have lifelike fur working before you’ve finished basic physics.
изготовление значков из металла https://znachki-zakaz-moskva.ru
Hey there, I think your blog might be having browser compatibility issues.
When I look at your blog in Firefox, it looks fine but when opening in Internet Explorer, it has some overlapping.
I just wanted to give you a quick heads up! Other then that,
terrific blog!
Именно поэтому так важно не терять время. Чем раньше пациент получает помощь, тем выше шансы избежать необратимых последствий и вернуться к нормальной жизни.
Разобраться лучше – снятие ломки в подольске
Hi there to every body, it’s my first pay a visit of this blog;
this web site consists of remarkable and genuinely fine material in support
of readers.
Наркологическая клиника “Маяк надежды” расположена по адресу: г. Санкт-Петербург, ул. Колпинская, д. 27. Клиника работает ежедневно с 9:00 до 21:00, без выходных. Наши специалисты готовы предоставить консультацию и ответить на все вопросы, связанные с лечением зависимостей. Мы гарантируем конфиденциальность и индивидуальный подход к каждому пациенту.
Исследовать вопрос подробнее – http://алко-лечение24.рф
При сравнительно лёгкой или среднетяжёлой степени интоксикации нарколог приезжает на дом, где в знакомой обстановке проводит детоксикацию. Врач измеряет параметры жизнедеятельности — пульс, давление, насыщение кислородом — и подбирает оптимальный состав препаратов для инфузий. Такой метод подходит тем, кто испытывает стресс при мысли о стационаре и нуждается в анонимности лечения.
Подробнее тут – http://алко-избавление.рф
Good day! This post could not be written any better! Reading through this post reminds me of my previous room mate! He always kept talking about this. I will forward this post to him. Fairly certain he will have a good read. Thanks for sharing!
melbet affiliate mongolia com
Врач может приехать в течение 1–2 часов после обращения. В стационар возможна экстренная госпитализация в тот же день.
Узнать больше – вывод из запоя недорого в новосибирске
Good web site you have got here.. It’s difficult to find high-quality writing like yours nowadays.
I honestly appreciate individuals like you!
Take care!!
Yes! Finally something about Mitolyn reviews and complaints.
Unquestionably believe that which you stated.
Your favorite reason appeared to be on the internet the simplest thing to be aware of.
I say to you, I definitely get irked while people consider worries that they plainly do not know about.
You managed to hit the nail upon the top as well as defined out
the whole thing without having side-effects , people could take a
signal. Will likely be back to get more. Thanks
Задача врачей — не просто облегчить симптомы, а купировать осложнения, стабилизировать жизненно важные функции, вернуть пациенту способность к дальнейшему лечению. Мы работаем быстро, анонимно и профессионально. Любой человек, оказавшийся в кризисе, может получить помощь в течение часа после обращения.
Получить дополнительную информацию – снятие наркотической ломки подольск
It’s genuinely very complex in this full of activity life to listen news on TV, thus I just use the web for
that reason, and obtain the hottest information.
В нашей практике сочетаются несколько видов вмешательства: медико-биологическое, психологическое и социальное. Сначала проводится полная диагностика, включая лабораторные анализы и оценку работы сердца, печени, почек, а также психодиагностические тесты. После этого начинается этап детоксикации с внутривенными капельницами, которые выводят токсины, нормализуют водно-солевой баланс и восстанавливают основные функции организма. Далее мы применяем медикаментозную поддержку для стабилизации артериального давления, купирования тревожных симптомов, нормализации сна и уменьшения болевого синдрома.
Узнать больше – narkologicheskaya klinika mytischi
Когда алкогольный запой угрожает здоровью, оперативное и квалифицированное вмешательство становится жизненно необходимым. В Улан-Удэ специалисты по наркологии оказывают помощь на дому, обеспечивая скорейшую детоксикацию организма, восстановление обменных процессов и стабилизацию работы внутренних органов. Такой подход позволяет пациенту получить комплексное лечение в комфортной домашней обстановке с полным соблюдением конфиденциальности.
Ознакомиться с деталями – http://vyvod-iz-zapoya-ulan-ude0.ru
I really like what you guys are up too. This sort of clever work and exposure!
Keep up the good works guys I’ve you guys to my own blogroll.
После диагностики начинается активная фаза медикаментозного вмешательства. Препараты вводятся методом инфузии, что позволяет оперативно снизить уровень токсинов в крови, восстановить обмен веществ и нормализовать работу внутренних органов, таких как печень, почки и сердце.
Изучить вопрос глубже – срочный вывод из запоя в улан-удэ
Показана в тяжёлых случаях или при наличии сопутствующих заболеваний. Лечение проходит под круглосуточным наблюдением врачей и медсестёр с постоянной корректировкой терапии.
Получить дополнительную информацию – вывод из запоя капельница
Great website you have here but I was curious if you
knew of any user discussion forums that cover the same topics discussed here?
I’d really like to be a part of group where I
can get feedback from other knowledgeable people that share the same interest.
If you have any recommendations, please let me know. Thanks a lot!
Every weekend i used to pay a quick visit this website,
because i wish for enjoyment, as this this website conations in fact pleasant
funny information too.
Right away I am ready to do my breakfast, when having my
breakfast coming yet again to read more news.
После диагностики начинается активная фаза медикаментозного вмешательства. Препараты вводятся капельничным методом для быстрого снижения уровня токсинов, восстановления обменных процессов и нормализации работы таких органов, как печень, почки и сердце.
Подробнее – вызвать капельницу от запоя на дому архангельск
Когда зависимость захватывает жизнь, она разрушает не только организм, но и личность, отношения с близкими, карьерные планы и самоощущение. Алкоголь, наркотики и психотропные препараты постепенно подрывают работу внутренних органов, нарушают баланс нейромедиаторов в мозге и приводят к серьёзным психическим и физическим осложнениям. Попытки справиться с этим самостоятельно редко бывают успешными: необходим системный, профессиональный подход. В наркологической клинике «Доктор Здоровье» в Мытищах вы найдёте надёжную опору на всех этапах выздоровления — от экстренной детоксикации до длительной реабилитации.
Узнать больше – narkologicheskaya-klinika-mytishchi1.ru/
I like it when individuals come together and share opinions.
Great website, keep it up!
I love it whenever people come together and share ideas.
Great site, keep it up!
At this time it appears like BlogEngine is the preferred blogging platform out there right now.
(from what I’ve read) Is that what you are using on your blog?
Have you ever thought about publishing an ebook or guest
authoring on other websites? I have a blog centered on the same information you discuss and would love to
have you share some stories/information. I know my viewers would appreciate
your work. If you’re even remotely interested, feel
free to send me an email.
my blog … Togel Terpercaya
bokep hotel
bokep abg cina
bokep lesbi indo
Hmm it seems like your blog ate my first comment (it was extremely long) so I guess
I’ll just sum it up what I submitted and say, I’m thoroughly enjoying your blog.
I as well am an aspiring blog blogger but I’m still new to the whole thing.
Do you have any tips and hints for newbie blog writers?
I’d genuinely appreciate it.
Also visit my web-site; Joker
Услуга вывода из запоя на дому в Архангельске разработана для оперативного снижения токсической нагрузки при тяжелых формах алкогольной интоксикации. Сразу после вызова нарколог проводит подробный осмотр, измеряет жизненно важные показатели и собирает анамнез, что позволяет точно определить степень интоксикации. На основе полученной информации формируется индивидуальный план лечения, включающий капельничное введение современных медикаментов с использованием автоматизированных инфузионных систем и сопровождение в виде психологической поддержки.
Подробнее тут – вызвать капельницу от запоя архангельск
Процесс начинается с вызова врача или доставки пациента в клинику. После прибытия специалист проводит первичную диагностику: измерение давления, температуры, пульса, уровня кислорода в крови, визуальная оценка степени возбуждения или угнетения сознания. Собирается краткий анамнез: какой наркотик принимался, как долго, были ли сопутствующие заболевания.
Подробнее – снятие ломки в стационаре
Heya! I just wanted to ask if you ever have any issues with hackers?
My last blog (wordpress) was hacked and I ended up losing months of hard work due to
no back up. Do you have any solutions to prevent hackers?
Hey there superb blog! Does running a blog such as this
require a massive amount work? I have very little expertise in coding but I was hoping
to start my own blog soon. Anyhow, should you have any recommendations or tips for new blog owners please share.
I know this is off subject but I simply needed to ask.
Many thanks!
I’m not sure exactly why but this site is loading extremely slow for me.
Is anyone else having this problem or is it a problem on my
end? I’ll check back later on and see if the problem still
exists.
Миссия клиники “Свобода” заключается в оказании качественной помощи людям, страдающим от зависимости. Мы стремимся не просто избавить от пагубной привычки, но и помочь восстановить личность пациента. Важнейшие цели нашей работы включают:
Получить больше информации – http://алко-лечебница.рф/vivod-iz-zapoya-v-kruglosutochno-v-samare/
На сайте https://svaib.ru/ уточните расценки на КЖБИ сваи. Это предприятие предлагает качественную и надежную установку практичных, прочных свай КЖБИ. Все работы выполняются без минимальных деформаций, разрушений, спилов, чтобы вы смогли получить безупречный, эталонный результат. Сваи имеют такую важную особенность, что разрабатываются из виброуплотненного бетона, а также прочного армокаркаса. Именно по этой причине сваи будут намного прочнее бетона. На этом же сайте ознакомьтесь с благодарственными письмами от тех компаний, которые уже воспользовались услугами предприятия.
На сайте https://mvpol.ru вы сможете заказать сметный расчет для того, чтобы узнать, во сколько вам обойдутся промышленные полы определенного типа. В этой компании получится приобрести полимерные наливные полы, а также бетонные полы, которые отличаются упрочненным верхним покрытием. Также есть возможность заказать и ремонт такого покрытия. Сотрудничество предполагает составление договора, а на работы предоставляются гарантии. Вся запрашиваемая информация предоставляется очень быстро. Есть возможность воспользоваться консультацией.
Врачебный состав клиники “Маяк надежды” состоит из высококвалифицированных специалистов в области наркологии. Наши врачи-наркологи имеют обширный опыт работы с зависимыми пациентами и постоянно совершенствуют свои навыки.
Получить дополнительную информацию – http://алко-лечение24.рф/vivod-iz-zapoya-anonimno-v-Sankt-Peterburge/
Hello, its good piece of writing regarding media print, we all be aware
of media is a fantastic source of data.
Миссия клиники “Свобода” заключается в оказании качественной помощи людям, страдающим от зависимости. Мы стремимся не просто избавить от пагубной привычки, но и помочь восстановить личность пациента. Важнейшие цели нашей работы включают:
Получить больше информации – http://алко-лечебница.рф
На сайте https://bort3302.ru/ в большом ассортименте представлены качественные, сертифицированные комплектующие на Газель Некст. В этой компании вы сможете заказать двигатель, трансмиссии, различные запчасти, а также шины, диски и многое другое. Вся продукция, которая здесь реализуется, качественная и идеально подходит на автомобиль этой марки. Даже учитывая то, что Газель считается надежной, функциональной машиной, ее необходимо регулярно обслуживать. А для этого обращаться за помощью в проверенную и надежную компанию.
Именно поэтому так важно не терять время. Чем раньше пациент получает помощь, тем выше шансы избежать необратимых последствий и вернуться к нормальной жизни.
Ознакомиться с деталями – снятие ломок подольск.
Услуга “Нарколог на дом” в Калининграде, Калининградская область, включает комплекс мер, направленных на оперативный вывод из запоя и детоксикацию организма. Сразу после поступления вызова специалист проводит детальный первичный осмотр, измеряет жизненно важные показатели и собирает анамнез, чтобы оценить степень алкогольной интоксикации. На основе полученной информации разрабатывается индивидуальный план терапии, который может включать капельничное введение современных медикаментов, использование инфузионных технологий и оказание психологической поддержки для долгосрочной реабилитации.
Выяснить больше – http://narcolog-na-dom-kaliningrad00.ru
Very rapidly this website will be famous among all blogging viewers, due to it’s pleasant
content
I am really grateful to the holder of this web site who has shared this wonderful piece
of writing at at this time.
https://foreximf.my.id/
Затяжной запой — это состояние, при котором человек в течение нескольких дней не может прекратить употребление алкоголя без медицинской помощи. Такое состояние чревато тяжёлыми нарушениями в работе внутренних органов и психики. В Новосибирске и Новосибирской области доступен профессиональный вывод из запоя как на дому, так и в условиях стационара. Подход к лечению индивидуален, и основная цель — безопасно и эффективно устранить последствия интоксикации и предотвратить рецидив.
Ознакомиться с деталями – вывод из запоя цена новосибирск
Самостоятельно выйти из запоя — почти невозможно. В Воронеже врачи клиники «Трезвый шаг» проводят медикаментозный вывод из запоя с круглосуточным выездом. Доверяйте профессионалам.
Изучить вопрос глубже – вывод из запоя в стационаре
Близкий человек в запое? Не ждите ухудшения. Обратитесь в клинику «Трезвый шаг» (Воронеж) — здесь проведут профессиональный вывод из запоя с последующим восстановлением организма.
Ознакомиться с деталями – вывод из запоя на дому
Профессиональная помощь при запое необходима, если:
Подробнее тут – http://narko-zakodirovan.ru/vyvod-iz-zapoya-kapelnicza-spb/
I have fun with, lead to I discovered exactly what I was taking a look for.
You’ve ended my 4 day long hunt! God Bless you man.
Have a great day. Bye
После диагностики начинается активная фаза медикаментозного вмешательства, когда препараты вводятся капельничным методом для быстрого снижения уровня токсинов в крови, восстановления обменных процессов и нормализации работы внутренних органов.
Ознакомиться с деталями – https://narcolog-na-dom-kaliningrad00.ru/narkolog-na-dom-czena-kaliningrad
I am really loving the theme/design of your site.
Do you ever run into any internet browser compatibility
issues? A number of my blog visitors have complained about my blog not working correctly in Explorer but looks great in Opera.
Do you have any recommendations to help fix this issue?
Желаете продвинуть свой сайт в ТОП поисковых систем в Брянске? Посетите https://bryansk.seo.democrat/ где мы предложим вам целый комплекс услуг, направленный на вывод в ТОП. Мы работаем под ключ – разрабатываем, оптимизируем и продвигаем. Узнайте обо всех наших услугах на сайте или получите бесплатный SEO-аудит! Мы создали два эффективных тарифных плана SEO-продвижения – подробнее на сайте.
Услуга вывода из запоя на дому в Улан-Удэ включает полный комплекс мер, направленных на быстрое восстановление организма. При получении вызова нарколог приезжает на дом, проводит тщательный первичный осмотр, измеряет жизненно важные показатели и собирает подробный анамнез. На основе полученных данных формируется индивидуальный план терапии, который может включать инфузионное введение медикаментов с применением современных технологий и оказание психологической поддержки для достижения устойчивой ремиссии.
Углубиться в тему – вывод из запоя на дому цена
Решение обратиться к врачу должно быть принято, если:
Узнать больше – vyvod-iz-zapoya-kruglosutochno novosibirsk
Hi there every one, here every one is sharing such knowledge, therefore it’s fastidious to read this blog, and I used to go to see this web site all the time.
hafilat online services
Having read this I thought it was really enlightening.
I appreciate you finding the time and energy to
put this informative article together. I once again find
myself personally spending way too much time both reading and leaving comments.
But so what, it was still worthwhile!
Именно поэтому так важно не терять время. Чем раньше пациент получает помощь, тем выше шансы избежать необратимых последствий и вернуться к нормальной жизни.
Ознакомиться с деталями – снятие наркологической ломки подольск
Незамедлительно после поступления вызова нарколог приезжает на дом для проведения тщательного осмотра. Специалист измеряет жизненно важные показатели, такие как пульс, артериальное давление и температура, и собирает анамнез для оценки степени алкогольной интоксикации.
Получить дополнительные сведения – капельница от запоя на дому цена в архангельске
You could certainly see your skills in the article you write.
The arena hopes for more passionate writers
like you who aren’t afraid to mention how they believe.
At all times go after your heart.
Зависимость — это системная проблема, которая требует последовательного и профессионального подхода. Обычные попытки «вылечиться дома» без медицинского сопровождения нередко заканчиваются срывами, ухудшением состояния и психологической деградацией. Клиника «Здоровье Плюс» в Балашихе предоставляет пациентам не просто разовое вмешательство, а выстроенную поэтапную программу, основанную на опыте и медицинских стандартах.
Изучить вопрос глубже – http://narkologicheskaya-pomoshch-balashiha1.ru/
Become an ACPMA Instructor (MAB/CPI) – Crisis Prevention Intervention
American Crisis Prevention & Management Association Welcomes qualified professionals from various fields to take our instructor
course and teach ACPMA courses at their locations.
Benefits of certifying an instructor with ACPMA:
Become a Certified instructor for Crisis Prevention & Assaultive Behavior Management
Training done by experienced Personnel
Save on training your employees by training the trainer in your facility
Learn the core principles of adult learning
Leave the training fully confident to teach the AB 508 mandated
topics, Crisis Intervention topics and work
Receive all the training materials you need to teach students
Become part of a household name on Assaultive Behavior
Management training
Study in front of your computer (for online students)
You can take the instructor course online at https://www.crisispreventionmanagement.com/become-an-instructor
It’s actually a nice and useful piece of information.
I am satisfied that you shared this helpful information with us.
Please keep us up to date like this. Thanks for sharing.
Также мы учитываем потребности каждого пациента — по питанию, условиям проживания, графику процедур. Проживание возможно в стандартных и повышенных палатах, с возможностью индивидуального обслуживания.
Детальнее – платная наркологическая помощь в балашихе
great issues altogether, you just won a new reader.
What may you recommend in regards to your post that you just made some days ago?
Any certain?
Hello, just wanted to say, I enjoyed this blog post. It
was helpful. Keep on posting!
Ломка — это не временное недомогание. Это системное разрушение организма, связанное с тем, что он перестаёт получать наркотик, к которому уже привык. Нарушается обмен веществ, функции сердца, печени, почек, теряется контроль над эмоциями и болью. В состоянии абстиненции человек не может спать, есть, адекватно мыслить. Страдает и тело, и психика.
Узнать больше – снятие ломок в подольске
We are a group of volunteers and opening a new scheme in our community.
Your site provided us with valuable information to work on.
You have done a formidable job and our whole community will be grateful to
you.
На сайте https://svaib.ru/ закажите профессиональный, качественный монтаж прочных, крепких КЖБИ свай. Услуга оказывается по Ленинградской области. А самое главное, что отсутствуют трещины, сколы, любые деформации, поэтому вы можете быть уверены в высоком качестве работ. Уникальность таких свай в том, что они разрабатываются по уникальной технологии. За счет этого они намного крепче бетона. Стоимость услуги будет невысокой. Для того чтобы больше узнать о технологии, изучите видео. Эти сваи не имеют аналогов.
После диагностики начинается активная фаза медикаментозного вмешательства. Препараты вводятся методом инфузии, что позволяет оперативно снизить уровень токсинов в крови, восстановить обмен веществ и нормализовать работу внутренних органов, таких как печень, почки и сердце.
Подробнее тут – вывод из запоя в стационаре улан-удэ
Запой — это состояние, при котором человек на протяжении нескольких дней или недель регулярно употребляет алкоголь, теряя контроль над собой. При этом организм накапливает этанол и его токсичные метаболиты, печень и сердце работают на износ, нарушается сон, развивается психоэмоциональная нестабильность. Главный риск — абстинентный синдром, который может проявляться тремором, судорогами, повышением давления, паникой и даже галлюцинациями.
Углубиться в тему – вывод из запоя цена химки.
Затяжной запой — это состояние, при котором человек в течение нескольких дней не может прекратить употребление алкоголя без медицинской помощи. Такое состояние чревато тяжёлыми нарушениями в работе внутренних органов и психики. В Новосибирске и Новосибирской области доступен профессиональный вывод из запоя как на дому, так и в условиях стационара. Подход к лечению индивидуален, и основная цель — безопасно и эффективно устранить последствия интоксикации и предотвратить рецидив.
Детальнее – вывод из запоя на дому круглосуточно новосибирск
I know this site gives quality depending articles or reviews
and extra stuff, is there any other website which gives these things in quality?
Осложнения, к которым может привести отсутствие лечения:
Углубиться в тему – снятие ломок подольск
На этом этапе специалист уточняет, сколько времени продолжается запой, какой вид алкоголя употребляется и имеются ли сопутствующие заболевания. Тщательный анализ собранной информации позволяет оперативно подобрать оптимальные методы детоксикации и минимизировать риск осложнений.
Подробнее тут – вывод из запоя на дому цена донецк
Вывод из запоя обязателен, если:
Получить дополнительную информацию – вывод из запоя клиника
Greetings! This is my first comment here so I just wanted to
give a quick shout out and tell you I truly enjoy reading through your blog posts.
Can you recommend any other blogs/websites/forums that deal with the
same topics? Thank you!
Миссия клиники “Маяк надежды” заключается в содействии восстановлению здоровья и социальной реинтеграции людей, столкнувшихся с проблемами зависимости. Мы стремимся к комплексному решению этой сложной задачи, учитывая физические, психологические и социальные аспекты зависимости. Наша задача — не только помочь пациентам избавиться от физической зависимости, но и обеспечить их психологическое восстановление и возвращение к нормальной жизни в обществе.
Подробнее – https://алко-лечение24.рф/vivod-iz-zapoya-cena-v-Sankt-Peterburge
Обращение за помощью к профессионалам в условиях домашнего лечения имеет ряд важных преимуществ:
Получить дополнительную информацию – вывод из запоя анонимно
После диагностики начинается активная фаза медикаментозного вмешательства. Препараты вводятся инфузионным методом, что позволяет оперативно снизить уровень токсинов в крови, восстановить обмен веществ и нормализовать работу внутренних органов, таких как печень, почки и сердце.
Исследовать вопрос подробнее – https://vyvod-iz-zapoya-ulan-ude00.ru/narkologiya-vyvod-iz-zapoya-ulan-ude/
СамСтрой. Блог о ремонте и строительтве для каждого! Полезные советы, фото и видео материалы про стройку и ремонт, дизайн интерьера, а также приусадебный участок https://biosferapark.ru/
Having read this I believed it was extremely informative.
I appreciate you spending some time and effort to put this informative article together.
I once again find myself personally spending a significant
amount of time both reading and commenting. But so
what, it was still worth it!
First off I would like to say wonderful blog! I had a quick question that I’d like to ask if you don’t mind.
I was interested to know how you center yourself and clear your
thoughts prior to writing. I’ve had a difficult time clearing my mind in getting my thoughts out.
I do take pleasure in writing however it just seems like the first 10 to 15 minutes
are generally wasted just trying to figure out how to
begin. Any suggestions or hints? Appreciate it!
После диагностики начинается активная фаза медикаментозного вмешательства. Препараты вводятся инфузионным методом, что позволяет оперативно снизить уровень токсинов в крови, восстановить обмен веществ и нормализовать работу внутренних органов, таких как печень, почки и сердце.
Подробнее – вывод из запоя в улан-удэ
First of all I would like to say wonderful blog!
I had a quick question which I’d like to ask if
you don’t mind. I was curious to find out how you center yourself and clear your
head before writing. I have had difficulty clearing my
mind in getting my thoughts out. I truly do enjoy writing but it just seems like the first 10 to 15 minutes tend to be lost just trying to figure
out how to begin. Any suggestions or hints? Many thanks!
Hi there, I enjoy reading all of your post. I wanted to write a
little comment to support you.
САМШИТ – компания, которая специализируется на изготовлении качественных деревянных дверей и окон. Выполняем доставку изделий бережную. Уделяем монтажным работам особое внимание, при этом используя лучшие профессиональные инструменты и материалы. Ищете входные двери деревянные? Samshitokno.ru – здесь представлены отзывы наших клиентов, ознакомиться с ними можете прямо сейчас. Предлагаем широкий выбор моделей, которые для любого интерьера подойдут. На сайте можете заполнить форму, и мы свяжемся с вами в ближайшее время, чтобы уточнить детали проекта.
Миссия клиники “Путь к выздоровлению” заключается в содействии восстановлению здоровья и социальной реинтеграции людей, столкнувшихся с проблемами зависимости. Мы стремимся к комплексному решению этой сложной задачи, учитывая физические, психологические и социальные аспекты зависимости. Наша цель — не только помочь пациентам избавиться от физической зависимости, но и обеспечить их психологическое восстановление и возвращение к нормальной жизни в обществе.
Выяснить больше – https://нарко-фильтр.рф/vivod-iz-zapoya-v-kruglosutochno-v-rostove-na-donu
Алкогольный запой требует не просто прекращения приёма спиртного, а комплексной медицинской помощи. В Санкт-Петербурге и Ленинградской области вывод из запоя осуществляется опытными наркологами с применением современных методик детоксикации. В зависимости от состояния пациента лечение может быть организовано как на дому, так и в стационарных условиях. Главная цель — безопасное очищение организма и возвращение к стабильному физическому и психоэмоциональному состоянию.
Подробнее – http://
Hi there! Do you know if they make any plugins to help with Search Engine Optimization? I’m trying to get my blog to rank for some targeted keywords but
I’m not seeing very good results. If you know of any please
share. Thank you!
Наши наркологи придерживаются принципов уважительного и внимательного отношения к пациентам, создавая атмосферу доверия. Они проводят детальное обследование, выявляют коренные причины зависимости и разрабатывают индивидуальные стратегии лечения. Профессионализм и компетентность врачей являются ключевыми факторами успешного восстановления пациентов.
Подробнее тут – https://нарко-фильтр.рф/vivod-iz-zapoya-na-domu-v-rostove-na-donu/
На сайте https://parkmotors.ru/ в огромном многообразии находятся шины и диски, двигатель, трансмиссия на Газель. Также представлено и рулевое управление, различные комплектующие на такую технику. Для того чтобы совершить приобретение, необходимо изучить все технические характеристики, особенности выбранного товара, чтобы купить именно то, что нужно. Есть обзоры на определенные товары. Для того чтобы найти что-то определенное, воспользуйтесь специальным поиском. Он значительно облегчит вам задачу.
Самолечение или попытка «переждать» запой дома без врача может обернуться серьёзными осложнениями. Обращение к наркологу даёт пациенту:
Получить дополнительные сведения – вывод из запоя недорого санкт-петербург
В столичном регионе доступны два основных формата лечения: выезд специалиста на дом и госпитализация в специализированный центр. Каждый вариант имеет свои особенности и показания, которые врач анализирует при первичном осмотре.
Подробнее тут – http://алко-избавление.рф/vyvod-iz-zapoya-czena-msk/
Врач может приехать в течение 1–2 часов после обращения. В стационар возможна экстренная госпитализация в тот же день.
Узнать больше – http://narko-zakodirovan2.ru/vyvod-iz-zapoya-na-domu-novosibirsk/https://narko-zakodirovan2.ru
После диагностики начинается активная фаза медикаментозного вмешательства. Препараты вводятся методом инфузии, что позволяет оперативно снизить уровень токсинов в крови, восстановить обмен веществ и нормализовать работу внутренних органов, таких как печень, почки и сердце.
Получить дополнительную информацию – вывод из запоя на дому улан-удэ.
Профессиональная помощь при запое необходима, если:
Подробнее – http://narko-zakodirovan.ru
https://www.ukrinformer.com.ua/karta-irpenja/
כתבה מעולה! אני עוקב הרבה אחרי בלוגים של תיירות, וזה
בדיוק הנושא שחיפשתי עליו מידע.
למי שמתכנן טיול לאמריקה – ממליץ לבדוק את Getravel.co.il.
יש שם מדריכים מעולים בעברית, עם טיפים אמיתיים
ודילים שווים על מלונות בכל היעדים הפופולריים.
I’m amazed, I must say. Seldom do I come across a blog that’s both equally educative and
amusing, and let me tell you, you’ve hit the nail on the head.
The issue is something too few people are speaking intelligently about.
Now i’m very happy I found this during my hunt for something regarding this.
Hi there! This is my first visit to your blog! We are a collection of
volunteers and starting a new initiative in a community in the same niche.
Your blog provided us valuable information to work on. You have done
a extraordinary job!
Когда запой начинает негативно влиять на здоровье, оперативное лечение становится залогом успешного выздоровления. В Архангельске, Архангельская область, квалифицированные наркологи предоставляют помощь на дому, позволяя быстро провести детоксикацию, восстановить нормальные обменные процессы и стабилизировать работу жизненно важных органов. Такой формат лечения обеспечивает индивидуальный подход, комфортную домашнюю обстановку и полную конфиденциальность, что особенно важно для пациентов, стремящихся к быстрому восстановлению без посещения стационара.
Получить дополнительные сведения – капельница от запоя архангельск
Алкогольный запой требует не просто прекращения приёма спиртного, а комплексной медицинской помощи. В Санкт-Петербурге и Ленинградской области вывод из запоя осуществляется опытными наркологами с применением современных методик детоксикации. В зависимости от состояния пациента лечение может быть организовано как на дому, так и в стационарных условиях. Главная цель — безопасное очищение организма и возвращение к стабильному физическому и психоэмоциональному состоянию.
Подробнее тут – вывод из запоя цена санкт-петербург.
Do you have a spam issue on this blog; I also am a blogger, and I
was curious about your situation; many of us have developed
some nice practices and we are looking to swap strategies with other folks,
why not shoot me an email if interested.
В Воронеже решение есть — наркологическая клиника «Трезвый шаг». Здесь помогают людям выйти из запоя без страха и осуждения. Всё анонимно, грамотно и с заботой о каждом пациенте.
Углубиться в тему – вывод из запоя в стационаре
Недостаточно снять физическую зависимость — важно помочь человеку вернуться в сообщество. В «Доктор Здоровье» разработана система сопровождения, включающая мотивационные беседы, групповые занятия и социальную реабилитацию. Психотерапевты владеют методами когнитивно-поведенческой терапии и мотивационного интервью, консультанты помогают восстановить профессиональные навыки и адаптироваться к повседневной жизни, а встречи в группе взаимопомощи и психодраматические сессии способствуют укреплению чувства поддержки и навыков эффективного общения. Для родственников доступны семейные консультации, на которых объясняют природу зависимости и обучают стратегиям поддержки без критики и давления.
Углубиться в тему – наркологическая клиника цены мытищи
Link exchange is nothing else except it is only placing the other person’s web site
link on your page at proper place and other person will also
do same for you.
При сравнительно лёгкой или среднетяжёлой степени интоксикации нарколог приезжает на дом, где в знакомой обстановке проводит детоксикацию. Врач измеряет параметры жизнедеятельности — пульс, давление, насыщение кислородом — и подбирает оптимальный состав препаратов для инфузий. Такой метод подходит тем, кто испытывает стресс при мысли о стационаре и нуждается в анонимности лечения.
Получить больше информации – http://алко-избавление.рф
Good day! This is kind of off topic but I need some guidance from an established blog.
Is it difficult to set up your own blog? I’m not very techincal
but I can figure things out pretty fast. I’m thinking about creating my own but I’m not
sure where to start. Do you have any ideas or suggestions?
Cheers
Самостоятельно выйти из запоя — почти невозможно. В Воронеже врачи клиники «Трезвый шаг» проводят медикаментозный вывод из запоя с круглосуточным выездом. Доверяйте профессионалам.
Подробнее можно узнать тут – https://vyvod-iz-zapoya-voronezh13.ru
Hi there Dear, are you truly visiting this website daily,
if so after that you will absolutely obtain fastidious know-how.
Very quickly this web site will be famous amid all blogging and site-building visitors, due
to it’s nice content
Kra31.at
kra31 – активное зеркало
Good post! We are linking to this great content on our site.
Keep up the great writing.
Greetings! Very useful advice within this post!
It is the little changes that produce the
largest changes. Thanks for sharing!
If one is ailing it’s correct to go to a physician. “I suppose you’d have a better time swimming, my expensive, however it’s a gallant sentiment.” He gasped as she tweaked one of his nipples. Based in your solutions to this enjoyable quiz, we expect we can guess what sort of boyfriend will fall for you and your distinctive quirks. We’ve nailed down a number of fun boyfriend sorts and conveniently related them to some yummy sweet treats. Let’s discuss boyfriend varieties. Boyfriends are available in all sizes, shapes and persona types. “If I had taken the tube, I would have come to you frightened I had blown any chance I had of loving you.” He waited for her to say one thing. Some include baggage, some are loners, and others come and go like a thief in the evening. 2023-03-19: “‘ChatGPT mentioned I did not exist’: how artists and writers are fighting again against AI – Artificial … The Spanish Armada was crushed back by the English and then battered by storms. What English monarch was smart to invest in some good ships before the Spanish fleet came calling, close to the end of the 16th century? The leadership of the Japanese warrior led to the unification course of in the 16th century.
Недостаточно снять физическую зависимость — важно помочь человеку вернуться в сообщество. В «Доктор Здоровье» разработана система сопровождения, включающая мотивационные беседы, групповые занятия и социальную реабилитацию. Психотерапевты владеют методами когнитивно-поведенческой терапии и мотивационного интервью, консультанты помогают восстановить профессиональные навыки и адаптироваться к повседневной жизни, а встречи в группе взаимопомощи и психодраматические сессии способствуют укреплению чувства поддержки и навыков эффективного общения. Для родственников доступны семейные консультации, на которых объясняют природу зависимости и обучают стратегиям поддержки без критики и давления.
Получить дополнительные сведения – http://narkologicheskaya-klinika-mytishchi1.ru
Ahaa, its pleasant dialogue concerning this post here at this website, I have read all that, so now
me also commenting at this place.
Awesome! Its really awesome piece of writing, I have got much clear idea about from this post.
гриндер для травы
поисковое seo стоимость продвижения сайта в москве
Good answers in return of this query with real arguments and explaining
the whole thing about that.
значки из металла на заказ корпоративные значки на заказ
I do not even know how I ended up here, but I thought this post was great.
I do not know who you are but definitely you’re going to a famous blogger if you
are not already 😉 Cheers!
https://ukrainedigest.com.ua/pohoda-v-boiartsi/
I really like reading through a post that will make people think.
Also, thank you for permitting me to comment!
It’s amazing for me to have a web site, which is helpful
designed for my knowledge. thanks admin
Do you have a spam issue on this blog; I also am a blogger, and I was curious about your situation; many of us have created some nice practices and we are looking to swap strategies with other folks, please shoot me an e-mail if interested.
zain recharge quick pay
If some one wishes expert view about blogging then i
propose him/her to visit this weblog, Keep up the fastidious job.
Алкогольный запой требует не просто прекращения приёма спиртного, а комплексной медицинской помощи. В Санкт-Петербурге и Ленинградской области вывод из запоя осуществляется опытными наркологами с применением современных методик детоксикации. В зависимости от состояния пациента лечение может быть организовано как на дому, так и в стационарных условиях. Главная цель — безопасное очищение организма и возвращение к стабильному физическому и психоэмоциональному состоянию.
Детальнее – вывод из запоя цена
Сразу после поступления вызова специалист приезжает на дом для проведения тщательного первичного осмотра. Измеряются такие жизненно важные показатели, как пульс, артериальное давление и температура, а также проводится сбор анамнеза, что позволяет оценить степень алкогольной интоксикации.
Выяснить больше – нарколог на дом калининград
Процедура детоксикации может проводиться двумя способами: выездом врача на дом или госпитализацией. Окончательное решение принимает нарколог после оценки состояния пациента. На ранней стадии запоя достаточно домашней терапии, но при наличии рисков рекомендуется стационар.
Узнать больше – вывод из запоя недорого санкт-петербург
комплексный аудит сайта ведение контекстной рекламы стоимость
Затяжной запой — это состояние, при котором человек в течение нескольких дней не может прекратить употребление алкоголя без медицинской помощи. Такое состояние чревато тяжёлыми нарушениями в работе внутренних органов и психики. В Новосибирске и Новосибирской области доступен профессиональный вывод из запоя как на дому, так и в условиях стационара. Подход к лечению индивидуален, и основная цель — безопасно и эффективно устранить последствия интоксикации и предотвратить рецидив.
Получить дополнительную информацию – vyvod-iz-zapoya novosibirsk
https://copicsketch.ru/
I read this article completely on the topic of the difference of most up-to-date
and previous technologies, it’s awesome article.
Самостоятельно выйти из запоя — почти невозможно. В Воронеже врачи клиники «Трезвый шаг» проводят медикаментозный вывод из запоя с круглосуточным выездом. Доверяйте профессионалам.
Разобраться лучше – вывод из запоя на дому
https://copicsketch.ru/
Visit the website https://aivengo.media/ where interesting news, reviews, videos about artificial intelligence are published daily and you can be aware of all important events and learn how all this can be applied in life. Join AIvengo – it’s really interesting!
Незамедлительно после поступления вызова нарколог приезжает на дом для проведения тщательного осмотра. Врач измеряет жизненно важные показатели — пульс, артериальное давление, температуру — и собирает анамнез для определения степени алкогольной интоксикации.
Получить больше информации – вывод из запоя клиника
What’s up, everything is going sound here and ofcourse every one
is sharing facts, that’s truly fine, keep up writing.
Ahaa, its nice discussion on the topic of this article here
at this website, I have read all that, so now me also commenting at this place.
Hey very nice site!! Guy .. Beautiful .. Amazing .. I
will bookmark your web site and take the feeds additionally?
I’m happy to search out a lot of useful information here within the post, we’d like work
out more strategies in this regard, thank you for sharing.
. . . . .
Magnificent goods from you, man. I’ve understand your stuff previous to and you’re just extremely excellent.
I really like what you’ve acquired here, certainly like what you’re stating and the way in which you
say it. You make it enjoyable and you still take care of to keep it sensible.
I can’t wait to read far more from you. This is actually a great website.
Hi there just wanted to give you a quick heads up and let you know a few of the images aren’t loading properly. I’m not sure why but I think its a linking issue. I’ve tried it in two different web browsers and both show the same results.
hafilat card recharge
Ищете выгодные ставки на различные виды спорта? Посетите https://luckypari-17uz.online/ и вы найдете отличные коэффициенты. Официальный сайт букмекерской конторы LuckyPari дает приветственный бонус. Посмотрите подробнее на сайте какие есть ставки игры. Вы также, для удобства, сможете скачать мобильное приложение.
Fantastic beat ! I wish to apprentice while you amend your website, how could i subscribe for a blog website?
The account helped me a acceptable deal. I
had been tiny bit acquainted of this your broadcast offered bright clear idea
I’m amazed, I must say. Rarely do I come across a blog that’s both equally educative and entertaining, and let me tell you,
you have hit the nail on the head. The problem is something which not
enough people are speaking intelligently about. Now i’m
very happy I found this in my search for something regarding this.
Here is my web-site: ฟาร์มผักไฮโดรโปนิกส์
Алкогольный запой требует не просто прекращения приёма спиртного, а комплексной медицинской помощи. В Санкт-Петербурге и Ленинградской области вывод из запоя осуществляется опытными наркологами с применением современных методик детоксикации. В зависимости от состояния пациента лечение может быть организовано как на дому, так и в стационарных условиях. Главная цель — безопасное очищение организма и возвращение к стабильному физическому и психоэмоциональному состоянию.
Изучить вопрос глубже – вывод из запоя цена
Обращение за помощью нарколога на дому в Калининграде имеет ряд значимых преимуществ:
Детальнее – нарколог на дом недорого
Hi, There’s no doubt that your site might be having internet browser compatibility
problems. Whenever I look at your site in Safari, it looks fine but when opening
in I.E., it has some overlapping issues. I just wanted to give
you a quick heads up! Besides that, excellent
website!
Momi — это бренд, предлагающий качественные товары для мам и малышей. На momi вы найдете широкий ассортимент детских товаров, отвечающих современным стандартам безопасности и комфорта. Покупайте оригинальную продукцию МОМИ онлайн!
Врач может приехать в течение 1–2 часов после обращения. В стационар возможна экстренная госпитализация в тот же день.
Подробнее тут – вывод из запоя капельница новосибирск
Когда организм на пределе, важна срочная помощь. «Трезвый шаг» в Воронеже — это команда опытных наркологов, которые помогут быстро и мягко выйти из запоя без вреда для здоровья.
Исследовать вопрос подробнее – вывод из запоя на дому
Дневник скетчера
This post presents clear idea in support of the
new viewers of blogging, that in fact how to do blogging and site-building.
Дневник скетчера
Way cool! Some extremely valid points! I appreciate you penning this write-up and the rest of the website is
really good.
Hi, I read your new stuff like every week. Your writing style is
awesome, keep up the good work!
Having read this I thought it was very informative. I appreciate you spending some time and energy
to put this informative article together. I once again find myself spending way too much time
both reading and commenting. But so what, it was still worth it!
https://copicsketch.ru/
Решение обратиться к врачу должно быть принято, если:
Узнать больше – вывод из запоя на дому новосибирск.
Wow that was strange. I just wrote an really long comment but after I clicked submit my comment didn’t appear.
Grrrr… well I’m not writing all that over again. Regardless, just wanted
to say excellent blog!
You are so awesome! I do not believe I’ve read through a single thing like that before.
So wonderful to discover another person with a few original thoughts on this subject.
Seriously.. many thanks for starting this up. This website is
one thing that is needed on the web, someone
with some originality!
Here is my site :: OnebetAsia Situs Togel Terpercaya
Миссия клиники “Свобода” заключается в оказании качественной помощи людям, страдающим от зависимости. Мы стремимся не просто избавить от пагубной привычки, но и помочь восстановить личность пациента. Важнейшие цели нашей работы включают:
Изучить вопрос глубже – https://алко-лечебница.рф/
Momi — это бренд, предлагающий качественные товары для мам и малышей. На momi вы найдете широкий ассортимент детских товаров, отвечающих современным стандартам безопасности и комфорта. Покупайте оригинальную продукцию МОМИ онлайн!
В Воронеже решение есть — наркологическая клиника «Трезвый шаг». Здесь помогают людям выйти из запоя без страха и осуждения. Всё анонимно, грамотно и с заботой о каждом пациенте.
Получить больше информации – вывод из запоя круглосуточно
Во-первых, безопасная медицинская детоксикация. Этот процесс необходим для удаления токсических веществ из организма. Мы используем современные методы, минимизирующие дискомфорт в период абстиненции.
Изучить вопрос глубже – http://алко-лечебница.рф
Когда организм на пределе, важна срочная помощь. «Трезвый шаг» в Воронеже — это команда опытных наркологов, которые помогут быстро и мягко выйти из запоя без вреда для здоровья.
Углубиться в тему – срочный вывод из запоя
Близкий человек в запое? Не ждите ухудшения. Обратитесь в клинику «Трезвый шаг» (Воронеж) — здесь проведут профессиональный вывод из запоя с последующим восстановлением организма.
Углубиться в тему – voronezh
Hi! I’ve been following your website for a while now and finally
got the courage to go ahead and give you a shout out from Kingwood Texas!
Just wanted to tell you keep up the good job!
I visited multiple websites however the audio quality for audio songs present at this web
site is really excellent.
Сразу после вызова нарколог прибывает на дом для проведения тщательного осмотра. Специалист измеряет жизненно важные показатели — пульс, артериальное давление и температуру — и собирает подробный анамнез для оценки степени алкогольной интоксикации.
Получить больше информации – наркология вывод из запоя улан-удэ
At this time I am ready to do my breakfast, later than having my breakfast coming again to read
other news.
Have a look at my web site: Kumpulan Togel
Поэтому наша служба экстренного выезда работает круглосуточно. Медицинская бригада приезжает на вызов в любой район Балашихи в течение часа. Пациенту ставят капельницы, стабилизируют давление, снимают судорожный синдром и устраняют тревожность. Всё это проходит под наблюдением опытных врачей, которые ежедневно сталкиваются с острыми ситуациями и знают, как действовать быстро и безопасно.
Узнать больше – неотложная наркологическая помощь
Близкий человек в запое? Не ждите ухудшения. Обратитесь в клинику «Трезвый шаг» (Воронеж) — здесь проведут профессиональный вывод из запоя с последующим восстановлением организма.
Подробнее – вывод из запоя цена
Thank you for sharing your info. I really appreciate your efforts and I
will be waiting for your further post thanks once again.
В стационаре пациент получает круглосуточный контроль, расширенную диагностику и возможность подключения к аппаратуре мониторинга. Это особенно важно при тяжёлой интоксикации, нарушении сознания или судорожной активности.
Разобраться лучше – https://narko-zakodirovan.ru/vyvod-iz-zapoya-czena-spb
Одной из самых сильных сторон нашей клиники является оперативность. Мы понимаем, что при алкоголизме, наркомании и лекарственной зависимости часто требуются немедленные действия. Если человек находится в состоянии запоя, абстиненции или передозировки, промедление может привести к тяжёлым осложнениям или даже смерти.
Получить дополнительную информацию – вызвать наркологическую помощь в балашихе
Excellent blog! Do you have any helpful hints for aspiring writers?
I’m hoping to start my own blog soon but I’m
a little lost on everything. Would you advise starting
with a free platform like WordPress or go for a paid option? There are so many choices out
there that I’m completely overwhelmed .. Any tips? Bless you!
Затяжной запой — это состояние, при котором человек в течение нескольких дней не может прекратить употребление алкоголя без медицинской помощи. Такое состояние чревато тяжёлыми нарушениями в работе внутренних органов и психики. В Новосибирске и Новосибирской области доступен профессиональный вывод из запоя как на дому, так и в условиях стационара. Подход к лечению индивидуален, и основная цель — безопасно и эффективно устранить последствия интоксикации и предотвратить рецидив.
Узнать больше – вывод из запоя в новосибирске
This piece of writing will help the internet users for creating new weblog or even a weblog from
start to end.
I believe everything said made a lot of sense.
But, what about this? what if you were to write a awesome post title?
I ain’t saying your information isn’t good, but what if
you added something to maybe grab a person’s attention? I mean Raspberry PI TFT Screen / USB
Bitcoin Miner is a little plain. You ought to look at Yahoo’s front page and
note how they create post titles to get people to open the links.
You might add a video or a picture or two to get people excited about what you’ve got to
say. Just my opinion, it would make your posts a little bit more interesting.
you’re really a good webmaster. The web site loading speed is incredible.
It seems that you’re doing any distinctive trick. Moreover, The contents are
masterpiece. you’ve performed a wonderful process on this topic!
Hi fantastic website! Does running a blog similar to this
require a lot of work? I’ve absolutely no knowledge of computer
programming but I was hoping to start my own blog
in the near future. Anyways, if you have any ideas or techniques for new
blog owners please share. I understand this is off subject nevertheless I just wanted to ask.
Thanks!
https://deleuzecinema.com/
Does your site have a contact page? I’m having a tough time locating
it but, I’d like to send you an email. I’ve got some suggestions
for your blog you might be interested in hearing.
Either way, great website and I look forward to seeing it improve over time.
Thanks a bunch for sharing this with all people you actually know what you’re talking about! Bookmarked. Please additionally seek advice from my web site =). We could have a hyperlink alternate contract among us
mel bet
If one is ill it’s correct to go to a doctor. “I assume you’d have an easier time swimming, my pricey, but it’s a gallant sentiment.” He gasped as she tweaked one among his nipples. Based in your answers to this fun quiz, we expect we will guess what sort of boyfriend will fall for you and your distinctive quirks. We’ve nailed down a few enjoyable boyfriend varieties and conveniently associated them to some yummy candy treats. Let’s speak about boyfriend sorts. Boyfriends come in all sizes, shapes and personality varieties. “If I had taken the tube, I’d have come to you frightened I had blown any probability I had of loving you.” He waited for her to say something. Some come with baggage, some are loners, and others come and go like a thief within the night time. 2023-03-19: “‘ChatGPT said I did not exist’: how artists and writers are fighting again against AI – Artificial … The Spanish Armada was beaten back by the English and then battered by storms. What English monarch was wise to put money into some good ships before the Spanish fleet got here calling, near the top of the 16th century? The management of the Japanese warrior led to the unification course of within the 16th century.
My brother recommended I might like this website. He was entirely right.
This post truly made my day. You cann’t imagine just how much time I
had spent for this information! Thanks!
Обращение за помощью нарколога на дому в Архангельске имеет множество преимуществ, среди которых:
Детальнее – http://kapelnica-ot-zapoya-arkhangelsk00.ru/kapelnicza-ot-zapoya-czena-arkhangelsk/
Самолечение или попытка «переждать» запой дома без врача может обернуться серьёзными осложнениями. Обращение к наркологу даёт пациенту:
Изучить вопрос глубже – срочный вывод из запоя в санкт-петербурге
Hi, yeah this post is truly nice and I have learned lot of things from it about blogging.
thanks.
It is truly a great and helpful piece of info. I’m glad that
you just shared this useful information with us. Please keep us up to date like this.
Thanks for sharing.
Yesterday, while I was at work, my cousin stole my iphone and tested to see if it can survive a twenty five foot drop, just so she can be a youtube sensation. My apple ipad is now destroyed and she
has 83 views. I know this is completely off topic but I had to
share it with someone!
Дневник скетчера
I’m very pleased to uncover this site. I need to to thank you for ones time due to this wonderful read!!
I definitely enjoyed every bit of it and i also have you saved to fav to see new information in your site.
Услуга вывода из запоя на дому в Улан-Удэ включает комплекс мероприятий, направленных на оперативное снижение токсической нагрузки и возвращение организма в нормальное состояние. Сразу после получения вызова специалист проводит тщательный осмотр, измеряет жизненно важные показатели и собирает подробный анамнез, что позволяет точно определить степень алкогольной интоксикации. На основе этих данных разрабатывается персональный план терапии, который может включать инфузионное введение медикаментов, коррекцию обмена веществ и оказание психологической поддержки.
Ознакомиться с деталями – нарколог вывод из запоя в улан-удэ
В клинике «ВитаМед Плюс» применяются проверенные методики и препараты, которые позволяют безопасно вывести пациента из запоя. Процедура начинается с внутривенного введения очищающих растворов, которые помогают ускорить выведение этанола и токсинов. Одновременно восстанавливается водно-солевой баланс, что особенно важно при обезвоживании после длительного употребления алкоголя.
Подробнее тут – срочный вывод из запоя в химках
You can definitely see your skills in the work you write.
The sector hopes for even more passionate writers such
as you who aren’t afraid to mention how they believe.
All the time follow your heart.
Когда запой угрожает здоровью и жизни, оперативное вмешательство становится критически важным. В Донецке ДНР опытные специалисты по наркологии оказывают профессиональную помощь на дому, обеспечивая качественную детоксикацию организма, стабилизацию жизненно важных функций и психологическую поддержку. Такой формат лечения позволяет пациенту получить комплексную терапию в условиях комфорта, сохраняя полную конфиденциальность и избегая лишних формальностей.
Получить дополнительные сведения – http://vyvod-iz-zapoya-donetsk-dnr0.ru
Наркологическая клиника “Путь к выздоровлению” расположена по адресу: г. Ростов-на-Дону, ул. Петровская, д. 19. Клиника работает ежедневно с 8:00 до 20:00, без выходных. Наши специалисты готовы предоставить консультацию и ответить на все вопросы, связанные с лечением зависимостей. Мы гарантируем конфиденциальность и индивидуальный подход к каждому пациенту.
Получить дополнительные сведения – https://нарко-фильтр.рф/vivod-iz-zapoya-v-stacionare-v-rostove-na-donu
Everything is very open with a precise description of the challenges.
It was really informative. Your website is very helpful.
Thank you for sharing!
Вывод из запоя обязателен, если:
Подробнее тут – вывод из запоя анонимно химки
На этом этапе специалист уточняет, сколько времени продолжается запой, какой вид алкоголя употребляется и имеются ли сопутствующие заболевания. Тщательный анализ собранной информации позволяет оперативно подобрать оптимальные методы детоксикации и минимизировать риск осложнений.
Подробнее – вывод из запоя донецкая область
На данном этапе врач уточняет длительность запоя, тип употребляемого алкоголя и наличие сопутствующих заболеваний. Тщательный анализ этих данных позволяет оперативно сформировать индивидуальный план лечения и выбрать оптимальные методы детоксикации.
Подробнее тут – http://kapelnica-ot-zapoya-arkhangelsk00.ru
Ломка — это не временное недомогание. Это системное разрушение организма, связанное с тем, что он перестаёт получать наркотик, к которому уже привык. Нарушается обмен веществ, функции сердца, печени, почек, теряется контроль над эмоциями и болью. В состоянии абстиненции человек не может спать, есть, адекватно мыслить. Страдает и тело, и психика.
Узнать больше – снятие ломок в подольске
https://copicsketch.ru/
When some one searches for his required thing, thus he/she
wishes to be available that in detail, therefore that thing is maintained over here.
What’s up, the whole thing is going well here and ofcourse every one
is sharing facts, that’s in fact excellent, keep up writing.
When you’re watching porn, you could notice that usually, the particular person receiving the blowjob begins completely erect and the blowjob giver instantly downs his penis, sucking as onerous as doable. For essentially the most half, you don’t need to worry about sucking “too hard”-but be happy to pause and ask your partner the way it feels, then alter accordingly if need be. “Never feel pressured to deepthroat,” Kerner says. “When giving great head, there’s no such factor as an excessive amount of spit,” Cobb says. “There are several completely different textures at your disposal in your mouth: the roughness of your tongue, the ridgy roof of your mouth, the smoothness of the insides of your cheeks,” Cobb says. Listen to his stroke when he is masturbating or when you’re having sex,” Cobb says. Plus, making eye contact along with your accomplice allows you to essentially convey your enthusiasm about having them in your mouth-which could just take them over the sting. You must be over 18 and allowed to view sexual materials to enter this website! Another largest myth about these warts is that they can not affect you while having oral or anal sex. There’s nothing flawed with having anal sex as long as it is between consenting adults.
Дневник скетчера
Именно поэтому так важно не терять время. Чем раньше пациент получает помощь, тем выше шансы избежать необратимых последствий и вернуться к нормальной жизни.
Получить дополнительную информацию – снятие ломки нарколог подольск
The other day, while I was at work, my sister stole my apple ipad and tested to see if it can survive
a 30 foot drop, just so she can be a youtube sensation. My apple ipad is now broken and she has 83 views.
I know this is completely off topic but I had to share it with someone!
For newest news you have to visit world-wide-web and on internet I found this web page
as a finest web page for most up-to-date updates.
Ahaa, its nice conversation regarding this post here at this weblog, I have read
all that, so at this time me also commenting at this place.
https://zeckoware.com/
I’ve been browsing on-line greater than 3 hours these days, yet I never
discovered any fascinating article like yours.
It’s beautiful value sufficient for me. Personally, if all web
owners and bloggers made just right content material as you did, the internet will be much more helpful than ever before.
Very good blog! Do you have any hints for aspiring writers?
I’m planning to start my own blog soon but
I’m a little lost on everything. Would you recommend starting with
a free platform like WordPress or go for a paid option?
There are so many choices out there that I’m completely confused ..
Any tips? Thanks!
Незамедлительно после поступления вызова нарколог приезжает на дом для проведения тщательного осмотра. Специалист измеряет жизненно важные показатели, такие как пульс, артериальное давление и температура, и собирает анамнез для оценки степени алкогольной интоксикации.
Исследовать вопрос подробнее – https://kapelnica-ot-zapoya-arkhangelsk00.ru/
I visited various web pages except the audio quality for audio
songs present at this website is actually marvelous.
Самолечение или попытка «переждать» запой дома без врача может обернуться серьёзными осложнениями. Обращение к наркологу даёт пациенту:
Получить больше информации – вывод из запоя на дому круглосуточно в санкт-петербурге
Become an ACPMA Instructor (MAB/CPI) – Crisis Prevention Intervention
American Crisis Prevention & Management Association Welcomes qualified professionals from various fields to take our instructor course and teach ACPMA courses at their locations.
Benefits of certifying an instructor with ACPMA:
Become a Certified instructor for Crisis Prevention &
Assaultive Behavior Management
Training done by experienced Personnel
Save on training your employees by training the trainer in your facility
Learn the core principles of adult learning
Leave the training fully confident to teach the AB 508 mandated
topics, Crisis Intervention topics and work
Receive all the training materials you need to teach students
Become part of a household name on Assaultive Behavior Management training
Study in front of your computer (for online students)
You can take the instructor course online at https://www.crisispreventionmanagement.com/become-an-instructor
Наши наркологи придерживаются принципов уважительного и внимательного отношения к пациентам, создавая атмосферу доверия. Они проводят детальное обследование, выявляют коренные причины зависимости и разрабатывают индивидуальные стратегии лечения. Профессионализм и компетентность врачей являются ключевыми факторами успешного восстановления пациентов.
Изучить вопрос глубже – http://нарко-фильтр.рф
https://copicsketch.ru/
Thanks for putting this together.
Дневник скетчера
Профессиональная помощь при запое необходима, если:
Исследовать вопрос подробнее – http://narko-zakodirovan.ru
Hi there are using WordPress for your blog platform? I’m new to the blog world but I’m
trying to get started and create my own. Do you
need any html coding expertise to make your own blog?
Any help would be really appreciated!
my web blog Bonus Freechip
Hello, i read your blog occasionally and i own a similar one and i was just wondering
if you get a lot of spam responses? If so how do
you stop it, any plugin or anything you can suggest?
I get so much lately it’s driving me insane so any support is
very much appreciated.
продать ролекс продать ролекс .
В стационаре пациент получает круглосуточный контроль, расширенную диагностику и возможность подключения к аппаратуре мониторинга. Это особенно важно при тяжёлой интоксикации, нарушении сознания или судорожной активности.
Ознакомиться с деталями – срочный вывод из запоя
I blog frequently and I really thank you for your information. This article has truly peaked my interest.
I’m going to bookmark your site and keep checking for
new information about once a week. I opted in for your Feed
too.
На данном этапе врач уточняет длительность запоя, тип употребляемого алкоголя и наличие сопутствующих заболеваний. Тщательный анализ этих данных позволяет оперативно сформировать индивидуальный план лечения и выбрать оптимальные методы детоксикации.
Разобраться лучше – https://kapelnica-ot-zapoya-arkhangelsk00.ru/kapelnicza-ot-zapoya-na-domu-arkhangelsk/
Именно поэтому так важно не терять время. Чем раньше пациент получает помощь, тем выше шансы избежать необратимых последствий и вернуться к нормальной жизни.
Выяснить больше – снятие ломки в стационаре в подольске
Excellent article! We are linking to this particularly great article on our site.
Keep up the good writing.
ایول مطلب خوبی بود
Pretty component of content. I just stumbled upon your weblog and in accession capital to assert
that I get actually loved account your blog posts. Any
way I’ll be subscribing for your augment or even I fulfillment you get entry
to consistently fast.
What’s up mates, its enormous paragraph on the topic of teachingand
fully defined, keep it up all the time.
Howdy, i read your blog from time to time and i own a similar one and i was just wondering if you
get a lot of spam feedback? If so how do you prevent it, any plugin or anything you can recommend?
I get so much lately it’s driving me crazy so any help is very much
appreciated.
No matter if some one searches for his necessary thing, thus he/she wants to be available that in detail, so that thing is maintained over here.
типография спб https://tipografiya-spb7.ru
выкуп ролекс выкуп ролекс .
типография санкт петербург типография срочно
типография санкт петербург типография изготовление
Задача врачей — не просто облегчить симптомы, а купировать осложнения, стабилизировать жизненно важные функции, вернуть пациенту способность к дальнейшему лечению. Мы работаем быстро, анонимно и профессионально. Любой человек, оказавшийся в кризисе, может получить помощь в течение часа после обращения.
Подробнее – снятие ломки наркозависимого подольск
uefa champions league https://footballnews.store/ .
Когда организм на пределе, важна срочная помощь. «Трезвый шаг» в Воронеже — это команда опытных наркологов, которые помогут быстро и мягко выйти из запоя без вреда для здоровья.
Узнать больше – вывод из запоя на дому
Hi, I log on to your blog on a regular basis. Your writing style is awesome,
keep it up!
I have read so many content about the blogger
lovers but this article is truly a good post, keep it
up.
Также мы учитываем потребности каждого пациента — по питанию, условиям проживания, графику процедур. Проживание возможно в стандартных и повышенных палатах, с возможностью индивидуального обслуживания.
Получить дополнительные сведения – платная наркологическая помощь
Во-первых, безопасная медицинская детоксикация. Этот процесс необходим для удаления токсических веществ из организма. Мы используем современные методы, минимизирующие дискомфорт в период абстиненции.
Исследовать вопрос подробнее – https://алко-лечебница.рф/
Good post! We will be linking to this particularly great content on our website.
Keep up the good writing.
В основе нашей методики — комплексный подход, сочетающий медицинскую точку зрения и психологические технологии. Мы не ограничиваемся снятием абстиненции: задача клиники — помочь пациенту обрести новую мотивацию, развить навыки противостояния стрессам и возобновить социальную активность. Работа строится на трёх ключевых принципах:
Изучить вопрос глубже – наркологические клиники алкоголизм в мытищах
Задача врачей — не просто облегчить симптомы, а купировать осложнения, стабилизировать жизненно важные функции, вернуть пациенту способность к дальнейшему лечению. Мы работаем быстро, анонимно и профессионально. Любой человек, оказавшийся в кризисе, может получить помощь в течение часа после обращения.
Выяснить больше – снять ломку
На сайте https://my-miele-shop.ru/ представлена продукция известной марки Miele, которая особенно пользуется популярностью среди тех, кто ценит функциональность, надежность и практичность. В разделе вы найдете встраиваемые холодильники, стиральные, сушильные машины, кофемашины, пароварки, выполненные из нержавеющей стали, духовые шкафы и многое другое для того, чтобы организовать комфортное пространство. Ознакомьтесь с теми товарами, которые находятся в тренде, и их покупает большинство.
пластиковые окна https://studio5floor.ru/ .
Aw, this was an extremely nice post. Taking a few minutes and actual effort to produce a superb article… but what can I say…
I put things off a whole lot and don’t seem to get nearly anything
done.
Appreciate this post. Let me try it out.
займ оформить онлайн http://investinq.ru .
Домашнее лечение позволяет снизить психологическое напряжение, поскольку пациент остаётся в привычной обстановке — рядом с близкими и без очередей. Экономия времени достигается за счёт оперативного выезда специалиста без необходимости госпитализации, а затраты на вызов часто оказываются ниже, чем в стационаре. При грамотном подборе медикаментов и круглосуточном контроле со стороны врача риск осложнений сводится к минимуму.
Получить больше информации – http://алко-избавление.рф/narkolog-vyvod-iz-zapoya-msk/
Процесс начинается с вызова врача или доставки пациента в клинику. После прибытия специалист проводит первичную диагностику: измерение давления, температуры, пульса, уровня кислорода в крови, визуальная оценка степени возбуждения или угнетения сознания. Собирается краткий анамнез: какой наркотик принимался, как долго, были ли сопутствующие заболевания.
Подробнее тут – снятие наркологической ломки на дому
Обращение за помощью нарколога на дому в Архангельске имеет множество преимуществ, среди которых:
Получить дополнительную информацию – kapelnica-ot-zapoya-arkhangelsk00.ru/
Hi there colleagues, how is all, and what you would like to say concerning this
post, in my view its truly amazing in support of me.
Hey would you mind stating which blog platform you’re working with?
I’m looking to start my own blog in the near future but I’m
having a difficult time choosing between BlogEngine/Wordpress/B2evolution and Drupal.
The reason I ask is because your design and
style seems different then most blogs and I’m looking for something completely unique.
P.S My apologies for being off-topic but I had to ask!
I am regular reader, how are you everybody? This piece of writing posted at this website
is truly pleasant.
Каждый день запоя увеличивает риск для жизни. Не рискуйте — специалисты «Трезвого шага» в Воронеже приедут на дом и окажут экстренную помощь. Без боли, стресса и ожидания.
Подробнее – http://vyvod-iz-zapoya-voronezh13.ru/
This is my first time pay a quick visit at here and i am actually pleassant to read all at single place.
Fantastic items from you, man. I’ve be mindful your stuff previous to and you are just too
excellent. I really like what you’ve got right here, certainly like what you are stating and the way in which in which you are
saying it. You make it entertaining and you continue to care
for to stay it sensible. I can’t wait to learn much more from you.
This is actually a great website.
В Воронеже решение есть — наркологическая клиника «Трезвый шаг». Здесь помогают людям выйти из запоя без страха и осуждения. Всё анонимно, грамотно и с заботой о каждом пациенте.
Подробнее – воронежская область
часы ролекс ломбард http://www.prodaja-rolex-chasi12.ru .
Когда зависимость захватывает жизнь, она разрушает не только организм, но и личность, отношения с близкими, карьерные планы и самоощущение. Алкоголь, наркотики и психотропные препараты постепенно подрывают работу внутренних органов, нарушают баланс нейромедиаторов в мозге и приводят к серьёзным психическим и физическим осложнениям. Попытки справиться с этим самостоятельно редко бывают успешными: необходим системный, профессиональный подход. В наркологической клинике «Доктор Здоровье» в Мытищах вы найдёте надёжную опору на всех этапах выздоровления — от экстренной детоксикации до длительной реабилитации.
Подробнее тут – наркологическая клиника цены
Когда запой угрожает здоровью и жизни, оперативное вмешательство становится критически важным. В Донецке ДНР опытные специалисты по наркологии оказывают профессиональную помощь на дому, обеспечивая качественную детоксикацию организма, стабилизацию жизненно важных функций и психологическую поддержку. Такой формат лечения позволяет пациенту получить комплексную терапию в условиях комфорта, сохраняя полную конфиденциальность и избегая лишних формальностей.
Исследовать вопрос подробнее – вывод из запоя анонимно в донецке
Стационарная программа позволяет стабилизировать не только физическое состояние, но и эмоциональную сферу. Находясь в изоляции от внешних раздражителей и вредных контактов, пациент получает шанс сконцентрироваться на себе и начать реабилитацию без давления извне.
Получить больше информации – наркологическая помощь балашиха
Если вы видите, что близкий не может выйти из запоя самостоятельно, или если после нескольких дней употребления появились тревожные симптомы — не ждите. Помощь нужна уже сейчас.
Подробнее тут – наркологический вывод из запоя химки
Незамедлительно после поступления вызова нарколог приезжает на дом для проведения тщательного осмотра. Врач измеряет жизненно важные показатели — пульс, артериальное давление, температуру — и собирает анамнез для определения степени алкогольной интоксикации.
Подробнее – срочный вывод из запоя в улан-удэ
It is not my first time to visit this site, i am visiting
this site dailly and obtain fastidious facts from here all the time.
Greetings from Los angeles! I’m bored to tears at work so
I decided to browse your blog on my iphone during lunch break.
I enjoy the knowledge you provide here and can’t wait to take a look when I get home.
I’m shocked at how quick your blog loaded on my phone .. I’m not even using WIFI, just 3G
.. Anyhow, great site!
В-четвёртых, просветительская работа. Мы проводим лекции и семинары, направленные на повышение уровня осведомленности общества о проблемах зависимости. Это важно для формирования толерантного отношения к людям, страдающим от зависимостей.
Подробнее – https://алко-лечебница.рф/vivod-iz-zapoya-anonimno-v-samare/
Близкий человек в запое? Не ждите ухудшения. Обратитесь в клинику «Трезвый шаг» (Воронеж) — здесь проведут профессиональный вывод из запоя с последующим восстановлением организма.
Изучить вопрос глубже – вывод из запоя капельница
I’m excited to discover this great site. I wanted to thank you for ones time for this wonderful
read!! I definitely liked every little bit of it and I
have you saved to fav to see new stuff on your blog.
I visited many websites however the audio quality for audio songs present at this web
site is really fabulous.
친구들에게 안녕하세요, 문화에 관한 멋진 포스트이며 완전히 설명되어 있습니다, 항상 계속하세요.
Когда организм на пределе, важна срочная помощь. «Трезвый шаг» в Воронеже — это команда опытных наркологов, которые помогут быстро и мягко выйти из запоя без вреда для здоровья.
Исследовать вопрос подробнее – вывод из запоя на дому
Услуга вывода из запоя на дому в Улан-Удэ включает полный комплекс мер, направленных на быстрое восстановление организма. При получении вызова нарколог приезжает на дом, проводит тщательный первичный осмотр, измеряет жизненно важные показатели и собирает подробный анамнез. На основе полученных данных формируется индивидуальный план терапии, который может включать инфузионное введение медикаментов с применением современных технологий и оказание психологической поддержки для достижения устойчивой ремиссии.
Выяснить больше – вывод из запоя цена
Definitely believe that which you stated. Your favorite justification appeared
to be on the internet the simplest factor to be aware
of. I say to you, I definitely get annoyed even as other folks think about issues that they plainly don’t
understand about. You controlled to hit the nail
upon the top and also defined out the whole thing with no need side-effects , folks could take a signal.
Will likely be back to get more. Thanks
14 July 2013 (Republican leaders made a plan to sabotage Obama in every approach) Republican leaders met and made a specific plan to sabotage Obama in every approach. Next time I’m going to elucidate some more specific strategies and strategies for relationship Asian women, together with ideas for randomly approaching women and starting cool conversations. 14 July 2013 (Time Magazine’s idea of a dialogue) Time Magazine’s thought of a discussion on US budget coverage was to current two Republicans who disagree on some particulars. However, that doesn’t mean it would be a good suggestion to get hitched to the FSA. Jeff: I have an thought. Will you’ve got them amputated, and return to life in the gymnasium? Will probably be for the rich. For example, population progress in Brazil creates individuals who demand jobs, and they give political support to the rich people that need to cut down all of the rain forest to develop soybeans and cattle.
When I originally commented I clicked the “Notify me when new comments are added” checkbox and now each time a comment is added I get four e-mails with the same comment.
Is there any way you can remove me from that service?
Many thanks!
Когда организм на пределе, важна срочная помощь. «Трезвый шаг» в Воронеже — это команда опытных наркологов, которые помогут быстро и мягко выйти из запоя без вреда для здоровья.
Подробнее можно узнать тут – вывод из запоя на дому
Обращение к наркологу позволяет избежать типичных ошибок самолечения и достичь стабильного результата. Квалифицированное вмешательство:
Получить дополнительную информацию – http://narko-zakodirovan2.ru
В столичном регионе доступны два основных формата лечения: выезд специалиста на дом и госпитализация в специализированный центр. Каждый вариант имеет свои особенности и показания, которые врач анализирует при первичном осмотре.
Получить дополнительные сведения – https://алко-избавление.рф/vyvod-iz-zapoya-czena-msk/
Hey! Do you know if they make any plugins to safeguard against hackers?
I’m kinda paranoid about losing everything I’ve worked hard on. Any tips?
Запой — это состояние, при котором человек на протяжении нескольких дней или недель регулярно употребляет алкоголь, теряя контроль над собой. При этом организм накапливает этанол и его токсичные метаболиты, печень и сердце работают на износ, нарушается сон, развивается психоэмоциональная нестабильность. Главный риск — абстинентный синдром, который может проявляться тремором, судорогами, повышением давления, паникой и даже галлюцинациями.
Подробнее можно узнать тут – наркологический вывод из запоя
Затяжной запой опасен для жизни. Врачи наркологической клиники «Трезвый шаг» в Воронеже проводят срочный вывод из запоя — на дому или в стационаре. Анонимно, безопасно, круглосуточно.
Выяснить больше – вывод из запоя на дому круглосуточно
Amazing! This blog looks exactly like my old one! It’s on a
totally different topic but it has pretty much the same page
layout and design. Great choice of colors!
Показана в тяжёлых случаях или при наличии сопутствующих заболеваний. Лечение проходит под круглосуточным наблюдением врачей и медсестёр с постоянной корректировкой терапии.
Подробнее – http://narko-zakodirovan2.ru
Когда запой угрожает здоровью и жизни, оперативное вмешательство становится критически важным. В Донецке ДНР опытные специалисты по наркологии оказывают профессиональную помощь на дому, обеспечивая качественную детоксикацию организма, стабилизацию жизненно важных функций и психологическую поддержку. Такой формат лечения позволяет пациенту получить комплексную терапию в условиях комфорта, сохраняя полную конфиденциальность и избегая лишних формальностей.
Детальнее – http://vyvod-iz-zapoya-donetsk-dnr0.ru
Затяжной запой — это состояние, при котором человек в течение нескольких дней не может прекратить употребление алкоголя без медицинской помощи. Такое состояние чревато тяжёлыми нарушениями в работе внутренних органов и психики. В Новосибирске и Новосибирской области доступен профессиональный вывод из запоя как на дому, так и в условиях стационара. Подход к лечению индивидуален, и основная цель — безопасно и эффективно устранить последствия интоксикации и предотвратить рецидив.
Ознакомиться с деталями – http://narko-zakodirovan2.ru/
Сразу после поступления вызова специалист приезжает на дом для проведения тщательного первичного осмотра. Измеряются такие жизненно важные показатели, как пульс, артериальное давление и температура, а также проводится сбор анамнеза, что позволяет оценить степень алкогольной интоксикации.
Получить дополнительные сведения – http://narcolog-na-dom-kaliningrad00.ru/vrach-narkolog-na-dom-kaliningrad/
bokep ngentot anak kecil
Hello, i read your blog occasionally and i own a similar one and i was just wondering
if you get a lot of spam feedback? If so how do you reduce it, any plugin or anything you can recommend?
I get so much lately it’s driving me crazy so any help is very much appreciated.
В Воронеже решение есть — наркологическая клиника «Трезвый шаг». Здесь помогают людям выйти из запоя без страха и осуждения. Всё анонимно, грамотно и с заботой о каждом пациенте.
Детальнее – срочный вывод из запоя
Обращение за помощью нарколога на дому в Улан-Удэ обладает рядом преимуществ, которые делают лечение эффективным и безопасным:
Подробнее – наркологический вывод из запоя улан-удэ
ремонт окон http://www.studio5floor.ru/ .
Алкогольный запой требует не просто прекращения приёма спиртного, а комплексной медицинской помощи. В Санкт-Петербурге и Ленинградской области вывод из запоя осуществляется опытными наркологами с применением современных методик детоксикации. В зависимости от состояния пациента лечение может быть организовано как на дому, так и в стационарных условиях. Главная цель — безопасное очищение организма и возвращение к стабильному физическому и психоэмоциональному состоянию.
Подробнее – narko-zakodirovan.ru/
Процесс начинается с вызова врача или доставки пациента в клинику. После прибытия специалист проводит первичную диагностику: измерение давления, температуры, пульса, уровня кислорода в крови, визуальная оценка степени возбуждения или угнетения сознания. Собирается краткий анамнез: какой наркотик принимался, как долго, были ли сопутствующие заболевания.
Подробнее можно узнать тут – снятие ломок подольск.
В стационаре пациент получает круглосуточный контроль, расширенную диагностику и возможность подключения к аппаратуре мониторинга. Это особенно важно при тяжёлой интоксикации, нарушении сознания или судорожной активности.
Разобраться лучше – наркология вывод из запоя санкт-петербург
It’s remarkable to visit this site and reading the views of all mates on the topic of this post, while I am also zealous of getting know-how.
I pay a quick visit daily some web sites and websites to read
articles, however this blog offers quality based posts.
Абстинентный синдром — одно из самых тяжёлых и опасных проявлений наркотической зависимости. Он развивается на фоне резкого отказа от приёма веществ и сопровождается сильнейшими нарушениями работы организма. Это состояние требует немедленного вмешательства. Самостоятельно справиться с ним невозможно — особенно если речь идёт о героине, метадоне, синтетических наркотиках или длительной зависимости. В клинике «НаркоПрофи» мы организовали систему снятия ломки в Подольске, работающую круглосуточно: как на дому, так и в условиях стационара.
Подробнее можно узнать тут – снять ломку в подольске
Профессиональная помощь при запое необходима, если:
Исследовать вопрос подробнее – https://narko-zakodirovan.ru/vyvod-iz-zapoya-kapelnicza-spb
На данном этапе специалист уточняет длительность запоя, тип употребляемого алкоголя и наличие сопутствующих заболеваний. Тщательный анализ этих данных позволяет разработать персональный план детоксикации, минимизируя риск осложнений.
Подробнее можно узнать тут – vyvod-iz-zapoya-ulan-ude0.ru/
It’s really a cool and helpful piece of information. I’m glad that you just shared this useful info with us.
Please stay us informed like this. Thanks for sharing.
При сравнительно лёгкой или среднетяжёлой степени интоксикации нарколог приезжает на дом, где в знакомой обстановке проводит детоксикацию. Врач измеряет параметры жизнедеятельности — пульс, давление, насыщение кислородом — и подбирает оптимальный состав препаратов для инфузий. Такой метод подходит тем, кто испытывает стресс при мысли о стационаре и нуждается в анонимности лечения.
Разобраться лучше – https://алко-избавление.рф/vyvod-iz-zapoya-na-domu-msk/
На данном этапе врач уточняет длительность запоя, тип употребляемого алкоголя и наличие сопутствующих заболеваний. Тщательный анализ этих данных позволяет оперативно сформировать индивидуальный план лечения и выбрать оптимальные методы детоксикации.
Выяснить больше – postavit-kapelniczu-ot-zapoya arhangel’sk
Алкогольный запой требует не просто прекращения приёма спиртного, а комплексной медицинской помощи. В Санкт-Петербурге и Ленинградской области вывод из запоя осуществляется опытными наркологами с применением современных методик детоксикации. В зависимости от состояния пациента лечение может быть организовано как на дому, так и в стационарных условиях. Главная цель — безопасное очищение организма и возвращение к стабильному физическому и психоэмоциональному состоянию.
Подробнее можно узнать тут – вывод из запоя санкт-петербург.
Когда организм на пределе, важна срочная помощь. «Трезвый шаг» в Воронеже — это команда опытных наркологов, которые помогут быстро и мягко выйти из запоя без вреда для здоровья.
Подробнее тут – нарколог вывод из запоя
Зависимость — это системная проблема, которая требует последовательного и профессионального подхода. Обычные попытки «вылечиться дома» без медицинского сопровождения нередко заканчиваются срывами, ухудшением состояния и психологической деградацией. Клиника «Здоровье Плюс» в Балашихе предоставляет пациентам не просто разовое вмешательство, а выстроенную поэтапную программу, основанную на опыте и медицинских стандартах.
Разобраться лучше – наркологическая помощь на дому московская область
This is a topic that is close to my heart… Thank you!
Where are your contact details though?
Сразу после поступления вызова специалист приезжает на дом для проведения тщательного первичного осмотра. Измеряются такие жизненно важные показатели, как пульс, артериальное давление и температура, а также проводится сбор анамнеза, что позволяет оценить степень алкогольной интоксикации.
Детальнее – http://narcolog-na-dom-kaliningrad00.ru
Задача врачей — не просто облегчить симптомы, а купировать осложнения, стабилизировать жизненно важные функции, вернуть пациенту способность к дальнейшему лечению. Мы работаем быстро, анонимно и профессионально. Любой человек, оказавшийся в кризисе, может получить помощь в течение часа после обращения.
Узнать больше – снятие ломок на дому подольск
Amazing write ups Appreciate it!
Wow! This blog looks just like my old one! It’s on a totally different topic but it has pretty much the same layout and design. Excellent choice of colors!
Процедура детоксикации может проводиться двумя способами: выездом врача на дом или госпитализацией. Окончательное решение принимает нарколог после оценки состояния пациента. На ранней стадии запоя достаточно домашней терапии, но при наличии рисков рекомендуется стационар.
Получить больше информации – нарколог вывод из запоя санкт-петербург
Профессиональная помощь при запое необходима, если:
Углубиться в тему – вывод из запоя анонимно санкт-петербург
На сайте https://feringer.shop/ в огромном количестве находятся печи для саун и бань. Этот магазин является специализированным интернет-бутиком, который реализует сертифицированную, оригинальную продукцию по лучшей стоимости. В разделе вы найдете порталы ламель, дымоходы ламель, отопительные печи, а также паровые, печи-казаны и многое другое. Вся продукция высокого качества, создана в соответствии с самыми высокими технологиями и только из лучших материалов. Постоянно появляются новинки, которые необходимо рассмотреть и вам.
На сайте https://relomania.com оставьте заявку для того, чтобы узнать, как вы сможете переехать в солнечную, завораживающую Испанию. Популярная компания «Relomania» предлагает воспользоваться полным комплексом услуг. Они необходимы как раз для того, чтобы реализовать вашу идею, независимо от ее сложности. Вам обязательно окажут содействие в том, чтобы оформить ВНЖ в Испании либо ВНЖ цифрового кочевника. В компании трудятся высококлассные, надежные специалисты, которые справятся с задачей.
Во-вторых, индивидуальный подход к каждому пациенту. Учитываются личные особенности, такие как возраст, пол, социальный статус. Это позволяет создать эффективный план лечения.
Ознакомиться с деталями – http://
Самолечение или попытка «переждать» запой дома без врача может обернуться серьёзными осложнениями. Обращение к наркологу даёт пациенту:
Получить дополнительные сведения – вывод из запоя недорого санкт-петербург
There are numerous benefits ɑssociated with thіs and it iѕ ideal
t᧐ look аt ѕome of them. SEO ԝould be easier if the keyword tһat yoou are targeting is рlaced on thе title of your website, but it doesn’t mean thаt уoս won’t
be successful in SEO wіthout it. Again, іf
your heading iѕ “What I think about Cucumber Pickles” ʏou can change your title
too “Cucumber Pickles” – bbut that would be a stupid idda fоr a
heading.
Алкогольный запой требует не просто прекращения приёма спиртного, а комплексной медицинской помощи. В Санкт-Петербурге и Ленинградской области вывод из запоя осуществляется опытными наркологами с применением современных методик детоксикации. В зависимости от состояния пациента лечение может быть организовано как на дому, так и в стационарных условиях. Главная цель — безопасное очищение организма и возвращение к стабильному физическому и психоэмоциональному состоянию.
Подробнее тут – вывод из запоя в стационаре
В клинике «ВитаМед Плюс» применяются проверенные методики и препараты, которые позволяют безопасно вывести пациента из запоя. Процедура начинается с внутривенного введения очищающих растворов, которые помогают ускорить выведение этанола и токсинов. Одновременно восстанавливается водно-солевой баланс, что особенно важно при обезвоживании после длительного употребления алкоголя.
Подробнее – вывод из запоя на дому цена химки
После диагностики начинается активная фаза медикаментозного вмешательства. Препараты вводятся методом инфузии, что позволяет оперативно снизить уровень токсинов в крови, восстановить обмен веществ и нормализовать работу внутренних органов, таких как печень, почки и сердце.
Выяснить больше – наркологический вывод из запоя
Профессиональная помощь при запое необходима, если:
Получить дополнительную информацию – вывод из запоя ленинградская область
Близкий человек в запое? Не ждите ухудшения. Обратитесь в клинику «Трезвый шаг» (Воронеж) — здесь проведут профессиональный вывод из запоя с последующим восстановлением организма.
Подробнее тут – вывод из запоя в стационаре
Today, I went to the beach front with my kids. I found
a sea shell and gave it to my 4 year old daughter and said “You can hear the ocean if you put this to your ear.” She put the shell to
her ear and screamed. There was a hermit crab inside and it pinched
her ear. She never wants to go back! LoL I know this is completely off topic but I had to tell someone!
Kenvox
1701 Е Edinger Ave
Santa Ana, ⅭA 92705, United Stаtes
16572319025
smart high precision equipment processes
Врач может приехать в течение 1–2 часов после обращения. В стационар возможна экстренная госпитализация в тот же день.
Ознакомиться с деталями – вывод из запоя анонимно в новосибирске
Heya i am for the first time here. I found
this board and I in finding It really useful & it helped
me out much. I hope to offer something back and aid others like you helped
me.
The 2nd workout on how you can get rid man boobs is the stair sprints. Foods which are soya beans based mostly may have excessive levels of plant estrogen which can lead to growth of man boobs. You must bear in mind that the basics are not bodily however they’re psychological. “Keep in mind the physique has a pure gastrocolic reflex,” Dr. Thomas explains. Would anybody thoughts terribly if I continued after a drink? For newbies, it will help to use toys that are available incremental sizes so you may “start small and then use larger ones as you wish,” says Dr. McDevitt. Having this conversation would possibly feel embarrassing, however setting practical expectations will help you’ve got a hotter, better time. No matter what you do upfront to clean your butt, concentrate on how unbelievable bottoming can really feel and talk along with your partner instead of freaking out about stray spots. Worth noting: Even for those who and your companion aren’t frightened about STIs or planning to modify between anal and vaginal penetration, using a condom could make you feel extra snug if mess is a concern.
Hello! Do you know if they make any plugins to safeguard against hackers?
I’m kinda paranoid about losing everything I’ve worked hard on. Any recommendations?
Эта публикация дает возможность задействовать различные источники информации и представить их в удобной форме. Читатели смогут быстро найти нужные данные и получить ответы на интересующие их вопросы. Мы стремимся к четкости и доступности материала для всех!
Получить дополнительные сведения – https://jobshew.xyz/index.php/2023/06/09/assistant-property-manager
Thanks for finally writing about > Raspberry PI TFT Screen / USB Bitcoin Miner
< Loved it!
Greate article. Keep posting such kind of info on your blog.
Im really impressed by your site.
Hi there, You’ve performed a fantastic job. I’ll certainly digg it and for my part recommend
to my friends. I’m confident they will be benefited from this website.
Лечение вывода из запоя на дому в Улан-Удэ организовано по четко отлаженной схеме, которая позволяет оперативно стабилизировать состояние пациента и начать процесс детоксикации.
Получить больше информации – вывод из запоя на дому цена улан-удэ
Ahaa, its good dialogue on the topic of this post here at this weblog,
I have read all that, so now me also commenting at this place.
Когда запой угрожает здоровью и жизни, оперативное вмешательство становится критически важным. В Донецке ДНР опытные специалисты по наркологии оказывают профессиональную помощь на дому, обеспечивая качественную детоксикацию организма, стабилизацию жизненно важных функций и психологическую поддержку. Такой формат лечения позволяет пациенту получить комплексную терапию в условиях комфорта, сохраняя полную конфиденциальность и избегая лишних формальностей.
Получить дополнительные сведения – нарколог вывод из запоя донецк
Wonderful posts, Kudos!
She’s a steamy Onlyfans small boobs creator with a penchant for erotic artwork, and even her name alone invokes the picture of the valuable gem this woman truly is. If you need small boobs Onlyfans content, and you need an insane quantity of it, then Syren Deville has you covered. Many creators make an excellent amount each month, from just a few hundred to a couple thousand dollars. The PA isn’t superb to start with, and when you combine that with Benson’s habitual mumble, you get one thing that sounds more like somebody struggling to digest a bad burrito than a college announcement. This signifies that animals are far more easily stimulated and that their sexuality is much less subtle because they, unlike people, have not the identical capability to reason and assume, thus they won’t understand their own actions as being “homosexual.” Therefore, there exist no homosexual inclinations in animals, or a minimum of in the best way that humans comprehend as a sexual orientation. Podofilox comprises the same active compound, however might be safely utilized by you at residence. Set up social media accounts utilizing the identical or similar username, and ensure you may have a clear link again to your Onlyfans web page.
What a stuff of un-ambiguity and preserveness of
valuable knowledge on the topic of unpredicted emotions.
https://copicsketch.ru/
ORISGAMING | Situs Slot dan Togel Terpercaya
Generally I don’t read articles on blogs, but I would like to say that this write-up very forced me to try and do so!
Your writing style has amazed me. Thanks, quite nice post.|
I was suggested this blog through my cousin. I’m now not sure whether this publish
is written through him as no one else realizes such certain details about my trouble.
You are incredible! Thank you!|
Hey there. I found your blog using msn. This is a really well-written article.
I’ll make sure to bookmark it and come back to read more of your useful information.
Thanks for the post. I’ll certainly come back.|
Hey there. I found your weblog the use of msn. This is an extremely smartly written article.
I’ll be sure to bookmark it and come back to learn more of
your useful info. Thank you for the post. I’ll definitely come back.|
Thanks for one’s marvelous posting! I really enjoyed reading it, you
can be a great author. I will remember to bookmark your blog and will eventually come back at some point.
I want to encourage you to continue your great work, have a nice weekend!|
Hey! I could have sworn I’ve been to this website before but after browsing through some of the posts I realized it’s new to me.
Anyhow, I’m definitely delighted I found it and I’ll be bookmarking and checking back frequently!|
Thanks designed for sharing such a good thought.
This paragraph is fastidious, that’s why I have read it
entirely.|
Hello there and thank you for your info – I’ve certainly picked up something new from right here.
I did, however, experience some technical issues using this web
site, since I experienced reloading the site a lot of
times before I could get it to load properly. I was wondering if your web host is OK?
Not that I’m complaining, but sluggish loading times often affect your placement in Google
and can damage your high quality score if ads and marketing with Adwords.
Anyway, I am adding this RSS to my email and could look out for a lot more of your fascinating content.
Ensure that you update this again very soon.|
Hurrah! Finally I got a blog from where I can truly obtain useful information concerning my study
and knowledge.|
When someone writes an article, he/she keeps the plan of a user in mind, ensuring
how a user can know it. So, that’s why this article is great.
Thanks!|
You’re so interesting! I do not suppose I have read something like this
before. So wonderful to discover another person with unique thoughts on this subject.
Seriously.. thanks for starting this up. This web site is something that is needed
on the internet, someone with some originality!|
Do you have a spam issue on this site; I also am a blogger, and I
was wanting to know your situation; many of us have created some nice
procedures and we are looking to exchange strategies with others, be
sure to shoot me an e-mail if interested.
Дневник скетчера
Этот информационный материал привлекает внимание множеством интересных деталей и необычных ракурсов. Мы предлагаем уникальные взгляды на привычные вещи и рассматриваем вопросы, которые волнуют общество. Будьте в курсе актуальных тем и расширяйте свои знания!
Получить дополнительную информацию – https://learning.ugain.eu/7-benefits-of-marital-relationship-in-a-international-country-to-locate-a-wife
My partner and I stumbled over here from a different web address and thought I should check
things out. I like what I see so now i’m following you. Look forward to
looking at your web page repeatedly.
Also visit my homepage: madrid77
Затяжной запой опасен для жизни. Врачи наркологической клиники «Трезвый шаг» в Воронеже проводят срочный вывод из запоя — на дому или в стационаре. Анонимно, безопасно, круглосуточно.
Получить больше информации – вывод из запоя клиника
Hello, every time i used to check blog posts here early
in the break of day, as i like to find out more and more.
They received out after two months. It is an selection while, and it may be fairly profitable, just be sure to decide on you medical doctor properly and be ready to pay out a hefty payment for the tactic. Ransomware applications encrypt all the data on a computer, then demand a cost to get the decryption key. After which, lastly, after i realized he had a boyfriend and everyone was telling me the truth, and then he informed me, I was like, dude, why didn’t you tell me? So in the event that they discovered their litter receptacle dirty then you might face the issue. JP Morgan may must pay 13 billion dollars as a penalty for numerous crimes related with the housing and fiscal crisis. I ponder how this compares with what it gained from the disaster. Here are technical details. However, the essential technical query is about your mail-studying program by means of which this system is launched. Ralph Nader explains how the Democratic Party has pale to the purpose where it has no optimistic program to supply.
Врач может приехать в течение 1–2 часов после обращения. В стационар возможна экстренная госпитализация в тот же день.
Исследовать вопрос подробнее – вывод из запоя капельница новосибирск
Terrific article! This is the type of information that should be shared around the net.
Disgrace on the seek engines for now not positioning this submit higher!
Come on over and discuss with my website . Thank you =)
my web page: Social media strategy
What’s up, after reading this amazing article
i am also delighted to share my familiarity here with mates.
I know this site provides quality depending posts and
extra information, is there any other site which offers these kinds of data in quality?
BJ88 Indonesia, situs judi online terbesar di
Indonesia, aman, terpercaya, dan inovatif, bonus menarik dan layanan pelanggan 24/7.
#BJ88 #BJ88Indonesia #Indonesia
Предлагаем вашему вниманию интересную справочную статью, в которой собраны ключевые моменты и нюансы по актуальным вопросам. Эта информация будет полезна как для профессионалов, так и для тех, кто только начинает изучать тему. Узнайте ответы на важные вопросы и расширьте свои знания!
Исследовать вопрос подробнее – https://a-vance.com/20210416-2
При сравнительно лёгкой или среднетяжёлой степени интоксикации нарколог приезжает на дом, где в знакомой обстановке проводит детоксикацию. Врач измеряет параметры жизнедеятельности — пульс, давление, насыщение кислородом — и подбирает оптимальный состав препаратов для инфузий. Такой метод подходит тем, кто испытывает стресс при мысли о стационаре и нуждается в анонимности лечения.
Подробнее тут – https://алко-избавление.рф/narkolog-vyvod-iz-zapoya-msk/
Greetings from Carolina! I’m bored at work so I decided to browse your blog on my iphone
during lunch break. I really like the knowledge you present here and can’t wait to take a look when I get home.
I’m amazed at how fast your blog loaded on my cell phone ..
I’m not even using WIFI, just 3G .. Anyways, amazing blog!
Hi there! I’m at work browsing your blog from my new iphone 3gs!
Just wanted to say I love reading through your blog and look forward to all your posts!
Keep up the excellent work!
В условиях клиники пациент находится под наблюдением медицинской сестры и врача 24/7, что особенно важно при тяжёлой интоксикации и риске острых осложнений. Быстрый доступ к расширенной диагностике — ЭКГ, УЗИ, анализы крови — обеспечивает точную корректировку терапии. Стационар подходит тем, у кого есть серьёзные сопутствующие заболевания или высокий риск алкогольных психозов.
Получить дополнительную информацию – https://алко-избавление.рф/vyvod-iz-zapoya-na-domu-msk/
I was able to find good info from your blog posts.
Этот обзорный материал предоставляет информационно насыщенные данные, касающиеся актуальных тем. Мы стремимся сделать информацию доступной и структурированной, чтобы читатели могли легко ориентироваться в наших выводах. Познайте новое с нашим обзором!
Детальнее – https://sterlingrec.org/artboard-44x
Предлагаем вашему вниманию интересную справочную статью, в которой собраны ключевые моменты и нюансы по актуальным вопросам. Эта информация будет полезна как для профессионалов, так и для тех, кто только начинает изучать тему. Узнайте ответы на важные вопросы и расширьте свои знания!
Исследовать вопрос подробнее – http://pixspec.com/2020/05/16/when-is-the-best-time-to-have-breast-augmentation-2
Hi there! I could have sworn I’ve been to this website before
but after browsing through some of the post I realized it’s new to me.
Anyways, I’m definitely glad I found it and I’ll be bookmarking and checking back often!
Hi there all, here every person is sharing these kinds of familiarity, thus it’s nice to read this website, and I used to pay a quick visit this weblog every day.
https://dietpillspapa.com/
Heya i’m for the first time here. I came across this board and I
find It really useful & it helped me out much. I hope to give something back and help others like you helped me.
I was curious if you ever thought of changing the layout of your site?
Its very well written; I love what youve got to say.
But maybe you could a little more in the way of content so people could connect with it better.
Youve got an awful lot of text for only having one or two pictures.
Maybe you could space it out better?
Дневник скетчера
Эта информационная статья охватывает широкий спектр актуальных тем и вопросов. Мы стремимся осветить ключевые факты и события с ясностью и простотой, чтобы каждый читатель мог извлечь из нее полезные знания и полезные инсайты.
Подробнее можно узнать тут – https://emuparadiserom.com/netflix-mod-apk-7-106-0-premium-unlocked
Дневник скетчера
With havin so much content do you ever run into any problems of plagorism or copyright infringement?
My website has a lot of unique content I’ve either authored myself or outsourced
but it appears a lot of it is popping it up all over the
web without my authorization. Do you know any
solutions to help protect against content from being ripped off?
I’d really appreciate it.
My site madrid77
Этот интересный отчет представляет собой сборник полезных фактов, касающихся актуальных тем. Мы проанализируем данные, чтобы вы могли сделать обоснованные выводы. Читайте, чтобы узнать больше о последних трендах и значимых событиях!
Получить дополнительную информацию – https://08-servers.com/post-1
Excellent goods from you, man. I have take into accout your stuff prior to and you are simply too great.
I really like what you have acquired here, certainly like what you are stating and
the best way in which you say it. You are making it enjoyable and you continue to care for to stay it wise.
I cant wait to learn much more from you. This is really a wonderful
website.
В этой статье собраны факты, которые освещают целый ряд важных вопросов. Мы стремимся предложить читателям четкую, достоверную информацию, которая поможет сформировать собственное мнение и лучше понять сложные аспекты рассматриваемой темы.
Узнать больше – https://allyoucaneatgids.nl/futuristische-all-you-can-eat-restaurant-met-robotbediening
Good day! Do you know if they make any plugins to help with Search Engine Optimization? I’m trying to get
my blog to rank for some targeted keywords but I’m not seeing very good success.
If you know of any please share. Kudos!
Kenvox
1701 E Edinger Ave
Santa Ana, ϹA 92705, United States
16572319025
Bookmarks
Этот информативный материал предлагает содержательную информацию по множеству задач и вопросов. Мы призываем вас исследовать различные идеи и факты, обобщая их для более глубокого понимания. Наша цель — сделать обучение доступным и увлекательным.
Получить дополнительную информацию – https://b-linked.marketing/b2b-lead-generation-2
I just could not depart your web site before suggesting that I really loved the usual information an individual provide in your visitors?
Is gonna be again regularly to check out new posts
It started off hectic as I moved my stuff from one workplace into another and waited to get into the network to get to work, then helped the new contractor for a while, then rushed around the remainder of the day doing Monday morning due diligence-type stuff to catch up. By the point I obtained there it was crawling and error windows have been popping up each few seconds, in all probability due to bugs within the spyware itself. At the top of all of it, I managed to get all the things cleaned up, remove the annoying error messages that appeared shortly after login, and even bought rid of the annoying System Soap startup window that hijacked every little thing. People will find yourself needing quantity data for each pussy-cat that could present anybody to register the true pussy-cat inside their model. True, some individuals still complain about hearing such phrases in the general public arena, however what’s now perceived as actually obscene are racial and ethnic slurs, the use of which can provoke authorized consequences. As an IT man, I’m also sick of performing surgical procedure on the workstation of Joe Schmoe in the next workplace over because his field is crawling like someone who thought they could out-drink Bluto from Animal House, and I’m sick of watching a sizable fraction of the community visitors be requests from muckware and not folks doing analysis.
В этой статье-обзоре мы соберем актуальную информацию и интересные факты, которые освещают важные темы. Читатели смогут ознакомиться с различными мнениями и подходами, что позволит им расширить кругозор и глубже понять обсуждаемые вопросы.
Выяснить больше – https://www.thebradshawcrew.net/wedding-update
W dobie dynamicznego rozwoju kasyn internetowych, Vavada Casino wylania sie jako platforma, ktora oferuje nie tylko rozrywke na najwyzszym poziomie, ale rowniez bezpieczne srodowisko do gry online https://vavadas.pl/ . Serwis jest dostosowany do potrzeb polskich graczy, oferujac korzystne warunki, szeroka game gier i atrakcyjne bonusy.
Ищете, где купить двигатель с гарантией и доставкой? Мы предлагаем проверенные агрегаты с пробегом до 100 тыс. км из Японии, Европы и Кореи. Подбор, установка, оформление документов — всё под ключ.
I’m truly enjoying the design and layout of your website.
It’s a very easy on the eyes which makes it much more enjoyable
for me to come here and visit more often. Did you
hire out a developer to create your theme?
Great work!
Эта публикация погружает вас в мир увлекательных фактов и удивительных открытий. Мы расскажем о ключевых событиях, которые изменили ход истории, и приоткроем завесу над научными достижениями, которые вдохновили миллионы. Узнайте, чему может научить нас прошлое и как применить эти знания в будущем.
Разобраться лучше – https://petrspetla.cz/panasonic-lumix
Эта информационная заметка предлагает лаконичное и четкое освещение актуальных вопросов. Здесь вы найдете ключевые факты и основную информацию по теме, которые помогут вам сформировать собственное мнение и повысить уровень осведомленности.
Разобраться лучше – https://pozay.life/bonjour-tout-le-monde
Эта статья сочетает в себе как полезные, так и интересные сведения, которые обогатят ваше понимание насущных тем. Мы предлагаем практические советы и рекомендации, которые легко внедрить в повседневную жизнь. Узнайте, как улучшить свои навыки и обогатить свой опыт с помощью простых, но эффективных решений.
Выяснить больше – http://forum.dodeff.com/newreply.php?tid=179&replyto=4047
Howdy! I’m at work surfing around your blog from my new apple iphone!
Just wanted to say I love reading your blog and look forward to all your posts!
Keep up the great work!
печать двусторонних визиток печать визиток
After I initially commented I appear to have clicked on the -Notify me when new comments are added- checkbox and now each time a
comment is added I get 4 emails with the same comment.
There has to be a way you can remove me from that service?
Appreciate it!
Эта статья для ознакомления предлагает читателям общее представление об актуальной теме. Мы стремимся представить ключевые факты и идеи, которые помогут читателям получить представление о предмете и решить, стоит ли углубляться в изучение.
Выяснить больше – https://www.handicapsolutions.ch/fauteuil
Эта статья полна интересного контента, который побудит вас исследовать новые горизонты. Мы собрали полезные факты и удивительные истории, которые обогащают ваше понимание темы. Читайте, погружайтесь в детали и наслаждайтесь процессом изучения!
Получить больше информации – https://worldmagazinenews.com/hello-world
여성들에게 효과적인 토닥이를 추천드립니다, 토닥토닥 거린다는 단어로
토닥이 마사지로 힐링을 시작해보세요
Купить диплом ВУЗа по невысокой стоимости возможно, обращаясь к проверенной специализированной фирме. Купить документ о получении высшего образования вы имеете возможность у нас. orikdok-4v-gorode-barnaul-22.ru
Spinbetter Casino en linea – Resena Completa
Hey there! I know this is kind of off topic but I was wondering if you knew where I could get a captcha plugin for my comment
form? I’m using the same blog platform as yours and I’m having trouble finding one?
Thanks a lot!
Ищете интернет-магазин мебели с доставкой и выгодными ценами? Посетите https://mebelzoom.ru/ где вы найдете широкий выбор кухонных гарнитуров, мебель для спальни, гостиные, мягкую мебель, мебель из массива и другую мебель. Мы предлагаем недорогую мебель от производителя. Подробнее на сайте.
На сайте https://www.parvenik.ru/ представлены березовые, дубовые, эвкалиптовые веники, которые можно приобрести как в розницу, так и оптом. Вся продукция продается по привлекательным ценам, действует быстрая доставка. Регулярное обновление ассортимента, чтобы вы приобрели все, что нужно и в любом количестве. Если вы регулярно посещаете баню, то вам пригодятся банные советы, которые находятся на этом портале. Огромное количество товаров, которые реализуются с большой скидкой. Также представлены и травы в мешочках, эксклюзивные букеты из целебных трав.
Заказать диплом можно через сайт компании. buildupcsi.com/kupit-diplom-oficialno-i-bez-riska-38
Этот информационный материал собраны данные, которые помогут лучше понять текущие тенденции и процессы в различных сферах жизни. Мы предоставляем четкий анализ, графики и примеры, чтобы информация была не только понятной, но и практичной для принятия решений.
Нажми и узнай всё – https://uptourismblog.in/where-i-lost-my-heart-to-krishna
Все вызовы фиксируются под кодовым номером без указания ФИО, что обеспечивает полную конфиденциальность каждого пациента.
Выяснить больше – https://narkologicheskaya-klinika-vladimir10.ru/anonimnaya-narkologicheskaya-klinika-vladimir/
Проблемы с алкоголем или наркотиками могут застать врасплох и привести к серьезным последствиям для организма, психического состояния и жизни пациента. Самостоятельные попытки выйти из запоя или преодолеть абстинентный синдром без медицинской поддержки редко оказываются эффективными и могут представлять реальную опасность для здоровья. Именно в таких ситуациях клиника «АльфаНаркология» предлагает услугу вызова нарколога на дом в Санкт-Петербурге и Ленинградской области. Наши специалисты оперативно реагируют на обращение, оказывают квалифицированную помощь и обеспечивают полную конфиденциальность лечения.
Ознакомиться с деталями – http://narcolog-na-dom-sankt-peterburg000.ru
Запой – это очень опасно! Круглосуточная помощь нарколога в Волгоградской области – ваш шанс выжить. Мы оказываем помощь круглосуточно, чтобы вы могли начать лечение в любой момент. Мы обеспечиваем оперативное вмешательство, индивидуальный подход и высокий уровень безопасности. Служба круглосуточного вывода из запоя работает оперативно и надежно. При ухудшении состояния, мы готовы выехать на дом или принять вас в клинике для детоксикации. Начинаем с диагностики: сбор анамнеза, измерение показателей и оценка степени интоксикации.
Разобраться лучше – https://vyvod-iz-zapoya-volgograd000.ru/vyvod-iz-zapoya-na-domu-volgograd
הוא החליק למעלה-והנה זה, הכל כמו כף היד. ההתכתבות נמשכה חודשים, וזה לא היה רק פלירטוט. אולג לעצמה לזיין. וזה היה קורה, והזונה מצצה לזרים שפגשה, והם זיינו את הזונה ממש ברחוב. נכון, החבר ‘ ה take a look at the site here
Пациенту устанавливают катетер в вену на руке или предплечье, используя лёгкий местный анестетик для минимизации дискомфорта. Затем подключают автоматизированную помпу, обеспечивающую равномерную подачу раствора в течение 3–6 часов.
Ознакомиться с деталями – капельница от запоя
I love looking through an article that will make men and women think.
Also, many thanks for allowing me to comment!
Superb blog! Do you have any hints for aspiring writers?
I’m hoping to start my own website soon but I’m a little lost
on everything. Would you propose starting with a free platform
like WordPress or go for a paid option? There are so many choices
out there that I’m totally overwhelmed .. Any suggestions?
Thank you!
частный пансионат для престарелых
pansionat-msk003.ru
дом престарелых
בירה? היא שאלה והושיטה את הבקבוק. אצבעותיה נגעו קלות בידו, וזה היה כמו פריקה של זרם. “כן, חיכה שהיא תצא, עטופה במגבת כדי לשאת אותה אבל זה לקח הרבה זמן לחכות, למרות שהוא דפק. – חכה! או source
Запой – тяжелое состояние, когда организм не может функционировать без алкоголя. Токсины накапливаются, органы перестают работать, иммунитет слабеет. Это очень опасно. Самостоятельные попытки выйти из запоя только ухудшают ситуацию и усиливают страдания. Клиника «Семья и Здоровье» предлагает лечение на дому, без стресса и в комфортной обстановке. Мы работаем круглосуточно, быстро приезжаем и проводим все необходимые процедуры. Длительный запой разрушает организм, ухудшает качество жизни и может привести к опасным ситуациям. Своевременный вывод из запоя — это критически важно для сохранения здоровья и жизни.
Подробнее можно узнать тут – вывод из запоя на дому красноярск недорого
Миссия нашей клиники заключается в оказании высококачественной помощи людям, страдающим от зависимостей. Мы стремимся создать безопасное и поддерживающее пространство для лечения, где каждый пациент получает необходимую поддержку и понимание. Наша задача — не только помочь избавиться от зависимости, но и вернуть полноценную жизнедеятельность человека, восстановив его социальные связи и жизненные ориентиры.
Углубиться в тему – kapelnicza-ot-zapoya-na-domu irkutsk
На сайте https://j-center.ru уточните, во сколько обойдутся курсы парикмахера, которые проходят в школе-студии Юлии Бурдинцевой. Вас будут обучать только лучшие, компетентные и квалифицированные парикмахеры, которые подают информацию в простой форме, что позволяет быстро получить знания. Каждый ученик получит фундаментальные знания, а программа подготовки специалистов является отработанной. За годы обучения школа-студия приобрела положительный имидж, что подтверждают многочисленные клиенты.
Действие и назначение
Получить дополнительные сведения – https://vyvod-iz-zapoya-novosibirsk00.ru/
лечение запоя краснодар
narkolog-krasnodar005.ru
экстренный вывод из запоя
Специалист уточняет, сколько времени продолжается запой, какой тип алкоголя употребляется, а также наличие сопутствующих заболеваний. Тщательный анализ этих данных помогает определить оптимальные методы детоксикации и скорректировать терапевтическую стратегию для минимизации риска осложнений.
Подробнее – вызов нарколога на дом рязанская область
Алкогольная и наркотическая зависимости требуют незамедлительного медицинского вмешательства. Длительные запои или острое отравление могут привести к тяжелым осложнениям и серьезным проблемам со здоровьем. Клиника «МедТрезвость» в Санкт-Петербурге предлагает квалифицированную наркологическую помощь прямо на дому, обеспечивая полную конфиденциальность и безопасность пациента. Наши специалисты оперативно выезжают по адресу, проводят все необходимые процедуры и помогают максимально быстро стабилизировать состояние пациента в комфортных домашних условиях.
Подробнее тут – http://narcolog-na-dom-sankt-peterburg0.ru
После вашего звонка диспетчер фиксирует заявку и передаёт её свободному специалисту. Нарколог связывается для уточнения симптомов, времени начала запоя и наличия сопутствующих заболеваний, чтобы привезти нужные препараты.
Узнать больше – https://kapelnica-ot-zapoya-voronezh.ru/kapelnicza-ot-zapoya-na-domu-v-voronezhe/
Лечение алкоголизма в Видном — это системная, комплексная терапия, сочетающая современные медицинские и психологические методики, которая позволяет не только справиться с физической зависимостью, но и обрести устойчивую трезвость на долгие годы. В наркологической клинике «Пульсар-Мед» пациентам доступен полный цикл помощи: от экстренной детоксикации и купирования абстинентного синдрома до долгосрочной реабилитации и поддержки на всех этапах восстановления. Каждая программа подбирается индивидуально, с учётом возраста, стажа употребления, сопутствующих заболеваний и особенностей семейной и социальной ситуации.
Исследовать вопрос подробнее – http://lechenie-alkogolizma-vidnoe4.ru/anonimnoe-lechenie-alkogolizma-v-vidnom/
Hurrah, that’s what I was seeking for, what a information! present here at this web site, thanks admin of this site.
купить диплом с занесением в реестр в спб arus-diplom32.ru .
Запой – потеря контроля над алкоголем и резкое отравление организма. Лечение на дому – это быстро, конфиденциально и с индивидуальным подходом. Экстренный вывод из запоя – это быстрая детоксикация и восстановление обмена веществ. Мы выезжаем круглосуточно, чтобы оперативно оценить состояние и начать лечение. На дому мы используем лекарства и психологическую поддержку для достижения максимального эффекта. Мы сначала очистим организм от алкоголя с помощью специальных лекарств.
Получить дополнительные сведения – http://vyvod-iz-zapoya-volgograd00.ru/vyvod-iz-zapoya-kruglosutochno-volgograd/
Вывод из запоя в Орехово-Зуево — это профессиональная экстренная помощь, предоставляемая наркологической клиникой «Гармония-Мед» на дому или в условиях современного стационара. Запой — тяжёлое состояние, при котором организм подвергается многодневному отравлению этанолом и продуктами его распада. Это критический момент в развитии алкогольной зависимости, опасный как для физического, так и для психического здоровья. Только своевременное и квалифицированное вмешательство позволяет предотвратить тяжёлые осложнения и вернуть пациента к полноценной жизни.
Ознакомиться с деталями – vyvod iz zapoya na domu orekhovo
Наркологическая клиника «ЗдравЦентр» оказывает круглосуточную помощь пациентам, страдающим от алкогольной интоксикации. Наши специалисты выезжают в любой район Москвы и Московской области, чтобы оперативно поставить капельницу, снять симптомы абстиненции и восстановить здоровье пациента в комфортных домашних условиях.
Изучить вопрос глубже – вызвать капельницу от запоя на дому москва
Запой – это критическое состояние, возникающее при длительном или чрезмерном употреблении алкоголя, когда организм не может справиться с токсическим воздействием этанола. Такое состояние характеризуется накоплением токсинов, разрушением внутренних органов и сильным нарушением психоэмоционального баланса. Когда запой продолжается, у человека развивается абстинентный синдром, сопровождающийся не только физическим истощением, но и резкими изменениями в психике: от выраженной тревожности и агрессии до галлюцинаций и потери ориентации.
Изучить вопрос глубже – http://narcolog-na-dom-krasnoyarsk0.ru/narkolog-na-dom-kruglosutochno-krasnoyarsk/
При звонке на горячую линию операторы уточняют основные параметры: возраст пациента, длительность запоя, частоту и количество употреблённого алкоголя, наличие хронических заболеваний. Это позволяет заранее подготовить необходимый набор медикаментов и оборудования.
Изучить вопрос глубже – капельница от запоя цена воронежская область
Если требуется срочное кодирование или детоксикация, вызов нарколога на дом – лучшее решение в Иркутске. Профессиональный нарколог приедет, оценит состояние, проведет детоксикацию на дому. «ТрезвоМед»: анонимный выезд нарколога 24/7, помощь при отказе от алкоголя. Тяжело бросить пить в одиночку? Обратитесь к наркологу! Главное – быстро оказать помощь при интоксикации, – нарколог Васильев.
Узнать больше – выезд нарколога на дом цена в иркутске
Введение препаратов осуществляется внутривенно, что обеспечивает оперативное действие медикаментов. В состав лечебного раствора входят средства для детоксикации организма, нормализации водно-электролитного и кислотно-щелочного баланса. При необходимости врач дополнительно вводит препараты, защищающие печень, стабилизирующие работу сердца и успокаивающие нервную систему. Вся процедура проводится под строгим контролем нарколога, который следит за состоянием пациента и корректирует терапию при необходимости. По завершении процедуры врач дает пациенту и его родственникам подробные рекомендации по дальнейшему восстановлению и профилактике повторных запоев.
Получить больше информации – https://kapelnica-ot-zapoya-nizhniy-novgorod0.ru/kapelnicza-ot-zapoya-czena-nizhnij-novgorod
Your method of explaining the whole thing in this post is truly good, every one be able to simply understand it,
Thanks a lot.
В нашей клинике “Сила воли” в Иркутске вы можете получить помощь как в стационаре, так и на дому. Мы предлагаем два вида услуг:
Получить дополнительные сведения – врача капельницу от запоя в иркутске
kraken зеркало
С момента основания клиники мы делаем ставку на сочетание передовых медицинских протоколов и внимания к каждому пациенту. Наши наркологи регулярно проходят обучение на базе ведущих российских и европейских центров, что позволяет внедрять в практику новые аппараты для аппаратной детоксикации, в том числе плазмаферез и молекулярное диализирование. Психологи и психотерапевты клиники работают по стандартам когнитивно-поведенческой терапии и мотивационного интервьюирования, а наши реабилитационные курсы аккредитованы в Международной ассоциации специалистов по алкоголизму и наркомании.
Исследовать вопрос подробнее – http://narkologicheskaya-klinika-zhukovskij4.ru/chastnaya-narkologicheskaya-klinika-v-zhukovskom/
Howdy I am so happy I found your site, I really found
you by mistake, while I was looking on Aol for something else,
Nonetheless I am here now and would just like to say thank
you for a remarkable post and a all round exciting blog
(I also love the theme/design), I don’t have time to read through it all at the minute
but I have saved it and also added your RSS feeds, so when I
have time I will be back to read more, Please do
keep up the excellent b.
Если ищете, где можно смотреть UFC в прямом эфире, то этот сайт отлично подойдёт. Постоянные трансляции, удобный интерфейс и высокая скорость загрузки. Всё работает стабильно и без рекламы: https://mma-fan.ru/
Viagra has been on the market for many years and the
blue pill has revolutionized the way in which erectile dysfunction is treated.
It, however, is connected to a number of unpleasant, even dangerous side effects.
היה צריך להיות, ומטלטלות פתאומיות, ותנועות עמוקות, אני גמרתי. המיצים שלי זרמו מהכוס שלי. הבחור שם גרונה נע בזמן שהיא לקחה כל טיפה אחרונה. וניה, מותש, נשען לאחור, מקומו מיד תפס קודריאש. הסתכלתי על this article
Услуга
Получить больше информации – капельница от запоя наркология в нижний новгороде
Перед кодированием важно снять острую интоксикацию и стабилизировать состояние. В «Орион-Клиник» пациенту проводят курс инфузионной терапии: капельницы с регидратационными растворами, гепатопротекторами и витаминно-минеральными комплексами. Это позволяет восстановить водно-электролитный баланс, поддержать функции печени и почек, нормализовать артериальное давление и работу сердца. Одновременно психолог проводит предварительные беседы для выяснения причин зависимости, уровня тревожности и мотивации. Подготовительный этап длится от одного до трёх дней в зависимости от тяжести состояния и поможет снизить риск побочных эффектов при введении кодирующего препарата.
Подробнее – центр кодирования от алкоголизма
I just couldn’t leave your website prior to suggesting that
I extremely enjoyed the usual info an individual supply on your visitors?
Is going to be again often in order to inspect new posts
my web blog: Tango-atlanta.com
Мы работаем круглосуточно и гарантируем строгое соблюдение конфиденциальности, используя только сертифицированные препараты и проверенные методики лечения.
Исследовать вопрос подробнее – vyzov-narkologa-na-dom sankt-peterburg
Сразу после поступления вызова специалист прибывает на дом для проведения первичного осмотра. На данном этапе нарколог:
Подробнее – нарколог на дом вывод из запоя рязань
На сайте https://xn—-8sbafccjfasdmzf3cdfiqe4awh.xn--p1ai/ узнайте цены на грузоперевозки по России. Доставка груза организуется без ненужных хлопот, возможна отдельная машина. В компании работают лучшие, высококлассные специалисты с огромным опытом. Они предпримут все необходимое для того, чтобы доставить груз быстро, аккуратно и в целости. Каждый клиент сможет рассчитывать на самые лучшие условия, привлекательные расценки, а также практичность. Ко всем практикуется индивидуальный и профессиональный подход.
Наша клиника сочетает в себе оперативность, комфорт и высокие стандарты безопасности. Вот основные преимущества сотрудничества:
Получить дополнительные сведения – капельница от запоя
После процедуры пациент и его близкие получают развернутые рекомендации по дальнейшему восстановлению, советы по профилактике рецидивов и возможности прохождения кодирования при желании пациента.
Подробнее – http://narcolog-na-dom-sankt-peterburg000.ru/psikhiatr-narkolog-na-dom-spb/
Второй этап — купирование абстинентного синдрома. Под контролем нарколога вводятся современные инфузионные растворы, витамины, седативные и поддерживающие препараты. Это позволяет вывести токсины, нормализовать работу сердца, печени и почек, снять тревогу, восстановить сон. При необходимости, особенно в случаях тяжёлых запоев, может быть подключена аппаратная детоксикация (плазмаферез, гемосорбция), что помогает быстро облегчить состояние даже при длительных и тяжёлых формах зависимости.
Детальнее – lechenie-alkogolizma-vidnoe4.ru/
ותשוקה שמאשה כמעט גנחה מהמבט הזה. הוא הביא את כף רגלה אל שפתיה ונישק בעדינות את קצות אצבעותיו. אמרה בחיוך. – אשוח אשוח-עניתי ונשכבתי על הגב. – אתמול היית גיבור-שכנע, אבל הוא עצמו נרדם. – אז learn more
Запой может быть не только физически тяжёлым, но и психологически разрушительным. Поэтому важно вовремя обратиться за помощью. Вывод из запоя в Нижнем Новгороде — это необходимая медицинская процедура, которая помогает победить алкогольную зависимость и восстановить здоровье. Мы в клинике «АнтиЗависимость» предлагаем круглосуточную помощь в комфортных условиях — на дому или в стационаре.
Подробнее тут – нарколог на дом вывод
I every time emailed this webpage post page to all my associates, for the
reason that if like to read it after that
my friends will too.
При запое организм теряет контроль над употреблением алкоголя. В Волгограде вызов нарколога на дом поможет быстро стабилизировать состояние. На дому можно получить квалифицированную помощь, провести детоксикацию и сохранить анонимность. Не затягивайте с вызовом нарколога, чтобы избежать необратимых последствий для организма. Вывод токсинов, восстановление баланса и нормализация работы организма – задачи нарколога на дому. Медикаменты и психология – основа лечения запоя на дому. Детоксикация – первый этап лечения, который проводится с помощью современных препаратов.
Разобраться лучше – вывод из запоя цены волгоград
What’s up i am kavin, its my first time to commenting anywhere, when i read this
piece of writing i thought i could also create comment due to this brilliant piece of writing.
Инфузионная терапия при запое основывается на принципе постепенной и контролируемой доставки лекарственных препаратов и питательных смесей непосредственно в кровеносное русло. Это позволяет:
Исследовать вопрос подробнее – http://kapelnica-ot-zapoya-voronezh2.ru
пансионат для пожилых с деменцией
pansionat-tula001.ru
дом престарелых
Наши специалисты применяют только сертифицированные и проверенные препараты. В их число входят детоксикационные растворы (глюкоза, физраствор, растворы Рингера), гепатопротекторы для восстановления печени, кардиопротекторы для нормализации сердечной деятельности, витамины и седативные препараты, позволяющие успокоить нервную систему, улучшить сон и снять тревожность. Индивидуальный подход врача позволяет подобрать именно тот набор медикаментов, который будет наиболее эффективен и безопасен в каждом конкретном случае.
Ознакомиться с деталями – https://narcolog-na-dom-sankt-peterburg0.ru/vyzov-narkologa-na-dom-spb
Незамедлительно после поступления вызова нарколог приезжает на дом для проведения детального первичного осмотра. На данном этапе специалист собирает анамнез, измеряет жизненно важные показатели — пульс, артериальное давление, температуру — и оценивает степень алкогольной интоксикации. Полученные данные являются основой для составления индивидуального плана лечения, что позволяет максимально адаптировать терапию под конкретное состояние пациента.
Получить дополнительные сведения – https://narcolog-na-dom-ryazan0.ru/vyzov-narkologa-na-dom-ryazan
После поступления звонка специалисты нашей клиники оперативно выезжают по адресу пациента в Новосибирске. Врач начинает работу с детальной диагностики: измеряет пульс, артериальное давление, сатурацию (уровень кислорода в крови), оценивает состояние нервной и сердечно-сосудистой систем, уточняет наличие хронических заболеваний, аллергических реакций, длительность и тяжесть запоя.
Подробнее тут – срочный вывод из запоя
При длительном запое в крови накапливаются ацетальдегид и другие токсичные метаболиты этанола, которые повреждают клетки печени, нарушают функцию почек и приводят к дисбалансу электролитов. Без своевременной детоксикации повышается риск острых состояний — судорог, инсультов, инфаркта, панкреатита и психоза. Чем раньше начато лечение, тем быстрее нормализуются показатели обмена веществ, возвращается водно-электролитный баланс и восстанавливается работа жизненно важных органов. Анонимный выезд нарколога помогает снять психологический барьер перед обращением за помощью.
Получить больше информации – капельница от запоя наркология в воронеже
Теряете контроль над алкоголем? Экстренная помощь нарколога на дому в Волгограде – это выход! Лечитесь дома! Это быстро, удобно, анонимно и эффективно. Быстрая детоксикация – первый шаг к выздоровлению! Мы работаем 24/7, чтобы вы могли получить помощь в любой ситуации. Наше лечение эффективно, потому что оно учитывает все аспекты проблемы. Сначала нужно очистить организм от алкоголя, и мы вам в этом поможем.
Углубиться в тему – вывод из запоя круглосуточно волгоград
В течение процедуры пациент находится под непрерывным наблюдением: внутривенные капельницы с регидратационными растворами, витаминно-минеральными комплексами и гепатопротекторами обеспечивают восстановление функций печени, нормализацию обменных процессов и поддержку работы сердечно-сосудистой системы. При необходимости к лечению привлекаются узкопрофильные врачи — кардиолог, невролог или терапевт — что делает процесс максимально комплексным. По завершении выведения из запоя врач предоставляет подробный план поддерживающей терапии с рекомендациями по питанию, питьевому режиму и графику повторных консультаций.
Получить больше информации – vyvod iz zapoya cena reutov
Запой – критическое состояние, грозящее жизни! Не ждите, вызывайте нарколога в Волгоградской области круглосуточно! Не важно, день или ночь – нарколог приедет к вам в любое время! Мы гарантируем быструю, безопасную и индивидуальную помощь. Мы гарантируем быструю и надежную помощь при запое. Мы готовы помочь вам, где бы вы ни находились – дома или в клинике! Сначала мы проводим диагностику, чтобы составить индивидуальный план лечения.
Ознакомиться с деталями – вывод из запоя цены на дому волгоград
My brother recommended I might like this web site.
He was totally right. This post truly made my day. You cann’t imagine
simply how much time I had spent for this info! Thanks!
Наши врачи используют только проверенные и сертифицированные медикаменты, индивидуально подбираемые для каждого пациента. В состав лечебного курса входят:
Получить дополнительные сведения – вывод из запоя на дому круглосуточно в новосибирске
Пациенты, которые выбирают нашу клинику для лечения алкогольного запоя, получают качественную и оперативную помощь, обладающую следующими преимуществами:
Подробнее – http://kapelnica-ot-zapoya-nizhniy-novgorod0.ru
Цены на капельницу от запоя на дому в Туле могут изменяться в зависимости от нескольких условий. Во-первых, стоимость услуг нарколога может различаться в зависимости от опыта врача и репутации медицинского учреждения. Выездной нарколог предлагает удобство, что также сказывается на стоимости.Кроме того, тип капельницы и её компоненты (например, глюкоза, витамины) также влияют на цену. Обычно, цена капельницы включает медицинскую помощь на дому, что увеличивает общие затраты.Наркологические услуги, такие как лечение алкоголизма и реабилитация от запоя, могут различаться по стоимости в зависимости от длительности и сложности лечения. Необходимо учитывать, что борьба с зависимостью от алкоголя требует комплексного подхода и профессиональной помощи. нарколог на дом Если вас интересует лечение запоя, рекомендуется обратиться к специалистам, которые могут предоставить актуальную информацию о ценах и услугах. В Туле услуги наркологии предлагают разнообразные решения для восстановления здоровья и улучшения качества жизни.
Hi there I am so thrilled I found your blog, I really
found you by accident, while I was looking on Aol for something else, Anyways I am here now and would just like
to say thank you for a marvelous post and a all round entertaining blog (I also
love the theme/design), I don’t have time
to read through it all at the minute but I have book-marked it and also added your RSS
feeds, so when I have time I will be back to read a
lot more, Please do keep up the awesome work.
Universal https://www.royalholloway.ac.uk/ remote simplifies home entertainment system control.
Свежая и проверенная база для эффективного продвижения
вашего сайта средствами Хрумера и ГСА!
Преимущества нашего предложения:
– Качественная база проверенных площадок для мощного SEO-прогона.
– Готовые успешные базы — мгновенный эффект без риска и
разочарований.
-Возможность создать уникальную базу под ваши конкретные критерии.
Основная терапия заключается в установке внутривенной капельницы, через которую вводятся специально подобранные растворы. Эти препараты помогают быстро вывести токсины, восстановить водно-электролитный баланс и нормализовать работу внутренних органов. При необходимости врач может дополнительно назначить медикаменты для поддержки печени, стабилизации сердечной деятельности и купирования симптомов абстинентного синдрома. По завершении процедуры специалист предоставляет рекомендации по дальнейшему восстановлению и профилактике повторных эпизодов зависимости.
Подробнее можно узнать тут – капельница от запоя на дому
В «Север-Мед» вы найдёте не только медицинскую, но и социальную поддержку: наши специалисты помогают восстановить утраченные навыки общения и трудоспособности. Родственники могут пройти семейное консультирование, где профессионалы подскажут, как построить эффективный диалог с зависимым и создать благоприятную среду для выздоровления.
Подробнее – narkologicheskaya klinika
Информационный портал об операционном лизинге автомобилей для бизнеса и частных лиц: условия, преимущества, сравнения, советы и новости рынка: https://fleetsolutions.ru/
Оформиление дипломов ВУЗов В киеве — с печатями, подписями, приложением и возможностью архивной записи (по запросу).
Документ максимально приближен к оригиналу и проходит визуальную проверку.
Мы гарантируем, что в случае проверки документа, подозрений не возникнет.
– Конфиденциально
– Доставка 3–7 дней
– Любая специальность
Уже более 2472 клиентов воспользовались услугой — теперь ваша очередь.
Купить диплом — ответим быстро, без лишних формальностей.
Выезд нарколога на дом включает несколько ключевых этапов: первичный дистанционный сбор анамнеза, оперативный приезд специалиста, проведение обследования — измерение пульса, давления, сатурации, уровня глюкозы и электролитов крови — и последующее назначение инфузионной терапии. В зависимости от состояния пациента подбирается индивидуальный состав растворов, направленных на восстановление водно-электролитного баланса, поддержку функций печени и нормализацию работы центральной нервной системы. Все процедуры выполняются с учётом противопоказаний и сопутствующих заболеваний.
Получить дополнительные сведения – капельница от запоя выезд в воронеже
Покупка дипломов ВУЗов по всей Украине — с печатями, подписями, приложением и возможностью архивной записи (по запросу).
Документ максимально приближен к оригиналу и проходит визуальную проверку.
Мы гарантируем, что в случае проверки документа, подозрений не возникнет.
– Конфиденциально
– Доставка 3–7 дней
– Любая специальность
Уже более 4764 клиентов воспользовались услугой — теперь ваша очередь.
Мы поможем — ответим быстро, без лишних формальностей.
It’s awesome in support of me to have a web site, which is helpful in support
of my know-how. thanks admin
Услуга
Изучить вопрос глубже – выезд нарколога на дом раменское
После процедуры пациент и его близкие получают развернутые рекомендации по дальнейшему восстановлению, советы по профилактике рецидивов и возможности прохождения кодирования при желании пациента.
Подробнее тут – нарколог на дом санкт-петербург
Запой – это неконтролируемое употребление алкоголя, которое приводит к серьезным последствиям. Алкогольное отравление организма приводит к серьезным проблемам со здоровьем. Выходить из запоя самостоятельно – рискованно и неэффективно. Мы предлагаем помощь при запое на дому, в привычных для вас условиях. Круглосуточная помощь при запое с выездом на дом за 30-60 минут. Длительный запой разрушает организм и может быть смертельным. Чем раньше вы обратитесь за помощью, тем больше шансов на выздоровление.
Подробнее можно узнать тут – вывод из запоя в красноярске
После стабилизации назначаются препараты, снижающие влечение к алкоголю, нормализующие работу нервной системы и улучшающие общее самочувствие. К методам кодирования относятся уколы, вшивание препаратов, аппаратные методики и психотерапевтические техники. Врач всегда индивидуально подбирает программу — с учётом предыдущего опыта, наличия хронических болезней, особенностей организма.
Изучить вопрос глубже – https://lechenie-alkogolizma-vidnoe4.ru/lechenie-alkogolizma-stoimost-v-vidnom
Вызов врача-нарколога на дом в Санкт-Петербурге начинается с детального осмотра и оценки состояния пациента. Врач измеряет давление, пульс, уровень кислорода в крови и определяет степень интоксикации.
Подробнее можно узнать тут – вызов врача нарколога на дом санкт-петербург
подключить интернет нижний новгород
domashij-internet-nizhnij-novgorod004.ru
домашний интернет
Мы понимаем, что лечение от алкогольной зависимости — это только первый шаг на пути к восстановлению. Профилактика рецидивов — важная часть нашего подхода. Мы проводим тренинги и курсы, направленные на развитие навыков борьбы с соблазнами и стрессом. Психотерапевтическая поддержка помогает пациентам справиться с эмоциональными трудностями, а также укрепляет мотивацию для сохранения трезвости.
Подробнее – капельница от запоя клиника в иркутске
Appreciate the recommendation. Let me try it out.
הקשיבה. היא פתחה את פיה רחב יותר, והזין שלו החליק פנימה, מילא את גרונה החם והרטוב. היא בלעה אותו נהדר! – באמת? אתה אוהב את זה? – כן! אתה הפטמה הכי טובה שלי! קארינה שטפה בהתרגשות וטיפסה את ידה why not find out more
Undeniably believe that which you stated.
Your favorite reason appeared to be on the net
the simplest thing to be aware of. I say to you, I definitely get annoyed while people consider worries that they just do not know about.
You managed to hit the nail upon the top as well as defined out the whole thing without having side-effects , people could take a signal.
Will likely be back to get more. Thanks
В статье представлены ключевые моменты по актуальной теме, дополненные советами экспертов и ссылками на дополнительные ресурсы. Цель материала — дать читателю инструменты для самостоятельного развития и принятия осознанных решений.
Смотрите также… – https://uniquementenpagne.com/2020/12/22/bonjour-tout-le-monde
купить аттестаты за 11 классов в перми купить аттестаты за 11 классов в перми .
Наркологическая помощь на дому становится всё более востребованной благодаря своей доступности, конфиденциальности и эффективности. Клиника «МедТрезвость» предлагает пациентам целый ряд важных преимуществ:
Выяснить больше – нарколог на дом вывод из запоя санкт-петербург
Когда организм уже не может обходиться без алкоголя, возникает запой. Вызов нарколога на дом в Волгограде – это безопасно и эффективно. Нарколог приедет на дом, проведет детоксикацию и поможет стабилизировать состояние, не нарушая привычный ритм жизни. Своевременная помощь нарколога поможет избежать осложнений, вызванных запоем. Дома нарколог поможет очистить организм и восстановить его нормальную работу. Избавление от запоя на дому – это сочетание лекарств и психологической помощи. Сначала нужно очистить организм от токсинов, и в этом помогут специальные препараты.
Узнать больше – http://vyvod-iz-zapoya-volgograd0.ru
Профессиональный подход к лечению запоя на дому включает в себя несколько последовательных этапов, которые гарантируют комплексное восстановление организма. Такой системный метод помогает не только вывести токсичные вещества, но и обеспечить психологическую поддержку, необходимую для формирования устойчивых навыков самоконтроля и предотвращения повторных эпизодов зависимости.
Подробнее можно узнать тут – нарколог на дом вывод из запоя рязань
Клиника «ТоксинНет» предлагает профессиональную помощь при алкогольной зависимости и запоях в Нижнем Новгороде. Наши опытные наркологи круглосуточно выезжают на дом для оказания экстренной медицинской помощи. Основным методом лечения является капельница от запоя, которая позволяет оперативно снять интоксикацию и стабилизировать общее состояние пациента. Мы обеспечиваем конфиденциальность, индивидуальный подход и высокий уровень безопасности процедур.
Получить дополнительную информацию – капельница от запоя наркология нижний новгород
Кодирование основано на блокировке механизмов зависимости на биохимическом и поведенческом уровнях. Медикаментозные методы включают введение препаратов пролонгированного действия, которые нарушают метаболизм этанола: при попытке выпить даже небольшую дозу алкоголь вызывает выражённые неприятные реакции, что психологически отвращает от новой пробы спиртного. Психотерапевтические техники, такие как гипноз или метод Довженко, направлены на переустановку подсознательных программ, удаление эмоционального влечения к алкоголю и укрепление мотивации к здоровому образу жизни. Аппаратные методики (электроимпульсная стимуляция, транскраниальная микрополяризация) воздействуют на нейроны, участвующие в развитии зависимости, снижая их активность и уменьшая физиологический дискомфорт. В «Орион-Клиник» часто используют комбинированные программы: сначала проводится детоксикация организма, затем вводится медикаментозное средство, после чего реализуется психотерапевтический блок влияния на подсознание.
Подробнее – анонимное кодирование от алкоголизма
Simply desire to say your article is as astounding.
The clarity in your post is simply cool and i can assume you’re an expert
on this subject. Fine with your permission allow me to grab your RSS feed
to keep updated with forthcoming post. Thanks a million and
please carry on the gratifying work.
Thanks for the great content! I’ve been into online gambling and bonus hunting lately and this truly
resonates. Especially with platforms like Free Deposit 365 offering freedeposit promos, the opportunities are just getting better.
I bookmarked this for more info like this. Do you also review gambling platforms?
Keep it up!
дом престарелых в туле
pansionat-tula002.ru
пансионат для лежачих пожилых
Этот текст призван помочь читателю расширить кругозор и получить практические знания. Мы используем простой язык, наглядные примеры и структурированное изложение, чтобы сделать обучение максимально эффективным и увлекательным.
Более подробно об этом – https://www.mimosaporto.com/pt/10-maneiras-de-passar-o-fim-de-semana-ao-ar-livre
купить диплом с занесением в реестр купить диплом с занесением в реестр .
Этот информационный обзор станет отличным путеводителем по актуальным темам, объединяющим важные факты и мнения экспертов. Мы исследуем ключевые идеи и представляем их в доступной форме для более глубокого понимания. Читайте, чтобы оставаться в курсе событий!
Более того — здесь – http://jennyolsson.com/bilderart/attachment/001
Эта статья для ознакомления предлагает читателям общее представление об актуальной теме. Мы стремимся представить ключевые факты и идеи, которые помогут читателям получить представление о предмете и решить, стоит ли углубляться в изучение.
Нажмите, чтобы узнать больше – http://www.bashmakovn.ru
Мы собрали для вас самые захватывающие факты из мира науки и истории. От малознакомых деталей до грандиозных событий — эта статья расширит ваш кругозор и подарит новое понимание того, как устроен наш мир.
Практические советы ждут тебя – http://muziekpromo.net/post/34
Этот информационный обзор станет отличным путеводителем по актуальным темам, объединяющим важные факты и мнения экспертов. Мы исследуем ключевые идеи и представляем их в доступной форме для более глубокого понимания. Читайте, чтобы оставаться в курсе событий!
Выяснить больше – http://ipclose.ru
купить диплом о высшем образовании с реестром купить диплом о высшем образовании с реестром .
В этой публикации мы предлагаем подробные объяснения по актуальным вопросам, чтобы помочь читателям глубже понять их. Четкость и структурированность материала сделают его удобным для усвоения и применения в повседневной жизни.
Как достичь результата? – https://phelionline.co.za/_sb_country/thailand
Публикация предлагает уникальную подборку информации, которая будет интересна как специалистам, так и широкому кругу читателей. Здесь вы найдете ответы на часто задаваемые вопросы и полезные инсайты для дальнейшего применения.
Узнать напрямую – https://scalebnb.com/mastering-time-management-key-to-business-success
Этот информативный текст выделяется своими захватывающими аспектами, которые делают сложные темы доступными и понятными. Мы стремимся предложить читателям глубину знаний вместе с разнообразием интересных фактов. Откройте новые горизонты и развивайте свои способности познавать мир!
Ознакомьтесь с аналитикой – https://topic.lk/14643
In 1998 ED drugs came as a blessing for those with erectile disorders.
These druigs are of great help. They help you in achieving erections by inhibiting the action of a
certain enzyme in your body. This enzyme is phosphodiesterase 5 or PDE 5.
Публикация приглашает вас исследовать неизведанное — от древних тайн до современных достижений науки. Вы узнаете, как случайные находки превращались в революции, а смелые мысли — в новые эры человеческого прогресса.
Выяснить больше – https://padovaniaviacao.com.br/ola-mundo
Публикация приглашает вас исследовать неизведанное — от древних тайн до современных достижений науки. Вы узнаете, как случайные находки превращались в революции, а смелые мысли — в новые эры человеческого прогресса.
Продолжить изучение – https://www.brunaleiden.nl/product/bruna-balpen-31-assorti
Hey very interesting blog!
Капельница от запоя на дому для пожилых людей в Туле — это ключевой элемент в лечении запоя. Нарколог на дом круглосуточно обеспечивает детоксикацию организма на дому, что является особенно важным для пожилых людей. Симптомы запоя, такие как слабость, тревожность и подавленное состояние, требуют немедленного вмешательства. Лечение алкоголизма включает использование капельниц, которые способствуют восстановлению водно-электролитного баланса. Однако необходимо учитывать риски, связанные с капельницами: аллергические реакции и осложнения, возникающие при неверном введении. Поэтому безопасность процедур должна быть приоритетом. Медицинская помощь на дому позволяет избежать стресса при транспортировке больного. Уход за пожилыми людьми требует особого внимания, и круглосуточная помощь нарколога обеспечивает необходимую заботу. Рекомендуется придерживаться рекомендаций врачей для эффективного восстановления после запоя.
Мы собрали для вас самые захватывающие факты из мира науки и истории. От малознакомых деталей до грандиозных событий — эта статья расширит ваш кругозор и подарит новое понимание того, как устроен наш мир.
Обратитесь за информацией – http://aocuoibinhminh.com/chao-moi-nguoi
Мы собрали для вас самые захватывающие факты из мира науки и истории. От малознакомых деталей до грандиозных событий — эта статья расширит ваш кругозор и подарит новое понимание того, как устроен наш мир.
Обратитесь за информацией – http://www.raduga-src.ru
Эта статья для ознакомления предлагает читателям общее представление об актуальной теме. Мы стремимся представить ключевые факты и идеи, которые помогут читателям получить представление о предмете и решить, стоит ли углубляться в изучение.
Смотри, что ещё есть – http://ya-v-videochate.ru
Stream live Cricket events online. Stay updated with upcoming matches, highlights,
and schedules. Join the excitement with E2BET today!
Эта информационная статья содержит полезные факты, советы и рекомендации, которые помогут вам быть в курсе последних тенденций и изменений в выбранной области. Материал составлен так, чтобы быть полезным и понятным каждому.
Обратитесь за информацией – https://phelionline.co.za/_sb_country/u-s-minor-outlying-islands
I’m gone to convey my little brother, that he should also go to see this website on regular basis to obtain updated from newest reports.
Этот увлекательный информационный материал подарит вам массу новых знаний и ярких эмоций. Мы собрали для вас интересные факты и сведения, которые обогатят ваш опыт. Откройте для себя увлекательный мир информации и насладитесь процессом изучения!
Доступ к полной версии – https://www.mibolhosting.com/product/standard
Эта статья для ознакомления предлагает читателям общее представление об актуальной теме. Мы стремимся представить ключевые факты и идеи, которые помогут читателям получить представление о предмете и решить, стоит ли углубляться в изучение.
Только для своих – https://newdesignhomes.com/how-to-lower-the-cost-of-home-renovation
В этой публикации мы предлагаем подробные объяснения по актуальным вопросам, чтобы помочь читателям глубже понять их. Четкость и структурированность материала сделают его удобным для усвоения и применения в повседневной жизни.
Почему это важно? – https://www.pietrocarlopellegrini.it/memoriale-giuseppe-garibaldi/08-15
В этом информативном тексте представлены захватывающие события и факты, которые заставят вас задуматься. Мы обращаем внимание на важные моменты, которые часто остаются незамеченными, и предлагаем новые перспективы на привычные вещи. Подготовьтесь к тому, чтобы быть поглощенным увлекательными рассказами!
Нажми и узнай всё – https://tdafrica.com/td-africa-huawei-co-launch-sme-products
интернет провайдеры нижний новгород
domashij-internet-nizhnij-novgorod005.ru
интернет по адресу нижний новгород
Этот текст сочетает в себе элементы познавательного рассказа и аналитической подачи информации. Читатель получает доступ к уникальным данным, которые соединяют прошлое с настоящим и открывают двери в будущее.
Подробная информация доступна по запросу – https://www.cmsapitpmt.com/live_player.php/?smbb=aHR0cHM6Ly93d3cuZmxhc2hjYWJpbmUuY29tLmJyL3RvdGVtLWZvdG9ncmFmaWNvLw
купить аттестат за 11 класс в сыктывкаре купить аттестат за 11 класс в сыктывкаре .
We’re a group of volunteers and opening a new scheme in our community.
Your site offered us with valuable info to work on. You’ve done
a formidable job and our entire community will be thankful to
you.
Click this site https://swalopets.com/2024/06/19/hola-mundo/?unapproved=458&moderation-hash=bf06eb3f9a0d8197b22c8bd907f4de69
пансионат для людей с деменцией в туле
pansionat-tula003.ru
пансионат с медицинским уходом
Hi there! I could have sworn I’ve been to this website before but
after browsing through many of the articles I realized it’s new to me.
Nonetheless, I’m definitely pleased I discovered it and I’ll be bookmarking it and checking back frequently!
Hey! This is my first visit to your blog! We are a collection of volunteers and starting a new
project in a community in the same niche. Your blog provided us
valuable information to work on. You have done a extraordinary job!
The slot jackpots keep me coming back!
Feel free to visit my webpage – https://andresffbo32716.csublogs.com/43008583/get-lucky-with-plinko
tele4
купить аттестат 10 11 класс вечерней школы купить аттестат 10 11 класс вечерней школы .
Wonderful blog! I found it while surfing around on Yahoo News.
Do you have any suggestions on how to get listed in Yahoo News?
I’ve been trying for a while but I never seem to get there!
Thank you
Howdy just wanted to give you a brief heads up and let you
know a few of the pictures aren’t loading correctly.
I’m not sure why but I think its a linking issue.
I’ve tried it in two different internet browsers and both show the same results.
купить аттестаты за 11 класс с занесением в реестр с проверенного сайта купить аттестаты за 11 класс с занесением в реестр с проверенного сайта .
После успешной детоксикации начинается этап реабилитации, который включает восстановление социального статуса пациента и формирование новых здоровых привычек. Мы предлагаем как групповые, так и индивидуальные занятия, направленные на изменение поведения и мышления, что способствует долгосрочному удержанию пациента от возвращения к зависимостям.
Узнать больше – http://kapelnica-ot-zapoya-irkutsk2.ru
https://avtocods.com/
Капельница от запоя: экстренная помощь при алкогольном отравлении Капельница содержит необходимые препараты для нормализации водно-электролитного состояния и укрепления здоровья больного. Эффективная терапия зависимости включает не только вывод из запоя, но и долгосрочную терапию алкоголизма. Важно помнить о восстановлении после запоя, который может занять определённый период и потребовать дополнительных усилий. вывод из запоя круглосуточно Скорая помощь включает в себя оценку состояния пациента и индивидуальный подход к каждому пациенту. При выявлении симптомов алкогольного отравления необходимо немедленно обратиться к специалистам. Не забывайте, что здоровье является наивысшей ценностью, и профессиональная помощь в наркологической клинике поможет вернуть контроль над своей жизнью.
где можно купить аттестат где можно купить аттестат .
Нарколог измеряет пульс, артериальное давление, частоту дыхания, насыщение кислородом, а также уточняет историю употребления и наличие хронических заболеваний. Это позволяет оперативно скорректировать состав и скорость инфузии.
Ознакомиться с деталями – капельница от запоя цена воронежская область
Затяжной запой опасен для жизни. Врачи наркологической клиники в Химках проводят срочный вывод из запоя — на дому или в стационаре. Анонимно, безопасно, круглосуточно.
Разобраться лучше – вывод из запоя на дому цена
Наши врачи уделяют внимание не только медицинским аспектам, но также социальным и психологическим факторам. Мы помогаем пациентам находить новый смысл в жизни, формировать новые увлечения и восстанавливать старые связи с близкими.
Детальнее – капельница от запоя наркология в иркутске
Качественная детоксикация помогает быстро стабилизировать состояние пациента, снять острые симптомы и минимизировать риск возможных осложнений.
Узнать больше – нарколог на дом санкт-петербург.
После поступления вызова нарколог клиники «АльфаНаркология» оперативно выезжает по указанному адресу. На месте врач проводит первичную диагностику, оценивая степень интоксикации, физическое и психологическое состояние пациента. По результатам осмотра врач подбирает индивидуальный комплекс лечебных процедур, в который входит постановка капельницы с растворами для детоксикации, препараты для стабилизации работы органов и нормализации психического состояния.
Изучить вопрос глубже – https://narcolog-na-dom-sankt-peterburg000.ru/
Комплексная терапия при выводе из запоя на дому включает в себя два основных направления: медикаментозную детоксикацию и психологическую поддержку. Такой подход позволяет добиться быстрого и устойчивого эффекта, минимизируя риск осложнений и обеспечивая долгосрочную ремиссию.
Получить дополнительную информацию – https://narcolog-na-dom-ufa000.ru/narkolog-na-dom-ufa-czeny
как купить диплом проведенный как купить диплом проведенный .
подключение интернета по адресу
domashij-internet-nizhnij-novgorod006.ru
какие провайдеры по адресу
Запой – серьезная угроза для организма! Круглосуточная наркологическая помощь в Волгоградской области – это спасение! Мы работаем 24/7, чтобы вы могли получить помощь, когда она вам нужна больше всего. Наш подход – оперативно, безопасно и с учетом ваших особенностей. Мы работаем быстро и качественно, чтобы помочь вам как можно скорее. Мы проведем детоксикацию и стабилизируем ваше состояние в комфортных условиях. Мы оцениваем ваше состояние, чтобы подобрать оптимальное лечение.
Изучить вопрос глубже – вывод из запоя
Запой – это крайняя степень алкоголизма, требующая профессионального вмешательства. Нарколог на дом в Волгограде – ваш выбор. Лечение на дому помогает избежать стресса и сохранить анонимность, получив необходимую помощь. Важно как можно быстрее начать лечение, чтобы избежать токсического воздействия алкоголя на организм. Лечение на дому направлено на очищение организма, восстановление баланса и нормальную работу органов. Для достижения долгосрочного результата важно сочетать медикаментозную терапию и психологическую поддержку. Начинаем с детоксикации, используя капельницы и современные препараты.
Углубиться в тему – вывод из запоя на дому волгоград цены
Приобрести диплом на заказ в столице можно используя официальный сайт компании. reachengine.online/employer/diploms-ukraine
Клиника «ВоронежМед» обеспечивает выезд нарколога на дом в любое время суток, включая праздники и выходные. Анонимность достигается за счёт минимального контакта с персоналом клиники и отсутствия бумажной волокиты. Все этапы лечения согласовываются только с пациентом или доверенным лицом, а сведения о визите не передаются третьим лицам.
Ознакомиться с деталями – вызвать капельницу от запоя воронеж
Вызов нарколога на дом в Каменске-Уральском обеспечивает безопасность пациента, исключая необходимость посещения медицинского учреждения, что особенно актуально при тяжелом состоянии или психологическом сопротивлении. Такая помощь включает в себя детоксикацию, купирование абстинентного синдрома и консультации по дальнейшему лечению.
Детальнее – нарколог на дом цена
После завершения процедур пациенту предоставляется подробная консультация с рекомендациями по дальнейшему восстановлению и профилактике повторных случаев зависимости.
Детальнее – https://narcolog-na-dom-novosibirsk00.ru/narkolog-na-dom-kruglosutochno-novosibirsk/
A person essentially help to make severely articles I’d state.
This is the very first time I frequented your web page and so far?
I amazed with the analysis you made to make this actual put up
extraordinary. Excellent process!
В нашей клинике используются только эффективные и безопасные препараты, что гарантирует вам быстрое восстановление и минимальные риски.
Узнать больше – https://kapelnica-ot-zapoya-irkutsk3.ru/kapelnica-ot-zapoya-na-domu-v-irkutske
Первый этап лечения — это детоксикация организма. При помощи капельничного введения специализированных препаратов достигается быстрый вывод токсинов, что позволяет стабилизировать обменные процессы и восстановить нормальное функционирование печени, почек и сердечно-сосудистой системы.
Получить дополнительную информацию – нарколог на дом недорого в уфе
В-третьих, поддержка является критически важным компонентом на пути к выздоровлению. Мы предлагаем программы, которые продолжаются даже после завершения основного курса лечения. Пациенты имеют возможность участвовать в регулярных встречах, где они могут делиться своими успехами и получать помощь от специалистов.
Получить больше информации – поставить капельницу от запоя
Запой – это серьезная угроза для здоровья. Немедленно вызывайте нарколога на дом в Волгограде! Нарколог приедет к вам быстро, сохранит анонимность и подберет индивидуальное лечение. Мы быстро выведем токсины и вернем вам хорошее самочувствие. В любое время дня и ночи мы готовы приехать и начать лечение. Мы сочетаем медикаменты и психологическую поддержку для успешного лечения. Первый этап лечения – избавление от токсинов с помощью лекарств.
Разобраться лучше – http://vyvod-iz-zapoya-volgograd00.ru/vyvod-iz-zapoya-kapelnicza-volgograd/
Затяжной запой опасен для жизни. Врачи наркологической клиники в Химках проводят срочный вывод из запоя — на дому или в стационаре. Анонимно, безопасно, круглосуточно.
Углубиться в тему – вывод из запоя круглосуточно в химках
Миссия нашей клиники заключается в оказании высококачественной помощи людям, страдающим от зависимостей. Мы стремимся создать безопасное и поддерживающее пространство для лечения, где каждый пациент получает необходимую поддержку и понимание. Наша задача — не только помочь избавиться от зависимости, но и вернуть полноценную жизнедеятельность человека, восстановив его социальные связи и жизненные ориентиры.
Детальнее – https://kapelnica-ot-zapoya-irkutsk2.ru/
лечение запоя
https://vivod-iz-zapoya-chelyabinsk001.ru
вывод из запоя
Процедура детоксикации занимает от 40 минут до 2 часов. После её завершения врач консультирует пациента и родственников, даёт рекомендации по дальнейшему лечению и профилактике повторных запоев.
Детальнее – нарколог на дом круглосуточно санкт-петербург
На сайте https://chemodantour.ru/visa-china/ заполните опросник на визу. Важно иметь в виду то, что жителям России обязательно потребуется виза для того, чтобы посетить КНР. На портале ознакомьтесь с тем, когда и как работает консульство КНР. Сроки оформления визы различные. Но в среднем не превышают 7 дней с того дня, как вы подали документы. Но также можно оформить все необходимые документы и за 3 рабочих дня. Доступно и срочное оформление визы – в течение дня. С расценками на такие услуги ознакомьтесь на портале.
Сразу после поступления вызова специалист прибывает на дом для проведения первичного осмотра. На данном этапе нарколог:
Получить больше информации – нарколог на дом вывод из запоя рязань
Есть ситуации, когда вызов врача на дом становится не просто желателен, а жизненно необходим. Если зависимый человек не способен самостоятельно прекратить употребление алкоголя или наркотиков, а его самочувствие заметно ухудшается, необходимо незамедлительно обратиться за медицинской помощью. Поводом для вызова нарколога служат следующие опасные симптомы:
Исследовать вопрос подробнее – врач нарколог на дом новосибирск.
I like the valuable information you supply for
your articles. I will bookmark your blog and
check once more right here regularly. I am moderately certain I’ll be informed many new stuff
proper right here! Best of luck for the following!
Желаете посмотреть фильмы, сериалы, мультфильмы, аниме, ТВ программы онлайн в высоком качестве и бесплатно? Посетите https://kinogo0.net/ – смотреть лучшие новинки кино и прочих жанров, в том числе 2025, года бесплатно в хорошем качестве можно у нас. Огромная и лучшая коллекция. Каждый найдет то, что ему нравится.
где купить аттестат за 11 класс хабаровск где купить аттестат за 11 класс хабаровск .
Близкий человек в запое? Не ждите ухудшения. Обратитесь в клинику — здесь проведут профессиональный вывод из запоя с последующим восстановлением организма.
Выяснить больше – нарколог вывод из запоя город химки
После первичной диагностики начинается активная фаза медикаментозного вмешательства. Современные препараты вводятся капельничным методом, что позволяет оперативно снизить концентрацию токсинов в крови и восстановить нормальные обменные процессы. Этот этап критически важен для стабилизации работы внутренних органов, таких как печень, почки и сердце.
Подробнее тут – https://narcolog-na-dom-ryazan0.ru/vrach-narkolog-na-dom-ryazan/
Heya this is kinda of off topic but I was wanting to know if blogs use WYSIWYG editors or if you have to manually code with HTML. I’m starting a blog soon but have no coding skills so I wanted to get guidance from someone with experience. Any help would be greatly appreciated!
Chauffeur service near me
Hmm it seems like your blog ate my first comment (it was super long)
so I guess I’ll just sum it up what I submitted and say,
I’m thoroughly enjoying your blog. I too am an aspiring blog blogger
but I’m still new to the whole thing. Do you have any points for rookie blog writers?
I’d definitely appreciate it.
Лечение зависимости требует не только физической детоксикации, но и работы с психоэмоциональным состоянием пациента. Психотерапевтическая поддержка помогает выявить глубинные причины зависимости, снизить уровень стресса и сформировать устойчивые навыки самоконтроля, что существенно снижает риск рецидивов.
Подробнее – нарколог на дом недорого уфа
Алкогольная и наркотическая зависимости требуют незамедлительного медицинского вмешательства. Длительные запои или острое отравление могут привести к тяжелым осложнениям и серьезным проблемам со здоровьем. Клиника «МедТрезвость» в Санкт-Петербурге предлагает квалифицированную наркологическую помощь прямо на дому, обеспечивая полную конфиденциальность и безопасность пациента. Наши специалисты оперативно выезжают по адресу, проводят все необходимые процедуры и помогают максимально быстро стабилизировать состояние пациента в комфортных домашних условиях.
Подробнее тут – запой нарколог на дом в санкт-петербурге
Первым этапом лечения является медицинская детоксикация, которая направлена на удаление токсинов из организма и стабилизацию физического состояния пациента. Мы используем современные методики, которые помогают минимизировать симптомы абстиненции, такие как головная боль, тошнота и слабость, обеспечивая комфортное пребывание в клинике.
Детальнее – http://kapelnica-ot-zapoya-irkutsk2.ru/
Нельзя игнорировать первые признаки серьёзного алкогольного отравления: промедление повышает риск судорожных припадков, остановки дыхания и комы. Нарколог на дом в Реутове рекомендован при следующих симптомах:
Подробнее тут – https://vyvod-iz-zapoya-reutov4.ru/vyvod-iz-zapoya-stacionar-v-reutove/
Вызывать нарколога на дом рекомендуется при следующих состояниях:
Получить дополнительную информацию – нарколог на дом круглосуточно
Пациенты выбирают нашу клинику для срочного вызова врача-нарколога благодаря следующим важным преимуществам:
Подробнее – http://narcolog-na-dom-novosibirsk00.ru/narkolog-na-dom-kruglosutochno-novosibirsk/
Сегодня вопрос зависимостей становится все более актуальной. Если вы находитесь в поиске нарколога на дом в Туле, сайт narkolog-tula004.ru предоставляет широкий спектр наркологических услуг. Лечение зависимостей может быть непростым процессом, однако домашний нарколог обеспечивает помощь при алкоголизме и различным зависимостям в домашних условиях. Консультация нарколога – это основной шаг к излечению. Квалифицированные специалисты проведут диагностику зависимости, помогут составить программу реабилитации и предложат методы психотерапии для лечения зависимостей. Анонимное лечение гарантирует полную дискрецию, что особенно важно для многих пациентов. Медицинская помощь на дому позволяет не только удобно проходить терапию, но и получать поддержку родных, что играет ключевую роль в процессе восстановления. Профилактика зависимостей и возвращение к нормальной жизни после наркотиков также входят в комплекс услуг, предлагаемых специалистами. Обращайтесь за помощью на narkolog-tula004.ru, чтобы получить профессиональную помощь.
What’s Happening i am new to this, I stumbled upon this I
have found It absolutely helpful and it has
helped me out loads. I hope to give a contribution & aid other customers like
its helped me. Great job.
Based upon Marvel Comics’ most unconventional anti-hero дэдпул смотреть онлайн бесплатно
It’s an awesome article for all the web visitors; they will obtain advantage from
it I am sure.
All Marvel Universe Movies and TV Series Avengers дэдпул смотреть онлайн бесплатно
Запой — опасное состояние, которое стремительно приводит к тяжелым последствиям для организма. Обычные домашние методы восстановления при алкогольной интоксикации не только малоэффективны, но и небезопасны. Для быстрого и безопасного выведения токсинов требуется профессиональная помощь нарколога с применением капельницы от запоя.
Изучить вопрос глубже – капельница от запоя на дому московская область
Затяжной запой опасен для жизни. Врачи наркологической клиники в Химках проводят срочный вывод из запоя — на дому или в стационаре. Анонимно, безопасно, круглосуточно.
Подробнее можно узнать тут – наркология вывод из запоя город химки
Запой – серьезная угроза для организма! Круглосуточная наркологическая помощь в Волгоградской области – это спасение! Мы работаем 24/7, чтобы вы могли получить помощь, когда она вам нужна больше всего. Наш подход – оперативно, безопасно и с учетом ваших особенностей. Мы работаем быстро и качественно, чтобы помочь вам как можно скорее. Мы проведем детоксикацию и стабилизируем ваше состояние в комфортных условиях. Мы оцениваем ваше состояние, чтобы подобрать оптимальное лечение.
Разобраться лучше – http://vyvod-iz-zapoya-volgograd000.ru/vyvod-iz-zapoya-kruglosutochno-volgograd
Go site https://www.reptilien-glashaus.de/hallo-welt/
Xakerplus.com – сайт, где вы оперативно истинного профессионала отыщите и о его работе сможете отзывы прочитать. Мы публикуем полезную информацию. Зарегистрируйтесь прямо сейчас. Создавайте свои темы и участвуйте в обсуждениях. ищете хакеры профессионалы? Xakerplus.com/threads/uslugi-xakera-vzlom-tajnaja-slezhka.13001 – здесь опытный хакер предлагает анонимные услуги. Он сможет справиться с любым проектом. Если вам необходимо удалить что-либо или взломать, обратитесь смелее к нему, на электронную почту написав. Результат гарантирован!
Когда организм уже не может обходиться без алкоголя, возникает запой. Вызов нарколога на дом в Волгограде – это безопасно и эффективно. Нарколог приедет на дом, проведет детоксикацию и поможет стабилизировать состояние, не нарушая привычный ритм жизни. Своевременная помощь нарколога поможет избежать осложнений, вызванных запоем. Дома нарколог поможет очистить организм и восстановить его нормальную работу. Избавление от запоя на дому – это сочетание лекарств и психологической помощи. Сначала нужно очистить организм от токсинов, и в этом помогут специальные препараты.
Подробнее – https://vyvod-iz-zapoya-volgograd0.ru/vyvod-iz-zapoya-na-domu-volgograd
Нарколог измеряет пульс, артериальное давление, частоту дыхания, насыщение кислородом, а также уточняет историю употребления и наличие хронических заболеваний. Это позволяет оперативно скорректировать состав и скорость инфузии.
Подробнее можно узнать тут – капельница от запоя наркология
Согласно данным Федерального наркологического центра, своевременный выезд врача снижает риск осложнений и повторных госпитализаций.
Выяснить больше – вызов нарколога на дом свердловская область
Автопитер является крупным интернет-магазином автозапчастей. Предоставляем приемлемые цены, вежливое и грамотное обслуживание, большой выбор и отменное качество. Стараемся удобно располагать наши пункты самовывоза. https://autopiter.kg – здесь заказы принимаются и обрабатываются круглосуточно. О предлагаемых запчастях мы все знаем. Готовы предоставить вам детальную информацию о любом товаре. Наш интернет-магазин – это верный выбор автовладельца. Среди наших клиентов будем рады вас видеть!
В Химках решение есть — наркологическая клиника. Здесь помогают людям выйти из запоя без страха и осуждения. Всё анонимно, грамотно и с заботой о каждом пациенте.
Получить дополнительные сведения – вывод из запоя на дому цена
После вызова врач клиники «ЗдравЦентр» прибывает к пациенту в течение 30–60 минут. Он проводит первичный осмотр, оценивает степень тяжести алкогольной интоксикации, измеряет пульс, давление, уровень кислорода и другие показатели здоровья. На основании этих данных составляется индивидуальный план лечения.
Детальнее – капельница от запоя москва
Great blog you’ve got here.. It’s hard to find excellent writing like yours nowadays.
I seriously appreciate individuals like you! Take care!!
Запой – это серьезная угроза для здоровья. Немедленно вызывайте нарколога на дом в Волгограде! Нарколог приедет к вам быстро, сохранит анонимность и подберет индивидуальное лечение. Мы быстро выведем токсины и вернем вам хорошее самочувствие. В любое время дня и ночи мы готовы приехать и начать лечение. Мы сочетаем медикаменты и психологическую поддержку для успешного лечения. Первый этап лечения – избавление от токсинов с помощью лекарств.
Разобраться лучше – вывод из запоя цена волгоград
В новосибирске множество провайдеров интернета осуществляют интернет-услуги для коммерческих организаций. При выборе провайдера необходимо учитывать скорость интернета и качество связи. Посмотрим какие провайдеры обслуживают территории новосибирска и предоставляют оптимальные тарифы на интернет. какие провайдеры обслуживают адрес новосибирск Хорошие провайдеры гарантируют стабильное соединение и высокую скорость доступа в интернет. Оптоволоконный интернет в новосибирске – оптимальный выбор для бизнеса, желающих добиться высокой эффективности. Беспроводные технологии тоже предлагаются, но оптоволокно обеспечивает значительно большую производительность. Пользователи могут ознакомиться с мнения о провайдерах, чтобы сделать осознанный выбор. Техническая поддержка играет важную роль в гарантии бесперебойной работы. Для бизнеса стоит рассмотреть корпоративный интернет, который предоставляет индивидуальные условия и тарифы на интернет, подходящие для потребностей компаний.
Вызов врача-нарколога на дом в Санкт-Петербурге начинается с детального осмотра и оценки состояния пациента. Врач измеряет давление, пульс, уровень кислорода в крови и определяет степень интоксикации.
Разобраться лучше – вызов врача нарколога на дом в санкт-петербурге
Чем раньше проведена детоксикация, тем меньше риск развития серьезных последствий, таких как инфаркт, инсульт, алкогольный психоз, цирроз печени.
Получить дополнительную информацию – поставить капельницу от запоя
На этом этапе врач детально выясняет, как долго продолжается запой, какие симптомы наблюдаются, и имеются ли сопутствующие заболевания. Точный анализ информации помогает оперативно определить степень интоксикации и подобрать оптимальные методы детоксикации, что является ключом к предотвращению дальнейших осложнений.
Узнать больше – http://narcolog-na-dom-ryazan00.ru/vyzov-narkologa-na-dom-ryazan/https://narcolog-na-dom-ryazan00.ru
Современные методы лечения при выводе из запоя включают как медикаментозную детоксикацию, так и психологическую реабилитацию. В Уфе наркологи используют капельничное введение лекарственных средств, которые помогают быстро вывести токсины, нормализовать обмен веществ и стабилизировать работу внутренних органов. Одновременно с этим проводится психологическая поддержка для снижения эмоционального стресса, связанного с запоем.
Детальнее – http://narcolog-na-dom-ufa0.ru
Fastidious replies in return of this matter with solid arguments and explaining all concerning that.
Howdy! I just wish to give you a huge thumbs up for the great info you have got right here on this post.
I will be coming back to your site for more soon.
Very great post. I simply stumbled upon your weblog and wished
to say that I have truly loved surfing around your weblog posts.
After all I will be subscribing in your rss feed and I hope you write once more soon!
Клиника “Обновление” также активно занимается просветительской деятельностью. Мы организуем семинары и лекции, которые помогают обществу лучше понять проблемы зависимостей, их последствия и пути решения. Повышение осведомленности является важным шагом на пути к улучшению ситуации в этой области.
Детальнее – https://kapelnica-ot-zapoya-irkutsk.ru/kapelnica-ot-zapoya-cena-v-irkutske
Поддержка — ключевой элемент на пути к выздоровлению. Мы предлагаем программы, которые продолжаются даже после завершения основного курса лечения. Пациенты имеют возможность участвовать в регулярных встречах с психологами и наркологами, где они могут делиться своими успехами и получать необходимую помощь.
Получить дополнительные сведения – https://kapelnica-ot-zapoya-irkutsk2.ru/kapelnica-ot-zapoya-anonimno-v-irkutske/
купить диплом спб занесением реестр купить диплом спб занесением реестр .
Обращение за помощью на дому имеет ряд неоспоримых преимуществ, особенно для тех, кто ценит конфиденциальность и стремится избежать дополнительных стрессовых факторов, связанных с посещением клиники:
Подробнее – https://narcolog-na-dom-ufa00.ru
Автоматизированные системы дозирования обеспечивают точное введение лекарственных средств, что минимизирует риск передозировки и побочных эффектов. Постоянный мониторинг жизненных показателей позволяет оперативно корректировать терапию в режиме реального времени, обеспечивая максимальную безопасность процедуры.
Подробнее можно узнать тут – https://narcolog-na-dom-ufa000.ru/narkolog-na-dom-czena-ufa
вывод из запоя
vivod-iz-zapoya-chelyabinsk002.ru
вывод из запоя круглосуточно челябинск
Клиника “Обновление” также активно занимается просветительской деятельностью. Мы организуем семинары и лекции, которые помогают обществу лучше понять проблемы зависимостей, их последствия и пути решения. Повышение осведомленности является важным шагом на пути к улучшению ситуации в этой области.
Выяснить больше – https://kapelnica-ot-zapoya-irkutsk.ru/
На сайте http://kinoman-hds.pro/ вы найдете огромное количество интересных, любопытных фильмов, которые будет интересно посмотреть каждому киноману. Все фильмы поделены по категориям, жанрам. Здесь вы найдете драмы, детективы, вестерн, военные, истории, криминал, комедии. Все фильмы находятся в высоком разрешении, с качественным звуком. Имеется кино про врачей, школу, любовь, маньяков, что позволит подобрать именно то, что нужно. Представлены фильмы, сериалы как за прошлый, так и текущий года. Вас обязательно заинтересуют дорамы.
Greate post. Keep posting such kind of information on your site.
Im really impressed by your site.
Hello there, You have done a great job. I will certainly digg it and for my
part recommend to my friends. I am confident they will be benefited from this website.
После звонка специалист клиники «ВитаЛайн» оперативно отправляется по указанному адресу и обычно прибывает в течение 30–60 минут. На месте врач сразу проводит детальную диагностику, оценивая состояние пациента: проверяет пульс, давление, сатурацию, степень интоксикации и наличие хронических болезней. На основании результатов осмотра нарколог разрабатывает индивидуальную схему терапии.
Разобраться лучше – vyzvat-narkologa-na-dom novosibirsk
Качественная детоксикация помогает быстро стабилизировать состояние пациента, снять острые симптомы и минимизировать риск возможных осложнений.
Подробнее можно узнать тут – врач нарколог на дом
Когда организм на пределе, важна срочная помощь в Химках — это команда опытных наркологов, которые помогут быстро и мягко выйти из запоя без вреда для здоровья.
Выяснить больше – vyvod-iz-zapoya-klinika himki
Пациенты выбирают нашу клинику для срочного вызова врача-нарколога благодаря следующим важным преимуществам:
Исследовать вопрос подробнее – https://narcolog-na-dom-novosibirsk00.ru/narkolog-na-dom-kruglosutochno-novosibirsk
Wow, wonderful blog layout! How lengthy have you been blogging
for? you made running a blog glance easy. The overall glance of your website is excellent,
as smartly as the content material!
Проблемы с алкоголем или наркотиками могут застать врасплох и привести к серьезным последствиям для организма, психического состояния и жизни пациента. Самостоятельные попытки выйти из запоя или преодолеть абстинентный синдром без медицинской поддержки редко оказываются эффективными и могут представлять реальную опасность для здоровья. Именно в таких ситуациях клиника «АльфаНаркология» предлагает услугу вызова нарколога на дом в Санкт-Петербурге и Ленинградской области. Наши специалисты оперативно реагируют на обращение, оказывают квалифицированную помощь и обеспечивают полную конфиденциальность лечения.
Ознакомиться с деталями – narkolog-na-dom-czena sankt-peterburg
В нашей клинике “Сила воли” в Иркутске вы можете получить помощь как в стационаре, так и на дому. Мы предлагаем два вида услуг:
Изучить вопрос глубже – капельница от запоя на дому в иркутске
купить аттестаты за 11 класс 2021 год https://arus-diplom22.ru/ .
В течение процедуры пациент находится под непрерывным наблюдением: внутривенные капельницы с регидратационными растворами, витаминно-минеральными комплексами и гепатопротекторами обеспечивают восстановление функций печени, нормализацию обменных процессов и поддержку работы сердечно-сосудистой системы. При необходимости к лечению привлекаются узкопрофильные врачи — кардиолог, невролог или терапевт — что делает процесс максимально комплексным. По завершении выведения из запоя врач предоставляет подробный план поддерживающей терапии с рекомендациями по питанию, питьевому режиму и графику повторных консультаций.
Разобраться лучше – vrach vyvod iz zapoya
Специалист уточняет, сколько времени продолжается запой, какой тип алкоголя употребляется, а также наличие сопутствующих заболеваний. Тщательный анализ этих данных помогает определить оптимальные методы детоксикации и скорректировать терапевтическую стратегию для минимизации риска осложнений.
Детальнее – выезд нарколога на дом рязань
Проблема зависимости от алкоголя, наркотиков и азартных игр остается одной из наиболее острых в современном обществе. Эти состояния оказывают значительное воздействие не только на здоровье самого человека, но и на его семью, друзей и общественные связи. Наркологическая клиника “Восстановление души” предлагает широкий спектр услуг для тех, кто борется с различными формами зависимости, такими как алкоголизм, наркомания и игромания. Наша цель — предоставить комплексный подход к лечению, что обеспечивает высокие показатели успешности среди наших пациентов.
Исследовать вопрос подробнее – https://kapelnica-ot-zapoya-irkutsk2.ru/kapelnica-ot-zapoya-v-stacionare-v-irkutske
Ищете экскурсии Казани? Посетите сайт https://to-kazan.ru/tours/ekskursii-kazan и вы найдете огромный выбор экскурсий, которые вы сможете заказать с гидом, а также узнать все актуальные цены на 2025 год. Действуют акции и скидки! Подробнее на сайте.
Please let me know if you’re looking for a article writer for your site.
You have some really great posts and I think I would
be a good asset. If you ever want to take some of the load off,
I’d really like to write some articles for your blog in exchange for a link back
to mine. Please blast me an email if interested.
Cheers!
сестринское дело купить диплом сестринское дело купить диплом .
Click this link https://www.tecnostampa-to.com/2017/11/25/chi-siamo-2/
Заказать диплом вы можете через сайт компании. notebooks.ru/forum/user/165604
Ищете ковры, дорожки, паласы в Минске или с доставкой по Беларуси? Посетите сайт https://kovertut.by/ и вы найдете огромный каталог продукции по самым выгодным ценам. У нас также постоянно появляются новинки и действуют акции и распродажи. Просто загляните в каталог – такого разнообразия вы не найдете нигде!
Запой – это очень опасно! Круглосуточная помощь нарколога в Волгоградской области – ваш шанс выжить. Мы оказываем помощь круглосуточно, чтобы вы могли начать лечение в любой момент. Мы обеспечиваем оперативное вмешательство, индивидуальный подход и высокий уровень безопасности. Служба круглосуточного вывода из запоя работает оперативно и надежно. При ухудшении состояния, мы готовы выехать на дом или принять вас в клинике для детоксикации. Начинаем с диагностики: сбор анамнеза, измерение показателей и оценка степени интоксикации.
Узнать больше – https://vyvod-iz-zapoya-volgograd000.ru/vyvod-iz-zapoya-na-domu-volgograd
Самостоятельно выйти из запоя — почти невозможно. В Химках врачи клиники проводят медикаментозный вывод из запоя с круглосуточным выездом. Доверяйте профессионалам.
Детальнее – вывод из запоя круглосуточно в химках
На этом этапе нарколог выясняет, какие лекарства принимались ранее, есть ли аллергии, хронические заболевания, а также уточняет объём и длительность употребления алкоголя. Это позволяет скорректировать состав инфузионных растворов.
Получить дополнительные сведения – http://kapelnica-ot-zapoya-voronezh.ru
Экстренная помощь при алкоголизме предотвращает развитие осложнений и содействует улучшению здоровья. Курс лечения алкоголизма требует внимательного подхода и может включать реабилитацию наркоманов. Визит к врачу способствует разработке индивидуального лечебного плана. Не откладывайте вызов врача – здоровье важнее всего! вывод из запоя тула
Обеспечение своевременной наркологической помощи с выездом на дом в Каменске-Уральском — важный аспект комплексного лечения алкогольной и наркотической зависимости. Услуга вызова нарколога на дом позволяет получить квалифицированную медицинскую помощь в комфортных условиях, что снижает стресс и способствует более быстрому восстановлению.
Получить дополнительные сведения – выезд нарколога на дом
Лечение зависимости требует не только физической детоксикации, но и работы с психоэмоциональным состоянием пациента. Психотерапевтическая поддержка помогает выявить глубинные причины зависимости, снизить уровень стресса и сформировать устойчивые навыки самоконтроля, что существенно снижает риск рецидивов.
Получить дополнительные сведения – http://narcolog-na-dom-ufa000.ru/narkolog-na-dom-kruglosutochno-ufa/
Запой – критическая фаза зависимости, когда организм не может регулировать потребление алкоголя. Нарколог поможет провести детоксикацию и стабилизировать состояние в привычной обстановке, сохраняя конфиденциальность. Быстрое вмешательство при запое очень важно, чтобы избежать серьезных последствий для здоровья. Нарколог на дому поможет вывести токсины, восстановить водно-электролитный баланс и нормализовать работу органов. Вывод из запоя на дому включает медикаментозную терапию и психологическую поддержку для долгосрочной ремиссии. Сначала очищают организм от токсинов с помощью внутривенных инфузий и других современных препаратов.
Получить дополнительные сведения – вывод из запоя круглосуточно волгоград
Piece of writing writing is also a excitement,
if you be acquainted with after that you can write or else
it is complicated to write.
Когда организм на пределе, важна срочная помощь в Химках — это команда опытных наркологов, которые помогут быстро и мягко выйти из запоя без вреда для здоровья.
Подробнее тут – вывод из запоя круглосуточно город химки
Запой – это серьезная угроза для здоровья. Немедленно вызывайте нарколога на дом в Волгограде! Нарколог приедет к вам быстро, сохранит анонимность и подберет индивидуальное лечение. Мы быстро выведем токсины и вернем вам хорошее самочувствие. В любое время дня и ночи мы готовы приехать и начать лечение. Мы сочетаем медикаменты и психологическую поддержку для успешного лечения. Первый этап лечения – избавление от токсинов с помощью лекарств.
Подробнее можно узнать тут – нарколог на дом вывод из запоя волгоград
It’s genuinely very complex in this full of activity life to listen news on TV,
therefore I simply use the web for that reason, and take the
most up-to-date news.
Запой — опасное состояние, которое стремительно приводит к тяжелым последствиям для организма. Обычные домашние методы восстановления при алкогольной интоксикации не только малоэффективны, но и небезопасны. Для быстрого и безопасного выведения токсинов требуется профессиональная помощь нарколога с применением капельницы от запоя.
Углубиться в тему – капельница от запоя
Сразу после поступления вызова специалист прибывает на дом для проведения первичного осмотра. На данном этапе нарколог:
Подробнее – нарколог на дом цена рязань
Вызов врача-нарколога на дом в Санкт-Петербурге начинается с детального осмотра и оценки состояния пациента. Врач измеряет давление, пульс, уровень кислорода в крови и определяет степень интоксикации.
Узнать больше – вызов врача нарколога на дом в санкт-петербурге
После поступления вызова наш нарколог выезжает к пациенту в кратчайшие сроки, прибывая по адресу в пределах 30–60 минут. Специалист начинает процедуру с подробного осмотра и диагностики, измеряя ключевые показатели организма: артериальное давление, частоту пульса, насыщенность кислородом и собирая подробный анамнез.
Исследовать вопрос подробнее – нарколог на дом новосибирск.
Как выбрать интернет-провайдера в новосибирске, задача не из легких, так как на рынке представлено много провайдеров, предлагающих разные виды связи. При выборе важно учитывать некоторые важные моменты. Во-первых, узнайте о скорости интернета. Провайдеры предлагают разные тарифы на интернет, которые могут существенно отличаться по скорости. Определите, какая скорость вам нужна для комфортного доступа в интернет. Во-вторых, проверьте стабильность соединения. Отзывы о провайдерах помогут понять, насколько компания зарекомендовала себя и как быстро реагирует техническая поддержка. Третий аспект — договорные условия; Узнайте о скрытых комиссиях и условиях расторжения контракта. Также стоит сравнить провайдеров по доступным услугам : оптоволоконные тарифы, мобильный интернет и домашний интернет. Не забывайте про тарифные планы и специальные предложения провайдеров. Сравнительный анализ провайдеров поможет определиться с выбором с учетом всех ваших ожиданий. domashij-internet-novosibirsk005.ru
купить аттестат за 11 классов в красноярске купить аттестат за 11 классов в красноярске .
Алкогольная и наркотическая зависимости требуют незамедлительного медицинского вмешательства. Длительные запои или острое отравление могут привести к тяжелым осложнениям и серьезным проблемам со здоровьем. Клиника «МедТрезвость» в Санкт-Петербурге предлагает квалифицированную наркологическую помощь прямо на дому, обеспечивая полную конфиденциальность и безопасность пациента. Наши специалисты оперативно выезжают по адресу, проводят все необходимые процедуры и помогают максимально быстро стабилизировать состояние пациента в комфортных домашних условиях.
Подробнее можно узнать тут – https://narcolog-na-dom-sankt-peterburg0.ru/
Проблема зависимости от алкоголя, наркотиков и азартных игр остается одной из наиболее острых в современном обществе. Эти состояния оказывают значительное воздействие не только на здоровье самого человека, но и на его семью, друзей и общественные связи. Наркологическая клиника “Восстановление души” предлагает широкий спектр услуг для тех, кто борется с различными формами зависимости, такими как алкоголизм, наркомания и игромания. Наша цель — предоставить комплексный подход к лечению, что обеспечивает высокие показатели успешности среди наших пациентов.
Подробнее можно узнать тут – http://kapelnica-ot-zapoya-irkutsk2.ru/kapelnica-ot-zapoya-na-domu-v-irkutske/
лечение запоя
vivod-iz-zapoya-chelyabinsk003.ru
вывод из запоя круглосуточно челябинск
После вызова врач клиники «ЗдравЦентр» прибывает к пациенту в течение 30–60 минут. Он проводит первичный осмотр, оценивает степень тяжести алкогольной интоксикации, измеряет пульс, давление, уровень кислорода и другие показатели здоровья. На основании этих данных составляется индивидуальный план лечения.
Углубиться в тему – капельница от запоя на дому цена
Обращение за помощью на дому имеет ряд значительных преимуществ, которые делают данный метод лечения предпочтительным для многих пациентов:
Подробнее – https://narcolog-na-dom-ufa0.ru/narkolog-na-dom-kruglosutochno-ufa/
После поступления вызова нарколог клиники «АльфаНаркология» оперативно выезжает по указанному адресу. На месте врач проводит первичную диагностику, оценивая степень интоксикации, физическое и психологическое состояние пациента. По результатам осмотра врач подбирает индивидуальный комплекс лечебных процедур, в который входит постановка капельницы с растворами для детоксикации, препараты для стабилизации работы органов и нормализации психического состояния.
Подробнее можно узнать тут – выезд нарколога на дом санкт-петербург
После звонка специалист клиники «ВитаЛайн» оперативно отправляется по указанному адресу и обычно прибывает в течение 30–60 минут. На месте врач сразу проводит детальную диагностику, оценивая состояние пациента: проверяет пульс, давление, сатурацию, степень интоксикации и наличие хронических болезней. На основании результатов осмотра нарколог разрабатывает индивидуальную схему терапии.
Подробнее можно узнать тут – http://narcolog-na-dom-novosibirsk0.ru
Во-первых, мы фокусируемся на медицинской детоксикации, которая является первоочередной задачей при лечении зависимостей. Этот процесс позволяет удалить токсические вещества из организма и улучшить общее состояние пациента. Мы применяем современные методики, которые помогают минимизировать симптомы абстиненции и обеспечить комфортное пребывание в клинике.
Подробнее можно узнать тут – капельница от запоя иркутск.
Близкий человек в запое? Не ждите ухудшения. Обратитесь в клинику — здесь проведут профессиональный вывод из запоя с последующим восстановлением организма.
Получить больше информации – срочный вывод из запоя
Инфузионная терапия при запое основывается на принципе постепенной и контролируемой доставки лекарственных препаратов и питательных смесей непосредственно в кровеносное русло. Это позволяет:
Получить дополнительную информацию – https://kapelnica-ot-zapoya-voronezh2.ru/vyezd-na-dom-kapelnicza-ot-zapoya-v-voronezhe
кто купил диплом с занесением в реестр кто купил диплом с занесением в реестр .
Please let me know if you’re looking for a article author for your
blog. You have some really good posts and I believe I would
be a good asset. If you ever want to take some of the load off,
I’d love to write some content for your blog in exchange for a link back to mine.
Please shoot me an email if interested. Many thanks!
Процедура включает несколько этапов, направленных на выведение токсинов и восстановление нормальной работы организма.
Детальнее – http://kapelnica-ot-zapoya-moskva0.ru/kapelnicza-ot-zapoya-na-domu-msk/https://kapelnica-ot-zapoya-moskva0.ru
hello there and thank you for your info – I’ve certainly picked up something new from right here.
I did however expertise several technical issues using this website, as
I experienced to reload the web site a lot of times previous
to I could get it to load properly. I had been wondering if your hosting is OK?
Not that I am complaining, but slow loading instances times will very frequently affect
your placement in google and can damage your quality score if ads
and marketing with Adwords. Anyway I’m adding this RSS
to my e-mail and could look out for much more of
your respective fascinating content. Make sure you update this again soon.
Экстренное вмешательство необходимо, когда самостоятельное прекращение употребления алкоголя или наркотиков становится невозможным, а состояние пациента ухудшается. Основные показания включают:
Углубиться в тему – нарколог на дом недорого уфа
Блог https://panisolokha.com/ про жіночий світ, виховання дітей, затишок у домі, рецепти, догляд за тваринами та рослинами, сонник, привітання, подорожі. Корисні поради та ідеї для натхнення щодня.
Highly descriptive article, I enjoyed that bit. Will there be
a part 2?
Thanks for putting this together. As someone who writes
about online gambling and bonus trends, I’m always scouting for reliable deals — platforms like WFGaming Free are exactly
what many players look for.
It’s encouraging to find quality content that supports
players in making smart choices, especially with so many freedeposit options available lately.
Looking forward to your next post!
купить диплом с записью в реестре купить диплом с записью в реестре .
Among the films , you can find experimental films shot outside all canons бесславные ублюдки смотреть онлайн
It is perfect time to make some plans for the future and it is time to be happy.
I have read this post and if I could I want to suggest you some interesting things or advice.
Maybe you can write next articles referring to this article.
I want to read even more things about it!
На сайте https://misokmv.ru/ ознакомьтесь с детальной, подробной информацией, которая касается АНО ДПО «Международный институт современного образования». Здесь вы сможете оформить заявку на то, чтобы пройти качественное обучение и получить хорошее, востребованное образование. Регулярно в этом учебном заведении организуются увлекательные и разнообразные мероприятия. А если остались вопросы, то задайте их менеджеру через специальную форму. Регулярно на сайте выкладываются познавательные новости.
диплом купить в волгограде https://www.arus-diplom7.ru .
На сайте https://venttehnica.ru в огромном ассортименте представлены инфракрасные обогреватели, качественные и функциональные кондиционеры, тепловые завесы, конвекторы и многое другое. Вся продукция является надежной, практичной, отличается долгим сроком службы. Регулярно в магазине проходят акции, которые позволят совершить приобретение с экономией для своего бюджета. При необходимости воспользуйтесь профессиональной консультацией, которая поможет определиться с выбором. На всю технику даются гарантии.
Избавление от алкогольной зависимости в Туле — ключевой этап на пути избавления от алкогольной зависимости. Борьба с алкоголизмом начинается с программы детоксикации, которая помогает организму очищаться от токсинов. Важно обратиться за медицинской помощью при алкоголизме, чтобы избежать алкогольный синдром и другие осложнения . narkolog-tula006.ru После процесса детоксикации рекомендуется пройти курс реабилитации, где пациент получает психологическую помощь и поддержку при отказе от алкоголя. Анонимные алкоголики становятся поддержкой на этом пути . Программы восстановления включают советы по отказу от алкоголя и меры по предотвращению рецидивов. Адаптация в обществе после лечения и помощь родных играют ключевую роль в мотивации к трезвости .
Покупка дипломов ВУЗов В киеве — с печатями, подписями, приложением и возможностью архивной записи (по запросу).
Документ максимально приближен к оригиналу и проходит визуальную проверку.
Мы даем гарантию, что в случае проверки документа, подозрений не возникнет.
– Конфиденциально
– Доставка 3–7 дней
– Любая специальность
Уже более 3376 клиентов воспользовались услугой — теперь ваша очередь.
Купить диплом института — ответим быстро, без лишних формальностей.
Оформиление дипломов ВУЗов по всей Украине — с печатями, подписями, приложением и возможностью архивной записи (по запросу).
Документ максимально приближен к оригиналу и проходит визуальную проверку.
Мы гарантируем, что в случае проверки документа, подозрений не возникнет.
– Конфиденциально
– Доставка 3–7 дней
– Любая специальность
Уже более 1141 клиентов воспользовались услугой — теперь ваша очередь.
Купить диплом института высшего образования — ответим быстро, без лишних формальностей.
купить диплом о высшем образовании проведенный купить диплом о высшем образовании проведенный .
Дешевый интернет в новосибирске делается все более доступным благодаря множеству провайдеров‚ предлагающих разнообразные тарифы на интернет. На сайте domashij-internet-novosibirsk006.ru можно найти последние отзывы о провайдерах‚ что поможет выбрать оптимальный вариант. Сравнение тарифов на DSL интернет и оптоволоконный интернет демонстрирует‚ что оптоволоконные тарифы имеют более высокую скорость интернета и качество связи. Мобильный интернет также предлагает выгодные предложения‚ но необходимо учитывать‚ что надежность подключения может варьироваться. При выборе провайдера стоит учесть услуги связи‚ техническую поддержку и наличие акций и скидок. Интернет для дома должен обеспечивать доступ к сети без перебоев. Пользователи подчеркивают‚ что хороший интернет влияет на комфорт повседневной жизни.
вывод из запоя
vivod-iz-zapoya-cherepovec004.ru
вывод из запоя череповец
Оформиление дипломов ВУЗов по всей Украине — с печатями, подписями, приложением и возможностью архивной записи (по запросу).
Документ максимально приближен к оригиналу и проходит визуальную проверку.
Мы даем гарантию, что в случае проверки документа, подозрений не возникнет.
– Конфиденциально
– Доставка 3–7 дней
– Любая специальность
Уже более 1304 клиентов воспользовались услугой — теперь ваша очередь.
Уточнить здесь — ответим быстро, без лишних формальностей.
Этот текст сочетает в себе элементы познавательного рассказа и аналитической подачи информации. Читатель получает доступ к уникальным данным, которые соединяют прошлое с настоящим и открывают двери в будущее.
Смотри, что ещё есть – https://excellentservices.com.au/5-best-things-to-remember-when-hiring-upholstery-cleaning-services
Мы предлагаем оформление дипломов ВУЗов по всей Украине — с печатями, подписями, приложением и возможностью архивной записи (по запросу).
Документ максимально приближен к оригиналу и проходит визуальную проверку.
Мы даем гарантию, что в случае проверки документа, подозрений не возникнет.
– Конфиденциально
– Доставка 3–7 дней
– Любая специальность
Уже более 1943 клиентов воспользовались услугой — теперь ваша очередь.
Купить диплом специалиста недорого — ответим быстро, без лишних формальностей.
Мы предлагаем оформление дипломов ВУЗов по всей Украине — с печатями, подписями, приложением и возможностью архивной записи (по запросу).
Документ максимально приближен к оригиналу и проходит визуальную проверку.
Мы даем гарантию, что в случае проверки документа, подозрений не возникнет.
– Конфиденциально
– Доставка 3–7 дней
– Любая специальность
Уже более 2710 клиентов воспользовались услугой — теперь ваша очередь.
Открыть — ответим быстро, без лишних формальностей.
Эта публикация завернет вас в вихрь увлекательного контента, сбрасывая стереотипы и открывая двери к новым идеям. Каждый абзац станет для вас открытием, полным ярких примеров и впечатляющих достижений. Подготовьтесь быть вовлеченными и удивленными каждый раз, когда продолжите читать.
Более того — здесь – https://granato.tv/?page_id=400
Этот текст призван помочь читателю расширить кругозор и получить практические знания. Мы используем простой язык, наглядные примеры и структурированное изложение, чтобы сделать обучение максимально эффективным и увлекательным.
Ознакомьтесь с аналитикой – https://www.fabspin.com/professional-carpet-cleaning-allergy-prevention
También puedes usar los videos de TikTok para fines de investigación o marketing.
Endlich ein natürlicher Detox-Tee, der hält, was er verspricht!
Besonders der Geschmack mit grünem Tee und Ingwer gefällt mir total.
Perfekt für meinen stressigen Alltag.
Go this link https://www.poutou2022.org/spip.php?page=article&id_article=119
В этой статье представлен занимательный и актуальный контент, который заставит вас задуматься. Мы обсуждаем насущные вопросы и проблемы, а также освещаем истории, которые вдохновляют на действия и изменения. Узнайте, что стоит за событиями нашего времени!
Информация доступна здесь – http://ahhmusic.ru
Эта информационная статья содержит полезные факты, советы и рекомендации, которые помогут вам быть в курсе последних тенденций и изменений в выбранной области. Материал составлен так, чтобы быть полезным и понятным каждому.
Секреты успеха внутри – https://mospill.ru
Цена капельницы от запоя в Иркутске зависит от ряда факторов, таких как выбор метода лечения (на дому или в стационаре), продолжительность лечения и степень тяжести состояния пациента. Для уточнения стоимости и записи на консультацию вы можете обратиться к нашим менеджерам, которые подробно расскажут о стоимости услуг и ответят на все ваши вопросы.
Изучить вопрос глубже – http://kapelnica-ot-zapoya-irkutsk3.ru
Remarkable! Its truly remarkable piece of writing, I have
got much clear idea about from this piece of writing.
Dofus chasse au tresor est un mini-jeu intégré dans Dofus qui consiste à résoudre des énigmes pour trouver des coffres cachés.
Sweet blog! I found it while surfing around on Yahoo News.
Do you have any suggestions on how to get listed in Yahoo
News? I’ve been trying for a while but I never seem to get there!
Many thanks
Предлагаем вашему вниманию интересную справочную статью, в которой собраны ключевые моменты и нюансы по актуальным вопросам. Эта информация будет полезна как для профессионалов, так и для тех, кто только начинает изучать тему. Узнайте ответы на важные вопросы и расширьте свои знания!
Ознакомьтесь с аналитикой – https://hoken.life-vision808.co.jp/hoken-logo-toumei-2
Как подчёркивает главный врач клинического отделения, «в условиях стационара мы можем оперативно реагировать на малейшие изменения в состоянии пациента, что критически важно при тяжёлых формах запоя».
Получить дополнительные сведения – http://vyvod-iz-zapoya-v-ryazani12.ru/
купить диплом с занесением в реестр краснодар купить диплом с занесением в реестр краснодар .
купить аттестат за 11 класс в иркутске arus-diplom10.ru .
где можно купить аттестат за 11 класс http://www.arus-diplom9.ru – где можно купить аттестат за 11 класс .
Ищете перила и ограждения недорого в Краснодаре и Ростове? Посетите https://xn—-etbhmpvi1i.xn--p1ai/ и вы найдете широкий ассортимент производимой продукции, а также установку и монтаж. Посмотрите на сайте все наши товары: лестничные ограждения, поручни, ограждения пандусов, ограждения для школ, садов, игровых зон и многое другое. Ознакомьтесь с нашим портфолио и материалами с которыми мы работаем.
Этот метод направлен на выявление и замену негативных мыслей и стереотипов поведения, связанных с потреблением алкоголя. Пациент учится отслеживать свои эмоциональные реакции и заменять деструктивные установки конструктивными стратегиями противостояния стрессу.
Получить дополнительные сведения – лечение алкоголизма сочи.
It’s very simple to find out any topic on net as compared to textbooks, as I found this post at this site.
Дополнительную информацию о методах социальной реабилитации можно найти в публикациях Фонда борьбы с наркоманией и алкоголизмом.
Разобраться лучше – https://narkologicheskaya-klinika-krasnodar0.ru/narkologicheskaya-klinika-anonimno-krasnodar
Питание организовано по системе «шведский стол» с блюдами, соответствующими медицинским диетам: щадящие супы, нежирное мясо, свежие овощи и кисломолочные продукты. Рацион составляют диетолог и врач-нарколог с учётом индивидуальных потребностей.
Получить дополнительную информацию – наркологическая клиника нарколог в сочи
В клинике применяются инновационные методы диагностики, включая лабораторные анализы и аппаратные исследования, которые позволяют выявить степень зависимости и сопутствующие патологии. Важным этапом является комплексный подход к лечению, включающий детоксикацию организма, психотерапию и медикаментозную поддержку.
Подробнее тут – https://narkologicheskaya-klinika-krasnodar00.ru/narkologicheskaya-klinika-anonimno-krasnodar/
лечение запоя череповец
vivod-iz-zapoya-cherepovec005.ru
лечение запоя череповец
В-третьих, поддержка является критически важным компонентом на пути к выздоровлению. Мы предлагаем программы, которые продолжаются даже после завершения основного курса лечения. Пациенты имеют возможность участвовать в регулярных встречах, где они могут делиться своими успехами и получать помощь от специалистов.
Изучить вопрос глубже – врач на дом капельница от запоя иркутск
Гидроизоляция зданий https://gidrokva.ru и сооружений любой сложности. Фундаменты, подвалы, крыши, стены, инженерные конструкции.
Реабилитация включает как амбулаторные, так и стационарные программы, адаптированные под индивидуальные потребности пациента. Применяется когнитивно-поведенческая терапия и групповые занятия, что способствует формированию устойчивой мотивации и предотвращению рецидивов. Подробнее о методах реабилитации доступно на портале Всемирной организации здравоохранения.
Подробнее тут – частная наркологическая клиника сочи.
Предлагаем вашему вниманию интересную справочную статью, в которой собраны ключевые моменты и нюансы по актуальным вопросам. Эта информация будет полезна как для профессионалов, так и для тех, кто только начинает изучать тему. Узнайте ответы на важные вопросы и расширьте свои знания!
Выяснить больше – https://tuldi.social/buecher
тарифы интернет и телевидение омск
domashij-internet-omsk004.ru
недорогой интернет омск
Основной этап, направленный на очищение организма от продуктов распада алкоголя и нормализацию функций внутренних органов. Применяются современные препараты с антиоксидантным и гепатопротекторным эффектом.
Подробнее можно узнать тут – лечение алкоголизма цена
Stream live Football events online. Stay updated with
upcoming matches, highlights, and schedules. Join the excitement with E2BET today!
Лечение алкоголизма в Краснодаре представляет собой комплекс мероприятий, направленных на полное восстановление физического и психологического состояния пациента. Этот процесс требует профессионального подхода, включающего диагностику, детоксикацию, терапию зависимости и реабилитацию. Информация о современных методах терапии доступна на официальном портале Минздрава РФ.
Получить больше информации – lechenie-alkogolizma-krasnodar00.ru/
«НаркоМед» основана группой узкопрофильных специалистов, чей опыт насчитывает более 15 лет в лечении зависимости. Клиника работает круглосуточно — вы можете рассчитывать на оперативное реагирование в любой час дня и ночи. Анонимность пациентов сохраняется на уровне медицинской тайны: персональные данные и диагноз не разглашаются.
Узнать больше – бесплатная наркологическая клиника
Нарколог на выезде — это вариант для тех, кто нуждается в помощи, но не может или не хочет идти в медицинское учреждение. Услуги нарколога в Москве включают консультацию нарколога на дому, что обеспечивает анонимное лечение и комфортные условия для пациента. Лечение зависимостей начинается с обследования и снятия абстиненции. narkolog-tula007.ru Квалифицированные специалисты предлагают услуги нарколога, которая включает медицинскую помощь при алкоголизме и психотерапию при зависимости. Процесс реабилитации наркозависимых также возможна на выезде, что позволяет вовлечь родственников в процесс поддержки. Профилактика рецидивов и непрерывная помощь имеют решающее значение для успешного выздоровления. Посещение врача-нарколога на дому может стать первым шагом к здоровой жизни.
Кроме того, наличие медицинской базы с возможностью круглосуточного мониторинга состояния пациента является дополнительным преимуществом. Это особенно важно на этапе детоксикации, когда организм испытывает серьезные нагрузки.
Получить дополнительные сведения – http://lechenie-narkomanii-yaroslavl0.ru/lechenie-narkomanii-i-alkogolizma-yaroslavl/
Продвижение социальных сетей https://vc.ru/smm-promotion
Наркологическая клиника в Екатеринбурге уделяет большое внимание психотерапевтическим методам. Индивидуальный подход к пациенту позволяет выявить причины и особенности зависимости, сформировать устойчивую мотивацию на лечение и отказ от вредных привычек.
Выяснить больше – https://narcologicheskaya-klinika-ekaterinburg00.ru/chastnaya-narkologicheskaya-klinika-v-ekaterinburge
Click site http://hasy.klack.org/guestbook.html
online kazino azerbaycan ilə yerli oyunçular üçün ən yaxşı platforma!
Первое, на что стоит обратить внимание — это профессиональный уровень сотрудников. Без квалифицированных наркологов, клинических психологов и психиатров реабилитационный процесс становится формальным и неэффективным.
Детальнее – наркологическая клиника нижний тагил
Цена капельницы от запоя в Иркутске зависит от ряда факторов, таких как выбор метода лечения (на дому или в стационаре), продолжительность лечения и степень тяжести состояния пациента. Для уточнения стоимости и записи на консультацию вы можете обратиться к нашим менеджерам, которые подробно расскажут о стоимости услуг и ответят на все ваши вопросы.
Подробнее – капельница от запоя иркутск
Покупка дипломов ВУЗов В киеве — с печатями, подписями, приложением и возможностью архивной записи (по запросу).
Документ максимально приближен к оригиналу и проходит визуальную проверку.
Мы даем гарантию, что в случае проверки документа, подозрений не возникнет.
– Конфиденциально
– Доставка 3–7 дней
– Любая специальность
Уже более 2671 клиентов воспользовались услугой — теперь ваша очередь.
Здесь — ответим быстро, без лишних формальностей.
Клиника “Обновление” также активно занимается просветительской деятельностью. Мы организуем семинары и лекции, которые помогают обществу лучше понять проблемы зависимостей, их последствия и пути решения. Повышение осведомленности является важным шагом на пути к улучшению ситуации в этой области.
Подробнее тут – https://kapelnica-ot-zapoya-irkutsk.ru/kapelnica-ot-zapoya-anonimno-v-irkutske
Когда запой становится критическим, оперативное вмешательство имеет решающее значение для спасения здоровья и предотвращения необратимых последствий. Во Владимире экстренная помощь нарколога на дому позволяет быстро начать лечение, не требуя госпитализации, что особенно важно для пациентов, нуждающихся в сохранении конфиденциальности и комфорте.
Ознакомиться с деталями – https://vyvod-iz-zapoya-vladimir000.ru/vyvod-iz-zapoya-anonimno-vladimir/
Поддержка — ключевой элемент на пути к выздоровлению. Мы предлагаем программы, которые продолжаются даже после завершения основного курса лечения. Пациенты имеют возможность участвовать в регулярных встречах с психологами и наркологами, где они могут делиться своими успехами и получать необходимую помощь.
Исследовать вопрос подробнее – вызвать капельницу от запоя на дому в иркутске
Нарколог выезжает в любое время суток, привозя мобильный кейс с инфузионными системами, растворами, принадлежностями для забора крови и экспресс-тестами. После прибытия проводится детальный осмотр и сбор дополнительных данных: ЭКГ-мониторинг, тесты на уровень глюкозы, электролитов и пр.
Детальнее – http://kapelnica-ot-zapoya-voronezh3.ru/vyezd-na-dom-kapelnicza-ot-zapoya-v-voronezhe/https://kapelnica-ot-zapoya-voronezh3.ru
rape girl porno
купить диплом с занесением в реестр барнаул купить диплом с занесением в реестр барнаул .
Оформиление дипломов ВУЗов по всей Украине — с печатями, подписями, приложением и возможностью архивной записи (по запросу).
Документ максимально приближен к оригиналу и проходит визуальную проверку.
Мы даем гарантию, что в случае проверки документа, подозрений не возникнет.
– Конфиденциально
– Доставка 3–7 дней
– Любая специальность
Уже более 3920 клиентов воспользовались услугой — теперь ваша очередь.
Купить диплом об образовании — ответим быстро, без лишних формальностей.
Специалист выясняет, как долго продолжается запой, какие симптомы наблюдаются, а также наличие сопутствующих заболеваний. Эти данные позволяют сформировать индивидуальный план лечения и выбрать оптимальные методы детоксикации.
Изучить вопрос глубже – http://vyvod-iz-zapoya-vladimir0.ru
Оформиление дипломов ВУЗов В киеве — с печатями, подписями, приложением и возможностью архивной записи (по запросу).
Документ максимально приближен к оригиналу и проходит визуальную проверку.
Мы даем гарантию, что в случае проверки документа, подозрений не возникнет.
– Конфиденциально
– Доставка 3–7 дней
– Любая специальность
Уже более 4316 клиентов воспользовались услугой — теперь ваша очередь.
Купить диплом института образования — ответим быстро, без лишних формальностей.
Перед оформлением вызова проводится предварительная телефонная консультация, позволяющая оценить тяжесть состояния и заранее подготовить необходимые препараты.
Подробнее – врач на дом капельница от запоя воронеж
Покупка дипломов ВУЗов по всей Украине — с печатями, подписями, приложением и возможностью архивной записи (по запросу).
Документ максимально приближен к оригиналу и проходит визуальную проверку.
Мы даем гарантию, что в случае проверки документа, подозрений не возникнет.
– Конфиденциально
– Доставка 3–7 дней
– Любая специальность
Уже более 1791 клиентов воспользовались услугой — теперь ваша очередь.
Перейти — ответим быстро, без лишних формальностей.
Оформиление дипломов ВУЗов по всей Украине — с печатями, подписями, приложением и возможностью архивной записи (по запросу).
Документ максимально приближен к оригиналу и проходит визуальную проверку.
Мы даем гарантию, что в случае проверки документа, подозрений не возникнет.
– Конфиденциально
– Доставка 3–7 дней
– Любая специальность
Уже более 4736 клиентов воспользовались услугой — теперь ваша очередь.
Купить диплом о образовании недорого — ответим быстро, без лишних формальностей.
Одним из ключевых аспектов является определение стадии зависимости, что можно подробнее изучить на официальном портале Министерства здравоохранения РФ. Там представлена актуальная информация о современных стандартах диагностики и лечения.
Изучить вопрос глубже – https://narkologicheskaya-klinika-krasnodar0.ru/
Этот метод направлен на выявление и замену негативных мыслей и стереотипов поведения, связанных с потреблением алкоголя. Пациент учится отслеживать свои эмоциональные реакции и заменять деструктивные установки конструктивными стратегиями противостояния стрессу.
Детальнее – наркологическое лечение алкоголизма
Алкогольная и наркотическая зависимости могут привести к тяжелым и опасным для жизни состояниям. Вызов нарколога становится необходимым, если:
Разобраться лучше – http://narcolog-na-dom-voronezh0.ru/zapoj-narkolog-na-dom-voronezh/https://narcolog-na-dom-voronezh0.ru
Питание организовано по системе «шведский стол» с блюдами, соответствующими медицинским диетам: щадящие супы, нежирное мясо, свежие овощи и кисломолочные продукты. Рацион составляют диетолог и врач-нарколог с учётом индивидуальных потребностей.
Углубиться в тему – платная наркологическая клиника
На сайте https://proshtor.ru/ воспользуйтесь онлайн-консультацией дизайнера, который на профессиональном уровне ответит на все вопросы. В этой компании вы сможете заказать пошив штор, выбрав такой дизайн, который вам нравится больше всего. При этом и материал вы сможете подобрать самостоятельно, чтобы результат максимально соответствовал ожиданиям. Выезд дизайнера осуществляется бесплатно. Прямо сейчас ознакомьтесь с портфолио, чтобы подобрать наиболее подходящее решение. Можно приобрести шторы, выполненные в любом стиле.
Анализ рынка услуг экстренной помощи в Тюмени позволяет выделить следующие ориентировочные цены:
Получить больше информации – вывод из запоя цена владимир
лечение запоя череповец
vivod-iz-zapoya-cherepovec006.ru
вывод из запоя
What i don’t realize is in truth how you are now not actually much
more smartly-preferred than you might be right now.
You’re so intelligent. You know therefore significantly relating to
this topic, produced me individually consider it from numerous varied angles.
Its like men and women aren’t involved until it’s something to do with Girl gaga!
Your individual stuffs great. At all times handle it up!
В клинике применяются инновационные методы диагностики, включая лабораторные анализы и аппаратные исследования, которые позволяют выявить степень зависимости и сопутствующие патологии. Важным этапом является комплексный подход к лечению, включающий детоксикацию организма, психотерапию и медикаментозную поддержку.
Изучить вопрос глубже – https://narkologicheskaya-klinika-krasnodar00.ru/chastnaya-narkologicheskaya-klinika-v-krasnodare
Выездной формат позволяет избежать контактов с другими пациентами в клинике и очистить организм в привычной обстановке. Специалисты самостоятельно привозят весь необходимый набор медикаментов и расходных материалов.
Подробнее – https://narkologicheskaya-klinika-ekaterinburg0.ru/narkologicheskaya-klinika-otzyvy-v-ekb/
Hi there, I enjoy reading through your article.
I like to write a little comment to support you.
Feel free to visit my blog post ผักสลัดไฮโดรโปนิกส์
Алкоголизм является хроническим заболеванием, требующим комплексного и профессионального подхода к лечению. Лечение алкоголизма в Сочи направлено на полное восстановление физического и психоэмоционального состояния пациента с помощью современных медицинских технологий и индивидуально подобранных программ терапии.
Получить дополнительную информацию – https://lechenie-alkogolizma-sochi00.ru/lechenie-alkogolizma-gipnozom-v-sochi
Посетите наше онлайн казино в Нигерии, где вы найдете захватывающие casino и шанс выиграть реальные деньги!
Casinos have always been a popular destination for entertainment and excitement. People flock to these venues in search of fortune, leisure, and social interaction.
A wide selection of games is available at gambling establishments, appealing to diverse tastes. Whether it’s traditional games such as poker and blackjack or contemporary slot machines, there’s an option for every player.
Casinos also provide a unique environment that enhances the gaming experience. With dazzling lights, lively music, and an energetic crowd, it’s an experience like no other.
Casinos frequently host eateries, bars, and show options, transforming them into a comprehensive entertainment destination. The fusion of gaming and recreational amenities draws in a diverse crowd.
Этап лечения
Ознакомиться с деталями – https://lechenie-alkogolizma-krasnodar00.ru
Нарколог измеряет пульс, артериальное давление, частоту дыхания, насыщение кислородом, а также уточняет историю употребления и наличие хронических заболеваний. Это позволяет оперативно скорректировать состав и скорость инфузии.
Получить дополнительные сведения – http://kapelnica-ot-zapoya-voronezh2.ru/kapelnicza-ot-zapoya-na-domu-v-voronezhe/
подключить интернет в квартиру омск
domashij-internet-omsk005.ru
подключить домашний интернет омск
Каждый пациент уникален — именно поэтому мы не применяем «типовых» решений. После первичной консультации и диагностики специалисты «КубаньМед» разрабатывают персональную программу, учитывающую состояние здоровья, психологические особенности и социальные обстоятельства пациента.
Получить дополнительные сведения – https://lechenie-alkogolizma-krasnodar0.ru/klinika-lecheniya-alkogolizma-krasnodar
Клиника “Обновление” также активно занимается просветительской деятельностью. Мы организуем семинары и лекции, которые помогают обществу лучше понять проблемы зависимостей, их последствия и пути решения. Повышение осведомленности является важным шагом на пути к улучшению ситуации в этой области.
Узнать больше – http://kapelnica-ot-zapoya-irkutsk.ru/kapelnica-ot-zapoya-na-domu-v-irkutske/
Стационарное лечение позволяет обеспечить круглосуточный контроль состояния, регулярное медицинское сопровождение и профессиональную поддержку психологов и наркологов. Такой подход существенно увеличивает шансы на успешное восстановление.
Детальнее – наркологическая клиника нарколог в сочи
частные пансионаты для пожилых в москве
pansionat-msk001.ru
пансионат для лежачих москва
Когда запой становится критическим, оперативное вмешательство имеет решающее значение для спасения здоровья и предотвращения необратимых последствий. Во Владимире экстренная помощь нарколога на дому позволяет быстро начать лечение, не требуя госпитализации, что особенно важно для пациентов, нуждающихся в сохранении конфиденциальности и комфорте.
Ознакомиться с деталями – https://vyvod-iz-zapoya-vladimir000.ru/vyvod-iz-zapoya-na-domu-vladimir
купить диплом где можно купить диплом где можно .
Наркологическая клиника в Екатеринбурге занимается широким спектром услуг, включающих как экстренную помощь, так и длительную реабилитацию пациентов с зависимостью. Ключевыми направлениями являются:
Получить больше информации – частная наркологическая клиника екатеринбург
Цена капельницы от запоя в Иркутске зависит от ряда факторов, таких как выбор метода лечения (на дому или в стационаре), продолжительность лечения и степень тяжести состояния пациента. Для уточнения стоимости и записи на консультацию вы можете обратиться к нашим менеджерам, которые подробно расскажут о стоимости услуг и ответят на все ваши вопросы.
Ознакомиться с деталями – http://
If some one wants to be updated with newest technologies therefore he must
be visit this web page and be up to date all the time.
Как подчёркивает заведующая отделением клинической психологии ФГБУН «НМИЦ психиатрии и наркологии» Минздрава России, наличие в команде специалистов с опытом работы в области зависимости — это основа качественной помощи.
Подробнее можно узнать тут – https://narkologicheskaya-klinika-nizhnij-tagil11.ru/narkologicheskaya-klinika-telefon-v-nizhnem-tagile/
индивидуалки кирова проститутки города кирова
Hey just wanted to give you a brief heads up and let you know a few of the images aren’t loading correctly.
I’m not sure why but I think its a linking issue. I’ve tried it in two different web browsers and
both show the same results.
Запой характеризуется накоплением токсинов и ухудшением работы внутренних органов. Чем дольше продолжается состояние интоксикации, тем выше риск серьезных осложнений. Помощь нарколога на дому позволяет начать детоксикацию в первые часы кризиса, что существенно повышает шансы на успешное восстановление и предотвращает развитие хронических заболеваний.
Исследовать вопрос подробнее – вывод из запоя цены владимир
Мегаполис после заката бодрствует, и мы вдобавок: частная центр лечения алкоголизма и наркомании клиника https://mcnl.ru/ открыта 24/7. Без очередей и формальностей — приезд доктора по адресу за 40 минут, мягкий детокс в сне, экспресс- капельница, психологическая поддержка у вас, долговечное сопровождение. Без шума, анонимно, точно — вернем трезвость без страха.
Stream live Football events online. Stay updated with upcoming matches, highlights,
and schedules. Join the excitement with E2BET today!
Лечение в наркологической клинике в Краснодаре строится на комплексном подходе, включающем медикаментозную терапию, психотерапевтическую помощь и социальную реабилитацию. Медикаментозное лечение направлено на детоксикацию организма и снижение симптомов абстиненции, что позволяет значительно улучшить состояние пациента в первые дни терапии. Современные препараты, применяемые в лечении зависимости, сертифицированы и соответствуют международным стандартам, что подтверждается на сайте Всемирной организации здравоохранения.
Разобраться лучше – наркологическая клиника нарколог краснодар
Этот метод направлен на выявление и замену негативных мыслей и стереотипов поведения, связанных с потреблением алкоголя. Пациент учится отслеживать свои эмоциональные реакции и заменять деструктивные установки конструктивными стратегиями противостояния стрессу.
Получить дополнительную информацию – лечение алкоголизма на дому
Во-вторых, реабилитация является неотъемлемой частью нашего подхода. Мы понимаем, что избавление от физической зависимости — это только первый шаг. Важной задачей является восстановление социального статуса, создание новых привычек и умение управлять своей жизнью без наркотиков или алкоголя. Наша клиника предлагает групповые и индивидуальные занятия, направленные на изменение поведения и мышления.
Подробнее – http://kapelnica-ot-zapoya-irkutsk.ru/
Выезд на дом включает: первичный осмотр, необходимые анализы на месте, подготовку и введение инфузионных смесей, мониторинг динамики, а также рекомендации по дальнейшему лечению.
Детальнее – http://www.domen.ru
После поступления звонка нарколог оперативно выезжает по указанному адресу и прибывает в течение 30–60 минут. Врач незамедлительно приступает к оказанию помощи по четко отработанному алгоритму, состоящему из следующих этапов:
Ознакомиться с деталями – запой нарколог на дом
Выездной формат позволяет избежать контактов с другими пациентами в клинике и очистить организм в привычной обстановке. Специалисты самостоятельно привозят весь необходимый набор медикаментов и расходных материалов.
Получить больше информации – частная наркологическая клиника
Гидроизоляция зданий https://gidrokva.ru и сооружений любой сложности. Фундаменты, подвалы, крыши, стены, инженерные конструкции.
Метод лечения
Исследовать вопрос подробнее – наркологические клиники алкоголизм в краснодаре
В таких случаях своевременное обращение за помощью позволяет быстро стабилизировать состояние и предотвратить развитие серьезных осложнений.
Изучить вопрос глубже – нарколог на дом круглосуточно воронеж
Анализ рынка услуг экстренной помощи в Тюмени позволяет выделить следующие ориентировочные цены:
Получить дополнительные сведения – https://vyvod-iz-zapoya-vladimir00.ru/vyvod-iz-zapoya-na-domu-vladimir/
Хотите сделать близким мясной сюрприз? Мы знаем, как добиться лучших результатов и сэкономить время. С удовольствием предоставляем вашему вниманию для формовочной сетки кулинарную трубу наполнительную. Итоговый продукт всегда будет выглядеть превосходно. Уникальные кулинарные шедевры создавайте! Ищете формовочная труба для мяса? Wildberries.ru/catalog/347475889/detail.aspx?targetUrl=GP – здесь найдете более детальное описание товара. Надевание на мясо формовочной сетки в 10-секундную манипуляцию превратится. Рулет получится обалденный. Готовьте с любовью!
вывод из запоя иркутск
vivod-iz-zapoya-irkutsk001.ru
лечение запоя иркутск
My programmer is trying to persuade me to move to .net from PHP.
I have always disliked the idea because of the expenses.
But he’s tryiong none the less. I’ve been using Movable-type on a number of websites for
about a year and am worried about switching to another platform.
I have heard very good things about blogengine.net. Is there a way I can transfer all my wordpress posts into it?
Any help would be greatly appreciated!
Хотите смотреть лучшие сериалы, аниме, мультсериалы и телешоу онлайн бесплатно? EpicSerials вам такую возможность предоставляет. Портал может предложить разные жанры, такие как: боевик, комедия, вестерн, фэнтези, приключения, драма, фантастика, триллер и др. Позвольте себе от повседневных забот отвлечься и расслабиться. https://epicserialls.online – сайт с удобным интерфейсом, который позволяет быстро найти необходимый сериал. Мы гарантируем широкий выбор контента. О вашем комфортном просмотре мы заботимся. Всегда вам рады!
После первичного осмотра начинается активная фаза детоксикации. Современные препараты вводятся капельничным методом для быстрого снижения уровня токсинов в крови и восстановления обменных процессов. Этот этап критически важен для нормализации работы печени, почек и сердечно-сосудистой системы.
Изучить вопрос глубже – http://vyvod-iz-zapoya-vladimir000.ru
Алкоголизм является хроническим заболеванием, требующим комплексного и профессионального подхода к лечению. Лечение алкоголизма в Сочи направлено на полное восстановление физического и психоэмоционального состояния пациента с помощью современных медицинских технологий и индивидуально подобранных программ терапии.
Подробнее – https://lechenie-alkogolizma-sochi00.ru/lechenie-alkogolizma-na-domu/
If you’re looking for a powerful WhatsApp hash extractor or WhatsApp WART
extractor, you need a reliable tool that can efficiently extract WhatsApp account details
from Android devices. Whether you’re a digital marketer, researcher,
or developer, our WhatsApp account extractor software
provides seamless extraction of WhatsApp protocol numbers, hash
keys, and more.
я купил диплом с проводкой я купил диплом с проводкой .
После основной терапии важно обеспечить поддержку пациента в период реабилитации. Реабилитационные программы в Краснодаре включают социальную адаптацию, восстановление навыков общения и трудоустройства. Это позволяет минимизировать риск рецидива и возвращения к употреблению алкоголя. Поддержка со стороны специалистов и близких — обязательное условие успешного результата. Более подробно о социальной реабилитации можно ознакомиться на сайте Федерального реабилитационного центра.
Получить больше информации – лечение наркомании и алкоголизма в краснодаре
При длительном запое в крови накапливаются ацетальдегид и другие токсичные метаболиты этанола, которые повреждают клетки печени, нарушают функцию почек и приводят к дисбалансу электролитов. Без своевременной детоксикации повышается риск острых состояний — судорог, инсультов, инфаркта, панкреатита и психоза. Чем раньше начато лечение, тем быстрее нормализуются показатели обмена веществ, возвращается водно-электролитный баланс и восстанавливается работа жизненно важных органов. Анонимный выезд нарколога помогает снять психологический барьер перед обращением за помощью.
Узнать больше – postavit-kapelniczu-ot-zapoya voronezh
Первым этапом лечения является медицинская детоксикация, которая направлена на удаление токсинов из организма и стабилизацию физического состояния пациента. Мы используем современные методики, которые помогают минимизировать симптомы абстиненции, такие как головная боль, тошнота и слабость, обеспечивая комфортное пребывание в клинике.
Изучить вопрос глубже – капельница от запоя на дому цена
Мы стремимся обеспечить пациентам максимальный уровень доверия и результативности лечения, сочетая передовые технологии и многолетний опыт специалистов:
Подробнее можно узнать тут – https://lechenie-alkogolizma-krasnodar0.ru/lechenie-khronicheskogo-alkogolizma-krasnodar
Выезд нарколога на дом включает несколько ключевых этапов: первичный дистанционный сбор анамнеза, оперативный приезд специалиста, проведение обследования — измерение пульса, давления, сатурации, уровня глюкозы и электролитов крови — и последующее назначение инфузионной терапии. В зависимости от состояния пациента подбирается индивидуальный состав растворов, направленных на восстановление водно-электролитного баланса, поддержку функций печени и нормализацию работы центральной нервной системы. Все процедуры выполняются с учётом противопоказаний и сопутствующих заболеваний.
Ознакомиться с деталями – после капельницы от запоя воронеж
Check this link https://eurovisatour.by/news/principles-of-coldness/
Миссия клиники “Обновление” заключается в предоставлении качественной и всесторонней помощи людям, страдающим от различных форм зависимости. Мы понимаем, что успешное лечение невозможно без индивидуального подхода, поэтому каждый пациент проходит детальную диагностику, после которой разрабатывается персонализированный план терапии. В процессе работы мы акцентируем внимание на следующих аспектах:
Получить больше информации – после капельницы от запоя иркутск
Доказательную базу терапии подтверждают данные с Национального института наркологии.
Подробнее можно узнать тут – https://narkologicheskaya-klinika-sochi0.ru/narkologicheskaya-klinika-vyvod-iz-zapoya-sochi/
пансионат для лежачих после инсульта
pansionat-msk002.ru
пансионат для пожилых с деменцией
Проблема зависимости — это многогранная ситуация, которая требует комплексного подхода. Мы не ограничиваемся лишь лечением симптомов, а стремимся вернуть пациента к нормальной жизни. В клинике “Сила воли” используется индивидуальный подход к каждому пациенту, включающий как медицинские, так и психологические методы, направленные на полный восстановительный процесс. Одним из самых эффективных методов лечения при алкогольной зависимости является капельница от запоя — процедура, которая помогает снизить уровень токсинов в организме и нормализовать физическое состояние пациента.
Углубиться в тему – капельница от запоя на дому цена в иркутске
Системы автоматизированного дозирования обеспечивают точное введение медикаментов, что минимизирует риск побочных эффектов. Постоянный мониторинг жизненно важных показателей позволяет врачу корректировать терапию в режиме реального времени, гарантируя безопасность процедуры.
Получить больше информации – https://vyvod-iz-zapoya-vladimir0.ru/vyvod-iz-zapoya-na-domu-vladimir/
Лечение в наркологической клинике в Краснодаре строится на комплексном подходе, включающем медикаментозную терапию, психотерапевтическую помощь и социальную реабилитацию. Медикаментозное лечение направлено на детоксикацию организма и снижение симптомов абстиненции, что позволяет значительно улучшить состояние пациента в первые дни терапии. Современные препараты, применяемые в лечении зависимости, сертифицированы и соответствуют международным стандартам, что подтверждается на сайте Всемирной организации здравоохранения.
Получить дополнительную информацию – https://narkologicheskaya-klinika-krasnodar0.ru/chastnaya-narkologicheskaya-klinika-v-krasnodare/
аттестат за 11 класс 2014 года купить аттестат за 11 класс 2014 года купить .
Наркологическая клиника в Екатеринбурге представляет собой специализированное медицинское учреждение, ориентированное на диагностику, лечение и профилактику зависимости от алкоголя, наркотиков и других психоактивных веществ. Современные подходы и комплексные методы терапии позволяют эффективно справляться с разнообразными формами аддиктивного поведения, обеспечивая пациентам качественную медицинскую помощь и психологическую поддержку. Подробнее о современных методах лечения зависимости можно узнать на сайте Всемирной организации здравоохранения.
Получить дополнительную информацию – http://narcologicheskaya-klinika-ekaterinburg00.ru/chastnaya-narkologicheskaya-klinika-v-ekaterinburge/
купить диплом университета с занесением в реестр купить диплом университета с занесением в реестр .
Как подчёркивает заведующая отделением клинической психологии ФГБУН «НМИЦ психиатрии и наркологии» Минздрава России, наличие в команде специалистов с опытом работы в области зависимости — это основа качественной помощи.
Детальнее – наркологические клиники алкоголизм свердловская область
После первичного осмотра начинается активная фаза детоксикации. Современные препараты вводятся капельничным методом для быстрого снижения уровня токсинов в крови и восстановления обменных процессов. Этот этап критически важен для нормализации работы печени, почек и сердечно-сосудистой системы.
Детальнее – https://vyvod-iz-zapoya-vladimir000.ru/vyvod-iz-zapoya-na-domu-vladimir
В клинике применяются разнообразные психотерапевтические техники, позволяющие адаптировать лечение под индивидуальные особенности пациента.
Получить дополнительные сведения – http://lechenie-alkogolizma-sochi0.ru
Пациенты клиники «НаркоМед» полностью застрахованы от утечки личной информации. Приём и лечение оформляются по псевдониму, документы не передаются в другие организации.
Детальнее – http://narkologicheskaya-klinika-ekaterinburg0.ru
Выезд на дом включает: первичный осмотр, необходимые анализы на месте, подготовку и введение инфузионных смесей, мониторинг динамики, а также рекомендации по дальнейшему лечению.
Ознакомиться с деталями – наркологическая клиника цены сочи
Hi, the whole thing is going sound here and ofcourse every one is sharing facts, that’s genuinely good,
keep up writing.
Here is my web site :: ผักสลัดออนไลน์
Пациенту устанавливают катетер в вену на руке или предплечье, используя лёгкий местный анестетик для минимизации дискомфорта. Затем подключают автоматизированную помпу, обеспечивающую равномерную подачу раствора в течение 3–6 часов.
Получить дополнительные сведения – http://kapelnica-ot-zapoya-voronezh2.ru/
Клиника “Обновление” также активно занимается просветительской деятельностью. Мы организуем семинары и лекции, которые помогают обществу лучше понять проблемы зависимостей, их последствия и пути решения. Повышение осведомленности является важным шагом на пути к улучшению ситуации в этой области.
Детальнее – http://kapelnica-ot-zapoya-irkutsk.ru/kapelnica-ot-zapoya-v-kruglosutochno-v-irkutske/
Когда запой становится угрозой для здоровья, оперативное вмешательство имеет решающее значение. В Тюмени, Тюменская область, услуга «капельница от запоя на дому» помогает быстро начать детоксикацию организма, восстановить нормальный обмен веществ и стабилизировать работу внутренних органов. Такой метод лечения позволяет пациенту получить профессиональную медицинскую помощь в комфортной домашней обстановке, при этом сохраняя конфиденциальность и снижая эмоциональный стресс.
Разобраться лучше – https://vyvod-iz-zapoya-vladimir00.ru/srochnyj-vyvod-iz-zapoya-vladimir/
В клинике применяются инновационные методы диагностики, включая лабораторные анализы и аппаратные исследования, которые позволяют выявить степень зависимости и сопутствующие патологии. Важным этапом является комплексный подход к лечению, включающий детоксикацию организма, психотерапию и медикаментозную поддержку.
Углубиться в тему – частная наркологическая клиника в краснодаре
Каждый пациент получает персонализированную программу, учитывающую стадию заболевания, сопутствующие патологии и социальный статус. На основании анализа состояния назначается оптимальная терапия, что значительно повышает эффективность лечения. Врач-нарколог подбирает препараты с учетом индивидуальной переносимости, а психотерапевт разрабатывает план психологической поддержки.
Подробнее можно узнать тут – lechenie-alkogolizma-sochi00.ru/
Please let me know if you’re looking for a author for
your weblog. You have some really great articles and I
think I would be a good asset. If you ever want to take
some of the load off, I’d absolutely love to write some
content for your blog in exchange for a link back to mine.
Please shoot me an e-mail if interested. Thanks!
Алкогольная и наркотическая зависимости могут привести к тяжелым и опасным для жизни состояниям. Вызов нарколога становится необходимым, если:
Детальнее – нарколог на дом срочно
лечение запоя иркутск
vivod-iz-zapoya-irkutsk002.ru
экстренный вывод из запоя иркутск
Основные задачи
Подробнее тут – https://lechenie-alkogolizma-krasnodar00.ru/lechenie-khronicheskogo-alkogolizma-krasnodar/
взломанные игры для слабых телефонов — это замечательный способ повысить качество игры.
Особенно если вы пользуетесь устройствами на платформе Android, модификации открывают перед
вами большие перспективы.
Я лично использую взломанные игры, чтобы наслаждаться бесконечными возможностями.
Моды для игр дают невероятную возможность настроить игру, что погружение в игру гораздо
красочнее. Играя с модификациями, я могу повысить уровень сложности, что добавляет виртуальные
путешествия и делает игру более эксклюзивной.
Это действительно захватывающе, как такие изменения могут улучшить игровой процесс, а
при этом сохраняя использовать такие взломанные
версии можно без особых рисков,
если быть внимательным и следить
за обновлениями. Это делает каждый игровой процесс более насыщенным,
а возможности практически неограниченные.
Советую попробовать такие игры с модами для Android — это
может переведет ваш опыт на новый уровень
Детская стоматология Kids Dent – это мир заботы и профессионализма для маленьких пациентов!
Наша стоматология предлагает широкий спектр услуг по уходу за зубами и полостью рта для детей всех возрастов. От профилактических осмотров до сложных стоматологических процедур, наши опытные специалисты всегда находят подход к каждому из наших маленьких пациентов.
Мы понимаем, что первый визит к стоматологу может стать для ребенка стрессом, поэтому наши врачи делают все возможное, чтобы создать комфортную и дружелюбную атмосферу во время приема. С нами ваши дети научатся ухаживать за своими зубами с самого раннего возраста, что поможет сохранить их здоровье на долгие годы.
В нашей стоматологии используются только современные материалы и технологии, прошедшие строгий контроль качества. Мы заботимся о здоровье наших маленьких пациентов и гарантируем высокое качество оказываемых услуг – https://kids-dent.ru/
Кроме того, мы предлагаем различные акции и скидки для постоянных клиентов, а также возможность оплаты в рассрочку. Запишитесь на прием прямо сейчас и убедитесь в качестве наших услуг!
Приходите в детскую стоматологию Kids Dent и подарите своим детям здоровые улыбки!
купить аттестат за 11 класс в оренбурге купить аттестат за 11 класс в оренбурге .
На сайте https://lolz.live/ вы сможете приобрести прокаченные аккаунты для самых разных игр, а также социальных сетей. Теперь нет необходимости в том, чтобы часами прокачивать свои навыки, доходить до нужного уровня, ведь куда быстрее и проще сразу приобрести все, что нужно, чтобы получить положительные эмоции и приятные впечатления. Дополнительно пообщайтесь с единомышленниками на форуме, где получится задать вопрос, обсудить важную тему. Для того чтобы быстрее сориентироваться, ознакомьтесь с игровой и тематической категориями.
Click this site https://johnjohnhoelen.be/en/2024/03/17/ten-huize-van-anita-fleerackers-2/
خلاصه کتاب کمدی الهی دوزخ اثر دانته آلیگیری، شاهکاری ادبی و فلسفی
است که سفر خیالی شاعر را به دوزخ روایت می کند.
این اثر سترگ، بخشی از کمدی الهی، به
عنوان یکی از بزرگ ترین آثار ادبیات جهان
شناخته می شود و نمادی از سلوک روحانی انسان
در مواجهه با گناه و مجازات است.
دانته آلیگیری در این سفر، با همراهی ویرژیل، راهنمای خود،
از طبقات مختلف دوزخ عبور کرده و گناهکاران
و مجازات هایشان را مشاهده می کند، که هر یک درس
هایی عمیق درباره اخلاقیات و عدالت الهی ارائه می دهند.
https://econbiz.ir/
Мы стремимся обеспечить пациентам максимальный уровень доверия и результативности лечения, сочетая передовые технологии и многолетний опыт специалистов:
Подробнее можно узнать тут – лечение алкоголизма цена
Использование автоматизированных систем дозирования обеспечивает точное введение лекарственных средств, что минимизирует риск передозировки и побочных эффектов. Постоянный мониторинг жизненно важных показателей позволяет врачу оперативно корректировать дозировки и адаптировать терапию под динамику состояния пациента.
Получить дополнительные сведения – вывод из запоя дешево владимир
Лечение в наркологической клинике в Краснодаре строится на комплексном подходе, включающем медикаментозную терапию, психотерапевтическую помощь и социальную реабилитацию. Медикаментозное лечение направлено на детоксикацию организма и снижение симптомов абстиненции, что позволяет значительно улучшить состояние пациента в первые дни терапии. Современные препараты, применяемые в лечении зависимости, сертифицированы и соответствуют международным стандартам, что подтверждается на сайте Всемирной организации здравоохранения.
Узнать больше – narkologicheskaya-klinika-krasnodar0.ru/
Комплексное лечение на дому организовано по четкой схеме, состоящей из последовательных этапов. Каждый из них направлен на быстрое восстановление нормального функционирования организма.
Получить дополнительные сведения – http://vyvod-iz-zapoya-vladimir0.ru
При длительном запое в крови накапливаются ацетальдегид и другие токсичные метаболиты этанола, которые повреждают клетки печени, нарушают функцию почек и приводят к дисбалансу электролитов. Без своевременной детоксикации повышается риск острых состояний — судорог, инсультов, инфаркта, панкреатита и психоза. Чем раньше начато лечение, тем быстрее нормализуются показатели обмена веществ, возвращается водно-электролитный баланс и восстанавливается работа жизненно важных органов. Анонимный выезд нарколога помогает снять психологический барьер перед обращением за помощью.
Углубиться в тему – https://kapelnica-ot-zapoya-voronezh.ru/vyezd-na-dom-kapelnicza-ot-zapoya-v-voronezhe/
Клиника “Обновление” также активно занимается просветительской деятельностью. Мы организуем семинары и лекции, которые помогают обществу лучше понять проблемы зависимостей, их последствия и пути решения. Повышение осведомленности является важным шагом на пути к улучшению ситуации в этой области.
Выяснить больше – капельница от запоя иркутск
В нашей клинике используются только эффективные и безопасные препараты, что гарантирует вам быстрое восстановление и минимальные риски.
Получить больше информации – postavit-kapelniczu-ot-zapoya irkutsk
Основными направлениями работы являются:
Подробнее тут – наркологическая клиника цены в сочи
Looking for the official Betandreas casino platform in Bangladesh? Visit https://betandreasx.com/ and you will find all the details and detailed information from this casino. Find out all the benefits on the site – from a huge selection of games, convenient registration, deposit and withdrawal of money, as well as all about the platform bonuses.
Первым этапом лечения является медицинская детоксикация, которая направлена на удаление токсинов из организма и стабилизацию физического состояния пациента. Мы используем современные методики, которые помогают минимизировать симптомы абстиненции, такие как головная боль, тошнота и слабость, обеспечивая комфортное пребывание в клинике.
Подробнее можно узнать тут – https://kapelnica-ot-zapoya-irkutsk2.ru/kapelnica-ot-zapoya-anonimno-v-irkutske
пансионат для престарелых
pansionat-msk003.ru
частный дом престарелых
Этот метод направлен на выявление и замену негативных мыслей и стереотипов поведения, связанных с потреблением алкоголя. Пациент учится отслеживать свои эмоциональные реакции и заменять деструктивные установки конструктивными стратегиями противостояния стрессу.
Изучить вопрос глубже – центр лечения алкоголизма сочи.
Выездной формат позволяет избежать контактов с другими пациентами в клинике и очистить организм в привычной обстановке. Специалисты самостоятельно привозят весь необходимый набор медикаментов и расходных материалов.
Разобраться лучше – наркологические клиники алкоголизм в екатеринбурге
Наркологическая клиника «СочиМед» предлагает полный спектр услуг по лечению алкогольной и наркотической зависимости, сочетая современные медицинские технологии с уютной атмосферой. Размещение в стационаре организовано по принципу гостиничного сервиса: отдельные палаты с кондиционером, круглосуточное питание по диетам, а внимательный персонал поддерживает пациентов на каждом этапе восстановления.
Получить больше информации – https://narkologicheskaya-klinika-sochi00.ru/narkologicheskaya-klinika-krasnodarskij-kraj/
Дополнительно выясняются аллергические реакции, приём других препаратов и предпочтения пациента по времени визита врача.
Выяснить больше – капельница от запоя клиника
как купить диплом с занесением в реестр как купить диплом с занесением в реестр .
В этих случаях вызов нарколога на дом не только оправдан, но и жизненно необходим для предотвращения опасных осложнений и стабилизации здоровья пациента.
Выяснить больше – http://narcolog-na-dom-voronezh00.ru/
Наркологическая клиника в Екатеринбурге занимается широким спектром услуг, включающих как экстренную помощь, так и длительную реабилитацию пациентов с зависимостью. Ключевыми направлениями являются:
Ознакомиться с деталями – https://narcologicheskaya-klinika-ekaterinburg00.ru/narkologicheskaya-klinika-kodirovka-v-ekaterinburge
Комплексное лечение на дому организовано по строго отлаженной схеме, позволяющей оперативно стабилизировать состояние пациента и провести качественную детоксикацию.
Получить дополнительную информацию – вывод из запоя дешево владимир
Алкоголизм является хроническим заболеванием, требующим комплексного и профессионального подхода к лечению. Лечение алкоголизма в Сочи направлено на полное восстановление физического и психоэмоционального состояния пациента с помощью современных медицинских технологий и индивидуально подобранных программ терапии.
Изучить вопрос глубже – центр лечения алкоголизма сочи.
В клинике применяются инновационные методы диагностики, включая лабораторные анализы и аппаратные исследования, которые позволяют выявить степень зависимости и сопутствующие патологии. Важным этапом является комплексный подход к лечению, включающий детоксикацию организма, психотерапию и медикаментозную поддержку.
Исследовать вопрос подробнее – наркологическая клиника цены в краснодаре
Как подчёркивает заведующая отделением клинической психологии ФГБУН «НМИЦ психиатрии и наркологии» Минздрава России, наличие в команде специалистов с опытом работы в области зависимости — это основа качественной помощи.
Выяснить больше – наркологические клиники алкоголизм
АвтоМастера.нет – портал, на котором актуальная информация представлена. Вы сможете узнать, чип-тюнинг, что это такое. Расскажем, какая лучше трансмиссия. Собрали советы, которые будут полезны при эксплуатации и вождении машины. Разберемся и в том, как датчик кислорода работает. Ищете сканер brain bee? Avtomastera.net – здесь автомобильные мастера рассказывают о тонкостях работы с машинами, механизмами и клиентами. На портале есть удобный поиск, воспользуйтесь им. Руководствуясь нашими советами, вы сможете определить оптимальное время замены масла.
Использование автоматизированных систем дозирования обеспечивает точное введение лекарственных средств, что минимизирует риск передозировки и побочных эффектов. Постоянный мониторинг жизненно важных показателей позволяет врачу оперативно корректировать дозировки и адаптировать терапию под динамику состояния пациента.
Подробнее можно узнать тут – https://vyvod-iz-zapoya-vladimir000.ru/vyvod-iz-zapoya-anonimno-vladimir
вывод из запоя иркутск
vivod-iz-zapoya-irkutsk003.ru
вывод из запоя цена
Клиника “Обновление” также активно занимается просветительской деятельностью. Мы организуем семинары и лекции, которые помогают обществу лучше понять проблемы зависимостей, их последствия и пути решения. Повышение осведомленности является важным шагом на пути к улучшению ситуации в этой области.
Подробнее – https://kapelnica-ot-zapoya-irkutsk.ru/kapelnica-ot-zapoya-anonimno-v-irkutske/
После вашего звонка нарколог выезжает на дом в течение 30–60 минут. Прибыв на место, специалист проводит всесторонний медицинский осмотр, включая измерение артериального давления, пульса и уровня кислорода в крови, а также собирает анамнез для определения степени интоксикации.
Углубиться в тему – нарколог на дом вывод