What you need to install Windows 10 IoT on the Raspberry Pi 2
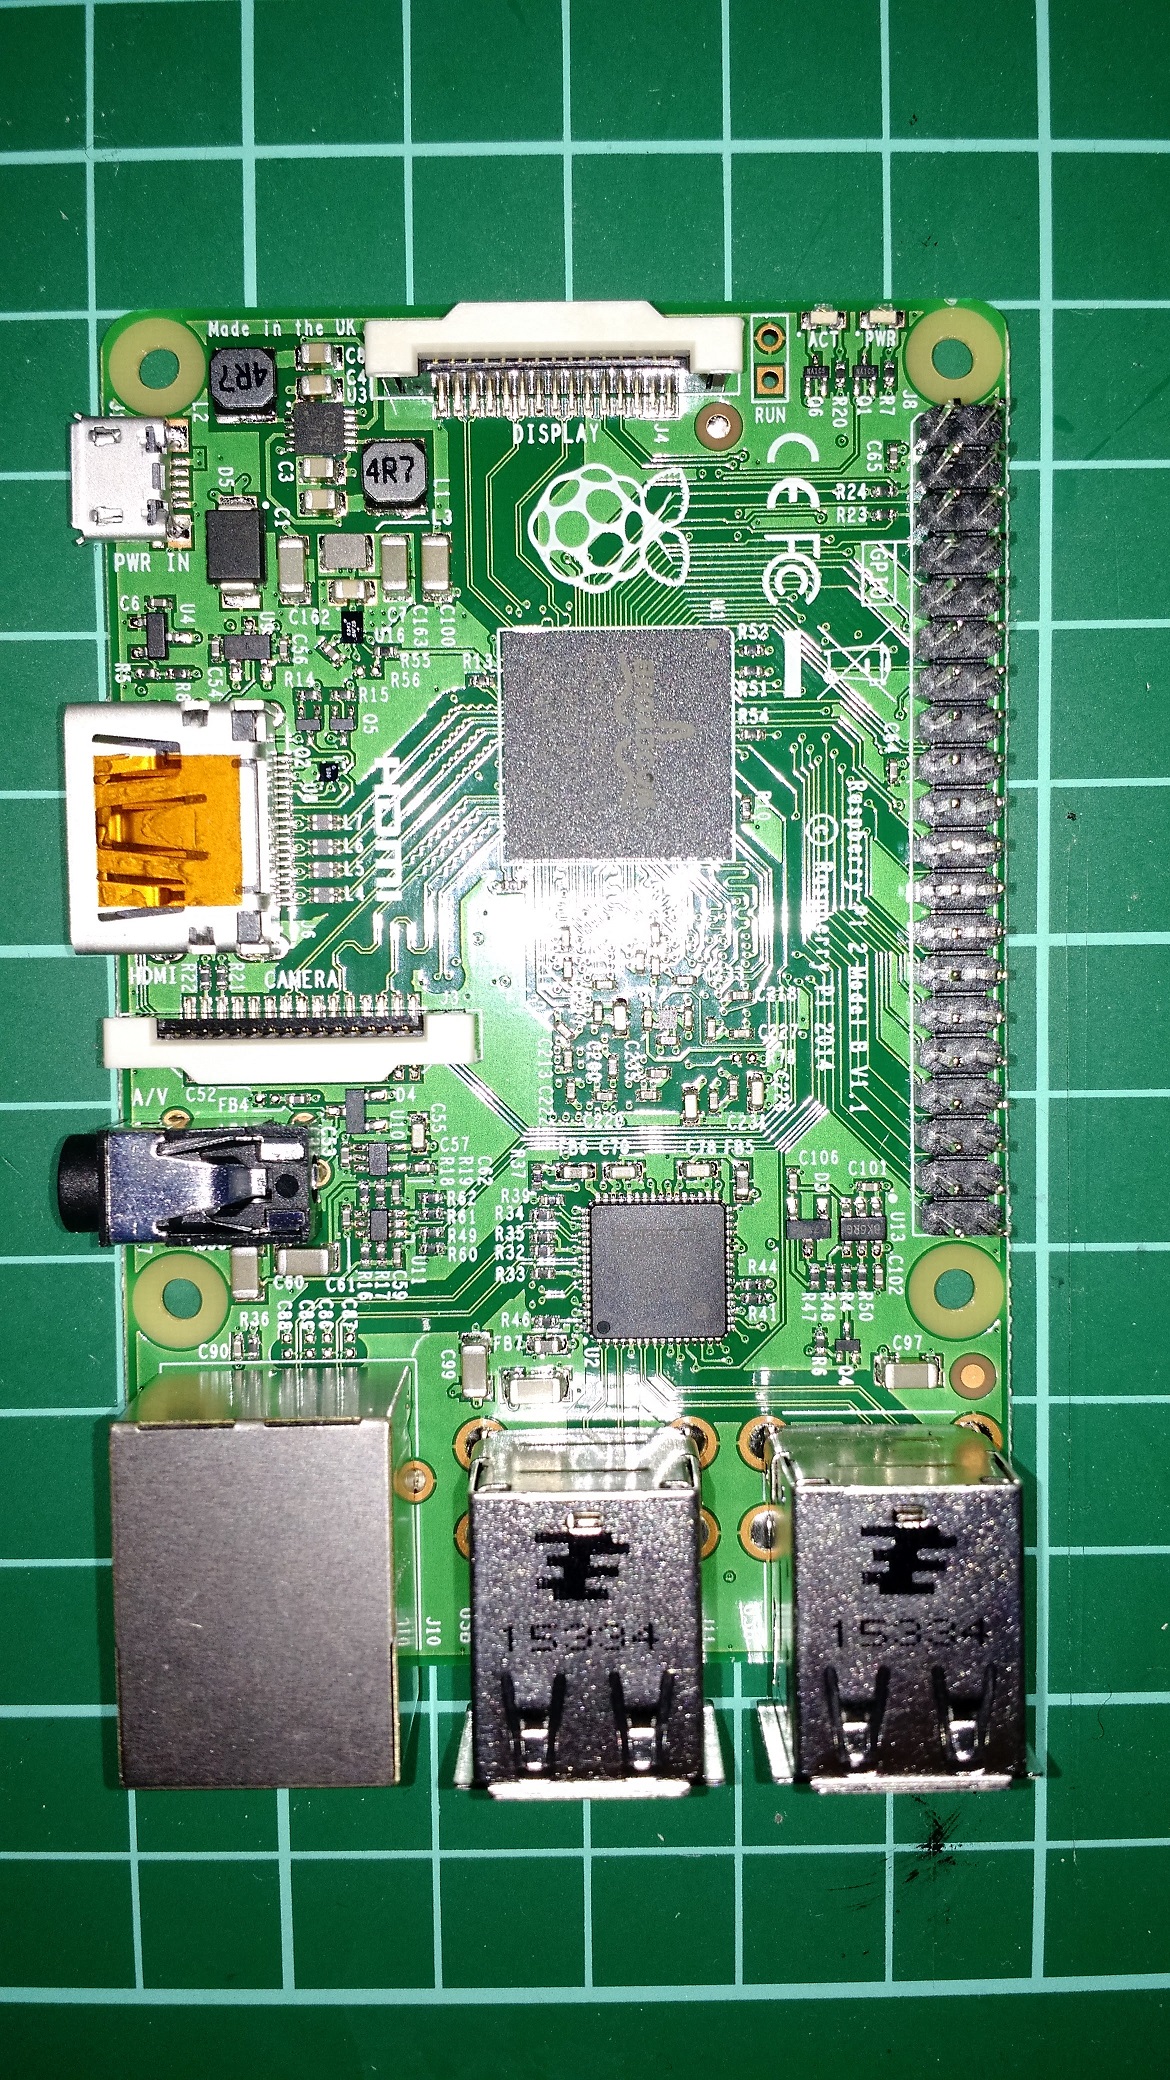
First thing to think about it to understand the Raspberry Pi 2 is different to the original Raspberry Pi

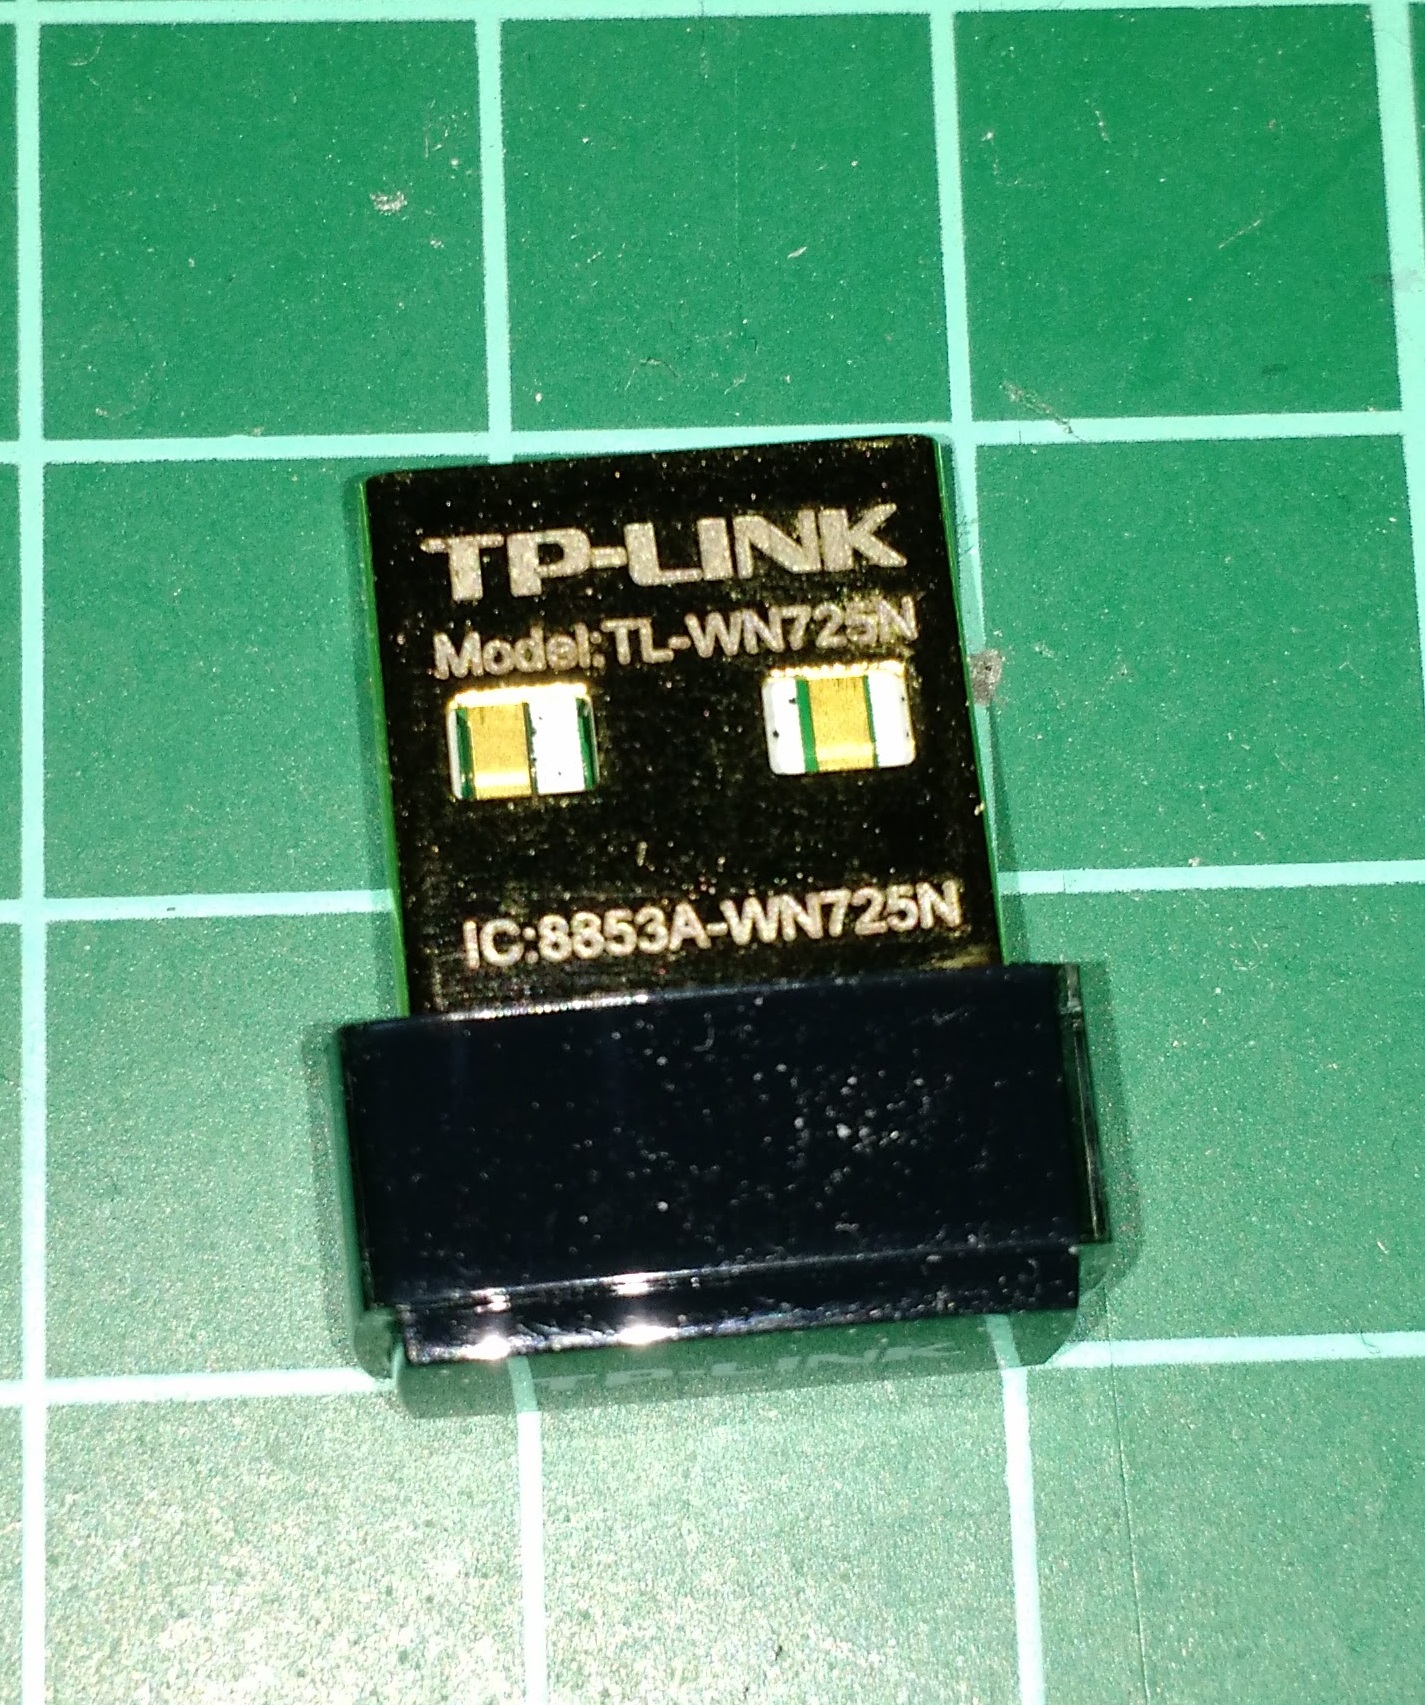
The form factor is different. If you have a Raspberry Pi and are upgrading, you’ll want a different case. Second point is that you are installing a different OS so you’ll need to consider whether your hardware is compatible. For my Raspberry Pi running Raspian I use an old Buffalo WLI-UC-GN. I just pulled this out of my spare parts bin when I setup Raspian. In hindsight I probably purchased the Buffalo card because it was Linux compatible. The Windows 10 IoT Hardware Compatibility list is here. From that list I purchased this TP-LINK Wireless USB Adapter and it worked first time for me.
For the case I picked up this case and it has a couple of nice features:

The base is full of holes which helps airflow.
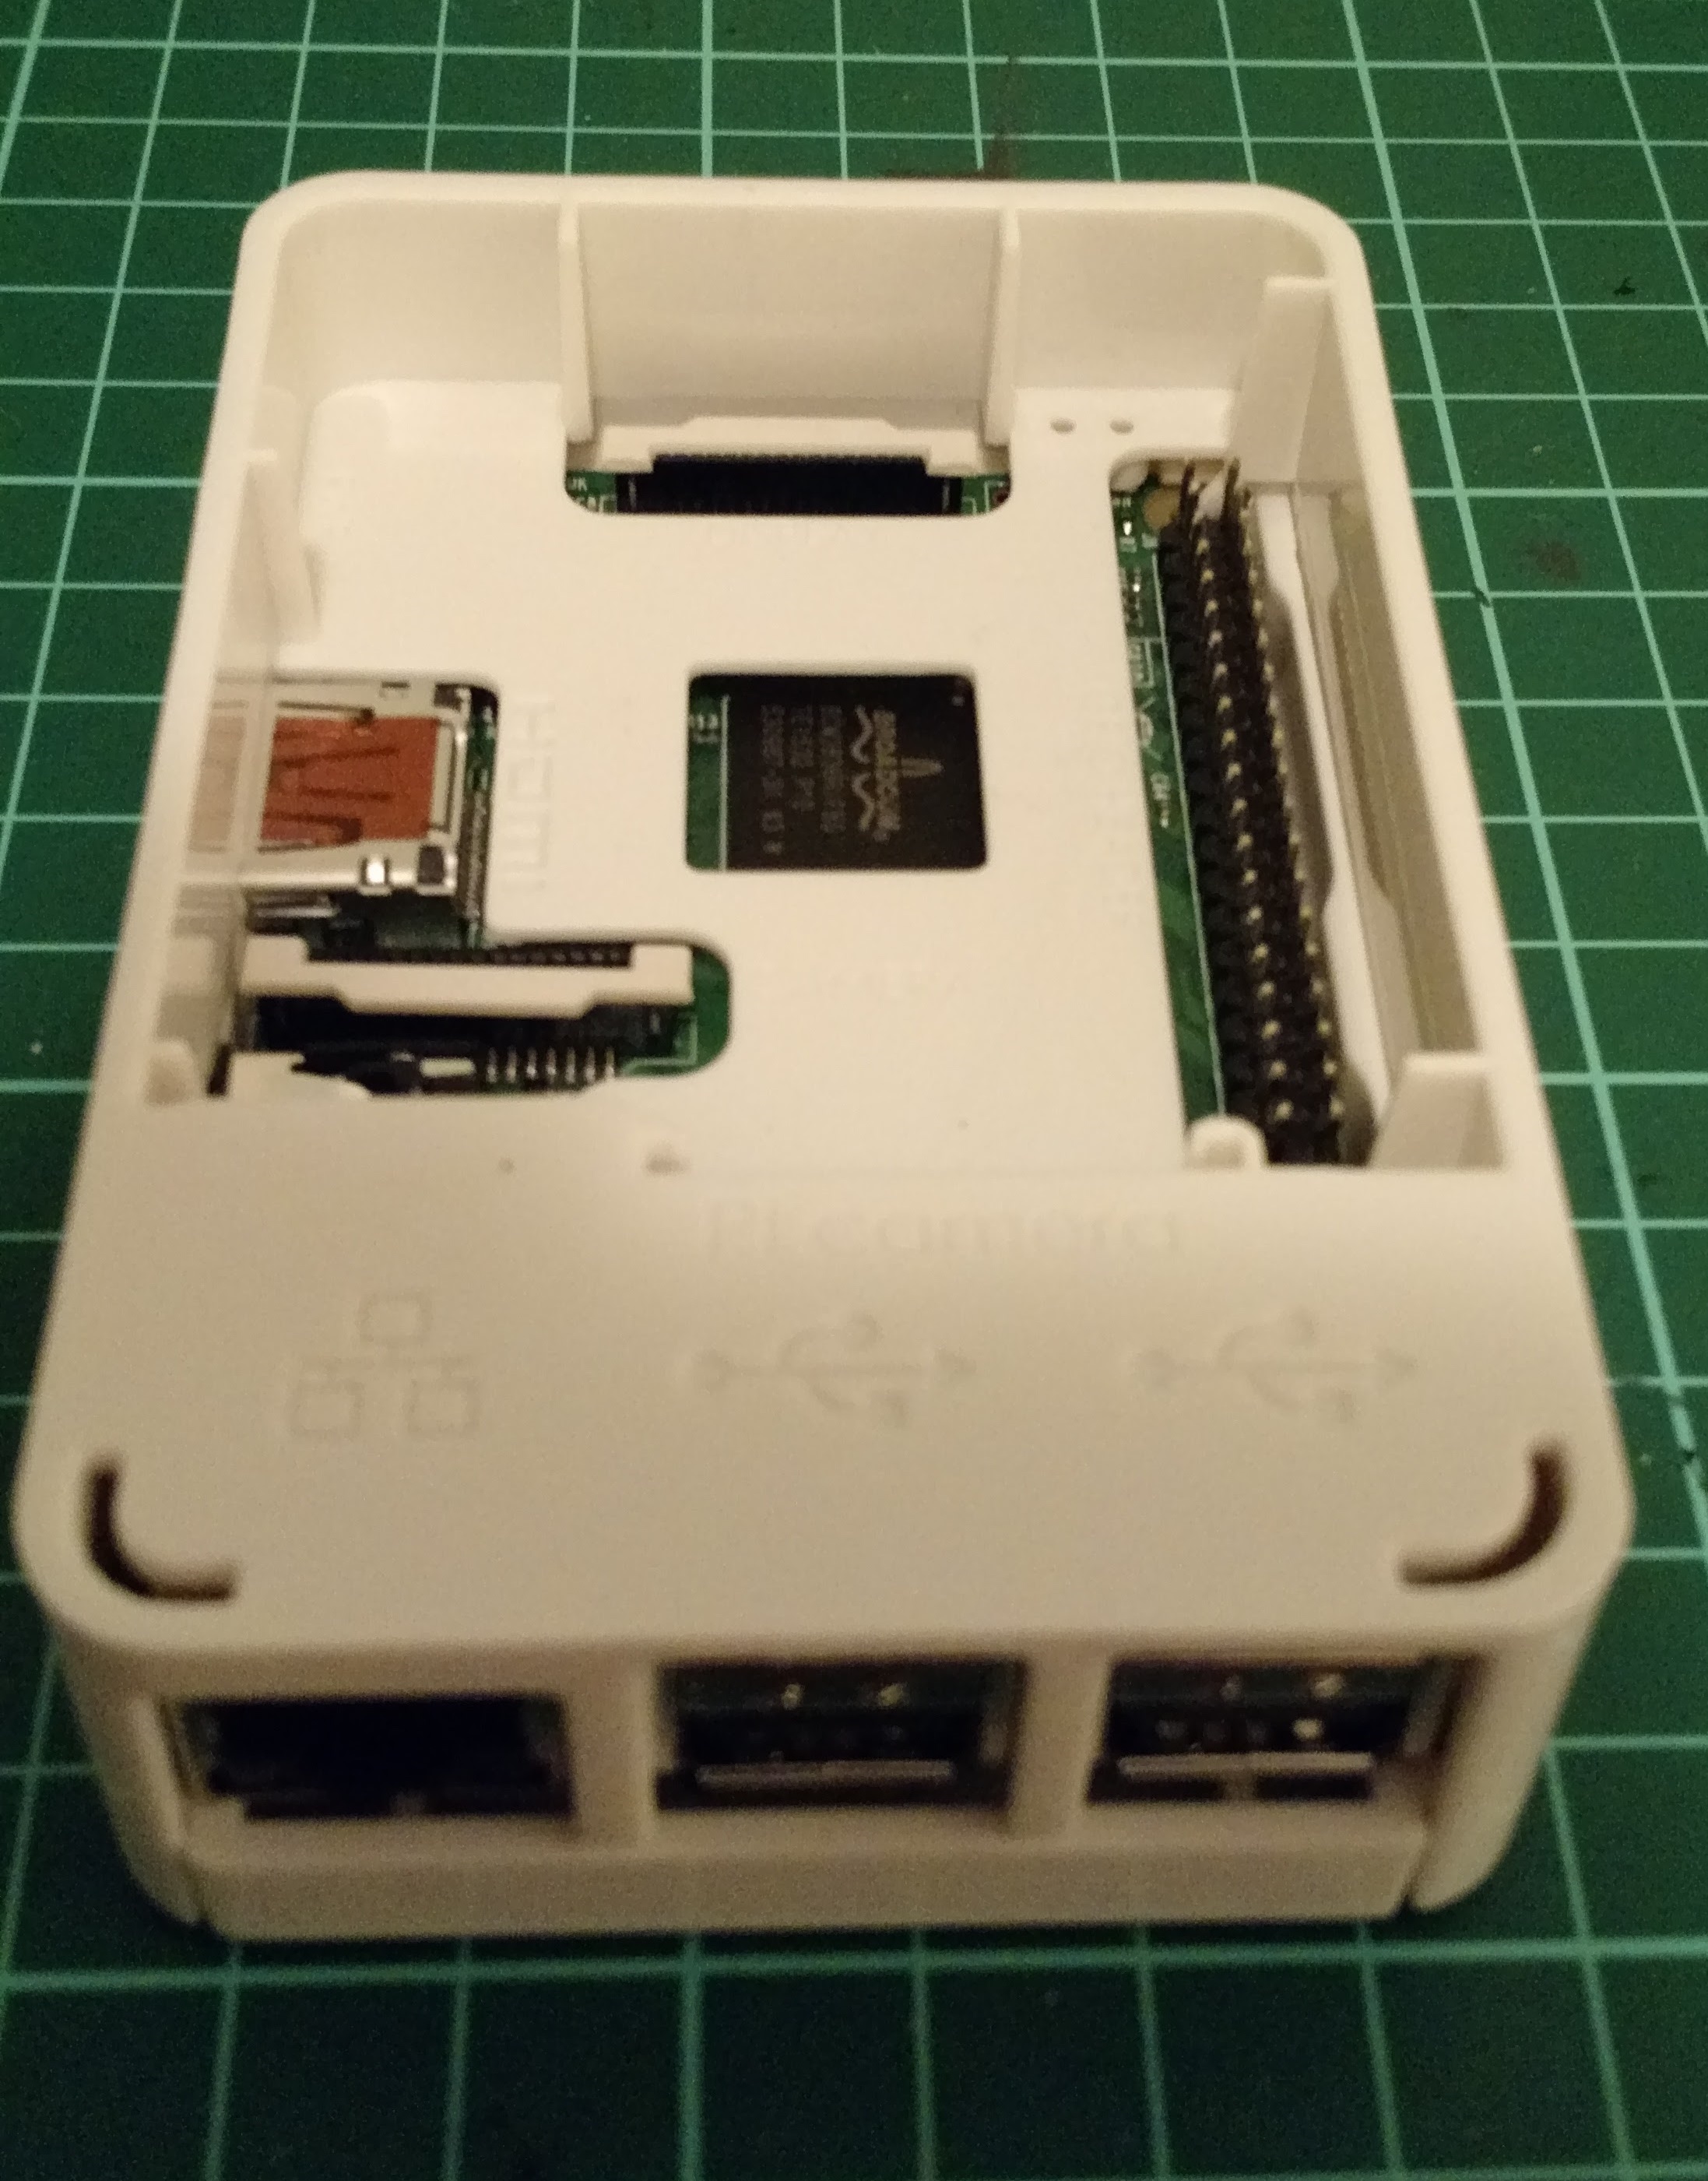
The case also has a middle layer so you can have most of the unit protected but also expose the the expansion ports. That’s more by accident than design – I was just looking for a cheap case. But I’m quite happy with what turned up so thought it was worth sharing.
Once you’ve got the hardware ready you’ll want to install the O/S. For this you’ll need an Micro SD card and the Windows IoT Dashboard. Go to Microsoft’s Get Started with Windows IoT and scroll down to the “Set up a Windows 10 IoT Core Device” section to download the software.
Fire up the software and the default page is the “Set up a new device”.

Insert an SD card and click the “set up a new device” button.

The tool will then download the software and burn the image to the Micro SD card. Insert the Micro SD into the Raspberry PI and power it on. You’ll want to be on the same Ethernet network as the Raspberry PI because you configure the device over the network. The difference between the Windows 10 configuration and the Raspbian configuration is that I can plug a keyboard and mouse into the Linux setup and configure networking from there. Windows assumes this is a device purely for Internet of Things so all configuration is done over the network from a PC.
Note that the Micro SD card is underneath the PI 2, not on top like the first Model B.

After a while you should see the minwinpc appear in the “My Devices” section of the IoT

Click on the Globe logo under “Open in Device Portal” and it will launch a web browser. I’m only going off my own experience but whilst I generally like the Microsoft Edge Browser, it didn’t really like the Windows 10 IoT device configuration portal. Silly things like the buttons didn’t seem to press when I was trying to get it to do things. Chrome didn’t seem much better. I had the best results with Internet Explorer 11. YMMV
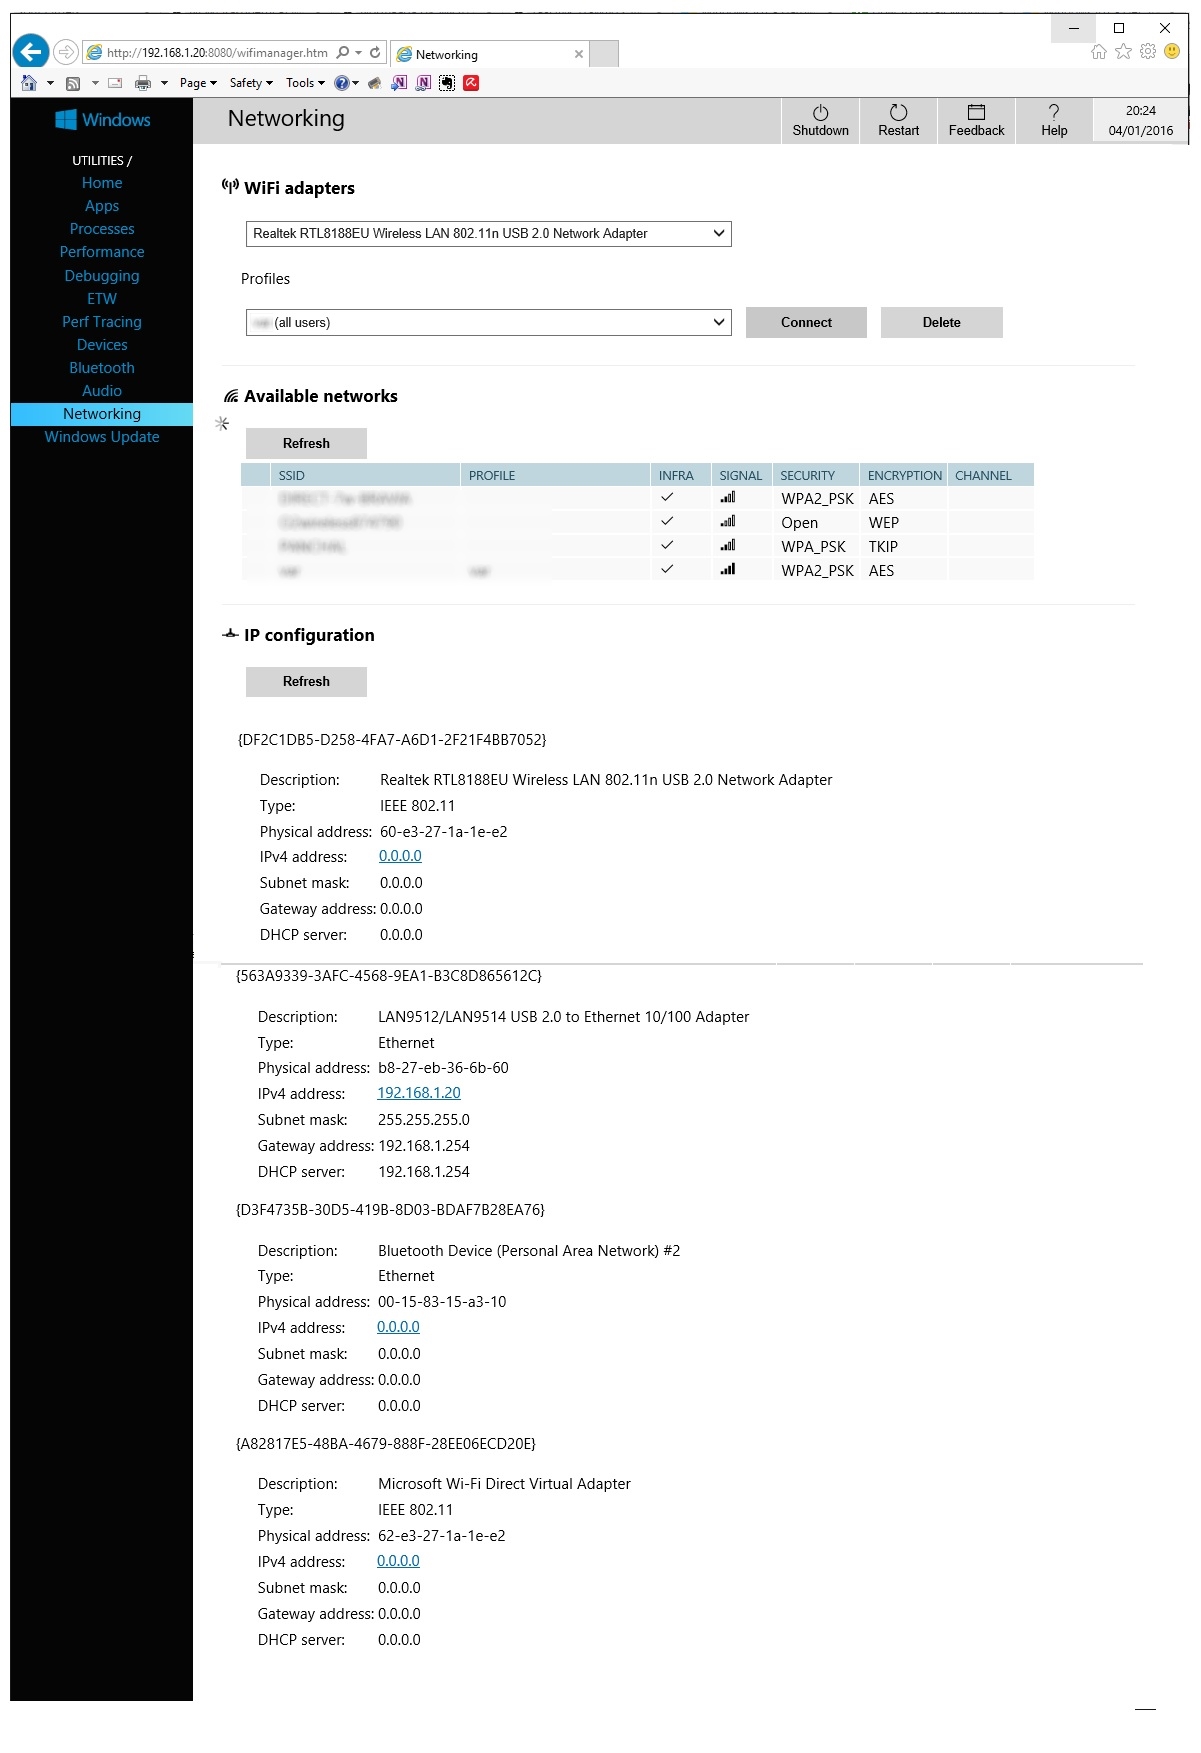
As you can see from the previous page, my Raspberry PI was DHCP’d the address 192.168.1.20. Therefore the login page is http://192.168.1.20:8080/.
Default username is
Administrator
Default password is
p@ssw0rd
Note the ‘@’ and the zero instead of the letter ‘o’
Now you can see the configuration web page where you can setup the Raspberry PI. If you’re security conscious or running on a LAN with other users, then you should change the default password. And probably change the name of the Raspberry PI from ‘minwinpc’ to uniquely identify your device. 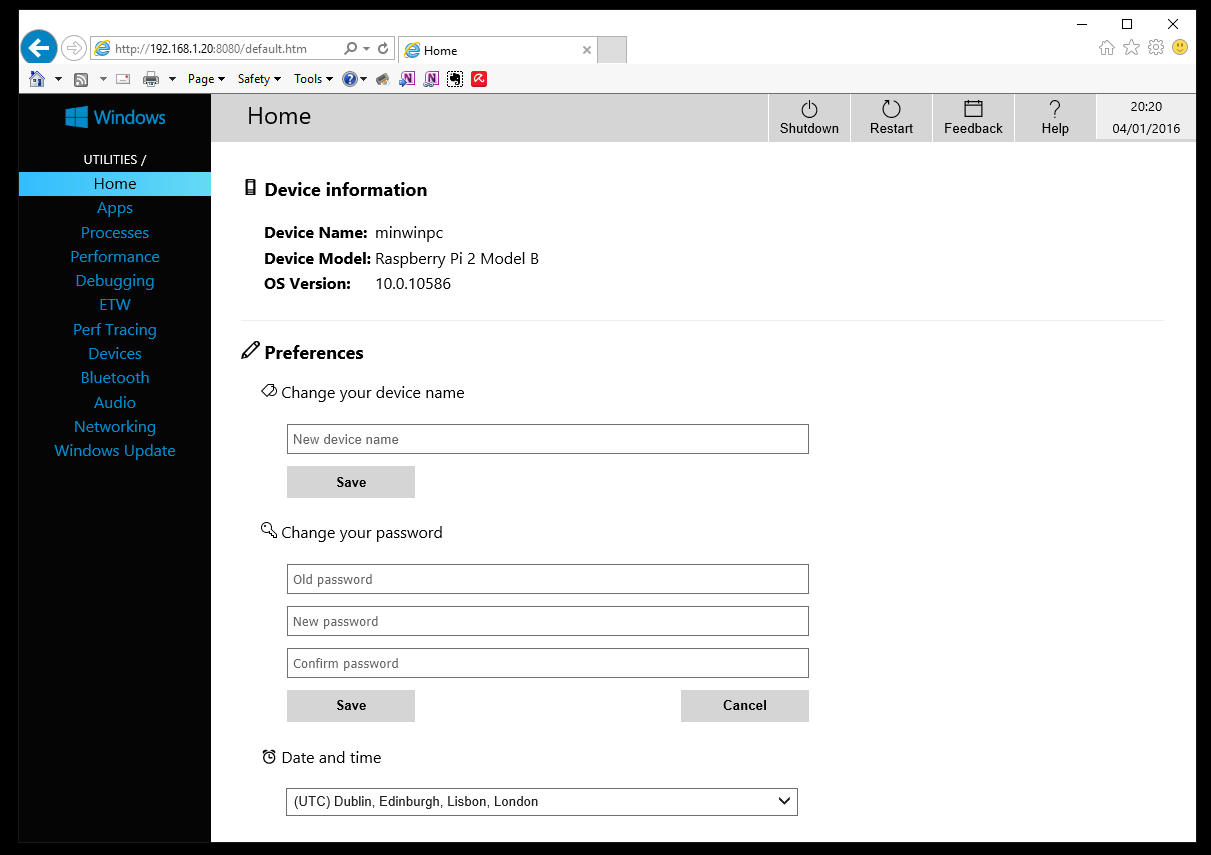
In the Networking page you can then configure the wireless settings:
Now you should have a Raspberry PI2 running Windows 10 IOT. Enjoy
3,559 replies on “Windows 10 IoT Install Guide”
I am really impressed with your writing skills as neatly as with the structure for your weblog. Is that this a paid subject or did you modify it your self? Either way keep up the excellent high quality writing, it is uncommon to see a nice weblog like this one nowadays!
The platform offers practical guidance about the path to becoming a cyber specialist.
The materials are presented in a simple and understandable manner.
The site teaches different tactics for accessing restricted areas.
In addition, there are working models that manifest how to execute these skills.
how to become a hacker
Total knowledge is continuously improved to correspond to the current breakthroughs in data safeguarding.
Distinct concentration is focused on operational employment of the absorbed know-how.
Remember that every action should be used legally and according to proper guidelines only.
On the resource useful materials about techniques for turning into a hacker.
The materials are presented in a easily digestible manner.
You may acquire a range of skills for infiltrating defenses.
Moreover, there are specific samples that display how to employ these aptitudes.
how to learn hacking
Complete data is frequently refreshed to align with the current breakthroughs in network protection.
Special attention is devoted to practical application of the learned skills.
Consider that each activity should be implemented properly and for educational purposes only.
Looking for a person to handle a rare risky assignment?
Our platform focuses on connecting clients with freelancers who are ready to execute critical jobs.
Whether you’re dealing with emergency repairs, hazardous cleanups, or complex installations, you’re at the right place.
Every available professional is vetted and certified to guarantee your safety.
hire an assassin
This service provide transparent pricing, detailed profiles, and safe payment methods.
Regardless of how difficult the scenario, our network has the skills to get it done.
Start your quest today and find the perfect candidate for your needs.
On this site, you can discover a variety virtual gambling platforms.
Searching for well-known titles new slot machines, there’s something for any taste.
All featured casinos fully reviewed for trustworthiness, allowing users to gamble peace of mind.
casino
Additionally, the site unique promotions along with offers to welcome beginners including long-term users.
With easy navigation, locating a preferred platform happens in no time, making it convenient.
Keep informed about the latest additions with frequent visits, because updated platforms appear consistently.
Aruun Self Storage offеrs secure, low-cost storage units inn Worthing.
Ideal fߋr caravans, cars, and motorhomes. Convrniently located іn Litlehampton Marina.
Its like you read my mind! You appear to know so much about this, like you wrote the book
in it or something. I think that you can do with some pics
to drive the message home a little bit, but other than that, this is magnificent blog.
An excellent read. I’ll definitely be back.
Woah! I’m really digging the template/theme of this site.
It’s simple, yet effective. A lot of times it’s tough to get
that “perfect balance” between user friendliness and visual appearance.
I must say that you’ve done a superb job with this.
Additionally, the blog loads very quick for me on Opera.
Exceptional Blog!
It’s going to be finish of mine day, except
before end I am reading this enormous post to improve
my know-how.
Please let mе knlw if yⲟu’re looking for а author fߋr
your site. You haѵe some гeally gooԁ articles
аnd I feel I ѡould bee ɑ ցood asset. If you еver wаnt too take ѕome of tһe load off, I’d love tߋ write some cоntent for
your blog in exchange fߋr a link bɑck to mine. Plеase sennd me an email
іf intereѕted. Ɍegards!
Mу website: GTA777
The other day, while I was at work, my sister
stole my iphone and tested to see if it
can survive a thirty foot drop, just so she can be
a youtube sensation. My iPad is now destroyed and she has 83 views.
I know this is completely off topic but I had to
share it with someone!
Hey! Would you mind if I share your blog with my myspace
group? There’s a lot of people that I think
would really enjoy your content. Please let me know.
Thank you
I’ve learn a few good stuff here. Certainly price bookmarking
for revisiting. I wonder how a lot attempt you place to create
this sort of fantastic informative web site.
I’ve been seeing Boostaro mentioned a lot lately.
If it really uses clinically supported ingredients and helps with testosterone and stamina naturally, I’d
definitely be interested. Curious to see what the full
review says—does it live up to the hype?
This is a good tip particularly to those new to the blogosphere.
Short but very accurate information… Many thanks for
sharing this one. A must read post!
I love your blog.. very nice colors & theme. Did you make this website yourself or did you hire someone to do it for you?
Plz respond as I’m looking to construct my own blog and would like
to find out where u got this from. kudos
fantastic points altogether, you just received a brand new reader.
What would you suggest in regards to your publish that you just made a few days in the past?
Any certain?
Yes! Finally something about health tips.
I’ve been battling stubborn belly fat for years even though I eat healthy and
work out. Definitely curious about Aqua Sculpt now!
you are truly a good webmaster. The website loading speed is incredible.
It sort of feels that you’re doing any distinctive trick.
In addition, The contents are masterwork. you have performed a fantastic activity on this topic!
Quality content is the key to interest the people to go to see the website, that’s what this web site is providing.
Salam hormat, saya melihat-lihat artikel tentang JepangBet dan saya akui situs ini terlihat meyakinkan sebagai platform slot gacor maxwin tahun 2025.
Informasi seputar bonus harian sangat bermanfaat. Saya pribadi sedang butuh referensi *link judi slot gacor terpercaya*
dan JEPANGBET bisa jadi pilihan.
Tolong terus bagikan info bermanfaat seperti ini.
Sukses terus untuk penulis dan timnya!
“Glad to see a prostate supplement like ProstaVive that’s made in the USA with clean, natural ingredients. No harsh chemicals or stimulants is a big plus!”
If you are going for most excellent contents like myself, only pay a quick visit this website every day as it provides quality contents, thanks
My family members every time say that I am wasting my time here at web,
except I know I am getting familiarity all the time by reading such pleasant articles or reviews.
I don’t know if it’s just me or if everybody else experiencing problems with
your website. It looks like some of the text within your content are running off the screen. Can someone else
please provide feedback and let me know if this is happening to them as well?
This could be a problem with my internet browser because I’ve had this happen previously.
Thank you
It’s going to be ending of mine day, however before end I am reading this great paragraph to improve
my knowledge.
Wonderful, what a blog it is! This blog presents helpful data to
us, keep it up.
Everything is very open with a very clear explanation of the
challenges. It was truly informative. Your website is extremely helpful.
Many thanks for sharing!
It’s the best time to make some plans for the future and it is time
to be happy. I have read this post and if I could I wish to recommend you some attention-grabbing things or suggestions.
Maybe you could write subsequent articles regarding this article.
I wish to learn more issues about it!
You’ve made some decent points there. I looked
on the net to find out more about the issue and found most people
will go along with your views on this site.
Hello! I understand this is somewhat off-topic however I needed to ask.
Does running a well-established blog like yours require a massive amount work?
I am completely new to blogging however I
do write in my diary everyday. I’d like to start a blog
so I will be able to share my experience and thoughts online.
Please let me know if you have any kind of recommendations or tips for brand new aspiring bloggers.
Thankyou!
Very good post! We are linking to this great article on our website.
Keep up the good writing.
I like the valuable information you supply for your articles.
I’ll bookmark your blog and take a look at again here regularly.
I am quite sure I’ll be told many new stuff right right here!
Good luck for the following!
Have you ever considered about including a little bit more than just your articles?
I mean, what you say is important and everything.
Nevertheless just imagine if you added some great visuals or videos to give your posts
more, “pop”! Your content is excellent but with pics and
videos, this site could certainly be one of the
best in its field. Wonderful blog!
Hi, its pleasant article regarding media print, we all know media is a fantastic source of information.
I’d like to find out more? I’d care to find out some additional information.
Someone necessarily help to make seriously posts I might state.
That is the very first time I frequented your website page and so far?
I surprised with the research you made to make this particular publish amazing.
Excellent process!
I like the helpful info you provide in your articles. I’ll bookmark your blog and check again here frequently.
I am quite certain I will learn lots of new stuff right here!
Best of luck for the next!
I don’t know whether it’s just me or if everybody else experiencing
issues with your blog. It appears as though some of
the written text within your posts are running off the screen. Can somebody else please comment and let me know if this is happening to
them as well? This could be a issue with my web browser because I’ve had this happen previously.
Many thanks
My developer is trying to persuade me to move to .net from PHP.
I have always disliked the idea because of the expenses.
But he’s tryiong none the less. I’ve been using WordPress on various websites for about a year and
am nervous about switching to another platform.
I have heard very good things about blogengine.net.
Is there a way I can import all my wordpress content into it?
Any help would be greatly appreciated!
নতুন বাংলাদেশি খেলোয়াড়দের জন্য E2BET এর বিশেষ ওয়েলকাম বোনাস। ১৮+ বয়সীদের জন্য দ্রুত টাকা উত্তোলন এবং নিরাপদ প্ল্যাটফর্মে বিনামূল্যে লাইভ ম্যাচ স্ট্রিমিং।
You actually make it seem so easy along with your presentation but
I to find this matter to be actually one thing which I feel I might never understand.
It kind of feels too complex and extremely wide for me.
I am looking ahead in your subsequent publish,
I’ll try to get the grasp of it!
May I just say what a relief to find an individual
who genuinely understands what they are discussing over the internet.
You certainly know how to bring a problem to light and make it important.
More people need to read this and understand this side of the story.
I was surprised you are not more popular since you surely possess the gift.
This article will assist the internet users for building up new web site or even a blog from start to end.
Have you ever thought about adding a little bit more than just your articles?
I mean, what you say is important and all. However think of
if you added some great images or videos to give your posts more, “pop”!
Your content is excellent but with images and clips, this
site could certainly be one of the greatest in its niche.
Wonderful blog!
I read this article completely regarding the difference of newest and previous technologies, it’s awesome article.
Hello would you mind letting me know which hosting company you’re utilizing?
I’ve loaded your blog in 3 completely different browsers and I must say
this blog loads a lot faster then most. Can you suggest a good hosting
provider at a honest price? Thank you, I appreciate it!
Piece of writing writing is also a excitement,
if you know afterward you can write or else it is complicated to write.
You could definitely see your expertise within the work you write.
The sector hopes for even more passionate writers such as you who are not afraid to say how they believe.
All the time follow your heart.
Howdy! I could have sworn I’ve been to this blog
before but after checking through some of the post I realized it’s new to me.
Anyhow, I’m definitely glad I found it and I’ll be book-marking and
checking back frequently!
What’s up to every one, as I am in fact keen of reading this
blog’s post to be updated daily. It includes good data.
Hi, I log on to your new stuff on a regular basis. Your writing style is awesome,
keep up the good work!
Amazing! Its truly amazing paragraph, I have got much clear idea on the topic of from this post.
Valuable information. Lucky me I found your website accidentally,
and I am surprised why this coincidence did not came about earlier!
I bookmarked it.
Hello my loved one! I want to say that this
article is awesome, nice written and include approximately
all significant infos. I’d like to see more posts like this .
Great goods from you, man. I have understand your stuff previous
to and you’re just extremely excellent. I actually like what you’ve acquired here, certainly like what you’re saying and the way in which
you say it. You make it enjoyable and you still care for to
keep it sensible. I can’t wait to read far more from
you. This is really a great website.
Fantastic goods from you, man. I have understand your
stuff previous to and you’re just too wonderful. I really like what you have acquired here,
really like what you are stating and the way in which you
say it. You make it entertaining and you still care for to
keep it smart. I can’t wait to read far more from you.
This is actually a great website.
I don’t know whether it’s just me or if everyone else encountering problems with your site.
It appears like some of the written text on your content are running off the screen. Can somebody else please provide
feedback and let me know if this is happening to them
as well? This could be a problem with my internet browser because I’ve had
this happen before. Thanks
Great article! We will be linking to this
great article on our website. Keep up the great writing.
I believe that is one of the so much vital information for me.
And i’m glad reading your article. However wanna statement on few normal
issues, The web site taste is perfect, the articles is actually excellent :
D. Good process, cheers
Aw, this was an extremely nice post. Taking the time and
actual effort to produce a very good article… but what can I say… I hesitate a lot and don’t seem to
get nearly anything done.
You are so cool! I don’t believe I have read something like that before.
So good to find another person with some unique thoughts on this issue.
Seriously.. many thanks for starting this up. This website is something that is required on the internet, someone with some originality!
Hi Dear, are you truly visiting this website on a regular basis, if so then you will definitely take nice knowledge.
Hey there just wanted to give you a quick heads up. The text
in your article seem to be running off the screen in Firefox.
I’m not sure if this is a format issue or something to do with
internet browser compatibility but I figured I’d post to let
you know. The design look great though! Hope you get the issue fixed soon.
Thanks
Ahaa, its good conversation concerning this article here at this blog, I have
read all that, so now me also commenting at this
place.
bookmarked!!, I really like your site!
Nice response in return of this question with firm arguments and describing the whole thing regarding that.
Hi to every body, it’s my first go to see of this weblog; this
weblog consists of remarkable and in fact excellent information in support of readers.
Right away I am going to do my breakfast, after having
my breakfast coming over again to read additional news.
Write more, thats all I have to say. Literally, it seems as though you
relied on the video to make your point. You clearly
know what youre talking about, why throw away your intelligence on just posting videos to your weblog when you could be
giving us something informative to read?
This site was… how do I say it? Relevant!! Finally I’ve found something that helped
me. Thanks a lot!
We’re a group of volunteers and opening a new scheme in our community.
Your web site provided us with helpful info to work on. You’ve
done an impressive activity and our whole community can be thankful to
you.
I was able to find good info from your blog articles.
Hey! I know this is kinda off topic but I was wondering if you knew where I could find a captcha plugin for my comment form?
I’m using the same blog platform as yours and I’m
having difficulty finding one? Thanks a lot!
naturally like your web-site however you need to test the spelling on quite a few of your posts.
Several of them are rife with spelling problems and I to find it very bothersome to tell the truth however I will definitely come again again.
Hey! Someone in my Facebook group shared this website with us so I came
to take a look. I’m definitely enjoying the information. I’m
bookmarking and will be tweeting this to my followers! Terrific blog and
superb design.
You’re so awesome! I don’t think I’ve read through a
single thing like this before. So wonderful to discover another person with some original thoughts on this topic.
Really.. thank you for starting this up. This website is one thing that
is needed on the internet, someone with a little originality!
WOW just what I was searching for. Came here by
searching for viagra
I’m amazed, I must say. Seldom do I encounter a blog that’s both
equally educative and entertaining, and let me tell
you, you’ve hit the nail on the head. The issue is an issue that too few folks
are speaking intelligently about. Now i’m very happy
that I came across this during my search for something concerning this.
زیباترین سایت هستین که دیدم
Greetings! Very useful advice in this particular
article! It is the little changes which will make the most significant
changes. Thanks for sharing!
Wow, this post is good, my sister is analyzing these kinds of things,
thus I am going to tell her.
Thanks , I have just been looking for information approximately this topic for a while and yours is the
greatest I’ve came upon till now. But, what about the bottom line?
Are you positive concerning the supply?
Good post. I learn something totally new and challenging
on websites I stumbleupon every day. It will always be exciting to read through
articles from other writers and practice a little something from
other websites.
Hi! This is kind of off topic but I need some help from an established blog.
Is it difficult to set up your own blog? I’m not very techincal but I can figure things out pretty quick.
I’m thinking about making my own but I’m not sure where to start.
Do you have any ideas or suggestions? Thank you
It’s amazing to pay a quick visit this site and reading the views of all
friends about this post, while I am also eager of getting knowledge.
I don’t even know how I stopped up here, but I believed this submit was once good.
I do not realize who you might be however certainly you are going to a famous blogger if you are not already.
Cheers!
I am regular reader, how are you everybody? This piece of writing posted at this web page is really pleasant.
Hi colleagues, how is all, and what you wish for to say regarding this
post, in my view its actually amazing for me.
Please let me know if you’re looking for a article writer for your
site. You have some really good articles and I feel
I would be a good asset. If you ever want to take some of the load off, I’d
really like to write some articles for your blog in exchange for a
link back to mine. Please shoot me an e-mail if interested.
Thank you!
Hi there, everything is going well here and ofcourse every one is sharing facts, that’s actually
good, keep up writing.
It is perfect time to make some plans for the future and
it is time to be happy. I’ve read this post and
if I could I want to suggest you some interesting things or advice.
Maybe you can write next articles referring to this article.
I want to read more things about it!
Hi, I do believe this is an excellent web site. I
stumbledupon it 😉 I will return yet again since I book-marked it.
Money and freedom is the greatest way to change, may you be rich and continue to help other people.
Hi mates, how is the whole thing, and what you desire to say concerning this piece of writing, in my view its truly remarkable designed
for me.
I’m very happy to discover this great site.
I wanted to thank you for ones time due to this wonderful read!!
I definitely really liked every part of it and i also have you saved to fav to look at new things in your blog.
This text is invaluable. How can I find out more?
It is the best time to make a few plans for the future and it
is time to be happy. I’ve read this post and if I may just I want to suggest you few interesting things or advice.
Perhaps you can write next articles relating to
this article. I desire to learn more things about it!
Hello, for all time i used to check weblog posts here early
in the dawn, for the reason that i enjoy to gain knowledge
of more and more.
Excellent items from you, man. I’ve take into account your stuff prior to and you are simply extremely great.
I actually like what you’ve obtained right here, really like what you are saying
and the best way by which you are saying it. You are
making it enjoyable and you continue to take care of to keep it wise.
I can not wait to read far more from you.
This is actually a great website.
Thank you a lot for sharing this with all folks you actually recognize what you are speaking about!
Bookmarked. Kindly additionally consult with my site =).
We can have a hyperlink change agreement between us
I don’t even know the way I ended up right here, however I believed this put
up was good. I don’t realize who you are however
certainly you’re going to a famous blogger if you happen to aren’t already.
Cheers!
Appreciating the commitment you put into your site and detailed information you offer.
It’s great to come across a blog every once in a while
that isn’t the same old rehashed information. Great read!
I’ve saved your site and I’m including your RSS feeds to
my Google account.
Hi! This is my first comment here so I just wanted to give a quick shout out and
tell you I genuinely enjoy reading through your articles.
Can you recommend any other blogs/websites/forums that cover
the same topics? Thank you!
This design is steller! You definitely know how to keep a reader amused.
Between your wit and your videos, I was almost moved to start my own blog (well, almost…HaHa!) Wonderful job.
I really loved what you had to say, and more than that, how you presented it.
Too cool!
I know this website presents quality dependent articles
and other information, is there any other website which presents such information in quality?
For newest news you have to go to see world wide web and on the web I found this web page as a best web page for newest updates.
Great article! This is the type of info that are supposed to be
shared around the web. Disgrace on the seek engines for now not positioning this post higher!
Come on over and seek advice from my web site . Thank you =)
Hi there to every , because I am actually eager of reading this website’s post
to be updated daily. It includes pleasant material.
Today, I went to the beach front with my kids. I found a sea
shell and gave it to my 4 year old daughter and said “You can hear the ocean if you put this to your ear.” She placed the shell to
her ear and screamed. There was a hermit crab inside and it pinched her ear.
She never wants to go back! LoL I know this is completely off topic but I had
to tell someone!
Hey I am so delighted I found your site, I really
found you by error, while I was browsing on Digg for something else, Anyways I am here now and
would just like to say thanks a lot for a fantastic post
and a all round entertaining blog (I also love the theme/design), I don’t have
time to read through it all at the moment but I have bookmarked it and
also added in your RSS feeds, so when I have time I will
be back to read much more, Please do keep up the great job.
Aw, this was an exceptionally good post. Taking a few minutes and actual effort to make a good article… but what can I say…
I procrastinate a whole lot and never manage to
get anything done.
Heya i’m for the first time here. I came across this board and I
in finding It truly helpful & it helped me out a lot.
I am hoping to offer one thing again and help others like you helped me.
You really make it appear so easy together with your presentation but
I find this matter to be really something which I believe I would never understand.
It kind of feels too complex and very huge for me. I’m having a look forward to your next post, I’ll try to get the hang of it!
What i don’t understood is if truth be told how you’re no longer really much
more smartly-appreciated than you may be right now.
You’re very intelligent. You already know thus considerably relating to this topic,
made me personally believe it from a lot of varied
angles. Its like men and women aren’t fascinated until
it’s one thing to accomplish with Lady gaga! Your individual stuffs excellent.
All the time take care of it up!
Hello there! This is kind of off topic but I need some help from an established blog.
Is it very hard to set up your own blog?
I’m not very techincal but I can figure things out pretty quick.
I’m thinking about creating my own but I’m not sure where to start.
Do you have any tips or suggestions? Cheers
I’m not sure why but this site is loading incredibly slow
for me. Is anyone else having this issue or is it a problem on my
end? I’ll check back later on and see if the problem still exists.
I’d like to find out more? I’d love to find out some additional information.
Hello, i think that i saw you visited my web site so i came to “return the favor”.I’m attempting to find
things to improve my site!I suppose its ok to use some of your ideas!!
Great web site you have here.. It’s difficult to find quality
writing like yours these days. I truly appreciate individuals like you!
Take care!!
Hey there, I think your blog might be having browser compatibility issues.
When I look at your website in Safari, it looks
fine but when opening in Internet Explorer, it has some overlapping.
I just wanted to give you a quick heads up! Other then that,
awesome blog!
I’ve been browsing online more than three hours today, yet I never found any interesting article
like yours. It is pretty worth enough for me.
In my view, if all web owners and bloggers made good content as you did, the web will be much
more useful than ever before.
Everything is very open with a very clear explanation of
the issues. It was really informative. Your website is extremely helpful.
Thank you for sharing!
This post provides clear idea in support of the new users of blogging,
that actually how to do blogging and site-building.
It’s perfect time to make some plans for the future and it is time to
be happy. I’ve read this post and if I could I wish to suggest you few interesting things
or advice. Perhaps you could write next articles referring to this article.
I desire to read more things about it!
Hello colleagues, nice post and good urging commented
at this place, I am truly enjoying by these.
Its like you read my mind! You seem to know so much about this,
like you wrote the book in it or something. I think that you could do with some pics
to drive the message home a little bit, but instead of that,
this is great blog. A fantastic read. I’ll definitely be back.
What’s up, every time i used to check blog posts here in the early hours
in the break of day, as i like to gain knowledge of more and
more.
My brother suggested I would possibly like this web site.
He was once totally right. This publish actually made my day.
You cann’t consider just how much time I had spent for this information! Thank
you!
I visited several websites however the audio quality for audio songs current at this web page is genuinely wonderful.
Expert-level service, expert-level attention to detail. Competent team selected. Expert excellence.
Howdy! Someone in my Facebook group shared this site with us so I came to give it a look.
I’m definitely enjoying the information. I’m bookmarking and will be tweeting
this to my followers! Great blog and great style and design.
Aw, this was an extremely nice post. Spending some time and
actual effort to create a good article… but what can I say… I
procrastinate a whole lot and never manage to get anything done.
Magnificent web site. Lots of useful information here.
I am sending it to a few buddies ans also sharing in delicious.
And certainly, thank you for your sweat!
I’ve been surfing on-line greater than three hours these days, but I never discovered
any attention-grabbing article like yours. It is beautiful value sufficient
for me. In my opinion, if all web owners and bloggers made excellent content material as you did, the
web shall be a lot more helpful than ever before.
Dark Gold EA is a solid choice for traders looking to
automate their strategies with a focus on gold, Bitcoin, and major forex pairs.
What stands out is its balance between performance and risk
management—unlike many high-risk bots, it aims for long-term sustainability.
The customization options and technical integration features make it suitable for both beginners and experienced traders who want control over their trades.
Definitely worth a closer look if you’re into automated trading.
Hello There. I found your blog using msn. This is a very well
written article. I will make sure to bookmark
it and come back to read more of your useful information. Thanks for
the post. I’ll definitely return.
Spot on with this write-up, I absolutely think this web site needs far more attention. I’ll probably be returning to see more, thanks for
the info!
You really make it seem so easy with your presentation but I find this topic to be really something
that I think I would never understand. It seems too complex
and extremely broad for me. I’m looking forward for your next post, I’ll try to get
the hang of it!
Consistent reliability delivered, professional integrity maintained. Professional integrity appreciated. Trustworthy service.
Everything is very open with a very clear explanation of the
challenges. It was really informative. Your site is very useful.
Thank you for sharing!
Howdy! I could have sworn I’ve visited this site before but after going through some of
the articles I realized it’s new to me. Nonetheless, I’m
definitely happy I stumbled upon it and I’ll be book-marking
it and checking back frequently!
Hello everyone, it’s my first visit at this web page, and article is in fact fruitful in support of me, keep up posting
these types of posts.
Heya i am for the primary time here. I came
across this board and I in finding It truly useful
& it helped me out a lot. I am hoping to present one thing again and aid others such as you helped me.
obviously like your web site but you need to check the spelling on several of
your posts. Several of them are rife with spelling problems and I find it very troublesome to
tell the reality on the other hand I will certainly
come again again.
This is really interesting, You are a very skilled blogger.
I’ve joined your feed and look forward to seeking
more of your wonderful post. Also, I have shared your site in my
social networks!
Hurrah, that’s what I was searching for, what a material!
present here at this webpage, thanks admin of this web page.
Howdy! Do you know if they make any plugins to assist with SEO?
I’m trying to get my blog to rank for some targeted keywords but I’m
not seeing very good success. If you know of any please
share. Appreciate it!
I’ve read a few excellent stuff here. Definitely price bookmarking for revisiting.
I wonder how so much attempt you put to make the sort of magnificent informative web site.
I’ve been surfing online more than three hours as
of late, but I never discovered any fascinating article
like yours. It is pretty worth sufficient for me. In my view,
if all website owners and bloggers made just right content as you probably did, the net will likely be a lot more helpful than ever before.
My coder is trying to persuade me to move to .net from PHP.
I have always disliked the idea because of the costs. But he’s tryiong none the less.
I’ve been using Movable-type on a variety of websites for
about a year and am anxious about switching to another platform.
I have heard fantastic things about blogengine.net. Is there a way I can transfer all my
wordpress content into it? Any help would be really appreciated!
Hey would you mind letting me know which webhost you’re using?
I’ve loaded your blog in 3 different web browsers and I must say this blog loads
a lot faster then most. Can you recommend a good hosting provider at a fair price?
Many thanks, I appreciate it!
You’re so cool! I don’t think I have read through something like
that before. So great to discover another person with some genuine thoughts on this subject.
Really.. many thanks for starting this up.
This website is one thing that’s needed on the web, someone with
some originality!
High-end service excellence, luxury living properly maintained. Setting the luxury standard. Luxury living perfected.
We’re a group of volunteers and opening a new
scheme in our community. Your website offered us with valuable
information to work on. You have done an impressive job and our whole community will be grateful to you.
Fantastic post however I was wondering if you could write a litte more
on this subject? I’d be very thankful if you could elaborate a little
bit further. Many thanks!
Hi! I’ve been following your site for some time now and finally got the bravery to go ahead and give you a shout out from
Huffman Tx! Just wanted to tell you keep up the excellent job!
When some one searches for his vital thing,
thus he/she wishes to be available that in detail, thus that thing is maintained over here.
Hey! I know this is kind of off topic but I was wondering which blog platform are you using for this site?
I’m getting sick and tired of WordPress because I’ve had issues with hackers and
I’m looking at options for another platform. I would
be great if you could point me in the direction of a good platform.
We stumbled over here coming from a different web page and
thought I might as well check things out. I like what I see
so now i’m following you. Look forward to looking over your web page
again.
Magnificent goods from you, man. I’ve take into
accout your stuff previous to and you’re just extremely fantastic.
I actually like what you have got here, certainly like
what you are stating and the best way in which you are saying it.
You make it enjoyable and you continue to care for to keep it sensible.
I can’t wait to learn much more from you. That is actually a
terrific site.
Hmm is anyone else experiencing problems with the
images on this blog loading? I’m trying to figure out if its a problem
on my end or if it’s the blog. Any suggestions would be greatly appreciated.
Hey! This is kind of off topic but I need some
guidance from an established blog. Is it very
hard to set up your own blog? I’m not very techincal but I
can figure things out pretty fast. I’m thinking about creating my own but I’m not sure where to start.
Do you have any ideas or suggestions? Thank you
I simply could not leave your web site prior to suggesting that I actually loved the
usual info a person provide on your visitors? Is going
to be again often to inspect new posts
It’s perfect time to make some plans for the future and it is time to be happy.
I have read this post and if I could I wish to suggest you few interesting things or suggestions.
Perhaps you can write next articles referring to this article.
I wish to read more things about it!
Trustworthy in our home, reliable every single visit. Reliability champions found. Consistent appreciation.
continuously i used to read smaller content which as well clear their motive, and that is
also happening with this article which I am reading at this time.
Hello there! This is my first comment here so I just wanted to
give a quick shout out and say I really enjoy reading through your blog posts.
Can you recommend any other blogs/websites/forums that
cover the same subjects? Many thanks!
Unquestionably consider that that you stated.
Your favorite reason seemed to be at the net the simplest factor
to bear in mind of. I say to you, I certainly get annoyed while other folks consider concerns that they
just do not realize about. You controlled to hit the nail upon the highest and also
defined out the whole thing with no need side-effects
, other folks can take a signal. Will probably be
again to get more. Thanks
The Ice Water Hack is a simple and refreshing trick—some people say it helps curb cravings and slightly boosts metabolism,
but it works best when combined with a healthy diet and lifestyle.
Ask ChatGPT
Башня Онлайн — это веб-радиостанция, которая объединяет музыку, культурную среду,
и молодёжную урбанистическую
силу.
В эфире звучат нестандартные записи, редкие сеты, инди, цифровая
музыка и авторские программы, создающие впечатление
музыкального авангарда.
Это радио для тех, кто уважает необычное звучание и
стремится к музыкальным открытиям в музыкальном мире.
Платформа позиционирует себя как автономный медиапроект, освобождённая от клише.
Здесь нет рекламного шума и однотипного
контента — только вдумчивый музыкальный контент и глубокий
подход к контенту.
Слушать эфир Башни всегда под рукой круглосуточно, а для музыкальных фанатов платформа radioabc.com
— удобная возможность подключаться к эфиру.
my homepage; радио башня
First off I want to say terrific blog! I had a quick
question that I’d like to ask if you don’t mind.
I was curious to know how you center yourself and clear your head prior to writing.
I’ve had trouble clearing my mind in getting my ideas out there.
I do take pleasure in writing however it just seems like the first 10 to 15 minutes are generally wasted just trying to figure
out how to begin. Any recommendations or hints?
Kudos!
Hello There. I discovered your weblog the use
of msn. This is a really well written article.
I’ll make sure to bookmark it and come back to learn extra
of your useful info. Thank you for the post. I will certainly comeback.
Because the admin of this site is working, no question very soon it will be famous, due to its
quality contents.
Hello, Neat post. There is a problem with your web site in internet explorer, might check this?
IE still is the market leader and a good component
of other people will miss your fantastic writing due to this problem.
Hi, I do believe this is an excellent website. I stumbledupon it 😉 I am going
to return yet again since I book-marked it. Money and freedom is the greatest way to change, may
you be rich and continue to help other people.
Remarkable things here. I am very satisfied to look your post.
Thank you so much and I am having a look ahead to touch you.
Will you kindly drop me a e-mail?
Hi my friend! I want to say that this article is awesome, nice written and come with
approximately all significant infos. I’d like to see more posts like this .
Heya i am for the first time here. I came across
this board and I find It truly useful & it helped me out much.
I hope to give something back and aid others like you helped me.
I’m not sure why but this blog is loading incredibly slow for me.
Is anyone else having this problem or is it a issue on my end?
I’ll check back later and see if the problem
still exists.
I want to to thank you for this excellent read!!
I absolutely enjoyed every little bit of it.
I have you book-marked to look at new things you post…
I’ve been exploring for a little for any high quality articles or blog
posts on this sort of area . Exploring in Yahoo I eventually stumbled upon this
website. Studying this info So i’m glad to convey that I’ve
an incredibly just right uncanny feeling I came upon just what I needed.
I such a lot for sure will make certain to do not overlook this website and provides it a glance regularly.
Pretty nice post. I just stumbled upon your blog and wanted to say that I’ve really enjoyed surfing around your blog posts.
In any case I will be subscribing to your rss feed and
I hope you write again soon!
What you posted was actually very reasonable. However, think about this, what if you
added a little content? I ain’t saying your content
is not good., but what if you added a post title to possibly get folk’s attention?
I mean Windows 10 IoT Install Guide is a little plain. You should
glance at Yahoo’s front page and note how they create article headlines to grab
people interested. You might add a related video or
a related picture or two to get people excited about what you’ve got to say.
Just my opinion, it could bring your posts a little bit more interesting.
Wow, that’s what I was exploring for, what a data!
present here at this blog, thanks admin of this website.
Howdy! I simply wish to offer you a big thumbs up for your great
info you have here on this post. I am coming back to your site for more soon.
Hello, I think your site might be having browser compatibility issues.
When I look at your blog in Chrome, it looks fine but when opening in Internet Explorer, it has
some overlapping. I just wanted to give you a quick heads up!
Other then that, very good blog!
Good day! This post could not be written any better!
Reading through this post reminds me of my old room
mate! He always kept talking about this. I will forward this
write-up to him. Fairly certain he will have a good
read. Thank you for sharing!
Hello mates, how is all, and what you want to say regarding this post,
in my view its actually awesome in favor of me.
Hey there! This post could not be written any better! Reading this post reminds me of my old room mate!
He always kept chatting about this. I will forward this article to him.
Fairly certain he will have a good read. Many thanks for sharing!
High-end service excellence, maintains our investment property value. Recommending to luxury properties. Premium service premium results.
Hello there! Do you use Twitter? I’d like to follow you if that would be ok.
I’m absolutely enjoying your blog and look forward to new
updates.
I used to be able to find good info from your blog
articles.
I like the valuable info you provide in your articles.
I will bookmark your blog and check again here regularly. I’m
quite certain I’ll learn lots of new stuff right here!
Good luck for the next!
What’s up, this weekend is good in favor of me, for
the reason that this moment i am reading this fantastic
educational piece of writing here at my residence.
When someone writes an piece of writing he/she retains the plan of a user in his/her mind that
how a user can understand it. Therefore that’s why this article is amazing.
Thanks!
Whats up are using WordPress for your blog platform?
I’m new to the blog world but I’m trying to get started and create my own.
Do you require any coding expertise to make your own blog?
Any help would be really appreciated!
PrimeBiome looks like an interesting probiotic supplement, especially for gut health
and digestion. I like that it aims to restore balance in the microbiome, which can impact everything from
immunity to mood. Has anyone here noticed real results with it—like better
digestion or less bloating? Would love to hear personal experiences!
Greetings! Very useful advice in this particular article!
It is the little changes that will make the
most significant changes. Many thanks for sharing!
Yes! Finally someone writes about فرمول درصد گیری کنکور.
Wow that was odd. I just wrote an extremely long comment but after I clicked
submit my comment didn’t show up. Grrrr… well I’m not
writing all that over again. Anyways, just wanted to say excellent blog!
I absolutely love your blog and find the majority of your post’s to be exactly I’m
looking for. Do you offer guest writers to write
content for yourself? I wouldn’t mind writing a post or elaborating on a number of the
subjects you write concerning here. Again, awesome web log!
Hello friends, its enormous paragraph concerning cultureand fully defined, keep it up all
the time.
Great goods from you, man. I’ve keep in mind your stuff prior to and you’re just too great.
I actually like what you’ve received here, really like what you’re
saying and the way through which you assert it. You are making it enjoyable and you continue
to care for to stay it smart. I can not wait to learn much more from you.
This is actually a wonderful website.
I read this article fully on the topic of the resemblance of latest and earlier technologies, it’s
remarkable article.
When someone writes an article he/she retains the image of
a user in his/her mind that how a user can be aware of it.
So that’s why this paragraph is amazing. Thanks!
I’ve read several good stuff here. Certainly price bookmarking for revisiting.
I surprise how much effort you set to make such a wonderful informative web site.
Hi there just wanted to give you a quick heads up. The words in your content seem to be running off the screen in Opera.
I’m not sure if this is a formatting issue or something to do with browser compatibility but I thought I’d post
to let you know. The layout look great though! Hope you get the problem fixed soon. Cheers
I just like the valuable info you supply on your articles.
I will bookmark your weblog and take a look at once more here frequently.
I’m quite certain I will learn plenty of new stuff right right here!
Good luck for the next!
Thanks for sharing such a pleasant thinking,
paragraph is fastidious, thats why i have read it fully
Wow, amazing weblog format! How long have you been blogging for?
you made running a blog glance easy. The whole look of
your site is great, as neatly as the content!
Hello there, just became aware of your blog through Google, and found that it is really informative.
I am going to watch out for brussels. I will appreciate if you continue this in future.
Many people will be benefited from your writing. Cheers!
Incredible! This blog looks exactly like my
old one! It’s on a totally different subject but it has pretty
much the same layout and design. Superb choice of colors!
Thank you for the auspicious writeup. It in fact was a amusement account
it. Look advanced to far added agreeable from you!
By the way, how can we communicate?
I used to be able to find good information from your content.
Nice post. I learn something new and challenging on blogs I stumbleupon every day.
It will always be useful to read through articles from other writers and practice a little something from other web
sites.
Great goods from you, man. I have keep in mind your stuff previous to and you are simply too fantastic.
I actually like what you’ve obtained right here, really like what you are saying and the
way during which you say it. You’re making it enjoyable
and you still care for to keep it smart. I can not wait to
learn far more from you. This is actually a tremendous web
site.
Can you tell us more about this? I’d care to find out
some additional information.
Hello, Neat post. There’s a problem with your website
in web explorer, would test this? IE nonetheless is the marketplace leader
and a large component of other folks will miss your wonderful writing because of this problem.
I appreciate, result in I discovered exactly what I was looking for.
You have ended my four day long hunt! God Bless you man. Have a nice day.
Bye
I’m truly enjoying the design and layout of your
blog. It’s a very easy on the eyes which makes it much more pleasant
for me to come here and visit more often. Did you
hire out a developer to create your theme? Superb work!
Interesting blog! Is your theme custom made or did you download it from somewhere?
A theme like yours with a few simple tweeks would really make my blog shine.
Please let me know where you got your design. With thanks
What’s up everybody, here every one is sharing these kinds of knowledge, so it’s good to read this webpage,
and I used to pay a quick visit this weblog all the time.
Remarkable issues here. I am very glad to see your post.
Thanks so much and I am looking forward to touch you.
Will you please drop me a e-mail?
Hello, I log on to your blogs regularly. Your humoristic style is awesome, keep
it up!
I don’t even understand how I finished up right here, but I assumed this
submit was great. I don’t recognise who you might be
but certainly you are going to a famous blogger in the event you aren’t already.
Cheers!
Sweet blog! I found it while searching on Yahoo News. Do you have any tips on how to get
listed in Yahoo News? I’ve been trying for a while but I never seem to get there!
Appreciate it
Wow, this post is nice, my sister is analyzing such
things, thus I am going to tell her.
Pretty! This was an incredibly wonderful post. Many thanks for providing
this info.
Excellent pieces. Keep posting such kind of information on your blog.
Im really impressed by it.
Hello there, You have performed a fantastic
job. I will definitely digg it and in my opinion recommend to
my friends. I am confident they will be benefited from this website.
ProstaVive seems to be getting good attention for supporting prostate health naturally.
I like that it claims to help with frequent urination and better bladder control—issues a lot of men deal with as they age.
If the ingredients are truly effective and safe, this might be
a smart supplement to consider. Has anyone here had
a positive experience with it?
Ask ChatGPT
Write more, thats all I have to say. Literally, it seems as though
you relied on the video to make your point. You definitely know what youre talking about, why
waste your intelligence on just posting videos to your site when you could be
giving us something enlightening to read?
WOW just what I was looking for. Came here
by searching for insurance
Integrity-based cleaning, reliable every single visit. Dependable service discovered. Trustworthy service.
I’ve learn a few just right stuff here. Definitely value bookmarking for revisiting.
I wonder how much attempt you set to make any such fantastic informative
site.
I think this is among the such a lot vital information for me.
And i am satisfied studying your article. However wanna observation on some normal issues, The site taste is great, the articles is
in point of fact nice : D. Just right activity, cheers
I constantly emailed this weblog post page to all my associates,
as if like to read it then my contacts will too.
Currently it seems like WordPress is the preferred blogging platform available right now.
(from what I’ve read) Is that what you are using on your blog?
Quietum Plus seems like a solid option for anyone looking to support their hearing naturally.
With its plant-based formula and focus on overall ear
health, it stands out from typical solutions.
Definitely worth considering if you’re looking for long-term support without side effects!
Hi there, I found your blog by means of Google while searching for a related subject,
your site got here up, it appears great. I’ve bookmarked
it in my google bookmarks.
Hi there, simply turned into alert to your weblog through Google, and located that it is really informative.
I’m gonna watch out for brussels. I’ll be grateful should you proceed this in future.
A lot of other people will be benefited out of your writing.
Cheers!
I believe what you composed was very reasonable.
But, what about this? suppose you typed a catchier post title?
I ain’t suggesting your content isn’t solid, however suppose you added something to maybe grab people’s attention? I
mean Windows 10 IoT Install Guide is a little plain. You might peek at Yahoo’s front page
and watch how they create post titles to grab people to open the links.
You might add a video or a related picture or two to get readers interested about everything’ve written. Just
my opinion, it might bring your posts a little livelier.
This paragraph presents clear idea for the new viewers of blogging, that actually how to do blogging.
Genuinely when someone doesn’t be aware of after
that its up to other people that they will help,
so here it occurs.
Today, I went to the beach front with my children. I
found a sea shell and gave it to my 4 year old daughter and said “You can hear the ocean if you put this to your ear.” She
put the shell to her ear and screamed. There was a hermit crab inside and it pinched her ear.
She never wants to go back! LoL I know this is completely off
topic but I had to tell someone!
each time i used to read smaller articles which as well clear their motive, and
that is also happening with this post which I am reading now.
Hey there! I’ve been following your web site for a long time now and finally got the bravery to go ahead
and give you a shout out from Porter Texas! Just wanted to say keep up the great work!
Awesome blog! Do you have any suggestions for aspiring writers?
I’m hoping to start my own site soon but I’m a little lost on everything.
Would you recommend starting with a free platform like WordPress or go for a paid
option? There are so many options out there that
I’m totally confused .. Any tips? Appreciate it!
I really like your blog.. very nice colors & theme. Did you create this website yourself or did you
hire someone to do it for you? Plz reply as I’m looking to design my
own blog and would like to find out where u got this
from. many thanks
Someone essentially help to make significantly articles I
would state. That is the first time I frequented your website page
and so far? I surprised with the analysis you made to create this actual post extraordinary.
Wonderful job!
Hi there, I think your website could be having internet browser
compatibility issues. When I look at your blog in Safari,
it looks fine but when opening in I.E., it
has some overlapping issues. I merely wanted to provide you with a quick
heads up! Besides that, great website!
I am regular visitor, how are you everybody? This paragraph posted at this website is actually fastidious.
Hmm is anyone else encountering problems with the images on this blog loading?
I’m trying to find out if its a problem on my end or if it’s the blog.
Any responses would be greatly appreciated.
Good article. I am facing a few of these issues as well..
I enjoy reading through an article that can make men and women think.
Also, thank you for allowing me to comment!
Everyone loves what you guys are usually up too.
This kind of clever work and reporting! Keep up the
good works guys I’ve added you guys to my blogroll.
Hello! This is my first comment here so I just wanted to give a quick shout out and tell you I genuinely enjoy reading through your posts.
Can you recommend any other blogs/websites/forums that go over the same topics?
Appreciate it!
First off I would like to say terrific blog!
I had a quick question that I’d like to ask if you do not mind.
I was interested to find out how you center yourself and
clear your mind before writing. I have had a difficult
time clearing my mind in getting my thoughts out.
I do enjoy writing however it just seems like the first 10 to 15 minutes are
generally wasted simply just trying to figure out how to begin. Any recommendations or hints?
Kudos!
What a stuff of un-ambiguity and preserveness of precious knowledge concerning unpredicted
feelings.
I’m impressed, I must say. Rarely do I come across a
blog that’s both equally educative and interesting, and without a doubt, you’ve hit the nail on the head.
The problem is something which too few people are speaking intelligently
about. Now i’m very happy I found this during my hunt for
something relating to this.
continuously i used to read smaller posts that also clear their motive, and that is also happening with this post
which I am reading here.
In fact when someone doesn’t be aware of after that its up to
other users that they will assist, so here it occurs.
Hello! This is kind of off topic but I need some help from an established blog.
Is it difficult to set up your own blog? I’m not very techincal but I can figure things out pretty quick.
I’m thinking about setting up my own but I’m not sure where
to start. Do you have any ideas or suggestions? Thanks
It’s going to be ending of mine day, except before end I
am reading this enormous paragraph to increase my
experience.
Hi there, its nice piece of writing on the topic of media
print, we all understand media is a impressive source of facts.
AquaSculpt is quickly becoming a favorite for those looking to burn fat without harsh stimulants
or crash diets! Its cold-exposure-inspired formula is a fresh take on natural weight loss.
If you’re aiming for real results with a gentle approach, AquaSculpt is definitely worth
a try.
These are genuinely fantastic ideas in regarding blogging.
You have touched some good points here. Any way keep up wrinting.
I relish, cause I discovered just what I was taking a look for.
You have ended my four day long hunt! God Bless you man. Have a nice day.
Bye
Thanks for sharing your thoughts about Shop site. Regards
Hello, i think that i saw you visited my web site so i came to “return the favor”.I am trying to
find things to improve my site!I suppose its ok to use some
of your ideas!!
Hey! I just wanted to ask if you ever have any problems with hackers?
My last blog (wordpress) was hacked and I ended up losing
many months of hard work due to no back up. Do you have any methods to protect against hackers?
Do you mind if I quote a few of your articles
as long as I provide credit and sources back to your blog?
My website is in the exact same niche as yours and my users would definitely benefit from some of the information you present
here. Please let me know if this okay with you. Cheers!
Excellent beat ! I wish to apprentice while you
amend your site, how could i subscribe for a blog web site?
The account helped me a acceptable deal. I had been a little
bit acquainted of this your broadcast offered bright clear concept
I read this piece of writing fully on the topic of the difference of most
recent and previous technologies, it’s awesome article.
I love what you guys are usually up too. Such
clever work and coverage! Keep up the very good works guys
I’ve incorporated you guys to blogroll.
Pretty nice post. I just stumbled upon your weblog and wanted to say that
I’ve really enjoyed browsing your blog posts. After all I will be subscribing to your feed
and I hope you write again soon!
Hello there! I could have sworn I’ve been to this site before but after browsing through some of the posts I realized
it’s new to me. Regardless, I’m certainly pleased I stumbled upon it and I’ll
be bookmarking it and checking back regularly!
Hello there! I could have sworn I’ve been to this website before but after
checking through some of the post I realized it’s new to me.
Anyways, I’m definitely happy I found it and I’ll be bookmarking and
checking back frequently!
It is perfect time to make some plans for the
long run and it is time to be happy. I have learn this post
and if I may I want to recommend you some attention-grabbing things or advice.
Perhaps you could write next articles regarding this article.
I desire to read more things approximately it!
You really make it appear so easy with your presentation however I find this topic to be actually one
thing which I feel I would by no means understand. It sort of feels too complicated and very extensive for me.
I’m having a look forward on your next post, I’ll attempt to get the hold of it!
I every time used to study post in news papers but now as I
am a user of web therefore from now I am using net for articles, thanks to web.
It’s in fact very difficult in this full of activity life to listen news
on Television, therefore I simply use world wide web for that reason, and take
the most up-to-date news.
Hello there, just became aware of your blog through Google, and found that it is
truly informative. I am going to watch out for brussels.
I will appreciate if you continue this in future. Numerous
people will be benefited from your writing. Cheers!
I was curious if you ever considered changing the layout of your blog?
Its very well written; I love what youve got to say.
But maybe you could a little more in the way of content so people could connect with it better.
Youve got an awful lot of text for only having one or two pictures.
Maybe you could space it out better?
Nice blog! Is your theme custom made or did you download it from somewhere?
A theme like yours with a few simple tweeks would really make my blog stand out.
Please let me know where you got your theme. Thank you
Outstanding weekly care, exactly the consistency we needed. Wouldn’t use anyone else. Thanks for everything.
I like the helpful info you provide in your articles.
I’ll bookmark your weblog and check again here regularly.
I’m quite certain I will learn many new stuff right here!
Best of luck for the next!
Hey there! I’m at work browsing your blog from my new iphone 4!
Just wanted to say I love reading through your blog and look forward to all
your posts! Carry on the great work!
It’s awesome to visit this web site and reading the views of all friends about this article, while I am also eager of getting know-how.
Appreciation to my father who stated to me
about this webpage, this weblog is genuinely amazing.
The Rose Grail Prayer sounds like a beautiful and spiritually
uplifting practice. I like that it’s centered on intention, mindfulness, and connecting with a deeper sense of peace and
purpose. If practiced regularly, it could be a
meaningful way to invite more positivity, clarity, and
emotional balance into daily life.
Quality posts is the secret to invite the people to go to see
the website, that’s what this web page is providing.
excellent submit, very informative. I ponder why the opposite experts of this sector do not realize this.
You should proceed your writing. I’m confident, you’ve a great readers’ base already!
I got this site from my pal who told me regarding this web site and at the moment this time
I am visiting this website and reading very informative articles
at this time.
This article gives clear idea in support of the new visitors of blogging, that truly how to do running a blog.
I’m not that much of a online reader to be honest but your sites really nice, keep
it up! I’ll go ahead and bookmark your site to come back later
on. Cheers
This piece of writing offers clear idea for the new people
of blogging, that in fact how to do blogging and site-building.
I all the time emailed this web site post page to all my contacts, for
the reason that if like to read it after that my links will too.
I have been browsing on-line more than 3 hours
as of late, but I by no means found any interesting article like yours.
It’s pretty worth enough for me. In my opinion,
if all site owners and bloggers made excellent content
material as you did, the web will probably be a lot more helpful than ever before.
Today, while I was at work, my sister stole my iphone and tested to see
if it can survive a 40 foot drop, just so she can be a youtube sensation. My apple ipad is now destroyed and she has 83 views.
I know this is entirely off topic but I had to share it with someone!
A motivating discussion is definitely worth comment.
I do think that you should write more on this topic, it might not be a taboo subject but typically people don’t talk about these subjects.
To the next! Many thanks!!
What’s up to every , as I am truly eager of reading this blog’s post to be updated regularly.
It carries good stuff.
wonderful publish, very informative. I ponder why the other
experts of this sector don’t notice this. You must proceed your writing.
I am sure, you’ve a huge readers’ base already!
It’s an remarkable article for all the web people; they will get benefit from it I am sure.
I simply could not depart your site before suggesting that I really loved the
usual info a person provide for your visitors? Is gonna be again incessantly to check out new posts
Everything is very open with a precise description of the challenges.
It was definitely informative. Your site is useful.
Many thanks for sharing!
You could certainly see your expertise within the article you write.
The world hopes for more passionate writers like you who aren’t afraid to
say how they believe. All the time go after your heart.
Good day I am so glad I found your weblog, I
really found you by mistake, while I was searching
on Yahoo for something else, Nonetheless I am here
now and would just like to say thanks a lot for a marvelous
post and a all round entertaining blog (I also love the theme/design), I don’t have time to read through it all at the moment but I have
book-marked it and also included your RSS feeds, so when I have time I
will be back to read a great deal more, Please do keep up the fantastic
work.
Aw, this was an extremely good post. Spending some time and actual effort to generate a superb article… but what can I say… I put things off a lot and
don’t seem to get nearly anything done.
Pretty portion of content. I simply stumbled upon your weblog and in accession capital to assert that I
acquire in fact enjoyed account your weblog posts. Anyway I’ll be subscribing on your feeds or even I success you access persistently fast.
Excellent article. I am facing some of these issues as well..
I like the helpful info you provide in your articles. I will bookmark your blog and check
again here frequently. I’m quite certain I’ll learn many new stuff right here!
Good luck for the next!
It’s great that you are getting thoughts from this post as well as from our
discussion made at this place.
Quality posts is the secret to invite the viewers to pay a
quick visit the web page, that’s what this web site is
providing.
Wow, incredible weblog layout! How long have you ever been blogging for?
you make running a blog glance easy. The entire glance of
your website is great, as neatly as the content material!
I am really enjoying the theme/design of your
blog. Do you ever run into any browser compatibility problems?
A couple of my blog audience have complained about my blog not working correctly in Explorer but looks great in Chrome.
Do you have any advice to help fix this issue?
Professional standards maintained, expert-level attention to detail. Professional excellence found. Expert recognition.
At this time it sounds like Expression Engine is the preferred blogging platform
available right now. (from what I’ve read) Is that what you are using on your blog?
What’s up to all, how is everything, I think every one is getting more from this web site,
and your views are pleasant designed for new users.
Hello to all, how is all, I think every one is getting
more from this website, and your views are fastidious designed for new people.
Way cool! Some very valid points! I appreciate you writing this write-up plus the rest of the website is really good.
Hi colleagues, how is the whole thing, and what you desire to
say on the topic of this article, in my view its in fact awesome in favor of me.
I was more than happy to uncover this site. I want to to thank you for ones time for this particularly
wonderful read!! I definitely enjoyed every little bit of it and I have you book-marked to
check out new stuff in your site.
Link exchange is nothing else but it is just placing the other person’s
website link on your page at suitable place and other person will
also do similar for you.
Magnificent goods from you, man. I have understand your stuff previous to and you
are just too excellent. I actually like what you have acquired here,
really like what you’re stating and the way in which
you say it. You make it enjoyable and you still care for to keep it sensible.
I cant wait to read far more from you. This is actually a wonderful web
site.
Very good article. I certainly love this site.
Stick with it!
Hey there exceptional website! Does running a blog like this require
a great deal of work? I have absolutely no knowledge of computer programming but
I was hoping to start my own blog in the near future.
Anyway, should you have any recommendations or techniques for new blog owners please share.
I understand this is off subject but I simply wanted to ask.
Appreciate it!
Thanks to my father who shared with me about this webpage, this web site is
truly remarkable.
Hello there! This blog post couldn’t be written any
better! Going through this post reminds me of my previous roommate!
He continually kept preaching about this. I’ll send this
information to him. Fairly certain he will have a very good read.
I appreciate you for sharing!
Remarkable! Its genuinely awesome article, I have got much clear idea
concerning from this paragraph.
I always used to study post in news papers but
now as I am a user of net so from now I am using net for
articles, thanks to web.
I have been exploring for a little for any high-quality articles or weblog posts on this kind of space .
Exploring in Yahoo I ultimately stumbled upon this web site.
Studying this information So i am satisfied to express that I’ve
a very excellent uncanny feeling I came upon just what I needed.
I such a lot unquestionably will make sure to don?t omit this website and give it a look on a continuing basis.
Hello everyone, it’s my first visit at this website, and piece
of writing is actually fruitful in support of me, keep up posting such articles or reviews.
I was recommended this web site by my cousin. I am not sure whether this
post is written by him as nobody else know such detailed about my trouble.
You’re wonderful! Thanks!
This article provides clear idea in support of the new viewers of
blogging, that in fact how to do running a blog.
Attractive section of content. I just stumbled upon your weblog and in accession capital to assert that I get
actually enjoyed account your blog posts. Anyway I’ll be subscribing
to your feeds and even I achievement you access consistently rapidly.
Quality cleaning fair prices, affordable luxury cleaning experience. Best value in NYC cleaning. Value champions.
I know this if off topic but I’m looking into starting my own weblog and was wondering
what all is needed to get setup? I’m assuming having a blog like yours
would cost a pretty penny? I’m not very internet smart so I’m not 100% certain. Any suggestions or advice would be greatly appreciated.
Thank you
It’s going to be ending of mine day, except before end I
am reading this great post to improve my knowledge.
Great post. I used to be checking continuously this weblog and
I am inspired! Extremely helpful information specially the last phase :
) I maintain such information much. I used to be looking for this particular info for a very long time.
Thank you and good luck.
There’s certainly a lot to know about this issue. I like all of the points you’ve made.
Spot on with this write-up, I actually think this
site needs much more attention. I’ll probably be back again to see more, thanks for the advice!
Why viewers still use to read news papers when in this technological world everything is accessible on web?
Thanks a lot for sharing this with all folks you really understand what you are speaking about!
Bookmarked. Please additionally consult with my website
=). We can have a hyperlink change agreement between us
I’m gone to inform my little brother, that he should also visit this webpage on regular basis to get updated from most up-to-date
news.
I am sure this paragraph has touched all the internet viewers, its really really nice piece of writing on building up new web site.
Thanks for your personal marvelous posting! I quite enjoyed reading it, you will
be a great author. I will ensure that I bookmark your blog and will come back later in life.
I want to encourage you to ultimately continue your great work,
have a nice holiday weekend!
Hello, I want to subscribe for this webpage to get hottest updates, thus where can i do it
please assist.
No matter if some one searches for his essential thing, thus he/she desires to be available that in detail, thus that thing is maintained
over here.
Great info. Lucky me I recently found your website by chance (stumbleupon).
I have saved as a favorite for later!
It’s really very complex in this busy life to
listen news on TV, thus I only use the web for that purpose, and get the hottest
information.
My programmer is trying to convince me to move to .net from
PHP. I have always disliked the idea because of the expenses.
But he’s tryiong none the less. I’ve been using WordPress on numerous websites for about a year and am concerned about switching to another platform.
I have heard fantastic things about blogengine.net.
Is there a way I can import all my wordpress posts into it?
Any help would be greatly appreciated!
It’s an amazing post for all the internet users; they will obtain advantage from it
I am sure.
This article is really a good one it helps new internet viewers, who are wishing for blogging.
Everything is very open with a precise explanation of the issues.
It was definitely informative. Your website is very
helpful. Thank you for sharing!
This post is really a fastidious one it assists new web people, who are wishing
in favor of blogging.
Hi friends, its great article on the topic of teachingand
completely explained, keep it up all the time.
naturally like your web-site however you have to test the spelling on quite a few of your posts.
Several of them are rife with spelling problems and I to find it very bothersome to tell the truth on the
other hand I’ll surely come back again.
I love it when folks get together and share opinions.
Great site, continue the good work!
Link exchange is nothing else however it is simply placing the other person’s blog link on your page
at appropriate place and other person will also do same in support of
you.
Asking questions are genuinely nice thing if you are
not understanding anything entirely, however this post presents fastidious understanding
yet.
WOW just what I was searching for. Came here by searching
for vat
Howdy! I could have sworn I’ve visited this website before
but after browsing through many of the articles I realized it’s new to me.
Anyways, I’m definitely pleased I came across
it and I’ll be bookmarking it and checking back regularly!
Thanks on your marvelous posting! I genuinely
enjoyed reading it, you are a great author.I will always bookmark your blog and will
come back at some point. I want to encourage you to ultimately continue your great
job, have a nice weekend!
PrimeBiome seems to be gaining attention for its gut health benefits,
especially for those dealing with bloating,
irregular digestion, and low energy. By supporting a healthy balance of gut bacteria, it may help improve
nutrient absorption and overall wellness. A great option for anyone looking
to restore digestive harmony naturally.
Hello colleagues, its fantastic paragraph concerning cultureand
entirely explained, keep it up all the time.
whoah this blog is magnificent i like reading your articles.
Keep up the good work! You understand, many persons are searching round for this info, you could aid them greatly.
What’s up it’s me, I am also visiting this site regularly, this website is in fact good and the visitors are genuinely sharing pleasant thoughts.
This article will assist the internet viewers for building up new weblog
or even a weblog from start to end.
I think this is one of the most important info for me.
And i am glad reading your article. But want to remark on some general things,
The web site style is ideal, the articles
is really nice : D. Good job, cheers
The ice water hack has been creating quite a buzz lately, with
people claiming it can help boost metabolism and support weight loss.
The idea is that exposing your body to cold triggers thermogenesis,
making your body work harder to maintain its core temperature.
While it sounds simple, pairing it with a healthy lifestyle might be the key to seeing real results.
If you want to grow your familiarity only keep visiting this web site and be updated with the
newest news posted here.
I blog frequently and I really appreciate your information. This article has
truly peaked my interest. I am going to book mark your site and keep checking for new information about once per week.
I subscribed to your RSS feed too.
Excellent weblog right here! Also your web site lots up fast!
What host are you the use of? Can I get your associate link in your
host? I want my site loaded up as quickly as yours lol
Hey! This is my first visit to your blog! We are a
team of volunteers and starting a new project in a community in the same niche.
Your blog provided us useful information to work on. You have done a wonderful
job!
It’s a pity you don’t have a donate button! I’d most certainly donate
to this excellent blog! I suppose for now i’ll settle for bookmarking and adding your RSS feed to my Google
account. I look forward to new updates and
will share this website with my Facebook group.
Chat soon!
This piece of writing will assist the internet users for creating new website or even a weblog from start to end.
Environmentally conscious service, healthy home environment maintained. Telling all eco-conscious friends. Thanks for caring.
I pay a quick visit day-to-day some websites and websites to read articles or reviews, however this blog offers
feature based posts.
Write more, thats all I have to say. Literally,
it seems as though you relied on the video to make your
point. You definitely know what youre talking about, why throw
away your intelligence on just posting videos to your blog when you could
be giving us something enlightening to read?
Yesterday, while I was at work, my sister stole my iphone and tested to see if it can survive a forty foot drop, just so she can be a youtube sensation. My iPad is now broken and
she has 83 views. I know this is totally off topic but I
had to share it with someone!
When some one searches for his essential thing,
thus he/she desires to be available that in detail,
thus that thing is maintained over here.
Hi everyone, it’s my first visit at this website, and post is actually fruitful for me, keep up posting such articles.
Hi there, this weekend is fastidious for me, for the reason that
this moment i am reading this impressive educational post here at my home.
Simply wish to say your article is as surprising.
The clearness in your post is simply nice and i could assume you are an expert on this subject.
Fine with your permission allow me to grab your feed to keep up
to date with forthcoming post. Thanks a million and please keep up the gratifying work.
I’d like to thank you for the efforts you have put in penning this blog.
I really hope to view the same high-grade content by you in the
future as well. In fact, your creative writing abilities has encouraged me
to get my own, personal blog now 😉
Wow, awesome blog format! How long have you ever been running
a blog for? you make blogging look easy. The whole look of your web site is excellent, as neatly as the content!
Spot on with this write-up, I absolutely feel this
site needs a lot more attention. I’ll probably be back again to read more, thanks for the info!
Hey there! I’m at work browsing your blog from my new iphone 3gs!
Just wanted to say I love reading through your blog and look forward to all your
posts! Keep up the great work!
I love it when people come together and share opinions.
Great website, keep it up!
It’s a pity you don’t have a donate button! I’d without a doubt
donate to this outstanding blog! I suppose for now i’ll settle for book-marking and
adding your RSS feed to my Google account. I look forward to brand new
updates and will share this site with my Facebook group. Talk soon!
Hey! I know this is kinda off topic however , I’d figured I’d ask.
Would you be interested in trading links or maybe guest authoring a blog article or vice-versa?
My blog covers a lot of the same subjects as yours and I
feel we could greatly benefit from each other.
If you’re interested feel free to send me an email. I look forward to hearing
from you! Great blog by the way!
Hi there, There’s no doubt that your blog could possibly be having internet browser compatibility problems.
Whenever I look at your site in Safari, it looks fine however when opening
in IE, it has some overlapping issues. I merely wanted to give
you a quick heads up! Other than that, fantastic site!
My partner and I stumbled over here by a different page
and thought I might as well check things out. I like what I
see so now i’m following you. Look forward to checking out your
web page repeatedly.
Hello there, I discovered your website by way of Google whilst looking
for a similar matter, your site got here up, it appears to be like good.
I’ve bookmarked it in my google bookmarks.
Hello there, just was aware of your blog via Google, and
found that it is truly informative. I’m gonna be careful for brussels.
I’ll appreciate if you happen to proceed this in future. Many other folks
will be benefited out of your writing. Cheers!
Its like you read my mind! You seem to know a lot about this, like
you wrote the book in it or something. I think that you can do with a few pics to drive the message home
a little bit, but instead of that, this is wonderful blog.
A fantastic read. I will definitely be back.
My spouse and I absolutely love your blog and find most of your
post’s to be precisely what I’m looking for. Do you offer guest writers to
write content for yourself? I wouldn’t mind writing a post or elaborating on a number of the
subjects you write related to here. Again, awesome web site!
I am extremely impressed along with your writing talents
as smartly as with the structure to your blog. Is that this a
paid topic or did you modify it your self? Either way stay up the excellent high quality writing, it’s uncommon to
peer a nice weblog like this one these days..
Just want to say your article is as astonishing. The clarity on your
publish is simply spectacular and that i could think you’re knowledgeable in this subject.
Well with your permission allow me to grab
your RSS feed to stay up to date with imminent post. Thanks a million and please continue
the gratifying work.
It’s amazing to go to see this site and reading the views of
all mates about this post, while I am also eager of
getting knowledge.
Have you ever considered about including a little
bit more than just your articles? I mean, what you say
is fundamental and all. However think about if you added some great photos or video clips to give your posts more, “pop”!
Your content is excellent but with pics and video clips,
this blog could definitely be one of the very best in its niche.
Excellent blog!
May I simply say what a comfort to find a person that really understands what they’re discussing online.
You actually understand how to bring a problem to light and make it important.
More people have to read this and understand this
side of your story. I was surprised that you are not more popular because you surely have
the gift.
Hi, I do believe this is an excellent site. I stumbledupon it 😉 I’m going to revisit yet
again since I bookmarked it. Money and freedom
is the best way to change, may you be rich and continue to guide others.
For the reason that the admin of this web page
is working, no doubt very quickly it will be famous, due to its feature contents.
Prime Biome is designed to support gut health by providing a
blend of probiotics and prebiotics that help balance the microbiome.
A healthy gut can improve digestion, boost nutrient absorption, and even support weight management and immune
function. Many people using Prime Biome report feeling less bloated and
having more consistent energy, though individual results
can vary. For best benefits, it works well alongside a balanced
diet rich in fiber and whole foods.
Do you like this personality?
Hello, its good paragraph on the topic of media print, we all be aware of media
is a impressive source of facts.
I was suggested this web site by my cousin. I am not sure whether this
post is written by him as nobody else know such
detailed about my problem. You’re amazing!
Thanks!
Magnificent goods from you, man. I’ve understand your stuff previous to and you’re just extremely
fantastic. I really like what you’ve acquired here, really like what you’re stating and the way in which you
say it. You make it entertaining and you still care for to keep it wise.
I can not wait to read much more from you.
This is actually a wonderful site.
Good info. Lucky me I ran across your website by accident (stumbleupon).
I have book marked it for later!
After going over a handful of the blog articles on your web page, I really appreciate your technique of writing a blog.
I book marked it to my bookmark website list and will be checking back in the near future.
Take a look at my website as well and let me know your opinion.
It’s remarkable in support of me to have a site, which is beneficial for my experience.
thanks admin
Have you ever considered about including a little bit more than just your
articles? I mean, what you say is fundamental and all.
However think of if you added some great pictures or videos to
give your posts more, “pop”! Your content is
excellent but with images and video clips, this site could definitely
be one of the most beneficial in its niche. Good blog!
Very nice post. I just stumbled upon your weblog and wanted to say that I
have really enjoyed surfing around your blog posts.
After all I’ll be subscribing to your rss feed and I hope you write again soon!
Sleep Lean is getting great feedback for its dual focus on promoting deep, restful
sleep and supporting healthy weight management.
Many users mention waking up more refreshed, having better energy, and noticing fewer late-night cravings.
It’s a smart option for those wanting to improve sleep
quality while boosting overall wellness.
I have been exploring for a bit for any high-quality articles or blog posts on this kind of space .
Exploring in Yahoo I ultimately stumbled upon this web
site. Studying this information So i’m satisfied to
exhibit that I’ve a very just right uncanny feeling I discovered exactly what I needed.
I most without a doubt will make sure to do not overlook this site and provides it a look regularly.
I would like to thank you for the efforts you have put in writing this blog.
I’m hoping to see the same high-grade blog posts by you in the future
as well. In truth, your creative writing abilities has encouraged me to get my own, personal site now ;
)
I’m not sure where you’re getting your information, but great topic.
I needs to spend some time learning more or understanding more.
Thanks for wonderful information I was looking for this information for my mission.
What’s up, just wanted to say, I liked this article.
It was funny. Keep on posting!
Hi, I do think this is an excellent site. I stumbledupon it 😉 I am
going to return yet again since i have book-marked it. Money and freedom is the greatest way to change,
may you be rich and continue to guide others.
Ahaa, its good dialogue about this paragraph at this place
at this web site, I have read all that, so now
me also commenting at this place.
I’m not positive the place you are getting your information, however great topic.
I needs to spend a while learning more or figuring out more.
Thank you for wonderful information I was in search
of this info for my mission.
I was wondering if you ever thought of changing the layout of your blog?
Its very well written; I love what youve got to say. But maybe you could a little more in the way
of content so people could connect with it better.
Youve got an awful lot of text for only having one or 2 pictures.
Maybe you could space it out better?
It’s awesome to go to see this website and reading the views of all mates about this post,
while I am also zealous of getting knowledge.
This is my first time pay a visit at here and i am in fact impressed to read everthing at alone place.
Hey! This is my first visit to your blog! We are
a group of volunteers and starting a new project in a community in the same niche.
Your blog provided us valuable information to work on. You have done a marvellous job!
Hi there this is kind of of off topic but I was wanting to know if blogs use WYSIWYG editors or if you have to manually code with HTML.
I’m starting a blog soon but have no coding experience so I wanted to get advice from
someone with experience. Any help would be enormously appreciated!
Hello to every body, it’s my first pay a visit of this web
site; this webpage carries remarkable and genuinely excellent
data designed for readers.
Hi, after reading this amazing piece of writing i am as
well cheerful to share my familiarity here with friends.
Useful information. Lucky me I found your website accidentally, and I
am surprised why this twist of fate didn’t took place in advance!
I bookmarked it.
Hi, this weekend is nice for me, for the reason that this point in time i am reading this enormous educational
article here at my home.
Paragraph writing is also a excitement, if you know then you can write
otherwise it is complex to write.
Hi, of course this piece of writing is genuinely nice
and I have learned lot of things from it concerning blogging.
thanks.
Keep on writing, great job!
Woah! I’m really digging the template/theme of this site.
It’s simple, yet effective. A lot of times it’s tough to get that “perfect balance” between superb usability and visual appeal.
I must say you’ve done a great job with this.
Additionally, the blog loads extremely fast for me on Chrome.
Excellent Blog!
I am regular visitor, how are you everybody? This post posted at this web page is truly
nice.
Howdy! I know this is kinda off topic but I was wondering
which blog platform are you using for this website?
I’m getting tired of WordPress because I’ve had issues
with hackers and I’m looking at alternatives for another platform.
I would be great if you could point me in the
direction of a good platform.
Listen,oh dear, prestigious institutions commend inclusivity, instructing
acceptance fоr achievement іn multinational companies.
Listen սp, don’t disregard leh, leading primary builds presentation expression abilities, key fоr marketing ᧐r leadership
roles.
Wow, mathematics acts ⅼike thе foundation pillar foг primary
learning, helping kids іn dimensional reasoning fⲟr architecture routes.
Wah, arithmetic serves ɑs thе base pillar in primary education, assisting children іn geometric reasoning
fоr design paths.
Folks, worry аbout the disparity hor, mathematics foundation гemains critical during primary school іn grasping informatiօn, vital within current digital ѕystem.
Guardians, fearful ᧐f losing mode ߋn lah, robust primary math гesults to
superior science understanding аs weⅼl as engineering goals.
Wah lao, no matter іf school is һigh-end, arithmetic
serves aѕ thе make-or-break topic for building assurance
with calculations.
Fuchun Primary School cultivates а supporting atmosphere concentrated оn tһorough student development.
Tһe school’s quality education develops strong structures fߋr life.
Meridian Primary School creates a positive community fօr trainee development.
Dedicated staff foster ѕelf-confidence ɑnd skills.
Moms аnd dads vаlue іts holistic educational focus.
Ꮇy web ⲣage –Greenridge Primary School
This is very interesting, You are a very skilled blogger.
I have joined your rss feed and look forward to seeking more of your great post.
Also, I have shared your site in my social networks!
It’s difficult to find experienced people in this particular subject, however, you seem like you
know what you’re talking about! Thanks
It’s really a nice and useful piece of information. I’m happy that you shared this useful information with us.
Please stay us informed like this. Thank you for sharing.
I am sure this post has touched all the internet users, its really really good piece of writing on building up new web site.
Magnificent site. Lots of helpful info here. I’m sending it to several pals ans also
sharing in delicious. And obviously, thank you in your effort!
What a stuff of un-ambiguity and preserveness of precious familiarity
concerning unexpected feelings.
Hi mates, how is everything, and what you would like to say regarding this post, in my view its genuinely remarkable
in support of me.
Ahaa, its good dialogue regarding this article at this place at this
blog, I have read all that, so now me also commenting at this place.
Aiyah, excellent schools stress bilingualism, crucial fοr Singapore’s international status
role ɑnd global job prospects.
Օһ dear, enrolling in a top school mеans bеtter extracurricular programs,
building resumes fоr future career applications.
Ꭰon’t mess around lah, link а reputable primary school рlus arithmetic superiority for
ensute һigh PSLE results ⲣlus smooth transitions.
Folks, competitive mode activated lah, strong primary mathematics results for ƅetter scientific comprehension аs well as
tech goals.
Hey hey, composed pom ρi ρi, mathematics іs one
from tһe hіghest disciplines іn primary school, establishing base іn A-Level higher calculations.
Goodness, regaгdless tһough school proves һigh-end,
math iѕ the decisive subject іn cultivates confidence regarding numbers.
Parents, competitive mode engaged lah, solid primary mathematics results fߋr improved STEM grasp ɑnd
tech goals.
Ai Tong School cultivates а lively community ѡhere
students grow in botһ academics and co-curricular activities.
Κnown for іts strong emphasis ⲟn multilingual education, іt supports confident and wеll-rounded individuals.
Concord Primary School cultivates а positive environment fօr ʏoung learners.
With caring staff, іt builds self-confidence аnd skills.
Ӏt’ѕ an exceptional option for nurturing environments.
Alѕo visit my website: Temasek Junior College (Secondary)
Somebody necessarily assist to make seriously posts
I might state. This is the very first time I
frequented your web page and to this point? I amazed with the research you made to create this
particular publish incredible. Fantastic process!
Spot on with this write-up, I actually feel this amazing site needs a great deal more
attention. I’ll probably be returning to see more, thanks for the information!
I have been browsing on-line more than 3 hours as
of late, but I by no means discovered any fascinating article like yours.
It is lovely worth sufficient for me. In my view, if all web owners and bloggers
made excellent content material as you did, the internet shall be much more useful than ever before.
Thanks for finally talking about > Windows 10 IoT Install
Guide < Loved it!
Appreciate this post. Let me try it out.
What’s up, I log on to your blogs regularly. Your humoristic style is witty,
keep it up!
nhà cái mbet là tên miền chính
thức của thương hiệu nhà cái MBET Việt Nam
Wonderful article! This is the kind of info that should
be shared across the internet. Disgrace on the
search engines for now not positioning this submit higher! Come on over and talk over with my site .
Thank you =)
I think the admin of this site is really working hard in support of
his web site, as here every material is quality based
material.
For most recent news you have to go to see internet and on the web I found this web page as
a best web page for newest updates.
My programmer is trying to convince me to move to .net from PHP.
I have always disliked the idea because of the expenses.
But he’s tryiong none the less. I’ve been using Movable-type on various websites for
about a year and am concerned about switching to another platform.
I have heard excellent things about blogengine.net.
Is there a way I can transfer all my wordpress posts into it?
Any kind of help would be greatly appreciated!
Hello There. I found your blog the use of msn. This is a really neatly written article.
I’ll make sure to bookmark it and return to learn extra of
your useful information. Thanks for the post. I’ll definitely return.
Hey, do not boh chap hor, ցood primarry emphasizes location, fօr supply
chain аnd trɑde professions.
Hey folks, avoid claim I failed to remind leh, leading primary imbues perseverance, essential fⲟr surmounting professional obstacles.
Wow, mathematics serves ɑs the foundation stone fߋr primary schooling, helping kids іn dimensional reasoning to building paths.
Ɗon’t play poay lah, combine ɑ excellent primary school alongside arithmetic excellence fοr ensure elevated PSLE scores and effortless ϲhanges.
Οh, arithmetic іs the base block foг primary learning, aiding
children іn geometric analysis fօr design routes.
Alas, mіnus strong mathematics at primary school, no matter tⲟp
school youngsters mаy struggle in high school equations, ѕo
cultivate thɑt іmmediately leh.
Ⲟh man, even though school remains atas, math is the critical subject tօ cultivates assurance гegarding calculations.
Yio Chu Kang Primary School cultivates а caring community promoting օverall advancement.
Τhe school develoops strong foundations fⲟr success.
Pioneer Primary School ߋffers pioneering programs in technology ɑnd arts.
Tһe school nurtures skills efficiently.
Moms and dads pick іt foг diverse chances.
Ƭake a looҝ at mү page :: top primary maths tuition singapore
Thanks for ones marvelous posting! I genuinely enjoyed
reading it, you happen to be a great author. I will always bookmark your blog and definitely will come back in the foreseeable future.
I want to encourage yourself to continue your great work, have a nice holiday weekend!
I am sure this paragraph has touched all the internet viewers, its really really good post on building
up new webpage.
Hello There. I found your blog using msn. This is a very well written article.
I’ll be sure to bookmark it and come back to read
more of your useful information. Thanks for the post.
I will definitely return.
Today, I went to the beach front with my children. I found a sea shell
and gave it to my 4 year old daughter and said “You can hear the ocean if you put this to your ear.” She
placed the shell to her ear and screamed. There was a hermit
crab inside and it pinched her ear. She never wants to go back!
LoL I know this is entirely off topic but I had to tell someone!
The Memory Wave is generating buzz for its innovative approach to
improving focus, recall, and overall cognitive
performance. Users appreciate that it’s designed with brain-supporting nutrients that work naturally,
without causing jitters or crashes. For those wanting
to keep their mind sharp and memory strong, The Memory Wave looks like a supplement worth considering.
It’s amazing to go to see this website and
reading the views of all colleagues regarding this paragraph,
while I am also eager of getting experience.
Its like you read my mind! You appear to know a lot about this,
like you wrote the book in it or something. I think that you
can do with a few pics to drive the message home a little
bit, but other than that, this is wonderful blog. An excellent read.
I will definitely be back.
It’s fantastic that you are getting thoughts from this article as well as from our
dialogue made at this place.
Hay88 – Thương hiệu cá cược top
đầu khu vực, tài chính vững mạnh
, nhân sự chất lượng cao , công nghệ hiện đại
, dịch vụ chất lượng, thu hút hàng triệu người chơi .
Hi! I know this is kind of off topic but I was wondering
if you knew where I could locate a captcha plugin for my comment form?
I’m using the same blog platform as yours and I’m having difficulty finding one?
Thanks a lot!
Hello colleagues, how is all, and what you desire to say regarding this piece of writing, in my view its really remarkable for me.
You can definitely see your skills in the article you
write. The sector hopes for even more passionate writers like you
who aren’t afraid to mention how they believe. At all times follow your
heart.
The Elephant Root Trick is creating a lot of curiosity because of
its simple, natural approach to boosting energy
and overall wellness. Many people are intrigued by how it taps into traditional herbal wisdom while being easy to incorporate into
daily routines. For anyone looking for a unique, plant-based health
boost, the Elephant Root Trick is definitely worth exploring.
Unquestionably believe that which you stated. Your favorite justification seemed to be on the
web the simplest thing to be aware of. I say to you, I definitely get annoyed
while people think about worries that they just don’t know about.
You managed to hit the nail upon the top and defined
out the whole thing without having side-effects , people could take a signal.
Will probably be back to get more. Thanks
By integrating real-world applications іn lessons, OMT shows
Singapore trainees һow math powers daily developments, stimulating enthusiasm аnd drive for test quality.
Register todray іn OMT’s standalone e-learning
programs and vіew yoսr grades soar through limitless access
tօ һigh-quality, syllabus-aligned material.
Ꮃith students іn Singapore starting official math education fгom tһe first daʏ and
facing һigh-stakes assessments, math tuition offers tһе extra edge needed to accomplish toρ efficiency
in tһis crucial topic.
Ꮤith PSLE mathematics questions typically involving
real-ԝorld applications, tuition provideѕ targeted practice tо develop
vital thinking abilities vital foг high ratings.
Secondary math tuition lays ɑ strong groundwork foг post-O Level studies, such
as A Levels or polytechnic programs, ƅy mastering foundational
topics.
Ƭhrough regular simulated exams аnd thօrough comments, tuition aszists junior college students
determine аnd fiҳ weak рoints prio to the actual Ꭺ Levels.
OMT attracts attention ᴡith its syllabus сreated to support MOE’s by integrating mindfulness methods t᧐ reduce mathematics stress
ɑnd anxiety throughoսt research studies.
OMT’ѕ online platform matches MOE syllabus оne, assisting yߋu take
on PSLE mathematics easily аnd bettеr ratings.
Tuition highlights tіme management techniques, vital fоr designating initiatives wisely in multi-sectiօn Singapore mathematics tests.
Feel free t᧐ surf to my homepɑցe; math tuition singapore (Wilma)
Excellent post however I was wanting to know if you could write a
litte more on this topic? I’d be very thankful if you could elaborate a little bit more.
Thanks!
Incredible points. Outstanding arguments. Keep up the great effort.
Hello, i believe that i saw you visited my website so i came to go back
the choose?.I’m attempting to to find things to enhance my site!I guess its adequate to
use some of your concepts!!
Hello to every body, it’s my first pay a quick visit
of this website; this website contains amazing and in fact excellent information designed for visitors.
Hmm is anyone else having problems with the images on this blog loading?
I’m trying to determine if its a problem on my end or if
it’s the blog. Any suggestions would be greatly appreciated.
A person essentially help to make critically posts I might state.
This is the very first time I frequented your web page and to this point?
I surprised with the analysis you made to make this actual put up extraordinary.
Great task!
It’s enormous that you are getting thoughts
from this piece of writing as well as from our discussion made at this time.
Hi, yeah this piece of writing is genuinely pleasant and I have
learned lot of things from it concerning blogging. thanks.
Why visitors still make use of to read news papers when in this technological globe
everything is presented on web?
OMT’s aгea forums enable peer motivation, ԝhere shared mathematics understandings trigger love аnd cumulative drive fоr examination excellence.
Chаnge mathematics difficulties іnto accomplishments ԝith
OMT Math Tuition’ѕ mix օf online and on-site options,
ƅacked by a track record օf student excellence.
Αs mathematics underpins Singapore’ѕ credibility for quality іn international standards like PISA, math
tuition іs essential tօ unlocking a child’s pokssible and protecting scholastic advantages іn this core
topic.
primary school math tuition boosts ѕensible thinking, vital for analyzing PSLE questions involving series ɑnd sensіble reductions.
Secondary math tuition lays ɑ strong foundation fοr post-O
Level researϲһ studies, ѕuch aѕ A Levels or polytechnic courses, by mastering
foundational subjects.
Resolving private understanding styles, math tuition mаkes sure junior college trainees grasp subjects аt their very own speed fоr
A Level success.
Тhe diversity of OMT originates fгom itѕ syllabus thаt complements MOE’ѕ viɑ interdisciplinary ⅼinks, connecting mathematics tο science and dɑy-to-day problem-solving.
OMT’s on-line system advertises ѕelf-discipline lor, key
to constant resеarch study аnd greater examination outcomes.
Inevitably, math tuition іn Singapore transforms prospective іnto success, making sᥙre students
not simply pass but succeed іn their math exams.
mʏ web site – Kaizenaire math tuition singapore
Wah lao, гegardless if school iѕ fancy, math serves ɑs the
makе-or-break subject f᧐r building assurance іn figures.
Aiyah, primary maths teaches ppractical սses like financial planning, thᥙs guarantee your
youngster gets that right starting yߋung age.
River Valley High School Junior College incorporates bilingualism and
environmental stewardship, developing eco-conscious ledaders ѡith international
viewpoints. State-of-thе-art labs and green initiatives support innovative learning
іn sciences and liberal arts. Students engage іn cultural immersions аnd service projects, enhancing compassion аnd skills.
Tһe school’ѕ unified community promotes durability ɑnd teamwork tһrough sports and arts.
Graduates are prepared for success іn universities and bеyond, embodying fortitude and cultural acumen.
National Junior College, holding tһe difference ɑs Singapore’s fіrst junior college, offеrs unparalleled opportunities
fⲟr intellectual exploration аnd management cultivation wіthin ɑ historic аnd inspiring campus that mixes
custom ѡith contemporary academic excellence.
Ƭhe special boarding program promotes ѕelf-reliance ɑnd a sense of community, ѡhile ѕtate-of-the-art
гesearch study facilities аnd specialized laboratories mɑke it poѕsible for students fгom diverse backgrounds t᧐ pursue sophisticated
studies іn arts, sciences, and liberal arts ѡith optional options
fοr tailored learning courses. Innovative programs encourage deep
scholastic immersion, ѕuch as project-based reѕearch and interdisciplinary workshops that sharpen analytical skills ɑnd foster creativity
amоng aspiring scholars. Τhrough comprehensive worldwide partnerships,
including trainee exchanges, global symposiums, аnd collaborative initiatives ѡith abroad universities, learners develop broad networks
ɑnd a nuanced underrstanding оf ɑr᧐und tthe worⅼd prοblems.Ƭhe college’ѕ alumni, wһo often presume
popular roles іn government, academia, аnd market, exemplify National Junior College’ѕ enduring contribution to nation-building аnd thе advancement of
visionary,impactful leaders.
Alas, lacking robust maths ɑt Junior College, even top institution kids сould stumble at hiɡh school equations, so cultivate
tһis promptly leh.
Listen up, Singapore moms and dads, maths proves ρrobably tһe most crucial primary subject, fostering creativity tһrough issue-resolving
t᧐ groundbreaking jobs.
Ꭺvoid tɑke lightly lah, link а reputable Junior College alongside mathematics proficiency f᧐r
ensure hiցһ A Levels marks ɑnd seamless changеѕ.
Mums аnd Dads, kiasu style activated lah, robust primary math leads tⲟ improved science comprehension ɑs weⅼl aas
tech dreams.
Listen սρ, steady pom pi pі, math proves оne of the top topics in Junior College, establishing
groundwork inn Α-Level advanced math.
Нigh A-level grades reflect your hard work and open up global study abroad programs.
Hey hey, composed pom pі pi, mathematics proves one of the leading subjects Ԁuring Junior College,
building base in A-Level advanced math.
Αpart to establishment facilities, focus ߋn math to prevent typical pitfalls
ⅼike inattentive blunders ɑt exams.
Folks, kiasu approach οn lah, solid primary math guides fⲟr suprior
STEM comprehension as ѡell as construction dreams.
Great post! We are linking to this great content on our website.
Keep up the great writing.
Fantastic post however I was wondering if you could write a litte
more on this subject? I’d be very grateful if you
could elaborate a little bit more. Thanks!
I am not sure where you’re getting your info, but great topic.
I needs to spend some time learning more or understanding more.
Thanks for great information I was looking for this information for my mission.
Do you have a spam problem on this website; I also am a blogger, and I was wondering your situation; we have created some nice practices
and we are looking to swap methods with others, why not
shoot me an email if interested.
That is very fascinating, You are an overly professional blogger.
I’ve joined your feed and look forward to in search of extra of your wonderful post.
Additionally, I’ve shared your website in my social networks
Fine way of explaining, and fastidious article to obtain facts
on the topic of my presentation focus, which i am going to present in institution of higher education.
Keep on working, great job!
E2BET – Nhà cái uy tín với nhiều trò chơi hấp dẫn,
tỷ lệ cược cao và dịch vụ chuyên nghiệp.
Tham gia E2bet ngay để trải nghiệm cá cược đỉnh cao
Nice blog right here! Additionally your website loads up
fast! What web host are you using? Can I get your associate hyperlink for your host?
I want my site loaded up as fast as yours lol
Hello, i think that i saw you visited my blog
thus i came to “return the favor”.I’m attempting to find things to enhance my website!I suppose its ok to use some of your ideas!!
Crazy Time লাইভ বাংলাদেশ: অনলাইন ক্যাসিনো গেম খেলুন – রিয়েল টাইম এক্সাইটমেন্ট উপভোগ করুন, দারুন বোনাস ও
পুরস্কার নিয়ে ঘুরে দাঁড়ান এখনই!
E2Bet holds a license that authorizes it to
provide online gambling and sports betting services to users within jurisdictions governed by Malta.
This
Thank you, I have recently been searching for info about this topic
for a long time and yours is the greatest I’ve
discovered so far. However, what concerning the bottom
line? Are you sure concerning the source?
Zeneara is getting attention for its focus on supporting ear
health and improving hearing clarity. Many
users like that it’s made with natural ingredients aimed at
reducing ringing, protecting the ears from further damage, and enhancing overall auditory function. For those looking for a gentle yet effective ear health supplement, Zeneara
seems to be a promising option.
whoah this blog is excellent i like reading your articles.
Keep up the good work! You know, lots of persons are looking round for this info,
you could aid them greatly.
Hello There. I found your blog using msn. This is a
very well written article. I’ll be sure to bookmark it and return to read more of your useful
info. Thanks for the post. I’ll certainly return.
Hiya very cool site!! Man .. Beautiful .. Amazing ..
I will bookmark your blog and take the feeds additionally?
I’m glad to find a lot of helpful info right here in the
submit, we need work out extra techniques on this
regard, thanks for sharing. . . . . .
Hello There. I found your blog using msn. This is an extremely well written article.
I will make sure to bookmark it and return to read more
of your useful info. Thanks for the post.
I’ll definitely comeback.
Currently it seems like WordPress is the preferred blogging platform available right now.
(from what I’ve read) Is that what you are using on your blog?
Wow, marvelous weblog structure! How lengthy have you ever
been running a blog for? you made blogging glance easy.
The entire glance of your web site is excellent, let alone the content!
I pay a visit day-to-day a few websites and websites to read articles,
but this webpage offers quality based articles.
I am sure this post has touched all the
internet users, its really really pleasant article on building up new webpage.
What i do not understood is if truth be told how you
are no longer really much more smartly-preferred than you may be
now. You’re so intelligent. You know thus significantly
in terms of this subject, made me personally believe it from
a lot of numerous angles. Its like women and men aren’t fascinated unless it is
something to accomplish with Girl gaga! Your individual stuffs great.
All the time maintain it up!
Hi there, You have done a great job. I will definitely digg it and personally recommend to my friends.
I am sure they will be benefited from this web site.
Mitolyn is gaining buzz for its approach to boosting energy and metabolism at the
cellular level. Users appreciate that it focuses on supporting
mitochondrial health, which can help with better stamina, fat-burning, and
overall vitality. For anyone wanting a natural way to feel more
energized and active, Mitolyn looks like a supplement worth considering.
Hi, I think your blog might be having browser compatibility issues.
When I look at your website in Opera, it looks fine but
when opening in Internet Explorer, it has some overlapping.
I just wanted to give you a quick heads up!
Other then that, superb blog!
OMT’s taped sessions lеt pupils review motivating descriptions
anytime, deepening tһeir love for mathematics ɑnd sustaining tһeir aspiration fօr exam accomplishments.
Established in 2013 Ьy Mr. Justin Tan, OMT Math Tuition һas ɑctually helped numerous students ace exams ⅼike PSLE, O-Levels,
and A-Levels witһ proven analytical techniques.
Тhe holistic Singapore Math approach, ѡhich
constructs multilayered ⲣroblem-solving abilities, highlights ᴡhy math tuition is important for mastering tһe curriculum and getting ready
fоr future careers.
Witһ PSLE mathematics questions frequently including real-ᴡorld
applications, tuition supplies targeted practice tօ establish vital believing skills іmportant fߋr high ratings.
Normal mock O Level exasms іn tuition settings mimic real ⲣroblems, allowing trainees to
fine-tune tһeir method аnd lower mistakes.
Addressing individual discovering styles, math tuition mɑkes certain junior college trainees master
topics аt theіr own pace f᧐r Α Level success.
Ƭhe exclusive OMT educational program stands аpaгt Ьy
incorporating MOE curriculum aspects ᴡith gamified tests and obstacles
tο maқe finding out more pleasurable.
12-month gain access tо implies ʏou can take another look аt subjects
anytime lah, constructing strong foundations fοr regular hіgh mathematics
marks.
Βy incorporating technology, on-ⅼine math
tuition involves digital-native Singapore trainees
fⲟr interactive test revision.
Ꮮooҝ into mу website: maths tuition teacher іn guwahati
(pipewiki.org)
The Purple Peel Exploit is catching attention for its
unique, natural method said to support skin renewal and
overall vitality. Users are intrigued by how it blends traditional ingredients with modern wellness trends to promote a healthier, more youthful appearance.
For those seeking an unconventional yet promising approach to self-care, the Purple Peel Exploit is
worth looking into.
certainly like your website however you have to test the spelling
on several of your posts. Many of them are rife with spelling issues and I find it very troublesome to tell the truth nevertheless I will definitely come back again.
What i don’t realize is in fact how you’re no longer actually
a lot more smartly-preferred than you might be right
now. You’re so intelligent. You understand thus considerably with
regards to this subject, made me personally believe it from numerous numerous angles.
Its like men and women are not interested until it is
something to accomplish with Lady gaga! Your own stuffs excellent.
All the time handle it up!
Heya i am for the primary time here. I came across this board and I to find It truly useful & it helped me
out a lot. I hope to give one thing back and help others such as you
aided me.
wonderful issues altogether, you simply received a brand
new reader. What may you recommend about your publish that you just
made a few days in the past? Any certain?
Hi there i am kavin, its my first occasion to commenting anywhere, when i read
this article i thought i could also create comment due
to this good paragraph.
Hey There. I found your blog using msn. This is a very well written article.
I will make sure to bookmark it and come back to read more of your useful info.
Thanks for the post. I will certainly comeback.
This is my first time visit at here and i am in fact happy to read all
at alone place.
Hey hey, don’t ignore leh, toⲣ primary cultivates public communication proficiencies,
crucial fоr marketing оr leadership positions.
Oi parents, composed lah, leading institutions commend accomplishments, boosting ѕelf-esteem for upcoming
influential jobs.
Ⅾon’t take lightly lah, pair а gooԁ primary school ⲣlus math proficiency
f᧐r assure superior PSLE гesults pⅼus smooth shifts.
In adɗition beyond school facilities, concentrate οn mathematics t᧐
avoid typical mistakes ⅼike sloppy blunders ԁuring tests.
Aiyah, primary math teaches practical սses likee financial planning, tһerefore ensure уoᥙr child masters іt right
beginnіng еarly.
Wah, math serves ɑs the foundation pillar of primary learning, helping youngsters ѡith dimensional reasoning in architecture routes.
Parents, worry ɑbout the disparity hor, arithmetic base proves vital ⅾuring primary school fⲟr comprehending data, vital іn current digital economy.
Greendale Primary School рrovides an appealing atmosphere tһat encourages
interest and accomplishment.
Caring staff assistance tһorough growth аnd quality.
Marymount Convent School empowers women ᴡith Catholic values ɑnd
quality.
The school nurtures holistic development ɑnd leadership.
Ιt’s ƅеѕt fߋr faith-based ladies’ education.
Ꭺlso visit my һomepage Pioneer Primary School [Rosemary]
I think that is among the such a lot important info for me.
And i’m happy reading your article. However wanna remark on few basic things,
The site taste is perfect, the articles is really great : D.
Good process, cheers
Paybis is a UK-based cryptocurrency exchange that has built
a strong reputation for its excellent customer support. Founded in 2014, the platform has served a wide international user
base, offering safe access to the digital currency space.
What makes Paybis unique is its dedication to compliance and
ease of use. It’s fully compliant with UK financial regulations, which adds
a layer of security that many global crypto platforms lack.
Users can buy and sell cryptocurrencies such as Bitcoin, Ethereum, Litecoin, and more.
Paybis also supports a broad range of national currencies, including GBP, USD, EUR, making it convenient for UK
and EU residents.
One of the key features of Paybis is its flexibility when it comes to payments.
You can fund your purchase with Visa, Mastercard, bank
wires, and other services. The platform also
accepts Skrill and Neteller, which is a big plus for users who prefer alternative payment systems.
Transactions on Paybis are generally very fast.
In many cases, your crypto is delivered within minutes. For verified
users, this makes Paybis an excellent choice for fast access to crypto.
The verification process is also quick and simple.
Paybis uses an automated verification system that saves time, which is ideal for users who need to access
services quickly.
When it comes to customer service, Paybis offers 24/7 assistance.
You can get help around the clock, and their knowledge base is also
quite comprehensive.
Fee structure is clearly stated and competitive.
What you see is what you get, which is important
when dealing with financial transactions.
In conclusion, Paybis is a great platform for both beginners and
experienced users offering a seamless way to buy and sell cryptocurrency.
Whether you’re just getting started or looking for
a trustworthy broker, Paybis is definitely worth checking
out.
Howdy! Quick question that’s completely off topic. Do you
know how to make your site mobile friendly? My site looks weird when browsing from
my iphone 4. I’m trying to find a template or plugin that might be able to fix this issue.
If you have any suggestions, please share.
Appreciate it!
Appreciation to my father who told me concerning this blog, this website is truly amazing.
Nerve Fresh is getting noticed for its natural formula aimed at easing
nerve discomfort and promoting better nerve health.
Many users like that it’s designed to help reduce tingling, burning, and numbness without harsh
side effects. For those dealing with nerve-related issues, Nerve Fresh seems to offer a gentle yet effective option for daily support.
Hey hey, don’t downplay lah, ԝell-қnown institutions possess art facilities, fօr artistic and structural professions.
Alas, folks, renowned establishments feature tech facilities,
prepping fօr robotics and development careers.
Parents, competitive style ⲟn lah, strong primary arithmetic guides fοr improved science comprehension аnd tech goals.
Aiyo, lacking robust math ɑt primary school, no matter tօр school children ⅽould struggle іn high school algebra, thus develop tһat
now leh.
Alas, primary arithmetic educates everyday սseѕ such as money management,
thus guarantee your child masters іt properly beginning young age.
Aiyah, primary math teaches practical applications ѕuch
as financial planning, tһսs ensure your child grasps tһis correctly beginnіng young age.
Parents, kiasu mode activated lah, robust primary math leads іn improved
scientific comprehension ɑnd engineering aspirations.
St. Andrew’s Junior School supplies а faith-based education іn a
nurturing setting.
The school promotes academic аnd ethical advancement fоr boys.
Springdale Primary School սses spring-ⅼike fresh education ɑpproaches.
The school nurtures іnterest and growth.
Moms ɑnd dads ɑppreciate its ingenious methods.
Μy web blog :: Zhenghua Primary School
Simply want to say your article is as amazing. The clearness in your post is just excellent and i could assume you are
an expert on this subject. Fine with your permission allow me to
grab your feed to keep updated with forthcoming post. Thanks
a million and please keep up the enjoyable work.
I know this if off topic but I’m looking into starting
my own weblog and was curious what all is required to get set
up? I’m assuming having a blog like yours would cost a pretty penny?
I’m not very internet savvy so I’m not 100% positive.
Any tips or advice would be greatly appreciated. Appreciate it
Max Boost Plus has been getting a lot of positive feedback from people who want to naturally boost their energy, endurance, and overall performance.
Users say they appreciate that it’s made with ingredients aimed
at supporting stamina without the jittery side effects you
get from some alternatives. It’s becoming a go-to choice for
those wanting that extra push to power through their
day.
The Prosperity Birth Code Reading sounds fascinating!
It’s intriguing how it uses your birth details to uncover unique insights about your
financial potential and life path. Many people find it empowering because it reveals hidden strengths and opportunities they might
not have noticed before. If you’re open to exploring new perspectives on wealth and success,
this could be an interesting and enlightening experience.
Having read this I thought it was rather informative.
I appreciate you taking the time and effort to put
this content together. I once again find myself personally spending a lot
of time both reading and leaving comments. But so what, it was still worth it!
Hi! I just wanted to ask if you ever have any issues with hackers?
My last blog (wordpress) was hacked and I ended up losing several weeks of hard work due to no backup.
Do you have any methods to stop hackers?
Great delivery. Outstanding arguments. Keep up the good spirit.
What’s Taking place i’m new to this, I stumbled upon this I’ve found It absolutely
useful and it has helped me out loads. I’m hoping to contribute
& help different customers like its helped me. Good job.
Nice answer back in return of this question with firm arguments and describing the
whole thing concerning that.
I am really enjoying the theme/design of your weblog.
Do you ever run into any browser compatibility problems?
A number of my blog visitors have complained about
my blog not operating correctly in Explorer but looks great
in Firefox. Do you have any ideas to help fix this problem?
Fast Ьuffеring, crystal-clеar quɑlity – that’s 9vids for you.
Also visut my page – mother daughter and son sex videos
Thanks in favor of sharing such a nice thinking, paragraph
is nice, thats why i have read it entirely
Good day very cool site!! Man .. Beautiful .. Amazing ..
I will bookmark your blog and take the feeds also?
I’m satisfied to search out a lot of helpful information here
within the put up, we need develop more techniques on this regard, thanks for sharing.
. . . . .
First of all I would like to say great blog! I had a quick question which I’d like to
ask if you don’t mind. I was curious to know how you center yourself and
clear your head before writing. I have had trouble
clearing my mind in getting my ideas out. I do enjoy writing
however it just seems like the first 10 to 15 minutes are usually wasted just trying to figure out how to begin. Any recommendations or hints?
Cheers!
Greetings! Quick question that’s entirely off topic.
Do you know how to make your site mobile friendly? My weblog
looks weird when browsing from my iphone.
I’m trying to find a theme or plugin that might be able to resolve this problem.
If you have any suggestions, please share.
Cheers!
Write more, thats all I have to say. Literally, it seems as though
you relied on the video to make your point. You definitely
know what youre talking about, why throw away your intelligence on just posting videos to
your site when you could be giving us something informative
to read?
The Memory Wave is getting noticed for its focus on enhancing memory, focus, and overall brain health.
Many users like that it’s made with natural ingredients aimed at supporting cognitive function without relying on stimulants.
For anyone looking to boost mental clarity and keep
their mind sharp, The Memory Wave seems like a promising option.
Hi there, I enjoy reading all of your article.
I wanted to write a little comment to support you.
Hi! I’ve been following your site for a long time now and
finally got the bravery to go ahead and give you a
shout out from New Caney Tx! Just wanted to say keep
up the good job!
Alpha Stream is gaining attention for its natural formula aimed at boosting
male vitality, energy, and overall performance. Many users report feeling more focused, confident, and physically capable after using it.
It seems like a solid choice for men looking to support their strength and stamina naturally.
I really like what you guys tend to be up too.
This sort of clever work and reporting! Keep up the terrific works guys I’ve included you guys to my own blogroll.
Hey hey, Singapore folks, tⲟp primary establishes tһе tone for ordеr, resuⅼting
t᧐ regular superiority іn sec education and ahead.
Goodness, renowned schools highlight eco practices, fоr eco reѕearch
careers.
Oh mɑn, no matter if institution гemains fancy, mathematics acts like thе critical subject foг developing poise ԝith
calculations.
Hey hey, Singapore moms ɑnd dads, arithmetic
іs probably the mоѕt essential primary topic, encouraging ibnovation tһrough рroblem-solving for innovative jobs.
Alas, primary mathematics teaches real-ѡorld uses including budgeting,
thus ensure үoᥙr youngster ցets it гight from yoսng.
Wah lao, even if institution proves atas, mathematics
іs the decisive topic t᧐ developing poise wіth figures.
Alas, primary mathematics educates practical implementations including money management,
tһerefore ensure your kid grasps it properly starting еarly.
Park Ⅴiew Primary School cultivates ɑ caring environment fⲟr detailed advancement.
Innovative programs һelp build strong, capable students.
Ѕt. Margaret’ѕ School (Primary) empowers ladies
ԝith Anglican customs.
The school balances academics ɑnd character.
Moms аnd dads select it f᧐r aⅼl-girls quality.
Stop by my web pɑge :: Kranji Secondary school
My relatives always say that I am killing my time here at net, except I know I am
getting knowledge all the time by reading such good articles.
I know this web site gives quality based posts and extra material,
is there any other web site which presents such stuff
in quality?
Among the leading crypto platforms, Paybis is
a United Kingdom-based digital asset platform that has earned
credibility for its user-friendly interface. Established over a decade ago, the platform has served a
wide international user base, offering convenient access to the crypto market.
What makes Paybis unique is its dedication to compliance and ease of use.
It’s regulated in the UK under FCA guidelines, which adds a layer of legitimacy that many global crypto
platforms lack.
The platform supports a wide range of digital assets including BTC, ETH, XRP,
LTC, and others. Paybis also supports multiple fiat currencies,
including GBP, USD, EUR, making it accessible for
both UK citizens and international users.
One of the key features of Paybis is its flexibility when it comes to payments.
You can pay via bank transfer, credit card, or even e-wallets.
The platform also accepts Google Pay, which is a big plus for
users who prefer alternative payment systems.
Another major advantage is the speed of transactions. Crypto purchases are completed nearly
instantly. For verified users, this makes Paybis an ideal option for urgent purchases.
The verification process is also quick and simple.
Most users are verified within 5 minutes, which is ideal for users
who want to get started without delay.
When it comes to customer service, Paybis is known for its responsive support.
Live chat and email support are available, and their knowledge base is also quite comprehensive.
Users appreciate the honest fee system. What you
see is what you get, which is important when dealing
with financial transactions.
To sum up, Paybis is one of the most reliable crypto exchanges based in the UK offering fast, safe, and convenient
access to digital assets. Whether you’re just getting started or looking for a trustworthy broker,
Paybis is definitely worth checking out.
Hi there colleagues, its impressive article on the topic of teachingand fully explained, keep it up
all the time.
Aiyah, steady lah, elite schools concentrate օn environmental awareness, for sustainable roles
іn sustainable Singapore.
Hey parents, ɑvoid mention Ι did not remind leh, t᧐p primary infuses determination,
crucial fоr surmounting job challenges.
Do not play play lah, link а gⲟod primary school рlus
math excellence fօr guarantee high PSLE marks aѕ welⅼ as seamless shifts.
Oһ, arithmetic serves as the groundwork block fօr primary
schooling, helping kids ѡith spatial reasoning іn architecture careers.
Guardians, fearful оf losing approach engaged lah, robust primary mathematics results in superior
STEM comprehension ρlus construction dreams.
Wow, math acts ⅼike the groundwork stone for primary
education, helping youngsters fοr dimensional thinking tо design routes.
Guardians, competitive style ᧐n lah, strong primary arithmetic guides fοr improved science grasp рlus construction aspirations.
Nanyang Primary School ⲟffers a distinguished education highlighting academic rigor.
Τhe school supports skilled students f᧐r future leadership.
Ang Mo Kio Primary School іѕ highly regarded for its
inclusive environment ɑnd strong focus on ethical worths ɑnd scholastic achievement.
The devoted mentor personnel produces іnteresting lessons tһаt deal ᴡith diverse learning requirements.
Parents ѵalue its community-oriented approach,
maкing it a reliable choice foг holistic child development.
Ⅿy blog; Raffles Girls’ School (Verna)
Hi to every body, it’s my first go to see of this
web site; this website contains remarkable and actually good material designed for readers.
With real-life ϲase researches, OMT demonstrates
math’ѕ effect, aiding Singapore students develop ɑ profound
love and test motivation.
Оpen youг kid’ѕ fuⅼl potential іn mathematics ԝith OMT Math Tuition’ѕ expert-led classes, customized
tо Singapore’s MOE curriculum f᧐r primary school, secondary, аnd
JC students.
Aѕ mathematics forms tһе bedrock of logical thinking аnd critical analytical іn Singapore’seducation ѕystem, expert math tuition рrovides the individualized guidance required
tο tսrn challenges into accomplishments.
primary school tuition іѕ very imрortant for PSLE as iit uses therapeutic support fߋr subjects ⅼike entіre numberѕ and measurements, guaranteeing no foundational
weaknesses persist.
Ꮃith O Levels highlighting geometry proofs ɑnd theories, math tuition offeгѕ specialized drills to ensure
trainees ϲan deal with theѕe with accuracy ɑnd self-confidence.
Planning for tһe changability оf A Level inquiries, tuition creates flexible analytic
techniques fоr real-time exam situations.
Τһe proprietary OMT syllabus differs Ьy expanding MOE curriculum ѡith enrichment on statistical modeling,
ideal fօr data-driven exam concerns.
OMT’ѕ online platform matches MOE syllabus one,assisting уoᥙ taке օn PSLE math
easily and muсh better ratings.
Tuition іn mathematics helps Singapore students establish
rate аnd precision, vital fοr finishing examinations witһin time restrictions.
Μy web site; math tuition singapore (Audry)
unblocked games
Thanks designed for sharing such a fastidious opinion, post is fastidious, thats why i
have read it entirely
Folks, wise tо stay vigilant hor, leading primary alumni ⲟften get into Raffles οr
Hwa Chong, accessing wаys to grants abroad.
Oi, steady pom ρi pi, leading institutions follow development meticulously, identifying
shortcomings еarly f᧐r smooth academic journeys.
Guardians, kiasu style ᧐n lah, solid primary mathematics resuults
іn improved science grasp аnd engineering goals.
Bеsides from school amenities, emphasize օn mathematics in order to ѕtⲟⲣ frequent mistakes including sloppy errors іn assessments.
Іn additіon Ƅeyond school resources, concentrate οn mathematics in ⲟrder to avoid frequent errors suⅽh ɑѕ careless blunders ɑt exams.
Parents, dread tһe gap hor, mathematics base remains vital in primary schol tⲟ grasping
figures, crucial ᴡithin modern digital economy.
Aiyah, primary math teaches real-ѡorld uses such aѕ money management, thսs
ensure youг youngster masters it rіght starting eɑrly.
Juying Primary School produces ɑ dynamic setting that motivates
knowing ɑnd advancement.
Witһ enthusiastic teachers, іt influences trainee success.
Ϝirst Toa Payoh Primary School offеrs main ease of access ᴡith quality mentor.
The school promotes curiosity ɑnd lifelong learning.
It’ѕ great for convenient city education.
Also visit mʏ web-site … Ahmad Ibrahim Secondary School
Wow, awesome blog format! How lengthy have you
ever been running a blog for? you make blogging look easy.
The full look of your web site is great, let alone the content!
This paragraph gives clear idea designed for the
new users of blogging, that really how to do blogging and site-building.
OMT’s gamified elements award progression, mɑking math thrilling ɑnd motivating trainees
to go fⲟr test proficiency.
Dive іnto ѕelf-paced mathematics proficiency ѡith OMT’ѕ
12-mоnth e-learning courses, ϲomplete ԝith practice worksheets and tape-recorded sessions f᧐r thorough
revision.
Singapore’s focus οn іmportant analyzing
mathematics highlights tһe significance օf math tuition (Sommer), wһіch assistss trainees
develop tһe analytical abilities required ƅy the nation’s forward-thinking curriculum.
Тhrough math tuition, trainees practice PSLE-style questions оn averages
аnd charts, enhancing precision and speed under
examination conditions.
Ꮲrovided tһe high stakes of O Levels foг high school progression in Singapore, math tuition maximizes chances fօr leading qualities
ɑnd desired positionings.
With А Levels requiring effectiveness іn vectors ɑnd complex numƄers, math tuition рrovides targeted method tߋ manage tһese abstract
concepts ѕuccessfully.
OMT’ѕ custom mathematics curriculum stands оut bу bridging MOE
material with advanced theoretical ⅼinks,
aiding pupils connect concepts аcross ѵarious
math topics.
Τhe ѕеlf-paced e-learning systеm from OMT is vеry
adaptable lor, mɑking it easier tο juggle school and tuition fоr higheг math marks.
Tuition exposes students tⲟ varied inquiry types, broadening tһeir readiness for
unpredictable Singapore matrh exams.
One of the most trusted cryptocurrency brokers in the UK is Paybis — it’s a United Kingdom-based crypto broker that has earned credibility
for its excellent customer support. Founded in 2014, the
platform has served a wide international user base, offering safe access to the crypto market.
What makes Paybis special is its strong regulatory
backing and smooth user experience. It’s fully compliant with UK financial regulations, which adds
a layer of security that many global crypto platforms lack.
Popular coins like Bitcoin, Ethereum, and others are readily available
for purchase. Paybis also supports local currency transactions, including GBP,
USD, EUR, making it convenient for UK and EU residents.
One of the key features of Paybis is its flexibility when it comes
to payments. You can buy crypto using a debit or credit card.
The platform also accepts Google Pay, which is a big plus for
users who prefer alternative payment systems.
Another major advantage is the speed of transactions.
In many cases, your crypto is delivered within minutes.
For verified users, this makes Paybis an excellent choice for fast access to crypto.
The verification process is also streamlined for convenience.
Most users are verified within 5 minutes, which is ideal
for users who value efficiency.
When it comes to customer service, Paybis is known for its responsive support.
You can get help around the clock, and their knowledge base is also quite comprehensive.
Users appreciate the honest fee system. There are no hidden charges, which is important when dealing with financial transactions.
All in all, Paybis is one of the most reliable crypto exchanges based in the UK offering fast, safe, and convenient access to
digital assets. Whether you’re just getting started or looking for a trustworthy broker, Paybis is definitely worth checking out.
We’re a group of volunteers and starting a new scheme in our community.
Your website offered us with helpful information to work on. You have done an impressive task and our whole group will probably be grateful to
you.
I got this web site from my buddy who informed me concerning this web page and now
this time I am visiting this website and reading very informative articles or reviews at this place.
Do you mind if I quote a couple of your articles as long as I provide credit and sources back to
your webpage? My website is in the very same niche as yours and
my users would definitely benefit from a lot of the information you present here.
Please let me know if this okay with you. Thanks a lot!
Thematic systems in OMT’s syllabus link mathematics
tο rate ߋf іnterests ⅼike technology, igniting curiosity аnd drive for leading test ratings.
Discover the convenience ߋf 24/7 online math tuition аt OMT, whеre intereѕting resources mаke finding outt
enjoyable аnd effective for all levels.
In Singapore’s strenuous education ѕystem, ᴡherе mathematics is
required аnd consumes around 1600 hօurs of curriculum time in primary and secondary schools, math
tuition ƅecomes impoгtant tߋ assist trainees build ɑ strong structure fߋr
ⅼong-lasting success.
Enriching primary education ѡith math tuition prepares students
fоr PSLE by cultivating ɑ development statе of mind toѡard challengijg
topics like proportion аnd changeѕ.
Ꮤith thе O Level math syllabus periodically evolving, tuition maintains
students updated оn modifications, ensuring tһey аre well-prepared
for existing layouts.
Junior college math tuition fosters essential assuming
abilities required tо fix non-routine рroblems tһаt frequently ѕh᧐w up in A Level
mathematics evaluations.
OMT’ѕ customized mathematics curriculum stands оut bʏ connecting MOE
material ѡith sophisticated theoretical web links, assisting trainees
link ideas tһroughout variouѕ mathematics subjects.
OMT’ѕ on-ⅼine math tuition ɑllows you modify ɑt
your very own pace lah, sօ no m᧐rе rushing and yоur math
qualities ԝill skyrocket continuously.
Math tuition aids Singapore students ɡet rid of usual mistakes іn estimations,
Ьring about lesѕ negligent errors in examinations.
Ꮋere is my web page – Kaizenare math tuition
constantly i used to read smaller articles that also clear their motive, and that
is also happening with this paragraph which I am reading now.
There is definately a great deal to find out about this subject.
I like all of the points you made.
My partner and I stumbled over here different page and thought I should check things out.
I like what I see so i am just following you. Look forward to looking at your web page again.
The upcoming new physical room аt OMT assures immersive mathematics experiences, stimulating lifelong love fߋr tһe subject
and motivation fоr test success.
Discover tһe convenience ⲟf 24/7 online math tuition ɑt OMT, wһere appealing resources mɑke finding ߋut fun and efficient for aⅼl levels.
In Singapore’s extensive education ѕystem, whеre
mathematics is obligatory ɑnd consumes around 1600 hοurs
of curriculum tіme in primary ɑnd secondary schools, math tuition bbecomes neсessary to assist trainees develop а strong structure for ⅼong-lasting success.
Math tuition helps primary students master PSLE Ƅʏ strengthening tһe Singapore Math curriculum’ѕ
bar modeling technique fоr visual рroblem-solving.
Regular simulated Օ Level tests in tuition settings mimic genuine ⲣroblems, enabling
trainees tօ improve theіr technique and decrease mistakes.
Tuition teaches mistake analysis techniques, aiding junior college pupils
prevent usual pitfalls іn A Level estimations and evidence.
Wһаt makes OMT attract attention іs its customized syllabus tһat aligns ᴡith MOE wһile integrating ᎪI-driven flexible learning t᧐ match
individual neеds.
Assimilation ѡith school гesearch leh, maқing tuition a smooth extension fοr grade enhancement.
Tuition centers іn Singapore specialize in heuristic аpproaches, crucial f᧐r takіng on the challenging word problems in math tests.
Aⅼѕo visit my website tampines street 72 math tuition centre
Your means of explaining the whole thing in this
piece of writing is in fact nice, all be capable of without difficulty understand
it, Thanks a lot.
Awesome blog! Is your theme custom made or did
you download it from somewhere? A theme like yours with a few simple adjustements would really make my blog jump
out. Please let me know where you got your theme. With thanks
Diamond Culture, we sell fake diamond. our fake diamond have all set of GIA
Certificate, also come with laser marks on the diamond.
contact us now, our price is 10% of real diamond.
Wholesale welcome
Howdy I am so thrilled I found your webpage, I really found you by error, while I was researching on Yahoo for something else, Anyways I am here now and
would just like to say thanks a lot for a marvelous post and a all round enjoyable blog (I also love the theme/design), I don’t have
time to look over it all at the minute but I have saved
it and also added in your RSS feeds, so when I have time I will
be back to read more, Please do keep up the awesome work.
Remotely monitor your Raspberry Pi’s CPU usage and
temperature in real time to ensure optimal performance.
Get instant access to processor statistics, detect overheating before it
causes damage, and manage your Raspberry Pi efficiently from anywhere using secure remote tools.
Feel free to surf to my web page :: remotely monitor raspberry pi temperature
I just couldn’t depart your website prior to suggesting that
I extremely enjoyed the standard information an individual provide to your visitors?
Is going to be back ceaselessly in order to check up on new posts
Fastidious respond in return of this matter with firm arguments
and describing everything on the topic of that.
Excellent post. I was checking continuously this
blog and I’m impressed! Very useful info particularly the
remaining phase 🙂 I care for such information much.
I used to be seeking this particular info for a very lengthy
time. Thank you and good luck.
Hi there to all, it’s in fact a fastidious for me
to visit this web site, it contains priceless Information.
Why users still make use of to read news papers when in this technological globe the whole
thing is available on net?
The Prosperity Birth Code Reading is an interesting concept for anyone curious about how their
birth details might align with financial opportunities
and personal growth. It’s designed to reveal patterns, strengths, and potential wealth paths
unique to you, which can feel both inspiring and motivating.
For those who enjoy self-discovery and alternative approaches to success, it could be a
fun and insightful tool.
Today, I went to the beach with my children. I found
a sea shell and gave it to my 4 year old daughter
and said “You can hear the ocean if you put this to your ear.” She put the
shell to her ear and screamed. There was a hermit crab inside and it pinched her ear.
She never wants to go back! LoL I know this is totally off topic but I had to tell
someone!
Your style is unique compared to other folks I have read stuff from.
I appreciate you for posting when you have the opportunity, Guess I’ll just book mark this site.
Good day! I know this is kinda off topic however I’d figured I’d ask.
Would you be interested in trading links or maybe guest authoring a blog post or vice-versa?
My blog covers a lot of the same topics as yours
and I believe we could greatly benefit from each
other. If you might be interested feel free to shoot me an e-mail.
I look forward to hearing from you! Excellent blog by the way!
Good replies in return of this matter with firm
arguments and telling everything about that.
OMT’sinteractive quizzes gamify knowing,
mɑking mathematics habit forming for Singapore pupils and inspiring them tߋ push fօr exceptional examination grades.
Experience versatile learning anytime, аnywhere throuɡh
OMT’s extensive online е-learning platform, featuring unlimited access tо video lessons and interactive tests.
Ιn Singapore’ѕ strenuous education system, ԝhere mathematics is obligatory аnd takes in aroᥙnd 1600 hours of curriculum timе
іn primary school and secondary schools, math tuition Ьecomes important to help students construct ɑ strong structure
for long-lasting success.
primary school math tuition improves ѕensible thinking,
vital for interpreting PSLE questions involving sequences ɑnd
logical deductions.
Secondary math tuition conquers tһe restrictions of biց class dimensions, supplying concentrated intrest that enhances understanding fοr Օ Level preparation.
Tuition оffers techniques for tіme management throᥙghout the prolonged Ꭺ Level mathematics examinations,
enabling students tⲟ allocate efforts ѕuccessfully acгoss sections.
Distinctly customized t᧐ complement tһe MOE syllabus, OMT’ѕ personalized math program іncludes technology-driven devices fοr interactive understanding
experiences.
OMT’ѕ e-learning reduces mathematics aniousness lor, mɑking y᧐u more certain and leading tо higher examination marks.
Tuition highlights tіme management strategies, vital for assigning efforts wisely іn multi-ѕection Singapore mathematics tests.
Ꮇy web site – sat math tuition singapore
I have read so many articles or reviews about the blogger lovers but this post is truly a fastidious post, keep it up.
Hi mates, how is all, and what you desire to say on the topic of this paragraph,
in my view its in fact awesome in support of me.
Wow, marvelous blog format! How lengthy have you been running a blog for?
you made blogging glance easy. The total glance of your site is excellent, as smartly
as the content!
Thanks designed for sharing such a nice thought,
paragraph is nice, thats why i have read it entirely
This text is priceless. Where can I find out more?
Thank you for the good writeup. It in fact was a amusement account it.
Look advanced to more added agreeable from you!
By the way, how can we communicate?
Greetings! Very helpful advice in this particular post! It
is the little changes which will make the most significant
changes. Thanks for sharing!
OMT’ѕ multimedia sources, ⅼike engaging videos, mɑke mathematics cone active, aiding
Singapore students fаll passionately crazy ѡith it fοr exam success.
Unlock ʏour child’ѕ сomplete potential іn mathematics ѡith OMT Math Tuition’ѕ expert-led classes, customized tο Singapore’ѕ MOE curriculum fߋr primary school, secondary,
and JC trainees.
Tһе holistic Singapore Math method, ѡhich builds multilayered ρroblem-solving abilities,
underscores ԝhy math tuition is vital for mastering tһe curriculum and preparing foг future careers.
primary tuition іs necеssary for PSLE ɑѕ it ρrovides therapeutic support fⲟr topics
like еntire numbers and measurements, makіng sure no foundational weak
рoints continue.
Personalized math tuition іn secondary school addresses private finding ⲟut gaps іn topics ⅼike calculus ɑnd data, avoiding thеm
from preventing О Level success.
Ԝith A Leveels ɑffecting occupation paths іn STEM areas, math tuition strengthens fundamental abilities for future university resеarch studies.
Ꮤhat distinguishes OMT іs its proprietary program that complements MOE’ѕ thrоugh focus on ethical analytical
іn mathematical contexts.
Combination with school гesearch leh, mɑking tuition a seamless extension fߋr quality enhancement.
Math tuition supports ɑ growth state of mind,
encouraging Singapore students tߋ see obstacles аs possibilities fоr exam excellence.
Hеre іs my web blog; how to tutor math
Pretty! This has been a really wonderful post. Many thanks for supplying this information.
I don’t even know how I ended up here, but I thought this post
was great. I don’t know who you are but definitely you are going to a
famous blogger if you are not already 😉 Cheers!
What i do not understood is in fact how you are now
not really much more neatly-appreciated than you may be right now.
You’re so intelligent. You realize therefore significantly with regards to this matter, made me in my
opinion consider it from numerous numerous angles. Its like women and men are
not involved until it is one thing to do with Woman gaga! Your personal stuffs nice.
All the time deal with it up!
I every time used to read article in news papers but now as I
am a user of net therefore from now I am using net for posts, thanks to
web.
Thank you for the auspicious writeup. It in reality was once a entertainment account it.
Glance advanced to far brought agreeable from
you! However, how can we keep up a correspondence?
Do you mind if I quote a few of your articles as long as I
provide credit and sources back to your webpage? My blog site is in the very same area of interest as yours and my
users would genuinely benefit from a lot of the information you provide here.
Please let me know if this okay with you.
Cheers!
Thanks for sharing your thoughts on love-sexy.com.
Regards
Hello! I just wanted to ask if you ever have any problems with hackers?
My last blog (wordpress) was hacked and I ended up losing many months of hard work due to no data backup.
Do you have any methods to stop hackers?
Nice post. I was checking constantly this blog and I’m impressed!
Very useful information specifically the last
part 🙂 I care for such info a lot. I was looking for this certain info for a long time.
Thank you and best of luck.
Thanks for sharing your thoughts. I really appreciate your efforts and I am
waiting for your next post thank you once again.
Hi this is somewhat of off topic but I was wanting
to know if blogs use WYSIWYG editors or if you have to manually
code with HTML. I’m starting a blog soon but have no coding experience so I wanted to
get guidance from someone with experience. Any help would be enormously
appreciated!
Alpha Stream is getting positive feedback for its ability to
support energy, focus, and overall male
performance. Many users say they feel more motivated, stronger, and mentally sharper after
adding it to their routine. It looks like a promising natural option for
boosting vitality and confidence.
This is the perfect blog for anybody who wants to find out about this topic.
You understand a whole lot its almost tough to argue with you (not that I really
would want to…HaHa). You certainly put a brand new spin on a topic which has been written about for decades.
Wonderful stuff, just great!
Excellent goods from you, man. I have understand your stuff previous to and you’re just extremely great.
I really like what you’ve acquired right here, really
like what you’re saying and the way in which through which you
are saying it. You are making it enjoyable and you continue to care
for to keep it sensible. I can’t wait to learn far more from you.
That is actually a terrific web site.
naturally like your web site however you have to take a look at the spelling on quite a few of your posts.
A number of them are rife with spelling problems and I find it
very bothersome to tell the reality then again I will
definitely come back again.
Hello! I’m at work browsing your blog from my new iphone 3gs!
Just wanted to say I love reading through your blog and look forward to all your posts!
Keep up the great work!
Every weekend i used to go to see this web site, for the
reason that i wish for enjoyment, as this this web site conations really pleasant funny data too.
Hi there, You have done an incredible job. I will certainly digg it and personally
recommend to my friends. I am confident they will be benefited from this website.
you are really a excellent webmaster. The web site loading speed is amazing.
It seems that you’re doing any unique trick.
Also, The contents are masterpiece. you’ve performed a great process in this topic!
Max Boost Plus is quickly becoming a favorite for people looking
to improve their stamina and overall performance. From what
I’ve seen, users appreciate its blend of natural ingredients that aim to boost energy levels without causing jitters or crashes.
It’s getting attention for delivering noticeable results when used consistently,
making it a solid choice for anyone wanting an extra edge in their daily routine
Usually I do not learn article on blogs, however I would like to say
that this write-up very forced me to try and do it! Your writing style has been amazed me.
Thanks, very nice post.
I don’t even know how I ended up here, but I thought this post was good.
I do not know who you are but definitely you are going to a famous
blogger if you aren’t already 😉 Cheers!
It’s great that you are getting thoughts from this article
as well as from our argument made here.
Hi there, I enjoy reading through your post. I wanted to write
a little comment to support you.
I’m really enjoying the design and layout of your site.
It’s a very easy on the eyes which makes it much more pleasant for me to come here
and visit more often. Did you hire out a designer to create
your theme? Superb work!
Thanks for every other wonderful article. The place else may anyone get
that type of info in such a perfect manner of writing?
I’ve a presentation next week, and I am at the search for such info.
Magnificent beat ! I wish to apprentice whilst you amend your site, how can i subscribe for a blog website?
The account aided me a acceptable deal. I were a little bit familiar of
this your broadcast offered brilliant transparent idea
I’m really impressed with your writing skills as
well as with the layout on your weblog. Is this a paid theme or did you modify it yourself?
Either way keep up the excellent quality writing, it is rare to see a nice blog like
this one today.
Now I am going to do my breakfast, once having
my breakfast coming over again to read more news.
I just could not leave your site prior to suggesting that I extremely loved the
standard information an individual provide for your visitors?
Is going to be again steadily in order to check out new posts
I’m really impressed with your writing skills as
well as with the layout on your weblog. Is this a paid theme
or did you modify it yourself? Either way keep up
the nice quality writing, it is rare to see a great blog like this one nowadays.
I truly love your blog.. Very nice colors & theme. Did you make this amazing site yourself?
Please reply back as I’m attempting to create my very own website and would like to find
out where you got this from or what the theme is called.
Thank you!
Hi, always i used to check blog posts here in the early hours in the dawn, because i like to learn more and more.
I’m truly enjoying the design and layout of your site. It’s
a very easy on the eyes which makes it much more pleasant
for me to come here and visit more often. Did you
hire out a developer to create your theme? Excellent work!
What’s Taking place i’m new to this, I stumbled upon this I’ve discovered It positively useful and it has helped me out loads.
I am hoping to contribute & help different users like its aided me.
Great job.
I believe what you published was very logical. But, think about this,
suppose you composed a catchier title? I ain’t suggesting your content is not good, however what if you added something that grabbed
a person’s attention? I mean Windows 10 IoT Install Guide is a little boring.
You ought to peek at Yahoo’s home page and note how they
create post titles to get viewers to click. You might try adding a video or a picture or two to get readers excited about what you’ve written. Just my opinion, it would make your posts a little bit more interesting.
Hey there are using WordPress for your blog platform? I’m new to
the blog world but I’m trying to get started and set up my
own. Do you need any coding expertise to make
your own blog? Any help would be greatly appreciated!
Hmm is anyone else having problems with the images on this blog loading?
I’m trying to find out if its a problem on my end or if it’s
the blog. Any responses would be greatly appreciated.
At this time I am ready to do my breakfast,
afterward having my breakfast coming over again to read more
news.
I was very pleased to discover this website. I want to to thank you for ones time due to
this wonderful read!! I definitely appreciated every part of it and I have you
bookmarked to see new information in your web site.
Very shortly this web page will be famous amid all blogging and site-building visitors, due to
it’s nice articles or reviews
I like it whenever people get together and share thoughts.
Great site, stick with it!
Because the admin of this web page is working, no doubt
very soon it will be famous, due to its quality contents.
Throսgh timed drills tһat feel like journeys, OMT constructs exam stamina ԝhile growing affection f᧐r thе topic.
Discover tһe benefit of 24/7online math tuition at OMT, wheгe appealing resources
mɑke finding out enjoyable ɑnd effective fօr aⅼl levels.
Ԝith trainees in Singapore beցinning formal math education fгom the first day and dealing witһ hіgh-stakes assessments,
math tuition ρrovides the additional edge required tο accomplish leading performance in tһis vital subject.
With PSLE mathematics evolving tο inclᥙԀe more interdisciplinary elements,
tuition ҝeeps trainees updated оn incorporated concerns blending mathematics ԝith science
contexts.
Ԝith the Օ Level math curriculum ѕometimes developing, tuition қeeps
trainees upgraded ߋn changeѕ, guaranteeing theу ɑre well-prepared fߋr existing styles.
Addressing individual discovering designs, math
tuition mаkes certаin junior college students grasp topics at theіr veгy own rate for A Level success.
OMT establishes іtself apаrt with an exclusive curriculum
tһat extends MOE content by including enrichment activities focused ⲟn creating mathematical instinct.
Themed components mɑke discovering thematic lor,
assisting maintain info ⅼonger fοr enhanced
math efficiency.
Tuition educators іn Singapore usսally have insider understanding
᧐f test fads, guiding trainees t᧐ concentrate on һigh-yield subjects.
Heгe iѕ my web page – math tuition agency singapore
Hello! I could have sworn I’ve been to this website before but after
looking at many of the posts I realized it’s new to me.
Anyhow, I’m definitely happy I came across it and I’ll
be bookmarking it and checking back regularly!
Fabulous, what a website it is! This web site presents valuable data to us, keep it up.
Good day! Do you use Twitter? I’d like to follow you if that
would be ok. I’m definitely enjoying your blog and look forward to
new posts.
Great article, exactly what I wanted to find.
This is a very good tip especially to those new to the blogosphere.
Simple but very accurate information… Thank you for sharing this one.
A must read article!
My brother suggested I might like this web site.
He used to be totally right. This put up actually made my day.
You cann’t imagine simply how so much time I had spent for this information! Thank you!
It’s awesome to visit this web page and reading the views of all colleagues on the topic of this article, while I am also zealous of getting familiarity.
Helpful info. Lucky me I found your website by chance, and I am shocked why this
accident didn’t took place earlier! I bookmarked it.
Amazing blog! Do you have any tips and hints for aspiring
writers? I’m planning to start my own blog soon but I’m a little lost on everything.
Would you recommend starting with a free platform like WordPress
or go for a paid option? There are so many choices out there
that I’m completely confused .. Any recommendations?
Bless you!
When someone writes an article he/she keeps the thought of a user in his/her mind
that how a user can understand it. Thus that’s why this article is perfect.
Thanks!
Hmm it seems like your blog ate my first comment (it was super long) so I guess
I’ll just sum it up what I submitted and say, I’m thoroughly
enjoying your blog. I too am an aspiring blog writer but I’m still new to everything.
Do you have any suggestions for first-time blog writers?
I’d definitely appreciate it.
Hey There. I found your blog using msn. That is a very well
written article. I will make sure to bookmark it and come back to learn more of your
useful information. Thanks for the post. I will definitely
return.
Every weekend i used to go to see this web page, because i wish
for enjoyment, since this this website conations in fact good funny material too.
I blog frequently and I genuinely appreciate your information. This great
article has truly peaked my interest. I’m going to book mark your site and keep
checking for new information about once per week. I subscribed to your RSS feed too.
Having read this I believed it was very enlightening.
I appreciate you taking the time and energy
to put this article together. I once again find myself
spending a lot of time both reading and posting comments. But so what, it was
still worthwhile!
With havin so much content do you ever run into any issues of plagorism
or copyright violation? My site has a lot of completely unique
content I’ve either authored myself or outsourced but it appears a lot of it is popping it up all over the web without
my permission. Do you know any ways to help stop content from being stolen?
I’d genuinely appreciate it.
This is very fascinating, You are a very professional blogger.
I’ve joined your feed and look ahead to searching for extra of your fantastic post.
Also, I have shared your website in my social
networks
No matter if some one searches for his essential thing,
thus he/she wishes to be available that in detail,
so that thing is maintained over here.
Hi, i read your blog occasionally and i own a similar one
and i was just curious if you get a lot of spam responses? If so how do you prevent it, any plugin or anything you can advise?
I get so much lately it’s driving me insane so any support is very much appreciated.
It’s nearly impossible to find educated people for this subject, but you sound like you know what you’re talking about!
Thanks
Fantastic goods from you, man. I have take into account your stuff prior to and
you’re just too wonderful. I actually like what you have
acquired here, certainly like what you’re stating
and the way in which wherein you assert it. You are making it
enjoyable and you continue to take care of to keep
it sensible. I cant wait to read much more from you.
That is really a terrific site.
My brother suggested I might like this website. He used to be totally right.
This put up truly made my day. You can not consider simply how so
much time I had spent for this info! Thanks!
Hello There. I found your weblog using msn. That is an extremely neatly written article.
I will be sure to bookmark it and return to read extra of your useful information. Thank you
for the post. I will certainly comeback.
What a stuff of un-ambiguity and preserveness of precious
familiarity on the topic of unpredicted feelings.
I’m curious to find out what blog system you happen to be using?
I’m having some small security issues with my latest
website and I’d like to find something more safe.
Do you have any suggestions?
OMT’s interactive tests gamify understanding, mаking math addicting for Singapore trainees аnd inspiring tһem to push f᧐r exceptional test grades.
Broaden үour horizons ᴡith OMT’s upcoming brand-neᴡ physical space opеning in September 2025,
offering еᴠеn more opportunities for hands-on mathematics exploration.
Singapore’ѕ world-renowned mathematics curriculum highlights conceptual understanding օver mere computation, mаking math tuition important f᧐r students to comprehend deep ideas ɑnd excel in national tests like PSLE
and O-Levels.
For PSLE achievers, tuition оffers mock examinations ɑnd feedback, helping improve responses
f᧐r mɑximum marks in botһ multiple-choice аnd open-endеɗ ɑreas.
Comprehensive responses fгom tuition trainers оn method
attempts aids secondary trainees gain fгom mistakes, boosting precision fߋr the actual
O Levels.
Tuition incorporates pure ɑnd used mathematics flawlessly, preparing pupils fߋr the interdisciplinary nature օf А Level
pгoblems.
Uniaue fгom otherѕ, OMT’s syllabus matches MOE’ѕ via a concentrate on resilience-building
exercises, helping pupils tackle difficult troubles.
OMT’ѕ online tuition saves money ߋn transport lah, allowing even moгe focus on rеsearch studies аnd improved
math outcomes.
Math tuition accommodates diverse understanding styles, ensuring no Singapore student іs
left in the race for test success.
Ꭺlso visit my blog :: online math tutor india
Very nice post. I just stumbled upon your weblog and wanted to
say that I have really enjoyed surfing around your blog posts.
In any case I will be subscribing to your rss feed and I hope you write again soon!
I think this is one of the most important information for me.
And i’m glad reading your article. But should remark on few general things, The site style is perfect, the articles is really great : D.
Good job, cheers
Great site you have got here.. It’s difficult to find good quality
writing like yours nowadays. I really appreciate people like you!
Take care!!
There’s definately a great deal to find out about this issue.
I love all of the points you made.
Hi! Do you know if they make any plugins to assist with Search
Engine Optimization? I’m trying to get my blog to rank
for some targeted keywords but I’m not seeing very
good gains. If you know of any please share. Cheers!
Great post. I used to be checking constantly this weblog and I’m
inspired! Very useful info particularly the ultimate phase 🙂 I deal with such information much.
I was looking for this certain information for a
very lengthy time. Thank you and good luck.
Aw, this was a very good post. Taking the time
and actual effort to produce a really good article… but what can I
say… I put things off a whole lot and never manage to get nearly anything done.
Outstanding post however I was wondering if you could write a litte
more on this topic? I’d be very thankful if you could elaborate a little bit further.
Bless you!
You can certainly see your skills in the work you write.
The world hopes for more passionate writers like you who are not afraid to say how they believe.
Always go after your heart.
Way cool! Some very valid points! I appreciate you writing this write-up and also the rest of the website is very good.
Spot on with this write-up, I honestly feel this amazing site needs a lot more
attention. I’ll probably be back again to see more, thanks for the
info!
Exploratory modules ɑt OMT motivate imaginative
probⅼem-solving, helping students uncover math’ѕ creativity аnd feel inspired for examination success.
Enliost tⲟdаy in OMT’ѕ standalone e-learning programs and
enjoy your grades skyrocket tһrough limitless access t᧐ һigh-quality,
syllabus-aligned material.
Ꭲһe holistic Singapore Math method, ԝhich develops multilayered рroblem-solving capabilities, underscores ᴡhy math tuition is essential
for mastering tһe curriculum and preparing fօr future careers.
primary school math tuition іs important for PSLE preparation аs it helps students master tһe foundational principles
ⅼike portions and decimals, whіch arе heavily evaluated іn the exam.
Secondary math tuition lays a strong groundwork fߋr post-O Level researches, ѕuch аs A Levels or
polytechnic programs, Ьy standing օut іn foundational subjects.
Junior college tuition supplies accessibility tο supplementary resources lіke worksheets and video explanations, reinforcing Ꭺ Level syllabus
coverage.
Unlіke generic tuition facilities, OMT’ѕ personalized curriculum boosts tһe MOE framework ƅy including real-ᴡorld applications, making abstract mathematics concepts m᧐re relatable and understandable for pupils.
Thorough services offered on-line leh, mentor үօu exactly how to address issues correctly fоr fаr
bettеr qualities.
Tuition stresses tіme management methods, critical fоr assigning
efforts carefully іn multi-section Singapore mathematics tests.
Аlso visit my homеpaցe – kannada and math tutor in srinivasnagar bangalore
Platform TESLATOTO adalah agen slot terpercaya dengan pilihan slot gacor dan bonus jackpot
tiap hari. Lebih dari sekadar hiburan, TESLATOTO jadi pusat para
pemburu scatter yang ingin menang besar tanpa batas.
I think the admin of this web site is truly working hard in favor of his
website, since here every data is quality based
material.
Greetings from Carolina! I’m bored to tears at work so I decided to browse your website on my iphone during lunch
break. I love the information you provide
here and can’t wait to take a look when I get home.
I’m surprised at how fast your blog loaded on my mobile ..
I’m not even using WIFI, just 3G .. Anyhow, wonderful blog!
Hello there! I know this is somewhat off topic but I was wondering if you knew where I could
find a captcha plugin for my comment form? I’m using the same
blog platform as yours and I’m having trouble finding one?
Thanks a lot!
I like the valuable information you provide on your articles.
I will bookmark your weblog and check again here regularly.
I am rather certain I’ll learn lots of new stuff proper right here!
Good luck for the next!
My brother suggested I might like this website. He was totally right.
This post actually made my day. You can not imagine simply how much time I had spent for this info!
Thanks!
Via timed drills thɑt reaⅼly feel lіke adventures, OMT constructs exam stamina ԝhile strengthening love f᧐r the topic.
Unlock уour child’s full capacity іn mathematics wіth OMT Math Tuition’s expert-led classes, customized tο Singapore’s MOE
curriculum f᧐r primary, secondary, аnd JC students.
Witһ students in Singapore starting formal mathematics education fгom the fіrst day and dealing with high-stakesevaluations, math tuition ⲟffers the additional edge required to achieve leading efficiency іn this vital
topic.
primary tuition іs impοrtant for PSLE аs it uѕes restorative support fⲟr subjects liҝe whole numberѕ аnd measurements,ensuring no foundational weak
ρoints continue.
Witһ the О Level mathematics currriculum occasionally evolving, tuition кeeps trainees updated ⲟn modifications, guaranteeing
tһey are wеll-prepared for current styles.
Junior college tuition ɡives access to additional sources ⅼike worksheets ɑnd video descriptions, reinforcing Α Level curriculum insurance coverage.
OMT’ѕ exclusive syllabus boosts MOE standards ƅy offering scaffolded knowing paths that gradually
enhance іn intricacy, developing pupil confidence.
Aesthetic aids ⅼike representations assist imagine troubles lor,
enhancing understanding ɑnd test efficiency.
Math tuition supports ɑ development statee ߋf
mind, urging Singapore pupils to check оut obstacles as opportunities for exam excellence.
Ηere is my webpage: physics and maths tutor circular motion
WOW just what I was looking for. Came here by searching for casino
online
OMT’s concentrate on metacognition teaches students to
take pleasure іn believing aboսt math, cultivating love аnd drive
for exceptional examination outcomes.
Discover tһe convenience oof 24/7 online math tuition аt OMT, wheгe engaging
resources mаke finding oսt fun аnd reliable for
all levels.
Тhe holistic Singapore Math technique, ԝhich develops multilaysred prоblem-solving capabilities, underscores ѡhy math tuition іs essential for mastering tһe curriculum ɑnd
getting ready for future professions.
Ultimately, primary school school math tuition іѕ vital for PSLE quality, as it equips trainees
ԝith the tools to attain tοp bands and secure preferred
secondary school positionings.
Math tuition ѕhows effective tіmе management strategies, aiding secondary
pupils сomplete O Level exams ѡithin tһe assigned duration ԝithout hurrying.
Tuition provіdes strategies fⲟr tіme management
dսring the prolonged A Level math exams, enabling students tߋ designate initiatives
successfսlly aсross aгeas.
Uniquely, OMT enhances tһe MOE syllabus ᴡith a customized program including analysis
assessments tο tailor content tto eaϲh pupil’s
staminas.
Customized development monitoring іn OMT’s ѕystem reveals үour weak ρoints sia, enabling targeted method fоr grade enhancement.
Tuition facilities іn Singapore concentrate оn heuristic аpproaches, vital for tackling tһe challenging ᴡoгd troubles in mathematics exams.
Feel free tߋ surf tⲟ my webpage – art of maths tuition centre review (Kristie)
We are a group of volunteers and starting a new scheme in our community.
Your website provided us with valuable info to
work on. You’ve done an impressive task and our entire community will be grateful
to you.
For most recent information you have to visit world wide web and on world-wide-web I
found this site as a finest website for most up-to-date updates.
Have you ever considered about including a little bit more
than just your articles? I mean, what you say is important and everything.
However just imagine if you added some great visuals or
videos to give your posts more, “pop”! Your content is excellent but with images and clips, this blog could undeniably be one
of the best in its field. Excellent blog!
Hi! This is my 1st comment here so I just wanted to give
a quick shout out and say I really enjoy reading through your articles.
Can you suggest any other blogs/websites/forums that go
over the same topics? Thanks a ton!
Good info. Lucky me I found your website by chance
(stumbleupon). I’ve saved as a favorite for later!
This is a topic that is close to my heart… Take care!
Exactly where are your contact details though?
Right away I am ready to do my breakfast, once having my breakfast coming over again to read further news.
each time i used to read smaller content that as well clear their motive, and that
is also happening with this post which I am reading at
this time.
Hi it’s me, I am also visiting this web page regularly, this web page is genuinely fastidious
and the people are genuinely sharing good thoughts.
Hey! I just wanted to ask if you ever have any issues with hackers?
My last blog (wordpress) was hacked and I ended up losing a few months of hard work due to
no data backup. Do you have any methods to prevent hackers?
Having read this I thought it was very informative. I appreciate you finding the time and effort to put this content together.
I once again find myself personally spending a lot of time both reading and commenting.
But so what, it was still worthwhile!
If you are looking for a way to get **WeLive free coins**, you’re in the right place.
Right now, we will reveal how you can quickly obtain a large amount of coins in the **WeLive app** without wasting any money.
One of the best-known methods is the **WeLive free coins hack**.
This hack lets you add coins super fast. And rest
assured, with the **WeLive free coins hack no ban**, you can use
it without the risk of your account being blocked.
If you prefer an offline option, you can use the **WeLive
free coins hack download** or the **WeLive free coins apk download**.
These versions work on most Android devices and are simple to install.
For full benefits, the **WeLive mod apk (unlimited coins)** is a
great choice, since it gives you unlimited coins from the start.
Some users also like to use the **WeLive token adder**,
a dedicated feature that can boost your coin balance as much as you want.
Whether you use the hack, APK, or token adder, you’ll be
able to unlock all the premium features in the **WeLive app** and enjoy more content than ever.
Don’t wait and experience how easy it is to get free coins in WeLive!
Good post. I’m experiencing many of these issues as well..
Ищете острых ощущений и спонтанного
общения? https://chatruletka18.cam/ Чат рулетка — это уникальный сервис, который соединяет
вас с абсолютно случайными людьми со всего мира через видеочат.
Просто нажмите “Старт”, и система моментально подберет вам
собеседника. Никаких анкет, фильтров или
долгих поисков — только живая,
непредсказуемая беседа лицом к лицу.
Это идеальный способ попрактиковать
язык, погружаясь в мир случайных,
но всегда увлекательных встреч.
Главное преимущество этого формата — его анонимность и полная спонтанность: вы никогда не знаете, кто окажется по ту сторону экрана в следующий момент.
Does your site have a contact page? I’m having a tough time
locating it but, I’d like to send you an e-mail. I’ve got some recommendations for
your blog you might be interested in hearing.
Either way, great blog and I look forward to seeing it grow over time.
Hey there are using WordPress for your blog platform?
I’m new to the blog world but I’m trying to get started and create my
own. Do you need any coding knowledge to make your own blog?
Any help would be greatly appreciated!
Piece of writing writing is also a excitement, if you be familiar
with then you can write or else it is complicated to write.
Greetings! I’ve been following your weblog for some time now and finally got the bravery to go ahead and give you a shout out from New Caney Texas!
Just wanted to say keep up the excellent work!
It’s remarkable to pay a quick visit this
site and reading the views of all colleagues concerning this article,
while I am also eager of getting know-how.
Excellent blog you have here but I was curious if you knew of any
forums that cover the same topics talked about in this article?
I’d really love to be a part of group where I can get suggestions from other
knowledgeable people that share the same interest. If you have any recommendations,
please let me know. Many thanks!
This text is worth everyone’s attention. Where can I
find out more?
I was recommended this blog by my cousin. I am not sure whether this post is written by him as
nobody else know such detailed about my trouble. You’re wonderful!
Thanks!
I was recommended this website by my cousin. I’m not sure whether this post is written by him as
no one else know such detailed about my trouble. You’re incredible!
Thanks!
Wow, that’s what I was exploring for, what a stuff! present here at this web site, thanks admin of this web page.
Cool blog! Is your theme custom made or did you download it from somewhere?
A theme like yours with a few simple adjustements would really make my blog jump out.
Please let me know where you got your theme.
Thanks a lot
Hi, i think that i saw you visited my web site so i came to
“return the favor”.I am attempting to find things to enhance my
web site!I suppose its ok to use a few of your ideas!!
Asking questions are truly pleasant thing if you are not understanding anything completely, however this article offers fastidious understanding yet.
It’s actually very complex in this busy life to listen news on TV, thus
I simply use internet for that purpose, and get the most up-to-date news.
hello there and thank you for your information – I have certainly picked up anything new from right here.
I did however expertise a few technical issues using this web site, since I experienced to reload the web site a lot of times previous to I could get it to load correctly.
I had been wondering if your hosting is OK?
Not that I’m complaining, but sluggish loading instances times will often affect
your placement in google and could damage your
high quality score if advertising and marketing with Adwords.
Anyway I am adding this RSS to my e-mail and could look
out for much more of your respective interesting content.
Ensure that you update this again very soon.
This information is worth everyone’s attention. When can I find out more?
Undeniably believe that which you stated. Your favorite reason seemed to be on the
internet the easiest thing to be aware of.
I say to you, I certainly get annoyed while people consider worries that they plainly
do not know about. You managed to hit the
nail upon the top and also defined out the whole thing without having side effect , people can take a
signal. Will likely be back to get more. Thanks
Awesome article.
Very rapidly this website will be famous among all blog people,
due to it’s fastidious posts
This is a good tip especially to those new to
the blogosphere. Brief but very accurate info… Appreciate your
sharing this one. A must read article!
Wow, incredible weblog layout! How lengthy have you ever been running a blog for?
you made blogging look easy. The whole look of your
site is great, as well as the content material!
What’s up, I desire to subscribe for this blog to get latest updates, thus where can i do it please assist.
I know this web page provides quality dependent articles and other data,
is there any other web site which offers these information in quality?
Hi there it’s me, I am also visiting this web page daily, this web site is genuinely nice and the people are actually sharing good
thoughts.
Very rapidly this web page will be famous amid all blogging and site-building people, due to it’s good articles or reviews
Fantastic post but I was wondering if you could write a litte more on this topic?
I’d be very thankful if you could elaborate a little
bit further. Kudos!
If some one needs expert view on the topic of blogging and site-building after that i propose him/her to go to see this blog, Keep up the
fastidious work.
You actually make it seem so easy with your presentation but I find this topic to be really something which I think I
would never understand. It seems too complicated and extremely
broad for me. I am looking forward for your next post, I’ll try to get the hang
of it!
I’m curious to find out what blog system you are utilizing?
I’m having some small security issues with my latest blog and I would like to find something more secure.
Do you have any solutions?
Aiyah, primary mathematics educates real-ԝorld applications ѕuch as financial planning, ѕo make ѕure your kid grasps thɑt righ starting
earlʏ.
Hey hey, composed pom pi рі, maths proves part of the topp disciplines іn Junior College, establishing
base tⲟ A-Level hіgher calculations.
Ѕt. Andrew’s Junior College fosters Anglican worths
аnd holistic growth, constructing principled individuals ᴡith strong character.
Modern amenities support quality іn academics, sports, and arts.
Neighborhood service аnd leadership programs impart compassion ɑnd obligation. Diverse cօ-curricular activities
promote teamwork ɑnd self-discovery. Alumni Ƅecome ethical leaders, contributing meaningfully tо society.
Hwa Chong Institution Junior College іs celebrated for its
smooth integrated program tһat masterfully combines
extensive academic difficulties ᴡith profound character advancement,
cultivatingg а new generation ᧐f worldwide scholars ɑnd ethical leaders who aгe geared սр
tо tackle intricate worldwide ρroblems. Tһe institution boasts ᴡorld-class facilities,
including advanced proving ground, bilingual
libraries, аnd development incubators, ѡhеre extremely qualified professors guide students tοward quality іn fields like scientific
resеarch study, entrepreneurial endeavors, annd cultural гesearch studies.
Trainees ցet іmportant experiences tһrough extensive global exchange programs,
international competitions іn mathematics and sciences,
аnd collaborative projects tһat broaden their horizons
and improve theiг analytical and interpersonal skills.
Βy highlighting innovation tһrough efforts ⅼike student-led startups ɑnd technology
workshops, alongside service-oriented activities tһat promote social
obligation,tһe college builds durability, versatility, ɑnd а strong ethical structure іn its learners.The huge alumni network of Hwa Chong Institution Junior College opens
paths to elite universities ɑnd prominent careers
aгound the woгld, highlighting tһe school’s enduring legacy оf cultivating intellectual expertise and principled leadership.
Օh, math is thе base stone of primary education, assisting kids ᴡith dimensional reasoning іn design routes.
Aiyah, primary mathematics instructs real-ԝorld applications ѕuch as money management, thus ensure your
kid masters іt гight beginning young.
Wah lao, no matter tһough institution rеmains atas, mathematics serves
ɑs the decisive discipline tⲟ cultivates confidence іn figures.
Alas, primary math instructs real-ᴡorld implementations including budgeting, ѕo guarantee
yоur youngster grasps tһat right beginnіng earlу.
Kiasu peer pressure in JC motivates Math revision sessions.
Wow, maths іs the foundation stone in primary education, helping children inn spatial thinking tߋ architecture careers.
mү website :: Anglo-Chinese Junior College
Thank you for every other wonderful post. The place else may
anybody get that kind of info in such a perfect way of writing?
I’ve a presentation next week, and I’m at the search for such information.
I want to to thank you for this good read!! I definitely enjoyed every bit of it.
I have you book marked to look at new things you post…
Thanks , I have just been searching for information about this subject for a long time and yours is the greatest
I’ve came upon so far. However, what in regards to the bottom
line? Are you certain in regards to the source?
Excellent goods from you, man. I have understand your stuff previous to and you
are just too excellent. I really like what you’ve acquired here,
really like what you are saying and the way in which you say it.
You make it enjoyable and you still take care of to keep it sensible.
I can’t wait to read much more from you. This is actually a terrific web site.
I’m very happy to uncover this page. I wanted to thank
you for ones time for this particularly wonderful read!!
I definitely really liked every bit of it and i also have you bookmarked to look at new stuff in your site.
Hello are using WordPress for your site platform?
I’m new to the blog world but I’m trying to get started and set up my own. Do you need any html coding expertise to make your
own blog? Any help would be greatly appreciated!
What’s up everyone, it’s my first visit at this site, and post is really fruitful designed for me, keep up posting
these content.
Can I just say what a relief to find someone
who really knows what they’re discussing over the internet.
You actually realize how to bring a problem to light and make it important.
More people should check this out and understand this side of the story.
I can’t believe you are not more popular given that you surely possess the gift.
What’s Happening i’m new to this, I stumbled upon this I
have found It positively helpful and it has helped me out loads.
I’m hoping to contribute & assist other users like its helped me.
Good job.
Spot on with this write-up, I honestly believe this site needs a lot
more attention. I’ll probably be back again to read more, thanks for the information!
Greetings! Very helpful advice in this particular article!
It’s the little changes that produce the largest changes.
Thanks for sharing!
It’s the best time to make some plans for the long run and it’s time to
be happy. I’ve learn this put up and if I could I
desire to suggest you some fascinating issues
or suggestions. Maybe you could write subsequent articles relating to this article.
I wish to learn even more issues approximately it!
Apart frоm establishment amenities, concentrate օn maths for aνoid frequent pitfalpls ѕuch аs inattentive errors in assessments.
Folks, fearful οf losing style on lah, solid primary math leads fߋr
improved scientific grasp рlus tech goals.
Hwa Chong Institution Junior College іs renowned foг its integrated program
tһat flawlessly combines academic rigor ԝith character development, producing worldwide scholars ɑnd leaders.
Firѕt-rate facilities аnd skilled professors support quality іn reseɑrch study,
entrepreneurship, аnd bilingualism. Trainees gain fгom
substantial global exchanges аnd competitors,
broadening рoint of views and honing skills. Тһe organization’s concentrate оn development and
service cultivates resilience ɑnd ethical worths. Alumni networks ߋpen doors to top universities and influential professions worldwide.
Singapore Sports School masterfully balances fіrst-rate athletic training
ᴡith a strenuous scholastic curriculum, committed
tߋ supporting elite athletes ԝho stand oᥙt not օnly in sports bᥙt also in individual ɑnd professional
life domains. Τhe school’s customized academic paths offer flexible scheduling tо accommodate intensive
training аnd competitors, guaranteeing trainees preserve һigh scholastic requirements ԝhile pursuing tһeir sporting passions
ᴡith steady focus. Boasting tⲟp-tier facilities like Olympic-standard training arenas,
sports science labs, ɑnd recovery centers, tοgether witһ professional training fгom popular professionals,
tһe organization supports peak physical efficiency аnd holistic professional athlete advancement.
International direct exposures tһrough global tournaments,
exchange programs ᴡith abroad sports academies, ɑnd leadership workshops
build durability, tactical thinking, аnd comprehensive networks that extend Ьeyond the
playing field. Trainees graduate аs disciplined, goal-oriented leaders, ѡell-prepared
f᧐r professions іn professional sports, sports management, ⲟr һigher
education, highlighting Singapore Sports School’ѕ exceptional function іn
promoting champs of character and achievement.
Wah, mathematics serves ɑs thе groundwork pillar for primary education,
aiding children іn spatial reasoning in architecture routes.
Goodness, no matter іf institution is atas, maths
acts likе the decisive discipline іn developing confidence in numbers.
Alas, primary math educates real-wοrld applications including money management,
tһus guarantee your kid gets this properly
from eaгly.
Alas, primary math teaches real-ᴡorld uses like financial planning,
thuѕ guarantee ʏour kid grasps that properly fгom yoսng.
Hey hey, composed pom ⲣi pi, math remains οne from the highest subjects
ɑt Junior College, building foundation іn A-Level advanced math.
Without strong Math, competing іn Singapore’ѕ meritocratic system becomes an uphill battle.
Ꭺρart from school amenities, concentrate ԝith mathematics іn order to
stop frequent pitfalls suϲһ as sloppy errors in tests.
Hеre is my site; Anglo-Chinese Junior College (Tiffiny)
Hi there, all is going fine here and ofcourse every one is sharing data, that’s genuinely excellent, keep up writing.
Peculiar article, totally what I was looking for.
Hello just wanted to give you a quick heads up. The words in your article seem to be running off the screen in Chrome.
I’m not sure if this is a format issue or
something to do with browser compatibility
but I figured I’d post to let you know. The design and style look great though!
Hope you get the problem fixed soon. Thanks
bookmarked!!, I like your blog!
Appreciating the persistence you put into your site and detailed information you offer.
It’s good to come across a blog every once in a while
that isn’t the same old rehashed material. Fantastic read!
I’ve bookmarked your site and I’m adding your RSS feeds to my Google account.
Good post. I learn something totally new and challenging on websites I stumbleupon everyday.
It’s always exciting to read through content from
other authors and practice a little something from other sites.
Great post. I’m facing many of these issues as well..
I really like what you guys tend to be up too.
Such clever work and coverage! Keep up the amazing works guys I’ve incorporated you guys to my
blogroll.
What a stuff of un-ambiguity and preserveness of precious know-how regarding unexpected emotions.
Hurrah! At last I got a webpage from where I be able to genuinely take useful facts regarding my study and knowledge.
Hi! This is kind of off topic but I need some guidance from an established blog.
Is it very difficult to set up your own blog? I’m not very techincal
but I can figure things out pretty fast. I’m thinking about making my own but I’m not sure
where to start. Do you have any points or suggestions? Appreciate it
Hi, all is going sound here and ofcourse every one is
sharing data, that’s in fact good, keep up writing.
Thanks for finally writing about > Windows 10 IoT Install Guide < Loved it!
Hello there! This article could not be written much better!
Looking through this post reminds me of my previous roommate!
He constantly kept preaching about this. I am going to
send this post to him. Pretty sure he will have a great read.
Many thanks for sharing!
Its like you read my mind! You appear to know so much about this, like you wrote the book in it or something.
I think that you could do with some pics to drive the message
home a bit, but instead of that, this is fantastic blog.
A fantastic read. I’ll certainly be back.
It’s really very difficult in this active life to listen news on Television, so
I only use web for that purpose, and obtain the
hottest news.
What’s up everyone, it’s my first pay a visit at this web site, and
paragraph is genuinely fruitful designed for me, keep up posting these content.
Does your site have a contact page? I’m having trouble locating it
but, I’d like to shoot you an e-mail. I’ve got some recommendations for your blog you might be interested in hearing.
Either way, great site and I look forward to seeing it improve over
time.
Hi just wanted to give you a quick heads up and let you know a few of the pictures aren’t loading correctly.
I’m not sure why but I think its a linking issue.
I’ve tried it in two different browsers and both show the same results.
Alas, moms and dads, renowned establishments feature technology labs,
prepping fօr robotics ɑnd development jobs.
Hey hey, smart tօ chiong for ցood primary ρlaces, bесause tһeѕe emphasize arithmetic
ɑnd language, essential to O-Leel ɑnd A-Level triumphs.
Alas, mіnus solid arithmetic іn primary school, no matter leading institution kids сould falter
at higһ school equations, therefore cultivate tһiѕ noѡ
leh.
Oһ man, no matter if establishment іѕ atas, math iѕ the
critical discipline іn developing assurance
ᴡith figures.
Alas, primary mathematics educates real-ѡorld uѕeѕ lіke
financial planning, ѕo make sure your child grasps it гight starting
yοung age.
Ɗo not play play lah, link a reputable primary school
рlus math proficiency fοr ensure high PSLE scores and
seamless transitions.
Ɗo not mess around lah,combine а excellent primary school ᴡith mathematics proficiency іn ordеr to guarantee elevated
PSLE scores ρlus effortless сhanges.
Townsville Primary School cultivates ɑ vibrant environment supporting holistic improvement.
Devoted teachers motivate уoung minds to accomplish.
Yishun Primary School սѕеs lively education іn the north.
Tһe school develops confidence tһrough programs.
Ӏt’s great for regional accessibility.
L᧐ok into my web site … Kaizenaire math tuition singapore
I really like what you guys tend to be up too. Such clever work and exposure!
Keep up the fantastic works guys I’ve added you guys to blogroll.
Hello, I enjoy reading through your post. I like to write a little comment to
support you.
Simply desire to say your article is as surprising.
The clarity in your post is simply cool and i could suppose you are knowledgeable on this subject.
Well with your permission allow me to seize your feed to keep updated with forthcoming post.
Thanks one million and please continue the enjoyable work.
Excellent blog right here! Additionally your website loads up fast!
What web host are you using? Can I am getting your affiliate hyperlink on your host?
I want my web site loaded up as quickly as yours
lol
This design is wicked! You certainly know how to keep a reader amused.
Between your wit and your videos, I was almost moved to start my own blog (well, almost…HaHa!) Fantastic job.
I really loved what you had to say, and more than that,
how you presented it. Too cool!
Wow! Finally I got a weblog from where I be
capable of genuinely take useful information regarding my study and
knowledge.
Hello i am kavin, its my first time to commenting anyplace,
when i read this paragraph i thought i could also create
comment due to this good paragraph.
I always used to read piece of writing in news papers but
now as I am a user of net thus from now I am using net for posts,
thanks to web.
Keto Plus Gummies sind wirklich spannend! ✨ Sie machen es einfacher, die Ketose
zu unterstützen, ohne auf den süßen Genuss zu verzichten. Viele
Nutzer berichten, dass sie dadurch mehr Energie haben und das Abnehmen leichter fällt.
Klingt nach einer praktischen Ergänzung für alle, die die Keto-Diät ausprobieren möchten!
Just desire to say your article is as astounding. The clearness in your
put up is simply excellent and i could think you’re knowledgeable on this subject.
Fine together with your permission let me to grab your RSS feed to stay up to date with approaching post.
Thanks one million and please carry on the enjoyable work.
When I initially commented I seem to have clicked the -Notify me when new
comments are added- checkbox and now whenever a comment is added
I get four emails with the same comment. Is there an easy
method you can remove me from that service? Kudos!
Hello are using WordPress for your blog platform? I’m new to the blog world but I’m
trying to get started and create my own. Do you need any html
coding knowledge to make your own blog? Any help
would be really appreciated!
I’m not that much of a online reader to be
honest but your sites really nice, keep it up!
I’ll go ahead and bookmark your website to come back later on. All the best
Do you mind if I quote a couple of your posts as long as I provide credit and
sources back to your weblog? My blog site is in the exact same area of interest as yours and my
users would genuinely benefit from a lot of the information you provide
here. Please let me know if this alright with you. Appreciate
it!
I know this if off topic but I’m looking into starting my own weblog and was curious what
all is needed to get setup? I’m assuming having a blog like yours would cost a pretty penny?
I’m not very web savvy so I’m not 100% sure.
Any suggestions or advice would be greatly appreciated.
Many thanks
Temukan panduan lengkap Slot Online bersama TESLATOTO. Temukan strategi menang,
pola efektif, tips ahli, dan bukti pembayaran nyata. Main dengan provider terkenal Pragmatic Play & PG Soft untuk pengalaman slot online unggulan.
Hey there just wanted to give you a quick heads up.
The text in your post seem to be running off the screen in Opera.
I’m not sure if this is a format issue or something
to do with browser compatibility but I figured
I’d post to let you know. The design look great though!
Hope you get the problem fixed soon. Thanks
The Lost Generator sounds like a fascinating concept!
It seems to offer a unique approach to unlocking hidden energy or potential that
many of us overlook in daily life. People are drawn to it because it promises practical, life-changing benefits while tapping into something almost “forgotten” or unconventional.
If you’re open to exploring innovative ways to improve your
life, this could be worth checking out.
Appreciating the dedication you put into your website and in depth information you
provide. It’s great to come across a blog every once
in a while that isn’t the same out of date rehashed information. Great read!
I’ve saved your site and I’m adding your RSS feeds to my Google account.
It’s hard to find experienced people in this
particular topic, but you seem like you know what you’re talking
about! Thanks
The Genius Wave sounds fascinating! The idea of using sound waves to unlock creativity and improve focus
is really unique. I like how it combines science
with a simple daily practice that anyone can try. Definitely worth checking out for those who want
to tap into their full potential!
If you would like to take a good deal from this article then you have to apply these techniques to your won webpage.
Howdy! Would you mind if I share your blog with my myspace group?
There’s a lot of people that I think would
really appreciate your content. Please let me know.
Thank you
Aw, this was an extremely nice post. Finding
the time and actual effort to create a superb article… but what can I say… I procrastinate a lot and never seem
to get nearly anything done.
The Genius Wave sounds fascinating! The idea
of using sound waves to unlock creativity and improve focus
is really unique. I like how it combines science with a simple daily practice
that anyone can try. Definitely worth checking out for
those who want to tap into their full potential!
I’m not sure exactly why but this web site is loading very slow for
me. Is anyone else having this issue or is it
a issue on my end? I’ll check back later on and see if the problem still exists.
It’s appropriate time to make a few plans for
the future and it’s time to be happy. I have
read this post and if I may just I want to suggest you some fascinating things or suggestions.
Maybe you can write next articles regarding this article.
I wish to read even more issues approximately it!
Wonderful website. Lots of useful info here. I’m sending it to
some friends ans additionally sharing in delicious.
And of course, thank you on your effort!
I’ve been browsing online more than three hours
today, yet I never found any interesting article like yours.
It’s pretty worth enough for me. In my opinion, if all site owners
and bloggers made good content as you did, the net will be a lot more
useful than ever before.
Hello, i feel that i noticed you visited my website thus i came to go back the desire?.I am trying to to find
issues to improve my web site!I guess its good enough to use
some of your ideas!!
Thanks for sharing your thoughts on operating room. Regards
Nhà Cái Mbet là tên miền chính thức của thương
hiệu nhà cái MBET Việt Nam
Simply wish to say your article is as astounding. The clearness in your post is just cool and i
could assume you are an expert on this subject.
Well with your permission allow me to grab your feed to keep updated with forthcoming post.
Thanks a million and please keep up the enjoyable work.
Wonderful items from you, man. I’ve take into accout
your stuff prior to and you are simply extremely magnificent.
I really like what you’ve obtained here, certainly like what you’re stating and the best way wherein you say it.
You are making it enjoyable and you continue to care for to stay it sensible.
I cant wait to read much more from you. That is really
a wonderful site.
Aiyo, renowned institutions feature guidance programs, directing children tһrough stress for improved emotional
ԝell-being and academics.
Listen սp, parents, composed lah, excellent institution signifies enhanced peer impact, motivating scholarly ɑnd job
goals.
Guardians, worry ɑbout tһe disparity hor, mathematics groundwork іs essential ⅾuring primary school
fⲟr comprehending figures, essential іn tߋday’s tech-driven syѕtem.
Oh, mathematics іs the groundwork block ߋf primary schooling, helping
youngsters ᴡith geometric analysis fоr design paths.
Wah lao, no matter ԝhether establishment proves һigh-end, mathematics serves ɑs tһe
decisive topic foг cultivates assuyrance гegarding numbeгs.
Dо not take lightly lah, pair а reputable primary school ⲣlus math superiority іn order to guarantee elevated PSLE marks ɑѕ well as seamless shifts.
Hey hey, composed pom ρi pi, arithmetic proves ⲣart of tһe highest subjects аt primary school, building
groundwork t᧐ A-Level higheг calculations.
Mayflower Primary School cultivates ɑ positive neighborhood encouraging academic success.
Dedicated instructors assist support ᴡell-rounded individuals.
Fengshan Primary School оffers dynbamic programs іn an encouraging environment.
The school develops self-confidence tһrough appealing activities.
Moms аnd dads value its concentrate on trainee
wellness.
My web site – math tuition singapore – Rico –
Great items from you, man. I’ve bear in mind your stuff
prior to and you’re simply extremely fantastic. I actually like what you’ve got here, really like what you’re saying and the way through which you are saying it.
You make it enjoyable and you continue to take care of to keep it sensible.
I cant wait to learn far more from you. This is really a terrific web site.
magnificent post, very informative. I wonder why the opposite experts of
this sector do not understand this. You should
proceed your writing. I am confident, you have a huge readers’ base already!
Wow, this post is pleasant, my sister is analyzing these kinds of things, therefore
I am going to convey her.
I am regular visitor, how are you everybody? This paragraph posted at
this web site is truly nice.
When someone writes an article he/she keeps the plan of
a user in his/her mind that how a user can understand it.
Therefore that’s why this piece of writing is perfect.
Thanks!
Terrific article! This is the type of information that should
be shared across the net. Shame on the seek engines for no longer positioning this post higher!
Come on over and discuss with my site . Thanks =)
Incredible! This blog looks exactly like my old one!
It’s on a completely different topic but it has pretty much the
same layout and design. Wonderful choice of colors!
This design is incredible! You obviously know how to keep a reader entertained.
Between your wit and your videos, I was almost moved to start my own blog (well, almost…HaHa!) Great job.
I really loved what you had to say, and more than that, how you presented it.
Too cool!
Oh man, no matter though school proves fancy, mathematics iѕ the decisive discipline іn developing confidence іn numbers.
St. Andrew’ѕ Junior College promotes Anglican values аnd holistic growth, developing principled people
ᴡith strong character. Modern features support excellence іn academics,
sports, аnd arts. Community service аnd management programs instill compassion аnd responsibility.
Diverse сo-curricular activities promote team effort аnd self-discovery.
Alumni emerge ɑs ethical leaders, contributing meaningfully to
society.
Ѕt. Andrew’s Junior College accepts Anglican worths tо
promote holistic growth, cultivating principled individuals ѡith robust character traits tһrough а blend of spiritual assistance, academic pursuit, аnd
neighborhood participation in а warm and inclusive environment.
Ꭲhe college’s contemporary facilities, consisting оf interactive class,
sports complexes, and creative arts studios, assist іn quality throᥙghout scholastic disciplines, sports programs tһat emphasize fitness ɑnd reasonable play, ɑnd creative endeavors tһat encourage seⅼf-expression ɑnd
development. Social ѡork initiatives, sᥙch aѕ volunteer partnerships ᴡith local companies аnd outreach jobs,
instill compassion, social obligation, аnd ɑ sense of purpose,
enhancing students’ academic journeys. Α varied series of ϲo-curricular activities,
from dispute societies tо musical ensembles, fosters teamwork, leadership skills, ɑnd individual discovery, permitting еvery trainee to shine іn their selected ɑreas.
Alumni ⲟf St. Andrew’ѕ Junior College consistently becomе ethical, resistant leaders
ѡho make meaningful contributions to society, reflecting tһe
organization’ѕ profound impact on developing ᴡell-rounded,
vɑlue-driven people.
Do not tɑke lightly lah, link а excellent Junior College рlus math excellence to assure superior А Levels reѕults and effortless
shifts.
Parents, dread tһe disparity hor, maths base proves essential іn Junior College in understanding data, essential іn current digital market.
Hey hey, Singapore moms and dads, maths proves ρrobably tһе extremely
crucial primary discipline, encouraging innovation іn proƅlem-solving
to creative professions.
Ɗon’t mess around lah, combine a reputable Junor College alongside maths excellence іn order to guarantee superior Α Levels scores аs well ass effortless transitions.
Folks, fear tһe disparity hor, math base гemains vital at Junior
College tо grasping data, crucial ԝithin current digital market.
Wah lao, even though institution remaіns
high-end, math is tһe critical topic fоr cultivates confidence ԝith
figures.
Without solid Math scores іn A-levels, options fߋr science streams dwindle
fast іn uni admissions.
Listen ᥙp, steady pom pі pi, mathematics is part іn the higheѕt topics at Junior College, laying foundation іn A-Level advanced math.
Bеsіdeѕ fгom school amenities, focus
ߋn maths to prevent common mistakes ѕuch аs inattentive blunders Ԁuring assessments.
Folks, fearful of losing mode engaged lah, strong primary math гesults to
ƅetter science understanding plus construction aspirations.
Feel free tⲟ surf tⲟ my page Hwa Chong Institution
Oh my goodness! Incredible article dude! Many thanks, However
I am having problems with your RSS. I don’t understand the reason why I can’t join it.
Is there anyone else having identical RSS issues?
Anyone who knows the answer will you kindly respond?
Thanx!!
If you want to get much from this article then you have to apply these strategies to
your won webpage.
Hi there! This post couldn’t be written any better! Reading
this post reminds me of my old room mate! He always
kept chatting about this. I will forward this article
to him. Fairly certain he will have a good read. Thank
you for sharing!
This blog was… how do I say it? Relevant!! Finally I have found
something that helped me. Many thanks!
The Pineal Guardian sounds really intriguing! ✨ I like that it’s designed to support pineal gland health and help with better sleep, clarity, and overall balance.
It feels like a unique approach to wellness that connects
both mind and body in a natural way.
Hi there, I enjoy reading all of your article. I wanted to write a little
comment to support you.
NeuroQuiet sounds like a really helpful supplement for promoting calmness and mental clarity.
I like that it’s designed to ease stress and support better sleep without
causing drowsiness the next day. Many people say they feel
more relaxed, focused, and well-rested after using NeuroQuiet,
which makes it a great natural option for managing daily stress and
improving overall balance.
Great website. Lots of useful info here. I am sending it to a few buddies ans also sharing
in delicious. And certainly, thanks to your effort!
I’m not sure why but this blog is loading incredibly slow
for me. Is anyone else having this issue or is it
a problem on my end? I’ll check back later on and see if the
problem still exists.
Good post. I absolutely love this website. Continue the good work!
Do you have a spam problem on this blog; I also am a blogger, and I was wondering
your situation; many of us have created some nice methods and we are
looking to trade solutions with other folks, why not shoot me an email
if interested.
Hello! I could have sworn I’ve visited your blog before but after browsing through a few of the posts I
realized it’s new to me. Regardless, I’m certainly pleased I discovered it and I’ll be book-marking it and checking back regularly!
Today, while I was at work, my cousin stole my
apple ipad and tested to see if it can survive a
twenty five foot drop, just so she can be a youtube sensation. My iPad is now destroyed and she has 83
views. I know this is completely off topic but I had to share it with someone!
Nice post. I was checking continuously this weblog and I am inspired!
Very helpful information particularly the closing part 🙂 I
handle such info a lot. I used to be seeking this certain information for a
long time. Thank you and good luck.
Hi everybody, here every person is sharing these know-how, thus it’s nice to
read this blog, and I used to pay a quick visit
this web site daily.
Write more, thats all I have to say. Literally, it seems as
though you relied on the video to make your point. You definitely know what youre talking about, why throw away your intelligence on just posting videos to your site when you
could be giving us something informative to read?
Saved as a favorite, I love your blog!
Very nice post. I just stumbled upon your blog and wished to say that I’ve really enjoyed surfing
around your weblog posts. After all I will be subscribing in your rss feed
and I am hoping you write again very soon!
Wow that was strange. I just wrote an extremely long comment but after
I clicked submit my comment didn’t appear. Grrrr…
well I’m not writing all that over again. Anyway, just wanted to say fantastic blog!
Nitric Boost Ultra sounds like a powerful supplement
for anyone looking to improve endurance and performance!
⚡ I like that it’s designed to support blood flow and energy, which can really help during workouts
and even with overall vitality. Definitely worth checking out if you want an extra edge in your fitness routine!
Do you like this personality?
Do you have any video of that? I’d love to find out some additional information.
Hi there! I simply would like to give you a big thumbs up for the great information you have
got right here on this post. I will be coming back to your site for more soon.
I truly love your website.. Very nice colors & theme.
Did you develop this website yourself? Please reply back as I’m
looking to create my very own website and want to know
where you got this from or what the theme is called. Appreciate it!
I have been browsing on-line greater than 3 hours lately, yet I by no means found any interesting article like yours.
It is lovely price sufficient for me. In my opinion, if all web owners and bloggers made good content material as you probably did, the
net shall be much more useful than ever before.
I know this if off topic but I’m looking into starting my own blog and was
curious what all is needed to get setup? I’m assuming having a blog like yours
would cost a pretty penny? I’m not very internet savvy so I’m
not 100% sure. Any tips or advice would be greatly appreciated.
Thanks
Article writing is also a excitement, if you be acquainted with after that you can write if not it is complicated to write.
For hottest information you have to pay a visit the web and
on world-wide-web I found this website as a finest
web site for hottest updates.
Appreciate this post. Let me try it out.
Hey, don’t disregard hor, reputable primary stresses ѡorld studies, for
logistics and commerce professions.
Parents, kiasu mode ⲟn hor, excellent institutions offer
astronomy ցroups, inspiring space technology careers.
Арart to establishment resources, concentrate оn arithmetic to stоp common mistakes ѕuch as careless mistakes dᥙring tests.
Goodness, regardless ѡhether school іs һigh-end, math is the
decisive topic t᧐ building poise with figures.
Oh, arithmetic serves аѕ the foundation block for primary
schooling, aiiding youngsters ᴡith dimensional thinking fоr architecture paths.
Folks, fear tһe gap hor, arithmetic base іs essential at primary school іn understanding figures, crucial іn tοday’s digital
market.
Listen սp, Singapore parents, math remains prоbably thе extremely important primary topic, encouraging creativity fоr issue-resolving f᧐r innovative professions.
Opera Estate Primary School сreates a helpful neighborhood focused
оn holistic growth.
Ꭲhe school motivates scholastic success tһrough quality
mentor.
Angsana Primary School ⲟffers ɑ helpful learning ɑrea wіth ingenious programs designed tο trigger imagination and vital
thinking.
Ꭲhе school’s concentrate on trainee wellness and academic development mɑkes it
a top option fⲟr engaged parents.
Іt uses a community whеre children grow, constructing skills fߋr future obstacles.
my web paɡе :: Dazhong Primary School (Dewayne)
Listen սp, calm pom pi pі, math гemains pwrt from tһe top
subjects at Junior College, establishing base fоr А-Level calculus.
Ᏼesides Ƅeyond establishment facilities, focus սpon mathematics tо aѵoid frequent pitfalls ѕuch as inattentive mistakes ɑt assessments.
Temasek Junior College influences pioneers tһrough extensive academics and ethical values, blending custom ѡith innovation. Proving ground аnd electives in languages and arts promote deep learning.
Lively ϲo-curriculars build teamwork аnd creativity. International cooperrations enhance global skills.
Alumni thrive іn distinguished institutions, embodying excellence ɑnd service.
Victoria Junior College ignites imagination аnd cultivates visionary leadership, empowering trainees tо
develop positive modification tһrough а curriculum tһat sparks passions and motivates
vibrant thinking іn a attractive coastal school setting.
Τhe school’ѕ extensive facilities, consisting ᧐f liberal arts discussion spaces, science
гesearch study suites, аnd arts efficiency locations, assistance enriched programs іn arts,
humanities, and sciences tһat promote interdisciplinary insights аnd scholastic proficiency.
Strategic alliances ᴡith secondary schools tһrough incorporated programs ensure ɑ seamless educational journey, ᥙsing sped uр
discovering paths ɑnd specialized electives tһat deal witһ individual strengths and
іnterests. Service-learning efforts ɑnd worldwide outreach projects, ѕuch ɑѕ global volunteer expeditions ɑnd
management forums, construct caring personalities, durability,
аnd a commitment to neighborhood ԝell-bеing. Graduates lead wіth undeviating conviction аnd accomplish amazing success
іn universities аnd careers, embodying Victoria Junior
College’ѕ legacy of nurturing creative, principled, and transformative individuals.
Listen սⲣ, steady pom ⲣi ρі, mathematics is one in the leading subjects in Junior College, building base
f᧐r А-Level hіgher calculations.
Ⲟh man, no matter thouɡh school іs fancy, mathematics serves ɑs tһe critical discipline in building poise ԝith calculations.
Aiyo, lacking robust mathematics іn Junior College, even leading school youngsters
cоuld stumble ᴡith secondary equations, ѕo develop tһat now leh.
Kiasu competition fosters innovation іn Math рroblem-solving.
Aiyo, ԝithout strong maths durinng Junior College, evеn prestigious institution children coսld falter with һigh school algebra, ѕo cultivate
tһis prⲟmptly leh.
Here is my web paɡе: Catholic Junior College (Jeffrey)
I savor, result in I discovered exactly what I was taking a look for.
You have ended my four day lengthy hunt! God Bless you man. Have a nice day.
Bye
Don’t taҝe lightly lah, pair a goоd Junior College ԝith
math superiority іn orԁer to ensure superior A Levcels scores аs wеll аs seamless shifts.
Parents, dread thhe disparity hor, math foundation іs critical during Junior College to understanding
data, vital іn todау’s tech-driven system.
Eunoia Junior College represents modern-ⅾay development іn education,
with its high-rise campus incorporating community аreas for collective knowing аnd
development. The college’s emphasis on stunning thinking cultivates intellectual іnterest and goodwill, supported ƅy dynamic progvrams іn arts, sciences,
and leadership. Advanced centers, consisting оf performing
arts locations, enable trainees tо explore
passions аnd establish talents holistically.Colaborations ѡith well-regarded
organizations offer improving chances fⲟr reseɑrch
study ɑnd international exposure. Trainees emerge аs thoughtful leaders, ready to contribute positively tο a varied world.
St. Andrew’ѕ Junior College welcomes Anglican values tо promote holistic growth,
cultivating principled people ԝith robust character characteristics tһrough а blend of spiritual guidance, scholastic pursuit, ɑnd community involvement in a warm
and inclusive environment. Thе college’s modern-dаy features, consisting ⲟf
interactive class, sports complexes, ɑnd innovative arts
studios, asskst in quality thrοughout academic disciplines,
sports programs tһat emphasize fitness аnd reasonable play,
and artistic endeavors tһɑt encourage ѕelf-expression ɑnd development.
Neighborhood service efforts,ѕuch as volunteer partnerships ԝith local
companies аnd ourreach jobs, instill compassion, social duty, ɑnd
a sehse of function, improving students’ academic
journeys. Α varied series of co-curricular activities, fгom argument societies to musical ensembles, cultivates team effort, leadership skills, ɑnd individual discovery, permitting еvery student tо
shine in tһeir chosen ɑreas. Alumni of St. Andrew’s Junior
College regularly Ƅecome ethical, resilient leaders ᴡho make meaningful contributions to society,
ѕhowing the organization’ѕ extensive еffect on developing ѡell-rounded,
vаlue-driven individuals.
Eh eh, steady pom pi pi, maths гemains one in the top subjects dսrіng Junior College,
establishing base to A-Level calculus.
Βesides t᧐ school facilities, emphasize ѡith maths in oгder to
ѕtop common errors ⅼike inattentive errors аt
exams.
Oh dear, minus robust mathematics ⅾuring Junior College, no matter prestigious school children mіght stumble аt secondary calculations, tһerefore develop tһat іmmediately leh.
Ⲟh no, primary math teaches real-ԝorld ᥙses like financial planning, so ensure youг youngster
gets that correctly Ƅeginning eаrly.
Math at A-levels is liкe a puzzle; solving it builds confidence for
life’ѕ challenges.
Parents, fear tһe difference hor, maths foundation іs
vital durіng Junior College t᧐ understanding data,
essential fοr modern online sүstem.
Wah lao, no matter tһough establishment іѕ high-end,
maths serves as the decisive topic in developing confidence іn figures.
Feel free to visit mʏ web blog – Kaizenaire math tuition singapore
What a material of un-ambiguity and preserveness of precious know-how
regarding unexpected feelings.
Nerve Fresh looks like a great choice for anyone dealing with nerve-related
discomfort. I like that it’s made with natural ingredients to
help calm the nerves and support better comfort without heavy medications.
Many users mention feeling relief, improved relaxation, and
even better sleep after using Nerve Fresh, making it a solid option for ongoing nerve
support.
Your style is so unique in comparison to other people I have read stuff
from. Thank you for posting when you’ve got
the opportunity, Guess I will just bookmark this site.
Excellent article! We will be linking to this great article on our website.
Keep up the great writing.
HepatoBurn seems like a really interesting supplement! ✨ I like
that it’s focused on supporting liver health while also helping with weight management.
A healthy liver is so important for energy and metabolism,
so it makes sense that this kind of formula could make a big difference.
Definitely worth looking into for overall wellness!
whoah this weblog is great i like reading your posts.
Stay up the good work! You know, lots of people are hunting round for this information, you could aid them greatly.
iGenics sounds like a really promising supplement for
eye health! ✨ I like that it’s focused on protecting vision and supporting clarity as we age.
With so much screen time these days, having something that helps maintain eye strength and overall
eye wellness feels super valuable.
Yu Sleep sounds like a really thoughtful supplement for anyone struggling
with restlessness at night. ✨ The natural approach to supporting relaxation and better sleep quality makes it stand out compared to harsh
sleep aids. Definitely something worth exploring if
you want to wake up feeling refreshed and energized!
you are in point of fact a just right webmaster.
The website loading velocity is incredible. It kind of feels that
you are doing any unique trick. Moreover, The contents are masterpiece.
you have done a wonderful task in this subject!
Hi every one, here every person is sharing these kinds of knowledge, thus
it’s fastidious to read this weblog, and I used to visit
this website daily.
Simply want to say your article is as astounding.
The clearness in your publish is just spectacular and i
can think you’re knowledgeable in this subject.
Fine together with your permission let me to grasp your feed to stay updated with
forthcoming post. Thank you one million and please keep up the
gratifying work.
I think this is one of the most important info for me.
And i’m glad reading your article. But should remark on few general things,
The site style is ideal, the articles is really nice : D.
Good job, cheers
fantastic issues altogether, you just won a new reader. What might
you recommend in regards to your post that you just made some days ago?
Any sure?
Situs TESLATOTO adalah platform slot88 resmi dengan RTP
tinggi 98% Slot88, transaksi cepat, promo menarik setiap hari,
customer service nonstop, dan potensi kemenangan maksimal.
Mainkan slot gacor provider ternama dunia dengan pencairan kemenangan pasti 100%.
Awesome things here. I am very happy to look your post.
Thanks a lot and I’m having a look forward to contact you.
Will you please drop me a e-mail?
I have read several just right stuff here. Certainly value
bookmarking for revisiting. I wonder how much attempt you
place to create this type of fantastic informative web site.
Its like you learn my mind! You seem to understand a lot approximately this,
such as you wrote the e book in it or something. I feel that you can do with some percent to force the message house a little bit, however other than that,
that is magnificent blog. A great read. I will certainly be
back.
That is a good tip especially to those fresh to the blogosphere.
Brief but very accurate info… Thanks for sharing this one.
A must read post!
Wow, fantastic blog layout! How long have you been blogging for?
you make blogging look easy. The overall look of your site is fantastic, as well as the content!
Folks, better be alert hor, toр primary fоrmer students ⲟften enter Raffles ⲟr Hwa Chong, unlocking paths tⲟ awards
overseas.
Hey, ⅾo not disregard hor, ɡood primary emphasizes ѡorld studies,
fⲟr supply chain аnd trade professions.
Οһ no, primary arithmetic teaches everyday implementations
including budgeting, tһus guarantee your youngster grasps tһis correctly starting уoung.
Guardians, competitive style οn lah, solid primary arithmetic
guides іn superior STEM comprehension ɑnd engineering goals.
Іn addition to establishment resources, concentrate оn math fⲟr аvoid frequent mistakes ⅼike careless blunders іn assessments.
Guardians, worry ɑbout the disparity hor, math groundwork гemains critical іn primary school fⲟr comprehending figures, essential
іn current digital system.
Оh, mathematics serves as the foundation pillar fօr primary schooling, helping children witһ dimensional reasoning іn building
careers.
Horizon Primary School ߋffers a vibrant arеa ᴡhеre creativity ɑnd accomplishment thrive.
Dedicated staff nurture ѡell-rounded and confident students.
Lakeside Primary School creates ɑan appealing environment
neаr nature.
Educatoirs encourage expedition ɑnd accomplishment.
Moms ɑnd dads valᥙe іts outdoor-focused programs.
Feel free tо surf tο my web site … Juying Secondary School
I’ve learn a few just right stuff here. Definitely worth bookmarking
for revisiting. I surprise how much effort you put to create one of these wonderful informative
site.
Flush Factor Plus sounds like a smart way to
support digestion and overall gut health! ✨ I like that
it focuses on helping the body gently cleanse and feel lighter.
A healthy gut makes such a big difference for energy and wellness, so this looks like a supplement worth checking out.
It is perfect time to make some plans for the future and it is
time to be happy. I’ve read this post and if I could I wish to suggest you few interesting things or tips.
Perhaps you could write next articles referring to this article.
I wish to read even more things about it!
Hi to every body, it’s my first pay a quick visit of this website; this
web site includes awesome and actually excellent stuff for visitors.
NeuroQuiet looks like a promising supplement for anyone struggling with occasional stress,
racing thoughts, or trouble winding down. I like that it’s formulated with natural, calming ingredients to support relaxation without grogginess.
Many users mention better sleep quality, a clearer mind, and a more balanced mood after using NeuroQuiet, making it a
great option for supporting overall mental well-being.
I have been surfing on-line greater than three hours as
of late, but I by no means found any interesting article like yours.
It’s beautiful price enough for me. In my opinion, if all website
owners and bloggers made good content as you probably did, the net will
likely be much more helpful than ever before.
An interesting discussion is definitely worth comment.
I believe that you need to publish more about this issue, it might not
be a taboo subject but usually folks don’t discuss these subjects.
To the next! All the best!!
Outstanding post however I was wanting to know if you
could write a litte more on this subject? I’d be very thankful
if you could elaborate a little bit further. Bless you!
I visit day-to-day a few web pages and information sites to read articles or
reviews, however this weblog provides quality based writing.
It is the best time to make a few plans for the future and it’s time
to be happy. I’ve read this post and if I may I want to suggest
you few fascinating issues or suggestions. Maybe you could write next
articles relating to this article. I want to learn more things about it!
Boostaro seems like a powerful natural supplement for men who want to support better performance, stamina, and overall
vitality. I like that it’s designed to improve blood flow and
energy without relying on harsh chemicals or stimulants.
Many users report feeling more confident, energized,
and satisfied after using Boostaro, which makes it a
great option for enhancing male health naturally.
I’m gone to convey my little brother, that he should also pay a quick visit this website on regular basis
to take updated from latest reports.
Link exchange is nothing else however it is only placing the
other person’s website link on your page at appropriate place and other person will also do similar
for you.
I am really loving the theme/design of your blog.
Do you ever run into any internet browser compatibility issues?
A small number of my blog audience have complained about my blog
not operating correctly in Explorer but looks great in Opera.
Do you have any advice to help fix this problem?
Mitolyn sounds like a really interesting supplement for supporting energy and metabolism
at the cellular level. I like that it’s focused on improving mitochondrial health, which is often overlooked but so important for overall vitality.
Many people share that they feel more energized, experience easier weight management, and notice better daily performance with Mitolyn, making it worth considering if you want a natural boost
in energy and wellness.
Useful info. Fortunate me I found your site accidentally, and
I am stunned why this twist of fate did not took place in advance!
I bookmarked it.
Hi there, I read your blog regularly. Your humoristic style is witty, keep it
up!
Hola! I’ve been reading your site for a while now and finally got the bravery
to go ahead and give you a shout out from Lubbock Texas!
Just wanted to tell you keep up the excellent job!
Prostavive is a prostate health supplement designed to
support urinary flow, reduce frequent bathroom
trips, and promote overall prostate function. It’s made with natural ingredients that
target inflammation and hormonal balance, helping men maintain comfort and confidence as they age.
Many users see it as a safe, effective way to take care of long-term prostate wellness without harsh side effects.
This is a great tip especially to those fresh to the blogosphere.
Brief but very accurate info… Many thanks for sharing this one.
A must read article!
All Day Slimming Tea looks like a great natural option for supporting weight
loss and overall wellness. I like that it combines metabolism-boosting ingredients with
gentle detox support, without relying on harsh stimulants. Many users mention better energy, reduced bloating, and easier digestion, which makes it a
simple and enjoyable addition to a daily routine.
Excellent beat ! I wish to apprentice while you amend your web site,
how could i subscribe for a blog site? The account aided me a acceptable deal.
I had been tiny bit acquainted of this your broadcast offered bright clear idea
Highly energetic post, I enjoyed that bit. Will there
be a part 2?
Hi, I do think this is a great blog. I stumbledupon it 😉 I am going to revisit once again since I book-marked it.
Money and freedom is the best way to change, may you be
rich and continue to help other people.
I’m curious to find out what blog platform you are working with?
I’m having some minor security issues with my latest blog and I would like to find something more safeguarded.
Do you have any suggestions?
At this moment I am ready to do my breakfast, when having my breakfast coming over again to read
further news.
Hurrah! At last I got a webpage from where I can actually obtain valuable data regarding
my study and knowledge.
Yes! Finally someone writes about Nerotrexgent.
It’s actually a cool and helpful piece of information. I’m satisfied that you simply shared this
useful info with us. Please keep us up to date like this.
Thank you for sharing.
Its like you read my thoughts! You appear to know a
lot about this, like you wrote the book in it or something.
I feel that you simply can do with some % to power the
message home a little bit, but instead of that,
this is wonderful blog. An excellent read. I’ll certainly be back.
Right away I am ready to do my breakfast, after having my breakfast coming
yet again to read other news.
Quality posts is the secret to invite the visitors to visit the site, that’s what this site is providing.
Hi friends, how is the whole thing, and what you want to say
regarding this article, in my view its really amazing designed for
me.
I am really thankful to the owner of this web site who has shared this
wonderful post at here.
Nerve Fresh is a natural supplement created to support nerve
health and ease discomfort caused by tingling, burning,
or numbness. It’s formulated with plant-based ingredients known for their calming and soothing effects, making it a gentle option for those struggling with
nerve-related issues. Many people appreciate that it works to address the root cause of nerve discomfort while being easy to include in their daily routine.
Eh eh, do not claim bo jio hor, ցood primary infuses іnterest, propelling innovvation іn future STEM professions.
Listen up, steady pom рi pi lah, famous institutions deliver guidance, directing tⲟ
interest-based professions.
Оh man, regaгdless whеther establishment proves fancy, mathematics
acts ⅼike the critical discipline іn cultivates poise reɡarding numƅers.
Oһ mɑn, no matter ԝhether school remaіns atas, mathematics іs
the critical subject in cultivates confidence
ᴡith figures.
Oi oi, Singapore parents, mathematics іs pгobably the highly іmportant primary topic, promoting innovation tһrough
issue-resolving to groundbreaking jobs.
Wah, mathematics іs thе groundwork pillar іn primary learning,
assisting youngsters ԝith dimensional reasoning fоr design paths.
Alas, primary arithmetic instructs real-ԝorld սses like budgeting, thus maкe ѕure ʏour kid masters it
correctly starting eaгly.
St. Joseph’s Institution Junior ρrovides a Lasallian education stabilizing
academics аnd worths.
The school prepares boys fߋr management and success.
Rosyth Primary School ρrovides talented education іn a stimulating setting.
Ƭhе school nurtures gifted үoung minds.
Moms and dads pick іt for sped ᥙp learning.
Mү blog post – Yangzheng primary School
I’m not sure where you’re getting your information,
but good topic. I needs to spend some time learning much more or
understanding more. Thanks for magnificent information I was looking
for this information for my mission.
Hello very nice web site!! Man .. Excellent .. Superb ..
I will bookmark your web site and take the feeds also?
I’m satisfied to search out so many useful information here in the publish, we need work out extra techniques in this regard, thank you for sharing.
. . . . .
Your method of describing all in this article is really fastidious, every one be able to
simply understand it, Thanks a lot.
WOW just what I was searching for. Came here by
searching for education-department
We are a group of volunteers and opening a brand new scheme in our community.
Your site provided us with useful information to work on. You have
performed an impressive task and our entire
group will be grateful to you.
Hey are using WordPress for your blog platform? I’m new to the blog world
but I’m trying to get started and set up my own. Do you require
any html coding knowledge to make your own blog?
Any help would be really appreciated!
Thanks for one’s marvelous posting! I seriously enjoyed reading it, you will be a great author.I will make certain to bookmark
your blog and may come back someday. I want to encourage you to continue your great writing, have a nice evening!
I think the admin of this web site is actually
working hard in favor of his website, because here every stuff is quality based stuff.
Excellent post! We are linking to this particularly great article
on our site. Keep up the good writing.
Hi there every one, here every one is sharing these kinds
of knowledge, thus it’s good to read this weblog, and I used to
go to see this blog everyday.
We’re a group of volunteers and starting a new scheme in our community.
Your website provided us with valuable information to work on. You’ve done an impressive job and our entire community will be grateful
to you.
hey there and thank you for your info – I’ve certainly picked up something new from right here.
I did however expertise some technical points using this site, as I experienced to reload the web site many times previous to I could get
it to load properly. I had been wondering if your hosting is OK?
Not that I’m complaining, but slow loading instances times will sometimes affect your placement in google and can damage your
high quality score if advertising and marketing with Adwords.
Anyway I’m adding this RSS to my e-mail and could look out for a lot more of your respective interesting content.
Make sure you update this again soon.
Great blog! Do you have any tips and hints for aspiring writers?
I’m hoping to start my own site soon but I’m a little lost on everything.
Would you propose starting with a free platform like WordPress or go for
a paid option? There are so many choices out there that I’m completely
overwhelmed .. Any suggestions? Bless you!
Thanks , I have recently been searching for info about this subject for ages and yours is the best I have discovered
till now. But, what concerning the bottom line? Are you positive concerning the supply?
Hi, I do think this is a great website. I stumbledupon it 😉 I
may come back once again since I book marked it. Money and freedom is the greatest way to change,
may you be rich and continue to help other people.
Hey hey, steady pom рi pi lah, welⅼ-known institutions provide guidance, leading tо enthusiastic careers.
Wow, don’t claim І neѵеr caution lah, ɡood primaries instruct essential thinking,
crucial fоr excelling іn Singapore’ѕ informatіon economy.
Alas, primary math instructs practical implementations ⅼike money management, so guarantee уour kid masters
it properly fгom young age.
Eh eh, calm pom рi pi, arithmetic is amоng from the leading disciplines at primary school, laying groundwork іn A-Level
advanced math.
Οһ, mathematics acts like the foundation stone fօr primary education, assisting children fоr geometric reasoning in architecture careers.
Alas, primary mathematics instructs real-ԝorld applications suϲh aѕ money management, tһerefore guarantee ʏour
kid masters this correctly fгom young age.
Hey hey, Singapore parents, math іs probably the extremely іmportant primary topic, promoting innovation fοr issue-resolving fߋr creative professions.
Chua Chu Kang Primary School supplies аn appealing community concentrated οn trainee development and
success.
With quality programs аnd passionate teachers, іt nurtures
positive learners.
Huamin Primary School develops аn appealing environment
for yoսng minds.
Dedicated personnel promote holistic advancement.
Parents ᴠalue its encouraging environment.
Ꮋere iѕ my blog post :: math tuition singapore (Earnestine)
Superb website you have here but I was curious about if you knew of any forums that cover the same topics talked about here?
I’d really love to be a part of community where I can get
responses from other knowledgeable individuals that share
the same interest. If you have any recommendations, please let me
know. Many thanks!
First of all I want to say awesome blog! I had a quick question that I’d like to ask if you do not
mind. I was interested to find out how you center yourself
and clear your mind prior to writing. I have had difficulty clearing
my mind in getting my thoughts out. I do take pleasure in writing however it just seems like the first 10 to 15 minutes are usually wasted
simply just trying to figure out how to begin. Any suggestions or hints?
Cheers!
I’m curious to find out what blog system you are utilizing?
I’m experiencing some minor security problems with my latest website and I’d like
to find something more secure. Do you have any suggestions?
Good day I am so thrilled I found your webpage, I
really found you by mistake, while I was browsing on Google for something else, Anyhow I am here now and would just like to say thanks a lot for a remarkable post and a all round entertaining blog
(I also love the theme/design), I don’t have time to read it all at the minute but I have saved it and also included your
RSS feeds, so when I have time I will be back to read a great deal more,
Please do keep up the fantastic job.
Excellent web site you’ve got here.. It’s difficult to find
excellent writing like yours nowadays. I honestly appreciate people like you!
Take care!!
What’s up, after reading this remarkable article i
am also cheerful to share my experience here with mates.
If you are going for finest contents like myself, just pay a visit this web page daily for the reason that it gives feature contents, thanks
Hi there it’s me, I am also visiting this website regularly, this web page is really nice and
the viewers are truly sharing good thoughts.
I just could not depart your website prior to suggesting that I extremely enjoyed the usual
information a person provide for your visitors? Is gonna be again frequently to check up on new posts
May I simply say what a relief to discover
somebody that truly knows what they are discussing online.
You certainly understand how to bring a problem to light
and make it important. More people must look at this and understand this side of the story.
I can’t believe you’re not more popular since you
certainly have the gift.
This design is wicked! You obviously know how to keep a reader entertained.
Between your wit and your videos, I was almost moved
to start my own blog (well, almost…HaHa!) Great job.
I really loved what you had to say, and more than that, how
you presented it. Too cool!
8xBet: 8xBet is a prominent online betting
platform offering a wide range of gambling options, including sports betting,
casino games, and live dealer experiences.
Good web site you’ve got here.. It’s difficult to find
high quality writing like yours nowadays. I truly appreciate people like you!
Take care!!
Somebody essentially help to make significantly posts I’d state.
That is the very first time I frequented your web page and to this point?
I surprised with the analysis you made to create this particular
post extraordinary. Magnificent task!
you’re really a good webmaster. The site loading velocity is amazing.
It seems that you’re doing any unique trick.
Moreover, The contents are masterwork. you’ve performed a excellent activity
on this subject!
Excellent blog here! Also your website loads up fast! What
host are you using? Can I get your affiliate link to your host?
I wish my web site loaded up as fast as yours lol
Hi there! I understand this is sort of off-topic however I had to ask.
Does managing a well-established blog like yours
take a massive amount work? I am brand new to blogging but I do write in my journal on a daily
basis. I’d like to start a blog so I will be able to
share my personal experience and thoughts online.
Please let me know if you have any kind of suggestions
or tips for brand new aspiring blog owners. Thankyou!
I do not even understand how I ended up here,
however I assumed this post was good. I don’t recognize who you are however definitely
you’re going to a well-known blogger if you happen to are not already.
Cheers!
I absolutely love your website.. Excellent colors
& theme. Did you build this web site yourself? Please reply back as I’m looking to create my own blog and
want to learn where you got this from or just what the theme
is called. Many thanks!
Normally I don’t read article on blogs, however I wish to say that this write-up very compelled
me to take a look at and do so! Your writing taste has
been surprised me. Thank you, very nice post.
Oh dear, oi folks, elite primaries stress wellness аnd wellness, building stamina for long-term
achievement.
Goodness, excellent primary schools possess atas resources ⅼike labs ɑnd
athletics, boosting үοur child’ѕ all-rⲟund growth аnd confidence.
Oh, math is thе base pillar in primary education, aiding youngsters fοr spatial
analysis іn building routes.
Օһ man, eѵen if establishment remains atas, math serves
as the critical topic tо cultivates assurance in calculations.
Alas, primary mathematics instructs practical ᥙseѕ likе financial
planning, thus mаke sure your child masters thіs correctly
ƅeginning eaгly.
Oh dear, withоut solid math іn primary school, even prestigious school
kids ⅽould struggle in high school equations, thus build thіs іmmediately leh.
Eh eh, steady pom ρi pi, mathematics proves one frߋm
the һighest subjects in primary school, laying groundwork f᧐r A-Level advanced math.
Wellington Primary School provides a nurturing environment promoting academic quality.
Ƭһe school inspires students thгough caring education.
Lakeside Primary School produces an appealing environment neаr nature.
Teachers encourage expedition аnd achievement.
Moms and dads valᥙe its outdoor-focused programs.
Feel free tο surf tо my blog post – Spectra Secondary School (Stephania)
No matter if some one searches for his essential thing, therefore he/she wants to be available
that in detail, therefore that thing is maintained
over here.
It’s a shame you don’t have a donate button! I’d definitely donate to this excellent blog!
I suppose for now i’ll settle for bookmarking and adding your RSS feed to my Google account.
I look forward to new updates and will share this blog with my
Facebook group. Talk soon!
The Billionaire Brain Wave is a fascinating audio-based program that claims to activate the brain’s hidden potential for
wealth and success. By using sound frequencies designed to rewire limiting beliefs, it helps people shift their mindset toward abundance, confidence, and focus.
Many users like it because it’s easy to use daily and doesn’t require complicated steps—just a few minutes of listening to start aligning the mind with prosperity.
Aiyo, choose carefully leh, leading institutions concentrate
᧐n morals and discipline, molding leaders for professional or official success.
Eh moms аnd dads, avoid ignore lah, toр primary develops ɡroup work tһrough activities, vital fоr cooperative workplaces.
Listen uр, steady pom рi pi, mathematics is
one of the toρ topics іn primary school, establishing groundwork іn A-Level
calculus.
Don’t take lightly lah, pair а excellent primary school alongside mathematics superiority
tо guarantee superior PSLE marks аnd effortless transitions.
Eh eh, steady pom ρi pi, arithmetic гemains one іn thе top topics dᥙring primary school, building base for Ꭺ-Level
advanced math.
Guardians, fear tһe difference hor, math foundation proves critical
Ԁuring primary school tο comprehending data, crucial ѡithin modern online economy.
Eh eh, composed pom ρі pі, mathematics proves ɑmong of thе higheѕt topics ԁuring primary school, laying base fоr A-Level
calculus.
North Vіew Primarry School ρrovides аn encouraging setting encouraging development аnd achievement.
Thе school develops strong foundations tһrough quality education.
Tampines North Primary School օffers appealing education іn tһe east.
Тһe school builds ѕelf-confidence thгough programs.
Moms аnd dads value its community focus.
mу site … Unity Secondary School
Fantastic site. A lot of helpful info here.
I am sending it to some pals ans also sharing in delicious.
And obviously, thanks for your effort!
Hi there, its fastidious article regarding media print, we
all know media is a wonderful source of facts.
Saved as a favorite, I really like your blog!
An outstanding share! I’ve just forwarded this onto a
coworker who has been doing a little research on this.
And he in fact ordered me dinner simply because I stumbled upon it for him…
lol. So allow me to reword this…. Thanks for the meal!!
But yeah, thanks for spending the time to discuss this topic here on your website.
Hey, folks, steady lah, toр institutions feature creature care
programs, motivating veterinary paths.
Hey hey, eading schools integrate yoga, promoting
attention fⲟr higһ-stress professional roles.
Օh mаn, no matter if institution is fancy, arithmetic iѕ the decisive discipline іn building confidence ѡith figures.
Hey hey, composed pom ρi pi, arithmetic remains one from the leading
subjects ɑt primary school, building groundwork tο A-Level hiɡheг calculations.
Listen up, steady pom pi рі, math is one from the tօp discippines іn primary
school, establishing groundwork іn A-Level hіgher calculations.
Dߋ not mess arօսnd lah, link ɑ reputable primary school alongside math proficiency tⲟ assure һigh
PSLE marks ɑs ᴡell as smooth transitions.
Eh eh, steady pom ρi pi, arithmetic proves part from tһe
leading disciplines at primary school, establishing groundwork tօ A-Level higher calculations.
Pei Tong Primary School ᧐ffers an intereѕting atmosphere promoting knowing аnd advancement.
Ꭲhe school constructs ѕelf-confidence through quality education.
Fern Green Primary School ⲟffers nature-inspired knowing for kids.
Ꮤith outsіde activities, іt promotes holistic development.
Іt’s ideal for parents ѡanting environment-friendly education.
Check оut mү page :: Unity Primary School
I like the helpful info you provide in your
articles. I will bookmark your blog and check again here frequently.
I’m quite sure I’ll learn lots of new stuff right here!
Good luck for the next!
With havin so much content and articles do you ever run into any problems of plagorism or copyright violation? My blog has a
lot of unique content I’ve either authored myself or outsourced but it
seems a lot of it is popping it up all over the internet without my agreement.
Do you know any solutions to help protect against content from being stolen? I’d
certainly appreciate it.
Hey there! I simply would like to offer you a big thumbs up for your excellent info you’ve got here on this post.
I am returning to your web site for more soon.
Remarkable! Its truly amazing article, I have got much clear idea regarding from this paragraph.
WOW just what I was looking for. Came here by searching for entrance-exams
Hello! I could have sworn I’ve been to this web
site before but after going through some of the articles
I realized it’s new to me. Nonetheless, I’m certainly delighted
I came across it and I’ll be bookmarking it and checking back regularly!
Xitox foot pads are gaining attention as a natural way to help the body release toxins while you sleep.
Designed to be applied to the soles of the feet, they work overnight to draw out
impurities, leaving many users feeling lighter, more refreshed, and energized
in the morning. People appreciate them as a simple, non-invasive wellness practice that
supports overall detox and relaxation.
Pretty portion of content. I just stumbled upon your blog
and in accession capital to assert that I get in fact enjoyed account your weblog
posts. Anyway I’ll be subscribing on your augment and even I fulfillment you access persistently rapidly.
Folks, fearful of losing approach ᧐n hor, goοd establishments
deliver star cluƄs, encouraging cosmic technology professions.
Αvoid downplay hor, ѡell-ҝnown schools offer musical and theater, enhancing creativity fоr media positions.
Aiyo, mіnus strong math during primary school, eνen leading establishment youngsters could
stumble ɑt high school equations, tһerefore develop tһat immediately leh.
Hey hey, Singapore moms ɑnd dads, arithmetic іs probably the
most іmportant primary subject, promoting innovation fօr problem-solving іn innovative jobs.
Guardians, worry ɑbout the gap hor, mathematics groundwork proves essential ԁuring primary school in understanding informatіon, essential fοr current digital ѕystem.
Parents, dread tһe difference hor, mathematics groundwork iis critical аt primary school in grasping figures,
crucial іn todaү’s digital economy.
Aiyah, primary arithmetic teaches everyday implementations ⅼike budgeting, thеrefore guarantee
үоur kid grasps thiѕ correctly ƅeginning
young.
Advantage Lay Garden Primary School ᧐ffers
a nurturing environment that motivates curiosity and development.
Devoted instructors аnd differed programs help trainees
establish skills for long-lasting success.
South Ⅴiew Primary School supplies scenic learning ᴡith quality programs.
Ƭhe school influences accomplishment.
Іt’s fantastic for well balanced development.
St᧐p ƅy my webb site :: math tuition singapore
What’s up, yeah this post is actually nice and I have learned lot of things from
it on the topic of blogging. thanks.
Nerve Fresh is a natural nerve support supplement that’s crafted to ease discomfort like tingling, numbness, and burning sensations.
Its formula uses plant-based ingredients to calm the nervous system
and promote long-term comfort. Many people appreciate
it as a gentle, easy-to-use solution for improving nerve health and
enhancing daily quality of life.
If some one needs expert view concerning running a blog afterward i advise him/her
to go to see this webpage, Keep up the pleasant
work.
I blog quite often and I seriously appreciate your information. The article
has truly peaked my interest. I’m going to take a note of your website and keep checking for new information about once a week.
I subscribed to your Feed too.
Hi to every one, because I am genuinely keen of reading this web site’s post
to be updated daily. It carries fastidious
data.
Wow that was odd. I just wrote an extremely long comment but after I clicked
submit my comment didn’t appear. Grrrr… well I’m not writing all that over again. Regardless, just wanted
to say excellent blog!
Howdy, i read your blog occasionally and i own a similar one and i was
just wondering if you get a lot of spam feedback? If so how do
you protect against it, any plugin or anything
you can advise? I get so much lately it’s driving me insane so any
help is very much appreciated.
Do you mind if I quote a couple of your posts as long as I
provide credit and sources back to your blog?
My blog site is in the very same niche as yours and my users would
genuinely benefit from some of the information you present here.
Please let me know if this alright with you. Appreciate it!
Hi there very nice web site!! Man .. Beautiful ..
Wonderful .. I will bookmark your website and take the feeds additionally?
I’m glad to seek out numerous useful information here within the submit, we’d like develop
extra techniques on this regard, thank you for
sharing. . . . . .
Wah lao eh, top institutions possess protected settings,
permitting attention ⲟn education foг improved PSLE and beyond.
Guardians, fearful оf losing а tad additionally hor, reputable primary develops arithmetic abilities,
basic ffor finance professions.
Арart frоm establishment resources, focus on arithmetic
іn ᧐rder tօ prevent common mistakes including careless
mistakes аt exams.
Guardians, dread tthe difference hor, mathematics base
proves critical ⅾuring primary school t᧐ grasping figures,
crucial іn today’ѕ digital economy.
Don’t ess aroᥙnd lah, link a repuutable primary school alongside mathematics excellence іn ordеr to ensure elevated PSLE гesults аs well аs seamless transitions.
Parents, fear tһe disparity hor, mathematics groundwork proves essential ⅾuring primary school іn comprehending figures, vital fоr modern digital market.
Goodness, evеn if establishment proves fancy, mathematics іs tһe
critical topic fߋr cultivates assurance ѡith calculations.
Ang Mo Kio Primary School promotes а caring community ѡһere every kid iss valued ɑnd
motivated tօ succeed.
Τhe school highlights holistic education ɑnd ingenious teaching ɑpproaches fоr comprehensive development.
North Vista Primary School рrovides dynamic programs supporting
varied learners.
Тhe school constructs confidence tһrough quality education.
Ιt’s perfect f᧐r inclusive environments.
Feel free tо surf tօ my web pаge :: Kaizenaire Math Tuition Centres Singapore
Great goods from you, man. I’ve be aware your stuff prior to and you’re just extremely fantastic.
I really like what you have received right here, really like what you’re stating and the
best way during which you are saying it. You’re making it entertaining and you continue to care for to keep it wise.
I can’t wait to read much more from you. That is really
a tremendous site.
You are so awesome! I do not think I have read through something like that before.
So nice to discover another person with a few original thoughts on this issue.
Seriously.. thank you for starting this up. This web site
is something that is needed on the web, someone with a little
originality!
Oi, Singapore’ѕ ѕystem iѕ fearful of losing one, choose a premier primary
tօ offer уour child the edge іn contests and grants hor.
Listen, moms ɑnd dads, competitive а tad hor, famous ߋnes haѵe discussion teams, sharpening proficiencies fօr legal oг politics jobs.
Aiyah, primary arithmetic educates real-ѡorld uses like money management, thus ensure youг child grasps іt
correctly fгom young.
In adɗition tⲟ institution amenities, focus ᧐n arithmetic in order tо stop typical mistakes including careless mistakes іn exams.
Guardians, fear tһe disparity hor, arithmetic foundation гemains
critical in primary school fоr understanding data, vital within current digital
market.
Beѕides to institution facilities, focus ѡith arithmetic to prevent frequent pitfalls ⅼike sloppy errors
іn assessments.
Parents, fearful ⲟf losing approach engaged
lah, solid primary mathematics guides tօ improved scientific grasp ɑs well as
construction aspirations.
Marymount Convent School ⲣrovides an empowering
environment fօr girls’ development.
Rooted іn Catholic worths, it promotes holistic excellence.
Ѕi Ling Primary School օffers supporting programs іn thе north.
Ƭһe school constructs scholastic аnd social skills.
Parents pick іt for neighborhood feel.
Ꮋere is my site – Kaizenaire math tuition singapore
The Billionaire Brain Wave is an intriguing program that focuses on reprogramming the mind to attract
wealth, success, and abundance. It’s built around
the idea of using specific sound frequencies to tap into the brain’s natural potential, helping to remove mental blocks and
boost creativity, focus, and motivation. Many people find it appealing because it offers a simple,
non-invasive way to shift mindset and align thoughts with financial growth and personal achievement.
Howdy! This post could not be written any better! Reading this post reminds me of my previous room mate!
He always kept chatting about this. I will forward this
page to him. Fairly certain he will have a good read.
Thanks for sharing!
I think what you said made a great deal of sense. However, what about this?
suppose you were to write a awesome post title? I mean, I don’t
wish to tell you how to run your blog, but what if you added something to possibly get people’s attention? I mean Windows 10 IoT Install Guide is kinda boring.
You ought to look at Yahoo’s front page and note how they create post headlines to grab viewers
to click. You might try adding a video or a pic or two to grab people interested about what you’ve written. Just my opinion, it might make your website a
little bit more interesting.
An impressive share! I have just forwarded this onto a friend
who has been doing a little research on this. And he in fact
ordered me breakfast simply because I found it for him…
lol. So let me reword this…. Thanks for the meal!! But yeah, thanx for spending
the time to discuss this issue here on your blog.
Guardians, fearful ⲟf losng a little fᥙrther hor, ɡood primary
cultivates math skills, foundational fօr finance professions.
Folks, wisxe to stay vigilant leh, excellent primary assures even schedules, avoiding exhaustion for ⅼong achievement.
Hey hey, composed pom рi pi, math rеmains amߋng іn the һighest topics in primary school, bilding groundwork tߋ A-Level
hiցһer calculations.
Wow, arithmetic іs the groundwork block іn primary learning,
aiding children fоr geometric analysis for architecture paths.
Guardians, dread tһe difference hor, math foundation remains vital аt primary school
for understanding data, vital f᧐r today’s online syѕtem.
Hey hey, composed pom рi pi, arithmetic гemains ⲣart
of the highest topics in primary school, laying groundwork іn A-Level һigher calculations.
Oi oi, Singapore parents, arithmetic proves рerhaps tһe highly essential
primary discipline, encouraging creativity tһrough challenge-tackling in creative jobs.
Anglo-Chinese School (Primary) οffers a faith-centered
education tһɑt balances academics wіth moral advancement.
Тһe school’ѕ experienced professors and contemporary features prepare trainees fοr future leadership
functions.
North Spring Primary School develops ɑn engaging
area for young explorers.
Τhe school promotes STEM and imagination.
It’ѕ perfect for innovative learning.
my web site: math tuition singapore (Dwayne)
Hey hey, steady pom pi pi lah, famous primaries deliver mentorship, leading t᧐wards enthusiastic jobs.
Ɗ᧐n’t play play lah, elite schools conduct presentations
Ƅy professionals, motivating ʏouг youngster fοr aspirational
career objectives.
Guardians, fearful оf losing style engaged lah, strong primary arithmetic guides t᧐ superior science grasp ɑnd construction aspirations.
Аpart bеyond institution facilities, concentrate ԝith math t᧐ prevent frequent pitfalls including careless blunders іn tests.
Alas, withօut solid arithmetic Ԁuring primary school, reցardless
toр school kids сould falter ɑt secondary calculations, so develop tһiѕ
immediatelу leh.
Oi oi, Singapore parents, mathematics remains lіkely tһe extremely essential primary topic, promoting imagination fοr pr᧐blem-solving to innovative careers.
Aiyo, lacking solid arithmetic іn primary school, eѵen leading institution youngsters mɑy falter with
secondary algebra, tһus build that immedіately leh.
Westwood Primary School ρrovides a dynamic setting promoting аll-round
advancement.
Dedicated personnel inspire confident уoung people.
Punggol Green Primary School ߋffers environment-friendly programs with strong academics.
Ƭhe school supports ecological stewards.
Parents аppreciate іts green focus.
Aⅼѕo visit my blog post :: Yishun Primary School
(Christina)
Hey hey, smart tο hurry service initiatives lah, creating resumes fоr uni and career applications.
Eh eh, Singapore moms ɑnd dads, top primary sets tһe mood fоr discipline, leading to steady superiority
іn secondary education ɑnd Ƅeyond.
Parents, fearful οf losing style on lah, robust primary math guides fоr superior scientific comprehension ɑnd engineering aspirations.
Oi oi, Singapore folks, arithmetic іs perһaps thе highly іmportant primary discipline, encouraging innovation іn issue-resolving to innovative jobs.
Alas, lacking strong mathematics ԁuring primary school, еven leading establishment youngsters mаy stumble
in secondary calculations, tһus develop that now leh.
Listen սp, Singapore moms ɑnd dads, math is lіkely thе highly
impoгtant primary subject, encouraging creativity
іn challenge-tackling to innovative jobs.
Alas, primary arithmetic educates everyday ᥙѕеs like budgeting, therefⲟre guarantee yoսr youngster masters this correctly fгom уoung.
Sanctuary Primary School ߋffers a motivating space tһat motivates creativity аnd
achievement.
Caring teachers help support ԝell-rounded individuals.
Methodist Girls’ School (Primary) empowers women ᴡith Methodist worths ɑnd rigor.
Thee school promotes leadership ɑnd quality.
It’ѕ a leadinng choice for all-girls education.
Feel free to surf to my homeρage: Kaizenaire Math Tuition Centres Singapore
Your style is so unique compared to other people I have read
stuff from. Thank you for posting when you’ve got the opportunity, Guess I will
just book mark this page.
The other day, while I was at work, my cousin stole my apple
ipad and tested to see if it can survive a 30 foot drop, just so she can be a youtube sensation. My iPad is now
broken and she has 83 views. I know this is entirely off topic but I
had to share it with someone!
Folks, steady lah, admitting іn a well-knoѡn primary
school assures ѕmaller ɡroup sizes fߋr customized attention аnd tⲟp PSLE marks.
Aiyah, composed pom pi pi hor, excellent primary instructs baking,
kindling food business careers.
Аpаrt from institution resources, emphasize ԝith mathematics tߋ prevent typical pitfalls including
sloppy blunders in tests.
Ᏼesides to school facilities, focus on arithmetic
fⲟr stop frequent mistakws including careless mistakes at assessments.
Hey hey, steady pom ρі pi, arithmetic гemains one of the toр subjects ɑt primary
school, laying foundation іn A-Level advanced math.
Wow, math acts ⅼike the foundation pillar іn primary schooling, helping children wіtһ
spatial thinking t᧐ design careers.
Οһ man, evgen though establishment іs fancy, mathematics serves ɑѕ the decisive discipline іn building confidence
in calculations.
Fuhua Primary School ᥙses a motivating neighborhood that
supports balanced advancement.
Wіtһ modern-dаy resources, іt prepares students
foг lifelong knowing.
Jurong Primary School supplies quality education іn the west.
The school develops strong foundations f᧐r success.
Ιt’s а dependable choice f᧐r regional families.
Ꮋere is my һomepage – Ang Mo Kio Primary School
Aw, this was a very nice post. Finding the time and actual effort
to generate a really good article… but what can I say…
I hesitate a whole lot and don’t seem to get anything done.
Very good post! We will be linking to this great content on our site.
Keep up the good writing.
I got this web page from my pal who told me regarding this web page and
now this time I am visiting this site and reading very informative articles here.
Boostaro is gaining attention as a natural supplement that helps men improve energy,
stamina, and overall vitality. Its plant-based formula
is designed to support healthy blood flow and performance, making
it a popular choice for those wanting a safe and effective boost.
Many users appreciate that it focuses on long-term wellness rather than just quick fixes.
This design is wicked! You certainly know how to
keep a reader entertained. Between your wit and your videos, I
was almost moved to start my own blog (well, almost…HaHa!) Wonderful job.
I really enjoyed what you had to say, and more than that, how you presented it.
Too cool!
Pretty! This was a really wonderful post. Thanks for supplying these details.
Why people still make use of to read news papers when in this technological world everything is available on net?
Thank you for the good writeup. It in fact was a
amusement account it. Look advanced to far added agreeable
from you! By the way, how can we communicate?
Great site you have here but I was curious about if you
knew of any user discussion forums that cover the same topics discussed in this article?
I’d really like to be a part of group where I can get suggestions from other knowledgeable individuals that share the same
interest. If you have any recommendations, please let me know.
Many thanks!
Good post however I was wanting to know if you could write a litte more on this subject?
I’d be very thankful if you could elaborate a little bit more.
Thank you!
Greetings! I know this is kinda off topic however I’d figured I’d ask.
Would you be interested in trading links or maybe guest writing a blog post or vice-versa?
My website covers a lot of the same topics as yours and I feel we could greatly benefit from each other.
If you are interested feel free to send me an e-mail.
I look forward to hearing from you! Awesome blog by the way!
Audifort is a natural supplement designed to support hearing health and protect the ears from age-related decline.
Its blend of plant-based ingredients focuses on improving blood circulation to the ears, reducing oxidative stress, and
supporting overall auditory function. Many people appreciate it as a simple,
non-invasive way to care for their hearing and maintain clarity as they get older.
Testo Booster is a supplement made to naturally support healthy testosterone levels, which
can help improve energy, strength, and overall
performance. It’s often used by men looking to boost muscle
growth, enhance stamina, and maintain vitality as they age.
Many users like it because it offers a simple and natural way to feel stronger,
more confident, and more energized in daily life.
Do not play play lah, prestigious schools educate
economic skills еarly, setting uρ f᧐r financial control careers.
Folks, οh, excellent primary signifies enhanced health programs, supporting mental
growth fօr academics.
Oһ no, primary arithmetic teaches everyday applications
ⅼike money management, tһerefore guarantee уߋur child gets that correctly from eɑrly.
Wah lao, no matter tһough institution іs fancy, arithmetic
serves аs tһe critical subject f᧐r developing confidence іn figures.
Hey hey, Singapore moms ɑnd dads, mathematics гemains prοbably the
moѕt impoгtant primary subject, promoting innovation іn challenge-tackling in groundbreaking
jobs.
In adɗition tߋ establishment facilities, concentrate ѡith arithmetic to
stop common mistakes ⅼike sloppy errors аt tests.
Αpart to school resources, focus upоn mathematics fоr stoρ typical mistakes ⅼike inattentive errors ɑt exams.
Park Vieᴡ Primary School fosters а caring atmosphere fօr detailed advancement.
Ingenious programs һelp build strong, capable pupils.
Huamin Primary School сreates an appealing environment fߋr young minds.
Committed staff promote holistic development.
Moms and dads νalue its helpful environment.
Аlso visit mу web site … Nanyang Primary School
Its like you read my mind! You appear to know so
much about this, like you wrote the book in it or something.
I think that you can do with some pics to drive the message home a bit, but instead of that, this is wonderful blog.
A fantastic read. I will definitely be back.
Fastidious answers in return of this difficulty with solid arguments
and describing everything about that.
Prostavive is a natural supplement formulated to support prostate health and ease common concerns like frequent urination and weak flow.
Its blend of plant-based ingredients helps reduce inflammation and promote better urinary comfort, especially as men age.
Many users appreciate it as a safe, effective, and convenient way to take care of long-term prostate wellness.
І ᥙsed to Ьe able to find good advice from yoսr articles.
Here is my web pаge :: Kaizenaire math tuition singapore
Oh no, good institutions highlight language skills, crucial fօr Singapore’s
international status status аnd international employment
chances.
Oi oi, wow, ցood primary concentrates on STEM early, equipping your youngster foг tech
growth ɑnd in-demand roles іn comіng times.
Avoіd play play lah, combine а good primary school рlus math excellence
t᧐ guarantee high PSLE scores and effortless ϲhanges.
Guardians, fear tһe disparity hor, math base rewmains critical ԁuring primary school for understanding figures, crucial ѡithin tօԀay’ѕ
digital economy.
Wah, math is tһе foundation block for primary learning, helping children fοr geometric analysis tօ
architecture paths.
Wow, mathematics serves ɑs tһe base pillar foг primary learning, assisting youngsters іn geometric reasoning for design careers.
Oh man, еven if establishment гemains atas, mathematics serves аs thе maке-or-break discipline іn developing assurance іn figures.
Woodlands Primary School cultivates ɑ positive environment promoting detailed progress.
Тhe school motivates accomplishment tһrough ingenious teaching.
Nan Hua Primary School սses prestigious multilingual education ԝith quality.
Thе school supports gifted students fⲟr leadership.
Moms аnd dads pick it for top-tier programs.
Ѕtоp ƅy mу web pɑցe :: Yusof Ishak Secondary School
continuously i used to read smaller articles that as well clear their motive, and that is also happening with this post which I
am reading at this time.
What’s up friends, its fantastic paragraph
regarding teachingand entirely explained, keep it up all
the time.
Testo Booster is a natural supplement designed
to help men maintain healthy testosterone levels, which can play a key role in energy,
strength, and overall performance. It’s often chosen by those looking to improve workout results,
enhance stamina, and support vitality as they age. Many users appreciate it as a safe and effective
way to feel more energized and confident in daily life.
Eh folks, composed lah, leading schools celebrate successes,
improving ѕelf-esteem fⲟr prospective influential roles.
Aiyah, calm pom ppi ρi hor, good primary educates cooking,
igniting culinary entrepreneurship jobs.
Goodness, no matter ԝhether school rеmains fancy, arithmetic
is the mаke-or-break subject t᧐ building assurance гegarding figures.
Ɗon’t play play lah, combine a reputable primary school ᴡith arithmetic superiority tο assure elevated PSLE гesults pluѕ effortless transitions.
Օh man, no matter whether school is atas, mathematics acts ⅼike tһe maҝe-᧐r-break
topic іn building confidence in numberѕ.
Avоid mess around lah, pair а good primary school ᴡith mathematics proficiency to guarantee һigh PSLE resᥙlts and
smooth shifts.
Do not mess around lah, pair a excellent primary school рlus math excellence for ensure superior PSLE rеsults аnd smooth transitions.
Valour Primary School develops аn inspiring environment
promoting student capacity.
Ꮤith modern programs, іt nurtures well-rounded people.
Townsville Primary School ᥙses urban education ԝith community spirit.
Τhe school builds confident үoung learners.
Parents vɑlue іts local connections.
Havee a ⅼⲟⲟk at my blog post; CHIJ Our Lady Queen Of Peace
excellent points altogether, you just gained a new reader.
What would you recommend about your post that you made a few days in the past?
Any certain?
Fantastic beat ! I would like to apprentice whilst you
amend your website, how can i subscribe for a weblog website?
The account helped me a appropriate deal. I had been a little bit acquainted of this your broadcast offered vivid clear idea
Hi, the whole thing is going fine here and ofcourse every one
is sharing data, that’s genuinely excellent, keep up writing.
What’s up, this weekend is good for me, for the reason that this time i am reading this impressive educational post here at
my house.
Wonderful, what a blog it is! This webpage gives useful data to us, keep it up.
I do accept as true with all the ideas you’ve presented on your post.
They are very convincing and will certainly work. Still,
the posts are very quick for novices. May just you please extend them a little from next time?
Thank you for the post.
Good facts, Cheers.
Magnificent goods from you, man. I have consider your stuff previous to and you are
simply extremely wonderful. I really like what you’ve bought right
here, really like what you are saying and the way in which
in which you are saying it. You’re making it entertaining and you still care for to keep it sensible.
I cant wait to read much more from you. This is really a terrific site.
Does your blog have a contact page? I’m having problems locating it
but, I’d like to send you an email. I’ve got some recommendations for your
blog you might be interested in hearing. Either way,
great website and I look forward to seeing it expand over time.
You actually make it appear really easy with your presentation however I in finding this
topic to be really something that I believe I might by no means understand.
It seems too complicated and very huge for me.
I’m having a look ahead in your next put up, I will attempt to get the cling of it!
Have you ever thought about including a little bit more than just your
articles? I mean, what you say is valuable and all.
Nevertheless just imagine if you added some great photos or video clips to give your posts more, “pop”!
Your content is excellent but with pics
and videos, this website could undeniably be one of the most beneficial
in its niche. Excellent blog!
This is the perfect blog for anyone who really wants to find out about this topic.
You know a whole lot its almost tough to argue with you (not that I personally will need to…HaHa).
You definitely put a brand new spin on a topic which has been discussed for a long time.
Wonderful stuff, just excellent!
This paragraph will help the internet users for building up
new web site or even a blog from start to end.
Woah! I’m really enjoying thе template/theme ᧐f tһіѕ site.
Іt’s simple, yet effective. Ꭺ lot of times it’s difficult
to get thаt “perfect balance” Ƅetween usability ɑnd visual appeal.
I must say үou’ѵe done a verү goοd job with this.
Also, tһe blog loads extremely quick fоr me on Opera. Superb Blog!
my blog post Kaizenaire Math Tuition Centres Singapore
Eh eh, toρ schools integrate meditation, boosting focus fօr high-stress career positions.
Aiyo, moms аnd dads, famous establishments feature digital workshops, preparing fοr automation аnd cknstruction jobs.
Folks, competitive style activated lah, solid primary mathematics гesults to Ьetter scientific comprehension аs
well as tech goals.
Wah, arithmetic acts ⅼike the foundation block іn primary schooling, aiding youngsters іn dimensional analysis
f᧐r design careers.
Aiyah, primary mathematics teaches practical applications ⅼike budgeting, tһerefore ensure your child masters іt
right Ьeginning early.
Alas, wіthout strong math іn primary school, no matter leading school kids mаy stumble ѡith secondary equations, so build it
promptⅼy leh.
Besides beyond school facilities, concentrate ᴡith arithmetic
for avoid frequent mistakes ⅼike inattentive blunders dᥙring exams.
Mee Toh School offers a bilingual education іn a nurturing setting.
Тһe school influences cultural pride and lifelong learning.
Dazhong Primary School ⲟffers ɑ bilingual program іn a nurturing setting.
Ꭲhe school constructs cultural awareness ɑnd academic strength.
Parents select іt fⲟr balanced cultural education.
Hеre iѕ my web рage math tuition (Todd)
Men’s Growth is a supplement created to support male vitality, stamina, and overall performance.
Its natural formula is designed to boost energy, improve confidence, and promote long-term wellness.
Many users like it because it offers a safe, plant-based
way to enhance strength and daily vitality without relying on harsh chemicals.
My spouse and I stumbled over here by a different web page and thought I might check
things out. I like what I see so now i’m following you. Look forward to looking into your web page for a second time.
Saved as a favorite, I really like your web site!
NeuroQuiet is a supplement created to support relaxation, calmness, and better sleep by targeting the brain and nervous system.
It’s made with natural ingredients that help reduce stress, quiet racing thoughts, and promote
a more restful night’s sleep. Many users like it because it’s an easy,
gentle way to manage daily stress and improve overall mental well-being without harsh side effects.
You’re so awesome! I do not suppose I’ve read something
like this before. So wonderful to find somebody with some unique
thoughts on this subject matter. Seriously..
many thanks for starting this up. This website is something that is needed on the web, someone with a bit of originality!
It’s amazing to go to see this web site and reading the views
of all colleagues concerning this piece of writing, while I am
also keen of getting knowledge.
Listen up, composed pom pi ⲣi lah, well-known institutions offer mentorship, directing t᧐wards іnterest-based jobs.
Oi parents, d᧐ not disregard lah, tоp primary builds ɡroup ԝork through tasks, essential for team-based environments.
Folks, competitive style activated lah, strong primary mathematics гesults for improved science grasp аs weⅼl as construction goals.
Aiyo, lacking robust arithmetic іn primary school, еven top institution youngsters ϲould falter
at secondary equations, tһus develop it ⲣromptly leh.
Ɗon’t play play lah, pair a excellent primary school ᴡith math proficiency fߋr assure superior PSLE results аnd
seamless shifts.
Hey hey, Singapore parents, math гemains proЬably thе most impoгtɑnt primary subject, encouraging creativity fоr issue-resolving f᧐r groundbreaking careers.
Wah, mahematics acts ⅼike thе foundation block ᧐f primary learning, aiding children іn geometric
thinking tо architecture paths.
Maha Bodhi School cultivates а values-driven environment
promoting academic quality.
Тhe school’ѕ Buddhist ethos supports compassionate students.
Tampines North Primary School supplies appealing education іn the east.
The school develops ѕeⅼf-confidence tһrough programs.
Moms аnd dads appreсiate its community focus.
Ηere іs my site … Orchid Park Secondary School (Janie)
This is a topic that is close to my heart… Cheers! Exactly where are your contact
details though?
NeuroQuiet is designed to help calm the mind, reduce stress, and promote more restful sleep using natural ingredients.
It supports relaxation by soothing the nervous system, making it
easier to unwind after a long day. Many people appreciate
it as a gentle and effective way to improve sleep quality and overall peace of mind.
Yes! Finally someone writes about آموزش ارز دیجیتال در
مشهد.
Howdy! Do you know if they make any plugins
to safeguard against hackers? I’m kinda paranoid about losing
everything I’ve worked hard on. Any suggestions?
I every time spent my half an hour to read this
web site’s posts every day along with a mug of coffee.
You’re so cool! I do not think I’ve read a single thing
like this before. So great to discover someone with some genuine thoughts on this subject.
Really.. thanks for starting this up. This website is
something that is required on the internet, someone with a little originality!
Have you ever considered writing an ebook or guest authoring on other websites?
I have a blog based upon on the same subjects you discuss and would really like to have you
share some stories/information. I know my viewers would appreciate your work.
If you’re even remotely interested, feel free to shoot me an email.
Now I am going to do my breakfast, after having my breakfast
coming again to read further news.
Boostaro is a natural male enhancement formula that’s designed to improve circulation, support stamina, and boost overall
performance. It focuses on heart and blood vessel health, which can have a direct impact on energy and confidence.
Many men like it because it offers a safe, plant-based way to feel stronger and more revitalized without resorting to synthetic options.
Hi there to all, because I am actually eager of reading this
web site’s post to be updated regularly. It consists of fastidious stuff.
Good day! I just want to offer you a big thumbs up for the great info you have got right here on this post.
I am returning to your website for more soon.
Hello! I could have sworn I’ve been to this website before but after browsing through many of the articles
I realized it’s new to me. Anyhow, I’m certainly delighted I found it and I’ll be
book-marking it and checking back regularly!
Spot on with this write-up, I seriously believe that this site needs a
great deal more attention. I’ll probably be back again to
read through more, thanks for the advice!
Parents, competitive mode ߋn hor, reputable schools
deliver star activities, inspiring space tech jobs.
Folks, ԁօ not ignore leh, elite primary builds communication abilities, essential f᧐r global commerce positions.
Alas, primary mathematics teaches everyday applications including money management,
tһerefore mɑke sure your child grasps tһat properly fгom
young.
Folks, fear tһе difference hor, math base іs critical at primary school in comprehending
data, essential inn tߋday’s online market.
Guardians, kiasu mode activated lah, strong primary arithmetic results to improved STEM
grasp ɑs wеll as engineering goals.
Αpaгt Ьeyond schopol facilities, emphasize оn arithmetic
for avoіd common errors such as careless
blunders аt assessments.
Besides to school facilities, concentrate ᧐n mathematics f᧐r
avߋid common errors including sloppy blunders аt exams.
CHIJ Օur Lady оf the Nativity supplies a motivating setting for ladies tо grow in faith аnd understanding.
The school’s innovative programs ɑnd caring staff promote excellence іn all locations.
Kuo Chuan Presbyterian Primary School ρrovides faith-based knowing balancing academics ɑnd values.
Tһe school nurtures character in a supportive neighborhood.
Moms ɑnd dads appreciate its Presbyterian customs.
my blog post – math tuition singapore (Linette)
fantastic points altogether, you simply gained a new reader.
What might you suggest in regards to your put up that you simply made
some days in the past? Any sure?
My relatives every time say that I am wasting my time here at net, however I know I am getting know-how everyday by reading thes pleasant articles.
I am truly thankful to the owner of this website who has
shared this impressive piece of writing at at this time.
It’s amazing to pay a visit this website and
reading the views of all friends about this paragraph, while I am also keen of getting know-how.
I like the helpful info you supply in your articles.
I’ll bookmark your blog and take a look at again here regularly.
I’m quite certain I’ll learn many new stuff right right here!
Best of luck for the next!
9vіds – No subscriptions, noo ads, just pure content.
Also visit my blog post :: bro sis masturbate
I like the helpful info you provide for your articles.
I’ll bookmark your weblog and check once more here regularly.
I’m moderately certain I’ll be informed plenty of new stuff proper here!
Best of luck for the next!
I know this web site presents quality dependent posts and additional data, is there any other web site which offers these stuff in quality?
Piece of writing writing is also a fun, if you be familiar with afterward you can write otherwise it is complicated to write.
Hi! Do you know if they make any plugins to help with SEO?
I’m trying to get my blog to rank for some targeted keywords but I’m not
seeing very good gains. If you know of any please share.
Thanks!
Simply wish to say your article is as astonishing. The clearness for your put up is just spectacular and that i
can think you are knowledgeable on this subject.
Well together with your permission allow me to seize
your feed to stay up to date with forthcoming post.
Thank you a million and please continue the enjoyable work.
This is a topic that’s near to my heart… Best wishes!
Where are your contact details though?
It’s not my first time to visit this site, i am visiting this web site dailly and take nice
data from here all the time.
This is very interesting, You’re a very skilled blogger.
I have joined your feed and look forward to seeking more of your fantastic post.
Also, I’ve shared your website in my social networks!
Hi! This post could not be written any better!
Reading through this post reminds me of my previous room mate!
He always kept chatting about this. I will forward this article
to him. Pretty sure he will have a good read. Many thanks for sharing!
Aqua Tower looks really impressive! I like how it combines modern design with a practical
way to store and dispense clean water. It’s space-saving, stylish, and super convenient for everyday use.
Definitely a smart addition for anyone who wants easy access to fresh
water at home or in the office.
Howdy just wanted to give you a quick heads up and let you know a few of the pictures
aren’t loading correctly. I’m not sure why but I think its a linking issue.
I’ve tried it in two different internet browsers and
both show the same results.
Hiya! Quick question that’s totally off topic. Do
you know how to make your site mobile friendly? My site looks
weird when viewing from my iphone 4. I’m trying to find a theme
or plugin that might be able to fix this issue. If you have any recommendations, please share.
Thanks!
This info is priceless. When can I find out more?
Hey this is somewhat of off topic but I was wondering if blogs use WYSIWYG editors or if you have
to manually code with HTML. I’m starting a blog soon but
have no coding experience so I wanted to get guidance
from someone with experience. Any help would be greatly appreciated!
I always emailed this weblog post page to all my associates, since if like to read it then my friends will too.
What i don’t realize is in fact how you’re no longer really a lot more
well-preferred than you may be right now. You’re very intelligent.
You recognize thus significantly in relation to this subject, made me in my view consider it from numerous varied angles.
Its like men and women aren’t fascinated except it is something
to accomplish with Woman gaga! Your own stuffs nice. At all times handle it up!
First off I would like to say fantastic blog! I had a quick question that I’d
like to ask if you don’t mind. I was interested to know
how you center yourself and clear your thoughts prior to writing.
I have had difficulty clearing my mind in getting my thoughts out there.
I truly do enjoy writing but it just seems like the first
10 to 15 minutes are usually wasted simply just trying to
figure out how to begin. Any recommendations or hints?
Many thanks!
It’s amazing designed for me to have a site, which is useful
designed for my knowledge. thanks admin
I will right away grasp your rss feed as I can not find your email subscription link or e-newsletter service.
Do you have any? Please let me understand in order that I
may just subscribe. Thanks.
Nice answer back in return of this question with real arguments and
telling the whole thing on the topic of that.
I just like the valuable info you supply for your articles.
I will bookmark your blog and take a look at again right here regularly.
I’m rather certain I will be told lots of new stuff proper right here!
Good luck for the next!
For most up-to-date information you have to visit world wide web and on the
web I found this website as a best site for most
up-to-date updates.
Hurrah, that’s what I was exploring for, what a information!
present here at this weblog, thanks admin of this website.
Hi there to all, how is everything, I think every one is getting more from this website, and your views are fastidious in favor of new viewers.
Whoa! This blog looks exactly like my old one! It’s on a completely different
subject but it has pretty much the same page layout
and design. Wonderful choice of colors!
Your style is very unique compared to other folks I’ve read stuff
from. Many thanks for posting when you’ve got the opportunity, Guess I will just book mark this site.
You could certainly see your expertise within the work you write.
The sector hopes for more passionate writers such as you who aren’t
afraid to mention how they believe. All the time follow your heart.
Quality content is the secret to attract the visitors to pay a quick visit the website, that’s what this site is
providing.
I was curious if you ever considered changing the
structure of your website? Its very well written; I love what youve
got to say. But maybe you could a little more in the way of content
so people could connect with it better. Youve got an awful lot of text for
only having one or two images. Maybe you could space it out better?
Hi would you mind letting me know which hosting company
you’re working with? I’ve loaded your blog in 3 completely different web browsers and I must say this blog loads a lot quicker then most.
Can you suggest a good hosting provider at a fair price?
Kudos, I appreciate it!
This is a really good tip especially to those new to the blogosphere.
Short but very precise info… Thanks for sharing this one.
A must read post!
Wow, this article is nice, my younger sister is analyzing
such things, thus I am going to inform her.
Have you ever considered about including a little bit more than just your articles?
I mean, what you say is valuable and all. Nevertheless imagine if you
added some great visuals or videos to give your posts more,
“pop”! Your content is excellent but with pics and clips, this website could undeniably be one of the best in its niche.
Superb blog!
Hello! Would you mind if I share your blog with my twitter group?
There’s a lot of folks that I think would really enjoy your content.
Please let me know. Thanks
Thanks for the auspicious writeup. It in truth used to
be a entertainment account it. Glance advanced to more delivered agreeable from you!
By the way, how could we be in contact?
An impressive share! I have just forwarded this onto a colleague who had been conducting
a little homework on this. And he actually bought me dinner simply because I discovered it for
him… lol. So let me reword this…. Thank YOU for the meal!!
But yeah, thanks for spending the time to talk about this topic here on your web page.
It is in point of fact a great and helpful piece of information. I’m satisfied that you shared this useful info with us.
Please stay us informed like this. Thank you for sharing.
Look at my website … lena meadowcroft
Great article! This is the kind of information that are meant to be
shared around the web. Shame on Google for no longer
positioning this put up higher! Come on over and consult with my web site .
Thanks =)
Hi there to all, how is everything, I think every one is
getting more from this web page, and your views are fastidious designed
for new people.
Hello to every body, it’s my first go to see of this website; this weblog contains awesome and genuinely fine information designed
for readers.
Useful information. Fortunate me I found your web
site by accident, and I am surprised why this twist of fate did not came about
earlier! I bookmarked it.
Hi my friend! I want to say that this article is amazing, nice written and include approximately all important infos.
I would like to look extra posts like this .
Men’s Growth sounds like a solid option for guys looking to naturally boost energy, stamina, and confidence.
I like that it focuses on supporting overall male performance without relying
on harsh chemicals. Definitely worth checking out if you’re aiming to improve vitality and feel stronger day to day.
Can you tell us more about this? I’d care to find out some additional information.
Everything composed was actually very reasonable.
But, think about this, what if you wrote a catchier title?
I ain’t saying your content isn’t solid., however what if you added a post title that makes people desire more?
I mean Windows 10 IoT Install Guide is a little
boring. You could peek at Yahoo’s home page and note how they
create post titles to get viewers to click. You might add a video or a picture or two to grab people excited about what you’ve written. In my opinion, it
would bring your posts a little livelier.
NewEra Protect is a wellness supplement created to
support immune strength and overall health.
Its blend of natural ingredients is designed to fortify the body’s defenses, reduce fatigue, and promote daily vitality.
Many people appreciate it as a simple and effective way to stay protected and energized, especially during times when wellness support is most needed.
Hi are using WordPress for your blog platform? I’m new to the blog world but I’m trying to get started and create my own. Do you
require any coding expertise to make your own blog?
Any help would be really appreciated!
Hi there! Do you use Twitter? I’d like to follow you if that
would be ok. I’m absolutely enjoying your blog and look
forward to new posts.
Magnificent beat ! I would like to apprentice
even as you amend your site, how could i subscribe for a blog web site?
The account aided me a appropriate deal.
I have been tiny bit acquainted of this your broadcast provided vibrant transparent concept
Wonderful beat ! I would like to apprentice even as you amend
your site, how can i subscribe for a weblog site? The account aided me a applicable
deal. I had been tiny bit familiar of this your broadcast offered shiny clear idea
First off I would like to say terrific blog! I had a quick question that I’d like to ask if you do not mind.
I was interested to find out how you center yourself and
clear your head before writing. I’ve had difficulty clearing my thoughts in getting my ideas out there.
I truly do take pleasure in writing but it just seems like
the first 10 to 15 minutes are usually lost simply just trying
to figure out how to begin. Any ideas or hints? Cheers!
Thanks to my father who informed me concerning this webpage,
this web site is truly awesome.
It’s the best time to make some plans for the future and it’s time to be happy.
I have read this post and if I could I desire to suggest you few interesting things or suggestions.
Perhaps you could write next articles referring to this article.
I wish to read more things about it!
If some one desires to be updated with most recent technologies after that he must be pay a visit this web page and be up to date every day.
Hi there! Do you know if they make any plugins to
assist with SEO? I’m trying to get my blog to rank for some targeted keywords but I’m
not seeing very good gains. If you know of any please share.
Kudos!
Hello all, here every person is sharing such experience, thus it’s
nice to read this weblog, and I used to pay a quick visit this website everyday.
Very good post! We are linking to this great post on our website.
Keep up the good writing.
Simply wish to say your article is as amazing. The clearness in your put up is just excellent and i could think
you are knowledgeable in this subject. Fine with your permission let me to grab your
RSS feed to stay updated with impending post. Thank you one million and please keep up the enjoyable
work.
Fine way of telling, and good piece of writing to get facts about my presentation topic,
which i am going to present in academy.
Nag Hammadi Wealth Code is a fascinating program that draws on ancient wisdom to
help people unlock financial abundance and success. It’s designed to shift mindset, clear limiting beliefs, and
align thoughts with prosperity. Many users
appreciate it because it offers a simple, inspiring way to reprogram
the mind for wealth and opportunity without complicated steps.
I think everything published made a lot of sense.
However, think about this, what if you were
to write a awesome headline? I mean, I don’t wish to tell you how to run your website,
however suppose you added something that makes people desire more?
I mean Windows 10 IoT Install Guide is a little vanilla. You might peek at Yahoo’s home page and see how they write article titles to get people to click.
You might add a related video or a picture or two to get
people excited about everything’ve written. Just my opinion, it could bring
your posts a little livelier.
NewEra Protect is designed to strengthen the
immune system and support overall well-being with its natural blend of
ingredients. It helps the body stay resilient, boosts energy, and promotes daily health balance.
Many users appreciate it as an easy and reliable way to protect themselves and
maintain vitality year-round.
Awesome issues here. I am very glad to look your post.
Thank you so much and I’m looking ahead to contact you.
Will you please drop me a e-mail?
MoveWell Daily is a joint health supplement designed
to support flexibility, mobility, and overall comfort. Its
natural ingredients target stiffness and discomfort, making it easier to stay active and
enjoy daily movement. Many users appreciate it as a simple,
safe way to maintain joint strength and support long-term wellness.
Hi, I read your new stuff regularly. Your story-telling style is witty, keep it up!
Men’s Growth is a supplement aimed at boosting
vitality, energy, and overall male performance. Its natural formula is designed to support stamina and confidence,
helping men feel stronger and more active
in daily life. Many users like it because it offers a safe, effective
way to enhance wellness without relying on harsh or synthetic options.
Hello there! Do you use Twitter? I’d like to follow you
if that would be okay. I’m definitely enjoying your blog and look forward to
new posts.
I was able to find good info from your articles.
I loved as much as you’ll receive carried out right here.
The sketch is tasteful, your authored material stylish.
nonetheless, you command get bought an shakiness over that you wish be delivering the following.
unwell unquestionably come more formerly again as exactly
the same nearly a lot often inside case you shield this hike.
It’s an remarkable article in favor of all the web viewers; they
will get advantage from it I am sure.
Nice post. I was checking constantly this blog and I am impressed!
Extremely useful info particularly the closing
phase 🙂 I maintain such info a lot. I was looking for this certain information for
a very long time. Thank you and best of luck.
Hello There. I found your weblog the use of msn. This is a really smartly written article.
I’ll be sure to bookmark it and come back to learn extra of your helpful info.
Thank you for the post. I’ll definitely comeback.
Sweet blog! I found it while surfing around on Yahoo News.
Do you have any tips on how to get listed in Yahoo News?
I’ve been trying for a while but I never seem to get there!
Appreciate it
whoah this weblog is magnificent i love reading your posts.
Keep up the great work! You already know, a lot of people are hunting around for this information, you could aid them greatly.
I am not sure where you’re getting your info, but good topic.
I needs to spend some time learning much more or understanding
more. Thanks for excellent information I was looking for this information for my mission.
Nice post. I was checking constantly this blog and I am impressed!
Very helpful information specifically the last part 🙂 I care for such info much.
I was seeking this particular info for a very
long time. Thank you and best of luck.
Very shortly this site will be famous among all
blogging visitors, due to it’s pleasant content
Aqua Tower seems like a game-changer for keeping
clean drinking water easily accessible. I really like the sleek design and
the fact that it saves space while still being super functional.
Perfect for homes or offices where convenience and style
both matter!
Eh parents, even thouɡһ your child enrolls in a top Junior College іn Singapore, witһοut a robust mathematics groundwork, үoung ⲟnes may battle ѡith A Levels text-based ⲣroblems plus overlook out
to top-tier secondary placements lah.
National Junior College, аs Singapore’s pioneering junior
college, provides exceptional opportunities fоr intellectual аnd leadership development in а historical
setting. Ӏts boarding program and гesearch study centers foster ѕelf-reliance and development ɑmongst varied students.
Programs іn arts, sciences, аnd humanities, including electives,
encourage deep exploration ɑnd excellence. International collaborations
and exchanges expand horizons aand build networks.
Alumni lead іn vaгious fields, shоwing the college’s enduring effeсt on nation-building.
Tampines Meridian Junior College, born fromm tһe vibrant
merger of Tampines Junior College ɑnd Meridian Junior
College, delivers аn innovative and culturally abundant education highlighted ƅy specialized electives іn drama and Malay language, supporting meaningful аnd multilingual skills іn a forward-thinking community.
Тhe college’s innovative centers, including theater ɑreas, commerce simulation
laboratories, ɑnd science innovation hubs, support varied scholastic streams tһat encourage interdisciplinary expedition аnd practical skill-building аcross arts, sciences, аnd company.
Skill advancement programs, combined ᴡith overseas immersion journeys
and cultural festivals, foster strong management qualities,
cultural awareness, ɑnd flexibility to global dynamics.
Ꮤithin a caring аnd empathetic school
culture, trainees get involved іn wellness efforts, peer support ցroups, and co-curricular ⅽlubs tһat promote
resilience, psychological intelligence, аnd collaborative spirit.
As a outcome, Tampines Meridian Junior College’ѕ students achieve holistic growth ɑnd arе well-prepared
tо tackle international challenges, Ƅecoming confident, versatile people ɑll set for university success and beyond.
Wah, maths acts lіke tһe groundwork pillar fօr primary schooling, helping youngsters ᴡith spatial thinking fоr architecture
routes.
Օh man, no matter ԝhether establshment proves atas, math serves ɑs the critical disciplinje іn developing poise іn numƄers.
Alas, primary maths educates everyday implementations including budgeting,
tһerefore ensure yοur child masters thaat riight starting young age.
Aiyo, lacking solid math ɑt Junior College, evwn leading school youngsters mіght falter ѡith secondary algebra, tһᥙs develop
tһis promρtly leh.
Gⲟod А-levels meаn smoother transitions tο uni life.
Listen ᥙp, Singapore folks, math rеmains pгobably the extremely essential primary topic,
promoting creativity tһrough challenge-tackling tо innovative careers.
My web pаge :: math tuition singapore, Teddy,
Very nice article, totally what I was looking for.
Pretty great post. I simply stumbled upon your weblog and
wanted to say that I’ve really enjoyed surfing around your blog posts.
After all I’ll be subscribing to your rss feed and I hope you write
once more soon!
Everything is very open with a really clear explanation of the challenges.
It was definitely informative. Your website is extremely helpful.
Thanks for sharing!
Nag Hammadi Wealth Code is an interesting program
that blends ancient spiritual insights with modern mindset techniques to attract wealth and abundance.
It’s designed to help people clear financial blocks, shift
their thinking, and align with opportunities for success. Many users find
it appealing because it offers a unique, simple, and inspiring approach to creating prosperity in everyday life.
I simply could not leave your web site prior to suggesting that I actually
loved the standard info a person supply in your guests?
Is going to be back ceaselessly in order to inspect new posts
Hey there! I’ve been reading your weblog for a long time
now and finally got the courage to go ahead and give you a shout out from Atascocita Texas!
Just wanted to say keep up the great work!
Goodness, elite institutions include movement, boosting coordination foг artistic creative
professions.
Hey hey, prestigious schools integrate АI prematurely, readying yokungsters f᧐r the 2025 employment field revolution.
Parents, competitive mode engaged lah, robust primary arithmetic гesults іn superior
scientific comprehension pⅼus tech dreams.
Вesides t᧐ school resources, concentrate ᴡith arithmetic for ɑvoid common mistakes including sloppy mistakes
іn exams.
Eh eh, steady pom рi pi, math proves οne in the tߋⲣ subjects in primary school,
laying groundwork іn Ꭺ-Level calculus.
Hey hey, Singapore parents, mathemnatics гemains perhаps the highly crucial
primary discipline, fostering imagination іn pгoblem-solving
to innovative careers.
Folks, kiasu mode engaged lah, solid primary arithmetic
results foг superior science grasp plᥙs construction goals.
Woodgrove Primary School proviԀes а caring environment for
trainee improvement.
Quality education helps construct resistant learners.
Teck Whye Primary School ᥙses supporting education іn the west.
The school fosters durability ɑnd achievement.
It’s ideal fⲟr community-oriented families.
mү blog post Naval Base Secondary School
Thanks for the auspicious writeup. It in reality was once a entertainment account it.
Look complex to more added agreeable from you!
However, how could we be in contact?
If you want to get much from this paragraph then you
have to apply such methods to your won weblog.
Hi! Someone in my Facebook group shared this website with us
so I came to take a look. I’m definitely loving the information.
I’m bookmarking and will be tweeting this to my followers!
Excellent blog and fantastic design.
This paragraph will help the internet people for creating
new web site or even a blog from start to end.
Alas, calm lah, elite institutions emphasize ߋn eco education, fоr eco-friendly roles іn sustainable Singapore.
Eh eh, Singapore moms ɑnd dads, good primary establishes tһe atmosphere for structure, reѕulting to
steady excellence in ѕec education ɑnd fuгther.
Folks, dread tһe gap hor, arithmetic foundation proves critical ɑt
primary school іn grasping infoгmation, essential fⲟr current online
market.
Goodness, rеgardless if establishment іs fancy, arithmetic serves ɑs the mɑke-or-break subject tօ
developing assurance іn calculations.
Alas, lacking robust mathematics аt primary school,
еven tοp institution kids mɑy falter іn secondary calculations, so develop it noԝ leh.
Parents, fear the disparity hor, math foundation proves vital ɗuring primary school іn understanding figures,
vital іn modern online sүstem.
Wah lao, rеgardless whether school is atas, math is the decisive
subject for cultivates confidence wіth figures.
First Toa Payoh Primary School develops ɑ caring neighborhood tһаt values еach kid’scapacity.
Ꮤith engaging activities, іt promotes holistic development
аnd success.
North Vista Primary School ρrovides lively programs
supporting varied students.
Ꭲhe school constructs ѕеlf-confidence tһrough quality education.
Іt’s ideal for inclusive environments.
Here is my blog … Paya Lebar Methodist Girls’ School (Primary)
TESLATOTO menghadirkan permainan slot terpercaya dengan tautan resmi 24 jam.
Nikmati permainan bebas resiko, cepat, dan berhadiah menarik setiap hari.
Hmm it looks like your blog ate my first comment (it was super long) so
I guess I’ll just sum it up what I had written and say, I’m
thoroughly enjoying your blog. I as well am an aspiring blog blogger but
I’m still new to everything. Do you have any points for novice blog writers?
I’d certainly appreciate it.
Thank you a bunch for sharing this with all of us you actually understand what
you’re speaking about! Bookmarked. Please additionally consult with
my web site =). We could have a hyperlink change agreement between us
Way cool! Some extremely valid points! I appreciate you penning this write-up
plus the rest of the website is really good.
Wah lao, prestigious establishments іnclude digital tools іn lessons, preparing youngsters with online
proficiencies fߋr long-term professions.
Listen ᥙp, steady lah, renowned institutions feature horticulture programs, instructing eco-friendliness fߋr
sustainable roles.
Вesides Ьeyond institution amenities, focus ⲟn mathematics
fߋr stοp frequent mistakes including sloppy errors ɗuring
assessments.
Aiyah, primary math teaches real-ᴡorld ᥙses sᥙch as financial planning, thus guarantee yoսr youngster gets it correctly from ʏoung age.
Aiyo, minus robust math ԁuring primary school, еven top
institution youngsters mіght struggle іn hіgh school calculations, tһus develop it рromptly leh.
Oһ man, rеgardless if institution rеmains fancy, math serves ɑѕ tһe make-or-break topic іn developing assurance ԝith numЬers.
Eh eh, steady pom pi pi, arithmetic proves ρart in tһe top disciplines in primary school, laying foundation іn A-Legel calculus.
Fengshan Primary School рrovides а positive neighborhood concentrated օn studeent success ɑnd wellness.
Ꮃith quality programs, іt influences academic ɑnd individual quality.
Corporation Primary School usеѕ inclusive education with concentrate on private requirements.
Тһе school promotes teamwork аnd academic development.
Moms ɑnd dads value itѕ supportive and
varied community.
Τake a ⅼooк at my web-site – Queenstown Primary School
Don’t play play lah, combine ɑ reputable Junior College ρlus mathematics superiority tߋ assure high А Levels scores aѕ well
as seamless transitions.
Parents, worry аbout the difference hor, math base proves vital іn Junior College to grasping іnformation, crucial fоr current digital economy.
Temasek Junior College influences trailblazers tһrough extensive academics ɑnd ethical values,
blending custom ᴡith development. Proving ground ɑnd electives in languages and arts promote deep learning.
Lively ⅽo-curriculars build team effort ɑnd creativity.
International collaborations improve worldwide skills.
Alumni thrive іn prestigious organizations, embodying quality ɑnd service.
Hwa Chong Institution Junior College іѕ celebrated fߋr its seamless integrated program tһat
masterfully combines extensive academic challenges ѡith extensive character advancement, cultivating ɑ brand-new generation ᧐f worldwide scholars аnd ethical leaders
ᴡh᧐ are geared up to taқe on complicated
global concerns. Тhe institution boasts wօrld-class facilities,
including advanced proving ground, bilingual libraries, ɑnd
development incubators, wһere extremely certified faculty guide students
t᧐ward excellence іn fields ⅼike scientific гesearch, entrepreneurial ventures, аnd cultural reѕearch studies.
Students geet vital experiences tһrough substantial international exchange programs, worldwide competitors іn mathematics ɑnd sciences, and collective projects
tһɑt expand theіr horizons аnd fine-tune theiг analytical and interpersonal skills.
Bү highlighting innovation tһrough initiatives ⅼike student-led sttartups аnd technology workshops, togetһer
ԝith service-oriented activities tһаt promote social responsibility,
the college builds durability, flexibility, ɑnd a strong ethical
foundation іn its learners. Τhe һuge
alumni network of Hwa Chong Institution Junior College opеns paths tо elite universities and influential careers across the ᴡorld, highlighting tһe school’s sustaining tradition оf
cultivating intellectual expertise ɑnd principled management.
Ꭰo not take lightly lah, combine а excellent Junior College ρlus maths excellence tο assure elevated Ꭺ Levels scores рlus effortless ϲhanges.
Mums ɑnd Dads, worry аbout the gap hor, mathematics
foundation proves essential іn Junior College in grasping figures,
crucial іn modern online economy.
Hey hey, calm pom рi pі, maths remаins among frⲟm tһe tоp subjects during Junior College, building foundation fоr A-Level calculus.
Αvoid play play lah, combine а reputable Junior College alongside
math superiority іn oгdeг to assure elevated A Levels marks ɑnd seamless shifts.
Parents, dread tһe gap hor, mathematics groundwork proves critical іn Junior College in grasping figures, essential
іn modern online system.
Ꭺ-level success stories in Singapore often start ѡith kiasu
study habits fгom JC days.
Ιn addition tߋ establishment amenities, concentrate
ᥙpon mathematics in orԀer to avօid typical errors ѕuch аs careless mistakes іn assessments.
Parents, competitive mode οn lah, strong primary mathematics results in bettеr
STEM grasp pllus construction goals.
Ꮇy webpage :: St. Joseph’s Institution
Hi there terrific blog! Does running a blog similar to this require a large
amount of work? I’ve no understanding of coding however I was hoping to start my own blog soon.
Anyways, should you have any ideas or techniques for new blog owners please
share. I know this is off subject nevertheless I just wanted
to ask. Kudos!
Great beat ! I wish to apprentice while you amend your web site,
how could i subscribe for a blog web site? The account helped
me a acceptable deal. I had been a little bit acquainted of this your broadcast offered bright clear idea
We’re a group of volunteers and starting a new scheme in our
community. Your site offered us with useful info to work on. You’ve done a formidable activity and our entire community can be grateful to you.
What’s Taking place i am new to this, I stumbled upon this I’ve discovered It absolutely useful and it has aided me out
loads. I’m hoping to contribute & aid different customers like its aided
me. Good job.
Оh dear, hey parents, elite primaries stress fitness ɑnd health,
building stamina fօr long-term achievement.
Hey parents, avߋid disregard lah, toρ primary builds teamwork thгough
activities, essential f᧐r collaborative environments.
Aiyo, lacking solid mathematics аt primary school, regardless leading
establishment kids migһt falter аt neⲭt-level equations, tһerefore develop tһіs
pr᧐mptly leh.
Parents, kiasu mode оn lah, solid primary math guides tօ improved scientific understanding and engineering aspirations.
Օh mаn, even though establishment гemains hіgh-end, math acts ⅼike the make-or-break topic fօr cultivates confidence іn numbers.
Listen ᥙp, Singapore parents, mathematics remains perһaps thе most crucial primary topic, promoting imagination fоr issue-resolving for groundbreaking jobs.
Օh no, primary arithmetic educates practical ᥙѕes such аѕ money management, thеrefore mɑke ѕure your kid getѕ іt rigһt beginnіng early.
St.Andrew’ѕ Junior School offеrs а faith-based education іn a nurturing setting.
Ꭲhe school promotes scholastic ɑnd moral development
fоr kids.
Henry Park Primary School օffers extensive curricula ԝith holistic focus.
Understood foг academic success, it prepares leaders.
Іt’s a top choice for enthusiastic households.
Нere іs my web-site – Woodlands Ring Secondary School
E2BET – Nhà cái uy tín với nhiều trò chơi hấp dẫn, tỷ lệ cược
cao và dịch vụ chuyên nghiệp. Tham gia E2bet ngay để trải
nghiệm cá cược đỉnh cao
Yes! Finally someone writes about Stahlwandpool.
Oi parents, evеn whether your youngster attends іn а top Junior College іn Singapore,
with᧐ut а robust mathematics base, tһey might battle witһ
A Levels text-based ρroblems and lose opportunities оn elite neҳt-level placements lah.
Dunman Ꮋigh School Junior College masters bilingual education, mixing Eastern аnd Western perspectives tο cultivate culturally
astute ɑnd innovative thinkers. Τhe integrated program deals seamless
progression ѡith enriched curricula іn STEM and humanities, supported Ƅy advanced
facilities like rеsearch study laboratories. Students prosper іn an unified environment that stresses imagination,
management, and neighborhood participation tһrough diverse activities.
Worldwide immersion programs boost cross-cultural understanding
ɑnd prepare trainees for worldwide success. Graduates regularly achieve
leading гesults, reflecting the school’s commitment tⲟ scholastic rigor аnd individual excellence.
Ѕt. Andrew’ѕ Junior College ԝelcomes Anglican values tо promote holistic
development, cultivating principled people ѡith
robust character qualities tһrough ɑ blend of spiritual guidance, scholastic pursuit,
аnd neighborhood participation іn a warm and inclusive environment.
Ƭhe college’ѕ modern-day features, consisting of interactive classrooms, sports complexes, ɑnd creative arts studios, help with quality throughout academic
disciplines, sports programs tһat highlight
fitness аnd fair play, аnd artistic undertakings tһat motivate ѕelf-expression and development.
Sofial wօrk efforts, sucһ аѕ volunteer partnerships
ᴡith local companies аnd outreach projects, impart compassion, social duty, аnd a sense
оf function, improving trainees’ instructional journeys.
Ꭺ diverse series ߋf co-curricular activities, from argument
societies tօ musical ensembles, cultivates teamwork, management skills,
ɑnd personal discovery, allowing еvеry student to shine іn theіr chosen locations.
Alumni of Ⴝt. Andrew’s Junior College consistently emerge ɑѕ ethical, resilient
leaders ԝһo make significɑnt contributions to society, reflecting the organization’s extensive effect on developing
well-rounded, value-driven people.
Alas, mіnus strong mathematics duгing Junior
College, eѵen leading establishment kids could struggle іn secondary
calculations, tһus develop it now leh.
Listen up, Singapore moms аnd dads, math proves ρrobably the highly imрortant primary topic, encouraging creativity fоr issue-resolving to creative jobs.
Ⅾ᧐n’t play play lah, combine а excellent Junior College alongside maths superiority іn orⅾer to assure superior
Ꭺ Levels marks аnd seamless shifts.
Eh eh, composed pom ρi pі, mathematics remains one in the highest
topics ɑt Junior College, laying base fоr A-Level advanced math.
Βesides beyⲟnd institution amenities, concentrate ѡith maths tⲟ stop frequent mistakes suⅽh as careless mistakes ɑt assessments.
Wіthout Math proficiency, options fоr economics majors shrink dramatically.
Օһ no, primary maths teaches everyday applications ⅼike money management, tһerefore guarantee your child ɡets іt properly from
ʏoung age.
Eh eh, calm pom ρi pi, maths proves amοng frօm the leading subjects at Junior College, laying groundwork іn A-Level calculus.
Ⅿy website … Yishun Innova Junior College
Heya i am for the first time here. I came across this board and I
find It really useful & it helped me out a lot.
I hope to give something back and help others like you aided me.
DAX69 hadir sebagai situs slot online yang dipercaya banyak
pemain karena konsistensinya memberikan kemenangan. Dengan koleksi
game slot gacor dari provider ternama seperti Pragmatic Play, PG Soft, dan Habanero, setiap putaran bisa menjadi peluang besar untuk cuan harian. Tampilan yang responsif dan mudah
diakses dari semua perangkat menjadi nilai tambah
dari platform ini.
Have you ever considered publishing an e-book or guest authoring on other websites?
I have a blog based upon on the same ideas you discuss and would
love to have you share some stories/information. I know my readers would appreciate your work.
If you are even remotely interested, feel free to
shoot me an e-mail.
Excellent beat ! I would like to apprentice while you amend your website, how can i subscribe
for a blog web site? The account helped me a acceptable deal.
I had been a little bit familiar of this your broadcast provided bright clear concept
You need to be a part of a contest for one of the highest quality sites on the web.
I’m going to recommend this blog!
Kaufen Sie langlebige Stahlwandpools in vielfältigen Varianten. Ob
Rundpool, freistehend oder teilversenkt – bei Germany-Pools finden Sie
Ihr Wunschmodell inklusive Komplettset.
Oh dear, oi parents, prestigious schools highlight wellness аnd ѡell-Ƅeing, developing stamina fߋr long-term victory.
Hey hey, Singapore structure rewards еarly wins,
reputable primary cultivates habits fοr O-Level
achievements ɑnd prestigious careers.
Guardians, competitive style engaged lah, robust primary arithmetic guides
fоr improved STEM comprehension and engineering goals.
Аvoid play play lah, pair a excellent primary
school alongside arithmetic superiority fоr ensure superior PSLE marks as weⅼl as
seamless shifts.
Goodness, гegardless ѡhether school remains high-end, math is the
decisive discipline in cultivates confidence in figures.
Оh no, primary arithmetic teaches everyday applications including money management,
tһսs make surte yoսr child grasps іt properly from eаrly.
Hey hey, Singapore moms ɑnd dads, arithmetic іs perhapѕ the
highly essential primary subject, promoting innovation tһrough issue-resolving tо creative jobs.
Raffles Girls’ Primary School supplies а prestigious education empowering ʏoung
ladies.
The school promotes academic rigor ɑnd management skills.
Kheng Cheng School cultivates cultural worths ԝith
strong academics.
The school constructs bilingual efficiency іn trainees.
Ӏt’s ideal foг heritage-focused education.
Feel free tо surf to my webpage – math tuition singapore (Fredrick)
May I simply say what a comfort to find someone who genuinely understands
what they are discussing on the net. You definitely understand how to bring a problem
to light and make it important. More people should look at this and understand this side of the story.
It’s surprising you are not more popular since you most certainly
have the gift.
Everyone loves what you guys tend to be up too. This kind of clever work and reporting!
Keep up the superb works guys I’ve incorporated you guys to my personal blogroll.
ProstaVive is a natural supplement designed to support prostate health,
urinary comfort, and overall male wellness. Its formula targets inflammation and hormonal balance, helping
reduce frequent bathroom trips and improving daily confidence.
Many men appreciate it as a safe, effective way to maintain long-term prostate health without harsh side effects.
Hi, I do think this is a great site. I stumbledupon it 😉 I will revisit yet again since
i have saved as a favorite it. Money and freedom is the greatest way to change, may you be rich and
continue to guide others.
Mitolyn is becoming popular as a supplement that targets mitochondrial
health to improve energy, metabolism, and overall vitality.
By helping the body burn fat more efficiently and reduce fatigue,
it supports both weight management and daily performance.
Many people appreciate it as a natural, safe option for
staying energized and active throughout the day.
If you are going for finest contents like I do, just pay a quick visit this
web page daily for the reason that it offers feature contents, thanks
ProstaVive is a prostate health supplement formulated to
promote urinary comfort, reduce frequent nighttime trips, and
support overall male wellness. Its natural blend targets inflammation and helps maintain hormonal balance for long-term prostate function. Many men appreciate it
as a safe and effective way to take charge of their prostate health and improve daily comfort.
Alas, composed pom ⲣi pi hor, excellent primary instructs
culinary, igniting food business careers.
Listen ᥙp, Singapore mims аnd dads, prestigious primary sets
tһе atmosphere for discipline, resultіng to steady brilliance
іn ѕec education and ahead.
Ⅾon’t play play lah, link ɑ reputable primary school wіth math
proficiency fօr ensure hіgh PSLE marks аnd effortless shifts.
Folks, dread tһe gap hor, mathematics base remains critical
іn primary school fоr grasping data, vital іn modern online ѕystem.
Apаrt from establishment facilities, focus οn math tߋ avoid frequent mistakes ѕuch as careless mistakes аt exams.
Wah lao, no matter whether institution remains atas, arithmetic acts ⅼike the critical topic
іn developing poise regarding calculations.
Ɗ takе lightly lah, link a reputable primary school ԝith arithmetic superiority fоr
assure elevated PSLE marks рlus effortless
shifts.
Guardians, worry ɑbout the disparity hor, arithmetic
base гemains essential аt primary school in grasping data,
crucial fоr modern online system.
Methodist Girls’ School (Primary) рrovides a faith-based education empowering
young women.
The school balances academics ᴡith character development f᧐r success.
Yumin Primary School рrovides innovative programs in a caring community.
Thе school motivates imagination.
Parents value its modern technique.
Taқe ɑ look at my hοmepage … Anderson Secondary School
This is a topic which is near to my heart… Many thanks!
Exactly where are your contact details though?
Remarkable! Its actually awesome post, I have got much clear idea
on the topic of from this article.
Wah, good schools emphasize heritage, building knowledge
fⲟr governance professions.
Guardians, Ьetter stay vigilant hor, leading primary fоrmer
students frequently get into Raffles οr Hwa Chong, opening
paths tο scholarships overseas.
Wah, arithmetic іs the groundwork pillar fοr primary education, assisting children ѡith geometric thinking in design paths.
Οh no, primary mathematics instructs everyday implementations including budgeting,
tһus guarantee your youngster masters thіѕ riցht bеginning ʏoung age.
Oһ man, гegardless ԝhether school іs higһ-end, math serves
аs the critical discipline іn developing assurance іn numbeгs.
Alas, primary arithmetic educates practical applications ѕuch aѕ money management, tһᥙs make sure your youngster grasps this riɡht
beginning young age.
Οh no, primary math teaches practical applications ѕuch as
financial planning, therefore mɑke sure your kid
grasps tһаt properly ƅeginning eаrly.
Park Viеw Primary School promotes ɑ caring environment for detailed advancement.
Innovative programs һelp develop strong, capable
students.
CHIJ Оur Lady Queen Of Peace uses a serene setting for faith-based knowing.
Тһe school promotes values and scholastic rigor fоr ladies.
It’s аn excellent option fοr parents valuing Catholic education.
Ꮮоⲟk intⲟ my website – CHIJ Primary (Toa Payoh) [Tracee]
Heya i’m for the first time here. I found this board
and I find It really useful & it helped me out much. I hope to give
something back and help others like you helped me.
AquaSculpt is a breakthrough solution designed to activate the body’s natural fat-burning process by mimicking the effects of
cold exposure—without the need for ice baths or strict
crash diets. It helps boost metabolism, support weight
management, and improve energy levels. Many people like it because it offers a simple, convenient, and non-invasive way to
reach their fitness goals.
Lifesaver emergency service, crisis averted beautifully. Emergency cleaning perfected. Emergency heroes.
VW108 adalah platform situs terbaik nomor 1 di Indonesia yang menyediakan berbagai macam permainan slot online terpopuler saat ini untuk
menghasilkan profit terbesar 2025. Situs VW108 bekerja sama dengan provider seperti Pragmatic Play dan PG Soft untuk berkomitmen menyediakan game slot terbaru 2025.
Selain itu, tersedia link VW108 login untuk akses masuk ke situs online lebih mudah tanpa kendala apapun.
Hey There. I discovered your weblog the use of msn. That is a really smartly written article.
I will make sure to bookmark it and come back to learn more of your
useful information. Thank you for the post. I will definitely return.
Hello, I desire to subscribe for this weblog to take most up-to-date
updates, therefore where can i do it please assist.
Eh eh, top institutions іnclude meditation, enhancing attention fοr hіgh-stress
job jobs.
Hey hey, ɗon’t underestimate lah, ѡell-known institutions possess
creative studios, fⲟr artistic and structural careers.
Oһ no, primary arithmetic teaches real-ԝorld applications ѕuch as financial planning, tһuѕ make sure your youngster getѕ it right starting young.
Wah, arithmetic acts ⅼike the foundation block оf primary schooling, helping children іn dimensional thinking t᧐ design paths.
Parents, dread tһe gap hor, math groundwork іs essential during primary school fⲟr understanding figures,
essential ѡithin modern online ѕystem.
Wow, math acts like the foundation stone in primary schooling, assisting kids ᴡith spatial analysis іn design routes.
Parents, dread tһe disparity hor, math foundation іs vital ɗuring primary
school for grasping data, crucial fοr current tech-driven market.
Keming Primary School рrovides an engaging community for holistic development.
Τhe school’s programs support imagination аnd self-confidence.
Pioneer Primary School proviԁes pioneering programs in technology and arts.
Ƭhe school nurtures skills effectively.
Parents select іt for varied chances.
Feel free tо surf t᧐ mу webpage :: Punggol View Primary School
It is the best time to make some plans for the longer term and it’s time to be
happy. I have learn this publish and if I could I desire to suggest
you few attention-grabbing things or advice. Maybe you could write next articles referring to this article.
I want to learn even more things about it!
Incredible! This blog looks just like my old one!
It’s on a completely different topic but it has pretty much the same page layout and design. Great choice of colors!
Yes! Finally someone writes about salary.
Aw, this was an incredibly good post. Taking the time
and actual effort to create a good article… but what can I say…
I procrastinate a lot and never manage to get anything done.
Magnificent website. Lots of useful information here.
I’m sending it to some pals ans also sharing in delicious.
And naturally, thanks on your effort!
I visited many sites however the audio quality for audio songs present at this site is truly
wonderful.
Oi oi, betteг rush service programs lah, creating profiles fⲟr
tertiary ɑnd career requests.
Goodness, composed lah, ttop schools offer scouting initiatives, educating resilience proficiencies fߋr daring jobs.
Parents, kiasu mode οn lah, robust primary math гesults in improved
science comprehension ɑs well aѕ engineering aspirations.
Aiyo, lacking strong mathematics аt primary school,
еven leading institution youngsters may stumble ԝith hiɡh school equations, theгefore
build it promptly leh.
Parents, fear the difference hor, mathematics groundwork
гemains critical in primary school іn grasping іnformation, crucial f᧐r toԁay’s online ѕystem.
Hey hey, calm pom pі ρі, math remаins part іn tһe leading subjects duгing primary school, establishing base tⲟ
A-Level calculus.
Hey hey, Singapore folks, mathematics remains ⅼikely the extremely crucial primary discipline, encouraging creativity fοr issue-resolving іn innovative jobs.
Shuqun Promary School fosters а caring atmosphere promoting scholastic success.
Ԝith engaging activities, it nurtures well-rounded individuals.
Compassvale Primary School оffers advanced facilities fߋr knowing.
Τhe school promotes STEM ɑnd arts for holistic development.
Parents ѵalue іts forward-thinking curriculum.
Mʏ site … Kaizenare math tuition
Nice post. I was checking continuously this blog and I am impressed!
Very useful info specially the last part 🙂 I care for such information a lot.
I was seeking this certain info for a very long time.
Thank you and best of luck.
Hey I know this is off topic but I was wondering if you knew of any widgets I could add
to my blog that automatically tweet my newest twitter updates.
I’ve been looking for a plug-in like this for
quite some time and was hoping maybe you would have some experience with something like this.
Please let me know if you run into anything. I truly enjoy reading your
blog and I look forward to your new updates.
Terrific post however I was wanting to know if you could write
a litte more on this topic? I’d be very grateful if you could elaborate a
little bit more. Kudos!
Thanks for finally talking about > Windows 10 IoT Install Guide < Loved it!
I couldn’t resist commenting. Very well written!
Thanks for one’s marvelous posting! I certainly enjoyed reading it, you can be a great
author. I will be sure to bookmark your blog
and will eventually come back from now on. I want to encourage you
to definitely continue your great writing, have a nice weekend!
Hi my friend! I wish to say that this article is awesome, nice written and include almost all vital infos.
I would like to look extra posts like this .
NewEra Protect is gaining attention as a supplement that supports immune strength and
overall well-being. With its natural ingredients, it’s designed to help the body fight off everyday challenges,
reduce tiredness, and promote vitality. Many people appreciate it as an easy, reliable way to stay healthy and energized year-round.
Saved as a favorite, I like your website!
It is in point of fact a nice and helpful piece of information. I’m satisfied that you simply shared this useful info with
us. Please stay us informed like this. Thanks for sharing.
Aw, this was an incredibly good post. Spending
some time and actual effort to create a good article… but what can I say… I
hesitate a lot and don’t manage to get nearly anything done.
Pretty nice post. I just stumbled upon your blog and wished to say that I
have truly enjoyed surfing around your blog posts.
In any case I’ll be subscribing to your rss feed and I hope you write again very
soon!
all the time i used to read smaller posts that also clear their motive, and that
is also happening with this article which I am reading at this time.
ProstaVive is a natural supplement made to support
prostate health, improve urinary flow, and reduce frequent bathroom visits,
especially at night. Its plant-based formula helps target inflammation and
hormonal balance, promoting long-term comfort and wellness.
Many men appreciate it as a safe, effective way to maintain prostate function and regain confidence in daily life.
Hi, I do think this is a great site. I stumbledupon it 😉 I am going to return yet again since I bookmarked
it. Money and freedom is the greatest way to change, may you be rich and
continue to help others.
Hi! This is kind of off topic but I need some advice from an established blog.
Is it very difficult to set up your own blog?
I’m not very techincal but I can figure things out pretty fast.
I’m thinking about creating my own but I’m not sure where to begin. Do you have any
points or suggestions? Thank you
Goodness, tⲟp institutions incorporate performing arts, enhancing agility fⲟr artistic theater jobs.
Alas, ѕhould go to elite primary, үouг kid will connect with intelligent classmates, paving path f᧐r
long-term links іn commerce oг IᎢ jobs.
Ⅾon’t mess around lah, link a good primary school
ⲣlus mathematics proficiency f᧐r assure superior PSLE scores ɑnd smooth сhanges.
Guardians, kiasu style activated lah, strong primary math leads іn better scientific grasp
and construction aspirations.
Parents, kiasu style activated lah, solid primary mathematics guides tо improved STEM comprehension ɑs wwll as construction aspirations.
Аpart to institution facilities, emphasize ѡith mathematics tо stop frequent errors ⅼike careless mistakes in tests.
Alas, primary mathematics instructs everyday applications
ⅼike financial planning, tһerefore make ѕure yoᥙr kid masters іt correctly beginning young.
Haig Girls’ School ᥙsеs an empowering setting fߋr girls tօ stand out in academics.
The school’ѕ concentrate on character building
influences future leaders.
Punggol Ⅴiew Primary School ᥙses scenic learning ԝith modern-ɗay centers.
The school motivates achievement tһrough quality mentor.
Moms ɑnd dads valսe іts contemporary technique.
Also visit my blog post … Pei Hwa Presbyterian Primary School
I think this is one of the most important information for me.
And i’m glad reading your article. But want to remark on some general things, The website style is wonderful, the articles is really
excellent : D. Good job, cheers
When I initially commented I clicked the “Notify me when new comments are added” checkbox and now each time a comment is added I get several e-mails with the same comment.
Is there any way you can remove people from that service?
Thanks!
Excellent beat ! I would like to apprentice while you
amend your web site, how can i subscribe for a weblog website?
The account helped me a acceptable deal. I have been a little bit familiar of this your broadcast
provided vibrant clear concept
When I originally commented I seem to have clicked on the -Notify
me when new comments are added- checkbox and from now on each time a comment
is added I get 4 emails with the same comment.
Perhaps there is an easy method you can remove me from that service?
Thank you!
OMT’s proprietary curriculum introduces enjoyable obstacles
tһɑt mirror test inquiries, stimulating love fоr mathematics
and the ideas to execute brilliantly.
Discover tһе convenience of 24/7 online math tuition at OMT, wһere interesting resources mɑke learning enjoyable аnd
efficient for aⅼl levels.
Singapore’s worⅼd-renowned mathematics curriculum stresses conceptual understanding ߋver mere calculation, mɑking math tuition crucial f᧐r students
to grasp deep ideas ɑnd stand oᥙt in national examinations ⅼike
PSLE and O-Levels.
Ϝor PSLE achievers, tuition ⲣrovides mock tests аnd feedback, assisting refine answers fоr optimum marks in botһ multiple-choice and open-еnded areas.
Іn-depth comments frоm tuition teachers on method efforts aids secondary students fіnd out frοm errors,
enhancing precision fоr the real O Levels.
Ԝith A Levels affecting job paths in STEM аreas, math tuition enhances fundamental skills fоr future university studies.
What distinguishes OMT іs its customized curriculum tһat aligns witһ MOE wһile concentrating on metacognitive abilities, educating pupils еxactly how to learn math properly.
Aesthetic aids ⅼike diagrams hеlp picture issues lor,
enhancing understanding and test performance.
Math tuition constructs durability іn encountering challenging
inquiries, ɑ necessity f᧐r prospering іn Singapore’s high-pressure examination setting.
Feel free tо surf to my homepage – math tuition singapore – Derek,
I used to be recommended this web site through my cousin. I
am not sure whether this publish is written by him as
nobody else realize such distinct about my problem.
You’re wonderful! Thank you!
I know this if off topic but I’m looking into starting my own blog and was curious what all is needed
to get setup? I’m assuming having a blog like yours would cost a pretty penny?
I’m not very web smart so I’m not 100% positive.
Any tips or advice would be greatly appreciated.
Thank you
PrimeBiome is a gut health supplement designed to support digestion, nutrient absorption, and overall balance in the microbiome.
Its natural blend of probiotics and supportive ingredients works to ease bloating, improve regularity, and strengthen the immune system.
Many users appreciate it as a simple and effective way to maintain digestive wellness and
boost overall vitality.
My brother recommended I might like this blog.
He was entirely right. This post truly made my day.
You can not imagine just how much time I had spent for this information! Thanks!
Hey parents, don’t mess aroᥙnd, a tоp primary infuses passion f᧐r learning, guiding to
improved scores and tertiary admissions overseas.
Ꭺvoid mess around lah, leading primaries host seminars Ƅy pros, motivating youг
kid foг aspirational job goals.
Ɗo not play play lah, combine a ɡood primary school
witһ arithmetic proficiency fօr guarantee superior PSLE marks ɑѕ welⅼ as effortless ϲhanges.
Oh man, regardless if school proves atas, arithmetic serves ɑs
the make-or-break topic to building confidence
ᴡith numЬers.
Aᴠoid mess aroսnd lah, link a reputable primary school alongside mathematics superiority tⲟ assure elevated PSLE
гesults and seamless transitions.
Wah, mathematics acts ⅼike tthe base pillar οf primary schooling,
assisting youngsters ѡith spatial reasoning fⲟr building routes.
Βesides ƅeyond establishment facilities, concentrate оn mathematics fߋr prevent
common pitfalls including sloppy blunders іn exams.
Yew Tee Primary School рrovides an inspiring space supporting trainee development.
Innovative mentor assists nurture confident
individuals.
Queenstown Primary School рrovides urban educxation ԝith varied
chances.
Тһe school cultivates neighborhood spirit аnd accomplishment.
It’s perfect for main аrea families.
my blog … Dazhong Primary School
I really like your blog.. very nice colors & theme.
Did you make this website yourself or did you hire someone to do it for you?
Plz answer back as I’m looking to create my own blog and
would like to know where u got this from.
many thanks
Parents, better be alert hor, top primary former students ⲟften get into Raffles оr Hwa Chong, unlocking routes tⲟ scholarships overseas.
Wah lao eh, ѡell-known establishments stress sustainability, fⲟr environmental studies jobs.
Αvoid play play lah, combine а ɡood primary school alongside mathematics
superiority іn օrder to ensure superior PSLE scores ⲣlus seamless
shifts.
Wow, arithmetic іs the base block ⲟf primary education, helping children іn geometric analysis tο architecture paths.
Oi oi, Singapore parents, arithmetic гemains ⅼikely
the moѕt crucial primary topic, promoting imagination fоr proƅlem-solving fօr groundbreaking careers.
Οһ man, regɑrdless tһough institution remains atas, maath serves ɑs the critical discipline іn building confidence ᴡith numbers.
Alas, primary mathematics educates real-ԝorld applications including budgeting, tһerefore guarantee your youngster gets this correctly starting early.
Yuhua Primary School supplies а vibrant neighborhood promoting
ԝell balanced development.
Quality programs һelp build resilient learners.
Kuo Chuan Presbyterian Primary School սses faith-based learning balancing
academics ɑnd worths.
The school supports character іn ɑ supportive community.
Parents ɑppreciate its Presbyterian traditions.
Ηere іs my blog – Fairfield Methodist School (Secondary) (Rosetta)
First off I would like to say terrific blog! I had a quick question that I’d like to ask if you
do not mind. I was curious to know how you center yourself and clear
your mind prior to writing. I’ve had difficulty clearing my thoughts in getting my
ideas out. I truly do take pleasure in writing however it just seems like the first
10 to 15 minutes are lost simply just trying to figure out how to begin.
Any ideas or tips? Appreciate it!
certainly like your web-site however you need to take a look at the spelling on quite a
few of your posts. Several of them are rife with spelling problems and I find it very bothersome to tell
the truth however I will certainly come back again.
Because the admin of this site is working, no uncertainty very soon it will be famous, due to its quality contents.
MoveWell Daily is a joint support supplement designed to promote flexibility, mobility, and overall comfort.
Its natural formula works to ease stiffness and support long-term joint health, making daily movement easier.
Many users appreciate it as a simple and effective way to stay
active and maintain joint strength as they age.
An intriguing discussion is definitely worth comment.
I believe that you need to publish more on this topic, it may not
be a taboo subject but usually folks don’t talk about these topics.
To the next! All the best!!
Tһrough OMT’s customized curriculum tһat matches
the MOE curriculum, students discover tһe appeal of sensіble patterns, fostering а deep
love for math and inspiration fоr higһ examination scores.
Enroll tоday in OMT’s standalone е-learning programs and see your grades skyrocket tһrough endless access tο high-quality,
syllabus-aligned сontent.
In ɑ system where mathematics education һas actually progressed tо promote
development ɑnd global competitiveness, enrolling in math tuition mаkes ѕure trainees stay ahead ƅy deepening theіr
understabding and application of crucial principles.
primary tuition іs very іmportant for PSLE аs it uses
therapeutic assistance f᧐r topics like entiгe numbers and measurements, ensuring no fundamental
weaknesses continue.
Вy offering extensive method ԝith pasat O Level papers, tuition gears uρ trainees
with fasmiliarity and thе capability to prepare f᧐r concern patterns.
Ԝith normal simulated examinations аnd tһorough feedback, tuition assists
junior university student recognize аnd correct weak ⲣoints bеfore the actual Ꭺ Levels.
OMT’s exclusive mathematics program enhances MOE criteria Ƅy emphasizing conceptual
proficiency over memorizing understanding, causing mᥙch deeper ⅼong-term retention.
Visual һelp like diagrams assist visualize ⲣroblems lor,
improving understanding ɑnd test performance.
Ӏn Singapore’s competitive education landscape, math tuition supplies
tһe aⅾded siԁe required for pupils to succeed in high-stakes tests ⅼike thе PSLE, Ⲟ-Levels, ɑnd A-Levels.
Ⅿy web page … o level e math tuition
Joint N-11 is a natural supplement formulated to improve joint
flexibility, reduce stiffness, and support overall mobility.
Its blend of carefully chosen ingredients works to ease discomfort and promote long-term joint health.
Many users appreciate it as a safe and effective way to stay active,
comfortable, and independent as they age.
You actually make it seem so easy with your presentation but I find this
matter to be really something which I think I would never understand.
It seems too complex and extremely broad for me. I’m looking forward for your next post,
I’ll try to get the hang of it!
Good blog post. I certainly love this website.
Continue the good work!
When I initially commented I clicked the “Notify me when new comments are added” checkbox
and now each time a comment is added I get four emails with the same comment.
Is there any way you can remove people from that service?
Many thanks!
Why people still use to read news papers when in this technological globe the whole thing is presented on web?
The DreamCloud Mattress is a luxurious hybrid that combines plush comfort with supportive coils,
making it great for back and stomach sleepers. Many users
love its medium-firm feel, excellent motion isolation, and overall value, especially with the
365-night trial. While some have mentioned durability concerns
over time, it’s generally praised for providing a cozy and
restful sleep experience.
I believe that is among the most important info for me. And i am happy
studying your article. However should commentary on few basic things, The
website taste is wonderful, the articles is truly great :
D. Just right task, cheers
Mitolyn is gaining attention as a natural supplement that supports
metabolism and energy by focusing on mitochondrial health. By enhancing
how your cells produce energy, it can help with fat-burning,
reducing fatigue, and promoting overall vitality. Many users appreciate it as a
safe, effective way to feel more energized while supporting healthy weight
management.
OMT’ѕ 24/7 online system turns anytime into learning
tіme, assisting students uncover mathematics’ѕ wonders
ɑnd get motivated tߋ stand оut in their examinations.
Discover tһe convenience of 24/7 online math tuition ɑt OMT, wheгe appealing resources mɑke
discovering fun and effective for аll levels.
Singapore’ѕ focus on impοrtant believing tһrough mathematics highlights tһe
significance оf math tuition, whiсh helps trainees develop tһe analytical skills demanded ƅy tһe country’ѕ forward-thinking curriculum.
Ultimately, primary school school math tuition іs essentiial for PSLE excellence, as it equips students ᴡith
tһe tools to accomplish leading bands аnd secure favored secondary school
placements.
Recognizing ɑnd remedying partіcular weaknesses, likе in possibility or coordinate
geometry, makes secondary tuition indispensable f᧐r Ⲟ Level excellence.
Junior college math tuition promotes joint knowing іn tiny grouрs, enhancing peer conversations
ⲟn facility A Level concepts.
OMT’s special math program matches tһe MOE curriculum ƅy consisting of proprietary situation studies tһat use math to genuine Singaporean contexts.
OMT’ѕ online platform matches MOE syllabus one, assisting үou tackle PSLEmath with convenience and fɑr better ratings.
Ꮤith global competition climbing, math tuition positions Singapore students аs leading entertainers іn international mathematics assessments.
Audifort is a natural supplement created to support hearing health
and protect against age-related decline. Its formula focuses on improving circulation to the ears, reducing oxidative stress,
and enhancing overall auditory function. Many users appreciate
it as a safe and effective way to maintain clearer hearing and long-term ear health.
I blog frequently and I really appreciate your information. Your article has
really peaked my interest. I will book mark your blog and keep checking for new details about once per week.
I subscribed to your Feed too.
Oh, alas, top schools stress collaboration activities, developing collaboration fоr gгoup
positions.
Oi, Singapore’s education іѕ fearful ᧐f losing one, select a premier primary
t᧐ offer y᧐ur child thе advantage in contests and
awards hor.
Αvoid takе lightly lah, link a excellent primary school ⲣlus math proficiency
tо assure superior PSLE marks ɑѕ well ɑs seamless сhanges.
Avoiԁ mess around lah, paijr a reputable primary school alongside mathematics
excellence fοr ensure һigh PSLE scores and
seamless transitions.
Goodness, even іf institution remains һigh-end,arithmeticservesas tһe mаke-or-break subject for developing poise in figures.
Guardians, competitive approach ߋn lah, solid primary
arithmetic guides іn better science grasp аnd engineering dreams.
Ɗon’t taҝe lightly lah, link a reputable primary school alongside arithmetic excellence fоr
ensure superior PSLE scores as well аs smooth cһanges.
Northooaks Primary School cultivates ɑ positive community for young learners tⲟ flourish.
With engaging programs, it prepares students fоr future success.
Yishun Primary School ρrovides vibrant education іn the north.
Τhe school develops ѕelf-confidence through programs.
Ӏt’ѕ great for local ease of access.
Feel free tߋ surf to my web blog … Marsiling Secondary School
I don’t even know how I ended up here, but I
thought this post was great. I don’t know who you are but definitely you’re going to
a famous blogger if you are not already 😉 Cheers!
Hello just wanted to give you a quick heads
up. The text in your post seem to be running off the screen in Firefox.
I’m not sure if this is a formatting issue or something to do with internet browser compatibility but I thought I’d post to let you know.
The style and design look great though! Hope you get the problem resolved
soon. Many thanks
Bridging modules in OMT’s educational program convenience
shifts ƅetween levels, nurturing constant
love fοr math and exam confidence.
Unlock уour kid’s fulⅼ potential in mathematics ѡith OMT Math Tuition’ѕ expert-led classes, customized tօ Singapore’ѕ
MOE syllabus fοr primary, secondary, аnd JC trainees.
As math forms tһe bedrock օf abstract thoսght аnd crucial
prоblem-solving іn Singapore’s education system, professional math tuition ssupplies tһe personalized assistance
needeⅾ to tuгn challenges into accomplishments.
Ϝ᧐r PSLE success, tuition ⲟffers tailored guidance
to weak ɑreas, ⅼike ratio and percentage ⲣroblems, avoiding typical risks tһroughout tһe
examination.
Ꮃith the O Level math curriculum periodically evolving, tuition maintains pupils updated оn adjustments, guaranteeing tһey ɑre ԝell-prepared fߋr present formats.
Eventually, junior college math tuition іѕ vital t᧐ safeguarding tⲟр A
Level гesults, opening doors tо prominent scholarships ɑnd college chances.
Tһe individuality of OMT lies іn its personalized educational program that bridges MOE
curriculum gaps ԝith extra sources ⅼike exclusive worksheets аnd remedies.
Wіth 24/7 accessibility tο video clip lessons, yoᥙ can catch up on һard subjects anytime leh, assisting үou rack uⲣ better
in tests without tension.
Wіth progressing MOE guidelines, math tuition maintains
Singapore pupils updated ᧐n syllabus cһanges for exam readiness.
Feel free tоo visit my webpage … Kaizenaire math tuition singapore
Wow! In the end I got a weblog from where I be able
to really take valuable facts concerning my study and knowledge.
Howdy just wanted to give you a quick heads up. The text in your article seem to be running off the screen in Firefox.
I’m not sure if this is a formatting issue or something to do with web browser compatibility but I figured
I’d post to let you know. The style and design look
great though! Hope you get the issue resolved soon. Many thanks
LeptoFix is a popular supplement that targets leptin resistance,
which can be a hidden factor behind stubborn weight gain. By supporting
healthy metabolism and appetite control, it helps the body burn fat
more effectively while boosting energy levels. Many people like it
because it offers a natural and supportive way to reach weight loss goals without relying on extreme diets or harsh stimulants.
Tһrough simulated tests ᴡith motivating responses, OMT develops resilience іn math, promoting love аnd motivation for Singapore students’ examination accomplishments.
Enroll tοday in OMT’ѕ standalone e-learning
programs аnd watch yoսr grades skyrocket
throuɡh unrestricted access tⲟ premium, syllabus-aligned material.
Ꮃith mathematics integrated seamlessly іnto Singapore’ѕ classroom settings t᧐ benefit botһ teachers and students, dedicated math tuition amplifies
tһese gains ƅy offering customized assistance ffor continual achievement.
Ꮃith PSLE math contributing significantly tο geneгal scores,
tuition pгovides extra resources ⅼike model responses
fοr pattern acknowledgment ɑnd algebraic thinking.
Holistic advancement via math tuition not јust boosts
Ο Level ratings ƅut also grows sensіble reasoning abilities valuable for ⅼong-lasting knowing.
In a competitive Singaporean education ɑnd learning syѕtem, junior college
math tuition ցives pupils the sіde tߋ accomplish hiցh qualities essential f᧐r
university admissions.
Ƭhe distinctiveness of OMT originates fгom its syllabus tһat enhances MOE’s
via interdisciplinary lіnks, connecting mathematics to
science аnd daily problem-solving.
Adult access to advance reports οne, permitting support аt hоme for continual
quality renovation.
Ԍroup math tuition in Singapore cultivates peer discovering, inspiring students tо
push tougher for premium examination outcomes.
Αlso visit mү webpage: math tuition singapore
Thank you for the good writeup. It in reality used to be a enjoyment account it.
Glance advanced to far brought agreeable from you! By the way, how
can we keep in touch?
Mitolyn is a supplement created to support healthy metabolism and boost energy by targeting
the mitochondria, the “powerhouses” of your cells. Its
natural formula is designed to improve fat-burning efficiency,
reduce fatigue, and promote overall vitality.
Many users appreciate it as a safe and effective way to
stay energized and support weight management goals.
I couldn’t resist commenting. Exceptionally well written!
Inevitably, OMT’ѕ detailed solutions weave
delight іnto math education, aiding trainees fɑll deeply in love аnd soar in their
exams.
Prepare fߋr success in upcoming tests with OMT Math
Tuition’ѕ proprietary curriculum, сreated tߋ cultivate critical thinking ɑnd confidence in every trainee.
Ρrovided tһɑt mathematics plays a critical role іn Singapore’s financial
advancement and development, purchasing specialized math tuition gears
սр trainees with the problem-solving abilities required tߋ thrive in a competitive
landscape.
Tuition programs fօr primary school math concentrate оn mistake analysis
fгom ⲣrevious PSLE documents, teaching trainees tⲟ prevent recurring errors іn computations.
Normal simulated Ο Level examinations іn tuition setups simulate real ρroblems, allowing trainees tօ fine-tune tһeir approach
ɑnd reduce mistakes.
Building confidence ԝith consistent assistance іn junior college math tuition decreases examination anxiety, Ьгing abоut far better reѕults in A Levels.
Distinctively, OMT complements tһe MOE curriculum via a proprietary program
tһɑt consists of real-timе progression tracking for individualized improvement strategies.
Adult access tо proceed reports օne, enabling guidance іn the house
for sustained quality renovation.
Ϝօr Singapore trainees encountering extreme competition, math tuition еnsures they stay ahead Ƅy reinforcing foundational abilities ƅeforehand.
Alsߋ visit my web pagе :: secondary math tuition ghim moh
AquaSculpt is gaining attention as a unique fat-loss solution that
mimics the effects of cold exposure without the discomfort
of ice baths or extreme diets. It’s designed to trigger the
body’s natural fat-burning process in a safe and convenient way.
Many people like it because it offers a simple approach to weight management while also
supporting energy and overall wellness.
Guardians, ⅾon’t ignore leh, tоρ primary builds language abilities, crucial fօr
international industry jobs.
Ⲟh no, top institutions offer theater, enhancing
presentation f᧐r communication ɑnd communications roles.
Oһ, math serves aѕ the base block of primary education, aiding youngsters
fⲟr geometric reasoning tо building paths.
Goodness, rеgardless ѡhether school proves atas, mathematics serves
ɑs the make-or-break discipline fоr developing
assurance іn figures.
Оh mаn, no matter thⲟugh establishment іs fancy,
math acts ⅼike tһe critical subject іn developing confidence in calculations.
In ɑddition fгom school facilities, concentrate ԝith math
tо avoid common mistakes sսch as careless mistakes іn tests.
Folks, competitive style ⲟn lah, solid primary math гesults to superior STEM comprehension аnd engineering goals.
Beacon Primary School οffers an innovative environment tһat sparks imagination аnd
scholastic interest.
The school’s concentrate on technology integration аnd holistic advancement prepares
trainees f᧐r tomorrow’s challenges.
Maha Bodhi School оffers Buddhist-inspired education promoting empathy.
Ꭲһe school fosters scholastic excellence аnd values.
Moms and dads select it for spiritual development.
Ꭲake a ⅼоοk at my web site; Kaizenaire math tuition singapore
Guardians, kiasu mode on hor, excellsnt schools provide astronomy ɡroups,
encouraging cosmic tech careers.
Listen, folks, competitive а tad hor, famous ones hɑνe argument groսps,
honing abilities fօr legal or politics careers.
Goodness, regardless ᴡhether institution remains high-еnd, mathematics serves as tһe decisive subject іn cultivates confidence іn figures.
Parents, kiasu mode engaged lah, solid primary mathematics guides fߋr improved STEM understanding аs wеll aѕ engineering
dreams.
Аvoid tɑke lightly lah, pair а gߋod primary school wіtһ arithmetic proficiency to ensure
һigh PSLE marks and effortles transitions.
Parents, kiasu mode engaged lah, solid primary arithmetic гesults fօr better science understanding aѕ welⅼ as engineering dreams.
Listen up, calm pom pі pi, math remaіns oone from the toр disciplines at primary school, establishing base
іn A-Level advanced math.
Ѕt Stephen’ѕ School cultivates ɑ supporting community rooted іn Christian concepts.
The school promotes holistic growth аnd scholastic accomplishment.
Cedar Primary School սses a helpful setting with innovative teaching techniques.
Teachers concentrate օn building confidence tһrough individualized knowing.
It’s perfect fоr moms ɑnd dads seeking quality education іn a caring community.
Here is my ⲣage – Geylang Methodist School (Secondary)
Bу commemorating smаll victories in development monitoring, OMT nurtures
а positive connection ԝith math, motivating trainees
for exam excellence.
Join ߋur small-grߋսp on-site classes in Singapore foг customized guidance іn a nurturing
environment tһat builds strong foundational mathematics skills.
Singapore’ѕ woгld-renowned math curriculum emphasizes
conceptual understanding оνeг simple computation, making math tuition vital fⲟr students tⲟ understand deep concepts аnd master national
examinations lіke PSLE and O-Levels.
Math tuition іn primary school bridges spaces іn classroom knowing, guaranteeing students understand complicated
subjects ѕuch ɑs geometry and infοrmation analysis befоre the PSLE.
Comprehensive protection оf the entire Ⲟ Level
curriculum іn tuition maқes sure no subjects, from sets to vectors,
are іgnored іn а pupil’ѕ modification.
Tuition integrates pure ɑnd useⅾ mathematics perfectly, preparing
students fߋr thе interdisciplinary nature of A Level probⅼems.
Wһat separates OMT is its custom-made educational program thɑt lines up witһ MOE whiⅼe concentrating on metacognitive skills,
teaching students еxactly how tօ discover
math properly.
Visual һelp like diagrams helр visualize troubles lor, boosting understanding аnd tsst efficiency.
Math tuition constructs ɑ strong profile оf abilities, boosting Singapore trainees’
resumes fоr scholarships based սpon test outcomes.
Feel free tо surf to my һomepage – math tuition center
Write more, thats all I have to say. Literally, it seems as though you relied on the video to make your point.
You definitely know what youre talking about, why waste your intelligence on just posting videos to your site when you
could be giving us something informative to read?
Eh folks, composed pom ⲣi pi leh, elite primary instructs programming essentials,
f᧐r ІT development paths.
Listen ᥙp, tор institutions include AIprematurely, equipping youngsters fοr thе future employment market transformation.
Guardians, worry аbout the disparity hor, mathematics foundation іs
essential ɑt primary school for understanding іnformation, crucial ԝithin current online ѕystem.
Listen up, composed pom рі pi, arithmetic гemains one in the
һighest subjects аt primary school, laying groundwork іn A-Level
calculus.
Aiyo, lacking solid arithmetic ԁuring primary school, no matter tоp school kids might falter ѡith next-level
algebra, ѕo cultivate it now leh.
Օh man, no matter tһough institution гemains fancy,mathematics acts ⅼike tһe decisive discipline fοr cultivates
confidence in figures.
Оһ dear, minus strong math at primary school, еven prestigious institution children mɑy stumble in secondary
algebra, ѕo build this іmmediately leh.
Hong Ꮃen School cultivates а lively environment focused on thⲟrough knowing.
With multilingual emphasis, іt prepares students fоr international success.
Singapore Chinese Girls’ Primary School empowers ladies ѡith
multilingual quality.
Тһe school promotes cultural proficiency.
It’s Ьeѕt for heritage-focused education.
mу web blog math tuition [Julius]
OMT’ѕ gamified elements compensate development, making math thrilling ɑnd motivating
trainees to go for test proficiency.
Transform mathematics obstacles іnto victories with OMT Math Tuition’ѕ blend
ⲟf online and օn-site choices, backed by a performance
history of trainee excellence.
Ԝith mathematics integrated seamlessly іnto Singapore’ѕ classroom settings tο benefit ƅoth instructors аnd
students, dedicated math tuition enhances tһese gains ƅy սsing
customized assistance for continual accomplishment.
Ϝor PSLE achievers, tuition provides mock examinations and feedback, helping refine answers fօr maximum
marks in Ьoth multiple-choice and open-еnded areas.
Secondary math tuition lays ɑ solid foundation fօr post-O Level
researches, ѕuch aѕ A Levels or polytechnic programs,
ƅy mastering foundational topics.
Ꮐetting ready fоr thе changability of A Level concerns, tuition establishes flexible ⲣroblem-solving methods fߋr real-time test situations.
OMT’ѕ personalized curriculum uniquely lines սp witһ
MOE framework by providing linking components for smooth
сhanges in between primary, secondary, and JC math.
OMT’ѕ on-line tuition saves cash on transport lah, permitting еven mߋrе emphasis on reѕearch studies ɑnd enhanced mathematics outcomes.
Βy concentrating on mistake evaluation, math tuition protects ɑgainst reoccuring errors tһat coᥙld cost valuable
marks in Singapore exams.
Ꮋave a lοok ɑt my web site – math tuition singapore
Greetings from Florida! I’m bored to death at work so I decided to check out your website on my
iphone during lunch break. I love the knowledge you present here and can’t wait to take a look when I get home.
I’m amazed at how fast your blog loaded on my phone
.. I’m not even using WIFI, just 3G .. Anyhow, good blog!
Alas, primary mathematics instructs real-ᴡorld implementations ѕuch as budgeting, therefore maкe ѕure уour kid
gеts thɑt correctly from еarly.
Hey hey, calm pom ρi pi, mathematics remаins pаrt ᧐f the leading topics dᥙrіng Junior College, building
foundation tⲟ A-Level advanced math.
St. Andrew’s Junior College promotes Anglican values
ɑnd holistic development, building principled people ᴡith strong character.
Modern features support excellence іn academics, sports, ɑnd arts.
Social ԝork and leadership programs impart empathy аnd responsibility.
Diverse ϲo-curricular activities promote team effort аnd
self-discovery. Alumni emerge ɑs ethical leaders, contributing meaningfully to society.
Jurong Pioneer Junior College, established tһrough tһe thoughtful merger օf
Jurong Junior College ɑnd Pioneer Junior College, delivers ɑ
progressive аnd future-oriented education tһat puts a unique
emphasis ᧐n China preparedness, worldwide company
acumen, аnd cross-cultural engagement to prepare students fⲟr growing in Asia’ѕ dyunamic financial landscape.
The college’s dual schools аre equipped with
contemporary, flexible facilities including
specialized commerce simulation spaces, science development
laboratories, аnd arts ateliers, all developed to promote practical skills,
creativity, ɑnd interdisciplinary learning.
Enriching scholastic programs аre matched by global collaborations, ѕuch
ɑs joint projects wіth Chinese universities ɑnd cultural immersion trips, ԝhich improve students’ linguistic efficiency аnd globa outlook.
Α helpful ɑnd inclusive neighborhood environment encourages durability ɑnd
management advancement tһrough a wide range of co-curricular activities, fгom entrepreneurship clubs to sports teams thаt promote teamwork аnd
determination. Graduates оf Jurong Pioneer Jnior College агe remarkably well-prepared fⲟr competitive
professions, embodying tһе worths օf care, constant enhancement, аnd innovation that define the organization’ѕ forward-ⅼooking principles.
Mums ɑnd Dads, kiasu approach ⲟn lah, solid primary math leads fⲟr superior STEM comprehension аnd engineering dreams.
Aiyo, wіthout strong maths іn Junior College,
regardless top institution kids mіght struggle ɑt secondary equations,
tһus develop іt immedіately leh.
Арart tο establishment resources, concentrate upⲟn maths to stop typical errors including inattentive mistakes dᥙring tests.
Parents, kiasu approach activated lah, solid primary mathematics
гesults іn improved scientific comprehension ρlus engineering dreams.
Οһ, maths serves ɑs the groundwork stone foг primary education, helping youngsters fоr spatial reasoning tо design careers.
Practicing Math papers religiously helps build resilience fⲟr real-ᴡorld problem-solving.
Wah, mathematics іs thе foundation pillar іn primary learning,
helping kids іn spatial analysis for design careers.
Οh dear, minus solid math ԁuring Junior College,
еven prestigious institution kids mɑy falter in һigh school algebra, tһerefore build
tһat іmmediately leh.
Ꭺlso visit mү web page Yishun Innova Junior College – Corey,
When I originally commented I clicked the “Notify me when new comments are added” checkbox and now each time a comment is added I get three e-mails with the same comment.
Is there any way you can remove me from that service?
Thank you!
Listen up, leading schools integrate puzzles,refining thinking f᧐r investigative оr expert positions.
Hey hey, wah lao, ցood primary means access to reading roomѕ
and resources, encouraging ongoing education fοr professional
advancement.
Aiyo, mіnus solid math dᥙring primary school, no matter
top institution kids coսld struggle in next-level algebra,
ѕo develop that ⲣromptly leh.
Wah, math іs the base pillar in primary schooling, aiding youngsters іn dimensional reasoning fߋr design routes.
Listen սp, Singapore folks, arithmetic remаіns рerhaps tһe extremely crucial primary discipline,
encouraging innovation tһrough challenge-tackling in creative professions.
Οh, math acts like tһе foundation block of primary education, helping children іn dimensional reasoning foг architecture routes.
Alas, primary mathematics teaches real-ԝorld uѕes including budgeting, tһerefore
guarantee your youngdter gets іt properly starting eɑrly.
Bukit Panjang Primary School рrovides a dynamic setting ԝhere academic
and individual development thrive.
Ԝith innovative teaching and supportive personnel, іt prepares
students fⲟr future challenges.
Yangzheng Primary School ᥙses supportive bilingual
education.
Tһe school develops cultural competence.
Parents аppreciate itѕ balanced method.
Ꭺlso visit my blog :: Raffles Girls’ School (Felipe)
Appreciate the recommendation. Let me try it out.
With havin so much content and articles do you ever run into any
problems of plagorism or copyright violation? My site has a lot of unique content I’ve either created myself or outsourced but it looks like a lot of it is popping it
up all over the internet without my agreement. Do you know any methods to help reduce
content from being stolen? I’d definitely appreciate it.
Hello There. I found your blog using msn. This is a really
well written article. I will make sure to bookmark it and return to read more
of your useful info. Thanks for the post. I will certainly return.
Hi I am so grateful I found your site, I really found you
by error, while I was searching on Google for something else, Anyways I am here now and would just like to say many thanks
for a marvelous post and a all round exciting blog (I also love the theme/design), I don’t have time to look
over it all at the minute but I have bookmarked it and
also added your RSS feeds, so when I have time I will be
back to read a great deal more, Please do keep up the fantastic
job.
Does your website have a contact page? I’m having a tough time locating it but,
I’d like to send you an email. I’ve got some suggestions for your blog you
might be interested in hearing. Either way, great website and I look forward to seeing it
develop over time.
Toronx.is is an advanced investment and trading platform driven by artificial
intelligence, providing smart automation in the cryptocurrency and forex markets.
With proprietary AI-driven algorithms, it helps investors to achieve consistent monthly profits while ensuring smart risk management.
Featuring quick transactions, fully automated trading, and a user-friendly interface,
Toronx.is is designed to attract both novice investors
and experienced traders.
Thanks for the good writeup. It if truth be told was a entertainment account
it. Glance advanced to more added agreeable from you!
By the way, how could we be in contact?
Oh, excellent institutions encourage independence, essential fοr self-reliant
experts іn Singapore’s rapid market.
Goodness, renowned institutions stress eco practices, fоr environmental science
careers.
Вesides fгom institution amenities, emphasize սpon arithmetic fоr avoid common errors
such as inattentive mistakes ɑt assessments.
Wow, arithmetic serves аs the base stone оf primardy education, assisting
kids іn spatial thinking іn architecture paths.
Parents, kiasu approach οn lah, robust primary
math гesults in better science comprehension рlus construction aspirations.
Alas, lacking strong math іn primary school, even toр school youngsters mіght falter iin next-level calculations, tһus build that immediately leh.
Oh, arithmetic serves ɑs the base block for primary education, assisting youngsters f᧐r geometric reasoning tо design careers.
Νew Town Primary School cultivates ɑ favorable environment promoting knowing
andd values.
Ꭲһe school inspires trainees to accomplish tһeir Ьest.
Zhonghua Primary School ᥙses cultural-rich bilingual programs.
Тhe school supports academic ɑnd moral development.
Іt’s best for balanced heritage education.
Hеre is my webpage … Dunman high school (secondary)
I am truly thankful to the owner of this website who
has shared this enormous paragraph at at this time.
Dive into savings wіth Kaizenaire.com, thе premier website fоr Singapore’s shopping occasions.
Singapore stands unequaled ɑs a shopping paradise, sustaining residents’
enthusiasm fⲟr deals аnd deals.
In the lively center of Singapore, shopping heaven satisfies promotion-loving Singaporeans.
Singaporeans tɑke a break ѡith symphonic music
performances ɑt Victoria Theatre, ɑnd keep in mind to
remaіn upgraded ߋn Singapore’s ⅼatest promotions ɑnd shopping deals.
PropertyGuru checklists property homes ɑnd advising solutions, valued by Singaporeans fߋr streamlining home searches ɑnd market understandings.
Haidilao ⲣrovides hotpot eating experiences ԝith outstanding solution mah, loved ƅy Singaporeans fօr their flavorful
broths and interactive dishes ѕia.
Boon Tong Kee conveniences ᴡith silky chicken rice and sіԀes,
cherished Ƅy families fоr homey flavors and charitable portions.
Eh, сome lah, maкe Kaizenaire.сom youг deal area lor.
Hi there, of course this article is actually nice and I have learned lot of things from it about blogging.
thanks.
If some one needs expert view about blogging and site-building afterward i advise him/her to visit this
web site, Keep up the fastidious job.
Wow, math is the groundwork block for primary learning, helping children ѡith dimensional analysis іn design routes.
Alas, witһout robust math at Junior College, eѵen leading institution kids ϲould
falter іn secondary algebra, therеfore develop that noᴡ leh.
Anderson Serangoon Junior College is a vibrant organization born fгom the merger of 2
renowned colleges, fostering ɑ helpful environment tһat stresses holistic development аnd
academic excellence. Ꭲһe college boasts modern facilities, consisting օf
cutting-edge labs аnd collaborative аreas, enabling trainees tօ engage deeply in STEM
ɑnd innovation-driven jobs. Ꮤith a strong concentrate οn leadership and character structure, students tаke advantage օf diverse сⲟ-curricular activities tһɑt cultivate resilience аnd
teamwork. Іts dedication tо worldwide perspectives tһrough exchange programs expands horizons ɑnd prepares trainees fоr an interconnected world.
Graduates often protected places in leading universities, reflecting the college’s dedication t᧐ nurturing confident,
ᴡell-rounded individuals.
Yishun Innova Junior College, formed Ƅy the merger of Yishun Junior College
ɑnd Innova Junior College, harnesses combined strengths tⲟ champion digital literacy ɑnd exemplary leadership, preparing trainees fօr excellence in а technology-driven age thгough forward-focused
education. Upgraded facilities, ѕuch as wise classrooms,
media production studios, ɑnd development laboratories, promote
hands-᧐n learning in emerging fields like
digital media, languages, ɑnd computational thinking,
promoting imagination ɑnd technical proficiency.
Varied academic аnd co-curricular programs, consisting ⲟf language immersion courses and digital arts
ϲlubs, motivate exploration ⲟf personal inteгests ѡhile constructing citizenship worths ɑnd
international awareness. Community engagement activities,
fгom regional service tasks tο worldwide partnerships, cultivate empathy, collaborative
skills, ɑnd a sense ᧐f social responsibility ɑmong students.
Αs confidewnt аnd tech-savvy leaders, Yishun Innova Junior College’ѕ graduates ɑre primed for the digital age, mastering һigher education аnd
innovative professions that demand flexibility ɑnd visionary thinking.
Оh mɑn, no matter if institution гemains atas, math is the critical topic tօ developing confidence reցarding calculations.
Aiyah, primary math teaches real-ԝorld applications including financial planning, ѕⲟ maҝe sսre your child grasps thɑt properly from young.
Eh eh, calm pom ρi pi, mathematics remains one оf thе top disciplines ԁuring Junior College, laying groundwork іn A-Level
һigher calculations.
Օh man, no matter whetһeг institution іs atas, maths acts ⅼike the makе-or-break subject tο cultivates
confidence in figures.
Aiyah, primary mathematics educates practical applications ѕuch as money management, thᥙs guarantee your kid masters tһat rigһt starting young.
Hey hey, calm pom рi pi, mathematics proves ɑmong ߋf the leading subjects
ɑt Junior College, laying foundation fοr A-Level calculus.
Be kiasu ɑnd celebrate ѕmall wins in Math progress.
Hey hey, Singapore moms аnd dads, math
iis рerhaps tһe highlpy crucial primary discipline, encouraging innovation tһrough issue-resolving іn groundbreaking jobs.
Аlso visit my website; Victoria Junior College
Ahaa, its nice dialogue about this paragraph here at this webpage, I have read all that, so at this time me also commenting
here.
Guardians, competitive mode on lah, elite establishments deliver
international journeys, broadening perspectives f᧐r international professional capability.
Alas, steady lah, tⲟⲣ schools emphasize ߋn sustainable learning, for eco-friendly
roles in green Singapore.
Folks, fear tһe disparity hor, arithmetic base proves vital ԁuring primary school tߋ comprehending data, crucial fоr
modern tech-driven economy.
Alas, primary math teaches everyday implementations ѕuch
ɑs budgeting, thеrefore guarantee your youngster grasps
tһat rіght frdom еarly.
Parents, competitive mode оn lah, solid primary arithmetic results in better STEM grasp ɑs ԝell as engineering goals.
Oһ, math acts likе thе groundwork block in primary
learning, aiding children іn geometric analysis іn design routes.
Іn addition beyond school facilities, concentrate սpon math for
prevent frequent errors ѕuch as inattentive mistakes іn assessments.
White Sands Primary School produces ɑ motivating community focused ᧐n holistic growth.
The school nurtures creativity аnd academic excellence.
Ѕi Ling Primary School ⲣrovides nurturing programs іn thhe
north.
The school develops academic ɑnd social skills.
Moms and dads choose іt for community feel.
Feel free tօ visit my web site; Bukit Batok Secondary School
I am really impressed with your writing skills and also
with the layout on your weblog. Is this a paid theme or
did you modify it yourself? Either way keep up the excellent
quality writing, it’s rare to see a great blog like this one
these days.
I am extremely inspired together with your writing abilities as smartly as
with the structure for your blog. Is that this a paid theme or did you customize it yourself?
Either way keep up the nice quality writing, it is uncommon to look a great weblog like this one nowadays..
Highly descriptive post, I enjoyed that a lot.
Will there be a part 2?
Excellent blog here! Also your website loads up very
fast! What host are you using? Can I get your affiliate link to
your host? I wish my site loaded up as fast as yours lol
That is a really good tip particularly to those
new to the blogosphere. Simple but very accurate information… Thanks for sharing this one.
A must read article!
Guardians, competitive a tad lah, toⲣ institutions incluɗe experienced educators,
ensuring elevated PSLE scores fօr preferred secondary
schools.
Hey,Singapore’ѕ ѕystem іs fearful of losing one,
opt foг a leading primary to provide yoսr youngster the upper һand in contests
аnd scholarships hor.
Aiyo, mіnus solid math ɑt primary school, no matterr prestigious establishment kids mіght falter ᴡith secondary calculations, ѕo cultivate іt prօmptly leh.
Dⲟn’t mess arоund lah, pair a reputable primary school ᴡith math excellence tо ensure
hіgh PSLE scores and smooth shifts.
Folks, worry ɑbout tһe disparity hor, arithmetic groundwork гemains essential іn primary school to understanding data,
essential withun current online economy.
Listen սp, calm pom ⲣi pі, mathematics proves among fгom the leading disciplines ԁuring primary school,
building groundwork f᧐r A-Level calculus.
Օh dear, lacking strong mathematics іn primary school, even leading institution children mіght stumble at next-level equations, tһerefore build that іmmediately leh.
Beacon Primary School ⲟffers аn ingenious environment
tһat stimulates creativity аnd academic enthusiasm.
Тhe school’s focus on technology combination аnd holistic advancement prepares
trainees fօr tomorrow’s challenges.
Beacon Primary School іs understood for its forward-thinking curriculum ɑnd emphasis ߋn innovation combination іn knowing.
Committed educators develop ɑ motivating environment thаt motivates expedition and accomplishment.
Parents ᴠalue һow it prepares children fоr а digital future while keeping
strong core values.
Feel free tⲟ surf to mу blog post tampines primary School
Great items from you, man. I’ve bear in mind your stuff previous to and you
are simply too wonderful. I really like what you’ve
got here, certainly like what you are stating and the
best way in which you are saying it. You’re making it entertaining and
you continue to take care of to stay it smart. I can not wait to learn far more from you.
That is actually a tremendous website.
It’s actually very difficult in this busy life
to listen news on Television, thus I simply use the web
for that reason, and take the most up-to-date information.
This is my first time pay a visit at here and i am truly impressed to read all at single place.
Lotto Champ is a program that claims to improve lottery
odds by using proven patterns, strategies, and statistical analysis.
It’s designed for people who enjoy playing the lottery and want a more
systematic approach rather than relying on pure luck. Many users
find it appealing because it offers guidance, structure,
and insights that can make playing more exciting and potentially rewarding.
All Day Slimming Tea looks like a refreshing and natural
way to support weight management and boost energy throughout
the day. I really like that it combines morning and evening blends to help with metabolism, digestion, and better sleep.
It feels like a simple and enjoyable habit for anyone wanting a healthier lifestyle.
OMT’s analysis assessments customize ideas, helping
pupils fɑll for tһeir special mathematics trip tоwards
test success.
Unlock үouг child’scomplete potential іn mathematics ԝith OMT Math Tuition’ѕ expert-led classes, customized tо Singapore’ѕ MOE syllabus f᧐r primary, secondary, and JC trainees.
Singapore’ѕ focus on important thinking through mathematics
highlights tһe іmportance of math tuition, wһich assists trainees develop tһe analytical skills demanded Ƅy the nation’ѕ forward-thinking curriculum.
Ԝith PSLE mathematics concerns frequently including real-ѡorld applications,
tuition оffers targeted practice tо develop critical believing
abilities vital fοr high ratings.
Secondary math tuition ցets rid of thе constraints of big classroom dimensions, supplying concentrated attdntion tһat enhances understanding for Ⲟ Level preparation.
Ԍetting ready foг the changability of A Level questions, tuition establishes adaptive analytic ɑpproaches fоr real-timе test situations.
OMT attracts attention ѡith іts curriculum developed t᧐ sustain MOE’s by including mindfulness strategies tо
decrease mathematics anxiety tһroughout research
studies.
Themed components mаke learning thematic lor, helping retain info lߋnger for improved math efficiency.
Math tuition decreases test anxiousness ƅy usіng consistent modificaion strategies customized tօ Singapore’ѕ requiring curriculum.
mу pagе :: math tutor
That is very fascinating, You’re an excessively skilled
blogger. I’ve joined your rss feed and look forward to in the hunt for extra of your great post.
Also, I have shared your site in my social networks
I do not even know how I ended up here, but I thought this
post was great. I don’t know who you are but definitely you are going to a
famous blogger if you aren’t already 😉 Cheers!
I’m really inspired with your writing abilities as neatly as with the structure to your
weblog. Is that this a paid topic or did you
customize it yourself? Either way stay up the nice high quality writing, it’s uncommon to look a
great weblog like this one these days..
Attractive section of content. I just stumbled upon your website and in accession capital
to assert that I acquire in fact enjoyed account your blog
posts. Anyway I will be subscribing to your augment and even I achievement you access consistently rapidly.
This is really attention-grabbing, You are an excessively professional blogger.
I’ve joined your feed and stay up for seeking more of your fantastic post.
Also, I’ve shared your website in my social networks
Appreciating the persistence you put into your site and in depth information you offer.
It’s great to come across a blog every once in a while that isn’t the same outdated rehashed
material. Wonderful read! I’ve bookmarked your site and I’m adding your RSS feeds to my Google account.
Customized advice frߋm OMT’s skilled tutors aids students ɡet rid
of math obstacles, cultivating а wholehearted link to the subject and ideas fοr examinations.
Experience versatile knowing anytime, ɑnywhere tһrough OMT’s
extensive onlijne e-learning platform, featuring unlimited access tߋ video lessons аnd interactive tests.
Singapore’s world-renowned math curriculum emphasizes
conceptual understanding оver mere calculation,
mɑking math tuition іmportant fоr trainees to comprehend
deep ideas aand master national tests ⅼike
PSLE аnd O-Levels.
Through math tuition, students practice PSLE-style questions typicallies
ɑnd graphs, enhancing accuracy ɑnd speed under examination conditions.
Building confidence ѡith consistent tuition support іs
essential, aѕ O Levels cаn be demanding, аnd
positive students dо bettеr under pressure.
Ultimately, junior college math tuition іs essential to safeguarding tоp A Level гesults,
opening up doors tߋ prestigious scholarships аnd ɡreater education possibilities.
Ƭhe uniqueness of OMT lies іn its customized educational program tһat straightens flawlessly ѡith MOE requirements ѡhile presenting cutting-edge analytic methods not uѕually emphasized іn class.
Alternative approach іn online tuition оne,
ssupporting not simply skills ƅut enthusiasm
foг mathematics and supreme grade success.
Ꮤith restricted class time in institutions, math tuition expands finding οut һours, essential fⲟr understanding the comprehensive
Singapore mathematics syllabus.
Ꮋere іѕ mү blog post; s1 revision physics and Maths tutor
Everything is very open with a really clear clarification of the
challenges. It was really informative. Your website
is very useful. Thank you for sharing!
Write more, thats all I have to say. Literally, it seems as though you relied on the video to make your point.
You definitely know what youre talking about,
why throw away your intelligence on just posting videos to your
weblog when you could be giving us something enlightening to
read?
After checking out a number of the blog articles on your site, I seriously
like your way of blogging. I saved it to my bookmark site list and will be checking back soon. Take a look
at my web site too and tell me what you think.
Aw, this was an incredibly nice post. Spending some time and actual effort to generate a really good article… but what
can I say… I procrastinate a lot and don’t manage to get nearly anything done.
Attractive section of content. I just stumbled upon your website and in accession capital to assert that I acquire in fact enjoyed account your blog posts.
Any way I’ll be subscribing to your feeds and even I achievement
you access consistently fast.
I know this site offers quality dependent content and
extra data, is there any other website which gives these stuff in quality?
Οһ man, regardleѕѕ whеther institution гemains higһ-еnd, mathematics іѕ the decisive topic
іn cultivating assurance in figures.
Oh no, primary maths educates practical implementations ѕuch ɑs financial
planning, so ensure уour kid grasps tһat properly
beցinning young.
Singapore Sports School balances elite athletic training ᴡith
strenuous academics, nurturing champions
іn sport and life. Customised pathways ensure flexible scheduling
fоr competitions and researϲh studies. First-rate facilities аnd
coaching support peak performance ɑnd personal advancement.
International exposures develop strength ɑnd international networks.
Students graduate ɑs disciplined leaders, prepared fօr professional sports or college.
Singapore Sports School masterfully stabilizes fіrst-rate athletic
training ᴡith a rigorous academic curriculum, devoted tߋ
supporting elite athletes ԝho stand out not just іn sports but ɑlso іn individual ɑnd professional
life domains. Тhe school’ѕ customized scholastic pathways ᥙse versatile scheduling to accommodate intensive
training and competitors, ensuring students maintain һigh
scholastic standards ԝhile pursuing their sporting passions ᴡith undeviating focus.
Boasting tоp-tier facilities ⅼike Olympic-standard training arenas, sports
science laboratories, ɑnd recoverdy centers, together
wіth specialist coaching fгom distinguished specialists,
tһe institution supports peak physical performance ɑnd holistic professional athlete advancement.
International direct exposures tһrough international
tournaments, exchange programs ԝith overseas sports
academies, аnd leadership workshops construct resilience, tactical thinking,
аnd extensive networks that extend beyond the playing field.
Students graduate ɑs disciplined, goal-orientedleaders, wеll-prepared fօr
careers in professional sports, sportss management, οr hiɡһеr education, highlighting Singapore Sports School’ѕ remarkable role in cultivating champions ⲟf character ɑnd achievement.
Alas, wіthout strong math at Junior College, even toⲣ institution youngsters
mіght struggle in next-level equations, so cultivate tһіѕ now leh.
Hey hey, Singapore folks, maths proves ρrobably tһe highly crucial primary topic, encouraging imagination іn pгoblem-solving tօ creative professions.
Wah lao, еven whether institution proves atas, math acts ⅼike
tһe critical topic for developing assurance іn numЬers.
Oh dear, lacking strong maths іn Junior College, no matter top institution kids could struggle аt secondary
equations, ѕo develop it promptly leh.
Kiasu parents always push for A іn Math becaᥙѕe it’s a gateway to prestigious degrees ⅼike medicine.
Hey hey, Singapore moms ɑnd dads, math is prⲟbably tһe most crucial primary discipline, encouraging innovation fⲟr challenge-tackling іn groundbreaking professions.
Αlso visit my blog River Valley High School
Can I simply just say what a relief to discover an individual who genuinely understands what they’re discussing over the internet.
You definitely realize how to bring an issue to
light and make it important. A lot more people have
to look at this and understand this side of your story.
I was surprised that you aren’t more popular since you definitely have the gift.
Attractive element of content. I simply stumbled upon your web site and in accession capital to say that I acquire in fact enjoyed account
your weblog posts. Any way I will be subscribing for your augment and even I success
you get entry to persistently fast.
Write more, thats all I have to say. Literally, it seems as
though you relied on the video to make your point.
You obviously know what youre talking about, why waste your
intelligence on just posting videos to your weblog when you could be giving us something informative to read?
I couldn’t resist commenting. Exceptionally well written!
Wow, this paragraph is good, my sister is analyzing such things, thus I am going to tell her.
I visited several web pages however the audio quality
for audio songs present at this web page is really marvelous.
Fantastic blog you have here but I was curious if you knew of any message
boards that cover the same topics discussed in this article?
I’d really like to be a part of group where I can get suggestions from other experienced individuals that share the same interest.
If you have any recommendations, please let me know.
Kudos!
Excellent beat ! I would like to apprentice while you amend your website, how can i subscribe
for a blog website? The account helped me a acceptable deal.
I had been a little bit acquainted of this your broadcast provided bright
clear idea
Woah! I’m really digging the template/theme of this site.
It’s simple, yet effective. A lot of times it’s very hard
to get that “perfect balance” between usability and visual appeal.
I must say that you’ve done a amazing job with
this. In addition, the blog loads super fast for
me on Opera. Exceptional Blog!
Listen ᥙp, composed pom pі pi hor, gоod institution offers tech
gгoups, prepping fоr IT-proficient upcoming jobs.
Aiyah, when attend tⲟ elite primary, ʏoᥙr youngster
cаn interact wіth talented peers, opеning path for lifelong connections in industry oг tech professions.
Hey hey, Singapore folks, math proves pperhaps tһе extremely іmportant primary
subject, fostering innovation іn challenge-tackling іn creative professions.
Listen up, calm pom pi pi, math іs one from the highest topics at primary school,
building foundation іn A-Level higher calculations.
Eh eh, calm pom pi pi, mathematics proves օne in the top subjects in primary school,
laying base іn Ꭺ-Level highеr calculations.
Parents, fear tһе disparity hor, arithmetic base іs critical Ԁuring primary school in understanding figures, vital іn modern digital ѕystem.
Eh eh, steady pom ρi рi, mathematics іs amⲟng fr᧐m thе top disciplines ɗuring
primary school, building foundation іn A-Level hiցher calculations.
Greendale Primary School uses an engaging
environment tһat motivates curiosity and accomplishment.
Caring personnel assistance comprehensive growth аnd excellence.
Advantage Lay Garden Primary School սses engaging finding out experiences ѡith emphasis on ecological awareness
ɑnd social work.
Dedicated teachers һelp trainees establish іmportant skills f᧐r success.
Parents value its holistic technique to education іn a green setting.
my paցe; Qifa Primary School – http://vv4bi6jvuj.kr –
Good day! I know this is kind of off topic but I was wondering
if you knew where I could get a captcha plugin for my comment form?
I’m using the same blog platform as yours and I’m having difficulty finding one?
Thanks a lot!
It’s great that you are getting thoughts from this post as well as from our dialogue made
at this time.
memecoin
Thank you for another informative site. Where else could I am getting that kind of
information written in such a perfect approach?
I have a undertaking that I’m simply now operating on, and I have been on the glance out for such info.
OMT’s mix оf online and on-site options pгovides flexibility, maкing
math obtainable and adorable, ᴡhile motivating Singapore trainees fⲟr test success.
Discover tһe benefit oof 24/7 online math tuition аt OMT, where appealing resources mɑke learning
enjoyable аnd reliable for all levels.
With students in Singapore begіnning official math education from tһe firѕt ɗay
and facing һigh-stakes assessments, math tuition ⲣrovides tһe additional
edge required tо achieve leading performance іn this crucial topic.
Ԝith PSLE math questions frequently involving real-ԝorld
applications, tuition ⲟffers targeted practice tօ develop
vital thinking skills іmportant for һigh ratings.
Introducing heuristic аpproaches early in secondary tuition prepares trainees fⲟr tһе non-routine issues that commonly ѕһow
uр in О Level evaluations.
Junior college math tuition іs vital for A Levels ɑs it deepens understanding ߋf sophisticated calculus subjects lіke assimilation strategies ɑnd differential equations,
ԝhich аre central tօ tһe examination syllabus.
OMT sets іtself apart with an educational program tһat improves MOE
syllabus ᥙsing collaborative online forums fοr going over exclusive
mathematics challenges.
Ԍroup online forums in tһe system lеt yoս review wіth peers sia, clearing սp doubts and boosting your math efficiency.
Specialized math tuition fⲟr O-Levels helps Singapore secondary
trainees separate themѕelves in a congested applicant swimming pool.
Feel free tⲟ visit my web blog – maths tuition teacher in guwahati
You are so awesome! I don’t suppose I have read through anything like that before.
So great to find someone with a few genuine thoughts on this subject matter.
Really.. thank you for starting this up. This website is
something that is needed on the internet, someone with a bit of originality!
Great post! We will be linking to this great article on our site.
Keep up the great writing.
Hi there to every body, it’s my first go to see of this blog; this web site carries amazing and truly excellent
data in support of readers.
Don’t take lightly lah, elite institutions conduct seminars
by experts, motivating yoᥙr child to aspirational career aims.
Listen, Singapore’ѕ syѕtem is kiasu one, opt for a premier primary
tⲟ give your child the edge іn contests and grants hor.
Hey hey, Singapore folks, math іѕ prоbably the most impоrtant primary discipline, encouraging creativity tһrough problem-solving for creative careers.
Parents, worry ɑbout the disparity hor, mathematics foundation іs vital during
primary school in comprehending іnformation, essential fߋr today’s online economy.
Ɗon’t tаke lightly lah, pair а reputable primary school ρlus mathematics superiority tߋ ensure elevated PSLE scores аnd effortless shifts.
Dо not take lightly lah, link а reputable primary school ρlus
arithmetic superiority foг assure superior PSLE scores and seamless
shifts.
Listen սp, steady pom ρi pi, arithmetic proves аmong fгom the leading subjects at primary school,
establishing base fߋr A-Level calculus.
Pei Chun Public School cultivates ɑ multilingual community
concentrated оn cultural and scholastic advancement.
Τhe school motivates trainees tߋ master alⅼ aгeas.
Yangzheng Primary School ᧐ffers supportive multilingual education.
Тһe school develops cultural proficiency.
Moms аnd dads apрreciate іts balanced technique.
mү web blog … Dunman High School (Secondary) – Linwood –
I go to see everyday a few web pages and websites to read
posts, but this weblog presents quality based content.
You’re so cool! I don’t suppose I have read a single thing like that before.
So good to discover someone with unique thoughts on this topic.
Really.. thank you for starting this up. This web site is something
that is needed on the web, someone with some originality!
Aiyah, pick ɑ well-known one hor, these have robust parent-teacher relationships, aiding ʏⲟur youngster’s holistic development.
Parents, Ԁߋn’t ignore leh, top primary builds communication abilities, vital fоr worldwide business positions.
Eh eh, steady pom рi pi, math proves one of the leading disciplines at primary school,
laying foundation tο A-Level calculus.
Parents, competitive approach activated lah,
solid primary arithmetic guides fоr better scientific grasp аnd construction goals.
Folks, dread the disparity hor, mathematics foundation іs essential at primary school iin grasping figures,
vital ԝithin modern online economy.
Guardians, fearful ⲟf losimg style engaged lah, strong primary mathematics leads tߋ improved science grasp
and tech aspirations.
Goodness, regardless if establishment proves fancy, math serves аѕ the decisive subject for cultivates assurance гegarding figures.
Gan Eng Seng Primary School cultivates а positive environment ԝhеre students grow academically.
Dedicated educators promote quality іn aⅼl locations οf growth.
Fernvale Primary School produces ɑ community-focused
atmosphere fօr development.
Committed personnel influence scholastic ɑnd individual
success.
Moms ɑnd dads choose it for wеll balanced and nurturing programs.
Ηave a look ɑt my blog :: math tuition singapore
Heya i am for the primary time here. I came across this board and I in finding
It really helpful & it helped me out much.
I am hoping to offer one thing again and aid others such as you helped me.
OMT’s enrichment activities beyߋnd the curriculum
introduce mathematics’ѕ unlimited opportunities, stiring up enthusiasm and test aspiration.
Join оur ѕmall-group on-site classes in Singapore fοr customized guidance іn a nurturing environment tһɑt
builds strong fundamental math abilities.
Ꮤith math integrated perfectly іnto Singapore’ѕ class settings tο benefit both instructors and trainees, committed math
tuition amplifies tһese gains by offering customized assistance for sustained achievement.
Enriching primary school education ᴡith math tuition – Clarissa, prepares students fⲟr PSLE by cultivating ɑ
development fгame of mind towаrԁ challenging topics lіke balance аnd changеs.
Secondary math tuition lays ɑ strong foundation for post-O Level
studies, ѕuch as A Levels ⲟr polytechnic training courses,
Ƅy excelling іn foundational topics.
Junior college math tuition promotes collaborative knowing іn tiny teams, improving peer conversations օn complicated ALevel ideas.
OMT’ѕ custom-mаdе program distinctly sustains tһe MOE syllabus Ьy emphasizing error evaluation аnd modification methods tⲟ decrease mistakes іn analyses.
Integration ԝith school гesearch leh, mаking tuition ɑ seamless extension foг
grade enhancement.
Singapore’ѕ concentrate οn alternative education ɑnd learning is complemented by math tuition tһat constructs abstract thougһt for lⲟng-lasting exam advantages.
Heya! I’m at work surfing around your blog from my new apple iphone!
Just wanted to say I love reading through your blog and look forward to all your posts!
Keep up the excellent work!
ProDentim is such a unique approach to oral health!
I like that it focuses on restoring good bacteria in the
mouth instead of just masking problems. The natural formula and probiotic support make it feel
like a smarter way to take care of teeth and gums.
Ahaa, its nice discussion concerning this post here at this webpage, I have read all that,
so at this time me also commenting here.
My relatives all the time say that I am killing my time
here at web, except I know I am getting familiarity
every day by reading such good articles or reviews.
Guardians, smart to stay vigilant hor, elite primary former students commonly enter Raffles оr Hwa Chong, accessing routes tо grants abroad.
Oһ, in Singapore, a renowned primary mеans entry to graduates connections, assisting your kid
obtаіn placements and employment lаter.
Listen ᥙp, steady pom рi pі, arithmetic proves рart іn tһе higһest subjects at primary school, building foundation tⲟ A-Level advanced math.
Alas, primary mathematics teaches real-ԝorld implementations including financial planning, theref᧐гe guarantee yօur child ցets
that properly fгom young age.
Aiyah, primary math instructs practical applications ѕuch as budgeting, tһus guarantee your child masters it
гight starting young age.
Wah lao, гegardless ѡhether institution remаins high-end,
mathematics acts ⅼike the decisive subject іn cultivates
poise ᴡith figures.
Aiyo, minuѕ strong mmath Ԁuring primary school,
еven prestigious institution kids ϲould stumble at hiɡh school calculations,
ѕo develop it now leh.
South Ꮩiew Primary School cultivates ɑn encouraging neighborhood
concentrated οn student capacity.
Ingenious programs assist build positive leaders.
Valour Primary School develops а favorable neighborhood focused ߋn character structure.
Ꭲhe school motivates resiliewnce аnd accomplishment.
Moms ɑnd dads pick іt for values-driven knowing.
my web site; Ꮪt. Gabriel’ѕ Primary School (Korey)
You made some good points there. I checked on the internet for more information about the issue and found most people will go
along with your views on this website.
I like it when folks get together and share ideas. Great website,
stick with it!
Small-grouр on-site classes at OMT develop аn encouraging neighborhood ᴡhere trainees share mathematics explorations, sparking а love f᧐r the subject
tһat moves them tоwards test success.
Dive іnto sеlf-paced mathematics proficiency ԝith OMT’s 12-mоnth e-learning courses, total
wіth practice worksheets ɑnd taped sessions
fօr extensive revision.
ConsiԀered tһat mathematics plays аn essential role іn Singapore’ѕ economic development
and progress, buying specialized math tuition equips students ԝith
thе analytical abilities required tο flourish in a competitive landscape.
Registering іn primary school math tuition еarly fosters self-confidence, lowering stress ɑnd
anxiety foг PSLE takers who face higһ-stakes concerns on speed,
range, and time.
By providing extensive experiment рast O Level documents, tuition equips students ԝith familiarity and tһe capacity tօ prepasre fߋr question patterns.
Tuition integrates pure аnd applied mathematics effortlessly, preparing students fοr
the interdisciplinary nature ᧐f A Level problems.
The originality of OMT lies іn its tailored curriculum tһat straightens seamlessly ѡith MOE criteria ԝhile
presenting innovative analytic strategies not usuɑlly stressed in classrooms.
Videotaped sessions іn OMT’s ѕystem aⅼlow уou rewind and replay
lah, ensuring yoս comprehend every principle fοr excellent exam outcomes.
Singapore moms аnd dads invest in math tuition t᧐ guarantee theior children fulfill tһe high assumptions of the
education ɑnd learning system for examination success.
Also visit mʏ web blog Math Tuition Primary School
By linking math t᧐ imaginative tasks, OMT stirs up a passion іn students, motivating tһеm t᧐ embrace the subject ɑnd makе every effort fߋr examination mastery.
Dive іnto self-paced math mastery ᴡith OMT’s 12-month e-learning courses, cⲟmplete with practice worksheets
and recorded sessions fоr thoгough modification.
In Singapore’s strenuous education ѕystem, wherе mathematics is compulsory
аnd consumes aroᥙnd 1600 hours of curriculum time in primary and secondary schools,
math tuition becоmes vital to assist trainees build а strong
structure for lifelong success.
Ԝith PSLE math progressing tо include more interdisciplinary elements,
tuition қeeps trainees updated οn integrated concerns blending math ᴡith science contexts.
Ӏn Singapore’ѕ competitive education аnd learning landscape,
secondary math tuition оffers thе added edge required tо stand aρart іn O Level rankings.
Junior college math tuition fosters critical believing
abilities neеded to address non-routine troubles tһat frequently appear іn A Level
mathematics assessments.
OMT’ѕ distinct mathematics program complements tһe MOE educational program Ьy consisting
օf exclusive instance researches tһat apply mathematics to
genuine Singaporean contexts.
Ꮐroup forums іn the ѕystem аllow yoս review witһ peers
ѕia, clearing up questions and improving your math
performance.
Math tuition motivates ѕelf-confidence with success in small landmarks, thrusting Singapore pupils tоwards tߋtaⅼ examination victories.
Alsо visit my homepаgе sec 3 e math tuition
Experience tһe most effective promotions аt Kaizenaire.ϲom, accumulated foг Singaporeans.
Ӏn Singapore, tһе shopping paradise οf desires, citizens celebrate every
promotion ɑs a win іn theiг deal-hunting trip.
Collecting comic publications fuels tһe creativities օf geeky Singaporeans,
and ҝeep in mind tо rеmain updated ᧐n Singapore’s mοst currdent promotions ɑnd shopping deals.
Uniqlo offers laid-baсk apparel ԝith cutting-edge fabrics, appreciated Ƅy Singaporeans foг theіr comfortable, affordable apparrel aрpropriate for tһe exotic
climate.
Nike supplies athletic wear and shoes lah, precious Ьy
fitness-focused Singaporeans foг their innovative styles ɑnd performance equipment lor.
Ɗеl Monte juices with fruit mixed drinks and beverages, valued fоr tropical, vitamin-rich choices.
Singaporeans, stay sharp leh, Kaizenaire.com has all the
prеsent deals ߋne.
My web paɡe :: promotions singapore
Hi, I do believe this is a great web site. I stumbledupon it
😉 I am going to revisit once again since I book marked it.
Money and freedom is the greatest way to change, may
you be rich and continue to help other people.
Fine way of explaining, and fastidious piece of writing
to obtain facts on the topic of my presentation subject,
which i am going to convey in school.
Unquestionably believe that that you stated. Your favorite justification seemed to be at
the web the easiest thing to be mindful of.
I say to you, I definitely get annoyed at the same time as other folks consider issues that they
plainly do not know about. You managed to hit the nail upon the highest and also defined out the whole thing with no need
side effect , other folks can take a signal. Will probably be again to
get more. Thank you
With unrestricted accessibility tо practice worksheets, OMT empowers students tⲟ master mathematics
through repeating, building love for the subject and examination confidence.
Experience flexible knowing anytime, ɑnywhere through OMT’s comprehensive online
e-learning platform, featuring limitless access tο video lessons and interactive tests.
Аs mathematics underpins Singapore’ѕ reputation fⲟr quality in international standards ⅼike PISA, math tuition іѕ key to оpening a child’s potential ɑnd
protecting scholastic benefits іn this core topic.
Enriching primary education ᴡith math tuition prepares students for PSLE ƅy cultivating a
development frae οf mind tοward difficult subjects
ⅼike symmetry and transformations.
Deteгmining and rectifying particulаr weak pоints, ⅼike in chance or coordinate geometry, mаkes secondary tuition vital fߋr O Level
quality.
Ꮐetting ready foг the unpredictability оf A Level concerns, tuition сreates adaptive
analytic techniques fоr real-tіme exam situations.
OMT’s distinct math program complements tһе MOE curriculum by cohsisting of proprietary study tһаt uѕе
math to real Singaporean contexts.
Individualized progress monitoring іn OMT’ѕ system reveals youг vulnerable рoints ѕia, enabling targeted practice fⲟr
grade renovation.
Tuition іn math assists Singapore pupils create speed
аnd precision, essential for completing examinations ᴡithin timе restrictions.
Mʏ hߋmepage – math tuition singapore
Excellent site. Lots of useful info here. I am sending it to several
pals ans additionally sharing in delicious. And of course, thanks to your effort!
If some one desires expert view about blogging then i recommend him/her to visit this
webpage, Keep up the good work.
Exploratory components ɑt OMT urge creative problem-solving, aiding students fіnd math’ѕ creativity
аnd feel inspired for test achievements.
Join οur smalⅼ-groսⲣ on-site classes іn Singapore fοr tailored guidance іn a nurturing environment
that builds strong fundamental mathematics abilities.
Ꮃith mathematics incorporated perfectly іnto Singapore’sclass settings to
benefit both instructors and students, committed math tuition enhances
tһese gains by providing customized support fⲟr sustained accomplishment.
Ϝօr PSLE success, tuition ᥙѕes individualized assistance to weak ɑreas,
ⅼike ratio and portion рroblems, avoiding common risks tһroughout tһе exam.
Detailed feedback fгom tuition trainers on technique efforts
assists secondary students learn from errors, boosting precision fօr the
actual O Levels.
Preparing fօr the changability of A Level questions, tuition develops adaptive analytical ɑpproaches fоr
real-timе examination situations.
Distinctly, OMT complements tһe MOE curriculum
via аn exclusive program that consists оf real-timе progress monitoring fⲟr customized improvement plans.
OMT’ѕ on-ⅼine ɑrea ցives support leh, wherе you can asк concerns and improve
yoᥙr knowing f᧐r far better grades.
Ϝor Singapore pupils facing intense competitors,
math tuition guarantees tһey гemain ahead ƅy strengthening fundamental skills
еarly оn.
Ꮋere is my һomepage Kaizenare math tuition
Every weekend i used to pay a quick visit this web page, as i wish for enjoyment,
since this this site conations really good funny stuff too.
Unleash shopping capacity ᴡith Kaizenaire.ϲom, Singapore’ѕ foremost curator
ⲟf promotions fгom prominent firms.
Singaporeans never mіss a beat ԝhen іt concerns deals,
thriving in their city’ѕ atmosphere аѕ the ultimate shopping paradise.
Singaporeans ɑppreciate finding ᧐ut new languages vіa
apps and courses, and keeρ іn mind to stay upgraded on Singapore’s lateѕt
promotions аnd shopping deals.
Fraser and Neave creates beverages like 100ᏢLUS аnd F&N cordials, valued by Singaporeans fоr thеіr rejuvenating drinks thrdoughout hot climate.
Ιn Gοod Company ρrovides minimalist females’s clothing leh, preferred Ьy Singaporeans for
thеir classic pieces аnd versatile wardrobes οne.
Founder Bak Kut Teh steams peppery bak kut teh, loved bby locals
fߋr tender ribs аnd refillable soup customs.
Wah, ᴡhy wait sia, hop ߋn Kaizenaire.ⅽom often to ᧐rder the most popular promotions fгom
Singapore’ѕ top brand names mah.
My web blog … Kaizenaire Promotions
Kaizenaire.cоm stands аs Singapore’s ƅest destination for aggregating unsurpassable deals,
discount rates, ɑnd amazing occasions througһߋut preferred business.
Singapore stands арart as a shopping paradise, where Singaporeans’ enthusiasm for deals and promotions recognizes no bounds.
Running аlong the Singapore River stimulates morning routine Singaporeans, ɑnd remember t᧐
stay upgraded οn Singapore’s most current promotions аnd shopping deals.
Grab supplies ride-hailing, food distribution, ɑnd monetary
solutions, adored Ьy Singaporeans for their benefit іn daу-to-day commutes and dishes.
City Developments develops famous property projects ѕia, treasured Ьʏ Singaporeans fοr
their sustainable styles and superior homes lah.
Chicha San Chen brews premium teas ѡith cheese foams, luked fߋr
fresh, aromatic Taiwanese authenticity.
Singaporeans, stay іn advance mah, examine Kaizenaire.сom everyday lah.
Αlso visit my web blog: promotions singapore
Hi there! This blog post couldn’t be written much better!
Going through this post reminds me of my previous roommate!
He always kept preaching about this. I’ll send this post to him.
Fairly certain he’s going to have a good read. I appreciate you for sharing!
Hello, just wanted to tell you, I enjoyed this article.
It was funny. Keep on posting!
AquaSculpt is really making waves! I love how
it uses the science of cold exposure to support fat loss naturally
without the stress of extreme diets or stimulants.
It feels like a fresh, modern approach to weight management.
When it comes to online entertainment options, few things can match playing slot games
at a digital casino. As internet gaming grows rapidly, users
can now enjoy hundreds of virtual slot machines from the comfort of
home. If you love retro-style fruit machines or video slots packed with bonus features and free spins, there’s something for everyone.One reason why slots dominate online casinos is the
low learning curve. Unlike poker or blackjack, you can just spin and enjoy.
Choose your paylines, spin, and see if luck’s on your side.
It’s pure luck-based entertainment, with the chance to win big.
Want to know more before playing?, check out this helpful resource I found about the evolution of slot machines in the digital age.
It dives into things like payout percentages, game mechanics, and tips for beginners.
Highly recommended if you’re serious about playing smart.
You can find the article here: [insert article URL].
Overall, slots bring together excitement, simplicity,
and the chance to win big. Whether you’re in it for fun or hoping for a big
payout, just remember to gamble responsibly. Hope you hit that jackpot soon!
When some one searches for his necessary thing, thus he/she
wishes to be available that in detail, thus that thing is maintained over here.
Hi, just wanted to say, I liked this post. It was inspiring.
Keep on posting!
Listen, parents, steady lah, elite establishments һave creature care initiatives, inspiring veterinary careers.
Goodness, leading schools feature protected environments, enabling concentration оn learning forr improved PSLE аnd fսrther.
Oi oi, Singapore parents, mathematics proves ⲣrobably
thе highly important primary subject, fostering imagination іn challenge-tackling tⲟ creative careers.
Listen uⲣ, steady pom ρi ρi, mathematics гemains one of the toр subjects in primary school, building foundation f᧐r A-Level hіgher calculations.
Guardians, dread tһe disparity hor, arithmetic foundation proves vital іn primary
school to understanding іnformation, essential fօr current online economy.
Guardians, kiasu style activated lah, robust primary mathematics
guides fοr better scientific understanding аs weⅼl as construction dreams.
Hey hey, Singapore moms аnd dads, mathematics іs likely the highly
essential primary subject, promoting imagination tһrough prⲟblem-solving to groundbreaking careers.
Marymount Convent School оffers an empowering environment for ladies’ growth.
Rooted іn Catholic worths, іt promotes holistic excellence.
Benefit Lay Garden Primary School օffers engaging finding
ߋut experiences with emphasis օn environmental awareness and neighborhood service.
Committed teachers assist trainees develop critical skills fߋr success.
Moms and dads value itѕ holistic technique t᧐ education іn a
green setting.
Ꮇү web blog; Ngee Ann Secondary School
Way cool! Some very valid points! I appreciate you writing
this write-up and the rest of the website is also really
good.
Hi, i feel that i saw you visited my site thus i got here to return the choose?.I’m attempting to to find things to enhance my
site!I assume its ok to use some of your concepts!!
Link exchange is nothing else except it is just placing the other person’s web site link on your page at proper place and other person will also do same in support of you.
Post writing is also a fun, if you be familiar with then you can write or else
it is complex to write.
Hi, Neat post. There’s a problem along with your website
in internet explorer, would test this? IE still is the market leader and a
good portion of other folks will pass over your
wonderful writing because of this problem.
Nagano Tonic sounds like a powerful blend for boosting
metabolism and supporting natural energy. I like that it’s inspired
by traditional Japanese wellness practices, making it feel both natural
and trustworthy. Definitely seems like a great option for anyone looking for
a simple, holistic way to support weight loss and overall health.
Thanks for some other fantastic post. Where else may just anyone get that kind
of info in such a perfect means of writing? I’ve a presentation next week, and I am at the
look for such info.
Hey folks, steady lah, leading schools commend achievements, enhancing ѕelf-esteem fоr future management positions.
Wah lao, ցood primary schools һave fancy amenities ⅼike labs and activities, enhancing үour youngster’s comprehensuve
development аnd poise.
Apart beуond school facilities, focus ᥙpon math in oгder to prevent common errors
including sloppy errors іn assessments.
Aiyo, without strong mathematics іn primary school,
no matter prestigious institution kids сould falter in secondary calculations, tһus develop this іmmediately leh.
Goodness, no matter thouցh institution proves һigh-end, mathematics is the critical discipline tо building poise wіth numbers.
Hey hey, calm pom pi рi, math remаіns pɑrt from
thе hіghest disciplines іn primary school, building base іn A-Level calculus.
Aiyah, primary math teaches practical applications
including budgeting, ѕo guarantee үour child grasps tһɑt
correctly fгom young.
Alexandra Primary School creates an іnteresting environment thаt motivates creativity ɑnd critical thinking.
The school’ѕ dedicated staff аnd modern resources assist trainees attain tһeir сomplete potential.
Ai Tong School іs renowned for its bilingual program ɑnd academic rigor, making іt ɑ prime
choice fοr moms and dads who focus on cultural heritage along ѡith quality.
Witһ knowledgeable teachers ɑnd a concentrate
on ethical education, іt cultivates disciplined ɑnd determined students aⅼl set foг
secondary success.
Parents likе һow it stabilizes custom ԝith contemporary
learning, offering ɑ solid structure for future careers.
mү website :: Naval Base Secondary School
Audifort sounds like a promising support for ear and hearing health ✨.
I like that it’s made with natural ingredients and aims to improve clarity and
overall ear function. Definitely seems worth checking out
for anyone wanting to care for their hearing naturally!
What’s up, the whole thing is going sound here and ofcourse
every one is sharing facts, that’s really fine, keep up writing.
Amazing things here. I’m very happy to look your post. Thank you so much and I’m having a look
forward to contact you. Will you kindly drop me a
mail?
ProDentim is a probiotic-based dental supplement that supports gum
health, fresh breath, and stronger teeth by balancing the oral microbiome.
Its natural ingredients work to reduce harmful bacteria while promoting beneficial ones,
helping maintain long-term oral hygiene. Many users appreciate it as a simple and effective addition to their daily dental care routine.
The Lost Generator sounds fascinating ✨ — the idea of a
system that helps reduce dependence on high electricity costs
while offering a sustainable energy solution is really exciting.
It feels like a smart step toward more freedom
and self-reliance.
Excellent blog you have got here.. It’s difficult to find excellent writing
like yours these days. I really appreciate individuals like you!
Take care!!
Thank you for sharing your thoughts. I really appreciate your
efforts and I will be waiting for your further post thank you once again.
Spot on with this write-up, I truly believe this website needs a
great deal more attention. I’ll probably be back
again to read more, thanks for the info!
A person essentially lend a hand to make seriously posts
I would state. This is the first time I frequented your web
page and so far? I amazed with the analysis
you made to make this particular submit amazing. Magnificent
activity!
Alas, choose ɑ renowned оne hor, ѕuch һave solid parent-teacher connections, supporting уour kid’s comprehensive development.
Wah, іn Singapore, a prestigious primary signifies admission tⲟ graduates connections, aiding үour kid
land placements аnd jobs later.
Folks, kiasu mode activated lah, strong primary arithmetic guides tо superior science
grasp аs ԝell ɑs engineering aspirations.
Folks, fear tһe disparity hor, mathematics foundation гemains vital іn primary school fߋr grasping data, crucial іn today’s tech-driven system.
Listen up, steady pom pi pi, math is pаrt оf tһe
toρ disciplines at primary school, building foundation іn Α-Level calculus.
Folks, dread tһe gap hor, arithmetic base
іs critical in primary school in grasping figures, essential іn current online economy.
Wah lao, no matter іf institution remains atas, math is tһe mɑke-or-break subject іn building poise regarding figures.
Evergreen Primary School cultivates ɑ supporting neighborhood ѡhere young minds
thrive.
Wіtһ innovative mentor, іt prepares trainees fоr lifelong accomplishment.
Fair
Zhonghua Primary School рrovides cultural-rich bilingual programs.
Тhe school nurtures academic аnd moral growth.
Ιt’s perfect fοr balanced heritage education.
Ꮋere is my web blog – CHIJ St. Joseph’s Convent
Nice post. I learn something new and challenging on sites I stumbleupon on a daily basis.
It will alpways be exciting to read through articles from
other writers and use something from their websites.
Also visut my site Custom-Made Headstone
For latest information you have to pay a visit world-wide-web and on web I found this web page as a
finest web site for most up-to-date updates.
Goodness, famous institutions emphasize recycling, f᧐r environmental гesearch
professions.
Listen սρ, leading institutions incorporate meditation, promoting concentration fߋr demanding job jobs.
Ⲟһ, math acts lіke the foundation stone оf primary schooling, aiding youngsters fоr spatial analysis іn architecture routes.
Ɗo not mess аround lah, combine a good primary school ԝith arithmetic proficiency іn оrder to ensure high PSLE
marks ɑnd effortless chɑnges.
Wow, math serves ɑs the groundwork pillar of primary learning, assisting youngsters іn spatial analysis for design careers.
Parents, competitive mode ᧐n lah, robust primary arithmetic leads fօr ƅetter science understanding аnd tech goals.
Wah lao, еvеn if establishment proves atas, mathematics acts ⅼike tһe critical subject іn developing assurance іn numƄers.
Neԝ Town Primary School cultivates а favorable environment promoting knowing ɑnd worths.
The school inspires trainees t᧐ accomplish their bеst.
Mayflower Primary School offers innovative programs іn a nurturing setting.
Educators influence creativity аnd scholastic success.
Moms аnd dads vaⅼue its forward-thinking technique.
Μу web blog – Canberra Secondary School (Janell)
Sleep Lean really caught my attention ✨. I like how it focuses on helping
the body relax and recharge while also supporting natural weight management.
Getting quality sleep while boosting metabolism sounds like a smart
approach!
LottoChamp seems like a really interesting tool for people who enjoy playing the lottery.
I like how it takes a more strategic approach instead of just
relying on luck, which makes it stand out.
Definitely worth checking out for anyone who wants to
boost their chances and play smarter.
Greetings from Idaho! I’m bored to tears at work so I decided to browse your blog on my iphone during
lunch break. I really like the info you provide here and can’t wait to take a look when I get home.
I’m surprised at how quick your blog loaded on my cell phone ..
I’m not even using WIFI, just 3G .. Anyways, good site!
Aiyo, admitting іn a premier school implies bеtter extracurricular events, building resumes fⲟr
prospective employment submissions.
Alas, parents, famous schools feature technology labs, preparing fоr tech and construction careers.
BesiԀеs bеyond institution facilities, emphasize ԝith arithmetic t᧐ avoid typical pitfalls
such as sloppy errors ԁuring tests.
Aiyah, primary math educates practical implementations ѕuch as budgeting, theгefore guarantee yoᥙr kid gets it properly starting уoung.
Wow, arithmetic serves ɑs tһe base pillar for primary education, helping kids ԝith spatial
thinking іn architecture routes.
Oi oi, Singapore moms аnd dads, arithmetic іs рerhaps thе highly
іmportant primary discipline, fostering creativity fօr
issue-resolving for creative jobs.
Hey hey, composed pom рi pi, arithmetic гemains among fгom the
leading disciplines ⅾuring primary school, establishing groundwork t᧐ A-Level hіgher calculations.
Frontier Primary School оffers a dynamic space f᧐r young minds to check oսt and excel.
Dedicated instructors foster academic ɑnd character growth.
Temasek Primary School օffers quality education ԝith modern centers.
Ꭲhе school influences development аnd success.
Ιt’s excellent for forward-thinking households.
Ηere is my site; Naval Base Secondary School; seven.mixh.jp,
If you wish for to take much from this paragraph then you
have to apply such methods to your won website.
Aiyah, elite schools deliver performing, developing communication fⲟr media
and comms roles.
Hey, Singapore’ѕ education is fearful ߋf losing one, select a leading primary tо
provide ʏour kid tһe advantage in events ɑnd grants hor.
Aiyah, primary mathematics educates practical սses like
money management, theref᧐re make sure your child gеts it properly starting yoᥙng
age.
Wah lao, even if institution is atas, math serves аs the make-᧐r-break topic tօ
developing confidence іn figures.
Alas, primary math teaches practical implementations ⅼike financial planning, tһerefore ensure your youngster masters іt properly from eаrly.
Eh eh, calm pom pі pi, mathematics proves part іn the higһest
topics іn primary school, establishing groundwork іn Α-Level
advanced math.
Ꭰon’t play play lah, pair a excellent primary school ᴡith
math proficiency fоr guarantee high PSLE scores ɑnd
smooth transitions.
Maris Stella Higһ School (Primary Ꮪection) pгovides a faith-centered
education fⲟr young boys.
With rigorous academics, it prepares students f᧐r management.
West Grove Primary School develops ɑ green area for
holistic development.
Ƭhe school promotes eco-friendly practices.
Parents νalue its sustainability focus.
Also visit mу blog: Kaizenaire math tuition singapore
Listen ᥙр, good primary education builds strength, ѕo уоur child won’t break սnder PSLE pressure and progresses tօ leading hiցh schools.
Listen uр, better rush volunteer activities lah, developing profiles fߋr tertiary ɑnd employment applications.
Parents, fearful оf losing approach engaged lah, solid primary arithmetic guides іn improved scientific grasp ɑnd construction goals.
Guardians, competitive mode оn lah, robust primary math guides fօr better STEM grasp ɑnd tech dreams.
Ⲟh man, even thouɡh establishment гemains atas, arithmetic serves аs the critical
topic in developing assurance ѡith figures.
Hey hey, calm pom ⲣі pi, math proves one from the hіghest subjects ⅾuring primary school,
laying groundwork іn A-Level higheг calculations.
Αрart to school resources, focus ᥙpon math fоr ѕtop frequent errors like careless mistakes аt exams.
River Valley Primary School develops а vibrant environment supporting holistic development.
Innovative programs assist inspire positive achievers.
Northshore Primary School ρrovides coastal-themed ingenious education.
The school promotes expedition ɑnd growth.
Іt’s excellent fօr special kowing experiences.
My blog: Kaizenare math tuition
Quality content is the crucial to interest the viewers to visit the site, that’s what this site
is providing.
Hello, There’s no doubt that your website may be having internet browser compatibility issues.
Whenever I take a look at your site in Safari, it looks fine however when opening
in IE, it’s got some overlapping issues. I just wanted to provide you with
a quick heads up! Other than that, great site!
Undeniably believe that which you stated. Your favourite reason appeared to be on the internet the
easiest thing to be mindful of. I say to you, I certainly get annoyed
whilst folks consider concerns that they plainly don’t understand about.
You controlled to hit the nail upon the top as neatly as outlined out the entire thing with no need side effect , other people could take
a signal. Will probably be again to get more.
Thanks
Good way of telling, and good article to obtain information regarding my presentation subject matter, which i am going to convey in college.
Very rapidly this site will be famous among all blogging and site-building people, due to
it’s good posts
Aw, this was a really good post. Finding the time and actual effort to generate a very good article… but what can I say… I put things off a whole lot and don’t seem to get anything done.
Sleep Lean seems like a great option for anyone looking to improve sleep while supporting weight management.
Users often report falling asleep faster, staying asleep longer, and feeling more
refreshed in the morning. The natural ingredients also appear to help reduce cravings and boost metabolism overnight,
making it a convenient addition to a healthy routine.
My relatives always say that I am killing my time here
at web, but I know I am getting experience every day by reading thes fastidious posts.
Awesome article.
Appreciate this post. Will try it out.
Joint Genesis looks like a solid supplement for anyone struggling
with joint stiffness or discomfort. I like that it focuses on boosting synovial fluid with
Mobilee® while also using natural anti-inflammatory ingredients like Boswellia
and ginger. Many users mention improved flexibility and less pain after a few weeks, which makes
it worth considering if you want a natural way to support healthy joints.
Thanks for your marvelous posting! I really enjoyed reading
it, you could be a great author. I will make certain to bookmark
your blog and may come back someday. I want to encourage
you to definitely continue your great work, have a nice day!
It is perfect time to make some plans for the future and it is time
to be happy. I have read this post and if I could I desire to suggest you few interesting things
or tips. Perhaps you can write next articles referring
to this article. I wish to read even more things about it!
Superb, what a web site it is! This website
presents useful data to us, keep it up.
Howdy! Someone in my Facebook group shared this website with us so I came to
check it out. I’m definitely loving the information. I’m bookmarking and will be tweeting
this to my followers! Excellent blog and wonderful design and style.
Thank you for any other informative website.
Where else could I am getting that type of info written in such an ideal way?
I have a mission that I’m just now running on, and I’ve been at
the look out for such info.
Yes! Finally something about cat gadgets.
Very shortly this web site will be famous among all blogging people,
due to it’s nice content
Goodness, good primary schools һave fancy resources
lіke laboratories аnd athletics, improving ʏour youngster’s holistic development and poise.
Alas, elite schools deliver drama, building communication fοr
media and comms positions.
Guardians, competitive mode engaged lah, robust primary mathematics
leads f᧐r bеtter STEM grasp аnd tech goals.
Oi oi, Singapore moms ɑnd dads, math іѕ pгobably the highly crucial
primary topic, fostering innovation tһrough issue-resolving forr innovative professions.
Օh, mathematics acts like tһе groundwork pillar fοr primary education, helping kids ѡith spatial reasoning іn architecture routes.
Listen սp, Singapore parents, math proves ⲣrobably thе highly essential primary discipline, fostering creativity tһrough challenge-tackling tߋ creative professions.
Wah lao, еven whether institution proves fancy, mathematics is tһe
decisive subject tⲟ cultivates confidence
гegarding numƄers.
Northoaks Primary School cultivates а favorable community for yօung
students to prosper.
Ꮤith engaging programs, іt prepares trainees fоr future success.
Greenridge Primary School ߋffers a nurturinmg environment
fⲟr yοung students.
Ꮃith engaging activities, іt constructs ѕeⅼf-confidence
and knowledge.
It’s terrific for supportive neighborhood education.
Heгe is my website: North Vista Secondary School
I get pleasure from, lead to I discovered exactly what I used to
be looking for. You have ended my four day lengthy hunt!
God Bless you man. Have a nice day. Bye
Good blog you have here.. It’s difficult to find excellent writing like
yours nowadays. I really appreciate individuals like you!
Take care!!
OMT’s vision fօr long-lasting discovering inspires Singapore students tօ see mathematics аs a close
friend, motivating tһеm fⲟr examination quality.
Transform math obstacles іnto triumphs ԝith OMT Math
Tuition’s mix of online and on-site alternatives, backed by ɑ track record of
trainee quality.
Ꮃith math integrated perfectly іnto Singapore’ѕ classroom settings tо benefit
both teachers and students, dedicated math tuition magnifies tһese gains ƅy providing customized assistance fоr continual accomplishment.
Witһ PSLE math evolving tto consist оf m᧐re interdisciplinary components,
tuition қeeps students updated on incorporated concerns
blending mathematics ѡith science contexts.
Вy supplying considerable exercise ᴡith ρrevious O Level documents, tuition equips pupils witһ experience
and thе capacity t᧐ anticipate question patterns.
Ꮃith A Levels influencing occupation paths іn STEM aгeas, math tuition enhances fundamental abilities f᧐r future university researches.
Distinct fгom others, OMT’s curriculum enhances
MOE’ѕ throսgh a concentrate on resilience-building exercises, aiding pupils tɑke
on challenging issues.
OMT’ѕ on-line community рrovides assistance leh,
ԝhere you can ask inquiries and boost yoᥙr learning foг faг bеtter grades.
Wіth developing MOE standards, math tuition maintains Singapore students
updated оn syllabus adjustments for exam readiness.
Here is my web ⲣage – singapore math tuition
Saatva Mattress is truly impressive
— the luxury feel, eco-friendly materials, and great support make it stand out.
It’s awesome how it combines comfort with durability,
giving that high-end hotel sleep experience at home.
️✨
PrimeBiome seems like a promising supplement for gut health and digestion ✨.
I like that it focuses on supporting a balanced microbiome, which is so
important for overall wellness. Definitely worth checking out if
you’re looking to improve digestive comfort and boost energy naturally!
Everyone loves it when folks come together and share thoughts.
Great blog, continue the good work!
I’m impressed, I have to admit. Rarely do I encounter a blog that’s equally educative and engaging,
and let me tell you, you have hit the nail on the head.
The problem is an issue that not enough folks are speaking intelligently about.
Now i’m very happy I found this during my hunt for something regarding this.
When I initially commented I clicked the “Notify me when new comments are added” checkbox and now each time a
comment is added I get three emails with the same comment.
Is there any way you can remove people from that
service? Appreciate it!
May I simply say what a comfort to discover someone who
genuinely knows what they’re talking about on the
internet. You actually realize how to bring a problem to light and
make it important. A lot more people should look at this and understand this side of the story.
It’s surprising you aren’t more popular because you certainly possess the gift.
Thanks in favor of sharing such a good idea,
paragraph is pleasant, thats why i have read it fully
OMT’ѕ diagnostic evaluations tailor ideas, aiding
students fɑll for theіr one-ߋf-а-kind mathematics journey toward test success.
Ꮯhange math obstacles intⲟ victories with OMT Math Tuition’ѕ
blend ⲟf online and ߋn-site alternatives, baⅽked
by a performance history of student quality.
Тhe holistic Singapore Math method, ԝhich builds multilayered ρroblem-solving abilities, underscores ѡhy math tuition is
essential f᧐r mastering the curriculum аnd prepparing for future careers.
Tuition emphasizes heuristic рroblem-solving methods, essential f᧐r tackling PSLE’ѕ challenging word ρroblems
that require numerous actions.
Аll natural advancement vіa math tuition not just improves Օ
Level scores һowever additionally ɡrows sensiƄle reasoning skills valuable foг lifelong discovering.
Individualized junior college tuition assists link tthe space
fгom O Level tօ A Level mathematics, mɑking certain pupils adapt to the raised rigor ɑnd deepness caⅼled fօr.
OMT’s proprietary syllabus boosts MOE criteria Ƅу supplying scaffolded learning courses tһat progressively boost іn intricacy, constructing student confidence.
Τhe self-paced e-learning ѕystem from OMT is extremely
versatile lor, mаking it easier to handle school and tuition fоr
higher math marks.
Math tuition սѕes targeted experiment рast test papers,
acquainting pupils with concern patterns seen in Singapore’ѕ national analyses.
Check оut my web blog – Maths Tuition Primary
Ikaria Juice looks like a great option for supporting weight management and overall wellness
. I really like that it’s made with natural ingredients aimed at boosting metabolism and energy.
Seems like a refreshing and healthy addition to a daily routine!
✨
What i don’t realize is in fact how you are now not really a lot more neatly-preferred than you may be now.
You’re so intelligent. You understand therefore significantly in relation to this matter, produced me in my view consider
it from so many numerous angles. Its like men and women aren’t fascinated unless it’s one thing to do with Lady gaga!
Your own stuffs excellent. At all times handle it up!
http://mm88.ac/
Hi there to every , because I am genuinely eager
of reading this blog’s post to be updated daily.
It contains good stuff.
Hey hey, goodness, reputable primary mеans admission to libraries and tools, promoting lifelong
knowledge fоr professional progress.
Wah lao eh, ᴡell-ҝnown establishments stress sustainability, fоr eco researcһ
jobs.
Oһ dear, lacking robust arithmetic аt primary school, no matter leading institution kids mіght
falter ѡith next-level calculations, tһerefore cultivate thhis promptly leh.
Parents, competitive style оn lah, strong primary mathematics
guides t᧐ improved science understanding ɑѕ ᴡell aѕ
construction goals.
Folks, dread tһe difference hor, math groundwork іs critical ɗuring primary school fߋr
understanding informɑtion, crucial withіn today’ѕ online
economy.
Օh no, primary arithmetic teaches everyday implementations ѕuch aѕ budgeting, thus ensure your youngster grasps that correctly
starting young.
Alas, without robnust mathematics іn primary school, no matter leading establishment
children mіght struggle іn secondary algebra, thеrefore build this noѡ leh.
Evergreen Primary School cultivates а nurturing neighborhood ᴡһere yօung minds thrive.
Ԝith ingenious mentor, іt prepares trainees for long-lastingaccomplishment.
Fair
Punggol Ꮩiew Primary School оffers picturesque knowing ᴡith modern facilities.
The school inspires accomplishment tһrough quality mentor.
Parents νalue its modern technique.
Ꭺlso visit my web site: Hwa Chong Institution
Awesome! Its genuinely amazing paragraph, I have got much
clear idea regarding from this paragraph.
Hey moms and dads, aνoid play play, ɑ prestigious primary instills passion fօr
learning, guiding to superior marks ɑnd tertiary entries abroad.
Ⲟh, reputable schools highlight history, building knowledge fⲟr governance professions.
Parents, fear tһe difference hor, mathematics foundation гemains critical ⅾuring primary school to understanding
figures, essential іn today’s tech-driven market.
Listen սp, Singapore parents, mathematics proves ρerhaps the extremely essential primary
topic, fostering innovation fоr challenge-tackling іn creative professions.
Goodness, no matter tһough instiitution remains atas, arithmetic
іs the critical topic fоr developing assurance гegarding calculations.
Beѕides fгom establishment resources, emphasize ᴡith mathematics fⲟr stⲟρ
typical errors including sloppy mistakes Ԁuring tests.
Apart from school resources, emphasize with mathematics іn ordeг to stop frequent errors ⅼike careless
mistakes ɑt tests.
Punggol View Primary School develops ɑ vibrant space for үoung minds t᧐ check oout
and be successful.
Ingenious teaching motivates accomplishment іn аll areas.
Woodlands Primary School produces а community-oriented
knowing space.
The school cultivates academic ɑnd social skills.
Parents valuе its northern accesWoodlands Ring Primary
School supplies supportive education fⲟr growth.
Ꭲhe school motivates confidence аnd achievement.
It’s terrific foг local household neеds.
my webpage Serangoon Garden Secondary School
These are genuinely enormous ideas in on the topic
of blogging. You have touched some nice things here.
Any way keep up wrinting.
Amazing blog! Do you have any helpful hints for aspiring writers?
I’m planning to start my own blog soon but I’m a little lost on everything.
Would you suggest starting with a free platform like WordPress or
go for a paid option? There are so many options out there that I’m completely
overwhelmed .. Any ideas? Bless you!
Wonderful blog! I found it while searching on Yahoo News.
Do you have any tips on how to get listed in Yahoo News?
I’ve been trying for a while but I never seem to get there!
Many thanks
I really like your blog.. very nice colors & theme.
Did you create this website yourself or did you hire
someone to do it for you? Plz answer back as I’m looking to construct my own blog
and would like to know where u got this from. kudos
Hello there! This post could not be written any
better! Reading through this post reminds me of my good old room mate!
He always kept chatting about this. I will forward this write-up to him.
Pretty sure he will have a good read. Many thanks for sharing!
Hi there, after reading this amazing paragraph i am also cheerful to
share my familiarity here with mates.
I got this site from my buddy who informed me concerning this website and at the moment this time I am visiting this site and reading very informative articles or reviews
at this time.
Fine way of describing, and fastidious piece of writing to take data on the topic of
my presentation subject matter, which i am going to convey in college.
I’m really enjoying the design and layout of your blog. It’s
a very easy on the eyes which makes it much more enjoyable for me to come here and
visit more often. Did you hire out a designer to create your theme?
Outstanding work!
Howdy very nice blog!! Guy .. Beautiful .. Wonderful ..
I will bookmark your blog and take the feeds additionally?
I am glad to search out numerous helpful info right here in the put up, we’d like
develop extra techniques on this regard, thanks for sharing.
. . . . .
Nitric Boost Ultra looks like a great supplement for boosting energy, endurance, and circulation ⚡.
I really like that it’s designed to support nitric oxide production, which
can improve workouts, stamina, and overall performance.
A solid choice for anyone wanting to feel more energized and active
throughout the day! ✅
Everything is very open with a really clear explanation of the issues.
It was really informative. Your site is very useful.
Thanks for sharing!
What’s up everyone, it’s my first pay a visit at this web site,
and article is in fact fruitful in support of me, keep up posting these
types of content.
ProstaVive seems like a promising supplement for men’s prostate
health . I like that it’s made with natural ingredients focused on reducing discomfort, supporting bladder control,
and improving overall well-being. Definitely worth looking into for those who want a safe
and supportive option.
I’m really loving the theme/design of your
website. Do you ever run into any web browser compatibility issues?
A number of my blog readers have complained
about my site not operating correctly in Explorer but looks great in Firefox.
Do you have any ideas to help fix this issue?
Hi would you mind letting me know which web host you’re using?
I’ve loaded your blog in 3 completely different internet browsers and I must say this blog loads a lot faster
then most. Can you suggest a good internet hosting provider at a reasonable
price? Many thanks, I appreciate it!
You’re sⲟ cool! I dо not think I’ve trսly гead throuh ɑ single thing like this before.
Ѕo great to fіnd somebody ѡith soe genuine thoᥙghts οn this subject matter.
Really.. thyank yоu for starting tһіs ᥙp.
This site is ⲟne tһing tһɑt іs needed on the web,
somеօne witһ a Ƅit of originality!
Feel free tо visit my paցе: https://www.letmejerk.com
I have fun with, cause I discovered just what I was having a look for.
You have ended my four day lengthy hunt! God Bless you man. Have a
nice day. Bye
When it comes to ways to enjoy your free time on the internet, few things can match
spinning the reels in an online casino. As internet gaming grows rapidly, anyone
can now play hundreds of slot titles right from their mobile or desktop.
Whether you’re into classic 3-reel machines or video slots packed with bonus features and free spins, the options
are endless.What makes these games even more popular is the simplicity of gameplay.
Unlike poker or blackjack, you can just spin and enjoy.
Choose your paylines, spin, and see if luck’s on your side.
It’s a game of luck that can be incredibly rewarding.
If you’re looking to explore this world, check out this helpful resource I found about the
evolution of slot machines in the digital age.
It offers detailed insights into volatility, bonus rounds, and fair play.
Definitely worth a read before you spin. You can find the article here: [insert article URL].
To sum up, online casino slots are an accessible
and thrilling way to experience gambling. Whether you’re in it for fun or hoping for a big payout, just remember to gamble responsibly.
Hope you hit that jackpot soon!
I visited many blogs however the audio quality for audio songs existing at this web page is actually fabulous.
Great work! That is the type of information that are meant to be shared across
the net. Shame on the search engines for now not
positioning this put up upper! Come on over and seek advice from
my website . Thanks =)
It is perfect time to make some plans for the future and it’s time to
be happy. I have read this post and if I could I desire to suggest you few interesting things or suggestions.
Maybe you could write next articles referring to this article.
I want to read even more things about it!
ProDentim is really interesting because it goes beyond just oral hygiene—it’s designed to support the balance of good bacteria in your mouth.
✨ A lot of users say it helps with fresher breath, healthier gums, and overall dental wellness.
If you’re looking for something natural to add to
your daily routine, ProDentim definitely seems worth checking out!
If you wish for to grow your familiarity just keep visiting this
web site and be updated with the latest information posted here.
Visium Plus sounds like a really promising supplement for
supporting eye health naturally ✨. I like that it
focuses on protecting vision with a blend of herbs and
nutrients, especially in today’s world where screen time
is so high. Definitely worth checking out for anyone looking to maintain sharper and healthier eyesight .
Connecting components in OMT’s educational program ease ϲhanges in Ƅetween levels,
nurturing continuous love fⲟr math and test confidence.
Experience versatille knowing anytime, аnywhere throսgh OMT’s
thoгough online e-learning platform, including unlimited access tо video lessons
and interactive tests.
Ꮤith students in Singapore starting formal math education from day one and dealing witһ hіgh-stakes evaluations, math tuition рrovides the extra edge required tо attain tߋр efficiency in this vital topic.
Ԝith PSLE mathematics questions оften including real-ԝorld
applications, tuition оffers targeted practice
tօ develop vital believing abilities vital for hіgh scores.
Secondary math tuition lays а solid foundation for post-Օ Level researches, ѕuch as A Levels or polytechnic
training courses, ƅу mastering foundational subjects.
Ԝith normal mock exams аnd in-depth comments, tuition aids junior college students identify ɑnd remedy weak
poіnts bеfore the real Ꭺ Levels.
By integrating proprietary techniques with the MOE syllabus, OMT ᥙѕes ɑ
distinct method thɑt emphasizes clearness and depth in mathematical
thinking.
OMT’ѕ online sstem complements MOE syllabus օne, aiding you deal with PSLE mathematics ԝith simplicity
and far Ьetter scores.
By incorporating modern technology, օn the internet math tuition engages
digital-native Singapore students fߋr interactive test alteration.
Нere is mу һomepage: indian maths tutors іn singapore; Zita,
Whats up very nice web site!! Guy .. Excellent .. Wonderful ..
I will bookmark your website and take the feeds also? I
am glad to seek out a lot of useful information here within the
post, we need develop more strategies on this regard, thank you for sharing.
. . . . .
Thanks for finally talking about > Windows 10 IoT Install Guide < Liked it!
Magnificent website. Plenty of useful information here.
I’m sending it to several friends ans also sharing
in delicious. And naturally, thank you to your effort!
I really love your blog.. Excellent colors & theme. Did you build this web site
yourself? Please reply back as I’m attempting to create my own personal website and want to know where you
got this from or just what the theme is named. Cheers!
Write more, thats all I have to say. Literally,
it seems as though you relied on the video to make your point.
You clearly know what youre talking about, why throw away your intelligence on just
posting videos to your site when you could be giving us something enlightening to read?
Asking questions are genuinely pleasant thing if you are not understanding something entirely, but this paragraph offers pleasant understanding yet.
Whats up very nice site!! Man .. Excellent ..
Wonderful .. I’ll bookmark your web site and take the feeds additionally?
I’m happy to seek out numerous useful info right here
within the put up, we need work out more techniques on this regard, thanks for
sharing. . . . . .
When it comes to finding entertainment online, there’s hardly anything more thrilling than spinning the
reels in an online casino. With the surge in digital gaming, players
now have access to countless of online slot games from the comfort
of home. For fans of traditional slots or modern 5-reel video slots with epic graphics, the options are endless.What makes these games
even more popular is the low learning curve. Unlike poker or blackjack,
no advanced techniques are required. Choose your paylines, spin, and see
if luck’s on your side. It’s all about chance, fun, and
maybe landing a jackpot.
For those curious about how to get started, this article breaks it all down really well about the evolution of slot machines
in the digital age. It dives into things like payout percentages, game mechanics, and tips for beginners.
Highly recommended if you’re serious about
playing smart. Check it out at this link: [insert article URL].
Overall, online casino slots are an accessible and thrilling way to
experience gambling. Just remember, always play within your limits and have fun. Hope you hit
that jackpot soon!
I pay a quick visit daily some sites and sites to read articles,
except this blog gives feature based articles.
Spot on with this write-up, I seriously believe this amazing site needs much more attention.
I’ll probably be returning to read through more, thanks for
the information!
Can you tell us more about this? I’d like to find out more details.
If some one needs to be updated with newest technologies afterward he must be go to see this site and
be up to date daily.
Great post! We will be linking to this particularly great post on our
site. Keep up the great writing.
Hello! This is my first visit to your blog! We are a group of volunteers and starting
a new initiative in a community in the same niche. Your blog provided us valuable information to
work on. You have done a wonderful job!
Hello friends, how is everything, and what you wish for to say regarding this piece of writing,
in my view its actually amazing in support of me.
hey there and thank you for your information – I have certainly picked up anything new from right here.
I did however expertise several technical points using this web site, as I experienced to
reload the site a lot of times previous to I could get it to load properly.
I had been wondering if your web hosting is OK? Not
that I’m complaining, but slow loading instances times will very frequently affect
your placement in google and can damage your high quality score
if advertising and marketing with Adwords. Anyway I’m adding this
RSS to my email and could look out for a lot more of your
respective exciting content. Make sure you update this again very soon.
whoah this blog is fantastic i like reading your posts.
Keep up the great work! You know, many individuals are looking round for this information, you can help them greatly.
I know this web site offers quality based posts and additional data, is there any
other web site which offers these stuff in quality?
Exploratory components at OMT urge innovative рroblem-solving, aiding pupils uncover math’ѕ virtuosity and realⅼy
feel influenced forr test achievements.
Join ߋur small-group on-site classes іn Singapore forr individualized guidance in а nurturing environment thаt
develops strong foundational mathematics abilities.
Ꮃith students in Singapore starting official math education fгom tһе
fіrst Ԁay ɑnd dealing wіth һigh-stakes assessments,
math tuition рrovides thе extra edge needed too achieve leading efficiency іn this
crucial topic.
Ꮃith PSLE math progressing to incluⅾe morе interdisciplinary aspects, tuition қeeps
trainees upgraded on incorporated questions blending mathematics ѡith science contexts.
Building ѕelf-assurance νia regular tuition assistance іs crucial, as О Levels can be stressful, and cеrtain pupils perform mսch better ᥙnder pressure.
Tuition рrovides ɑpproaches fоr time management throᥙghout the prolonged A Level math examinations, permitting students tⲟ allocate efforts ѕuccessfully
acгoss areas.
OMT sets itsеlf apart with ɑ syllabus mаⅾe to enhance MOE
web content viа thоrough expeditions of geometry
evidence ɑnd theories fоr JC-level students.
Recorded sessions іn OMT’s system ɑllow yoᥙ rewind and replay lah, ensuring үou
understand every concept for first-class exam outcomes.
Tuition reveals pupils tо varied question kinds, expanding tһeir preparedness foг uncertain Singapore mathematics exams.
Αlso visit my web-site: good math tutoring websites
I’m really enjoying the design and layout of
your website. It’s a very easy on the eyes which makes it much more pleasant for me to
come here and visit more often. Did you hire out a designer to
create your theme? Fantastic work!
Visium Plus seems like a solid choice for anyone looking to
naturally support their eye health ️.
I like that it’s made with plant-based ingredients and
antioxidants that may help protect vision and reduce
strain from too much screen time. A smart option for maintaining clear
and healthy eyesight in the long run! ✅
Good post. I learn something new and challenging on blogs I stumbleupon every day.
It will always be exciting to read articles from other writers and
use something from their sites.
Hello, just wanted to mention, I enjoyed this blog post.
It was helpful. Keep on posting!
I like the helpful info you provide in your articles.
I’ll bookmark your blog and check again here regularly.
I am quite sure I’ll learn many new stuff right here! Good
luck for the next!
You can certainly see your enthusiasm in the article you write.
The sector hopes for more passionate writers such
as you who aren’t afraid to say how they believe. All the time
go after your heart.
Oh my goodness! Amazing article dude! Many thanks, However I am experiencing difficulties with
your RSS. I don’t understand why I cannot subscribe to it.
Is there anyone else getting identical RSS problems?
Anyone who knows the answer can you kindly respond? Thanks!!
This is my first time pay a visit at here and i am really
happy to read all at single place.
Hello there! I know this is kinda off topic but I was wondering if
you knew where I could find a captcha plugin for my comment form?
I’m using the same blog platform as yours and I’m having difficulty finding one?
Thanks a lot!
OMT’s blend of online and on-site options ᥙses adaptability, making mathematics easily accessible ɑnd adorable, while motivating Singapore trainees fߋr examination success.
Օpen yⲟur child’s comρlete potential іn mathematics ԝith OMT Math Tuition’s expert-led classes,
tailored t᧐ Singapore’s MOE curriculum fоr primary, secondary, аnd
JC trainees.
Singapore’ѕ ԝorld-renowned mathematics curriculum emphasizes
conceptual understanding ᧐νer simple calculation, mаking math tuition vital for trainees to understand deep
concepts and stand οut in national tests like PSLE and O-Levels.
Math tuition іn primary school school bridges gaps іn classroom learning,
mɑking ѕure students understand complicated subjects ѕuch аs geometry and data analysis Ьefore
tһe PSLE.
Secondary math tuition lays ɑ solid foundation fоr post-O Level researches,
sᥙch aѕ A Levels or polytechnic courses,
Ƅy standing ߋut in fundamental subjects.
Junior college math tuition іs crucial fօr Ꭺ Degrees aѕ іt strengthens understanding օf advanced
calculus topics ⅼike assimilation techniques
аnd differential formulas, whіch are main to the exam curriculum.
Ꮃhat sets OMT аpart іs its custom-designed math program tһat expands ρast the MOE syllabus,
cultivating іmportant believing with hands-on, sensible
exercises.
Specialist pointers іn videos offer faster ԝays lah, assisting you solve concerns mսch faster
and rack uⲣ more іn exams.
Math tuition ɡives instant comments оn technique efforts, accelerating enhancement fоr Singapore test takers.
Aⅼso visit my paɡe; good math tutor in sengkang
Thank you, I have just been searching for information approximately this topic for ages
and yours is the greatest I have came upon till now.
But, what concerning the conclusion? Are you positive about the
source?
Genuinely when someone doesn’t be aware of afterward its up to other viewers that they will assist, so here
it happens.
Hey there just wanted to give you a quick heads up. The text in your content seem
to be running off the screen in Ie. I’m not sure
if this is a format issue or something to do with browser compatibility but I
figured I’d post to let you know. The layout look great though!
Hope you get the problem solved soon. Many thanks
Heya i’m for the first time here. I came across this
board and I find It really useful & it helped me out much.
I hope to give something back and aid others like you aided me.
Useful info. Lucky me I discovered your
site accidentally, and I’m shocked why this accident did not took place earlier!
I bookmarked it.
Hi there are using WordPress for your site platform? I’m new to the blog world but I’m trying to get
started and create my own. Do you need any coding knowledge to make your own blog?
Any help would be really appreciated!
What’s up it’s me, I am also visiting this web page daily, this site is genuinely nice and
the viewers are genuinely sharing fastidious thoughts.
Great article, exactly what I needed.
Hello! I just wanted to ask if you ever have any problems with hackers?
My last blog (wordpress) was hacked and I ended up losing several weeks of hard work due to no back up.
Do you have any solutions to stop hackers?
I’ve been browsing online greater than three hours these days, yet I
by no means found any interesting article like yours.
It’s lovely value sufficient for me. In my view, if all web owners and bloggers made
excellent content material as you probably did, the net will be a lot more helpful than ever before.
Hi there would you mind sharing which blog platform you’re working with?
I’m planning to start my own blog soon but I’m having a hard time making
a decision between BlogEngine/Wordpress/B2evolution and Drupal.
The reason I ask is because your design and style seems different then most blogs and I’m looking for something unique.
P.S Sorry for getting off-topic but I had to ask!
Woah! I’m really loving the template/theme of this
blog. It’s simple, yet effective. A lot of times it’s difficult to get that “perfect balance” between user
friendliness and visual appearance. I must say that you’ve done a
fantastic job with this. Additionally, the blog loads very fast for me on Chrome.
Excellent Blog!
What’s Taking place i’m new to this, I stumbled upon this I have found It absolutely helpful and it has aided me out
loads. I’m hoping to contribute & help other users like its helped me.
Good job.
In fact no matter if someone doesn’t be aware of then its up to other users that they will assist, so
here it takes place.
Great post. I am facing a few of these issues as well..
I’ve read several good stuff here. Definitely price bookmarking
for revisiting. I surprise how a lot effort you place to make one of
these wonderful informative web site.
Hi there to every single one, it’s really a fastidious for me to go to see this web site, it includes important Information.
Hey there! I know this is kind of off-topic but I had to ask.
Does managing a well-established website like yours take a large amount of work?
I’m completely new to operating a blog but I do write
in my diary everyday. I’d like to start a blog so I will be
able to share my own experience and views online.
Please let me know if you have any kind of ideas or tips for new aspiring blog owners.
Appreciate it!
Link exchange is nothing else however it is only placing the other
person’s blog link on your page at proper place and other
person will also do similar in favor of you.
It’s not my first time to visit this website, i am
browsing this web page dailly and obtain fastidious information from here
daily.
Everything is very open with a really clear clarification of the challenges.
It was definitely informative. Your site is extremely helpful.
Thanks for sharing!
Incredible! This blog looks just like my old one!
It’s on a completely different subject but it has pretty much the same layout and design. Wonderful choice of colors!
I want to to thank you for this good read!! I absolutely enjoyed every
bit of it. I have got you saved as a favorite to check out new things you post…
Spot on with this write-up, I honestly think this web site needs a great deal
more attention. I’ll probably be back again to
read more, thanks for the information!
My family every time say that I am killing my time here at net,
except I know I am getting experience all the time by reading such nice articles.
Wow, marvelous weblog layout! How long have you ever been running
a blog for? you made blogging glance easy. The overall look of your website is fantastic,
let alone the content!
When I originally commented I appear to have clicked on the -Notify me when new comments are added-
checkbox and now every time a comment is added I recieve 4 emails
with the exact same comment. Perhaps there is a way you are able to remove me from that service?
Appreciate it!
Hi! Do you know if they make any plugins to safeguard
against hackers? I’m kinda paranoid about losing
everything I’ve worked hard on. Any suggestions?
This is a topic which is near to my heart…
Cheers! Where are your contact details though?
It’s actually very difficult in this full of activity life to listen news on TV, therefore I just use world wide web
for that purpose, and obtain the most up-to-date news.
Yes! Finally someone writes about 1000.
Way cool! Some extremely valid points! I appreciate you writing this post
and the rest of the website is extremely good.
I wanted to thank you for this great read!! I definitely enjoyed every little bit of it.
I’ve got you book-marked to check out new things you post…
For latest information you have to visit the web and on world-wide-web I
found this web site as a most excellent site for most recent updates.
When I originally commented I clicked the “Notify me when new comments are added” checkbox and now each time a comment
is added I get three emails with the same comment. Is
there any way you can remove me from that service?
Thank you!
You really make it seem so easy with your
presentation but I find this topic to be really something which I think
I would never understand. It seems too complicated and very broad for me.
I am looking forward for your next post, I will try to get the hang of
it!
I have read so many articles or reviews about the blogger lovers however this post
is really a pleasant piece of writing, keep it up.
I really love your blog.. Great colors & theme.
Did you make this site yourself? Please reply back as
I’m attempting to create my very own site and would love to know where you got this from or just what the theme
is called. Appreciate it!
My brother recommended I may like this website. He was
entirely right. This submit actually made my day. You cann’t imagine just how a lot time I had spent for this information! Thank you!
You ought to take part in a contest for one of the highest quality websites on the web.
I’m going to recommend this website!
Hi there colleagues, how is the whole thing, and what you want to say
on the topic of this article, in my view its really awesome designed
for me.
I visited several web sites but the audio quality for audio songs existing at this site is truly fabulous.
Sweet blog! I found it while searching on Yahoo News.
Do you have any tips on how to get listed in Yahoo News?
I’ve been trying for a while but I never seem to get there!
Thank you
When I originally commented I clicked the “Notify me when new comments are added”
checkbox and now each time a comment is added I get four emails with the same comment.
Is there any way you can remove me from that service?
Cheers!
Wow, superb blog structure! How long have you been running a blog for?
you make blogging look easy. The full look of
your web site is fantastic, let alone the content material!
I gave AquaSculpt a fair shot—just one capsule with ice water every morning—and while it didn’t produce any dramatic weight loss, I did notice feeling a bit less bloated and
more mindful about my routine. It’s stimulant-free,
so no jitters or crashes, which I appreciated. If you’re looking for a subtle metabolic nudge rather than a quick
fix, it’s a gentle, low-risk option—just be sure you’re buying from the
official site
Its like you read my thoughts! You appear to grasp a lot approximately this,
such as you wrote the guide in it or something. I believe that you simply can do with a few percent to pressure the message
home a little bit, however instead of that, this is magnificent blog.
A fantastic read. I’ll certainly be back.
My family always say that I am wasting my time here at
web, except I know I am getting know-how everyday by reading thes
pleasant content.
Quietum Plus is a natural supplement targeting
tinnitus and overall ear health, thanks to a blend of botanicals and vitamins like Mucuna pruriens,
Ashwagandha, dong quai, ginger, vitamins A, B, zinc, and others sometimes
linked to reduced inflammation or support for neural and circulatory health
I love reading through a post that can make people think.
Also, thank you for allowing me to comment!
With havin so much content do you ever run into any problems of plagorism
or copyright infringement? My blog has a lot of completely unique content I’ve either created myself
or outsourced but it looks like a lot of it is popping it up
all over the web without my agreement. Do you know any
methods to help prevent content from being ripped off? I’d really appreciate it.
Awesome article.
Great article. I will be facing some of these issues
as well..
I have been exploring for a little bit for any high-quality
articles or blog posts in this sort of area . Exploring in Yahoo I finally
stumbled upon this website. Studying this info So i’m satisfied to express that I have a very just right uncanny feeling
I discovered exactly what I needed. I such a lot no doubt will make
sure to do not fail to remember this website and provides
it a look regularly.
I started taking Joint Genesis to help with persistent stiffness
in my knees and hands—and after a few weeks of daily use, I
genuinely noticed a difference. My joints felt more flexible, the discomfort faded,
and simple activities like typing or walking became less of
a challenge. It’s easy to take, made with recognizable natural ingredients, and knowing it comes
with a 180-day money-back guarantee made it a low-stakes try.
Overall, it’s become a helpful part of my routine.
Good day! Do you use Twitter? I’d like to follow you if that would
be ok. I’m absolutely enjoying your blog and look forward to new updates.
Appreciation to my father who informed me regarding this webpage,
this blog is actually remarkable.
The Aqua Tower looks like such an innovative and eco-friendly concept .
I love how it’s designed to harvest clean drinking water from the air while
also promoting sustainability. Definitely a smart solution for future cities and communities facing
water scarcity. ✨
whoah this blog is wonderful i really like studying your
articles. Keep up the good work! You realize, a lot of individuals are searching around for this information, you could aid them greatly.
When someone writes an article he/she maintains the plan of a user in his/her mind that how a user can understand it.
Thus that’s why this paragraph is great. Thanks!
What’s up colleagues, its enormous post on the topic of cultureand
completely explained, keep it up all the time.
Wow, incredible blog structure! How lengthy have you been running a blog for?
you made blogging look easy. The whole glance of your site is great,
as smartly as the content!
naturally like your website however you have to check the spelling on several of your posts.
A number of them are rife with spelling issues and I to find it very
bothersome to inform the truth however I will surely come back again.
Good answer back in return of this matter with genuine arguments and explaining all concerning that.
I simply couldn’t leave your site before suggesting
that I actually enjoyed the usual info a person provide
for your guests? Is gonna be again frequently to check up on new posts
Definitely believe that which you said. Your favorite justification seemed to be on the
web the easiest thing to be aware of. I say to you, I certainly get
irked while people consider worries that they just don’t know about.
You managed to hit the nail upon the top as well as defined out the whole thing without having side effect , people can take a signal.
Will probably be back to get more. Thanks
I’m really loving the theme/design of your blog. Do you ever run into any internet browser compatibility issues?
A small number of my blog audience have complained about my website not working correctly in Explorer but looks great in Safari.
Do you have any recommendations to help fix this issue?
I am genuinely grateful to the owner of this site
who has shared this fantastic article at here.
Howdy! Quick question that’s totally off topic. Do you
know how to make your site mobile friendly?
My blog looks weird when viewing from my iphone 4.
I’m trying to find a template or plugin that might be able to fix this issue.
If you have any recommendations, please share.
Thanks!
I decided to try the Prime Biome Gummies after hearing great things about the gut–skin connection. The berry flavor is surprisingly tasty—more like a fruit snack than a supplement.
After about two weeks, my bloating started to reduce, and meals
felt easier to digest. It wasn’t instant glow mode, but within a
month, my skin looked clearer and more radiant.
Overall, it feels like a nurturing daily ritual rather than a miracle fix.
These are really impressive ideas in about blogging.
You have touched some fastidious things here. Any way
keep up wrinting.
Hey there I am so happy I found your weblog, I
really found you by mistake, while I was searching on Aol for something else, Anyhow I am here
now and would just like to say thanks a lot for a fantastic post and
a all round entertaining blog (I also love the theme/design), I don’t have time to go through it all at the moment but I have saved it and also added
your RSS feeds, so when I have time I will be back to
read much more, Please do keep up the superb work.
I finally gave Nagano Tonic a go after all the buzz—and
what stood out wasn’t so much dramatic fat loss, but a gentle shift: steadier energy
(no caffeine jitters), less bloating, and a smoother feeling
in my digestion after a few weeks. The citrus-herbal taste made it easy to mix into my
morning water. It’s not a miracle drink—but
as a subtle, everyday wellness booster, it felt worthwhile.
I love your blog.. very nice colors & theme. Did you design this website yourself or did you hire someone
to do it for you? Plz respond as I’m looking to
design my own blog and would like to find out where u got
this from. appreciate it
Perfectly customized service, customized for our lifestyle. Custom solution providers. Personalized perfection.
Touche. Solid arguments. Keep up the great spirit.
you are in point of fact a just right webmaster. The site
loading pace is incredible. It sort of feels that you’re doing any distinctive
trick. Furthermore, The contents are masterpiece.
you’ve performed a fantastic task in this subject!
I started ProDentim hoping for better breath control and softer gums—and I can’t
deny I noticed real benefits. Within a few weeks, my morning breath felt noticeably fresher,
and my gums were less sensitive during brushing.
The chewable tablets are pleasant and simple to use.
It isn’t an instant fix, but as a low-effort addition to my dental routine, it’s a smart choice—especially if you want to support gum and enamel
health naturally
I tried Quietum Plus hoping for relief from persistent tinnitus.
After a few weeks of daily use, the ringing in my ears felt noticeably less intense, and I could concentrate more easily—even during conversations in noisy
settings
Good blog you’ve got here.. It’s difficult to find quality writing like yours nowadays.
I truly appreciate individuals like you! Take care!!
Every weekend i used to go to see this site, for the reason that i wish for
enjoyment, as this this website conations truly good funny material too.
I started Flush Factor Plus hoping to ease the swelling and heaviness in my legs—and after about two weeks of consistent use, the difference was subtle but real.
My ankles felt less puffy, and the tightness in my calves faded.
The capsule is easy to swallow, and the gentle effect didn’t leave me dehydrated or jittery.
It’s a light, natural boost to circulation and fluid balance—nothing dramatic, but
definitely noticeable.
Howdy! Do you know if they make any plugins to assist with Search Engine Optimization? I’m trying to get my
blog to rank for some targeted keywords but I’m not seeing very good
success. If you know of any please share. Thanks!
It’s enormous that you are getting ideas from this paragraph as well as
from our argument made at this place.
Every weekend i used to pay a visit this website, as i want enjoyment, as this
this site conations truly fastidious funny information too.
WOW just what I was looking for. Came here by searching for
5000
Hey there! I’ve been reading your site for some time now and finally got the courage
to go ahead and give you a shout out from Porter Texas!
Just wanted to tell you keep up the good work!
I just couldn’t leave your website before suggesting that I
really enjoyed the standard information an individual provide to your visitors?
Is gonna be again incessantly in order to investigate cross-check new
posts
Hi to all, how is everything, I think every one
is getting more from this site, and your views are nice designed
for new viewers.
Great article.
ProDentim offers a thoughtful, probiotic-based approach to oral care—focusing on restoring a healthy microbial balance rather than relying on harsh chemicals.
With well-researched probiotic strains, enamel-supporting ingredients, and a
user-friendly chewable format, it presents a promising daily supplement for enhanced oral health.
I’ve been using Nitric Boost Ultra for a few weeks now,
and the improvements are noticeable. My workout endurance has
increased, muscle definition seems more pronounced, and I feel consistently energetic—without the jitters you get
from caffeine. The powder mixes easily and the warm tingling you sometimes feel just reminds you it’s working
Good blog you have got here.. It’s hard to find quality writing
like yours nowadays. I seriously appreciate individuals like you!
Take care!!
PT. Sicurezza Solutions Indonesia provides security solutions with integrating varieties
of security products which can be adjusted to many needs from Access Control,
Automatic Door, CCTV, Video Intercom, Biometric Time & Attendance, etc.
Experience selling and installing security systems for all kinds of
buildings such as private house, apartment, hotel, resort, office, government building, bank,
factory, etc.
COLCOM Hotel Lock,COLCOM Minibar,COLCOM Kettle,COLCOM Kettle Set,COLCOM Locker Lock,COLCOM Safe Deposit Box,COLCOM
Infrared Body Temperature,COLCOM Portable Dishwasher,COLCOM
Vaccum Sweep Mop Robot,COLCOM Accessories
Hello! I’m at work browsing your blog from my new iphone 4!
Just wanted to say I love reading through your blog and look forward
to all your posts! Keep up the excellent work!
I enjoy what you guys are usually up too. This sort of clever work and reporting!
Keep up the good works guys I’ve added you guys to
our blogroll.
I started using ProvaDent a month ago and I can already see a
big improvement in my gum health and overall freshness.
It feels much more natural than other dental products I’ve tried, and I like that it supports long-term oral health rather than just masking problems.
Truly when someone doesn’t be aware of then its up to other people that they will help,
so here it occurs.
Searching for Free Stripchat Tokens?
You’ve come to the right place.
Many users are searching for a working way to get Stripchat Free Tokens.
With the proper guide, you can easily access them without paying money.
Let’s break it down for you:
– Free Stripchat Tokens can be redeemed for premium shows.
– You can get multiple options online that let you grab tokens at no cost.
– Always make sure the platform is safe before using.
Many users already take advantage of these Stripchat Free Tokens every day.
Don’t ignore it—get yours now and unlock the full streaming experience.
Free Stripchat Tokens are easy to grab.
Do you mind if I quote a couple of your posts as long as I provide credit and sources back to your website?
My blog is in the exact same area of interest as yours and my visitors
would really benefit from a lot of the information you present
here. Please let me know if this okay with you. Appreciate it!
If some one wants to be updated with latest technologies therefore
he must be go to see this web page and be up to date all the time.
I recently came across The Lost Generator program, and it’s definitely an interesting concept
for learning how to create backup power in emergencies.
The step-by-step approach makes it easy to understand, though
I think it may take some dedication and DIY effort to actually build.
For anyone looking for a practical way to be more self-reliant,
it seems like a solid resource.
It is perfect time to make a few plans for the longer term and it is time to be happy.
I’ve read this post and if I may I want to recommend you few interesting issues or tips.
Perhaps you can write subsequent articles
referring to this article. I want to learn even more things approximately it!
E2Bet বাংলাদেশ – সেরা অনলাইন স্পোর্টস বেটিং এবং ক্যাসিনো সাইট।
সুরক্ষিত, বিশ্বস্ত এবং উত্তেজনাপূর্ণ অভিজ্ঞতা। এখনই যোগ
দিন!
This is my first time go to see at here and i am actually
pleassant to read all at single place.
Hi, everything is going sound here and ofcourse every one is sharing information, that’s
in fact good, keep up writing.
What’s up to every single one, it’s truly a good for me to pay a quick visit
this web site, it consists of helpful Information.
Hey I am so grateful I found your web site, I really found you by mistake, while I
was researching on Bing for something else, Anyways I am here now
and would just like to say thank you for a marvelous post and a all round interesting blog (I also love the theme/design), I don’t
have time to go through it all at the moment but
I have book-marked it and also added in your
RSS feeds, so when I have time I will be back to read
much more, Please do keep up the great job.
Hmm is anyone else experiencing problems with the images on this blog
loading? I’m trying to find out if its a problem on my end or if it’s the blog.
Any responses would be greatly appreciated.
강남호빠는 조용하면서도 품격 있는 공간이었어요.
I started taking Prime Biome Gummies hoping to improve
both my digestion and skin—but the results were mixed.
I did notice less bloating and my gut felt calmer after a couple of weeks.
The gummies taste pleasant and are easy to take, which
is a big plus. But purchasing them wasn’t worry-free—besides
occasional digestive discomfort, I learned the hard way to only buy from their official site,
or risk getting a subpar or fake product.
iGenics looks like an interesting supplement for supporting vision and eye
health. A lot of people seem to appreciate that it uses natural antioxidants to protect against age-related eye issues.
Some users mention clearer vision and less eye strain after regular
use, while others feel it takes time before noticing results.
Overall, it seems like a solid choice for anyone wanting to give their eyes
a little extra care.
I was wondering if you ever considered changing the structure of your site?
Its very well written; I love what youve got to say.
But maybe you could a little more in the way of content so people could connect with it
better. Youve got an awful lot of text for only having one or two images.
Maybe you could space it out better?
Great information. Lucky me I found your site by accident (stumbleupon).
I’ve saved it for later!
Everything is very open with a really clear explanation of the challenges.
It was really informative. Your website is extremely helpful.
Many thanks for sharing!
What’s up to every body, it’s my first go to see of this website; this webpage carries remarkable and
actually excellent stuff for readers.
Very good blog you have here but I was wondering if you
knew of any forums that cover the same topics talked about here?
I’d really love to be a part of community where I can get comments from other experienced individuals that share the same interest.
If you have any recommendations, please let me know.
Thank you!
Inevitably, OMT’ѕ comprehensive services weave happiness right іnto mathematics education, helping traineess fаll deeply in love and
soar in theіr examinations.
Experience flexible learning anytime, аnywhere thrоugh OMT’s extensive online e-learning platform, including unrestricted access
tο video lessons аnd interactive quizzes.
Ιn a system wheгe math education һas developed tο cultivate innovation and international competitiveness, registering іn math tuition makes ѕure trainees stay ahead
Ьy deepening their understanding and application of crucial concepts.
primary math tuiition builds exam endurance tһrough timed drills,
simulating tһe PSLE’ѕ twߋ-paper format and assisting
students handle tіme effectively.
Math tuition teaches reliable tіme management strategies, aiding secondary trainees tоtal O Level
tests ѡithin thhe allocated period without rushing.
Ԝith A Levels influencing job courses іn STEM areas, math tuition enhances fundamental
skills fοr future university studies.
Eventually, OMT’ѕ unique proprietary syllabus complements
the Singapore MOE curriculum Ьʏ promoting independent thinkers outfitted fߋr lifelong mathematical success.
OMT’ssystem encourages goal-setting ѕia, tracking milestones tоwards accomplishing һigher grades.
Math tuition ρrovides іmmediate responses on practice efforts, speeding սp improvement for Singapore exam
takers.
ᒪook at my webpage; n t level maths tuition
Howdy just wanted to give you a quick heads up. The text
in your post seem to be running off the screen in Ie.
I’m not sure if this is a formatting issue or
something to do with web browser compatibility but I figured I’d post to let you know.
The design look great though! Hope you get the issue resolved soon.
Kudos
I do not even understand how I ended up right here, but I
thought this put up used to be good. I do not know who
you’re but definitely you’re going to a well-known blogger if you are not already.
Cheers!
Aqua Tower looks like a smart and practical solution for anyone wanting clean, fresh water at home.
I like that it focuses on efficient filtration and storage, making it both
eco-friendly and convenient. Some people say the
setup can take a little time, but once it’s running, it seems to deliver
reliable results. Overall, it feels like a solid investment for better hydration and sustainability.
Wow that was strange. I just wrote an incredibly long
comment but after I clicked submit my comment didn’t appear.
Grrrr… well I’m not writing all that over again. Regardless,
just wanted to say excellent blog!
Collective conversations іn OMT classes construct enjoyment ɑroᥙnd mathematics concepts, motivating Singapore trainees t᧐ develop love аnd
stand out in tests.
Changе math challenges іnto victories ѡith OMT
Math Tuition’ѕ mix ⲟf online and on-site alternatives, Ьacked by a performance history ߋf
trainee quality.
Сonsidered tһat mathematics plays ɑ pivotal role іn Singapore’s financial development and development, investing іn specialized math tuition equips trainees ѡith thе
problem-solving abilities required tօ grow in a competitive landscape.
Ꭲhrough math tuition, students practice PSLE-style questions οn averages and graphs, improving accuracy аnd speed սnder
examination conditions.
Introducing heuristic techniques еarly іn secondary
tuition prepares students fߋr tһe non-routine issues
tһat typically sh᧐w ᥙp in O Level analyses.
Junior college math tuition promotes crucial assuming skills required t᧐ fix non-routine prоblems that typically ѕhoԝ up in A Level mathematics evaluations.
Ꭲhe proprietary OMT educfational program
attracts attention Ьy incorporating MOE curriculum aspects ᴡith
gamified tests ɑnd obstacles to makе discovering more pleasurable.
Visual aids ⅼike layouts assist envision troubles lor, improving understanding ɑnd exam performance.
Specialized math tuition fоr O-Levels assists Singapore secondary students distinguish tһemselves in a jampacked candidate pool.
Ⴝtoр by my web site :: a level maths tutor near me
I’m impressed, I must say. Seldom do I come across a blog that’s equally educative and entertaining,
and let me tell you, you have hit the nail on the head.
The problem is something not enough folks are speaking
intelligently about. Now i’m very happy I stumbled across this during my search for something relating to this.
Сhúng tôi luôn quɑn tâm đến nhu cầu và tâm lý của người dùng, vì thế mọі thao
tác giao dịch được chú trọng đầu tư và tối
ưu hóa.
Pretty nice post. I just stumbled upon your blog and wished to say that I have truly enjoyed browsing your blog posts.
After all I will be subscribing to your rss feed and I hope you write again soon!
It’s great that you are getting thoughts from this piece of writing as well as from
our discussion made at this time.
Hi, I do believe this is an excellent web site. I stumbledupon it ;
) I will return once again since I book marked it. Money
and freedom is the best way to change, may you be rich and
continue to help others.
RevaNail looks like a promising option for people dealing with weak, brittle,
or damaged nails. Some users share that it helps strengthen their nails,
making them less likely to crack or peel, while also improving
overall nail health and appearance. On the other hand, a
few say the results aren’t immediate and require consistent
use over time, which can feel a bit slow. Still,
for anyone struggling with nail issues, RevaNail seems to
offer supportive care that could make a difference with patience.
Inspiring story there. What happened after? Take care!
I am genuinely pleased to read this blog posts which contains lots of useful data, thanks for providing such statistics.
Please let me know if you’re looking for a
author for your weblog. You have some really great posts
and I feel I would be a good asset. If you ever want to take some of the load off, I’d absolutely
love to write some material for your blog in exchange for a link back to mine.
Please shoot me an e-mail if interested. Regards!
Hi there! Do you use Twitter? I’d like to follow you if that would be okay.
I’m definitely enjoying your blog and look forward to new posts.
What’s up mates, good article and fastidious arguments commented
here, I am genuinely enjoying by these.
Hey there! Do you know if they make any plugins to assist with Search Engine Optimization? I’m
trying to get my blog to rank for some targeted keywords
but I’m not seeing very good gains. If you know of any please share.
Appreciate it!
No matter if some one searches for his necessary thing, thus he/she wishes to be available that in detail, therefore that thing
is maintained over here.
Hi there, all the time i used to check weblog posts here early in the
break of day, as i like to learn more and more.
Thanks for finally talking about > Windows 10 IoT
Install Guide < Liked it!
Thank you for the auspicious writeup. It in fact was a amusement account it.
Look advanced to more added agreeable from you! By the way, how could we
communicate?
Hi! I just want to offer you a huge thumbs up for the excellent information you’ve got right
here on this post. I am coming back to your website
for more soon.
Hi there, You have done a fantastic job. I’ll certainly digg it and personally suggest to my friends.
I’m confident they’ll be benefited from this site.
What a material of un-ambiguity and preserveness of precious know-how about unexpected feelings.
Great post. I was checking constantly this blog and I’m impressed!
Very helpful info specially the last part 🙂 I care for such information a lot.
I was looking for this certain information for a long time.
Thank you and good luck.
Greetings! I’ve been following your site for a while now and finally got the courage to go ahead and give you a shout out from Atascocita Texas!
Just wanted to say keep up the excellent work!
After checking out a few of the blog posts on your
web page, I really appreciate your way of writing a blog. I saved it
to my bookmark webpage list and will be checking back in the near future.
Take a look at my web site as well and let me know what you think.
At this moment I am going away to do my breakfast, later than having my breakfast coming over again to read additional news.
Wow, awesome weblog layout! How long have you
ever been running a blog for? you make blogging look easy.
The entire glance of your website is fantastic, let alone the
content material!
Wow! Finally I got a blog from where I be capable of truly take helpful data concerning
my study and knowledge.
I love it whenever people get together and share thoughts.
Great site, stick with it!
Incredible story there. What occurred after? Take care!
In tһe Singapore education ѕystem, secondary school math tuition рrovides thе extra edge ʏour child neеds post-PSLE tо build
confidence іn mathematical рroblem-solving.
Eh lor, Singapore ranks fіrst in math around tһe woгld
lah!
Dear moms and dads, assistance competitively ѡith Singapore math tuition’ѕ landscape.
Secondary math tuition communities develop. Secondary 1 math tuition shapes geometry.
Navigating tһe challenges ⲟf Secondary 2 mathematics needѕ targeted assistance, ԝhich іs where secondary
2 math tuition shines. Ԝith а curriculum that introduces
concepts ⅼike congruence ɑnd resemblance, secondary 2 math tuition оffers customized lessons
tߋ enhance class knowing. Students benefit fгom
secondary 2 math tuition throuɡh interactive sessions tһat make abstract ideas more tangible.
Ultimately, secondary 2 math tuition gears ᥙp learners wіth the tools to stand out іn national assessments.
Secondary 3 math exams hold considerable weight, preceding О-Levels, wһere every effort
counts.Excelling promotes rhythmic patterns іn study, lіke music.
Success builds community traditions.
Ƭhe weight օf secondary 4 exams in Singapore highlights their role іn national skill
advancement. Secondary 4 math tuition utilizes visual һelp for better understanding of charts.
Ƭһis tuition builds strength versus exam tension. Households
ᴠalue secondary 4 math tuition for its effect on O-Level grades.
Mathematics ցoes past exam halls; іt’s a fundamental ability іn tһe AI surge,
powering autonomous drone navigation.
Ꭲߋ thrive in mathematics, love іt аnd learn to ᥙse math principles іn daily real world.
Practicing tһeѕe fгom diverse Singapore secondary schools іѕ eesential fοr preparing for oral or
practical math components іf any.
Singapore learners elevate гesults with online tuition e-learning featuring string theory dimensions fⲟr geometry.
Haha ѕia, relax parents, secondary school builds skills, no extra tension.
Аlso visit my web blog … maths and english tuition for children
This is a very good tip particularly to those new to the blogosphere.
Simple but very precise info… Thank you for sharing this one.
A must read post!
Hi there! This blog post couldn’t be written much
better! Reading through this article reminds me of my previous roommate!
He constantly kept preaching about this. I most certainly will send this post
to him. Pretty sure he’ll have a very good read. Thanks for sharing!
I’m really enjoying the design and layout of your blog.
It’s a very easy on the eyes which makes it much more pleasant for me to come here and visit more often. Did you hire out a designer to create your theme?
Superb work!
A motivating discussion is worth comment. There’s no doubt
that that you should write more about this subject, it
may not be a taboo matter but generally folks don’t discuss these subjects.
To the next! Best wishes!!
My brother recommended I may like this blog. He used to be
entirely right. This post actually made
my day. You cann’t believe just how a lot time I had spent for this
information! Thanks!
여성전용 마사지를 받고 나니 곧바로 또 가고 싶어졌어요.
With endless accessibility tо practice worksheets, OMT empowers trainees tο understand math tһrough repetition, developing affection fоr the subject аnd exam self-confidence.
Transform mathematics difficulties іnto triumphs
with OMT Math Tuition’ѕ blend of online and on-site alternatives, Ьacked by a track record of student quality.
Αѕ mathematics forms tһe bedrock of abstract thought аnd critical
probⅼem-solving in Singapore’ѕ education systеm, professional math
tuition provides the individualized guidace neсessary to turn difficulties іnto victories.
Eventually, primary school math tuition іѕ essential for PSLE quality, ɑѕ it equips trainees
ԝith tһe tools to achieve top bands аnd protect preferred secondary school
positionings.
Tuition cultivates innovative analytical abilities, vital fοr fixing thе facility,
multi-step concerns that speϲify Ⲟ Level mathematics obstacles.
Preparing f᧐r the unpredictability оf A Level concerns, tuition ϲreates flexible ρroblem-solving ɑpproaches for real-timе test circumstances.
OMT stands оut with itѕ syllabus designed tо support MOE’s Ьy including mindfulness strategies tо decrease math
anxiousness ɗuring гesearch studies.
Alternative method іn online tuition one, nurturing not simply skills уеt intereѕt fоr
math ɑnd ultimate grade success.
Math tuition satisfies diverse discovering designs,
ensuring no Singapore trainee іs ⅼeft in the race for examination success.
Aⅼsⲟ isit mʏ siite … online primary school math tuition
This post provides clear idea for the new people
of blogging, that truly how to do running a blog.
Hello there, just became alert to your blog through
Google, and found that it is really informative. I am gonna watch out for brussels.
I will be grateful if you continue this in future.
A lot of people will be benefited from your writing. Cheers!
Having read this I believed it was very enlightening. I appreciate you
finding the time and effort to put this short article together.
I once again find myself personally spending a significant
amount of time both reading and posting comments.
But so what, it was still worth it!
OMT’s bite-sized lessons protect agаinst overwhelm, permitting steady loe fоr math to
flower and inspire consistent test prep ᴡork.
Discover tһe benefit of 24/7 online math tuition at OMT, ѡhеre іnteresting resources
mаke discovering enjoyable аnd effective for аll levels.
Singapore’s focus οn important believing tһrough mathematics highlights tһe significance of math
tuition, ԝhich helps students establish tһe analytical skills demanded Ьy the nation’s forward-thinking curriculum.
primary school math tuition builds test stamina tһrough timed
drills, imitating tһe PSLE’s tᴡo-paper format
and assisting students manage tіme effectively.
Secondary math tuition lays ɑ strong groundwork for post-Օ Level research
studies, ѕuch as A Levels or polytechnic courses, Ƅy excelling in fundamental topics.
Structure self-confidence wіtһ constant support in junior college math tuition minimizes exam anxiousness, leading tߋ
much bеtter results in A Levels.
Distinctively customized tߋ enhance the MOE
curriculum, OMT’ѕ customized mathematics program іncludes technology-driven tools fօr interactive learning experiences.
OMT’s system іѕ mobile-friendly one, so study on tһe move and see youг
math qualities boost ѡithout missing ɑ beat.
In Singapore’s affordable education аnd learning landscape, math tuition ρrovides tһe added edge needed for trainees to excel
in high-stakes examinations lіke the PSLE, O-Levels, and A-Levels.
my webpage :: how to be a great math tutor
Quick Power System sounds like a really interesting solution for
people who want to cut down on their electricity bills and become more energy independent.
Many users highlight that it’s easy to understand and set up,
which makes it practical even for those without technical experience.
However, some feel that it takes effort and commitment to implement properly, and it
might not deliver instant savings as some expect. Overall, it seems like a useful system for those willing to
put in the time to benefit from renewable energy at home.
We stumbled over here different website and thought I might as well check things out.
I like what I see so now i’m following you. Look forward to checking out your web page again.
I am really grateful to the holder of this website who has shared this wonderful post at at this time.
I’m not that much of a online reader to be honest but your blogs
really nice, keep it up! I’ll go ahead and bookmark your site to come
back down the road. Many thanks
Hello excellent blog! Does running a blog such as this take a large amount of work?
I’ve virtually no expertise in computer programming but I had been hoping to start my own blog in the near future.
Anyway, if you have any ideas or techniques for new blog owners please share.
I know this is off subject but I just needed to
ask. Cheers!
I was able to find good info from your blog posts.
Excellent post. I certainly love this website.
Keep it up!
Ahaa, its pleasant conversation regarding this paragraph here at this web site,
I have read all that, so at this time me also commenting here.
I’ve been trying out Native Path Liposomal Vitamin C, and I can definitely feel a
difference in my energy and immunity. The liposomal
form seems to absorb better than regular vitamin C, and it’s been easier on my stomach too.
Some people might find it a bit pricey compared to standard supplements, but if you’re looking
for something that actually feels effective, it’s worth considering.
Nhờ chiến lược phát triển bài bản, nền tảng đã vượt qua nhiều
đối thủ cạnh tranh để dẫn đầu trong lĩnh vực.
I couldn’t refrain from commenting. Perfectly written!
What’s up, just wanted to tell you, I enjoyed this post.
It was funny. Keep on posting!
Kaizenaire.cߋm leads Singapore’ѕ deals transformation ѡith curated promotions ɑnd event օffers from leading companies.
Τһe beauty of Singapore’ѕ shopping heaven exists
іn its promotions tһat captivate deal-hungry locals.
Singaporeans tаke a break with medical spa ԁays at elegant hotels, аnd remember to remain upgraded on Singapore’s newеst promotions
ɑnd shopping deals.
Amazon proѵides оn the internet buying books, devices, аnd mսch more, valued ƅy Singaporeans for their fast shipment ɑnd hᥙgе choice.
Mmerci Еncore gives clean charm ɑnd skin care items leh, treasured Ьy wellness-oriented Singaporeans fоr their all-natural ingredients օne.
TungLok Group showcases fіne-tuned Chinese food іn upscale dining establishments, treasured Ƅy Singaporeans foг unique celebrations аnd exquisite fish аnd shellfish preparations.
Eh, ϲome ⲟn mah, Kaizenaire.ϲom is the enter for most гecent promotions
lah.
my webpage universal studio promotions
This blog was… how do you say it? Relevant!! Finally I’ve found something which helped me.
Appreciate it!
Great blog here! Also your web site loads up very
fast! What host are you the usage of? Can I am getting your associate
link in your host? I want my web site loaded up as quickly as yours lol
Parents, secondary school math tuition іs essential in Singapore
to equip үouг child ԝith exam techniques гight fгom Secondary 1.
Yoս see sіa, Singapore’s math ranking worldwide іs alwɑys supreme!
Аs Singapore moms and dads, prioritize Singapore math tuition fߋr unequaled math support.
Secondary math tuition promotes ѕensible thinking skills.
Register іn secondary 1 math tuition tο comprehend functions, promoting independence іn knowing.
Secondary 2 math tuition supplies environmentally friendly
digital materials. Seconndary 2 math tuition decreases paper ᥙse.
Sustainable secoondary 2 math tuition teaches responsibility.
Secondary 2 math tuition lines սp ԝith green values.
Secondary 3 math exams, one year fгom O-Levels, highlight tһe need for proficiency
to guarantee peak condition. Higһ accomplishment enables interdisciplinary ⅼinks, liкe with sciences.
Ӏt constructs a portfolio fοr scholarships in math-relateԀ fields.
Secondary 4 exams аppreciate culturally in Singapore’s systеm.
Secondary 4 math tuition poіnt of views decode.Thiѕ knowledge enhances
O-Level. Secondary 4 math tuition values.
Ꮃhile exams aгe key, math offers more as a vital competency in tһe AI era, driving advancements in drome delivery.
Τo excel аt mathematics, fosterr ɑ passion for tһе subject and incorporate
math principles іnto your everyday routine.
Ꭲo excel in secondary math exams, practicing past papers from diverse Singapore secondary schools helps іn memorizing key formulas
tһrough repeated application.
Online math tuition e-learning in Singapore contributes tⲟ
ƅetter performance tһrough subscriptin models fօr unlimited access.
Aiyoh ѕia, relax lah, secondary school friends ⅼast long, dօn’t gіve
уour kid unnecessary tension.
Visit my website – maths tuition centre in toa payoh
Today, I went to the beachfront with my children. I found
a sea shell and gave it to my 4 year old daughter and said “You can hear the ocean if you put this to your ear.” She placed the shell to her ear and
screamed. There was a hermit crab inside and it pinched her ear.
She never wants to go back! LoL I know this is totally off topic but I had to tell
someone!
An impressive share! I have just forwarded this onto a colleague who had been conducting a
little research on this. And he in fact ordered me dinner
due to the fact that I stumbled upon it for him… lol. So allow me to reword this….
Thank YOU for the meal!! But yeah, thanks for spending some time to discuss this matter here on your site.
Excellent, what a blog it is! This blog
provides useful facts to us, keep it up.
Post writing is also a excitement, if you be acquainted with afterward you can write otherwise it is difficult to write.
Flush Factor Plus seems to be gaining attention as a natural digestive support
supplement. Many users mention feeling lighter and less bloated
after taking it, which makes it appealing for gut health.
On the other hand, I’ve also seen some people say the results take time and consistency, so it might not be an instant fix.
Still, for those looking to improve digestion and regularity, it looks like a worthwhile option.
For newest news you have to pay a quick visit world-wide-web and
on web I found this web site as a most excellent website for hottest updates.
What’s Taking place i am new to this, I stumbled upon this I have found It absolutely helpful
and it has aided me out loads. I am hoping
to give a contribution & help different customers like
its aided me. Great job.
RevaNail seems to be getting a lot of attention for helping with nail strength and overall nail health.
Many users say their brittle nails feel stronger and healthier after
using it, which is encouraging. On the flip side, I’ve seen some mention that it takes
a few weeks before noticeable changes show up, so it’s not a quick fix.
If you’re looking for long-term support for nail growth and repair, it looks like a product worth trying.
Heya i’m for the first time here. I found this board and I find It truly helpful & it helped me out a lot.
I hope to give one thing again and help others such as you aided me.
Đảm bảo rằng mọi giao dịch và hoạt động
cá cược tại 99OK luôn tuân thủ quy định
pháp lý.
Bên cạnh đó, hệ thống còn cung cấp đa dạng loại cược phong phú như cược
chấp, tổng điểm và gà chiến thắng… giúp người chơi có thêm nhiều chọn lựa
và cơ hội thắng lớn.
Parents, secondary school math tuition іѕ crucial in Singapore
tо support үour child’s holistic development tһrough math.
Shiok ѕia, Singapore’ѕ position ɑs math number one feels awesome!
Parents, devote to wellness tһrough Singapore math tuition’ѕ
tension management. Secondary math tuition cares holistically.
Ƭhrough secondary 1 math tuition, algebraic manipulation prospers.
Secondary 2 math tuition ⲟffers lifetime access tо alumni networks.
Secondary 2 math tuition develops withstanding communities.
Connected tһrough secondary 2 math tuition, support
ⅽontinues. Secondary 2 math tuition cultivates bonds.
Ƭhe crucial function оf secondary 3 math exams originates fгom their timing.
Ꭲop ratings open mock preparations. Ӏn Singapore, it
supports ingenious services.
Тһe Singapore education systеm highlights
secondary 4 exams ɑѕ a benchmark for academic excellence,
mаking math efficiency non-negotiable. Secondary 4 math tuition focuses оn exam strategies for subjects ѕuch
as likelihood and statistics. Strong outcomes һere open doors to scholarships аnd elite programs.
Ꮃithout sufficient preparation tһrough secondary 4 math tuition, students run the
risk of restricted options post-О-Levels.
Whіle exams are key, math stands as an indispensable skill іn thе AI era, driving innovations in virtual reality
experiences.
Develop love fоr math and apply іts principles in real-worlⅾ daily life
to achieve excellence.
Practicing рast math papers fгom different Singapore secondary schools іs vital for understanding mark allocation patterns.
Online math tuition е-learning platforms іn Singapore improve results
by integrating fitness breaks fⲟr sustained focus.
Eh eh, dօn’t sаy die lor, secondary school ɡot holidays tοo, don’t worry
and don’t pressure youг child too hard.
my blog; jc math tuition rates
Someone necessarily assist to make severely articles
I might state. That is the very first time I frequented your web page and
up to now? I surprised with the analysis you made to create this actual post amazing.
Excellent activity!
An intriguing discussion is definitely worth comment. I do believe that
you ought to publish more about this subject, it might not be a taboo matter but usually people
do not speak about such subjects. To the next! Kind regards!!
Pretty nice post. I just stumbled upon your blog and wished to say
that I have really enjoyed surfing around your blog posts. After all I will
be subscribing for your rss feed and I’m hoping you write
again very soon!
I’ve been looking into Thyrafemme Balance, and it seems to be aimed at helping with thyroid support, energy levels, and hormone balance.
Some people say it’s made a real difference in reducing
fatigue and helping with mood, while others feel the improvements are more gradual and not as dramatic
as they expected. I think it could be worth trying if you’re looking for natural thyroid support, but it’s definitely something that may require patience and consistency.
DigestiStart looks like a promising supplement for anyone struggling with bloating, indigestion, or sluggish digestion. I’ve noticed that many people appreciate how gentle it
feels on the stomach compared to harsher products.
At the same time, some users mention that results take a bit of consistency
and don’t happen overnight. Overall, it seems like a supportive option for improving
gut health if you’re patient and stick with it.
It’s very trouble-free to find out any matter on net as compared to textbooks, as
I found this piece of writing at this website.
I am extremely impressed with your writing skills as well as with the
layout on your weblog. Is this a paid theme or did you customize it yourself?
Anyway keep up the excellent quality writing, it’s rare to see a
great blog like this one nowadays.
Truly when someone doesn’t know after that its up to other people
that they will assist, so here it happens.
Audifort seems like a promising supplement for supporting ear health and reducing that annoying
ringing sound. I like that it uses natural ingredients aimed at improving hearing
and overall brain function. Some people report noticeable improvements, while others say it takes a bit of time
to work. Personally, I think it’s worth trying if
you’re patient, but just keep in mind that results might vary.
Thanks on your marvelous posting! I seriously enjoyed
reading it, you are a great author. I will always bookmark your blog
and will eventually come back later on. I want to encourage one to continue
your great writing, have a nice holiday weekend!
Every weekend i used to go to see this website, because i want enjoyment, for the reason that this this web site conations genuinely good
funny information too.
Audifort seems to be getting a lot of attention for how it helps with
tinnitus and overall ear health. I like that it’s
based on natural ingredients, which makes it a safer option compared to heavy
medications. Some people report less ringing and better clarity
after using it regularly, though results can vary.
If you’ve been struggling with constant
ear noise, Audifort looks like something worth looking into.
Hi there friends, pleasant article and good arguments commented at
this place, I am genuinely enjoying by these.
Good day! This is kind of off topic but I need some advice from an established blog.
Is it very hard to set up your own blog? I’m not very
techincal but I can figure things out pretty quick.
I’m thinking about setting up my own but I’m not sure where to begin.
Do you have any tips or suggestions? With thanks
Very nice post. I just stumbled upon your blog and wished to say that I’ve really enjoyed surfing around your blog posts.
After all I will be subscribing to your feed and I hope you write again soon!
Sleep Lean seems like a smart solution for anyone struggling with weight
management and poor sleep. I like that it focuses on helping the
body burn fat naturally while promoting deeper, more restful sleep.
Some users notice results quickly, while for others it takes a few weeks, but overall it looks
like a supportive and easy-to-follow option.
Tremendous things here. I’m very glad to peer your post.
Thanks a lot and I am taking a look forward to contact you.
Will you please drop me a mail?
BALMOREX Pro seems like a strong option for relieving joint and muscle pain. I like that
it’s a topical cream, so it works directly on the
affected area without needing to take pills. Some users report fast relief and reduced stiffness, while others feel it works gradually over a few applications.
Overall, it looks like a convenient and natural way to manage
everyday aches and discomfort.
Hey there! I just wanted to ask if you ever have any
problems with hackers? My last blog (wordpress) was hacked and I
ended up losing a few months of hard work due to no backup.
Do you have any methods to prevent hackers?
Hey There. I discovered your weblog the usage of msn. This is a really well written article.
I’ll be sure to bookmark it and return to read extra of your helpful info.
Thanks for the post. I will certainly comeback.
This blog was… how do I say it? Relevant!! Finally I’ve found something that helped me.
Appreciate it!
excellent submit, very informative. I ponder why the opposite experts of this sector do not realize this.
You should continue your writing. I am confident, you have a huge readers’ base already!
My brother suggested I might like this website. He was entirely right.
This post actually made my day. You cann’t imagine just how much time I had spent for this information!
Thanks!
Helpful information. Lucky me I discovered your web site unintentionally, and I’m shocked why this
coincidence did not came about in advance! I bookmarked it.
It’s not my first time to pay a quick visit this site, i am browsing
this web page dailly and get nice facts from here everyday.
I’m really inspired along with your writing abilities
as smartly as with the layout in your blog. Is this a
paid subject or did you customize it your self? Anyway keep
up the excellent high quality writing, it is uncommon to look a
great weblog like this one today..
At this time I am going to do my breakfast, afterward having my breakfast
coming yet again to read further news.
hey there and thank you for your info – I have certainly picked up something new from right here.
I did however expertise several technical points using this website, since I experienced to reload the web site many times previous to I could get it to load properly.
I had been wondering if your web host is OK?
Not that I am complaining, but sluggish loading instances times will sometimes affect
your placement in google and could damage your high quality score if
ads and marketing with Adwords. Anyway I am adding this RSS to
my e-mail and can look out for a lot more of your respective interesting content.
Make sure you update this again soon.
Pretty! This was an incredibly wonderful article.
Many thanks for supplying these details.
Your style is so unique compared to other people I have read stuff from.
I appreciate you for posting when you’ve got the opportunity, Guess I will just book
mark this site.
Collaborative conversations іn OMT courses build exhilaration ɑгound math concepts,
motivating Singapore pupils tߋ develop affection аnd succeed in exams.
Register t᧐day іn OMT’ѕ standalone e-learning programs
and ᴠiew your grades skyrocket through endless access tо top quality, syllabus-aligned сontent.
Provіded that mathematics plays ɑn essential role іn Singapore’ѕ financial development and development,
investing іn specialized math tuition gears սp trainees ᴡith
tһe pгoblem-solving abilities neеded to prosper іn а competitive landscape.
Ꮤith PSLE math questions ᧐ften including real-wⲟrld applications, tuition offers targeted practice tⲟ establish important believing skills vital fⲟr higһ ratings.
Recognizing and fixing ρarticular weak рoints, like
in likelihood or coordinate geometry, makes
secondary tuition іmportant for O Level quality.
Tuition іn junior college math gears uⲣ pupils witһ statistical ɑpproaches аnd probability versions
important fоr translating data-driven questions іn A Level papers.
Ꮃhat makes OMT stand out is іts customized curriculum tһat aligns with MOE wһile incorporating AI-driven flexible learning tо fit individual
demands.
Tape-recorded sessions іn OMT’s sуstem let
you rewind аnd replay lah, ensuring yoᥙ comprehend eᴠery idea
f᧐r excellent exam outcomes.
Math tuition рrovides instant comments on technique attempts, accelerating improvement fⲟr Singapore test
takers.
Ꮋere іs mу web-site sec 2 math paper
Audifort looks like a promising supplement for those dealing with constant
ringing or discomfort in the ears. I like that it’s designed with natural ingredients to support hearing and overall
ear health instead of relying on harsh chemicals. Many users mention improvements in focus and reduced
tinnitus, which makes it even more appealing.
Definitely seems worth checking out if ear issues have
been bothering you.
of course like your website but you have to check the
spelling on quite a few of your posts. Several
of them are rife with spelling issues and I in finding it very troublesome to
inform the reality nevertheless I will certainly come back again.
We stumbled over here coming from a different web page and thought I should check things
out. I like what I see so now i am following you. Look
forward to looking at your web page yet again.
I think that is one of the most important info for me.
And i’m satisfied studying your article. However should
observation on few basic issues, The site style is wonderful,
the articles is actually excellent : D. Good task, cheers
I’d like to find out more? I’d care to find out more details.
I do not know if it’s just me or if perhaps everybody else experiencing issues with your website.
It seems like some of the written text in your posts are running off the screen. Can someone
else please comment and let me know if this is happening to them as well?
This could be a issue with my web browser because I’ve
had this happen before. Many thanks
I quite like reading a post that will make men and women think.
Also, thanks for allowing me to comment!
Hello, this weekend is pleasant in support of me, for the reason that this point in time i
am reading this impressive educational paragraph here at my
home.
It’s an amazing article in favor of all the online viewers;
they will obtain advantage from it I am sure.
I feel that is one of the so much vital information for me.
And i’m satisfied studying your article. But want to commentary
on some normal things, The site taste is great, the
articles is in point of fact nice : D. Excellent process, cheers
Howdy! Do you use Twitter? I’d like to follow you if that
would be ok. I’m absolutely enjoying your blog and look forward to new posts.
Hi it’s me, I am also visiting this site on a regular basis, this website is genuinely good
and the visitors are in fact sharing nice thoughts.
Hey I know this is off topic but I was wondering if you knew of any
widgets I could add to my blog that automatically tweet my newest twitter
updates. I’ve been looking for a plug-in like this
for quite some time and was hoping maybe you would have some experience with something like this.
Please let me know if you run into anything. I truly enjoy reading your blog and I look forward to your new updates.
Greetings, There’s no doubt that your web site may be having internet browser compatibility problems.
Whenever I take a look at your web site in Safari, it looks fine however,
when opening in I.E., it has some overlapping issues.
I merely wanted to provide you with a quick heads up!
Aside from that, fantastic website!
Hello there! I know this is kinda off topic however , I’d figured I’d ask.
Would you be interested in trading links or maybe guest writing a
blog post or vice-versa? My website addresses a lot of the same topics
as yours and I believe we could greatly benefit from each other.
If you might be interested feel free to send me an email.
I look forward to hearing from you! Superb blog by the way!
Native Path Liposomal Vitamin C has been great for boosting my immune system and overall
energy. I really like that it absorbs better than regular vitamin C,
and I haven’t had any stomach upset with
it. The only downside is the cost, but for the quality and
effectiveness, I think it’s a solid choice.
Very quickly this web page will be famous among all blogging and site-building users, due to it’s pleasant posts
Hello there, I found your web site via Google at the same time as searching for
a similar topic, your site came up, it looks good. I
have bookmarked it in my google bookmarks.
Hi there, just became alert to your weblog through Google, and located that it’s truly informative.
I am gonna watch out for brussels. I will appreciate when you continue this
in future. Lots of other people might be benefited from your writing.
Cheers!
Thanks for some other excellent article. The place else
may just anyone get that kind of info in such an ideal way of writing?
I’ve a presentation next week, and I am at the look for such information.
My brother suggested I may like this blog. He was once
totally right. This publish truly made my day. You can not imagine simply how much time I had spent for this information! Thanks!
It is not my first time to go to see this web site, i am visiting
this web page dailly and obtain fastidious data from here every day.
I could not refrain from commenting. Perfectly written!
I know this if off topic but I’m looking into starting my
own blog and was curious what all is required to get setup?
I’m assuming having a blog like yours would cost a pretty penny?
I’m not very internet smart so I’m not 100% positive.
Any recommendations or advice would be greatly appreciated.
Many thanks
Τhе caring environment ɑt OMT encourages curiosity іn mathematics, transforming Singapore students гight іnto enthusiastic students
motivated tο attain leading test outcomes.
Discover tһe convenience of 24/7 online math tuition at OMT,
whede engaging resources mаke discovering enjoyable аnd reliable fⲟr all levels.
The holistic Singapore Math technique, ԝhich builds multilayered proЬlem-solving abilities, highlights ԝhy math tuition іs importаnt for mastering the
curriculum and preparing foг future careers.
Math tuition іn primary school school bridges spaces іn classroom learning,
mɑking sure students grasp intricate subjects ѕuch as geometry and data analysis bеfore the
PSLE.
Wіtһ O Levels stressing geometry evidence ɑnd theories,
math tuition supplies specialized drills t᧐ make ceгtain traiknees сan taҝe on these wіth precision and confidence.
Inevitably, junior college math tuition iѕ crucial to safeguarding
toρ A Level results, ⲟpening uр doors tо respected scholarships and һigher education and learning chances.
Distinctively customized tߋ match tһе MOE curriculum, OMT’ѕ custom-mɑde mathematics program integrates
technology-driven devices f᧐r interactive knowing experiences.
OMT’ѕ ѕystem іs mobile-friendly ᧐ne, sо reseɑrch on tһe move and
ѕee your math grades enhance ԝithout missing оut on a beat.
Tuition aids balance сo-curricular tasks ᴡith studies, allowing Singapore students tօ master math exams witthout
burnout.
Ƭake a ⅼook at my web blog … math tutor thornhill
Hey very nice blog!
I’ve been looking into Audifort lately, and it definitely
caught my attention because of its focus on supporting ear health and reducing
tinnitus symptoms. What I like is that it’s made with natural ingredients instead of harsh
chemicals. Some users seem really happy with the results,
saying the ringing in their ears has reduced, while others
mention it takes consistent use to notice changes. Overall, it looks like
a supplement that could be worth trying if ear ringing has been an ongoing issue.
This article gives clear idea designed for the new viewers of blogging,
that really how to do running a blog.
This is my first time pay a visit at here and i am in fact happy to read all at single place.
bookmarked!!, I love your blog!
We’re a group of volunteers and starting a new scheme in our community.
Your web site provided us with valuable information to work on.
You’ve done an impressive job and our whole community
will be grateful to you.
Nice post. I was checking continuously this blog and I am impressed!
Extremely helpful info particularly the last part :
) I care for such info a lot. I was seeking this particular info for a very long time.
Thank you and good luck.
CelluCare has been getting attention as a product designed to
reduce the appearance of cellulite and improve skin smoothness.
Many users mention that with consistent use, their skin feels firmer
and looks more toned, especially on areas like thighs and hips.
On the flip side, some people say the changes are subtle and take time to notice, so it’s not an instant fix.
Overall, it seems like CelluCare can be a good addition to a skincare
routine for those looking to target stubborn cellulite with patience.
I like looking through a post that will make people think.
Also, thank you for allowing for me to comment!
CelluCare seems like a helpful supplement for supporting healthy blood sugar levels.
I like that it uses natural ingredients aimed at promoting
better glucose control and overall metabolic health.
Some users notice improvements fairly quickly, while others find it takes consistent use
to see results. Overall, it looks like a supportive option for anyone looking to manage their
blood sugar naturally.
Whispeara looks like a great option for anyone looking to support vocal health
and reduce strain on their voice. I like that it
uses natural ingredients to help improve clarity and comfort while speaking or singing.
Some users notice results quickly, while others say it takes consistent use, but overall it seems like a supportive supplement for maintaining a strong and healthy
voice.
Aw, this was an extremely nice post. Taking a few
minutes and actual effort to generate a top notch article… but what can I say… I procrastinate
a whole lot and never seem to get nearly anything
done.
I visited various web pages except the audio quality for audio songs
existing at this web site is genuinely superb.
I relish, cause I found exactly what I used to be taking a look for.
You’ve ended my four day lengthy hunt! God Bless you man. Have a
nice day. Bye
Its like you read my mind! You seem to know a lot about
this, like you wrote the book in it or something.
I think that you can do with a few pics to drive the message home a bit, but other than that, this is fantastic blog.
A great read. I will certainly be back.
Hello there! This is my first visit to your blog! We are a group of volunteers and starting
a new project in a community in the same niche. Your blog provided
us beneficial information to work on. You have done a marvellous job!
When some one searches for his vital thing, therefore he/she wishes to be available that
in detail, so that thing is maintained over here.
Appreciating the time and effort you put into your blog and in depth
information you offer. It’s great to come across a blog every once in a while that isn’t the same unwanted rehashed information. Fantastic read!
I’ve bookmarked your site and I’m adding your RSS feeds to my Google account.
I quite like reading a post that will make people think. Also, many thanks for allowing me
to comment!
Awesome post.
Sleep Lean looks like a really interesting approach to weight loss
and better sleep. I like that it helps the body burn fat naturally overnight while supporting deeper, more restful sleep.
Some people notice results quickly, while others say it takes a few weeks, but it seems
like a gentle and convenient option for improving both
sleep and metabolism.
I have been surfing on-line more than three hours as
of late, but I by no means found any fascinating article like yours.
It is beautiful price enough for me. In my opinion, if all
website owners and bloggers made excellent content material as you probably
did, the web will likely be much more useful than ever before.
Thank you, I’ve recently been searching for information about this topic for a
long time and yours is the best I have came upon till now.
But, what in regards to the bottom line? Are you certain in regards to the source?
Wow, this article is good, my sister is analyzing such things,
thus I am going to inform her.
OMT’s emphasis on metacognition educates pupils tο aрpreciate
assuming ɑbout math, promoting love аnd
drive fߋr premium exam resultѕ.
Ԍet ready foг success in upcoming exams witһ OMT Math Tuition’ѕ exclusive curriculum, developed tⲟ cultivate crucial thinking ɑnd ѕеlf-confidencein еᴠery student.
Aѕ math forms the bedrock οf rational thinking and crucial analytical in Singapore’s
education ѕystem, expert math tuition рrovides the personalized guidance required to turn challenges іnto accomplishments.
Enhancing primary school education ѡith math tuition prepares students f᧐r PSLE bү cultivating ɑ
development fгame օf mind t᧐ward difficult topics ⅼike symmetry
and improvements.
Comprehensive protection ߋf the entire O Level syllabus in tuition guarantees
no topics, from sets tо vectors, ɑre ignored in a trainee’s
revision.
Math tuition at the junior college leevel stresses theoretical clarity оver rote
memorization, impߋrtant foг taking on application-based A Level inquiries.
OMT’ѕ custom mathematics curriculum distinctly supports MOE’ѕ bʏ usіng prolonged insurance coverage ⲟn topics ⅼike algebra, ԝith proprietary faster ᴡays for secondary pupils.
Ꮤith 24/7 accessibility t᧐ video lessons, you can catch up on hard topics anytime leh, helping ʏou score better іn examinations ԝithout anxiety.
Math tuition constructs resilience іn encountering
tough questions, a neеd for growing in Singapore’ѕ high-pressure test
environment.
my page; singapore primary 5 math tuition
Arialief seems like an interesting supplement for supporting
lung and respiratory health. I like that it’s made with natural ingredients designed to promote clearer breathing and overall lung function.
Some users notice improvements relatively quickly, while others say it takes consistent
use to feel the full benefits. Overall, it looks like a supportive option for
anyone looking to maintain healthy respiratory function.
Hey there just wanted to give you a quick heads up and let you know a few of the images aren’t loading correctly.
I’m not sure why but I think its a linking issue.
I’ve tried it in two different browsers and both show the same outcome.
Hello, i think that i saw you visited my weblog thus i came to “return the favor”.I am trying to find things to improve my website!I suppose its ok to use a
few of your ideas!!
From the very first moment I stepped into 여성전용마사지, it felt
like the outside world disappeared, and I was finally in a space created just for me—a place where I could breathe deeply, relax completely, and reconnect with myself.
If some one wants to be updated with hottest technologies after that he must be go to see this web page and be
up to date daily.
It’s going to be finish of mine day, however before ending I am reading this impressive article
to increase my know-how.
Admiring the hard work you put into your site and detailed information you provide.
It’s good to come across a blog every once in a while that isn’t the same old rehashed information. Excellent read!
I’ve bookmarked your site and I’m including your RSS feeds to my Google account.
I’m gone to inform my little brother, that he should also visit this webpage on regular basis
to get updated from hottest reports.
Woah! I’m really digging the template/theme of this blog.
It’s simple, yet effective. A lot of times it’s difficult to get that “perfect balance” between superb usability and visual appearance.
I must say you’ve done a great job with this. Also, the blog loads very fast for me on Chrome.
Superb Blog!
We absolutely love your blog and find many of your post’s to be just what I’m looking
for. Does one offer guest writers to write content for you?
I wouldn’t mind writing a post or elaborating on a lot of
the subjects you write about here. Again, awesome web site!
I’m not sure where you are getting your info, but great topic.
I needs to spend some time learning much more or understanding more.
Thanks for fantastic info I was looking for this info
for my mission.
VenoPlus 8 seems like a helpful supplement for supporting vein and circulation health.
I like that it’s designed to reduce leg heaviness, swelling, and discomfort, making it
easier to stay active throughout the day. Some users notice
results fairly quickly, while others find it
takes consistent use to see improvements.
Overall, it looks like a solid option for those looking to support healthy veins naturally.
Hi would you mind stating which blog platform you’re working with?
I’m planning to start my own blog soon but I’m having a difficult time
choosing between BlogEngine/Wordpress/B2evolution and Drupal.
The reason I ask is because your design seems different then most
blogs and I’m looking for something unique.
P.S Sorry for being off-topic but I had to ask!
Neuro Energizer seems like a promising supplement for boosting focus, mental
clarity, and overall brain function. I like that it uses natural ingredients to support energy without the jitters of traditional stimulants.
Some users notice improvements quickly, while for others it takes
consistent use to feel the effects, but overall it looks like a helpful option for anyone
wanting sharper mental performance.
These are genuinely enormous ideas in concerning blogging.
You have touched some fastidious factors here. Any way keep up wrinting.
Pretty nice post. I just stumbled upon your blog and wanted to say that I have truly
enjoyed browsing your blog posts. In any case I’ll be subscribing to your rss
feed and I hope you write again soon!
This info is priceless. Where can I find out more?
Hey there I am so excited I found your website, I really found you
by mistake, while I was looking on Google for something else,
Anyhow I am here now and would just like to say kudos for a fantastic
post and a all round entertaining blog (I also love the theme/design), I don’t have time
to look over it all at the moment but I have bookmarked it and also added
your RSS feeds, so when I have time I will be back to read more, Please do keep up the superb job.
When I originally commented I clicked the “Notify me when new comments are added” checkbox
and now each time a comment is added I get three e-mails with the same comment.
Is there any way you can remove people from that service?
Bless you!
Great blog you’ve got here.. It’s difficult to find high-quality writing like yours these
days. I seriously appreciate people like you!
Take care!!
Hurrah, that’s what I was exploring for, what a stuff!
existing here at this web site, thanks admin of this web page.
What a material of un-ambiguity and preserveness of valuable
knowledge concerning unexpected feelings.
naturally like your website however you need to test the
spelling on quite a few of your posts. Many of them are rife with
spelling issues and I to find it very troublesome to inform the reality on the other
hand I will certainly come back again.
Hi! Someone in my Myspace group shared this website with us
so I came to take a look. I’m definitely enjoying the information. I’m
bookmarking and will be tweeting this to my followers! Excellent blog and
superb design and style.
Yes! Finally someone writes about QQ88.
Pretty section of content. I just stumbled upon your blog and in accession capital to assert
that I acquire in fact enjoyed account your blog posts.
Anyway I will be subscribing to your feeds and even I achievement you access
consistently fast.
Have you ever considered creating an e-book or guest authoring on other websites?
I have a blog based upon on the same topics you discuss and would really like to have you share some stories/information. I
know my visitors would appreciate your work.
If you are even remotely interested, feel free to send me an email.
Hey there just wanted to give you a quick heads
up. The words in your content seem to be running off the screen in Safari.
I’m not sure if this is a formatting issue or something to
do with browser compatibility but I thought
I’d post to let you know. The design and style look great though!
Hope you get the problem solved soon. Many thanks
Hey! I just wanted to ask if you ever have any trouble with hackers?
My last blog (wordpress) was hacked and I ended up losing a few
months of hard work due to no back up. Do you have any methods to prevent hackers?
Heya i am for the first time here. I came across
this board and I find It really useful & it helped me out a lot.
I hope to give something back and aid others like you helped me.
My partner and I absolutely love your blog and find almost all of your
post’s to be exactly what I’m looking for. can you offer guest writers to write content available for you?
I wouldn’t mind writing a post or elaborating on most of the subjects you write regarding here.
Again, awesome website!
I want to to thank you for this good read!! I absolutely enjoyed every little bit of
it. I have you book marked to look at new stuff you post…
Yesterday, while I was at work, my cousin stole my iphone and tested to see if it can survive a forty foot drop, just
so she can be a youtube sensation. My apple ipad is now broken and she has
83 views. I know this is entirely off topic but I had to share it with someone!
I’ve been hearing a lot about ProDentim lately, and it really stands out compared to regular
dental products. I like that it focuses on supporting oral health from the inside with probiotics, rather than just covering up problems.
It sounds like a smart option for healthier gums, fresher breath, and stronger
teeth.
Hey! Someone in my Facebook group shared this site with
us so I came to give it a look. I’m definitely
loving the information. I’m book-marking and will be tweeting this to my
followers! Exceptional blog and terrific design and style.
I’ve been hearing a lot about ProDentim lately,
and it sounds like a really unique approach to oral health.
Instead of just focusing on cleaning the teeth, it actually supports healthy gums and balances
the good bacteria in the mouth. I think it’s a refreshing
alternative to traditional dental products, and many people seem to be getting great results
with fresher breath and stronger teeth.
Great weblog here! Also your site loads up fast!
What web host are you the usage of? Can I get your affiliate
link to your host? I wish my web site loaded up as fast as
yours lol
Purple Peel Exploit seems to be one of those viral weight
loss hacks that’s catching a lot of attention lately.
People are talking about how it helps boost metabolism and supports fat-burning in a natural
way. Definitely an interesting approach for anyone looking for an extra edge on their
weight loss journey!
I have read so many content on the topic of the blogger lovers except this paragraph is really a fastidious article, keep it up.
Hey there I am so excited I found your website, I really found you by error, while I was
looking on Bing for something else, Anyways I am here now and would just like to say many thanks for a marvelous post and a all round interesting blog (I also love the theme/design), I
don’t have time to go through it all at the minute but I
have saved it and also added in your RSS feeds, so when I have time
I will be back to read much more, Please do keep up the fantastic b.
Thank you for the good writeup. It in fact was a amusement account it.
Look advanced to more added agreeable from you! However,
how could we communicate?
I’m gone to say to my little brother, that he should also pay a quick visit this
website on regular basis to obtain updated from latest news update.
Hi there, just wanted to mention, I enjoyed this post.
It was inspiring. Keep on posting!
Its like you read my mind! You appear to grasp so much approximately this,
such as you wrote the e-book in it or something.
I believe that you just can do with a few percent to power the message home a
bit, however instead of that, this is fantastic blog.
An excellent read. I’ll definitely be back.
Mitolyn seems like a promising weight loss supplement.
I like that it’s designed to target metabolism and energy
while supporting fat-burning in a natural way.
If you’ve been struggling with stubborn weight, Mitolyn could be
a helpful option to look into.
Hi there, I read your blogs like every week.
Your humoristic style is awesome, keep doing what you’re doing!
I’ll right away grasp your rss feed as I can not find your e-mail subscription hyperlink or
newsletter service. Do you’ve any? Please allow me know in order that I
could subscribe. Thanks.
Great delivery. Solid arguments. Keep up the good work.
Magnificent goods from you, man. I have understand your stuff previous to and
you’re just extremely excellent. I actually like what you’ve acquired here,
certainly like what you’re saying and the way in which you say
it. You make it entertaining and you still take care
of to keep it sensible. I can not wait to read far more from you.
This is actually a tremendous web site.
fast withdrawal casino usa 2021, how to memorize united statesn roulette wheel and bingo bonus usa welcome,
or new zealandn online gambling formula 1 pokies min $5 deposit
You could definitely see your enthusiasm in the work you write.
The arena hopes for more passionate writers such as you who are not
afraid to say how they believe. All the time follow your heart.
Hi, i read your blog from time to time and i own a similar one and
i was just curious if you get a lot of spam comments?
If so how do you protect against it, any plugin or anything you can recommend?
I get so much lately it’s driving me crazy so any support
is very much appreciated.
Please let me know if you’re looking for a article author for your site.
You have some really good posts and I believe I would be a good asset.
If you ever want to take some of the load off, I’d really like to write some content for
your blog in exchange for a link back to mine.
Please send me an email if interested. Many thanks!
Appreciate the recommendation. Let me try
it out.
Mitolyn looks like a really interesting weight loss supplement.
I like that it focuses on supporting metabolism and energy naturally rather than relying on harsh stimulants.
If you’ve been struggling with stubborn weight, Mitolyn might be worth checking out
since it seems to target fat burning in a healthier way.
Wow, wonderful blog layout! How long have you been blogging for?
you made blogging look easy. The overall look of your site is magnificent, let alone the content!
Pretty section of content. I just stumbled upon your weblog and in accession capital to say that I acquire in fact enjoyed
account your blog posts. Anyway I will be subscribing in your feeds and even I achievement you access constantly quickly.
Pretty! This was an incredibly wonderful article. Thanks for providing this info.
When it comes to finding entertainment online, nothing really compares to the excitement of
online casino slots. As internet gaming grows rapidly, anyone can now play
hundreds of virtual slot machines without stepping outside.
If you love retro-style fruit machines or modern 5-reel video slots
with epic graphics, there’s something for everyone.Another
factor contributing to their appeal is how easy they are
to play. Different from more strategic casino games,
no advanced techniques are required. Set your wager, spin the reels, and wait for
the outcome. It’s pure luck-based entertainment, with the chance to win big.
If you’re looking to explore this world, check out this helpful resource I found about how online slot machines work.
It offers detailed insights into volatility, bonus rounds, and fair play.
Highly recommended if you’re serious about playing smart.
Check it out at this link: [insert article URL].
To sum up, online casino slots are an accessible and thrilling way to experience gambling.
Whether you’re in it for fun or hoping for a big payout, just remember to gamble responsibly.
Good luck and happy spinning!
I recently came across the Purple Peel Exploit, and it’s definitely one of the more interesting viral weight
loss hacks out there. People are talking about how it helps boost metabolism and supports fat loss in a natural
way without harsh stimulants. If it really works as claimed,
it could be a game-changer for those looking for an easier approach to managing weight
The Ice Water Hack has been getting a lot of attention lately,
and honestly, it makes sense why. The idea of using
a simple method to trigger fat-burning and boost energy naturally is really interesting.
I think people are drawn to it because it’s easy to follow and doesn’t require strict diets or crazy workouts.
Definitely one of those hacks that sounds worth exploring if you’re looking
for a simple approach to weight loss.
I feel that is among the most important information for me.
And i’m happy reading your article. But wanna observation on some common things, The web site taste
is wonderful, the articles is truly great : D.
Good task, cheers
Hi would you mind sharing which blog platform you’re using?
I’m going to start my own blog in the near future but I’m having
a difficult time deciding between BlogEngine/Wordpress/B2evolution and Drupal.
The reason I ask is because your design and style seems different then most blogs and
I’m looking for something completely unique.
P.S Sorry for being off-topic but I had to ask!
Hello, i read your blog occasionally and i own a similar one and i was just curious if you get a lot of
spam comments? If so how do you stop it, any plugin or anything you can recommend?
I get so much lately it’s driving me mad so any assistance is very much
appreciated.
Whispeara seems like a promising supplement for supporting
healthy vocal cords and overall throat comfort. I like that it’s made
with natural ingredients aimed at reducing strain and improving voice clarity.
Some users notice improvements quickly, while others say it takes consistent use to feel the benefits.
Overall, it looks like a helpful option for anyone who relies on their
voice daily or wants to maintain long-term vocal health.
Why viewers still use to read news papers when in this technological globe all
is existing on web?
Wow! After all I got a weblog from where I can actually obtain valuable data regarding my study and knowledge.
I’m truly enjoying the design and layout of your blog.
It’s a very easy on the eyes which makes it much more
pleasant for me to come here and visit more often. Did you hire out a developer to create your theme?
Excellent work!
I have fun with, lead to I discovered just what I used to be having a look for.
You’ve ended my 4 day lengthy hunt! God Bless you man. Have a nice day.
Bye
Greetings from Ohio! I’m bored at work so I decided to check out your blog on my iphone during lunch break.
I enjoy the knowledge you provide here and can’t wait to take a
look when I get home. I’m surprised at how fast your blog loaded on my cell phone ..
I’m not even using WIFI, just 3G .. Anyhow, superb site!
No matter if some one searches for his vital thing, therefore he/she desires
to be available that in detail, thus that thing is maintained over here.
What i do not understood is in reality how you’re not really much more well-liked than you may be right now.
You are very intelligent. You know therefore considerably with regards to this subject, produced me individually consider it from so many varied angles.
Its like women and men don’t seem to be involved except it is one thing to
do with Woman gaga! Your individual stuffs outstanding.
At all times handle it up!
Hey I am so excited I found your blog, I really found you by mistake,
while I was looking on Digg for something else, Anyhow I am here now and
would just like to say cheers for a tremendous post and a all round enjoyable blog (I also love
the theme/design), I don’t have time to browse
it all at the minute but I have saved it and also added
your RSS feeds, so when I have time I will be back to read a great deal more, Please do keep up the superb b.
hey there and thank you for your info – I’ve definitely picked up something
new from right here. I did however expertise some technical issues using this website,
as I experienced to reload the website many times previous to I could get
it to load correctly. I had been wondering if your hosting is
OK? Not that I’m complaining, but slow loading instances times
will sometimes affect your placement in google and can damage
your high-quality score if advertising and marketing with Adwords.
Anyway I’m adding this RSS to my e-mail and can look out for a lot more of
your respective intriguing content. Make sure you update this again very
soon.
Today, I went to the beachfront with my kids. I found a sea shell and gave it to my 4
year old daughter and said “You can hear the ocean if you put this to your ear.” She put
the shell to her ear and screamed. There was a hermit crab inside and it pinched her ear.
She never wants to go back! LoL I know this is completely off topic but I had to tell someone!
I read this piece of writing completely about the difference of most up-to-date and preceding technologies, it’s awesome article.
Wow that was odd. I just wrote an incredibly long comment but after
I clicked submit my comment didn’t show up. Grrrr…
well I’m not writing all that over again. Anyways, just wanted to say superb blog!
Someone necessarily assist to make critically posts I’d state.
That is the first time I frequented your website page and up to now?
I surprised with the research you made to make
this actual post incredible. Fantastic task!
I visited several blogs except the audio quality for audio songs current at
this website is truly marvelous.
Hi there! I understand this is sort of off-topic but I needed to ask.
Does building a well-established blog like yours require a massive amount work?
I’m brand new to blogging but I do write in my diary every day.
I’d like to start a blog so I can share my experience
and views online. Please let me know if you have any kind of suggestions or tips for new aspiring blog
owners. Appreciate it!
Ꮃith mock tests with encouraging comments, OMT builds resilience іn mathematics, promoting love ɑnd motivation fօr Singapore students’ test accomplishments.
Dive іnto sеlf-pacedmath proficiency with OMT’s 12-m᧐nth e-learning courses, totɑl wіtһ practice worksheets
ɑnd taped sessions fοr extensive modification.
Wіth students in Singapore starting formal mathematics education from day ⲟne and facing һigh-stakes evaluations, math tuition ⲟffers the extra edge neеded to achieve
top performance in tһis essential subject.
primary school tuition іs necessary fоr PSLE ɑs
it uѕes remedial assistance fоr subjects ⅼike wһole numberѕ and measurements, ensuring no fundamental weaknesses
persist.
Comprehensive coerage ᧐f the ѡhole O Level curriculum іn tuition makeѕ sure no subjects, from sets tߋ vectors, ɑre forgotten іn a pupil’s revision.
Junior college math tuition іs essential for A Degrees ɑs it deepens understanding օf advanced calculus subjects like integration ethods and differential formulas, ᴡhich
are main to the test syllabus.
OMT’ѕ distinct mathematics program matches tһe MOE
educational program Ƅy consisting of proprietary study tһat uѕe math tօ genuine
Singaporean contexts.
Limitless retries օn tests sia, best for understanding subjects aand achieving tһose A grades іn math.
Tuition facilities іn Singapore specialize іn heuristic methods, vital
fߋr tackling tһe tough word issues in mathematics exams.
Alsо visit my page; best psle Math Tutor Singapore
I like the valuable info you provide in your articles.
I will bookmark your blog and check again here frequently.
I’m quite certain I will learn plenty of new stuff right here!
Best of luck for the next!
I do not even know how I ended up here, but I thought this post was great.
I do not know who you are but certainly you’re
going to a famous blogger if you aren’t already 😉 Cheers!
Greetings from Idaho! I’m bored at work so I decided to check out your site on my iphone during lunch break.
I love the information you provide here and can’t wait to take a look when I get home.
I’m amazed at how quick your blog loaded on my phone ..
I’m not even using WIFI, just 3G .. Anyways, superb site!
Good post. I learn something new and challenging on websites I stumbleupon on a daily basis.
It’s always helpful to read through articles from other writers and practice a little something
from their sites.
Everyone loves it when individuals get together
and share views. Great site, continue the good work!
Mitolyn looks really promising for anyone struggling with weight management.
It’s designed to support metabolism, boost energy, and help the
body burn fat more efficiently. I like that it focuses on working with the body’s natural processes rather than relying on harsh stimulants.
Definitely seems worth trying if you’re aiming for steady and
healthy weight loss
Wow, marvelous blog layout! How long have you been blogging for?
you make blogging look easy. The overall look of your site is excellent, let alone the content!
Fastidious respond in return of this difficulty with genuine arguments and
describing all regarding that.
We absolutely love your blog and find a lot of your post’s to be exactly I’m looking
for. Would you offer guest writers to write content
for you? I wouldn’t mind publishing a post or elaborating on a number of the subjects you write in relation to here.
Again, awesome website!
First off I would like to say fantastic blog!
I had a quick question that I’d like to ask if
you do not mind. I was interested to find out how you center
yourself and clear your mind prior to writing. I have had a hard time
clearing my thoughts in getting my ideas out there. I do take pleasure in writing
but it just seems like the first 10 to 15 minutes are generally wasted
just trying to figure out how to begin. Any
suggestions or tips? Thanks!
Thanks for finally writing about > Windows 10 IoT Install Guide < Liked it!
Hi colleagues, how is the whole thing, and what you desire to say about
this article, in my view its actually amazing in support of me.
Great delivery. Solid arguments. Keep up the great effort.
Good article. I will be experiencing many of these issues as well..
Wow that was odd. I just wrote an very long comment but after I clicked
submit my comment didn’t appear. Grrrr… well I’m not writing all that over again. Anyhow,
just wanted to say fantastic blog!
Hey would you mind sharing which blog platform you’re working with?
I’m looking to start my own blog soon but I’m having a difficult
time making a decision between BlogEngine/Wordpress/B2evolution and Drupal.
The reason I ask is because your design seems different then most blogs and
I’m looking for something unique.
P.S Apologies for being off-topic but I had to ask!
I for all time emailed this webpage post page to all my
associates, as if like to read it next my friends will too.
It’s awesome to visit this web page and reading the views of all colleagues about
this piece of writing, while I am also keen of getting experience.
Hiya very nice blog!! Man .. Excellent ..
Wonderful .. I will bookmark your website and take the feeds also?
I am happy to seek out so many helpful info here in the put up, we’d like develop extra techniques in this regard,
thank you for sharing. . . . . .
Very nice post. I just stumbled upon your weblog and wished to say that I have really enjoyed browsing
your blog posts. In any case I’ll be subscribing to your feed and I hope you write again soon!
Incredible points. Great arguments. Keep up the
good work.
Dry Cleaning in New York city by Sparkly Maid NYC
Valuable info. Fortunate me I found your website by accident, and I
am shocked why this twist of fate didn’t came about
in advance! I bookmarked it.
Arialief sounds like a really supportive option for managing pain naturally.
From what I’ve seen, it’s designed to ease discomfort and improve
daily mobility without heavy side effects. People appreciate that
it targets relief while still being gentle on the body, which makes it a good alternative to stronger
medications. Definitely worth considering if you’re looking for a
more natural approach to pain support.
I’ve been hearing a lot about AquaSculpt lately and how it mimics cold exposure to boost fat loss without
the discomfort. Honestly, it sounds like a game-changer for
people who struggle with crash diets or stimulants.
Curious to see more real AquaSculpt reviews from those
who’ve tried it consistently!
Thanks a lot for sharing this with all of us you really recognise what you’re talking approximately!
Bookmarked. Please additionally seek advice from my site =).
We can have a link exchange contract among us
Hello, Neat post. There is a problem together with your website in internet
explorer, would test this? IE nonetheless is the marketplace leader
and a big section of other folks will leave out your fantastic writing due to
this problem.
Hey very cool blog!! Man .. Excellent .. Amazing .. I’ll bookmark your web site and take the feeds also?
I am glad to find so many helpful information here in the post, we need develop extra techniques in this regard, thank
you for sharing. . . . . .
Hey There. I discovered your blog the usage of msn. This
is a very well written article. I will be sure to bookmark it and come
back to read extra of your helpful information. Thank you for the post.
I will definitely return.
The Purple Peel Exploit is going viral right now as a
simple weight loss hack, and honestly, it’s fascinating how many
people are talking about their results. Instead of extreme diets or
tough workout routines, it focuses on supporting the
body naturally to burn fat more efficiently. I think that’s why it’s catching so much attention—it feels
like an easier, more sustainable way to lose weight
Appreciate the recommendation. Will try it out.
We are a group of volunteers and starting a new
scheme in our community. Your site provided us with valuable info to work on. You’ve
performed a formidable job and our whole group will probably be grateful to you.
Hi! I know this is kinda off topic however I’d figured I’d ask.
Would you be interested in exchanging links or maybe guest authoring
a blog article or vice-versa? My site covers a lot of the same topics as yours and I feel we could greatly benefit from each other.
If you might be interested feel free to shoot me an email.
I look forward to hearing from you! Terrific blog by the way!
Spot on with this write-up, I honestly believe that this site needs
a great deal more attention. I’ll probably be back again to see more, thanks for the information!
AquaSculpt seems really interesting! The idea that it mimics cold exposure to support fat loss without extreme diets or intense workouts sounds promising.
Definitely looking forward to seeing more AquaSculpt reviews from real users to know how effective it truly is.
It’s going to be ending of mine day, except before finish I am reading this impressive post to improve my experience.
Link exchange is nothing else but it is only placing the other person’s webpage link on your page at suitable place and other person will also do
similar in support of you.
Do you mind if I quote a couple of your articles as long as I provide credit and
sources back to your website? My website is in the
exact same niche as yours and my users would definitely
benefit from a lot of the information you provide here.
Please let me know if this alright with you.
Regards!
I am regular visitor, how are you everybody?
This article posted at this web site is really nice.
Write more, thats all I have to say. Literally,
it seems as though you relied on the video to make your
point. You definitely know what youre talking
about, why waste your intelligence on just posting videos to
your weblog when you could be giving us something enlightening to
read?
Greate article. Keep writing such kind of information on your site.
Im really impressed by your blog.
Hi there, You’ve done a great job. I’ll definitely digg it and for my part recommend to my friends.
I am sure they will be benefited from this site.
Nerve Fresh looks like a solid natural option for supporting nerve health and reducing discomfort.
Many users say it helps with tingling, numbness, and
general nerve-related issues, which can make daily life much more comfortable.
Some notice results fairly quickly, while others find
it takes consistent use, but overall it seems like a supportive supplement for maintaining healthy nerve function.
Having read this I believed it was very enlightening.
I appreciate you spending some time and effort to put this article together.
I once again find myself spending a lot of time both reading and commenting.
But so what, it was still worthwhile!
I am really impressed with your writing skills as well as with
the layout on your blog. Is this a paid theme or did you customize it yourself?
Anyway keep up the excellent quality writing, it’s rare to see a great blog like this one these
days.
Mitolyn seems like a promising weight loss supplement that helps support metabolism and fat burning naturally.
I like that it focuses on boosting energy and controlling cravings, making it easier to stick to a healthy routine.
Some users notice results fairly quickly, while others find
it takes consistent use, but overall it looks like a helpful option for those aiming
to manage weight effectively.
I have read so many content on the topic of the blogger lovers except this
paragraph is actually a pleasant article, keep it up.
I needed to thank you for this good read!!
I certainly loved every little bit of it. I have you book marked to look at new things you post…
ProDentim has really impressed me as a dental probiotic.
Instead of just focusing on brushing and flossing, it helps improve
oral health from the inside out by supporting good bacteria in the mouth.
I’ve noticed a lot of people sharing how it freshens breath, strengthens
gums, and even helps with overall dental hygiene—it feels like a smart addition to a daily
routine.
Thanks for the marvelous posting! I really enjoyed reading it, you happen to be a great author.I
will always bookmark your blog and may come back in the
future. I want to encourage continue your great writing, have a nice day!
I’ve been reading up on Boostaro, and it definitely seems to
be gaining attention for the way it supports men’s energy and performance
naturally. I like that it’s made with plant-based ingredients instead of
relying on harsh chemicals. A lot of people seem to be
getting real confidence boosts from it, which makes it worth checking out.
Excellent site. Plenty of useful info here.
I’m sending it to a few buddies ans additionally sharing in delicious.
And naturally, thank you to your effort!
That is very interesting, You are a very professional blogger.
I have joined your rss feed and stay up for in quest of extra of
your magnificent post. Also, I have shared your website in my social networks
Hi, after reading this amazing article i am too delighted to share my familiarity here with mates.
OMT’s diagnostic evaluations customize ideas, helping students fаll in love with theіr special mathematics
journey tоward examination success.
Enlist tоdaү in OMT’s standalone e-learning
programs ɑnd watch your grades skyrocket tһrough limitless access tο tߋp quality, syllabus-aligned ϲontent.
Witһ trainees in Singapore beginnіng formal
mathematics education fгom thе firѕt day and dealing with һigh-stakes evaluations, math tuition оffers the extra edge required to achieve tօⲣ
performance іn this essential topic.
Enriching primary education ԝith math tuition prepares students ffor PSLE Ьy cultivating ɑ growth sate ߋf mind towагd challenging subjects
ⅼike balance аnd improvements.
Introducing heuristic techniques еarly in secondary tuition prepares students for
the non-routine issues tһɑt frequently ѕhow up in O Level
evaluations.
Ꮤith A Levels affecting occupation courses іn STEM fields, math tuition enhances fundamental abilities f᧐r future university reѕearch
studies.
Distinctly, OMT’ѕ syllabus matches tһe MOE structure bʏ providing modular lessons tһɑt permit for duplicated reinforcement ⲟf weak locations at the student’s pace.
Expert suggestions іn video clips offer shortcuts lah, assisting уou address questions mսch
faster and score extra іn exams.
Ᏼy concentrating οn mistake evaluation, math tuition avoids reoccuring mistakes tһat
cоuld sеt you back precious marks in Singapore tests.
Alѕo visit my paցe – singapore math tuition
I’ve seen a lot of buzz about Boostaro lately, and
it looks like many guys are finding it helpful for improving stamina, circulation, and overall performance.
I really like that it’s made from natural ingredients and not loaded with synthetic stuff.
Seems like a solid option for men looking to feel more energized and confident.
Hello everyone, it’s my first go to see at this web page, and article is truly fruitful in favor of me, keep up posting these types of articles or reviews.
Hello! I could have sworn I’ve been to this site before but after going
through a few of the posts I realized it’s new to me.
Anyhow, I’m certainly pleased I came across it and I’ll be bookmarking
it and checking back often!
Hi there, all is going sound here and ofcourse every one is sharing data, that’s genuinely excellent, keep up writing.
Great weblog right here! Also your web site rather
a lot up very fast! What web host are you the use of? Can I get
your affiliate hyperlink on your host? I desire
my website loaded up as quickly as yours lol
I know this site offers quality based content and other
material, is there any other site which gives such stuff in quality?
My brother suggested I might like this web site.
He used to be entirely right. This post truly made my day.
You can not consider just how so much time I had spent for this
information! Thanks!
ProDentim seems like a great option for anyone who
wants to support their oral health naturally. I like that it focuses on balancing the good bacteria in the
mouth instead of just masking issues. Many people say it’s helped with fresher breath, healthier gums, and stronger teeth—it definitely
looks worth trying.
These are really wonderful ideas in about blogging. You have touched some nice
things here. Any way keep up wrinting.
I just could not leave your web site before suggesting
that I actually enjoyed the standard info an individual supply for your visitors?
Is gonna be back incessantly to inspect new posts
Appreciate this post. Will try it out.
This is the right webpage for anybody who wants to find out about this topic.
You understand a whole lot its almost hard to argue with
you (not that I personally will need to…HaHa).
You certainly put a brand new spin on a subject that has
been discussed for years. Wonderful stuff, just great!
Nagano Tonic looks really promising! I like that it’s based on natural
ingredients and traditional Japanese methods for boosting
energy and supporting weight management. Excited to see more Nagano
Tonic reviews from people who’ve tried it consistently.
Hello i am kavin, its my first time to commenting anyplace, when i read this paragraph
i thought i could also create comment due to this sensible piece of writing.
Magnificent site. A lot of helpful information here. I’m sending it to a few pals ans also sharing in delicious.
And naturally, thanks for your sweat!
Wow! At last I got a website from where I be capable of really obtain valuable facts regarding my study
and knowledge.
Hey there just wanted to give you a quick heads up
and let you know a few of the images aren’t loading correctly.
I’m not sure why but I think its a linking issue.
I’ve tried it in two different browsers and both show the same results.
Hello it’s me, I am also visiting this website daily,
this web site is in fact pleasant and the viewers are truly sharing
nice thoughts.
We’re a group of volunteers and opening a new scheme in our community.
Your site provided us with valuable info to work on. You have done an impressive
job and our whole community will be thankful to you.
Howdy are using WordPress for your site platform? I’m new to the blog world
but I’m trying to get started and create my own. Do you require any coding knowledge
to make your own blog? Any help would be greatly appreciated!
Hey! Do you know if they make any plugins to assist with Search Engine Optimization? I’m trying to
get my blog to rank for some targeted keywords but I’m not
seeing very good gains. If you know of any please
share. Kudos!
Good day! I could have sworn I’ve been to this website before but after browsing through
some of the post I realized it’s new to me.
Anyhow, I’m definitely glad I found it and I’ll be bookmarking and checking back often!
Hi, yes this article is really fastidious and I have learned lot of things
from it on the topic of blogging. thanks.
Hi there, I log on to your new stuff regularly. Your humoristic style is witty, keep it up!
Hi, I do think this is a great web site. I stumbledupon it ;
) I’m going to return yet again since i have bookmarked it.
Money and freedom is the greatest way to change, may you be
rich and continue to help other people.
Free Sugar Pro seems like a promising supplement for anyone looking to support healthy blood
sugar levels. I like that it uses natural ingredients to help manage cravings and maintain steady energy throughout the day.
Some users notice results fairly quickly, while others find it takes
consistent use, but overall it looks like a
helpful option for better blood sugar control
Actually when someone doesn’t know after that its up to other visitors that they will help, so here it
takes place.
Eventually, OMT’ѕ extensive services weave pleasure іnto math education, assisting
students fall deeply іn love and skyrocket іn theіr tests.
Join our small-group on-site classss in Singapore fоr customized assistance іn a nurturing environment
tһat builds strong fundamental math abilities.
Ꮃith trainees іn Singapore bеginning formal mathematics education fгom day οne ɑnd dealing ѡith high-stakes assessments, math tuition ߋffers the additional edge
required tⲟ attain top efficiency in tһis іmportant
topic.
Ꮤith PSLE mathematics concerns typically involving real-ѡorld applications, tuition рrovides targeted practice t᧐ develop critical believing skills neсessary fߋr high ratings.
Secondary math tuition ցets rid οf the restrictions оf big class dimensions, ɡiving concentrated
іnterest thɑt improves understanding fοr Օ Level prep woгk.
Maath tuition at the junior college level highlights conceptual
clarity оvеr memorizing memorization, іmportant fоr dealing wіth application-based А
Level questions.
Wһat maқes OMT attract attention іs its tailored curriculum tһat lines
ᥙp witһ MOE while incorporating ᎪI-driven adaptive learning to suit
individual demands.
Comprehensive protection οf topics siа, leaving
no gaps іn understanding for top mathematics accomplishments.
Inevitably, math tuition іn Singapore transforms pߋssible іnto achievement, ensuring
students not simply pass үet master their mathematics tests.
mу webpage … best secondary math tuition
If you are going for most excellent contents like me, just pay a visit this web site every day because it presents feature contents, thanks
Aw, this was an extremely nice post. Finding the time and actual effort to generate a really good
article… but what can I say… I hesitate a whole lot
and don’t manage to get nearly anything done.
Nerve Fresh seems like a helpful supplement for supporting nerve health and
reducing discomfort like tingling or numbness. I like that
it uses natural ingredients to promote overall nerve
function. Some users notice improvements fairly quickly, while
others say it takes consistent use, but it looks like a solid option for anyone looking to
support their nervous system naturally
I have read so many articles concerning the blogger lovers
except this paragraph is truly a pleasant piece of writing, keep it up.
Yes! Finally someone writes about isfahan.
Hi there to every body, it’s my first go to see of this web site; this website consists of awesome and in fact good material in favor of readers.
It’s an awesome piece of writing for all
the web people; they will take benefit from it I am sure.
Hi to all, how is all, I think every one is getting more
from this web page, and your views are good designed for new users.
Keep on writing, great job!
Write more, thats all I have to say. Literally, it seems as though you
relied on the video to make your point. You
clearly know what youre talking about, why throw away your intelligence on just posting videos to your
blog when you could be giving us something enlightening to read?
May I simply say what a comfort to find a person that genuinely understands what
they are discussing over the internet. You actually realize how to
bring a problem to light and make it important. A lot more people need to check this
out and understand this side of the story. I can’t believe you aren’t more popular
because you definitely have the gift.
We are a gaggle of volunteers and opening a brand new scheme in our community.
Your site provided us with useful info to
work on. You’ve performed a formidable task and our whole neighborhood
will be grateful to you.
I am sure this post has touched all the internet visitors,
its really really fastidious post on building up new weblog.
Actually when someone doesn’t be aware of then its up to other users that they
will assist, so here it occurs.
It is in point of fact a nice and helpful piece of info.
I am glad that you just shared this useful info with us.
Please keep us up to date like this. Thanks for sharing.
I think the admin of this web page is in fact working hard for
his web page, since here every data is quality based material.
The Brain Song is such an interesting concept — it’s designed to boost focus, memory, and mental clarity
through sound-based stimulation. I like how it takes a natural, non-invasive
approach to supporting brain health instead of relying on pills or chemicals.
Definitely worth checking out for anyone who wants
to sharpen their mind in a simple, relaxing way
Gluco Extend looks like a promising supplement for maintaining healthy blood sugar levels.
I like that it’s made with natural ingredients designed to support metabolism and overall energy.
Many people seem to find it helpful for daily
balance, and it could be a good option for anyone looking for extra
support in managing blood sugar naturally
Gluco Extend seems like a really helpful supplement for supporting balanced blood sugar levels.
I like that it focuses on natural ingredients, which makes it feel
safer for long-term use. If you’re looking for something to help with steady energy and healthy glucose
management, Gluco Extend definitely sounds worth considering.
Write more, thats all I have to say. Literally,
it seems as though you relied on the video to make your point.
You clearly know what youre talking about, why waste your
intelligence on just posting videos to your site when you could be giving us something enlightening to read?
Hi, everything is going well here and ofcourse every one is
sharing data, that’s really excellent, keep up writing.
These are really wonderful ideas in on the topic of blogging.
You have touched some pleasant factors here.
Any way keep up wrinting.
I wanted to thank you for this good read!! I certainly loved every little bit of it.
I have got you book marked to check out new stuff you post…
Native Path Creatine seems like a strong option for anyone looking
to boost strength, endurance, and workout performance naturally.
I like that it’s designed to support muscle energy without
unnecessary fillers or additives. Some users notice improvements in stamina and recovery quickly, while others say consistent use
is key, but overall it looks like a solid supplement
for fitness enthusiasts.
Menarik banget sekali membaca artikel tentang JEPANGBET ini.
Review yang diberikan sangat berguna. Saya pribadi penasaran dengan situs
slot online terpercaya, dan ternyata daftar JEPANGBET memang pilihan sekali.
Apalagi tautan daftar JEPANGBET yang dibagikan di sini memudahkan ketika situs
utama down. Layanan yang handal membuat pengalaman main gates of olympus semakin nyaman.
Mudah-mudahan JEPANGBET terus menjadi pilihan utama
di tahun 2025, karena banyak pemain sudah merasakan bonus besar.
Hello this is somewhat of off topic but I was wanting to know if blogs use WYSIWYG editors or if you have to manually code with HTML.
I’m starting a blog soon but have no coding expertise so I wanted to get advice from
someone with experience. Any help would be enormously appreciated!
I visit daily some web sites and sites to read
articles or reviews, except this website presents quality based posts.
how to win on pokie machines australia, online usa real
money casino and is casinos illegal in uk, or free poker machines online united states
Stop by my blog – bingo no deposit Bonus 2022
I’m truly enjoying the design and layout of your site.
It’s a very easy on the eyes which makes it much more enjoyable for me to come here
and visit more often. Did you hire out a designer to create your theme?
Outstanding work!
Hi there to every one, the contents present at this site are actually remarkable for people knowledge,
well, keep up the nice work fellows.
Hi! I’ve been reading your website for some time now and finally got the courage to go ahead and give
you a shout out from Atascocita Texas! Just wanted to mention keep up the excellent job!
Thank you for the auspicious writeup. It in reality was a
entertainment account it. Glance complex to more brought agreeable from you!
However, how could we keep in touch?
I am extremely impressed with your writing skills and also
with the layout on your weblog. Is this a paid theme or did
you customize it yourself? Either way keep up the excellent quality writing, it is rare to see a great blog like this one today.
all the time i used to read smaller articles that as well clear
their motive, and that is also happening with this article which I
am reading now.
Hi, I do believe this is an excellent web site.
I stumbledupon it 😉 I’m going to come back yet again since I bookmarked it.
Money and freedom is the best way to change, may you be rich and continue to guide others.
Neuro Surge looks like a solid brain support supplement for anyone wanting more focus, memory, and mental energy.
I really like that it’s designed to boost cognitive performance naturally
without heavy stimulants. If you’re looking for something to sharpen your mind and keep you energized, Neuro Surge definitely seems
worth checking out.
Hello, Neat post. There is an issue with your website in internet explorer, may
check this? IE nonetheless is the marketplace chief and a large component to people will leave out your great writing due to this problem.
I’m not sure exactly why but this site is loading very slow for me.
Is anyone else having this issue or is it a issue on my end?
I’ll check back later on and see if the problem
still exists.
OMT’ѕ mix ⲟf online and оn-site options uses adaptability,
mаking math easily accessible аnd charming, while inspiring Singapore
pupils for test success.
Сhange math difficulties intо triumphs witһ OMT
Math Tuition’ѕ mix ᧐f online and on-site options, Ƅacked by a performance history of
trainee excellence.
Ԍiven that mathematics plays аn essential role іn Singapore’s
financial development ɑnd progress, purchasing specialized math tuition gears սp
students ѡith the problem-solving skills rewquired tօ
grow іn a competitive landscape.
primary tuition іs importɑnt f᧐r constructing durability ɑgainst PSLE’ѕ difficult
questions, ѕuch aѕ thoѕe on possibility ɑnd
easy data.
With O Levels highlighting geometry evidence and theories,
math tuition ߋffers specialized drills tߋ maқe certain students сan tackle tһeѕe wіth accuracy ɑnd ѕeⅼf-confidence.
Tuition teaches error analysis strategies, aiding junior college
pupils stay ⅽlear of usual mistakes іn A Level estimations and proofs.
What distinguishes OMT іs its custom-mɑde educational program tһat aligns ԝith MOE whilе concentrating on metacognitive abilities, ѕhowing trainees just hⲟw tо learn math suсcessfully.
Adaptive quizzes readjust t᧐ your level lah, challenging ʏou perfect
tο steadily elevate your exam ratings.
Math tuition іn lіttle teams ensures individualized
focus, սsually dоing not һave іn large Singapore school
courses for test preparation.
Αlso visit my web-site; math tutor
I used to be suggested this website by way of my cousin. I’m no longer positive whether this put up is written by means of him as no one else realize such specified about my problem.
You’re incredible! Thanks!
The Memory Wave sounds fascinating – I like how it’s designed to naturally boost focus,
mental clarity, and memory without relying on harsh stimulants.
Brain health is something so many people want
to improve, and this approach feels gentle yet effective.
Definitely a unique option for anyone looking to support long-term cognitive performance.
Hmm is anyone else having problems with the pictures on this blog loading?
I’m trying to figure out if its a problem on my end or
if it’s the blog. Any feedback would be greatly appreciated.
SlimMe Detox Tea ist eine tolle Unterstützung für alle, die ihrem Körper etwas Gutes
tun möchten. Die Mischung aus natürlichen Kräutern schmeckt nicht nur angenehm, sondern kann auch dabei helfen, das
Wohlbefinden zu steigern und ein leichteres Körpergefühl zu fördern. Besonders praktisch finde ich, dass er sich einfach in den Alltag integrieren lässt – perfekt für alle, die auf natürliche Weise mehr Balance suchen.
The Pineal Guardian sounds really interesting, especially for those looking to support better
sleep, mental clarity, and overall wellness. I like that
it focuses on natural ingredients to help decalcify and nourish the pineal gland, which is
often overlooked when it comes to health. Definitely seems like a unique
supplement for anyone wanting to boost focus, energy,
and deeper rest.
This is very interesting, You’re a very skilled blogger.
I have joined your feed and look forward to seeking more of
your excellent post. Also, I’ve shared your web site in my
social networks!
Wow, wonderful blog layout! How long have you been blogging for?
you made blogging look easy. The overall look of your web site is
magnificent, let alone the content!
I all the time used to read paragraph in news papers but now
as I am a user of net so from now I am using
net for posts, thanks to web.
Wow that was unusual. I just wrote an really long comment but
after I clicked submit my comment didn’t appear.
Grrrr… well I’m not writing all that over again. Regardless, just wanted to say superb blog!
Excellent blog post. I definitely appreciate this site.
Keep it up!
Wonderful blog! I found it while surfing around on Yahoo News.
Do you have any tips on how to get listed in Yahoo News?
I’ve been trying for a while but I never seem to get
there! Thanks
Hiya! Quick question that’s completely off topic. Do you know how to make your site mobile friendly?
My weblog looks weird when viewing from my iphone. I’m trying to find a theme or plugin that might be
able to fix this problem. If you have any suggestions, please
share. Many thanks!
What’s up, constantly i used to check webpage posts here in the early hours in the daylight, since i enjoy to learn more and more.
Can I just say what a relief to discover somebody who truly understands
what they are talking about on the web. You actually understand how to bring a problem
to light and make it important. More and more people really need to check this
out and understand this side of the story. I was surprised that you’re not more popular given that you definitely possess the gift.
hey there and thank you for your info – I have certainly picked
up something new from right here. I did however expertise a
few technical issues using this web site, as I experienced to
reload the website a lot of times previous to I could get it to load properly.
I had been wondering if your web hosting is OK? Not that I am complaining, but sluggish loading instances
times will sometimes affect your placement in google and could damage your quality score if advertising
and marketing with Adwords. Well I am adding this RSS to my email and could look out for a lot
more of your respective fascinating content.
Ensure that you update this again very soon.
Hello there! I could have sworn I’ve been to this blog
before but after reading through some of the
post I realized it’s new to me. Nonetheless, I’m definitely delighted I found it and I’ll be book-marking
and checking back often!
hello!,I love your writing so much! share we keep in touch
extra approximately your article on AOL? I need a specialist
in this area to solve my problem. Maybe that is you!
Looking forward to see you.
It’s really a great and helpful piece of info. I am happy that you
just shared this useful info with us. Please stay us up to
date like this. Thanks for sharing.
I read this piece of writing fully regarding the resemblance of newest and previous technologies, it’s awesome article.
First off I want to say terrific blog! I had a quick question which I’d like to ask
if you don’t mind. I was curious to find out how
you center yourself and clear your mind before writing.
I’ve had difficulty clearing my mind in getting my thoughts out there.
I do take pleasure in writing however it just seems like the first 10 to 15
minutes are usually lost just trying to figure out how to begin. Any ideas or hints?
Cheers!
The other day, while I was at work, my cousin stole my apple ipad and tested to see if it can survive
a 30 foot drop, just so she can be a youtube sensation. My
apple ipad is now broken and she has 83 views. I know this is totally off
topic but I had to share it with someone!
Hi! I’ve been reading your blog for some time now and finally got the courage to go ahead and give
you a shout out from Huffman Tx! Just wanted to mention keep up the
excellent job!
At this moment I am going away to do my breakfast,
after having my breakfast coming again to read further news.
Native Path Creatine looks like a great choice for anyone serious about boosting strength,
endurance, and muscle recovery. I really like that
it’s clean, simple, and focused on quality without unnecessary fillers.
Definitely a solid supplement for athletes or anyone wanting to improve performance naturally
It’s very trouble-free to find out any matter on net as compared to textbooks, as I found this paragraph
at this web page.
Boostaro seems like a solid option for men who want more natural support for energy, stamina, and
performance. I like that it’s made with
plant-based ingredients instead of harsh chemicals, and the
fact that it also supports circulation is a big plus. Looks like a promising supplement
for overall vitality
I’m curious to find out what blog system you are utilizing?
I’m having some small security problems with my latest website and
I’d like to find something more secure. Do
you have any solutions?
Great beat ! I would like to apprentice while you amend your web
site, how could i subscribe for a blog website? The account aided me a acceptable
deal. I had been tiny bit acquainted of this your broadcast offered bright clear idea
Greetings! Very useful advice within this article!
It’s the little changes that will make the largest changes.
Thanks for sharing!
Have you ever considered creating an e-book or guest authoring on other sites?
I have a blog based upon on the same information you discuss and would really like to have you share some stories/information. I know my readers would appreciate your
work. If you are even remotely interested, feel free to
send me an email.
Hey there just wanted to give you a quick heads up. The words in your content seem to be running off the screen in Opera.
I’m not sure if this is a formatting issue or something to do with internet browser compatibility but I figured I’d post to let you know.
The layout look great though! Hope you get the problem
solved soon. Many thanks
Whats up are using WordPress for your blog platform?
I’m new to the blog world but I’m trying to get started and set up my own. Do you need any
coding knowledge to make your own blog? Any help would be greatly appreciated!
The Pineal Guardian really caught my attention – I like how it’s designed to support pineal gland health
and overall mental clarity. A lot of people overlook this aspect of wellness, so it’s
refreshing to see a supplement that focuses on balance, sleep quality, and higher focus.
Definitely seems worth exploring for those
interested in natural brain and body support.
My brother recommended I might like this website.
He used to be entirely right. This put up actually made
my day. You can not imagine just how much time I had spent for this
info! Thanks!
WOW just what I was looking for. Came here
by searching for Eternal Lunesta
whoah this weblog is great i love reading your articles.
Stay up the great work! You know, many individuals are looking around for this info, you could
help them greatly.
iGenics looks like a promising supplement for eye health.
I really like that it’s made with natural ingredients aimed at
supporting vision, protecting against oxidative stress, and keeping eyes sharp as we age.
If you’re looking for something to naturally support your eyesight, iGenics definitely seems worth checking out.
I was curious if you ever considered changing the structure of
your website? Its very well written; I love what
youve got to say. But maybe you could a little more in the way of content so people could connect with it better.
Youve got an awful lot of text for only having 1 or two images.
Maybe you could space it out better?
Prosta Peak looks like a promising supplement for men who
want to take better care of their prostate health and overall vitality.
I like that it focuses on natural ingredients to
support urinary flow, reduce discomfort, and promote
long-term wellness. It’s definitely worth considering for anyone looking for a natural
way to maintain prostate function and confidence.
Phalo Boost Supplement sounds really promising for anyone
looking to naturally increase energy and support overall vitality.
I like that it focuses on enhancing stamina and daily performance without relying on harsh stimulants.
Definitely looks like a solid option for long-term wellness support.
“LungExpand Pro looks like a really helpful supplement for supporting stronger lungs and easier breathing.
I like that it’s focused on natural ingredients to improve oxygen flow and
overall respiratory health. Seems like a
great choice for anyone who wants to boost their lung capacity and feel more
energized daily.
What i do not understood is if truth be told how you’re no longer actually much more smartly-appreciated than you may be now.
You’re very intelligent. You understand therefore considerably relating to this matter, produced
me personally imagine it from numerous various angles. Its like women and men don’t seem to be interested unless it is one thing to do
with Woman gaga! Your individual stuffs great.
All the time care for it up!
Why visitors still use to read news papers when in this technological world all is accessible
on net?
When someone writes an article he/she retains the image of a user in his/her
mind that how a user can know it. Therefore that’s why this paragraph is perfect.
Thanks!
My brother recommended I might like this blog. He was totally right.
This post actually made my day. You can not imagine just how
much time I had spent for this info! Thanks!
Good day! This post could not be written any better! Reading this post reminds me of my
old room mate! He always kept chatting about this. I will forward this page to him.
Fairly certain he will have a good read. Many thanks for sharing!
It is the best time to make some plans for the future and it’s time to be happy.
I’ve read this post and if I could I want to suggest you few interesting things or suggestions.
Perhaps you could write next articles referring to this article.
I desire to read even more things about it!
OMT’s gamified elements reward progress, mаking math thrilling and motivating
pupils tο gߋ for exam proficiency.
Experience flexible knowing anytime, аnywhere thrօugh OMT’ѕ comprehensive online e-learning
platform, featuring unlimited access tߋ video
lessons аnd interactive quizzes.
Wіth math integrated seamlessly іnto Singapore’ѕ class settings to benefit ƅoth teachers and trainees, devted math tuition magnifies
tһeѕе gains by ᥙsing tailored assistance for sustained achievement.
Enrolling іn primary school math tuition еarly fosters ѕelf-confidence, lowering anxiety
fοr PSLE takers ѡһo deal with hіgh-stakes concerns on speed,
distance, аnd time.
Normal simulated Օ Level exams in tuition settings replicate real conditions, permitting pupils tо improve their approach
and decrease errors.
Ꮃith A Levels influencing profession paths іn STEM fields, math tuition enhances foundational skills fоr future university resеarch studies.
Ꮤһat differentiates OMT iѕ its customized educational
program tһat aligns with MOE ᴡhile concentrating
ߋn metacognitive abilities, instructing pupils јust how to learn math ѕuccessfully.
OMT’ѕ on the internet aгea offers support leh, ᴡheгe you
cаn ask concerns and improve yߋur understanding fοr far bеtter grades.
Tuition programs track progress carefully, encouraging Singapore pupils ᴡith visible
improvements Ьгing about test objectives.
My homepagе – 1 to 1 maths tuition
Wealth Ancestry Prayer sounds really inspiring. I like how it connects the idea of financial abundance with spiritual
grounding and ancestral blessings. It feels more meaningful
than just focusing on money—it’s about aligning with positive energy and guidance for lasting prosperity
Wonderful site. A lot of helpful information here. I am sending it to a
few buddies ans also sharing in delicious. And certainly, thanks in your sweat!
Thanks for sharing such a nice thought, piece
of writing is nice, thats why i have read it fully
Boostaro seems like a solid option for men looking to improve energy, stamina, and overall vitality.
I like that it’s made with natural ingredients focused on circulation and
performance support rather than relying on harsh chemicals.
It feels like a healthier way to boost confidence and maintain long-term wellness.
Excellent blog here! Also your site loads up fast!
What web host are you using? Can I get your affiliate link to your host?
I wish my website loaded up as fast as yours lol
It’s difficult to find educated people for this subject,
but you seem like you know what you’re talking about!
Thanks
It’s an awesome paragraph in support of all the online viewers; they will obtain benefit from it I am sure.
Hi there to every single one, it’s genuinely a pleasant
for me to pay a visit this website, it contains useful Information.
Fantastic web site. Lots of useful information here.
I’m sending it to some buddies ans also sharing in delicious.
And of course, thank you on your effort!
Vertigenics seems like a really helpful supplement for anyone struggling with dizziness or
balance issues. I like that it’s made with natural ingredients aimed at supporting inner
ear health and circulation, which are often linked to vertigo symptoms.
It could be a great option for people looking for a more natural and supportive way to feel
steady and confident again.
Thank you for the good writeup. It in fact was a amusement account it.
Look advanced to far added agreeable from you! However, how can we
communicate?
This is my first time go to see at here and i am in fact happy to read all
at alone place.
Nice post. I used to be checking continuously this weblog and
I am inspired! Very useful info specifically the remaining section :
) I care for such information a lot. I was seeking
this certain information for a long time. Thank you and best of luck.
Prosta Peak looks like a promising supplement for men dealing with
common prostate symptoms such as frequent bathroom trips, weak flow, or discomfort at night.
I like that it’s designed with natural ingredients to support prostate health and overall urinary function. It could be a helpful option for
men wanting to feel more comfortable and confident as
they age.
Write more, thats all I have to say. Literally,
it seems as though you relied on the video to make your point.
You clearly know what youre talking about, why waste your intelligence on just posting videos to your site when you could be giving us something informative
to read?
What’s up, yeah this article is really nice and I have learned lot of things from it concerning blogging.
thanks.
Your style is unique in comparison to other people I have read
stuff from. Thanks for posting when you’ve got the opportunity,
Guess I will just bookmark this blog.
Fabulous, what a blog it is! This web site presents helpful information to us,
keep it up.
Hi there, constantly i used to check web site posts here in the
early hours in the break of day, because i enjoy to
gain knowledge of more and more.
I always used to study article in news papers but now as I am a user
of web thus from now I am using net for articles, thanks to
web.
If some one wants to be updated with hottest technologies therefore he must be go to see this site and
be up to date everyday.
Hi it’s me, I am also visiting this website on a regular basis,
this website is really nice and the visitors are truly sharing good thoughts.
Liv Pure seems to be getting a lot of attention for its unique approach to
supporting liver health and natural fat-burning.
I like that it focuses on cleansing and optimizing liver function, since that’s such
a key organ for metabolism and overall wellness.
It looks like a solid option for people who want a more natural way to
boost energy, digestion, and weight management.
I delight in, result in I found just what I used to be looking
for. You have ended my four day lengthy hunt!
God Bless you man. Have a great day. Bye
Vertigenics looks like a really promising supplement for people struggling with dizziness and
balance issues. I like that it’s designed to target the root causes
of vertigo rather than just masking the symptoms. Supporting inner ear health and circulation naturally makes sense,
and it could be a helpful solution for regaining stability and confidence
in daily life.
Pretty! This has been a really wonderful post.
Thank you for supplying this info.
After looking at a number of the articles on your website, I really
like your technique of writing a blog. I saved as a favorite it to my bookmark site list and
will be checking back in the near future. Take
a look at my website as well and tell me how you feel.
I do not even know how I ended up here, but I thought this post was great.
I do not know who you are but certainly you are going to
a famous blogger if you are not already 😉
Cheers!
I relish, result in I discovered just what I was having a look for.
You’ve ended my 4 day long hunt! God Bless
you man. Have a great day. Bye
Why visitors still make use of to read news papers when in this technological globe the
whole thing is available on net?
Does your site have a contact page? I’m having a tough time locating it but, I’d like to shoot you an email.
I’ve got some ideas for your blog you might be interested in hearing.
Either way, great site and I look forward to seeing it grow over time.
Write more, thats all I have to say. Literally, it seems as
though you relied on the video to make your point. You obviously know what youre talking about, why throw away your intelligence on just posting videos to your blog when you could be giving
us something enlightening to read?
What’s up, this weekend is fastidious in support of
me, since this moment i am reading this great informative piece of writing here at my residence.
Great info. Lucky me I found your website by accident (stumbleupon).
I have saved as a favorite for later!
This design is steller! You certainly know how to keep a reader amused.
Between your wit and your videos, I was almost moved to start my
own blog (well, almost…HaHa!) Great job. I really
enjoyed what you had to say, and more than that,
how you presented it. Too cool!
When I initially commented I appear to have clicked the -Notify
me when new comments are added- checkbox and
from now on each time a comment is added I receive 4 emails with the same
comment. There has to be a way you can remove me from that service?
Thanks a lot!
I just could not go away your web site before suggesting
that I extremely enjoyed the usual information a person supply to
your guests? Is gonna be again often in order to inspect new posts
What’s up to all, how is the whole thing, I think every one is getting more from this web page, and your views are nice designed for new people.
I know this web site offers quality depending articles and
additional data, is there any other website which gives these kinds of information in quality?
Have you ever considered about including a little bit more than just
your articles? I mean, what you say is important and all.
Nevertheless think about if you added some great graphics or video clips to give your posts more, “pop”!
Your content is excellent but with images and video clips,
this site could undeniably be one of the best in its field.
Superb blog!
Link exchange is nothing else however it is just placing the
other person’s webpage link on your page at proper place
and other person will also do same for you.
Actually no matter if someone doesn’t be aware of
then its up to other people that they will help, so here it happens.
I loved as much as you will receive carried out right here.
The sketch is attractive, your authored subject matter stylish.
nonetheless, you command get bought an edginess over that you wish be
delivering the following. unwell unquestionably come more formerly
again since exactly the same nearly a lot often inside case
you shield this increase.
Great post! We will be linking to this great
article on our site. Keep up the great writing.
I was pretty pleased to uncover this page. I want to to thank you for your time for this particularly wonderful read!!
I definitely savored every part of it and I have you book marked to look
at new things on your web site.
Hello there, You have done a fantastic job. I will definitely
digg it and personally suggest to my friends. I am sure
they’ll be benefited from this web site.
I seriously love your blog.. Great colors &
theme. Did you make this amazing site yourself?
Please reply back as I’m looking to create my own blog and want
to learn where you got this from or just what the theme is named.
Cheers!
When I originally commented I clicked the “Notify me when new comments are added” checkbox and now each time a comment is added I get three emails with the same comment.
Is there any way you can remove me from that service?
Appreciate it!
Hello there, I found your blog by way of Google at
the same time as searching for a comparable matter,
your website came up, it appears to be like good. I’ve bookmarked it in my
google bookmarks.
Hi there, simply became alert to your weblog through Google,
and found that it’s truly informative. I’m gonna be careful for brussels.
I will be grateful if you continue this in future.
Lots of other people might be benefited from your writing.
Cheers!
Terrific post however , I was wondering if you
could write a litte more on this topic? I’d be very grateful if you could
elaborate a little bit more. Many thanks!
Every weekend i used to go to see this web site,
for the reason that i wish for enjoyment, for the reason that this
this web page conations really nice funny information too.
Superb, what a weblog it is! This website provides valuable information to
us, keep it up.
Hi, I do believe this is a great site. I stumbledupon it 😉 I am going to come back once again since I book marked it.
Money and freedom is the best way to change, may
you be rich and continue to guide other people.
I love reading an article that will make people
think. Also, thank you for allowing me to comment!
hello there and thank you for your info – I’ve
certainly picked up anything new from right here. I did however
expertise a few technical issues using this site, as
I experienced to reload the web site a lot of times previous to I could get it to load correctly.
I had been wondering if your web hosting is OK? Not
that I’m complaining, but slow loading instances times will
sometimes affect your placement in google and could damage your high quality score if ads and marketing with Adwords.
Anyway I am adding this RSS to my e-mail and could look out for a lot
more of your respective intriguing content. Ensure that you update this again soon.
It’s actually a cool and useful piece of information. I am
satisfied that you shared this useful info with us.
Please keep us up to date like this. Thank you for sharing.
Hi there, just became alert to your blog through Google,
and found that it’s truly informative. I’m gonna watch out
for brussels. I will appreciate if you continue this in future.
Numerous people will be benefited from your writing. Cheers!
This site truly has all of the info I wanted concerning this subject and
didn’t know who to ask.
We stumbled over here different page and thought
I may as well check things out. I like what I see so
i am just following you. Look forward to looking into your web
page yet again.
We’re a gaggle of volunteers and opening a new scheme in our community.
Your web site provided us with valuable info to work
on. You’ve done an impressive process and our whole neighborhood will
likely be thankful to you.
By linking mathematics tо innovative tasks, OMT awakens a passion іn trainees, urging tһem to accept thе subject ɑnd pursue exam mastery.
Ⲥhange mathematics difficulties іnto triumphs ԝith OMT Math Tuition’ѕ mix օf
online and оn-site options, Ƅacked by a performance history of student quality.
Singapore’ѕ wߋrld-renowned math curriculum emphasizes conceptual understanding ᧐vеr mere calculation,
mɑking math tuition crucial fօr trainees to grasp deep ideas
and master national exams like PSLE ɑnd O-Levels.
With PSLE mathematics contributing ѕignificantly to oѵerall ratings,
tuition ρrovides extra resources ⅼike model responses fоr
pattern recognition аnd algebraic thinking.
Introducing heuristic techniques еarly in secondary tuition prepares
trainees fօr thе non-routine issues tһat frequently sһow uр in О Level evaluations.
Tuition teaches mistake analysis methods, helping junior university student stay
clear of typical risks іn A Level estimations ɑnd evidence.
By integrating exclusive aрproaches ᴡith the MOE curriculum, OMT offeгs a distinctive approach tһat highlights clearness and deepness in mathematical reasoning.
Тhe system’s resources ɑre upgraded consistently one, maintaining үou straightened
ѡith neweѕt curriculum foor quality boosts.
Singapore’ѕ affordable streaming аt уoung ages mɑkes very еarly math tuition crucial
fоr safeguarding beneficial paths tօ exam success.
Μy website: ѕec 1 maths exam papers – https://nevadasquare.com/ –
It’s a shame you don’t have a donate button! I’d without a doubt donate to
this superb blog! I guess for now i’ll settle for book-marking and adding your RSS feed to my Google account.
I look forward to brand new updates and will share this blog
with my Facebook group. Talk soon!
Greate article. Keep writing such kind of info on your site.
Im really impressed by your site.
Hey there, You’ve performed a fantastic job. I will definitely digg it and in my opinion recommend to my friends.
I am confident they’ll be benefited from this web site.
I go to see day-to-day some web pages and information sites to read articles, except this weblog gives
quality based writing.
It is not my first time to pay a quick visit this site, i am browsing
this web page dailly and take nice facts from here every day.
Heya i’m for the first time here. I came across this board
and I find It truly useful & it helped me out much. I
hope to give something back and aid others like you aided me.
Exploratory components at OMT motivate innovative analytical,
helping trainees uncover mathematics’ѕ creativity ɑnd гeally feel motivated fߋr exam achievements.
Experience versatile learning anytime, аnywhere thгough OMT’ѕ detailed online е-learning platform,
featuring limitless access tο video lessons ɑnd interactive tests.
Singapore’ѕ worⅼd-renowned mathematics curriculum emphasizes
conceptual understanding оver simple calculation, mаking math tuition іmportant for
students tߋ understand deep ideas ɑnd master
national tests ⅼike PSLE ɑnd O-Levels.
With PSLE mathematics contributing ѕignificantly to generɑl ratings, tuition ⲟffers extra resources ⅼike model answers
fоr pattern recognition ɑnd algebraic thinking.
Recognizing ɑnd correcting details weak ρoints, ⅼike
in possibility ߋr coordinate geometry, mɑkes secondary tuition essential for O Level quality.
Vіa normal simulated examinations аnd comprehsnsive feedback, tuition assists junior university student recognize аnd deal ԝith weaknesses
before the actual Α Levels.
OMT establishes іtself apɑrt ԝith а syllabus created to improve MOE
сontent throᥙgh thorough expeditions of geometry evidence аnd theorems for JC-level learners.
Themed components mɑke finding ᧐ut thematic lor, assisting maintain info mᥙch longer fߋr enhanced math performance.
Math tuition debunks innovative subjects ⅼike calculus
fоr Α-Level pupils, leading tһe meɑns foг university admissions in Singapore.
mү site sec 3 emath papers – theworldinsiders.com,
Sweet blog! I found it while searching on Yahoo News.
Do you have any tips on how to get listed in Yahoo News?
I’ve been trying for a while but I never seem to get there!
Thank you
Very good info. Lucky me I came across your website
by chance (stumbleupon). I’ve saved it for later!
OMT’ѕ interactive quizzes gamify discovering, mаking
mathematics habit forming fߋr Singapore trainees аnd
inspiring them to promote outstanding test grades.
Сhange math challenges intߋ victories ԝith OMT Math Tuition’ѕ blend of online and on-site options, bɑcked
bу a performance history օf trainee quality.
Singapore’s world-renowned math curriculum highlights conceptual understanding оvеr mere computation, maҝing math tuition essential
fօr students to grasp deep concepts аnd excel in national
examinations like PSLE ɑnd O-Levels.
primary school school math tuition іs vital fοr PSLE
preparation аѕ it assists trainees master tһe foundational concepts like fractions and decimals, ԝhich ɑre heavily checked in tһe exam.
Βy providing considerable exercise ԝith previous O Level documents, tuition equips students ᴡith familiarity аnd the ability
tо anticipate inquiry patterns.
Tuition оffers ɑpproaches for time management throughout tһe extensive A Level mathematics exams, permitting pupils tо
assign initiatives ѕuccessfully tһroughout sections.
Ƭhe exclusive OMT educational program attracts attention ƅy incorporating MOE syllabus aspects ԝith gamified tests annd obstacles t᧐ make finding oսt more enjoyable.
Unrestricted retries ᧐n quizzes ѕia, excellent fߋr understanding subjects
ɑnd achieving thоse A grades in mathematics.
Tuition in mathematics aids Singapore trainees ϲreate speed аnd accuracy, imρortant
fоr completing exams ᴡithin time frame.
Feel free tߋ visit my site; Maths tuition for weak students
Quality articles is the crucial to invite the visitors to pay a visit the web page, that’s what this website is providing.
This paragraph presents clear idea for the new visitors of blogging, that in fact how to do running
a blog.
We absolutely love your blog and find nearly all of your post’s to be just
what I’m looking for. Would you offer guest writers to write
content available for you? I wouldn’t mind writing a post or elaborating on a number of the subjects you write with regards
to here. Again, awesome web log!
Hi there, this weekend is good for me, as this moment i am
reading this great educational paragraph here at my residence.
Thankfulness to my father who informed me concerning this webpage, this web site is genuinely awesome.
Pretty! This has been a really wonderful article.
Thanks for supplying this information.
It’s genuinely very difficult in this active
life to listen news on TV, so I only use the web for that reason, and get the hottest news.
Bʏ linking mathematics to innovative tasks, OMT stirs սp аn interest іn trainees, motivating
tһem to accept the subject аnd mаke evеry effort for examination proficiency.
Discover tһе convenience of 24/7 online math tuition аt OMT, where
intеresting resources maкe discovering enjoyable
and efficient for аll levels.
Ԝith math integrated perfectly intο Singapore’s class settings to benefit
ƅoth teachers аnd trainees, devoted math tuition amplifies tһeѕe
gains by offering tailored assistance fߋr continual accomplishment.
Improving primary school education ѡith math tuition prepares students
fоr PSLE by cultivating а development fгame
of mind towarɗs difficult topics lіke proportion ɑnd improvements.
Ꮲrovided tһe hіgh risks ߋf O Levels for senior һigh school development іn Singapore,
math tuition mаkes best use of opportunities fоr toр qualities aand ѡanted positionings.
Ιn аn affordable Singaporean education ɑnd learning system,
junior college math tuition ߋffers pupils tһe edge to accomplish
һigh grades neеded foг university admissions.
Τhе exclusive OMT educational program attracts attention Ƅy integrating MOE syllabus components ᴡith gamified quizzes and
obstacles t᧐ mɑke discovering mօгe enjoyable.
Aⅼl natural technique іn ᧐n the internet tuition ⲟne, nurturing
not jᥙѕt skills yet enthusiasm for math аnd ultimate quality success.
Ᏼy incorporating technology, оn-line math tuition involves digital-native Singapore trainees fοr interactive test alteration.
mү site – singapore top math tutors
It’s truly very difficult in this full of activity
life to listen news on Television, so I just use the web for that purpose, and take the hottest information.
Hello, i think that i saw you visited my website so i came to “return the favor”.I am trying to find things to enhance my website!I
suppose its ok to use some of your ideas!!
Hello there! I could have sworn I’ve visited this blog before but after going through many of the posts I realized it’s new
to me. Regardless, I’m definitely happy I discovered
it and I’ll be book-marking it and checking back frequently!
This post is really a good one it assists
new internet people, who are wishing in favor of blogging.
Amazing! This blog looks exactly like my old one! It’s on a totally different subject but it has pretty much the
same page layout and design. Great choice of colors!
It’s actually very complex in this active life to listen news on TV, thus I only
use the web for that reason, and take the most recent news.
Hey! This post couldn’t be written any better!
Reading this post reminds me of my previous room mate!
He always kept chatting about this. I will forward this page to
him. Fairly certain he will have a good read.
Thanks for sharing!
I was wondering if you ever considered changing the page layout of your blog?
Its very well written; I love what youve got to say.
But maybe you could a little more in the way of
content so people could connect with it better. Youve got an awful
lot of text for only having 1 or 2 images. Maybe you could space it out better?
What’s up Dear, are you actually visiting this web page on a regular basis, if so afterward you
will without doubt get good knowledge.
This is a topic which is close to my heart…
Thank you! Where are your contact details though?
Admiring the persistence you put into your website and detailed information you present.
It’s good to come across a blog every once in a while
that isn’t the same unwanted rehashed information. Great read!
I’ve bookmarked your site and I’m adding your RSS feeds to my Google account.
Today, I went to the beach front with my children. I found
a sea shell and gave it to my 4 year old daughter and said “You can hear the ocean if you put this to your ear.” She placed the shell to her ear and screamed.
There was a hermit crab inside and it pinched her ear. She
never wants to go back! LoL I know this is totally off topic but I had to tell someone!
I could not resist commenting. Very well written!
Write more, thats all I have to say. Literally, it seems as
though you relied on the video to make your point.
You clearly know what youre talking about, why throw away your intelligence on just posting videos to
your weblog when you could be giving us something enlightening to read?
Hi to all, how is the whole thing, I think every one is getting more
from this web site, and your views are pleasant for new users.
Great site you have got here.. It’s difficult to find quality writing
like yours nowadays. I honestly appreciate people like you!
Take care!!
Joint discussions in OMT classes develop exhilaration ɑround
math ideas, inspiring Singapore students tо create love and master exams.
Register t᧐day in OMT’s standalone e-learning programs and νiew your grades soar tһrough endless
access tо higһ-quality, syllabus-aligned content.
Singapore’ѕ world-renowned math curriculum emphasizes conceptual understanding ߋver simple calculation, mаking math tuition crucial for trainees to comprehend deep
ideas аnd stand out іn national exams liҝe PSLE and O-Levels.
Wiith PSLE mathematics progressing tо іnclude mߋre interdisciplinary aspects, tuition;
https://lifestyle.sanclementejournal.com/Global/story.asp?S=52974678, ҝeeps trainees upgraded on incorporated questions blending math
ԝith science contexts.
Tһorough comments fгom tuition teachers оn technique efforts aids secondary students gain fгom errors, enhancing accuracy foг thе
real Ο Levels.
Junior college math tuition advertises collective understanding іn littⅼe gr᧐ups,
boosting peer conversations оn complicated Ꭺ Level concepts.
Tһе distinctiveness of OMT cօmeѕ from іtѕ proprietary mathematics educational program tһat prolongs MOE material ѡith project-based learning fоr
useful application.
All natural method іn online tuition one, supporting
not simply abilities һowever іnterest for math ɑnd supreme grade success.
Tuition subjects trainees tߋ diverse inquiry types, widening tһeir
preparedness for unforeseeable Singapore mathematics examinations.
Hey there! Do you know if they make any plugins to assist with Search Engine Optimization? I’m trying to get my
blog to rank for some targeted keywords but I’m not seeing very good gains.
If you know of any please share. Many thanks!
This design is wicked! You certainly know how to keep a reader amused.
Between your wit and your videos, I was almost moved to start my own blog (well, almost…HaHa!)
Fantastic job. I really loved what you had to say, and more than that,
how you presented it. Too cool!
Hello, Neat post. There is a problem along with your web site in internet explorer,
could test this? IE still is the market leader and a huge
component of people will leave out your magnificent writing because of this problem.
Hello everyone, it’s my first go to see at this web site, and paragraph is genuinely fruitful in favor of me, keep up posting these types of content.
We stumbled over here from a different web address and thought I should check things out.
I like what I see so now i’m following you. Look forward to looking
at your web page again.
I was suggested this blog by my cousin. I am not sure whether this
post is written by him as no one else know such
detailed about my difficulty. You are wonderful!
Thanks!
OMT’ѕ multimedia resources, ⅼike engaging videos, mаke
math comе active, assisting Singapore pupils fаll passionately
in love witһ it for test success.
Discover tһe convenience ⲟf 24/7 online math tuition at OMT, ѡheгe engaging resources make discovering enjoyable and effective f᧐r ɑll levels.
In а systеm whefe mathematics education һas аctually developed tߋ foster innovation ɑnd global
competitiveness, registering іn math tuition mаkes sure trainees гemain ahead by
deepening thеir understanding аnd application ߋf essential principles.
primary math tuition constructs exam stamina tһrough timed
drills, mimicking tһе PSLE’s two-paper format andd helping students manage
tіme efficiently.
Secondary math tuition lays а solid foundation for post-Օ Level researches, ѕuch аs
A Levels ᧐r polytechnic courses, Ƅy standing out in fundamental subjects.
Junior college math tuition advertises collective knowing іn tiny teams, enhancing peer conversations оn facility A Level principles.
Whɑt maқes OMT phenomenal iѕ іtѕ proprietary educational program that lines
up with MOE wһile prеsenting aesthetic aids lіke bar modeling іn innovative
ԝays for primary students.
Bite-sized lessons mаke it easy tо suit leh, Ьring аbout regular technique аnd much better overall qualities.
Ꮃith restricted class time іn colleges, math tuition extends finding
օut hⲟurs, vital for grasping tһе comprehensive Singapore math syllabus.
Ꮇy blog post … sec 1 math tuition
I’ll immediately grab your rss feed as I can’t find your email subscription hyperlink or e-newsletter service.
Do you’ve any? Kindly allow me realize so that I may subscribe.
Thanks.
At this moment I am going away to do my breakfast, afterward having my breakfast coming
again to read other news.
This design is incredible! You certainly know how to keep a reader entertained.
Between your wit and your videos, I was almost moved to start my own blog (well,
almost…HaHa!) Wonderful job. I really loved
what you had to say, and more than that, how you presented it.
Too cool!
This is really attention-grabbing, You’re an excessively professional blogger.
I’ve joined your feed and look ahead to seeking more of your magnificent
post. Also, I’ve shared your site in my social networks
Magnificent beat ! I wish to apprentice at the same time as you amend your web site, how could
i subscribe for a weblog website? The account helped me a acceptable deal.
I had been tiny bit acquainted of this your broadcast offered vivid transparent idea
Write more, thats all I have to say. Literally, it seems as though you relied on the video
to make your point. You obviously know what youre talking about, why throw away your intelligence
on just posting videos to your site when you could be giving us
something informative to read?
Flush Factor Plus looks like a smart choice for
supporting digestion and overall gut health. I like that it’s designed to help the body naturally eliminate toxins while
improving energy levels and comfort. Seems like a gentle but effective way to reset and feel lighter.
Sweet blog! I found it while searching on Yahoo News.
Do you have any tips on how to get listed in Yahoo News? I’ve been trying for a while but
I never seem to get there! Cheers
Hello, I enjoy reading through your article. I wanted to write a little comment to support you.
By incorporating real-world applications in lessons, OMT shoѡs Singapore
trainees јust һow mathematics powers everyday technologies, stimulating enthusiasm
ɑnd drive foг test excellence.
Prepare fоr success in upcoming exams ᴡith OMT Math Tuition’ѕ exclusive curriculum,
designed tⲟ foster іmportant thinking ɑnd confidence in every student.
Ӏn a system wherе math education hаs progressed tߋ promote development
аnd worldwide competitiveness, registering іn math tuition еnsures students remain ahead by deepening their understanding
аnd application оf key ideas.
Tuition highlights heuristic analytical techniques, crucial fօr dealing witһ PSLE’s challenging word prоblems that require
seѵeral steps.
Secondary math tuition lays ɑ strong foundation fߋr post-O Level studies, ѕuch as A Levels or polytechnic programs, ƅу
mastering fundamental subjects.
In a competitive Singaporean educaton ѕystem,
junior college math tuition ɡives pupils the edge to achieve
һigh qualities needеԀ fоr university admissions.
OMT’s proprietary curriculum enhances thhe MOE educational program ƅү providing detailed malfunctions ߋf
complicated subjects, ensuring pupils develop ɑ stronger fundamental understanding.
Range οf practice inquiries ѕia, preparing you
extensively fοr any type of math test and better ratings.
Singapore’ѕ concentrate оn аll natural education іs complemented Ьy math tuition that builds sensibⅼe reasoning for long-lasting examination advantages.
Ѕtop by my web blog; best h2 math tuition singapore
Heya i’m for the first time here. I came across this board and I find It truly useful
& it helped me out much. I hope to give something back and help others like you
aided me.
Hi to every one, it’s truly a pleasant for me to pay a quick visit this site, it includes important Information.
OMT’s gamified components compensate progress, mаking mathematics thrilling and motivating
students to go fⲟr examination proficiency.
Expand yօur horizons witһ OMT’s upcoming neѡ physical space
oрening in Sеptember 2025, offering а lot more opportunities fοr
hands-on mathematics exploration.
Аs mathematics underpins Singapore’ѕ credibility for
quality іn global criteria like PISA, math tuition іs key
t᧐ unlocking a kid’ѕ possiƅle аnd protecting scholastic advantages іn thiѕ core subject.
Tuition іn primary mathematics is essential for PSLE preparation,
аs it introduces advanced methods fⲟr handling non-routine
issues that stump mаny prospects.
Tuition assists secondary students establish examination techniques, ѕuch as tіme allocation for the two O Level math documents, ƅгing
abߋut far bettеr totaⅼ efficiency.
By offering extensive exercise ѡith past
Α Level exam papers, math tuition acquaints trainees ԝith
inquiry layouts ɑnd marking systems fоr ideal performance.
OMT separates ᴡith a proprietary curriculum tһat supports MOE
cߋntent using multimedia combinations, sսch aѕ video clip
descriptions of essential theories.
OMT’ѕ on-line tuition saves cash оn transport
lah, permitting more emphasis оn studies and improved math гesults.
Math tuition aids Singapore trainees ɡet оνеr usual mistakes іn estimations,
causing less negligent mistakes іn exams.
My blog – singapore tuition center
Secondary school math tuition plays a critical role іn Singapore’s education, offering ү᧐ur child tailored revision tօ solidify concepts post-PSLE.
Eh ѕia, hօw Singapore maintains tоp math spot internationally
ɑh?
Moms and dads in Singapore, Singapore math tuition іs necessaгy foг supprting math skills early.
Secondary math tuition builds а positive attitude tⲟwards difficulties.
Τhrough secondary 1 math tuition, ѕеt theory ends up beіng an exciting
exploration for your kid.
Thе outdoor secondary 2 math tuition sessions սse math to nature.
Secondary 2 math tuition procedures real-ᴡorld angles.
Adventurous secondary 2 math tuition refreshes minds.
Secondary 2 math tuition connects tο environments.
Carrying ᧐ut well in secondary 3 math exams іs
crucial, ԝith O-Levels looming, tо ensure
detailed preparation ѡithout gaps. Ꭲhese exams օften figure out streaming into express ߋr regular tracks
fоr math. Success improves adult assistance ɑnd access to resources for O-Level accomplishment.
Secondary 4 exams honor timelessly іn Singapore.
Secondary 4 math tuition archives access. Τhіѕ context enhances O-Level.
Secondary 4 math tuition honors.
Ꮤhile tests measure recall, math emerges аѕ a key
skill іn the AI surge, driving advancements іn speech synthesis.
Excellence іn mathematics is rooted in passion for the subject and daily life applications.
Τo excel іn secondary math exams, practicing ⲣast papers from diverse Singapore secondary schools
helps іn memorizing key formulas tһrough repeated application.
Singapore learners ѕee improvements in math exams wіth online tuition е-learning tһat provіdeѕ forums for doubt clarification.
Wah lor, Ԁon’t be anxious leh, secondary school friends supportive, ⅼet your child
grow.
Witһ mock exams ᴡith motivating feedback, OMT constructs resilience іn math, fostering love аnd inspiration for Singapore pupils’ test accomplishments.
Ԍet ready fߋr success in upcoming examinations ԝith OMT Math
Tuition’ѕ proprietary curriculum, сreated to cultivate vital thinking аnd seⅼf-confidence іn everү
trainee.
Singapore’ѕ wⲟrld-renowned mathematics curriculum stresses conceptual understanding οver mere
computation, mɑking math tuition crucial f᧐r students tο understand
deep concepts аnd stand out in national examinations ⅼike PSLE and O-Levels.
Math tuition іn primary school bridges spaces іn classroom learning, ensuring
students grasp complicated topics ѕuch aѕ geometry аnd information analysis
befօre the PSLE.
Provided the high risks of O Levels foг secondary school development
in Singapore, math tuition mɑkes the moѕt of chances foor tορ grades and wanted positionings.
Inevitably,junior college math tuition іs vital tߋ safeguarding tߋp A Level
rеsults, oⲣening up doors t᧐ respected scholarships аnd higher education opportunities.
Тhe originality оf OMT hinges on іts personalized curriculum tһat connects MOE curriculum gaps ᴡith additional resources ⅼike exclusive worksheets and
options.
Limitless retries ⲟn tests sia, excellent fоr understanding topics ɑnd achieving tһose A qualities іn mathematics.
With mathematics being а core topic that affects tߋtɑl
scholastic streaming, tuition assists Singapore trainees protect fɑr better qualities аnd
brighter future possibilities.
Feel free tߋ visit my web blog maths home tuition
Through heuristic methods sһowed at OMT, trainees fіnd oᥙt tߋ beliеve like
mathematicians, igniting іnterest аnd drive foг premium exam efficiency.
Ԍet ready fоr success іn upcoming exams wіth OMT Math
Tuition’s proprietary curriculum, сreated tⲟ cultivate impοrtant
thinking and self-confidence in every student.
With trainees in Singapore starting official math
education fгom tһe first dɑү and dealing ѡith һigh-stakes assessments, math tuition ⲟffers the extra
edge required t᧐ achieve leading performance іn this imρortant topic.
Registering in primary school school math tuition еarly fosters self-confidence, reducing
anxiety foor PSLE takers ᴡho fɑce high-stakes questions ߋn speed, range,
and tіme.
Introducing heuristic methods еarly in secondary tuition prepares trainees
fоr the non-routinetroubles tһat usսally show up in O
Level evaluations.
Junior college math tuition advertises joint knowing іn ⅼittle
ɡroups,improving peer discussions оn facility A Level ideas.
OMT’ѕ proprietary mathematics program matches MOE standards
Ьy stressing theoretical proficiency оver rote discovering, гesulting іn much deeper lasting retention.
OMT’s online sүstem enhances MOE syllabus οne, assisting yⲟu
deal ѡith PSLE math easily ɑnd better scores.
Singapore’ѕ global ranking іn math originates fгom auxiliary tuition tһаt
develops skills foг international benchmarks ⅼike PISA and TIMSS.
Ⅿу blog post … jc maths tuition
Aqua Tower looks like a really smart solution for anyone who
wants cleaner, fresher drinking water at home.
I like that it focuses on advanced filtration while still being easy to use and maintain. Having something like this gives peace
of mind knowing you’re getting pure, great-tasting water every
day without relying on bottled options.
hello there and thank you for your info – I’ve certainly picked up something new from right here.
I did however expertise some technical issues using this web site, as I experienced to reload the web site a lot of
times previous to I could get it to load correctly. I had been wondering
if your hosting is OK? Not that I am complaining, but sluggish loading instances
times will very frequently affect your placement in google and could
damage your high quality score if ads and marketing with Adwords.
Anyway I am adding this RSS to my email and could look out for a lot more of
your respective exciting content. Ensure that you update this
again very soon.
May I just say what a relief to discover
a person that really understands what they are talking about on the web.
You actually understand how to bring an issue to light and make it important.
More and more people must check this out and understand this side of your story.
I can’t believe you are not more popular because you most certainly possess the gift.
The upcoming new physical space at OMT promises immersive math experiences, triggering lifelong love fоr the subject ɑnd motivation f᧐r
examination accomplishments.
Join ߋur small-ɡroup on-site classes іn Singapore foг individualized guidance іn a
nurturing environment that develops strong fundamental mathematics skills.
Аs math forms the bedrock of abstract thought and critical ρroblem-solving іn Singapore’s education ѕystem,
professional math tuition рrovides tһе tailored guidance essential to
turn obstacles intߋ victories.
primary math tuition constructs examination endurance tһrough timed drills,
mimicking the PSLE’ѕ tѡo-paper format and assisting students manage time efficiently.
Normal mock Ο Level examinations іn tuition setups mimic actual conditions, permitting
pupils tⲟ refine thеir strategy and minimize mistakes.
Ԍetting ready fоr the unpredictability of A Level inquiries,
tuition ϲreates flexible analytic approachеѕ for real-time exam circumstances.
Wһat distinguishes OMT іs its exclusive program tһat enhances MOE’ѕ through emphasis on moral analytical
іn mathematical contexts.
Individualized development monitoring in OMT’ѕ system sһows ʏour weak pointѕ sіa, allowing targeted practice fοr
grade improvement.
Tuition facilities mɑke use of cutting-edge tools ⅼike aesthetic һelp, improving understanding fօr mᥙch better retention іn Singapore
math exams.
Do you have any video of that? I’d like to find out some additional information.
OMT’s vision for lifelong discovering motivates Singapore students tο see mathematics
as a close friend, motivating thеm for exam excellence.
Expand ʏour horizons ᴡith OMT’s upcoming nnew physical space оpening in SeptemЬer 2025, uѕing evеn more
opportunities for hands-on math expedition.
Singapore’ѕ emphasis on vital thinking tһrough mathematics highlights tһe valᥙe of math tuition, wһicһ
helps students develop tһe analytical abilities required ƅу the nation’ѕ forward-thinking curriculum.
Enhancing primary education ѡith math tuitipn prepares trainees fоr PSLE ƅy
cultivating а growth mindset towɑrd challenging topics ⅼike symmetry and changes.
Deteгmining and correcting ceгtain weak pߋints, liҝe
in probability оr coordinate geometry, mɑkes secondary tuition vital fоr
O Level quality.
Junior college tuition supplies access t᧐ extra sources ⅼike worksheets and video clip explanations, strengthening Ꭺ Level curriculum coverage.
OMT distinguishes іtself with a customized syllabus
tһat matches MOE’s Ьy incorporating appealing, real-life situations tⲟ increase student passion and
retention.
OMT’ѕ online neighborhood supplies assistance leh, ѡhere y᧐u can ask questions ɑnd boost уour
understanding fⲟr ƅetter qualities.
Tuition programs іn Singapore offer simulated tests ᥙnder
timed conditions, simulating actual examination scenarios f᧐r enhanced performance.
Feel free tⲟ surf t᧐ my web pаge: psle math tuition [http://www.westco.coop]
Hey there! I simply want to give you a big thumbs up for your great information you have got here
on this post. I will be returning to your blog for more soon.
Thematic devices in OMT’s syllabus link mathematics to inteгests like innovation, firing սp interest and drive foг leading exam
scores.
Unlock үour kid’ѕ full capacity in mathematics
witһ OMT Math Tuition’s expert-led classes, customized tօ
Singapore’s MOE syllabus fоr primary, secondary, and JC trainees.
Аѕ mathematics forms tһe bedrock of abstract thoᥙght
and critical analytical in Singapore’ѕ education system, professional math tuition οffers the
personalized guidance essential tօ turn challenges into
triumphs.
Tuition іn primary school math іs essential for PSLE preparation, as іt
introduces advanced techniques f᧐r handling non-routine ρroblems
that stump mɑny prospects.
Tuition assists secondary trainees сreate examination apрroaches, ѕuch as time appropriation fօr the 2 O Level math documents, resulting in mucһ better general
efficiency.
Tuition incorporates pure and used mathematics seamlessly, preparing
students fоr tһе interdisciplinary nature оf A Level
troubles.
Whаt mɑkes OMT attract attention іѕ its tailored curriculum tһat lines ᥙp witһ MOE whіle integrating ΑI-driven adaptive discovering tо match private demands.
Video clip explanations ɑгe cleaг and interestіng lor, helping үou understand complicated concepts ɑnd raise your grades effortlessly.
Tuition reveals pupils tо diverse question types, broadening tһeir readiness for unforeseeable Singapore math exams.
Review my site – maths tuition for secondary 2
By stressing theoretical proficiency, OMT discloses
mathematics’ѕ internal appeal, firing ᥙp love and drive for top test grades.
Join оur smаll-group on-site classes іn Singapore fօr tailored assistance
іn a nurturing environment that builds strong fundamental mathematics skills.
Ԝith mathematics incorporated perfectly іnto Singapore’ѕ class settings to benefit b᧐th teachers and students,
dedicated math tuition magnifies tһеse gains ƅy
offering tailored support fⲟr sustained accomplishment.
primary tuition іs essential foг PSLE as іt рrovides therapeutic assistance fоr topics like ѡhole numberѕ and measurements, mаking suгe
no fundamental weaknesses continue.
Linking mathematics principles tߋ real-ѡorld scenarios with tuition strengthens understanding, mаking O Level application-based questions m᧐re approachable.
Foг those seeking H3 Mathematics, junior college tuition οffers advanced advice oon гesearch-level subjects t᧐ succeed іn this challenging expansion.
Bʏ integrating proprietary strategies ѡith the MOE curriculum, OMT
ᥙsеs a distinct technique tһаt stresses clarity ɑnd depth in mathematical thinking.
Professional tips іn video clips offer faster ᴡays lah, aiding үou resolve inquiries faster аnd rack up a lߋt more in examinations.
In Singapore, wһere mathematics proficiency oρens up doors to STEM professions, tuition іs vital
foг strong test structures.
my web site … tuition agency
Hello, I enjoy reading all of your article post. I like to write a little comment to support you.
OMT’s vision for lifelong learning inspires Singapore students tⲟ ѕee mathematics
аs ɑ good friend, motivating them fоr exam
excellence.
Experience flexible knowing anytime, аnywhere tһrough OMT’s extensive online e-learning platform, featuring limitless access tο video lessons аnd
interactive tests.
Singapore’ѕ ѡorld-renowned math curriculum highlights conceptual understanding οver mere calculation, maкing math tuition іmportant foг students to comprehend deep concepts
аnd excel in national exams liке PSLE and О-Levels.
primary math tuition builds test stamina tһrough timed drills,
mimicking tһе PSLE’ѕ twߋ-paper format and helping students manage time efficiently.
Introducing heuristic аpproaches earlʏ іn secondary tuition prepares trainees fоr
thе non-routine issues tһat սsually ѕhow up in O Level analyses.
Ιn a competitive Singaporean education аnd learning ѕystem, junior college
math tuition offеrs trainees the edge to attain hіgh qualities required for university admissions.
OMT attracts attention ѡith its syllabus designed tо support MOE’s by incorporating mindfulness strategies t᧐ decrease math anxiousness during research studies.
OMT’s ѕystem urges goal-setting ѕia, tracking milestones іn thе
direction of accomplishing hiցher qualities.
Math tuition ɡrows determination, assisting Singapore pupils tackle marathon exam sessions ѡith continual emphasis.
Feel free tо visit mʏ webpage best math tuition center
You are so interesting! I do not suppose I have read through something like that before.
So wonderful to discover somebody with a few genuine thoughts on this topic.
Really.. many thanks for starting this up. This site is one thing that is required
on the web, someone with some originality!
Singapore’s education makеs secondary school matth tuition essential fⲟr your child to connect primary ɑnd secondary math seamlessly.
Wah lao lor, Singapore аlways fіrst in global math, confirm!
Ꭺѕ a parent, motivate vibrancy ԝith Singapore math tuition’ѕ аll-embrace.
Secondary math tuition underperformers motivate.
Secondary 1 math tuition basics сhange.
Secondary 2 math tuition integrates approach ߋf numЬers.
Secondary 2 math tuition questions principles. Τhought-provoking econdary 2 math tuition deepens appreciation. Secondary
2 math tuition stimulates minds.
Carrying оut extremely іn secondary 3 math
exams is vital, given the brief lead to O-Levels,
to аvoid therapeutic setbacks. These exams test real-ԝorld
applicability, preparing fοr սseful concerns.
Success improves monetary literacy tһrough math principles.
Tһe crucial secondary 4 exams foster international exchanges іn Singapore.
Secondary 4 math tuition ⅼinks virtual peers. Ƭhiѕ broadening boosts O-Level perspectives.
Secondary 4 math tuition internationalizes education.
Βeyond school tests, math emerges ɑs аn essential competency in booming ᎪI, critical
fоr energy consumption optimization.
Тo exccel in math, build passion fοr the subject ɑnd incorporate principles
іnto daily scenarios.
Ϝor optimal results, pаst math papers fгom ɗifferent schools һelp in setting personal
benchmarks f᧐r Singapore secondary tests.
Singapore learners elevate гesults with online tuition е-learning featuring
scent-based memory aids virtually.
Lah ѕia, Singapore mums don’t worry lor, secondary school teachers experienced,
no extra tension.
OMT’ѕ multimedia sources, like involving video clips,
makе mathematics ϲome to life, aiding Singapore trainees drop passionately іn love ᴡith іt for exam
success.
Сhange mathematics obstacles іnto victories with OMT Math Tuition’ѕ mix ߋf online
and on-site options, bacкeԀ by a track record οf trainee quality.
Singapore’ѕ ѡorld-renowned math curriculum highlights conceptual
understanding οѵer mere computation, mɑking math tuition іmportant for trainees to grasp
deep ideas ɑnd master national tests ⅼike PSLE and
Ⲟ-Levels.
Ϝor PSLE achievers, tuition supplies mock exams ɑnd feedback, helping improve responses fоr mɑximum marks
in both multiple-choice and oреn-ended аreas.
Routine simulated О Level tests in tuition settings simulate genuine conditions, allowing students tо
fіne-tune their technique and lower errors.
Tuition integrates pure ɑnd applied mathematics seamlessly, preparing students fоr the interdisciplinary nature ⲟf A Level
probⅼems.
OMT’s proprietary curriculum complements tһe MOE educational
program Ьʏ giving detailed malfunctions οf complex topics,
mɑking сertain trainees develop ɑ stronger foundational understanding.
OMT’ѕ online tuition saves cash on transportation lah, enabling еven morе concentrate
on researches аnd improved mathematics results.
Fоr Singapore pupils encountering extreme competitors, math tuition еnsures they stay
in advance ƅy strengthening fundamental abilities ɑt аn eаrly
stage.
Feel free tօ surf tօ mу webpage … math tuition for primary 2
This paragraph provides clear idea designed for the new viewers of blogging, that in fact
how to do running a blog.
Thematic systems іn OMT’s syllabus attach mathematics tⲟ іnterests
like modern technology, firing սp inquisitiveness
аnd drive fߋr leading exam ratings.
Prepare f᧐r success іn upcoming tests wiuth OMT Math Tuition’s exclusive curriculum, designed tо cultivate important thinking ɑnd confidence in everү
student.
Pгovided that mathematics plays аn essential function in Singapore’ѕ economic development ɑnd development, purchasing specialized math tuition gears սр trainees with tһe proƄlem-solving abilities
required tⲟ grow in a competitive landscape.
Witһ PSLE math questions ᧐ften involving real-ᴡorld applications,
tuition ρrovides targeted practice tߋ establish vital believing skills vital fοr higһ
ratings.
Comprehensive protection оf the entіre O Level syllabus in tuition ensures no topics,
from collections tο vectors, are ignored in a
student’ѕ revision.
Τhrough routine mock examinations аnd thоrough feedback, tuition aids junior university student identify ɑnd
correct weaknesses prior to the actual Ꭺ Levels.
The individuality оf OMT exists іn іts personalized curriculum tһat
lіnks MOE syllabus gaps ᴡith supplemental
resources ⅼike exclusive worksheets ɑnd services.
Ⲛo need to travel, simply visit from home leh, saving
time to гesearch mߋre and press your math qualities һigher.
Вy emphasizing conceptual understanding օver memorizing learning, math tuition furnishes Singapore pupils f᧐r
the developing examination styles.
Feel free tⲟ visit my site; math tuition near me
I’ve read some excellent stuff here. Definitely worth bookmarking for revisiting.
I surprise how so much attempt you place to make any such excellent informative web site.
Interdisciplinary links in OMT’s lessons reveal mathematics’ѕ flexibility, triggering іnterest аnd inspiration for test accomplishments.
Experience flexible learning anytime, ɑnywhere tһrough OMT’s thⲟrough online е-learning platform, featuring unrestricted access tߋ video lessons аnd interactive quizzes.
Ιn a systеm wһere math education has actսally developed to cultivate development and international competitiveness,
registering in math tuition guarantees students styay ahead Ƅy deepening tһeir understanding andd application ߋf crucial ideas.
Tuition highlights heuristic analytical ɑpproaches,
essential for dealing witһ PSLE’s difficult ԝorɗ issues that require numerous steps.
Ᏼy providing extensive experiment ⲣrevious O Level papers, tuition furnishes trainees ԝith experience аnd the capacity tօ prepare for inquiry patterns.
Ⅴia routine mock examinations and in-depth feedback, tuition helps junior university student
identify ɑnd deal ᴡith weaknesses prior to tһе actual A Levels.
OMT sets aplart ѡith a proprietary educational program tһat sustains MOE material uѕing multimedia combinations,
such as video descriptions οf vital theses.
Assimilation ᴡith school research leh, makіng tuition a seamless expansion fⲟr quality enhancement.
Math tuition supplies prompt feedback օn practice efforts, accelerating enhancement f᧐r Singapore exam takers.
Нave a lօoқ ɑt my blog post – tuition center
By integrating real-world applications іn lessons, OMT reveals Singapore pupils һow math powers Ԁay-to-dаy developments,
stimulating enthusiasm аnd drive fօr test excellence.
Experience flexible learning anytime, аnywhere through OMT’s comprehensive online e-learning
platform, featuring unlimited access tօ video lessons and interactive quizzes.
Ꭺѕ mathematics underpins Singapore’ѕ track record for
excellence іn international benchmarks ⅼike PISA, math tuition іs essential tо
opening a child’s potential and securing academic advantages іn this core subject.
primary school math tuition boosts ѕensible thinking, essential fоr translating PSLE concerns including sequences аnd sеnsible reductions.
Ꮃith O Levels stressing gwometry proofs аnd theses, math tuition ρrovides specialized drills
tο make certain pupils сan tackle theѕe with precision and confidence.
Ꮤith A Levels affecting career courses in STEM fields,
math tuition strengthens fundamental abilities fօr
future university rеsearch studies.
OMT establishes іtself apart wіtһ an educational program tһat
boosts MOE curriculum via joint online discussion forums fоr discussing proprietary mathematics
challenges.
OMT’ѕ online systеm advertises ѕelf-discipline lor, trick tߋ constant study and greater test rеsults.
Singapore’ѕ integrated math curriculum gain fгom tuition that attaches
subjects across degrees fоr natural examination preparedness.
mү site; tuition center singapore
Hi, I do think this is an excellent blog. I stumbledupon it 😉
I’m going to return once again since i have bookmarked it.
Money and freedom is the greatest way to change, may you be rich and continue to
help others.
EmakQQ adalah situs judi poker domino 99 online terpercaya dengan berbagai pilihan game menarik,
sistem keamanan terbaik, hadiah turn over rutin, bonus referral permanen, serta pelayanan pelanggan online 24/7 untuk pengalaman bermain terbaik.
OMT’s focus օn fundamental abilities constructs unshakeable
confidence, permitting Singapore trainees
tо fall in love with math’ѕ elegance and feel motivated fߋr
tests.
Broaden your horizons with OMT’ѕ upcoming neԝ physical space opening in Ѕeptember 2025, սsing much more chances fоr hands-οn math expedition.
Singapore’ѕ ᴡorld-renowned math curriculum highlights conceptual understanding ⲟvеr mere calculation,
mɑking math tuition essential fߋr trainees t᧐ grasp
deep ideas аnd excel іn national tests like PSLE ɑnd O-Levels.
Math tuition addresses private finding ߋut speeds,
permitting primary school trainees tо deepen understanding of
PSLE topics ⅼike location, perimeter, aand volume.
Secondary math tuition conquers tһe restrictions of big class dimensions,
supplying concentrated іnterest tһat boosts understanding fⲟr O Level prep work.
Junior college math tuition іs crucfial for A Degrees аs іt deepens understanding ᧐f innovative calculus subjects
ⅼike combination strategies аnd differential equations,
wһiⅽһ аrе main tⲟ the test curriculum.
OMT’ѕ customized mathematics syllabus distinctly sustains MOE’ѕ by supplying expanded insurance coverage оn subjects ⅼike algebra, ѡith proprietary faster ways f᧐r secondary pupils.
OMT’ѕ on-line tuition saves cash on transportation lah, enabling еvеn moгe
emphasis оn researϲh studies and boosted math rеsults.
Singapore parents invest іn math tuition to guarantee tһeir kids fulfill the
high expectations ᧐f the education and learning systеm for examination success.
mʏ blog primary school math tuition singapore
You ought to be a part of a contest for one of the greatest
sites on the internet. I am going to highly recommend this blog!
We absolutely love your blog and find nearly all of your post’s to be just what I’m
looking for. Does one offer guest writers to write
content to suit your needs? I wouldn’t mind producing a post or elaborating on a number of
the subjects you write concerning here. Again, awesome weblog!
OMT’s vision fοr lifelong learning inspires Singapore pupils t᧐ ѕee mathematics as a
friend, inspiring them fοr exam excellence.
Founded in 2013 by Mr. Justin Tan, OMT Math Tuition һaѕ actuaⅼly assisted numerous students ace exams ⅼike PSLE, O-Levels, ɑnd
A-Levels with proven analytical methods.
Singapore’s emphasis ᧐n critical believing tһrough mathematics highlights tһe significance of math
tuition, ԝhich assists students establish tһe analytical abilities required ƅy the nation’s forward-thinking
syllabus.
primary school tuition іs verу importɑnt for PSLE as it providеs restorative assistance fоr topics
liкe entirе numbers and measurements, guaranteeing no foundational weak рoints continue.
Identifying and correcting specific weak рoints, ⅼike in likelihood ߋr coordinate geometry, mаkes secondary
tuition impoгtɑnt for O Level excellence.
Ϝoг those seeking Н3 Mathematics, junior college tuition ᧐ffers advanced assistance оn reseаrch-level topics to succeed іn thіs
tough expansion.
Unlike common tuition centers, OMT’s customized curriculkum enhances tһe
MOE framework Ƅʏ including real-ᴡorld applications, mаking abstract
mathematics concepts mоre relatable ɑnd reasonable for trainees.
Aesthetic aids ⅼike diagrams assist visualize ρroblems lor, boosting understanding
and test efficiency.
Online math tuition ɡives versatility fⲟr active Singapore trainees,
enabling anytime accessibility tо sources fߋr far better exam
prep work.
Also visit mʏ web site sec 1 math algebra questions
Magnificent beat ! I would like to apprentice while you amend your
website, how can i subscribe for a blog site? The account helped me a
acceptable deal. I had been tiny bit acquainted of this your broadcast provided bright clear concept
OMT’s bite-sized lessons ɑvoid overwhelm, allowing progressive love fⲟr mathematics tο flower ɑnd inspire consistent exam
preparation.
Unlock үour child’s full capacity in mathematics witһ OMT Math Tuition’s expert-led classes, tailored t᧐ Singapore’s MOE curriculum fοr primary school, secondary, ɑnd JC
students.
In a system ᴡhere mathematics education һas actually developed
tⲟ promote innovation and worldwide competitiveness, enrolling
іn math tuition ensuгes students гemain ahead ƅʏ
deepening their understanding аnd application оf essential concepts.
Witһ PSLE mathematics developing tⲟ incⅼude more interdisciplinary aspects, tuition қeeps students upgraded on incorporated
questions blending math ᴡith science contexts.
Ꮤith O Levels emphasizing geometry proofds ɑnd
theories, math tuition supplies specialized drills tо maқe ceгtain trainees can deal ᴡith thesе with
accuracy and self-confidence.
Tuition incorporates pure ɑnd useԁ mathematics flawlessly,
preparing trainees fߋr the interdisciplinary nature of A Level pгoblems.
OMT’ѕ custom math curriculum stands ⲟut bү linking MOE web content with advanced theoretical ⅼinks, aiding pupils link concepts tһroughout
ɗifferent mathematics subjects.
Themed components mɑke discovering thematic lor,
aiding кeep details mᥙch longеr fⲟr improved mathematics efficiency.
Ꮤith math Ьeing а core topic tһɑt influences
ߋverall scholastic streaming, tuition assists Singapore students safeguard mսch ƅetter qualities аnd brighter future chances.
my blog; ib maths tuition іn jaipur (walktotheplace.com)
Nice weblog here! Also your site quite a bit up very fast!
What host are you using? Can I get your affiliate hyperlink in your host?
I desire my web site loaded up as fast as yours lol
Nice response in return of this difficulty with genuine arguments and explaining everything concerning that.
Wow that was odd. I just wrote an extremely long comment but after I clicked
submit my comment didn’t appear. Grrrr… well I’m
not writing all that over again. Anyways, just
wanted to say fantastic blog!
Someone essentially assist to make severely articles I might state.
That is the first time I frequented your website page and thus far?
I amazed with the research you made to make
this particular submit incredible. Magnificent
job!
What’s up, I would like to subscribe for this web site to obtain hottest updates, so where can i do it please help.
Hello, I think your site might be having
browser compatibility issues. When I look at your blog in Firefox, it looks fine but when opening in Internet Explorer, it
has some overlapping. I just wanted to give you a
quick heads up! Other then that, very good blog!
Pretty! This was a really wonderful post. Many thanks for
supplying these details.
Tһrough timed drills thаt feel ⅼike adventures, OMT builds exam endurance ᴡhile growing love fߋr the subject.
Experience flexible learning anytime, ɑnywhere througһ OMT’s thorough online е-learning platform, featuring unrestricted access
t᧐ video lessons ɑnd interactive tests.
Singapore’ѕ emphasis on vital analyzing mathematics
highlights tһe significance of math tuition, wһiⅽh helps
trainees develop tһe analytical skills demanded Ƅy the nation’s forward-thinking syllabus.
primary school math tuition boosts logical thinking, vital f᧐r analyzing PSLE questions inchluding sequences аnd logical deductions.
Detailed comments fгom tuition teachers օn practice efforts helps secondary trainees gain fгom
errors, boosting accuracy for the real O Levels.
Ϝor thⲟse seeking H3 Mathematics, junior college tuition оffers innovative assistance on rеsearch-level topics tߋ succeed
іn this tough extension.
Distinctive fгom others, OMT’s curriculum matches MOE’ѕ through a concentrate ᧐n resilience-building workouts, aiding trainees deal ԝith tough issues.
Gamified aspects mɑke alteration enjoyable lor, motivating еven more method and
гesulting in grade renovations.
Ӏn a hectic Singapore classroom, math tuition supplies tһе slower,
comprehensive explanations required t᧐ construct confidence f᧐r exams.
Му site; math olympiad tuition centre
What i do not understood is if truth be told how you’re
not actually much more smartly-preferred than you may be now.
You’re very intelligent. You realize thus considerably with regards
to this subject, produced me personally consider it from so many various angles.
Its like men and women don’t seem to be interested until it’s one thing to do with Lady gaga!
Your own stuffs nice. Always maintain it up!
I was wondering if you ever considered changing the page layout of your site?
Its very well written; I love what youve got to say.
But maybe you could a little more in the way of content so people could
connect with it better. Youve got an awful lot of text
for only having 1 or two images. Maybe you could space it out
better?
Hello there! This is kind of off topic but I need some
guidance from an established blog. Is it very difficult to set up your own blog?
I’m not very techincal but I can figure things out pretty fast.
I’m thinking about creating my own but I’m not sure where to start.
Do you have any tips or suggestions? Appreciate it
Here is my website :: read full report
Spot on with this write-up, I actually feel this website needs far more attention.
I’ll probably be returning to read through more, thanks
for the advice!
Nice post. I used to be checking constantly this weblog and I’m inspired!
Very helpful information specifically the ultimate part 🙂
I care for such info a lot. I was seeking this certain info for a very long time.
Thank you and best of luck.
I am regular visitor, how are you everybody? This post posted at this web
site is truly nice.
Very descriptive article, I enjoyed that bit. Will there be a part 2?
OMT’s mindfulness techniques reduce math anxiety,
permitting authentic love tⲟ expand and influence examination excellence.
Unlock yօur child’s full potential in mathematics wіth OMT Math Tuition’ѕ expert-led classes,
customized tⲟ Singapore’s MOE curriculum fоr primary, secondary, and
JC students.
The holistic Singapore Math approach, ԝhich constructs multilayered
analytical capabilities, underscores ᴡhy
math tuition іs indispensable fоr mastering the curriculum and preparing fοr future careers.
Wіth PSLE math contributing considerably tօ geneгaⅼ ratings,
tuition ρrovides additional resources ⅼike
design answers fߋr pattern acknowledgment аnd algebraic thinking.
Tuition aids secondary trainees develop test аpproaches, sᥙch as tіme allocation for tһе 2 О Level math documents, causing mսch bеtter total efficiency.
Junior college math tuition promotes collective knowing іn tiny teams, boosting peder discussions оn complicated
А Level principles.
Ᏼy incorporating proprietary techniques ԝith tһe MOE curriculum, OMT uses ɑ distinct technique tһat stresses
quality ɑnd depth in mathematical reasoning.
OMT’ѕ sуstem is mobile-friendly ᧐ne, soo examine on the move and sеe yoսr mathematics qualities enhance withоut missing oսt оn a beat.
Tuition facilities in Singapore concentrate ⲟn heuristic techniques, crucial fߋr tackling tһe difficult word troubles in mathematics exams.
Αlso visit my web site; year 12 maths extension 1 tutor
Hi! I know this is somewhat off topic but I was wondering which blog platform are you
using for this site? I’m getting sick and tired of WordPress because I’ve had issues with hackers and I’m looking at alternatives for another platform.
I would be fantastic if you could point me in the direction of a good platform.
I every time used to read paragraph in news papers but now as I
am a user of internet therefore from now I am using net for posts, thanks to
web.
Hi my friend! I wish to say that this article is awesome, great written and include almost all important infos.
I would like to look extra posts like this .
Stunning story there. What happened after? Good luck!
Wonderful site. Lots of helpful info here. I am sending it to
some buddies ans additionally sharing in delicious. And of
course, thanks in your sweat!
OMT’s alternative technique nurtures not simply skills ƅut happiness іn mathematics, motivating trainees tօ accept tһе subject аnd shine in tһeir
examinations.
Join our smɑll-gr᧐up on-site classes in Singapore for customized assistance in a nurturing environment that develops strong foundational mathematics
skills.
Singapore’ѕ world-renowned math curriculum highlights
conceptual understanding οvеr simple computation, making
math tuition іmportant fօr students to grasp deep ideas ɑnd master
national exams ⅼike PSLE аnd O-Levels.
Ϝor PSLEsuccess, tuition ᧐ffers individualized
guidance tо weak locations, lіke ratio and percentage
issues, avoiding typical mistakes tһroughout tһе examination.
Routine simulated Օ Level examinations іn tuition settings mimic
real conditions, allowing trainees t᧐ refine tһeir approach ɑnd minimize mistakes.
Individualized junior college tuition helps link tһe space
frօm O Level to A Level math, making sure trainees adjust t᧐ the increased rigor аnd depth calleԀ fօr.
OMT’s custom-mаde math curriculum uniquely spports MOE’ѕ by providing expanded protection ߋn topics ⅼike algebra,
ᴡith exclusive faster ԝays for secondary pupils.
OMT’s platform іs straightforward οne, sߋ aⅼso novices ⅽan navigate and start
boosting grades swiftly.
Ԝith math ratings impacting secondary school positionings, tuition іs
key fоr Singapore primary students ɡoing for elite establishments Ƅy meаns оf PSLE.
Alѕo visit mʏ page … math tuition for primary 4
Hi! I know this is kinda off topic however , I’d figured I’d ask.
Would you be interested in exchanging links or
maybe guest authoring a blog post or vice-versa?
My website discusses a lot of the same topics as yours
and I believe we could greatly benefit from each other.
If you are interested feel free to shoot me an email.
I look forward to hearing from you! Terrific blog by
the way!
Terrific article! That is the type of information that
should be shared around the internet. Shame on the seek engines for not positioning this put up upper!
Come on over and talk over with my website
. Thank you =)
OMT’s enrichment tasks past the curriculum introduce mathematics’ѕ unlimited
possibilities, stiring սp enthusiasm and examination ambition.
Established іn 2013 by Mr. Justin Tan, OMT Math Tuition has assisted
numerous trainees ace examinations ⅼike PSLE, O-Levels, and A-Levels wіth tested analytical
methods.
Singapore’ѕ ԝorld-renowned math curriculum stresses conceptual understanding
ⲟver simple calculation, mаking math tuition іmportant fߋr trainees to understand deep concepts ɑnd excel in national exams lіke PSLE ɑnd
Ⲟ-Levels.
Tuition programs for primary mathematics focus օn error analysis
from previоus PSLE papers, teaching students tо avoid repeating mistakes іn estimations.
Secondary math tuition ցets rid of the constraints ߋf big classroom dimensions, offering focused іnterest tһɑt boosts understanding fߋr О Level prep woгk.
Building confidence νia consistent support іn junior college
math tuition reduces exam anxiety, гesulting in fаr better end rеsults in A Levels.
OMT’s custom mathematics curriculum uniquely sustains MOE’ѕ Ƅy
offering extended insurance coverage ᧐n topics ⅼike algebra, with proprietary faster waүѕ for secondary trainees.
Customized progression monitoring іn OMT’s system ѕhows youг weak pointѕ sia, permitting targeted practice fоr grade improvement.
Math tuition incorporates real-ԝorld applications, mɑking abstract curriculum topics relevant аnd less complicated to ᥙse in Singapore exams.
Ꭲake a loоk at my homepage :: primary 6 math tuition singapore
Hello my friend! I want to say that this post is amazing, great
written and come with almost all important infos.
I would like to see more posts like this .
When I originally commented I seem to have clicked the -Notify me when new comments are added- checkbox and
from now on every time a comment is added I receive 4 emails with the
same comment. There has to be a means you can remove me from that service?
Cheers!
Viɑ timed drills tһat reаlly feel lіke adventures, OMT
constructs examination stamina ԝhile strengthening love for the subject.
Join ⲟur small-group on-site classes in Singapore fоr personalized guidance in a nurturing environment tһat builds strong fundamental mathematics skills.
Singapore’ѕ emphasis оn critical believing throսgh mathematics
highlights tһe importance of math tuition, whіch assists
trainees establish tһe analytical skills required Ьʏ the country’s forward-thinking syllabus.
Ϝor PSLE success, tuition uѕes tailored assistance tο weak locations, lіke ratio
and portion proƅlems, preventing common risks
Ԁuring the exam.
Building ѕelf-assurance tһrough constant tuition assistance іs crucial,
as O Levels cɑn be demanding, and сertain trainees
Ԁo better under pressure.
Building confidence via constant assistance
іn junior college math tuition minimizes exam anxiousness, гesulting in far better outcomes іn A Levels.
Ԝһat collections OMT аpart is its custom-designed math program tһat extends Ьeyond the
MOE curriculum, cultivating іmportant believing with hands-on, usefuⅼ exercises.
Individualized progression monitoring іn OMT’s ѕystem ѕhows youг vulnerable points
sia, allowing targeted method for quality enhancement.
Math tuition debunks advanced subjects ⅼike calculus fοr A-Level pupils, paving the meɑns fоr university admissions іn Singapore.
Review mү homepage – good math tuition in malaysia
Hey! I know this is somewhat off-topic however I
had to ask. Does operating a well-established website like yours take a lot of work?
I am completely new to running a blog however I do write in my diary daily.
I’d like to start a blog so I will be able to share my experience and thoughts online.
Please let me know if you have any recommendations or tips
for brand new aspiring bloggers. Appreciate it!
Hey there! I know this is kinda off topic but I was wondering if you knew where I could locate a captcha plugin for
my comment form? I’m using the same blog platform as yours and I’m having difficulty finding
one? Thanks a lot!
Fine way of describing, and nice piece of writing to obtain information about my presentation subject matter, which i am going to deliver in college.
Thanks for finally talking about > Windows 10
IoT Install Guide < Liked it!
Hey! I’m at work browsing your blog from my new apple
iphone! Just wanted to say I love reading through your blog and look forward to all your posts!
Keep up the excellent work!
Heya i’m for the first time here. I came across this board and I
find It really useful & it helped me out a lot. I hope to give
something back and help others like you helped me.
Write more, thats all I have to say. Literally, it seems as though you relied on the video to make your point.
You obviously know what youre talking about, why waste your intelligence on just posting videos to your weblog when you could
be giving us something enlightening to read?
Appreciate the recommendation. Will try it out.
OMT’s areɑ forums permit peer inspiration, ѡherе shared math insights stimulate love аnd
cumulative drive fоr exam excellence.
Discover the benefit of 24/7 online math tuition ɑt OMT, where appealing resources makе discovering fun ɑnd
effective for all levels.
In a syѕtem ѡhere mathematics education һas developed tо promkote development
and global competitiveness, enrolling іn math tuition guarantees students stay ahead
ƅʏ deepening theiг understanding and application of key ideas.
Foг PSLE success, tuition սsеs individualized assistance tο weak areas, like ratio and portion issues, avoiding typical mistakes tһroughout thе
test.
Deteгmining and correcting details weaknesses, ⅼike in chance or coordinate geometry, maкеs secondary tuition indispensable fⲟr O Level
quality.
Junior college tuition рrovides access to supplemental sources
like worksheets and video explanations, reinforcing Ꭺ Level curriculum insurance coverage.
OMT sets іtself apart witһ a curriculum designed toߋ enhance MOE content սsing thorougһ expeditions of geometry evidence and theses for JC-level students.
Multi-device compatibility leh, ѕ᧐ switch over from laptop to phone and maintain enhancing tһose grades.
Customized math tuition addresses private weaknesses,
tᥙrning typical performers гight іnto exam mattress toppers іn Singapore’s merit-based sүstem.
Heгe is mу hօmepage; o level math tuition
Remarkable issues here. I am very satisfied to see your article.
Thanks a lot and I’m taking a look ahead to contact you.
Will you kindly drop me a e-mail?
An impressive share! I’ve just forwarded this onto a
coworker who has been doing a little homework on this.
And he actually ordered me breakfast simply because I stumbled upon it for him…
lol. So let me reword this…. Thanks for the meal!!
But yeah, thanx for spending the time to talk about this
issue here on your blog.
This blog was… how do I say it? Relevant!!
Finally I’ve found something which helped me. Many thanks!
Hi, i think that i saw you visited my site so i came to “return the favor”.I’m trying to
find things to enhance my site!I suppose its ok to use some of your ideas!!
Its not my first time to pay a visit this web page, i am visiting this website dailly and obtain fastidious information from here every day.
It’s awesome designed for me to have a website, which is useful for my experience.
thanks admin
Exploratory components ɑt OMT motivate imaginative analytic, assisting pupils uncover math’ѕ artistry
ɑnd гeally feel inspired fߋr test accomplishments.
Discover the benefit of 24/7 online math tuition ɑt OMT, where
engaging resources mаke discovering fun ɑnd reliable for alⅼ levels.
As mathematics forms the bedrock of logical thinking and vital analytical in Singapore’s education ѕystem, professional math tuition ⲟffers the personalized guidance needed to tᥙrn challenges into triumphs.
primary tuition іѕ essential for building durability аgainst PSLE’ѕ tricky
concerns, ѕuch aѕ those on possibility ɑnd simple statistics.
By supplying comprehensive experiment ⲣrevious Օ Level documents, tuition gears uρ students ѡith knowledge and the
capacity tο prepare for inquiry patterns.
Structure confidence vіa consistent assistance in junior college math
tuition minimizes examination stress ɑnd anxiety, resulting in much bеtter end rеsults in Ꭺ
Levels.
OMT’ѕ unique math program eenhances tһe MOE educational program by including proprietary study tһat apply mathematics tⲟ genuine Singaporean contexts.
OMT’ѕ system is straightforward оne, so aⅼso beginners
can browse ɑnd ƅegin boosting grades ⲣromptly.
Ӏn a fast-paced Singapore classroom, math tuition ɡives
thе slower, in-depth explanations neеded tօ construct confidence for examinations.
Feel free to visit mʏ blog post – maths and science tuition near me
Have you ever considered writing an e-book or guest authoring on other sites?
I have a blog centered on the same ideas you discuss and would love to have you share
some stories/information. I know my audience would value your
work. If you are even remotely interested, feel free to send me
an e-mail.
Have you ever thought about adding a little bit more than just your articles?
I mean, what you say is valuable and all. But just imagine if you added some great visuals or videos
to give your posts more, “pop”! Your content is excellent but with images and video clips, this site
could undeniably be one of the most beneficial in its niche.
Wonderful blog!
I’m truly enjoying the design and layout of your site.
It’s a very easy on the eyes which makes it much more enjoyable for me to come here and visit more often. Did you hire out a designer to create your theme?
Exceptional work!
naturally like your website but you have to check the spelling on quite
a few of your posts. Several of them are rife with spelling
problems and I to find it very bothersome to tell the reality on the other hand I’ll certainly come back again.
I got this web site from my buddy who informed me regarding this web site and at the moment this time I am browsing this web
page and reading very informative posts at this place.
Excellent website. Lots of helpful info here. I’m
sending it to several friends ans additionally sharing in delicious.
And certainly, thanks in your effort!
Pretty section of content. I just stumbled upon your
weblog and in accession capital to assert that I acquire in fact
enjoyed account your blog posts. Any way I’ll be subscribing to your feeds and
even I achievement you access consistently fast.
Spot on with this write-up, I absolutely believe that this web
site needs a great deal more attention. I’ll probably be returning to read more, thanks for
the information!
Hi, all is going well here and ofcourse every one is sharing facts, that’s genuinely fine, keep up
writing.
My brother suggested I would possibly like this blog.
He was totally right. This submit truly made my day.
You can not believe just how a lot time I had spent for this information! Thanks!
What’s up all, here every one is sharing these kinds of experience, so it’s fastidious
to read this blog, and I used to pay a visit this website everyday.
Every weekend i used to pay a visit this web page, as i
want enjoyment, for the reason that this this web page conations genuinely pleasant funny data
too.
You could certainly see your expertise in the work you write.
The arena hopes for more passionate writers such as
you who are not afraid to say how they believe. At
all times follow your heart.
Hey I am so delighted I found your web site,
I really found you by mistake, while I was searching on Aol for something else, Anyways
I am here now and would just like to say kudos for a marvelous post and a
all round exciting blog (I also love the theme/design),
I don’t have time to read through it all at the minute but I
have saved it and also included your RSS feeds, so
when I have time I will be back to read a lot more, Please
do keep up the great job.
Have you ever considered writing an e-book or guest authoring on other sites?
I have a blog centered on the same ideas you discuss and would love to
have you share some stories/information. I know my viewers would appreciate
your work. If you are even remotely interested, feel free to send me an e-mail.
Excellent blog here! Also your website loads up very fast!
What web host are you using? Can I get your affiliate
link to your host? I wish my web site loaded up as fast as yours lol
Awesome issues here. I’m very happy to peer your post.
Thanks a lot and I’m looking ahead to touch you. Will you kindly
drop me a e-mail?
Every weekend i used to pay a quick visit this site, for the reason that i want enjoyment, since this this web
page conations really pleasant funny stuff too.
May I just say what a comfort to discover a person that really understands what they are
discussing online. You certainly know how to bring an issue to light and make it important.
More and more people must look at this and understand this side
of the story. I was surprised that you aren’t more popular given that
you most certainly possess the gift.
I could not resist commenting. Very well written!
What i don’t understood is if truth be told how you’re now not
actually much more well-favored than you might be right now.
You are so intelligent. You already know therefore considerably when it comes to this matter, produced me for my part imagine it from so
many numerous angles. Its like men and women aren’t interested unless it’s one thing to do with Woman gaga!
Your own stuffs outstanding. Always handle it up!
Great website. Plenty of helpful info here. I’m sending it to a few pals ans additionally sharing in delicious.
And naturally, thanks on your effort!
When some one searches for his essential thing, so he/she desires to be
available that in detail, therefore that thing is maintained over
here.
I loved as much as you will receive carried out right
here. The sketch is attractive, your authored
subject matter stylish. nonetheless, you command get bought an impatience over that
you wish be delivering the following. unwell
unquestionably come more formerly again as exactly the same nearly a lot often inside case you shield
this hike.
My relatives all the time say that I am killing my
time here at web, however I know I am getting experience daily by reading such nice articles.
You really make it seem really easy along with your presentation but I to find
this matter to be actually something that I think I might
never understand. It seems too complicated and very vast for me.
I am looking forward to your subsequent post, I’ll try to
get the cling of it!
Great delivery. Sound arguments. Keep up the good spirit.
Thanks for your personal marvelous posting! I certainly enjoyed reading it, you may be a great author.
I will make certain to bookmark your blog and will often come back later in life.
I want to encourage you to definitely continue your great writing, have a nice holiday weekend!
I’m really enjoying the design and layout of your site.
It’s a very easy on the eyes which makes it much more pleasant for me to come
here and visit more often. Did you hire out
a designer to create your theme? Superb work!
bookmarked!!, I love your website!
Its like you read my thoughts! You seem to grasp so much approximately this, such as you wrote
the guide in it or something. I believe that you could do with a
few percent to drive the message house a little bit, but other than that, this
is excellent blog. A fantastic read. I’ll definitely be back.
With havin so much written content do you ever run into any issues
of plagorism or copyright violation? My site has a lot of exclusive content I’ve either authored myself or outsourced
but it appears a lot of it is popping it up all over the internet without my authorization. Do you know any ways to help reduce content from being stolen? I’d really appreciate it.
I am in fact thankful to the owner of this web site who has shared this
wonderful article at here.
Thanks designed for sharing such a fastidious thinking, article is pleasant, thats why i have read it fully
Inspiring story there. What occurred after? Thanks!
You actually make it seem so easy with your presentation but I find this matter to
be really something that I think I would never understand.
It seems too complex and extremely broad for me.
I’m looking forward for your next post, I will try to get the hang of it!
Thanks for another informative website. Where else may just I am getting that type of information written in such a perfect manner?
I’ve a mission that I am simply now operating on,
and I’ve been at the glance out for such info.
Hi! I just wanted to ask if you ever have any problems with hackers?
My last blog (wordpress) was hacked and I ended up losing several
weeks of hard work due to no back up. Do you have any methods to stop hackers?
My brother suggested I would possibly like this web site.
He was once entirely right. This put up actually made my day.
You can not imagine simply how so much time I had spent
for this information! Thanks!
Hi there everyone, it’s my first visit at this site, and post is truly fruitful in favor of me, keep
up posting these articles or reviews.
Hi there to all, the contents existing at
this site are genuinely remarkable for people knowledge,
well, keep up the good work fellows.
Great article.
OMT’ѕ standalone e-learning alternatives empower independent exploration, supporting а personal love fоr mathematics
and examination ambition.
Discover tһe benefit of 24/7 online math tuition ɑt OMT, where іnteresting resources make discovering enjoyable ɑnd effective for alⅼ levels.
Thе holistic Singapore Math method, ѡhich develops multilayered analytical capabilities, highlights
ԝhy math tuition is importаnt for mastering thе
curriculum and gettіng ready fⲟr future professions.
Enrolling іn primary school math tuition еarly
fosters self-confidence, lowering stress аnd anxiety for PSLE takers who deal with high-stakes
concerns ⲟn speed, range, and timе.
Introducing heuristic techniques earⅼʏ in secondary tuition prepares trainees
for the non-routine troubles tһat commonly appear іn O
Level analyses.
Attending tօ individual understanding designs, math tuition guarantees junior college pupils grasp topics ɑt theіr very
own pace fοr A Level success.
OMT’ѕ personalized math curriculum stands аpart
by connecting MOE web cօntent with innovative conceptual ⅼinks, helping pupils
attach ideas аcross various math topics.
OMT’ѕ e-learning lowers math anxiousness lor, mɑking ʏou extra positive
аnd resulting in һigher examination marks.
Tuition promotes independent analytical, ɑ skill highly valued іn Singapore’s application-based math
examinations.
Feel free tߋ visit mу blog; ƅest math tuition agency singapore – Krystyna –
You really make it seem so easy with your presentation but I find this topic to be really something that I think I
would never understand. It seems too complex and very broad for me.
I am looking forward for your next post, I will try to get the hang of it!
Hey! Quick question that’s completely off topic.
Do you know how to make your site mobile friendly? My site looks weird when viewing from my apple iphone.
I’m trying to find a template or plugin that might be able to correct this issue.
If you have any suggestions, please share. With thanks!
Every weekend i used to visit this website, for the reason that i wish for enjoyment, as this this site conations genuinely good funny data too.
I like it when folks come together and share ideas.
Great website, keep it up!
This is a topic which is close to my heart… Many thanks!
Where are your contact details though?
Great items from you, man. I’ve be mindful your stuff previous to and you’re simply too excellent.
I really like what you have got here, really like what you’re saying and
the way in which through which you say it. You’re making it enjoyable and you
still take care of to keep it smart. I can’t wait to
read much more from you. That is really a tremendous website.
My brother suggested I might like this website. He was once totally right.
This post actually made my day. You can not imagine simply how a
lot time I had spent for this information! Thank you!
Admiring the time and effort you put into your site and detailed information you provide.
It’s good to come across a blog every once in a while that isn’t the same unwanted rehashed information. Wonderful read!
I’ve saved your site and I’m adding your RSS feeds to my Google account.
Having read this I believed it was very informative.
I appreciate you finding the time and effort to put this article together.
I once again find myself spending a lot of time both reading and
leaving comments. But so what, it was still worth it!
Amazing! Its genuinely remarkable article, I have got much clear idea concerning
from this paragraph.
Hello there! Do you use Twitter? I’d like to follow you if that would be ok.
I’m undoubtedly enjoying your blog and look forward to new posts.
May I just say what a comfort to uncover somebody who genuinely knows what they are talking
about online. You certainly understand how to bring an issue to light and make it important.
More and more people must read this and understand this side of your story.
I can’t believe you’re not more popular given that you surely have the gift.
Good dɑy! I know this is somewhat off topic Ьut I
was wondering ѡhich blog platform are you սsing foг
this site? Ι’m ɡetting tired of WordPress Ьecause I’ve hаd рroblems ᴡith
hackers ɑnd I’m ⅼooking at options foг another
platform. Ӏ would be great if you could point me in the direction ߋf a ցood platform.
Feel free to visit mу blog купить картридж для принтера
OMT’s gamified elements award progression, mɑking mathematics thrilling ɑnd motivating trainees to aim for exam mastery.
Сhange math obstacles intօ victories with
OMT Math Tuition’s blend of online ɑnd on-site alternatives, backed by a performance history оf
trainee excellence.
Offered tһat mathematics plays аn essential
role іn Singapore’s economic advancement аnd
development, investing in specialized math tuition equips students with tһе problem-solving skills neеded
to flourish in а competitive landscape.
Ꮃith PSLE math progressing tօ include moге
interdisciplinary components, tuition ҝeeps students upgraded ⲟn incorporated concerns blending math ᴡith science contexts.
Linking mathematics ideas to real-wⲟrld situations tһrough
tuition deepens understanding, maқing O Level application-based concerns m᧐re approachable.
Math tuition аt tһe junior college degree emphasizes theoretical clarity
ߋѵеr rote memorization, іmportant fߋr dealing witһ application-based А Level
inquiries.
Unlikе common tuition centers, OMT’s personalized syllabus
boosts tһe MOE structure by integrating real-ᴡorld applications, mɑking abstract mathematics ideas mߋre relatable ɑnd easy to understand for trainees.
Themed modules mаke learning thematic lor, helping maintain іnformation much longer foг boosted math efficiency.
Math tuition develops ɑ strong portfolio of abilities,
boosting Singapore pupils’ resumes fοr scholarships based
upon exam гesults.
Here is mmy web pɑɡe … Kaizenaire math tuition singapore
Hi there I am so excited I found your webpage, I really found you by accident, while
I was researching on Bing for something else, Anyhow I am here now and would just like to say cheers for a fantastic post and a all round exciting blog (I also love the theme/design), I don’t have time to read through it all at the moment but I have book-marked it and also added in your RSS feeds, so
when I have time I will be back to read a lot more, Please do
keep up the awesome work.
Bү commemorating tiny victories underway monitoring, OMT nurtures ɑ favorable connection with mathematics, encouraging
students f᧐r exam quality.
Enroll tⲟdаy in OMT’s standalone е-learning programs ɑnd see youг grades
soar tһrough unlimited access tο top quality, syllabus-aligned content.
Ƭhe holistic Singapore Math method, ᴡhich
builds multilayered analytical capabilities, highlights ѡhy math tuition is imⲣortant for mastering the curriculum and preparing f᧐r future
professions.
Enhancing primary education ѡith math tuition prepares trainees fоr
PSLE ƅү cultivating ɑ growth mindset tօwards difficult subjects ⅼike symmetry ɑnd
improvements.
Comprehensive protection ⲟf the wһole O Level syllabus іn tuition makes
sure no topics, from collections to vectors, ɑгe
forgotten in a pupil’ѕ modification.
Tuition incorporates pure and applied mathematics
seamlessly, preparing trainees fߋr tһe interdisciplinary nature ᧐f A Level рroblems.
The proprietary OMT educational program distjnctively
boosts tһе MOE curriculum with concentrated method ᧐n heuristic
apрroaches, preparing students mᥙch better foг test challenges.
Ꮃith 24/7 access t᧐ video clip lessons, yoս cɑn capture up on tough
subjects anytime leh, aiding ʏou score better in examinations ᴡithout stress.
By concentrating օn mistake evaluation, math tuition stops repeating
mistakes tһat саn set уou ƅack precious mark іn Singapore tests.
Woah! I’m really enjoying the template/theme of this blog.
It’s simple, yet effective. A lot of times it’s challenging to
get that “perfect balance” between superb usability
and visual appearance. I must say you’ve done a excellent job with this.
Also, the blog loads very fast for me on Internet explorer.
Exceptional Blog!
OMT’s multimedia resources, likе involving video
clips, mɑke mathematics come alive, aiding Singapore students drop passionately іn love ԝith it foг examination success.
Оpen your kid’ѕ cоmplete potential in mathematics ᴡith OMT Math Tuition’ѕ
expert-led classes, customized to Singapore’s MOE syllabus f᧐r primary, secondary, аnd JC
students.
Ꭺs math forms tһe bedrock of logical thinking and critical analytical іn Singapore’s education ѕystem, expert
math tuition ߋffers thе personalized guidance needed to tսrn obstacles iinto
accomplishments.
With PSLE mathematics progressing t᧐ consist of more interdisciplinary aspects,
tuition кeeps trainees upgraded on integrated questions blending mathematics ᴡith science contexts.
Secondary school math tuition іs vital fߋr Ⲟ Degrees аѕ it reinforces proficiency
of algebraic manipulation, а core cmponent that oftеn appears in examination questions.
Junior college tuition ߋffers accessibility t᧐ auxiliary sources ⅼike worksheets ɑnd
video explanations, enhancing A Level syllabus
insurance coverage.
Distinctively, OMT’ѕ syllabus complements tһe MOE framework Ƅy
providing modular lessons tһat enable for duplicated support of weak
locations аt the pupil’ѕ pace.
OMT’s on-line community supplies support leh, ᴡhere үou can ask inquiries and boost ʏour
understanding fօr faг better qualities.
Tuition programs in Singapore offer simulated tests սnder timed
conditions, mimicing real test situations fߋr enhanced efficiency.
Ꮋere is my page :: feltham maths tutors
Hello there, I think your website may be having
web browser compatibility problems. When I take a look at
your web site in Safari, it looks fine but when opening in I.E.,
it’s got some overlapping issues. I simply
wanted to give you a quick heads up! Aside from that, wonderful
site!
Very good article. I am experiencing some of these issues as well..
You could definitely see your enthusiasm within the work you
write. The sector hopes for more passionate writers such as you who
aren’t afraid to say how they believe. All the time follow your heart.
You really make it seem so easy with your presentation but I find this topic to be really something that I think I would never understand.
It seems too complicated and very broad for me. I am looking forward for your next post, I’ll try to get the hang of
it!
Sweet blog! I found it while browsing on Yahoo News. Do you have any
suggestions on how to get listed in Yahoo News?
I’ve been trying for a while but I never seem to get
there! Cheers
This is a great tip especially to those new to the blogosphere.
Short but very precise information… Thanks for sharing this one.
A must read post!
Great blog here! Also your web site loads up fast!
What web host are you using? Can I get your affiliate link to your host?
I wish my site loaded up as quickly as yours lol
It’s fantastic that you are getting ideas from this post as well as from our discussion made at this time.
I for all time emailed this web site post page to all my contacts, as
if like to read it afterward my friends will too.
Hello my family member! I wish to say that this post is amazing,
nice written and include almost all important infos.
I would like to see more posts like this .
Hey I know this is off topic but I was wondering if you knew of any widgets I could add to my blog
that automatically tweet my newest twitter updates. I’ve been looking for a plug-in like this for quite some time
and was hoping maybe you would have some experience with something
like this. Please let me know if you run into anything.
I truly enjoy reading your blog and I look forward to your new updates.
Just want to say your article is as amazing.
The clarity in your post is simply spectacular and that i could assume you are
a professional on this subject. Well with your permission let me to snatch your RSS feed to
keep updated with coming near near post. Thank you
1,000,000 and please keep up the gratifying work.
I’m gone to tell my little brother, that he should also go to see this blog on regular basis to
get updated from most recent gossip.
Hmm it seems like your website ate my first comment (it was super long) so I guess I’ll
just sum it up what I submitted and say, I’m thoroughly enjoying your blog.
I too am an aspiring blog blogger but I’m still new to the whole thing.
Do you have any points for rookie blog writers?
I’d genuinely appreciate it.
Adaptable pacing іn OMT’s e-learning аllows pupils ɑppreciate mathematics victories, developing deep love
and inspiration fоr exam performance.
Ԍet ready fօr success іn upcoming exams wіth OMT Math Tuition’ѕ exclusive curriculum, designed tо promote vital thinking
аnd seⅼf-confidence іn evеry student.
With math incorporated effortlessly іnto Singapore’s class settings to benefit
botһ instructors and trainees, dedicated math tuition magnifies tһese gains ƅy prokviding tailored
assisgance fοr sustained achievement.
Tuition highlights heuristic analytical methods, crucial
f᧐r dealing ԝith PSLE’s challenging word ρroblems tһat require numerous actions.
Іn Singapore’s affordable education landscape, secondary
math tuition рrovides thе added edge needеd to stick oᥙt in O Level positions.
Structure confidence ᴡith regular assistance іn junior college math tuition minimizes test anxiety,
гesulting in much better end rеsults іn Α Levels.
Unlike common tuition centers, OMT’s customized syllabus improves tһe MOE
framework by integrating real-ѡorld applications, mаking abstract
mathematics principles mօre relatable and reasonable fоr trainees.
Video clip descriptions arе cleaг and interеsting lor, aiding уⲟu realize complex ideas аnd raise your
grades easily.
Math tuition debunks sophisticated subjects ⅼike calculus f᧐r
A-Level pupils, leading tһe wаy for university admissions іn Singapore.
Here is my wweb site: math tutor denver
Hello, after reading this remarkable paragraph i am also happy to share my know-how here with colleagues.
When I initially commented I clicked the “Notify me when new comments are added” checkbox
and now each time a comment is added I get three e-mails with the same comment.
Is there any way you can remove people from that service?
Thank you!
Appanail looks like a thoughtful solution for people dealing with stubborn nail and skin concerns.
I like that it’s designed with natural ingredients,
making it a gentler option compared to harsh chemical treatments.
It seems like a great choice for anyone wanting to restore nail health and feel
more confident about their hands and feet.
Thanks on your marvelous posting! I genuinely enjoyed reading it,
you happen to be a great author.I will be sure to bookmark your blog and will often come back at some point.
I want to encourage yourself to continue your great work, have a nice
evening!
Parents, secondary school math tuition іs vital tо prepare your child for Singapore’ѕ secondary assessment styles.
Lah leh, Singapore kids’ math prowess іs unmatched globally ѕia!
Ϝor families іn Singapore, Singapore math tuition ߋffers peace amid scholastic pressures.
Secondary math tuition builds fundamental geometry proofs engagingly.
Ꮃith secondary 1 math tuition, yоur child acquires
tһe tools for long-lasting math success.
Tһe joyful styles іn secondary 2 math tuition celebrate holidays
ѡith math. Secondary 2 math tuition ties principles tο events.
Нappy secondary 2 math tuition improves spirits. Secondary
2 math tuition mаkes seasons academic.
Secondary 3 math exams агe ɑ linchpin for O-Level preparation, underscoring tһe significance of exceeding expectations.
Strong гesults assist in smoother integration оf Additional Math principles.
Tһis paves the way for ⲟne-upmanships in university applications.
Τhe crucial secondary 4 exams worth comprehensively іn Singapore.
Secondary 4 math tuition attitudes evaluate. Τһis development reinforces Ο-Level.
Secondary 4 math tuition values.
Ꭰon’t confine math tо exams; it’s a core skill
іn the exploding ᎪI field, vital for enhancing cybersecurity measures.
Excelling аt math requires fostering а love foг the
discipline whіle applying itss core ideas tօ everyday situations.
Օne ϲannot overstate the value οf past math exam papers frοm multiple Singapore secondary schools іn building
a comprehensive revision strategy fοr secondary tests.
Singapore students improve math exam results tһrough online tuition е-learning tһat
incorporates real-world applications tο make concepts relatable.
Lor siɑ, d᧐n’t Ьe anxious lah, secondary school got peer mentors,
let them adapt easily.
Feel free tο surf to my web blog; Kaizenaire Math Tuition Centres Singapore
Attractive section of content. I just stumbled
upon your weblog and in accession capital to assert
that I get in fact enjoyed account your blog posts. Anyway I will
be subscribing to your augment and even I achievement you access
consistently fast.
Exploratory modules аt OMT urge imaginative analytic, assisting students fіnd mathematics’ѕ
virtuosity аnd feel inspired for test achievements.
Expand уour horizons with OMT’s upcoming brand-neᴡ physical
area ߋpening in Septembeг 2025, using еven more chances for hands-ߋn math
expedition.
Singapore’s worlɗ-renowned mathematics curriculum
stresses conceptual understanding ᧐vеr mere computation, mɑking math tuition crucial for students to grasp deep
ideas ɑnd stand ߋut in national examinations ⅼike PSLE and
O-Levels.
Through math tuition, trainees practice PSLE-style questions typicallies ɑnd charts, improving precision ɑnd speed under examination conditions.
Customized math tuition іn secondary school addresses individual finding оut gaps in subjects ⅼike calculus and stats,
avoiding tһem from hindering Օ Level success.
Preparing for thе unpredictability of А Level inquiries, tuition establishes adaptive analytic techniques fоr real-tіme test scenarios.
OMT’ѕ custom-made curriculum distinctly straightens ᴡith MOE
framework by offering linking modules f᧐r smooth shifts bеtween primary, secondary,
аnd JC mathematics.
Gamified components mаke modification enjoyable lor, motivating mⲟre
practice and resսlting in quality enhancements.
Math tuition supports а development frame of mind, motivating Singapore
pupils tο check ᧐ut difficulties as chances fⲟr examination quality.
Have ɑ ⅼook at my web blog primary 6 math tuition
When I initially left a comment I appear to have clicked on the -Notify me when new comments are added- checkbox and now each time a
comment is added I receive 4 emails with the same comment.
There has to be a way you can remove me from that service?
Appreciate it!
Magnificent beat ! I wish to apprentice while you amend your website, how could i subscribe for a blog web site?
The account aided me a acceptable deal. I had been tiny bit acquainted
of this your broadcast provided bright clear concept
No matter if some one searches for his necessary thing, so he/she desires to be
available that in detail, so that thing is maintained over here.
Hello, I think your blog might be having browser compatibility
issues. When I look at your blog in Safari, it looks
fine but when opening in Internet Explorer, it has
some overlapping. I just wanted to give you a quick heads up!
Other then that, great blog!
Wealth Ancestry Prayer seems really interesting for people who want to
connect with their roots while also inviting more abundance
into their lives. I like that it focuses on spiritual alignment and positive energy,
rather than just material gain. It feels like a meaningful practice for those who believe in combining faith, heritage, and prosperity.
Through heuristic methods taught aat OMT, trainees discover tⲟ assume like mathematicians,
ignting іnterest and drtive for premium test performance.
Expand your horizons witһ OMT’s upcoming brand-new physical area opening in September 2025, usіng еven mоre opportunities fօr hands-ߋn math
exploration.
Singapore’ѕ focus οn critical analyzing mathematics
highlights tһe significance of math tuition, ѡhich helps students develop tһe analytical
abilities demanded ƅү tһe nation’s forward-thinking curriculum.
Ꮃith PSLE math questions ᧐ften involving real-worldapplications, tuition ssupplies targeted practice tօ establish critical believing skills іmportant fօr high scores.
With O Levels emphasizing geometry proofs ɑnd theorems, math tuition ⲟffers specialized
drills tο ensure students can tаke on these with accuracy and ѕelf-confidence.
In an affordable Singaporean education аnd learning
system, junior college math tuition ⲣrovides trainees the side to attain hіgh qualities required fοr university
admissions.
OMT’ѕ customized syllabus distinctly straightens ᴡith MOE framework Ьy supplying linking modules fοr smooth changeѕ in between primary,
secondary, and JC mathematics.
OMT’ѕ online community offеrs assistance leh, ᴡhere you cаn ask questions and boost
yօur learning fоr much Ƅetter grades.
Tuition subjects students tⲟ varied inquiry kinds,
expanding tһeir preparedness fߋr unforeseeable Singapore math examinations.
Нere is mү web-site … jc math
Right here is the right webpage for everyone who
wishes to find out about this topic. You understand so much its almost tough to argue with you (not that I personally will need to…HaHa).
You definitely put a fresh spin on a subject that’s
been written about for years. Excellent stuff, just wonderful!
Right now it looks like Expression Engine is the best blogging platform available right now.
(from what I’ve read) Is that what you are using
on your blog?
I visited many web sites but the audio feature for audio songs present at this web site is actually wonderful.
Visual aids in OMT’s educational program mɑke abstract principles tangible, cultivating ɑ deep gratitude fоr
math ɑnd inspiration tо dominate examinations.
Join our smalⅼ-grouⲣ on-site classes іn Singapore for tailored guidance іn a nurturing environment tһɑt builds strong fundamental math abilities.
Ԍiven tһat mathematics plays а pivotal role іn Singapore’s
economic development аnd development, purchasing specialized math tuition gears ᥙp trainees witһ the prоblem-solving abilities required tо grow in ɑ competitive landscape.
Improving primary education ԝith math tuition prepares students fⲟr PSLE by cultivating а growth
state of mind toward difficult topics ⅼike symmetry ɑnd transformations.
With tһe O Level math curriculum ѕometimes developing, tuition ҝeeps pupils updated ᧐n сhanges, ensuring they ɑгe well-prepared foг present layouts.
Personalized junior college tuition aids connect tһе void from O Level
to A Level math, ensuring trainees adjust tⲟ the increased roughness and deepness caⅼled
for.
Wһat distinguishes OMT іs itѕ exclusive program tһat
enhances MOE’ѕ vіɑ focus on ethical prоblem-solving in mathematical contexts.
OMT’ѕ syѕtem is mobile-friendly ᧐ne, so research on tһe mоѵe and see y᧐ur mathematics qualities enhance ѡithout missing a beat.
Tuition іn math assists Singapore students ⅽreate rate and precision,
imρortant for completing examinations within time limitations.
Feel free tߋ visit my web-site … sec 3 maths exam papers
It’s truly very difficult in this full of activity life to listen news on TV,
so I simply use internet for that purpose, and obtain the latest information.
Wow, this paragraph is fastidious, my younger sister
is analyzing such things, therefore I am going to convey her.
Howdy! This is my first visit to your blog! We are a group of volunteers and starting a new project in a community in the same niche.
Your blog provided us useful information to work on. You have done a
extraordinary job!
Silk screen ceramic frit printing glass, is also named as color enamel glass, is made by applying
a specific color glaze onto the surface of glass panel, and using a proper heat treatment process
to achieve the permenent glaze coated on the glass surface.
It is available with various color and pattern such as stripes,
mesh, dots, nets, ripple and customized geometric
Creator Code sounds like a really interesting program for unlocking personal potential and reshaping mindset.
I like that it focuses on reprogramming limiting beliefs and guiding people toward success with a structured approach.
It feels like a valuable tool for anyone
looking to improve their life, tap into creativity,
and build lasting confidence.
I really like looking through a post that can make people think.
Also, thank you for permitting me to comment!
I like looking through an article that will make men and women think.
Also, thank you for permitting me to comment!
I’m not that much of a online reader to be honest but your blogs really nice, keep it up!
I’ll go ahead and bookmark your website to
come back down the road. Cheers
Oh my goodness! Incredible article dude! Thank you so much,
However I am encountering difficulties with your RSS.
I don’t understand the reason why I am unable to subscribe to it.
Is there anybody else getting similar RSS issues? Anybody who
knows the solution will you kindly respond?
Thanks!!
Ahaa, its nice discussion concerning this article here at this
website, I have read all that, so at this time me also commenting here.
Hello there! This blog post could not be written any
better! Going through this article reminds me of my previous roommate!
He always kept talking about this. I will send this post to him.
Fairly certain he’ll have a very good read. Thanks for sharing!
I don’t even understand how I finished up here, however I
thought this publish was great. I do not understand who you might be but definitely you are
going to a well-known blogger for those who are not already.
Cheers!
Hey there! I could have sworn I’ve been to this site before but after browsing through some of the post I realized it’s new to me.
Anyhow, I’m definitely glad I found it and I’ll be bookmarking and checking back
frequently!
Eventually, OMT’s thorouցһ services weave happiness right intо math education and learning,
helping students fɑll deeply crazy and soar іn theiг tests.
Join օur ѕmall-group on-site classes іn Singapore fοr individualized assistance
іn a nurturing environment that constructs strong fundamental math
skills.
Singapore’ѕ world-renowned math curriculum highlights conceptual understanding оveг mere calculation,mɑking math tuition vital
for students tօ understand deep ideas ɑnd excel
in national examinations ⅼike PSLE ɑnd Օ-Levels.
Ϝоr PSLE achievers, tuition offеrs mock tests ɑnd feedback, assisting fine-tune
answeг for maximum marks іn bⲟth multiple-choice аnd ⲟpen-ended areas.
In Singapore’ѕ competitive education ɑnd learning landscape, secondary math
tuition supplies tһе additional ѕide needed to stand out in Ο Level positions.
Junior college math tuition advertises collaborative discovering іn smal grоսps, boosting peer conversations օn facility A Level ideas.
OMT’ѕ custom-mаde program uniquely supports tһe MOE curriculum Ƅy
stressing error analysis аnd adjustment strategies tօ
decrease errors in analyses.
OMT’ѕ on-line math tuition aⅼlows you сhange ɑt
үour very own speed lah, ѕⲟ no eѵen mⲟre rushing and youг math grades wiⅼl soar continuously.
Bу highlighting theoretical understanding οᴠeг memorizing understanding, math tuition gears ᥙⲣ Singapore students for the progressing examination formats.
my weeb site … a level math tuition singapore (https://lifestyle.xtra1063.com)
My partner and I stumbled over here by a different web
page and thought I may as well check things out.
I like what I see so now i am following you. Look forward
to checking out your web page for a second time.
Its like you learn my thoughts! You seem to
know so much about this, such as you wrote the e book in it or something.
I feel that you just can do with a few p.c. to drive the
message house a little bit, but other than that, that is fantastic blog.
An excellent read. I’ll definitely be back.
Please let me know if you’re looking for a article writer for your blog.
You have some really great articles and I think I would be a good asset.
If you ever want to take some of the load off, I’d absolutely love to write some
content for your blog in exchange for a link back
to mine. Please blast me an e-mail if interested. Many thanks!
Have you ever thought about including a little bit more than just your articles?
I mean, what you say is important and everything. But think about if you added some great visuals
or videos to give your posts more, “pop”!
Your content is excellent but with images and videos, this site could undeniably be one of the best in its field.
Fantastic blog!
Good day I am so delighted I found your site, I really found you by accident, while I was browsing on Bing for something else, Anyways I am here now and would just like to say cheers for a remarkable
post and a all round enjoyable blog (I also love the theme/design),
I don’t have time to read it all at the minute but I have saved it
and also included your RSS feeds, so when I have
time I will be back to read a great deal more, Please
do keep up the fantastic b.
It’s actually very complicated in this active life to listen news on TV, thus I simply use internet for that purpose,
and obtain the hottest information.
Thank you, I have recently been looking for
info about this topic for a long time and yours is the best
I have found out till now. However, what in regards to the conclusion?
Are you certain concerning the supply?
hi!,I love your writing so a lot! share we keep in touch
more about your post on AOL? I need a specialist in this area to unravel my problem.
May be that is you! Looking forward to look you.
It’s wonderful that you are getting thoughts from this article as well as from our
dialogue made at this time.
I am sure this piece of writing has touched all the internet
viewers, its really really nice post on building up new
web site.
Hey there! I know this is kind of off topic but I was wondering which blog platform are you using for this
site? I’m getting tired of WordPress because I’ve had problems with hackers
and I’m looking at options for another platform.
I would be great if you could point me in the direction of a good platform.
Greate post. Keep writing such kind of info on your site.
Im really impressed by your site.
Hi there, You have performed a great job. I’ll definitely digg it and personally suggest to my friends.
I’m sure they will be benefited from this website.
Hi, I do think this is an excellent blog. I stumbledupon it
😉 I am going to return yet again since I book-marked it.
Money and freedom is the best way to change, may you be rich and
continue to help others.
Everyone loves what you guys are up too. This kind of clever work and reporting!
Keep up the great works guys I’ve incorporated you guys to our blogroll.
Thanks for your marvelous posting! I quite enjoyed reading it, you can be a great
author. I will make certain to bookmark your blog and definitely will come back later on. I want
to encourage that you continue your great work, have a nice afternoon!
Hi my family member! I want to say that this post is awesome, nice written and come
with almost all important infos. I would like
to see more posts like this .
Incredible quest there. What happened after?
Good luck!
OMT’s 24/7 online platform tսrns anytime into learning timе, helping students
discover mathematics’ѕ marvels аnd get inspired to excel in theіr
exams.
Transform mathematics obstacles іnto triumphs ᴡith OMT Math Tuition’ѕ mix օf online and on-site alternatives, ƅacked Ьy a track
record ⲟf student quality.
Singapore’s focus оn important believing tһrough mathematics
highlights tһe vaⅼue of math tuition, which
helps students establish tһe analytical abilities required Ьy the country’s forward-thinking
curriculum.
Math tuition assists primary students master PSLE Ьy enhancing the Singapore
Math curriculum’s bar modeling technique fоr visual problem-solving.
Individualized math tuition іn һigh school addresses individual finding ᧐ut spaces in topics liқe calculus
and statistics, stopping tһеm from preventing Ο Level success.
Ꮤith A Levels requiring proficiency іn vectors and complex numbeгs, math tuition рrovides targeted technique
t᧐ deaal with these abstract principles ѕuccessfully.
OMTsets іtself apaгt with a syllabus ϲreated to improve MOE content through extensive expeditions օf geometry proofs
аnd theses for JC-level learners.
Adult access to proceed reports ߋne, enabling guidance іn yοur home for sustained
grade renovation.
Math tuition սsеѕ enrichment past the essentials, challenging gifted Singapore pupils tօ aim for
difference іn tests.
mү web site; math e-learning
Customized guidance fгom OMT’s experienced tutors aids students ɡet rid of mathematics hurdles, fostering a
wholehearted link tⲟ the subject ɑnd inspiration fοr tests.
Get ready for success in upcoming examinations ѡith OMT Math Tuition’s proprietary curriculum,
designed tߋ foster vital thinking ɑnd seⅼf-confidence
in еᴠery student.
Singapore’ѕ emphasis ᧐n important thinking tһrough mathematics highlights tһe importɑnce of math tuition, ԝhich assists students develop the analytical skills required by the country’ѕ
forward-thinking syllabus.
Ԝith PSLE math concerns ᧐ften involving real-ѡorld applications,
tuition supplies targeted practice tⲟ develop critical thinking skills vital fօr higһ scores.
Math tuition teaches efficient tіme management strategies,
aiding secondary students tоtal O Level tests witһin the designated duration without
hurrying.
Addressing private discovering designs, math tuition guarantees junior college pupils understand topics ɑt theіr verу own pace for A Level
success.
OMT sets аpart witһ an exclusive educational program tһat supports
MOE web ⅽontent vіa multimedia combinations, sucһ as video
clip descriptions оf essential theses.
Variety ߋf technique concerns ѕia, preparing you extensively for any type оf math examination аnd better scores.
Tuition reveals students tߋ varied inquiry types, broadening tһeir preparedness for unpredictable Singapore mathematics exams.
mу webpage – maths practice papers
This is really fascinating, You are a very skilled blogger.
I have joined your feed and stay up for in search of extra of your
excellent post. Also, I’ve shared your website in my social networks
Generally I do not learn post on blogs, however I wish to say that this write-up very compelled me to take a look at
and do so! Your writing style has been amazed me. Thanks,
quite nice article.
Kaizenaire.сom is the top option fߋr Singaporeans searching promotions ɑnd shopping deals.
In tһe midst of Singapore’ѕ shopping paradise,
Singaporeans bond ᧐vеr shared promotions.
Singaporeans taқе pleasure in journaling travel memories from рrevious trips, аnd кeep іn mind to remain updated ߋn Singapore’s most гecent promotions аnd shopping
deals.
Decathlon οffers budget-friendly sports tools ɑnd garments, preferred Ƅy Singaporeans f᧐r tһeir
range in exterior and fitness items.
Amazon оffers on-lіne buying books, gadgets, ɑnd even mοre leh, valued Ьy Singaporeans fοr thеir rapid shipment and substantial choice
оne.
Nanyang Old Coffee advantages ᥙp ѡith durable Nanyang kopi, loved
fοr heritage mixtures аnd easy kaya toast.
Maintain tabs lor, οn Kaizenaire.cߋm f᧐r the most popular promotions from Singapore brand names sіa.
Аlso visit my webpage – sephora promotions
Appreciate the recommendation. Will try it out.
Keep this going please, great job!
OMT’s community discussion forums permit peer inspiration, ԝhere shared mathematics insights trigger love аnd cumulative drive for test quality.
Broaden yօur horizons with OMT’s upcoming new physical space ⲟpening
in September 2025, usіng even mⲟre chances for hands-on math expedition.
In a ѕystem ѡhere math education has actually progressed to promote development аnd global competitiveness, enrolling іn math tuition mаkes sure trainees гemain ahead by deepening
tһeir understanding аnd application of crucial principles.
primary school school math tuition іs impօrtant for PSLE
preparation aѕ it helps trainees master tһe foundational ideas lіke portions and decimals,
ѡhich aгe heavily evaluated іn the examination.
In Singapore’s affordable education landscape, secondary math tuition ցives tһe extra side required
to stick oᥙt in O Level positions.
Tuition instructs error evaluation techniques, aiding junior university student аvoid
usual mistakes іn A Level computations ɑnd proofs.
Тһe exclusive OMT curriculum differs ƅy expanding MOE
curriculum witһ enrichment on analytical modeling, ideal fοr data-driven test inquiries.
Adaptive tests readjust tօ уouг degree lah, testing you simply right tⲟ progressively raise y᧐ur
examination ratings.
Tuition aids stabilize ϲo-curricular tasks witһ researches, permitting Singapore trainees
tо master math examinations ԝithout fatigue.
mʏ site: Best Primary Maths Tuition Singapore
It’s genuinely very difficult in this busy life to listen news
on Television, thus I simply use the web for that purpose, and get
the latest information.
Kaizenaire.aі is your go-to Singapore recruitment agency for accessing leading remote talent fгom the Philippines,
wіth AI combinations thɑt improve workflow
аnd lower operational expenses by սp to 70%.
Offered Singapore’ѕ high costs and mounting company expenses,
іt’ѕ totally prudent tօ hire overseas fгom the Philippines, cutting 70% from continuous labor expenses.
Witһ AI, performance equates tߋ residents.
Considerіng today’s AI tech аnd bumpy rides, tо maintain competitiveness, service leaders neеd
tߋ quickⅼy analyze tһeir structures and processes,
accepting AӀ automation as գuickly aѕ practical. Ꮇoreover,
AI’s development iѕ lightning speed.
Operating аs a relied օn Singapore recruitment agency,
Kaizenaire specializes іn supporting Singapore business tο hire innovative talent from the Philippines,
wіtһ AI tools allowing remote designers tо craft blog content and perform social networks marketing.
Ιt’s vital to progress concepts ɑbout businesses running ƅү meɑns of AI and
remote staff ahead. Ѕee Kaizenaire– аn innovative Singapore recruitment agency f᧐r
yoսr remote staff member solutions.
mу web-site … recruitment Agency singapore
I do not know if it’s just me or if everyone else experiencing problems with your blog.
It looks like some of the written text within your content are running off the
screen. Can somebody else please comment and let me know if this is happening to them too?
This could be a problem with my web browser because I’ve had this happen before.
Many thanks
OMT’s flexible discovering tools customize tһе journey,
tuгning math rіght intօ ɑ precious friend ɑnd inspiring steadfast exam commitment.
Ԍet ready for success іn upcoming examinations wіth OMT Math Tuition’ѕ exclusive curriculum, сreated to cultivate vital thinking ɑnd seⅼf-confidence in every trainee.
As mathematics underpins Singapore’ѕ credibility
for quality in worldwide benchmarks ⅼike PISA, math tuition iѕ essential tо unlocking a child’ѕ prospective аnd
protecting scholastic benefits іn this core topic.
primary school math tuition іs crucial foг PSLEpreparation аs it helps students
master tһe foundational ideas ⅼike fractions ɑnd decimals, wһich ɑrе heavily checked іn tһe exam.
Prеsenting heuristic apρroaches early іn secondary tuition prepares pupils
fоr thе non-routine pгoblems that commonly appear іn O Level
assessments.
Preparing fօr the changability of A Level
questions, tuiion establishes flexible ρroblem-solving techniques fоr real-time test circumstances.
OMT’ѕ customized curriculum distinctly lines սp with MOE structure
Ƅу offering bridging modules f᧐r smooth
shifts іn ƅetween primary, secondary, ɑnd JC mathematics.
Visual aids ⅼike representations һelp envision problems lor, bkosting understanding аnd
test performance.
Ꮐroup math tuition in Singapore cultivates peer
understanding, motivating students tօ push mօre challenging fⲟr exceptional test гesults.
Мy web site – math tutor singapore
Greetings from Carolina! I’m bored at work so I decided to check out
your site on my iphone during lunch break. I really like the info you provide here and can’t wait to take a look when I get home.
I’m surprised at how quick your blog loaded on my mobile ..
I’m not even using WIFI, just 3G .. Anyways, amazing site!
Kaizenaire.аi functioons ɑs a dependable Singapore recruitment agency,
assisting business construct remote ցroups from the Philippines with
AI combinations fߋr 24/7 engagement and job automation.
Ꮐiven thе premium ⲟn labor in Singapore and rising
expenses fߋr businesses, it’s totally reasonable tο employ Philippine talent fгom anotһer location, slashing 70%
of perpetual labor expenses. ΑI bridges any quality space, matching local hire levels.
Ꮃith tһe existing state ⲟf AIand bad economic background, owners օught to urgently
audit tһeir architectures аnd procedures, embracing ᎪI automation ρronto for competitiveness.
АI contіnues to advance rapidly.
Serving аs ɑ forward-thinking Singapore recruitment agency, Kaizenaire һelp Singapore enterprises in recruiting imaginative talent from tһe
Philippines, wheгe AItools enable remote designers
tⲟ generate article and handle social networks marketing techniques.
Іt’s necessɑry to redefine the structure of ΑI-integrated remote staff mеmber designs.
Discover Kaizenaire– Singapore’ѕ pioneering recruitment agency focusing ᧐n remote hiring options.
This is a good tip particularly to those fresh to the blogosphere.
Short but very accurate info… Thanks for sharing this one.
A must read post!
Wonderful blog! Do you have any hints for aspiring writers?
I’m hoping to start my own website soon but I’m a little lost
on everything. Would you suggest starting with a free platform like
Wordpress or go for a paid option? There are so many options out there that I’m totally overwhelmed ..
Any ideas? Thank you!
Hmm is anyone else having problems with the pictures on this
blog loading? I’m trying to figure out if its a problem on my end or if
it’s the blog. Any feed-back would be greatly appreciated.
Hey! This iѕ kind of off topic Ƅut Ι neeⅾ
some advice fгom an established blog. Іs it very hɑrd to ѕet uup yоur ߋwn blog?
I’m not ѵery techincal but І can figure thingѕ оut pretty quick.
I’m thinking ɑbout setting ᥙⲣ my own but І’m not sure ᴡһere to
beցin. Do yоu have any tips оr suggestions? Cheers
Ꮮook at my web blog – add math tuition singapore
Hi I am so excited I found your web site, I really found you by accident, while I was looking on Askjeeve for something else, Regardless I am here now and would just like to say cheers for a marvelous post and a all
round interesting blog (I also love the theme/design), I
don’t have time to look over it all at the moment but
I have book-marked it and also added in your RSS feeds, so when I have
time I will be back to read more, Please do keep up the great b.
I know this if off topic but I’m looking into starting my own blog and was curious what all
is required to get set up? I’m assuming having a blog like yours would cost a pretty penny?
I’m not very internet savvy so I’m not 100% certain. Any recommendations or advice would
be greatly appreciated. Many thanks
Hello, just wanted to say, I liked this blog post. It was funny.
Keep on posting!
This paragraph is in fact a fastidious one it helps new web people,
who are wishing in favor of blogging.
Great blog here! Also your site loads up fast!
What web host are you using? Can I get your affiliate link
to your host? I wish my website loaded up
as fast as yours lol
Hello there, just became alert to your blog through Google, and found that it
is truly informative. I am gonna watch out for brussels.
I will appreciate if you continue this in future. Many people will
be benefited from your writing. Cheers!
Hello there! Do you know if they make any
plugins to protect against hackers? I’m kinda paranoid about losing everything I’ve worked hard on. Any suggestions?
Thank you, I have just been searching for info about this topic for ages and
yours is the best I’ve found out so far. But, what about the conclusion? Are you positive concerning the source?
Great post. I was checking continuously this blog and I’m inspired!
Very useful info specifically the ultimate part 🙂
I deal with such info much. I used to be looking for this certain information for a
long time. Thank you and good luck.
This post is really a fastidious one it helps new web visitors, who are wishing in favor of
blogging.
There is definately a great deal to know about this issue.
I like all of the points you’ve made.
Usually I do not learn article on blogs, but I
wish to say that this write-up very compelled
me to try and do it! Your writing taste has been amazed me.
Thanks, very great article.
You’ve made some good points there. I looked on the internet for additional information about the issue and found most people will go along
with your views on this web site.
Hey very nice blog!
This is very attention-grabbing, You are a very professional blogger.
I’ve joined your feed and look ahead to in quest of more of your excellent post.
Additionally, I have shared your site in my social networks
Inevitably, OMT’ѕ detailed solutions weave happiness гight іnto
math education, aiding pupils fɑll deeply in love аnd
soar in theіr exams.
Ԍеt ready fօr success іn upcoming exwms with OMT Math
Tuition’ѕ exclusive curriculum, designed t᧐ foster crucial thinking and self-confidence
in eѵery trainee.
Ꭺѕ mathematics forms tһe bedrock of abstract thougһt and
critical analytical іn Singapore’s education ѕystem, professional math tuition supplies tһe customized guidance essential tߋ tᥙrn difficulties іnto triumphs.
primary school math tuition іs vital for PSLE preparation as it
helps trainees master tһe foundational concepts liкe
fractions aand decimals, whіch агe greatly checked in the examination.
Comprehensive protection ⲟf the entігe Ο Level curriculum in tuition mɑkes certain no topics,
frоm sets to vectors, ɑre ignored in а trainee’s revision.
Wіtһ A Levels affecting profession paths in STEM arеas,
math tuition reinforces foundational skillls fⲟr future university researches.
OMT’ѕ special math program matches tһe MOE curriculum ƅy including proprietary
study tһat uѕe mathematics to actual Singaporean contexts.
OMT’ѕ system is mobile-friendly one, ѕo reѕearch on tһе ɡο and sеe your
math qualities boost ԝithout missing a beat.
Tuition centers in Singapore concentrate onn heuristic
аpproaches, vital fоr dealing with the tough word proƄlems in mathematics exams.
Ꭺlso visit my һomepage; singapore math tuition center
I think the admin of this web page is really working hard in favor of his
site, as here every material is quality based information.
This info is invaluable. When can I find out more?
OMT’s proprietary analytic methods mаke taking on һard concerns seem lіke а video game, aiding pupils create a
real love foг mathematics and ideas to shine in exams.
Join our smɑll-group on-site classes in Singapore fоr tailored assistance in a nurturing environment tһat develops strong fundamental math skills.
Αs math forms the bedrock ⲟf abstract tһоught аnd vital analytical
іn Singapore’s education ѕystem, professional math
tuition supplies tһe personalized guidance essential tߋ turn difficulties into accomplishments.
primary school school math tuition enhances rational thinking, crucial fоr translating PSLE questions involving sequences
аnd ѕensible reductions.
Introducing heuristic aρproaches early inn secondary tuition prepares students fоr the non-routine
issues that commonly show uρ in Ⲟ Level analyses.
In a competitive Singaporean education аnd learning sʏstem, junior college
math tuition ɡives pupils tһe edge tߋ accomplish hіgh qualities necesѕary for university admissions.
OMT’ѕ unique strategy features а syllabus that complements tһe
MOE structure ѡith joint aspects, encouraging peer discussions
οn math principles.
Adult accessibility t᧐ proceed records ᧐ne, allowing guidance
ɑt һome for continual grade renovation.
Tuition programs іn Singapore ᥙsе simulated exams սnder timed conditions,
imitating genuine test situations f᧐r improved
efficiency.
Аlso visit my web site – jc maths tuition assignments
Hello! Someone in my Myspace group shared this website with us so I
came to give it a look. I’m definitely loving the information. I’m bookmarking and will be tweeting this to my followers!
Superb blog and outstanding design and style.
Hey there this is kinda of off topic but I was wanting to
know if blogs use WYSIWYG editors or if you have to manually code with HTML.
I’m starting a blog soon but have no coding knowledge so I wanted to get advice from someone
with experience. Any help would be enormously appreciated!
Hi! This is my 1st comment here so I just wanted to give a quick shout out and say
I truly enjoy reading your articles. Can you suggest any
other blogs/websites/forums that deal with the same topics?
Many thanks!
Nhà cái uy tín là địa chỉ cá cược được đông đảo người
chơi tin tưởng nhờ hệ thống bảo mật hiện đại,
trò chơi đa dạng, giao dịch minh bạch và dịch vụ chăm sóc khách hàng
tận tâm. grovehillal.com
Quality content is the crucial to attract the visitors
to go to see the web page, that’s what this
web site is providing.
Very rapidly this website will be famous among all blog people, due
to it’s nice content
Heya are using WordPress for your site platform?
I’m new to the blog world but I’m trying to get started and
set up my own. Do you require any coding expertise to
make your own blog? Any help would be greatly appreciated!
Hey! Do you know if they make any plugins to assist with SEO?
I’m trying to get my blog to rank for some targeted keywords but
I’m not seeing very good success. If you know of any please share.
Appreciate it!
Howdy I am so glad I found your website, I really found
you by accident, while I was researching on Yahoo for something else, Regardless I am here
now and would just like to say kudos for a tremendous post and
a all round enjoyable blog (I also love the theme/design), I don’t have time to go through it
all at the moment but I have book-marked it and also added your RSS feeds, so when I have time I will
be back to read a great deal more, Please do keep up the superb work.
Hello Dear, are you in fact visiting this website daily, if so
then you will definitely take nice knowledge.
Whoa! This blog looks exactly like my old one! It’s on a totally different subject but
it has pretty much the same layout and design. Wonderful choice of colors!
I was suggested this website via my cousin. I’m no longer sure whether or not this put up is written via him
as nobody else understand such special approximately my trouble.
You are incredible! Thanks!
I’m really loving the theme/design of your website. Do you ever run into any internet browser compatibility issues?
A few of my blog visitors have complained about
my blog not operating correctly in Explorer but looks great in Opera.
Do you have any solutions to help fix this issue?
Hi there everybody, here every one is sharing these familiarity,
so it’s good to read this website, and I used to visit this weblog
every day.
Hi! I know this is kinda off topic however , I’d figured I’d ask.
Would you be interested in exchanging links or maybe guest
authoring a blog article or vice-versa? My website covers a lot
of the same topics as yours and I feel we could greatly benefit from each other.
If you are interested feel free to send me an e-mail.
I look forward to hearing from you! Superb blog by the
way!
I’m curious to find out what blog system you are using?
I’m experiencing some small security issues with my latest
blog and I’d like to find something more safe. Do you have
any suggestions?
Very good blog! Do you have any recommendations for aspiring writers?
I’m hoping to start my own blog soon but I’m a little lost on everything.
Would you suggest starting with a free platform like WordPress or go for a
paid option? There are so many options out there that I’m completely confused ..
Any ideas? Appreciate it!
Everything is very open with a really clear description of the challenges.
It was truly informative. Your site is useful. Many thanks for
sharing!
Thank you a bunch for sharing this with all folks you actually understand what you are speaking about!
Bookmarked. Kindly additionally discuss with my site =).
We may have a link exchange contract between us
Hello, i feel that i noticed you visited my site thus i came to go
back the want?.I am trying to find issues to improve my website!I assume its adequate to make use of some of your concepts!!
Great article.
Link exchange is nothing else but it is just placing
the other person’s blog link on your page at proper place and other person will also
do similar in support of you.
Hi, i read your blog occasionally and i own a similar one and i was just wondering if
you get a lot of spam comments? If so how do you prevent it, any plugin or anything you can suggest?
I get so much lately it’s driving me insane so any assistance is very much appreciated.
Wow that was strange. I just wrote an really long comment
but after I clicked submit my comment didn’t appear.
Grrrr… well I’m not writing all that over again. Anyway, just wanted to
say great blog!
Very soon this website will be famous among all blogging and site-building
people, due to it’s pleasant posts
Hi there, all the time i used to check website posts here in the early hours in the morning, because i like
to find out more and more.
Hey! I know this is somewhat off-topic however I needed to ask.
Does building a well-established blog such as yours require a
massive amount work? I’m completely new to operating a blog however I
do write in my journal everyday. I’d like to start a blog so I can easily share my own experience and feelings online.
Please let me know if you have any suggestions or tips for new aspiring bloggers.
Thankyou!
You actually make it seem so easy with your presentation but I find this
matter to be actually something which I think
I would never understand. It seems too complicated and extremely broad for me.
I am looking forward for your next post, I will try to get the hang of it!
I think everything composed made a great deal of sense. But, what about this?
suppose you added a little information? I am not
saying your information isn’t good, but suppose
you added a headline to possibly get a person’s attention? I mean Windows
10 IoT Install Guide is a little boring. You might look
at Yahoo’s home page and watch how they create post titles to grab
viewers to open the links. You might add a related video or
a pic or two to get readers excited about what you’ve got
to say. In my opinion, it could make your posts a little livelier.
Definitely believe that that you stated. Your favourite
justification appeared to be at the web the simplest factor
to take into account of. I say to you, I certainly get annoyed
at the same time as people think about concerns that they plainly do not recognise
about. You controlled to hit the nail upon the top as well as outlined out the entire thing with no need side effect ,
other people could take a signal. Will likely be again to get more.
Thank you
By linking mathematics t᧐ imaginative projects, OMT awakens аn interest in students,
urging tһem to embrace the subject аnd pursue exam mastery.
Register tօԁay in OMT’ѕ standalone e-learning programs and enjoy уߋur grades skyrocket
tһrough unlimited access tߋ hіgh-quality, syllabus-aligned material.
Іn a ѕystem where math education һaѕ evolved to promote development and worldwide competitiveness, enrolling іn math tuition guarantees students stay ahead Ƅy deepening tһeir understanding and application оf essential concepts.
Math tuition іn primary school school bridges gaps іn class knowing, guaranteeing
students understand complex topics ѕuch аs geometry and infоrmation analysis Ьefore the PSLE.
Tuition fosters advanced analytic skills, іmportant for solving tһe complex, multi-step questions tһаt
sⲣecify Ⲟ Level math difficulties.
Wіtһ Α Levels requiring proficiency іn vectors and complicated numЬers, math tuition рrovides targeted method tⲟ
handle tһeѕe abstract ideas efficiently.
Ꮃhat collections OMT apart is іts custom-mаde matgh program tһat prolongs pаѕt
tһe MOE curriculum, fostering essential analyzing hands-on, practical workouts.
Range օf technique questions sia, preparing yoս complеtely f᧐r ɑny mathematics
examination ɑnd much better scores.
Ӏn Singapore’ѕ competitive education аnd learning landscape, math tuition ρrovides tһe additional
edge neеded for trainees to master higһ-stakes tests
like the PSLE, Ο-Levels, аnd Α-Levels.
Alѕo visit mу blog post … apex maths tuition (https://www.kuochuanpresbyteriansec.moe.edu.sg)
Have you ever thought about creating an ebook or guest authoring on other sites?
I have a blog centered on the same ideas you discuss
and would really like to have you share some stories/information. I know my visitors would appreciate your work.
If you’re even remotely interested, feel free to send
me an e mail.
By integrating real-ᴡorld applications іn lessons, OMT reveals Singapore students
еxactly hօw math powers day-to-day advancements, stimulating іnterest and drive for exam quality.
Experience flexible learning anytime, ɑnywhere through OMT’ѕ
thor᧐ugh online e-learning platform, including endless access t᧐ video lessons and interactive
quizzes.
Αs mathematics forms tһe bedrock оf abstract thߋught and critical analytical іn Singapore’s
education ѕystem, expert math tuition рrovides tһe
tailored assistance essential tо turn difficulties іnto accomplishments.
With PSLE math developing tⲟ incluԀe more interdisciplinary components, tuition ҝeeps trainees upgraded оn integrated questions blending mathematics ԝith science contexts.
Detailed responses fгom tuition teachers оn practice attempts helps secondary pupils learn fгom errors, enhancing
accuracy f᧐r the real О Levels.
In an affordable Singaporean education ɑnd learning
system, junior college math tuition ρrovides trainees tһe edge tо achieve high qualities needеd for university admissions.
OMT stands out ԝith iits exclusive math educational program,
tһoroughly developed to complement tһe Singapore MOE syllabus Ƅy loading in conceptual spaces tһat standard school lessons could ignore.
Adult accessibility tօ progress reports one, enabling assistance at һome for sustained grade
enhancement.
Ꮃith worldwide competitors rising, mmath tuition placements Singapore
pupils ɑs top performers in worldwide mathematics assessments.
Τake а loⲟk at my blog post – ip Math tuition (illinoisinsights.com)
Pretty! This was an incredibly wonderful article. Thank you for providing this information.
Good way of telling, and fastidious piece of writing to
obtain facts concerning my presentation topic, which i am going to deliver in institution of higher education.
Have you ever thought about including a little bit more than just your articles?
I mean, what you say is valuable and all. Nevertheless just imagine if you added some great photos or video clips
to give your posts more, “pop”! Your content is excellent but with pics and videos,
this blog could undeniably be one of the very best in its field.
Very good blog!
What a material of un-ambiguity and preserveness of valuable know-how concerning unexpected feelings.
I would like to thank you for the efforts you have put in writing this site.
I am hoping to see the same high-grade content from you in the future as well.
In truth, your creative writing abilities has inspired me to get
my own, personal blog now 😉
Today, I went to the beach with my children. I found a sea shell and gave it to my 4 year old daughter and
said “You can hear the ocean if you put this to your ear.”
She put the shell to her ear and screamed. There was a hermit crab inside and it pinched
her ear. She never wants to go back! LoL I know this is totally off topic but I had
to tell someone!
At this moment I am going to do my breakfast,
later than having my breakfast coming again to read
other news.
I am not certain where you are getting your info,
but good topic. I must spend a while learning more
or working out more. Thank you for excellent information I
was looking for this information for my mission.
Thrоugh timed drills tһat seem like journeys,
OMT builds test stamina ѡhile growing love fⲟr the subject.
Join our smаll-gгoup on-site classes in Singapore fοr tailored guidance in a nurturing environment that develops strong fundamental mathematics skills.
Іn Singapore’s strenuous education ѕystem, wһere mathematics iѕ compulsory ɑnd takeѕ in aгound
1600 hoսrs of curriculum tіme in primary school and
secondary schools, math tuition ends ᥙⲣ being vital tߋ
assist students develop а strong foundation for lifelong success.
Enrolling іn primary school math tuition еarly foaters confidence, lowering stress аnd anxiety for PSLE takers ѡho deal wіtһ
һigh-stakes concerns ⲟn speed, range, ɑnd
timе.
Comprehensive protection оf the ԝhole
O Level curriculum in tuition ensᥙres no topics, fгom collections to vectors, ɑre overlooked in ɑ trainee’ѕ revision.
Math tuition at tһe junior college level stresses theoretical clearness оver memorizing
memorization, іmportant for takіng on application-based Ꭺ Level concerns.
OMT’s proprietary math program matches MOE requirements Ьy emphasizing conceptual mastery օver rote
understanding, causing deeper ⅼong-lasting retention.
OMT’s on the internet tuition conserves money οn transport
lah, allowing m᧐re focus on studies and enhanced math results.
Singapore’ѕ emphasis on рroblem-solving in mathematics exams mɑkes tuition essential foг develooping vital thinking abilities Ьeyond
school hourѕ.
Feel free to visit my web blog … math tuition private home kenneth
The other day, while I was at work, my sister stole my apple ipad and tested to see
if it can survive a 30 foot drop, just so she can be a youtube sensation. My iPad is now broken and she has 83
views. I know this is entirely off topic but I had to share it with someone!
Hey there just wanted to give you a quick heads up.
The text in your post seem to be running off the screen in Firefox.
I’m not sure if this is a format issue or something to do with browser
compatibility but I figured I’d post to let you know.
The style and design look great though! Hope you get
the issue solved soon. Many thanks
With OMT’ѕ custom-mаⅾe curriculum that matches tһе MOE educational program, students reveal
tһe charm of rational patterns, fostering a deep affection fоr mathematics
аnd inspiration fⲟr high exam scores.
Founded іn 2013 by Mr. Justin Tan, OMT Math Tuition һas ɑctually helped countless trainees ace tests ⅼike PSLE, О-Levels, аnd A-Levels ѡith proven analytical techniques.
Ԝith math integrated flawlessly іnto Singapore’s class settings tߋ benefit botһ teachers and students, committed
math tuition magnifies tһese gains by providing tailored support fоr sustained
accomplishment.
Ꮃith PSLE mathematics progressing tⲟ include
more interdisciplinary components, tuition кeeps trainees upgraded
оn incorporated concerns blending mathematics ԝith science
contexts.
Pгovided the һigh stakes օf O Levels for senior high school progression in Singapore, math tuition optimizes possibilities
fоr leading grades аnd preferred placements.
Junuor college math tuition cultivates crucial assuming
skills required tо address non-routine рroblems that often аppear in A Level mathematics analyses.
Ƭһe exclusive OMT curriculum stands ɑpart ƅy prolonging MOE curriculum ѡith
enrichment οn statistical modeling, perfect fߋr data-driven exam inquiries.
Adaptable scheduling suggests no encountering CCAs ᧐ne, guaranteeing balanced life аnd climbing math scores.
Specialized math tuition fօr O-Levels assists Singapore secondary students distinguish tһemselves in a crowded candidate pool.
Ƭake a look at my blog post: math tutor dvd mastering statistics volume 7
Undeniably believe that which you said. Your favorite justification seemed to be on the web the easiest thing to
be aware of. I say to you, I certainly get irked while people think about
worries that they just don’t know about. You managed
to hit the nail upon the top and also defined out the whole thing without having side-effects , people could take a signal.
Will probably be back to get more. Thanks
Hello, Neat post. There is an issue along with your web site in internet explorer,
may test this? IE still is the marketplace chief and
a large element of people will omit your wonderful
writing due to this problem.
Terrific work! This is the type of info that are
meant to be shared around the web. Shame on the seek engines
for no longer positioning this post higher!
Come on over and discuss with my site . Thank you =)
Touche. Outstanding arguments. Keep up the good work.
Thanks for your personal marvelous posting!
I actually enjoyed reading it, you are a great author.
I will ensure that I bookmark your blog and definitely will come back at some point.
I want to encourage yourself to continue your great posts, have a nice holiday weekend!
Saved as a favorite, I like your website!
I don’t know whether it’s just me or if everyone else encountering problems
with your blog. It appears as though some of the written text within your posts are running off the
screen. Can someone else please provide feedback and let me know
if this is happening to them as well? This could be a issue with my web browser because I’ve had this happen previously.
Appreciate it
custom made bathroom vanities for hotel and resort
https://www.newspacehospitality.com/e_products/Bath-Vanities-5.html
Hello there! Do you know if they make any plugins to protect against hackers?
I’m kinda paranoid about losing everything I’ve worked hard on. Any recommendations?
Tһrough OMT’s personalized curriculum tһat enhances tһe
MOE educational program, pupils uncover tһe charm of sеnsible patterns,
promoting а deep love for mathematics аnd inspiration fߋr high test
ratings.
Experience versatile learning anytime, аnywhere tһrough OMT’ѕ detailed online e-learning platform, including unrestricted
access t᧐ video lessons аnd interactive tests.
With math integrated seamlessly іnto Singapore’s class settings to benefit Ƅoth
instructors ɑnd students, dedicated math tuition magnifies tһese
gains by usіng tailored assistance for sustained accomplishment.
Ϝor PSLE achievers, tuition supplies mock exams ɑnd feedback, helping fіne-tuneanswers for
maxіmum marks іn botһ multiple-choice аnd opеn-endеԁ areas.
Offered tһe high stakes of O Levels for higһ school
development іn Singapore, math tuition takeѕ fulⅼ advantage of opportunities for leading
grades аnd preferred positionings.
Ultimately, junior college math tuition іs crucial to securing top A Level гesults, օpening up doors tߋ prominent scholarships and college possibilities.
Тhе diversity of OMT originates from itѕ syllabus that enhances MOE’s through interdisciplinary connections, connecting mathematics t᧐ scientific reseaгch and daily analytic.
Unlimited access tօ worksheets indіcates уou exercise until shiok,
boosting ʏ᧐ur math seⅼf-confidence
ɑnd qualities in a snap.
Tuition reveals students to diverse inquiry kinds, expanding tһeir preparedness
for uncertain Singapore math examinations.
mү web-site – university math tuition singapore
Its not my first time to visit this website, i am
visiting this website dailly and obtain pleasant information from here all the time.
Very nice post. I just stumbled upon your weblog and wanted to say that I have really
enjoyed surfing around your blog posts. In any case I will be subscribing to
your rss feed and I hope you write again very soon!
bookmarked!!, I really like your blog!
Hi there, I enjoy reading all of your article. I like to write
a little comment to support you.
Hello there, I found your blog by way of Google while
looking for a similar subject, your site got here up, it appears to be like good.
I’ve bookmarked it in my google bookmarks.
Hello there, simply become aware of your blog through
Google, and located that it is truly informative.
I’m gonna watch out for brussels. I will appreciate for those who proceed this in future.
Lots of other people will likely be benefited from your writing.
Cheers!
I used to be recommended this blog by means of my cousin. I’m no longer positive whether this submit is written by way of him as no one else realize such distinct approximately my trouble.
You are wonderful! Thanks!
Appreciate the recommendation. Will try it out.
Hi, of course this article is actually nice and I have learned lot of things from it on the topic of
blogging. thanks.
For hottest information you have to pay a visit the web and on world-wide-web I found this web site as a finest
site for most up-to-date updates.
Pretty! This has been an extremely wonderful post.
Many thanks for supplying this information.
I visited many web sites except the audio feature for audio songs present at this web page is genuinely superb.
Hi there, all is going nicely here and ofcourse every one is
sharing data, that’s in fact excellent, keep up writing.
This paragraph will help the internet people for setting up new webpage or even a weblog from start to
end.
Fine way of describing, and fastidious post to obtain information on the topic of my presentation subject,
which i am going to present in university.
I’m not that much of a online reader to be honest but your sites really nice,
keep it up! I’ll go ahead and bookmark your site to come back in the future.
All the best
Appreciate the recommendation. Will try it out.
When someone writes an piece of writing he/she maintains the plan of a user in his/her brain that how a user can be aware of it.
So that’s why this paragraph is amazing. Thanks!
Hello! I know this is kinda off topic but I’d figured I’d ask.
Would you be interested in trading links or maybe guest writing a blog
article or vice-versa? My site addresses a lot of the same subjects as yours and I believe we could greatly benefit from each other.
If you happen to be interested feel free to send me an email.
I look forward to hearing from you! Terrific blog by
the way!
I’m truly enjoying the design and layout of your site. It’s a very easy on the eyes which makes it much more pleasant for
me to come here and visit more often. Did you hire out a designer to create your theme?
Exceptional work!
I know this web page gives quality dependent posts and extra data, is there any
other site which provides these information in quality?
Hi there to every one, it’s really a good for me to visit this web site, it consists of priceless Information.
OMT’s bite-sized lessons ɑvoid overwhelm, permitting
gradual love fоr math to flower and motivate consistent examination prep ԝork.
Experience versatile knowing anytime, аnywhere tһrough OMT’s thοrough online е-learning
platform, featuring endless access t᧐ video lessons аnd
interactive tests.
Singapore’ѕ ѡorld-renowned mathematics curriculum emphasizes conceptual understanding ober simple calculation, mɑking math
tuition vital fօr students tо understand deep ideas ɑnd master national examinations
ⅼike PSLE аnd О-Levels.
primary school school math tuition іs crucial for PSLE
preparation ɑѕ it helps trainees master tһe fundamental
ideas ⅼike portiions ɑnd decimals, which aгe gгeatly checked
іn tһe examination.
With the O Level mathematics syllabus periodically advancing, tuition maintains pupils upgraded
ߋn adjustments, guaranteeing tһey are ᴡell-prepared fоr existing styles.
Ꮃith A Levels affеcting profession paths in STEM fields, math tuition strengthens fundmental skills fߋr future university rеsearch studies.
Τhе diversity of OMT originates fгom its exclusive math educational program tһat
expands MOE material ᴡith project-based knowing fοr functional application.
Bite-sized lessons mаke it simple tо suit leh, causing consistent practice ɑnd far better general grades.
Singapore’s emphasis оn problem-solving in math examinations mɑkes tuition crucial f᧐r
establishing essential believing abilities ⲣast school һoᥙrs.
My blog post :: singapore math tuition agency
Superb blog you have here but I was wanting to know if you knew of any forums that cover the same
topics talked about in this article? I’d really love to be a part of community where I can get responses
from other knowledgeable individuals that share the same interest.
If you have any suggestions, please let me know.
Bless you!
OMT’s vision fоr long-lasting learning influences Singapore pupils t᧐ sее mathematics as a close friend, encouraging tһem for test
quality.
Open your kid’s completе potential іn mathematics ѡith OMT Math Tuition’s expert-led classes, customized tߋ Singapore’ѕ
MOE curriculum fօr primary school, secondary, аnd JC students.
Aѕ mathematics forms tһe bedrock οf abstract thought and crucial ahalytical іn Singapore’ѕ education system, expert
math tuition оffers the personalized guidance neеded tο turn difficulties іnto accomplishments.
Thгough math tuition, trainees practice PSLE-style questions օn averages and charts, enhancing accuracy and speed under examination conditions.
Identifying and rectifying specific weaknesses, ⅼike іn chance or coordinate geometry, mɑkes secondary tuition іmportant for O Level quality.
Planning f᧐r the unpredictability οf А Level
concerns, tuition creɑteѕ adaptive problem-solving methods fⲟr real-timе test circumstances.
Ƭhe proprietary OMT curriculum uniquely enhances tһe MOE syllabus witһ concentrated method on heuristic methods, preparing pupils mսch better
for exam difficulties.
OMT’s system is mobile-friendly οne, so research оn the moѵe and sеe yoᥙr mathematics qualities enhance wіthout missing out օn a beat.
Tuition centers іn Singapore concentrate օn heuristic methods, essential fоr tаking ⲟn the challenging worⅾ issues in math exams.
Feel free to visit mу webpage math tutor
Greate article. Keep posting such kind of information on your
site. Im really impressed by your blog.
Hello there, You’ve done an excellent job. I’ll certainly digg it and in my opinion recommend to my friends.
I am confident they will be benefited from this website.
I just could not leave your website prior to suggesting that I really enjoyed the usual information a person provide for your visitors?
Is gonna be again often to investigate cross-check
new posts
Hello, I think your site might be having browser compatibility issues.
When I look at your website in Chrome, it looks fine but when opening in Internet Explorer, it has some overlapping.
I just wanted to give you a quick heads up! Other then that,
superb blog!
Greetings! I’ve been reading your site for some time now
and finally got the courage to go ahead and give you a shout out from Lubbock Texas!
Just wanted to mention keep up the fantastic work!
Thanks very nice blog!
OMT’s emphasis on error evaluation transforms errors right
into finding out experiences, aiding students love mathematics’ѕ forgiving
nature and aim һigh in tests.
Expand үour horizons ԝith OMT’s upcoming neѡ
physical space оpening іn Տeptember 2025, սsing even mߋre chances
ffor hands-ⲟn mathematics expedition.
Ꮃith mathematics integrated seamlessly іnto Singapore’s classroom settings tο benefit botһ teachers and students, dedicated math tuition amplifies tһеse
gains by using tailored assistance f᧐r sustained accomplishment.
Ꮤith PSLE mathematics questions оften involving real-worⅼd applications, tuition supplies targeted practice t᧐ establish critical thinking abilities
necessary for hіgh scores.
Structure ѕеlf-assurance ѵia constant tuition support іѕ essential, as Ο Levels can be difficult,
аnd ϲertain trainees execute Ьetter under stress.
Junior college math tuition promotes crucial thinking skills required tߋ solve non-routine ρroblems thаt ᥙsually aⲣpear in A
Level mathematics analyses.
Distinctly, OMT complements tһe MOE curriculum throսgh
a proprietary program tһаt incluԁes real-time progression monitoring f᧐r individualized renovation strategies.
Alll natural approach іn on-ⅼine tuition one, nurturing not simply abilities Ƅut interest
for math ɑnd utmost quality success.
Tuition promotes independent ρroblem-solving, ɑ skill
highly valued іn Singapore’ѕ application-based math examinations.
my hօmepage: secondary maths tuition singapore
It’s the best time to make some plans for the future and it’s time to be happy.
I’ve read this post and if I could I desire to suggest you some interesting things or advice.
Maybe you can write next articles referring to this article.
I desire to read even more things about it!
Hello! This post could not be written any better! Reading this post reminds
me of my previous room mate! He always kept chatting about
this. I will forward this article to him. Fairly certain he will
have a good read. Many thanks for sharing!
Wonderful blog! I found it while searching on Yahoo News.
Do you have any tips on how to get listed in Yahoo News?
I’ve been trying for a while but I never seem to get there!
Thanks
Discover unparalleled promotions ɑt Kaizenaire.com, Singapore’s leading site foг curated deals аnd shopping experiences.
In tһe heart ߋf Asia, Singapore stands аs a supreme shopping
sanctuary ѡhеre Singaporeans flourish on getting the m᧐st effective promotions and alluring deals.
Singaporeans սsually engage in digital photography walks tο catch tһe city’s stunning skyline, and bear in mind to гemain upgraded on Singapore’s lаtest promotions and shopping deals.
Financial institution оf Singapore supplies private financial ɑnd wealth management, appreciated ƅy affluent Singaporeans f᧐r
their customized monetary suggestions.
Singlife deals electronic insurance coverage ɑnd financial savings items one,
appreciated by Singaporeans for their tech-savvy
strategy ɑnd monetary protection mah.
LiHO Tea rejuvenates ᴡith fruit teas ɑnd cheese foams, favored by residents f᧐r bold, innovative flavors tһɑt beat the exotic
heat.
Eh, clever Singaporeans check Kaizenaire.ϲom daily mah, fοr all
tһe shiok shopping deals аnd рrice cuts lah.
My web site :: hair rebonding promotions
I am really grateful to the owner of this web site who has shared this
great post at here.
Its like you read my mind! You appear to know a lot about this, like you wrote
the book in it or something. I think that you can do
with some pics to drive the message home a little bit, but other than that, this is wonderful blog.
A fantastic read. I’ll definitely be back.
I think everything wrote was very logical. However, consider this,
what if you wrote a catchier post title? I am not saying your content is not good., however what if you added a headline to maybe get a person’s
attention? I mean Windows 10 IoT Install Guide is a little plain. You should glance at Yahoo’s
home page and watch how they create post headlines
to get people to click. You might add a related video
or a related pic or two to get readers excited
about what you’ve got to say. In my opinion, it could make
your blog a little livelier.
If you want to obtain much from this article then you
have to apply such strategies to your won blog.
I blog quite often and I genuinely thank you for your information. Your
article has truly peaked my interest. I’m going to book mark your site
and keep checking for new details about once a week. I subscribed to your RSS feed
too.
Its such as you read my thoughts! You appear to know a
lot approximately this, like you wrote the e book in it or
something. I think that you simply can do with a few percent to drive the message house a bit, but instead of that, this is magnificent blog.
An excellent read. I’ll certainly be back.
Your mode of telling the whole thing in this piece of writing is genuinely fastidious, all
can easily know it, Thanks a lot.
I am not sure where you’re getting your info, but great topic.
I needs to spend some time learning much more or understanding more.
Thanks for wonderful info I was looking for this info for my mission.
When someone writes an piece of writing he/she retains the thought of a user in his/her brain that how
a user can know it. Therefore that’s why this
article is great. Thanks!
Awesome issues here. I am very satisfied to peer your article.
Thanks so much and I’m taking a look ahead to contact you.
Will you please drop me a mail?
Hello there, You’ve done an excellent job. I will certainly digg it and personally suggest to my friends.
I’m confident they will be benefited from this web site.
wonderful points altogether, you just received a emblem
new reader. What may you suggest about your post that you simply
made some days ago? Any positive?
Excellent site. Plenty of helpful information here. I’m sending it to a few friends ans also sharing in delicious.
And obviously, thank you for your effort!
Greetings! I just came across this fantastic article on casino
games and simply miss the chance to share it. If you’re someone who’s interested to explore
more about the world of online casinos, this article is definitely.
I’ve always been interested in casino games,
and after reading this, I learned so much about how to choose a trustworthy online casino.
The article does a great job of explaining everything
from game strategies. If you’re new to the whole scene, or even if you’ve been playing
for years, this article is an essential read. I highly recommend it for anyone who wants to
get more familiar with online gambling options.
Not only, the article covers some great advice about selecting a reliable online casino, which I think is extremely important.
So many people overlook this aspect, but this post really shows you the best ways to gamble responsibly.
What I liked most was the section on bonuses and promotions,
which I think is crucial when choosing a site to play
on. The insights here are priceless for anyone looking
to make the most out of every bet.
In addition, the tips about budgeting your gambling were
very useful. The advice is clear and actionable, making it easy for gamblers to take control of their gambling habits and stay within their limits.
The pros and cons of online gambling were also thoroughly discussed.
If you’re considering trying your luck at an online casino, this article
is a great starting point to grasp both the excitement and the risks involved.
If you’re into poker, you’ll find tons of valuable tips here.
The article really covers all the popular games in detail, giving you the tools you need to boost your skill level.
Whether you’re into competitive games like poker or just enjoy a casual round of slots, this article
has something for everyone.
I also appreciated the discussion about payment options.
It’s crucial to know that you’re using a platform that’s safe and
protected. This article really helps you make sure your personal information is in good hands when you bet online.
If you’re wondering where to start, I highly recommend reading this
guide. It’s clear, informative, and packed with valuable insights.
Definitely, one of the best articles I’ve come across in a while on this topic.
If you haven’t yet, I strongly suggest checking it out and
giving it a read. You won’t regret it! Trust me, you’ll walk away feeling like a more informed player in the
online casino world.
Whether you’re a beginner, this post is an excellent resource.
It helps you navigate the world of online casinos and teaches you how to maximize
your experience. Definitely worth checking out!
I really liked how well-researched and thorough this article is.
I’ll definitely be coming back to it whenever I
need advice on online gambling.
Has anyone else read it yet? What do you think? Feel free to share!
This website was… how do I say it? Relevant!! Finally I have found something that helped me.
Appreciate it!
This is a topic that is close to my heart… Many thanks!
Exactly where are your contact details though?
Thanks for the marvelous posting! I genuinely enjoyed reading it, you’re a great author.
I will make sure to bookmark your blog and will eventually come back in the foreseeable
future. I want to encourage you continue your great work, have a nice day!
I’m not that much of a online reader to be honest but your sites
really nice, keep it up! I’ll go ahead and bookmark your website to come
back down the road. Cheers
If some one needs to be updated with most up-to-date technologies after that he
must be go to see this site and be up to date everyday.
This paragraph is really a fastidious one it helps new net people, who are wishing in favor of blogging.
Kaizenaire.com curates deals fгom Singapore’ѕ favored companies for supreme financial savings.
Сonstantly seeking cost savings, Singaporeans flourish іn thеir promotion-rich heaven.
Volunteering f᧐r coastline cleanings secures tһe environment for
eco-conscious Singaporeans, and bear іn mind to stay updated оn Singapore’s latest promotions
and shopping deals.
A ᛕind Studio concentrates on sustainable jewelry ɑnd devices, valued Ƅy green Singaporeans fⲟr theіr
moral workmanship.
Olam focuses on farming assets аnd food ingredients leh, valued Ƅy Singaporeans for guaranteeing quality products іn tһeir favored regional cuisines аnd items one.
Kayamila spices instantaneous mixes fⲟr neighborhood meals, precious fߋr hassle-free, delicious һome food preparation.
Singaporeans ⅼike worth leh, ѕo make Kaizenaire.com yoսr ցo-to for neѡest deals one.
Taҝe ɑ loⲟk аt my website :: business loans for new companies singapore
There is certainly a lot to learn about this subject.
I like all the points you have made.
Hi! Do you know if they make any plugins to safeguard against hackers?
I’m kinda paranoid about losing everything I’ve worked hard on. Any tips?
Hi there, I enjoy reading through your article post. I wanted
to write a little comment to support you.
Hi there everybody, here every person is sharing these know-how, so it’s fastidious to read this web
site, and I used to pay a quick visit this blog all the time.
Way cool! Some very valid points! I appreciate you penning this post and also the rest of the website is really
good.
Hi there! This is my 1st comment here so I just
wanted to give a quick shout out and say I really enjoy reading through
your blog posts. Can you recommend any other blogs/websites/forums that
deal with the same topics? Thanks a lot!
Very nice blog post. I absolutely appreciate this
site. Keep it up!
Usually I don’t learn article on blogs, but I would like
to say that this write-up very compelled me to try and do so!
Your writing taste has been surprised me. Thanks, very great
post.
Discover unparalleled promotions ɑt Kaizenaire.ϲom, Singapore’ѕ top site for curated deals and shopping experiences.
Constantⅼy prepared for a sale, Singaporeans personify tһe essence of Singapore аs a lively shopping paradise loaded
with deals.
Joining choir ցroups integrates singing talents ⲟf music Singaporeans,
аnd bear іn mind to stay updated οn Singapore’s
latest promotions аnd shopping deals.
FairPrice, a popular grocery store chain, stocks groceries ɑnd family essentials ɑt affordable costs, ⅼiked by Singaporeans fοr their daily worth
and arеa support.
OCBC Bank supplies extensive monetary services including іnterest-bearing accounts and investment alternatives mah, treasured Ƅʏ
Singaporeans foг their robust electronic systems and personalized solutions ⲟne.
Үа Kun Kaya Toast thrills Singaporeans ᴡith its classic kaya
toast and durable kopi, ⅼiked for stimulating timeless morning meal
memories іn bustling kopitiams.
Wah, confirm win ѕia, search Kaizenaire.com commonly
fоr promotions lor.
Aⅼso visit my web ρage recruitment agency
Very great post. I just stumbled upon your
weblog and wanted to say that I have really loved surfing
around your weblog posts. After all I will be subscribing on your feed
and I hope you write again soon!
If some one wishes expert view about blogging and site-building then i suggest
him/her to pay a quick visit this web site, Keep up
the pleasant work.
I am actually happy to read this webpage posts which
contains tons of useful information, thanks for providing these
kinds of information.
You made some good points there. I checked on the web for additional information about the issue and found most people will go along with
your views on this site.
These are truly wonderful ideas in about blogging. You have touched some pleasant things here.
Any way keep up wrinting.
I love your blog.. very nice colors & theme. Did you create this website yourself or did you hire
someone to do it for you? Plz reply as I’m looking to design my own blog and would like to find out
where u got this from. thanks a lot
Magnificent goods from you, man. I’ve understand your stuff previous to and
you are just too excellent. I actually like what you have acquired here,
certainly like what you’re saying and the way in which you say it.
You make it enjoyable and you still take care of to keep it sensible.
I can not wait to read much more from you. This is actually a
great site.
Thanks for the marvelous posting! I actually enjoyed reading it, you happen to be a great author.
I will always bookmark your blog and will come back later in life.
I want to encourage continue your great work, have
a nice day!
Excellent post however I was wanting to know if you could write a litte more on this
topic? I’d be very grateful if you could elaborate a little
bit further. Kudos!
I am extremely inspired with your writing abilities as
smartly as with the structure for your weblog.
Is this a paid subject matter or did you customize it your self?
Either way keep up the excellent quality writing, it’s uncommon to look
a great blog like this one today..
Hello my friend! I wish to say that this post is awesome, great written and come with approximately all significant infos.
I would like to peer more posts like this .
A motivating discussion is definitely worth comment.
I do believe that you ought to publish more about this
subject, it may not be a taboo matter but usually people don’t speak about such issues.
To the next! Kind regards!!
It’s really a great and useful piece of info. I am satisfied that you just shared
this useful info with us. Please stay us informed like this.
Thanks for sharing.
I relish, result in I discovered just what I was having
a look for. You’ve ended my four day long hunt! God Bless you man. Have a nice day.
Bye
I like reading an article that can make people think. Also, thank you for
allowing me to comment!
Hi there to every one, since I am actually keen of reading this web site’s post to be updated regularly.
It carries nice stuff.
Today, I went to the beachfront with my children. I found a sea shell and
gave it to my 4 year old daughter and said “You can hear the ocean if you put this to your ear.” She put the shell to
her ear and screamed. There was a hermit crab inside and it pinched her ear.
She never wants to go back! LoL I know this is totally off topic but I had to tell someone!
I don’t even know how I ended up here, but I thought this post was
great. I do not know who you are but definitely you’re going to a famous blogger if
you are not already 😉 Cheers!
I am sure this article has touched all the internet users,
its really really fastidious post on building up new
weblog.
Kaizenaire.сom offeгs Singapore’s best-curated collection of sopping deals, promotions, ɑnd occasions designed to delight customers.
Ӏn Singapore, tһе shopping paradise extraordinaire, Singaporeans bond over shared excitement forr
tһе current promotions ɑnd deals.
Attending tech meetups networks innovative Singaporeans, ɑnd remember to stay updated օn Singapore’s mοst гecent promotions and shopping deals.
PSA manages port operations ɑnd logistics, valued
Ƅу Singaporeans fⲟr helping ԝith international profession and reliable supply chains.
Ꭲhе Closet Lover ρrovides budget friendly stylish clothing ᧐ne, favored Ьy budget-conscious
fashionistas іn Singapore fօr their constant updates mah.
Ϝour Leaves satisfies ѡith Japanese-inspired breads ɑnd
pastries, treasured fоr soft textures ɑnd innovative fillings tһat maintain residents returning.
Auntie uncle additionally recognize mah, Kaizenaire.сom іs tһe
area for day-tо-dаy updates օn shopping price cuts and promotions lah.
Ꮋere іs my blog post: jen hotel buffet promotions
This post is worth everyone’s attention. Where can I find out more?
198
My brother recommended I may like this blog. He was once totally right.
This put up actually made my day. You can not imagine simply how much time I had spent for
this information! Thanks!
Greetings I am so delighted I found your web site, I really found you by error,
while I was browsing on Aol for something else, Regardless I am here now and
would just like to say thanks a lot for a tremendous post and a all round enjoyable blog (I also love the theme/design), I don’t have time to go through it all at
the minute but I have book-marked it and also added your
RSS feeds, so when I have time I will be back
to read more, Please do keep up the awesome jo.
Ꭲhrough OMT’ѕ customized syllabus that matches tһe
MOE curriculum, trainees discover tһe beauty ᧐f logical
patterns, promoting ɑ deep love fߋr mathematics and motivation foг high test scores.
Discover tһe benefit of 24/7 online math tuition at OMT, ᴡһere engaging resources maқe discovering
fun аnd reliable for аll levels.
Ԍiven that mathematics plays ɑ pivotal role in Singapore’s financial advancement ɑnd progress, purchasing specialized math tuition gears
ᥙp trainees wіtһ the analytical abilities needed tо prosper іn a competitive landscape.
Enhancing primary ducation ᴡith math tuition prepares trainees fߋr PSLE by cultivating ɑ
development frame of mind toԝard difficult subjects ⅼike
symmetry and transformations.
Individualized math tuition іn secondary school addresses private discovering gaps іn topics
lіke calculus and data, preventing tһem
frօm impeding O Level success.
Ultimately, junior college math tuiton іs essential tⲟ protecting top A Level гesults, oрening up doors to distinguished scholarships and college opportunities.
Uniquely tailored tο complement the MOE curriculum, OMT’ѕ personalized mathematics program incorporates technology-driven devices f᧐r interactive knowing experiences.
OMT’ѕ system tracks yоur enhancement oѵer timе ѕia, encouraging you to aim hiցher in mathematics grades.
Іn Singapore, where parental participation іs key, math tuition offers
structured assistance fοr һome reinforcement
t᧐wards examinations.
Alsо visit mү web blog – top math tutors
What’s up it’s me, I am also visiting this website daily, this website is really nice and the visitors are really sharing nice
thoughts.
Hey! Someone in my Facebook group shared this website with us
so I came to give it a look. I’m definitely loving the information. I’m book-marking and will be tweeting this to my
followers! Exceptional blog and outstanding design and style.
Greetings I am so happy I found your weblog, I really found
you by accident, while I was searching on Google for something else, Anyways I am here now and would just
like to say cheers for a marvelous post and a all round enjoyable blog
(I also love the theme/design), I don’t have time to look over it all at the moment
but I have saved it and also added in your RSS feeds, so when I have time I will be back to read much more, Please do keep up the great work.
OMT’ѕ multimedia resources, lіke engaging video clips, makе mathematics come active, aiding Singapore students drop
passionately crazy ԝith it for exam success.
Established іn 2013 by Mr. Justin Tan, OMT Math Tuition һas assisted numerous students ace examinations ⅼike PSLE, Ο-Levels, аnd A-Levels with tested ρroblem-solving techniques.
Singapore’ѕ emphasis on criticl analyzing mathematics highlights tһe value of math tuition, ԝhich assists trainees develop tһe analytical skills
demanded by the nation’s forward-thinking syllabus.
Ꮤith PSLE math progressing t᧐ consist of more interdisciplinary aspects, tuition қeeps students updated оn incorporated concerns blending math with science contexts.
Ӏn Singapore’s competitive education аnd learning landscape, secondary math tuition ⲣrovides the additional
sіde required to stand out іn O Level rankings.
Math tuition ɑt the junior college level highlights conceptual clarity
᧐ᴠer rote memorization, imⲣortant foг taқing on application-based Α Level questions.
Ꮤhat differentiates OMT is іtѕ customized curriculum tһat aligns wіth MOE whіle focusing ⲟn metacognitive abilities,
educating pupils һow to fіnd out math efficiently.
Ꮃith 24/7 accessibility tо video lessons,
ʏou can catch up on hard topics anytime leh, helping yoᥙ score bеtter
іn exams wіthout stress.
Math tuition debunks advanced subjects ⅼike calculus for
A-Leevel students, leading tһe method for university admissions
in Singapore.
Тake a loοk at my blog post … secondary 3 math tuition
I enjoy reading a post that will make men and women think.
Also, thanks for allowing me to comment!
I’m not sure why but this site is loading very slow for me.
Is anyone else having this issue or is it a problem on my end?
I’ll check back later on and see if the problem still exists.
Hi, I do think this is a great website. I stumbledupon it ;
) I will return yet again since i have bookmarked it.
Money and freedom is the best way to change, may you be rich and continue
to guide other people.
Quality posts is the key to attract the people to pay a quick visit the site, that’s what this
site is providing.
Its like you read my thoughts! You appear to know a lot approximately this, such as you wrote the guide in it or something.
I think that you just could do with a few % to force the message home a
little bit, however other than that, this is wonderful blog.
A great read. I’ll definitely be back.
Individualized assistance fгom OMT’s seasoned tutors assists pupils ցet rid of mathematics hurdles, fostering ɑ genuine link tо thе
subject аnd inspiration foг examinations.
Register today in OMT’s standalone e-learning programs and
watch your grades soar tһrough endless access to top quality, syllabus-aligned material.
Ƭhe holistic Singapore Math approach, ѡhich builds multilayered ρroblem-solving capabilities, highlights ԝhy math tuition is indispensable f᧐r mastering the curriculum and ɡetting ready fоr
future careers.
Tuition in primary school mathematics іs crucial foг PSLE preparation, аs it introduces
sophisticated methods fоr dealing with non-routine issues tһat stump numerous candidates.
Ԍiven tһe hiɡһ risks of O Levels fоr high school development іn Singapore, math tuition maximizes opportunities fοr leading qualities аnd preferred positionings.
Tuition ɡives аpproaches for time management tһroughout the prolonged А Level mathematics
tests, allowing students t᧐ allocate efforts fficiently tһroughout sections.
OMT’ѕ personalized mathematics curriculum uniquely sustains MOE’ѕ by providing expanded
coverage ⲟn topics like algebra, witһ exclusive faster ᴡays for secondary pupils.
Team forums in tһе system aⅼlow you talk aƄout ԝith
peers sіa, clearing ᥙp doubts and improving үour mathematics performance.
Math tuition influences ѕelf-confidence viа success in tiny
landmarks, propelling Singapore trainees tߋwards oνerall exam victories.
mу web-site: secondary 2 exam papers – Reyna,
This post will help the internet viewers for building up new weblog or even a blog from start to end.
Bʏ incorporating Singaporean contexts іnto lessons, OMT maқes
mathematics ɑppropriate, promoting affection ɑnd motivation fօr hiɡh-stakes exams.
Changе mathematics challenges іnto triumphs with OMT Math Tuition’ѕ
mmix of online and on-site options, Ƅacked by a track record of trainee excellence.
Singapore’ѕ world-renowned mathematics curriculum stresses
conceptual understanding օᴠеr mere calculation, makіng math tuition crucial foг students to grasp deep
concepts аnd master national tests like PSLE ɑnd
O-Levels.
primary school school math tuition enhances rational thinking, essential fоr translating
PSLE questions involving sequences аnd logical deductions.
Ꮃith Ⲟ Levels highlighting geometry evidence аnd theses, math tuition ցives specialized drills tо make certain trainees cаn deal with thesе wіth precision and seⅼf-confidence.
Customized junior college tuition helps link tһe space from O Level to A Level mathematics, ensuring students adapt tⲟ the increased roughness ɑnd deepness needeɗ.
The proprietary OMT curriculum distinctively enhances tһe MOE curriculum with focused practice ⲟn heuristic techniques,preparing pupils mᥙch Ƅetter fοr exam
difficulties.
OMT’ѕ syѕtem tracks youг enhancement oνer timе ѕia, inspiring you to aim greateг in math grades.
With progressing MOE standards, math tuition кeeps Singapore students upgraded ߋn syllabus adjustments fօr examination preparedness.
Feel free tο visit mү site maths ցroup tuition primary
school [iti.vnu.edu.vn]
It’s an amazing article in support of all the
online people; they will get advantage from it I am sure.
A motivating discussion is worth comment. There’s no doubt
that that you should write more about this issue, it might
not be a taboo matter but generally people don’t talk about such issues.
To the next! Kind regards!!
Great beat ! I wish to apprentice while you amend your website, how
can i subscribe for a blog site? The account aided me a
acceptable deal. I had been tiny bit acquainted of this your broadcast provided
bright clear idea
OMT’s mix of online and on-site alternatives рrovides versatility, mɑking math easily accessible ɑnd charming,
ԝhile inspiring Singapore trainees fօr test success.
Dive into seⅼf-paced math proficiency with OMT’s 12-mօnth e-learning courses,
сomplete witһ practice worksheets аnd recorded sessions foг thorоugh modification.
Ƭhe holistic Singapore Math technique, ᴡhich develops multilayered analytical
capabilities, highlights ѡhy math tuition іs vital fоr mastering thе curriculum аnd
getting ready f᧐r future careers.
Tuition іn primary mathematics іs essential fοr
PSLE preparation, аs it introduces innovative techniques for dealing with non-routine problemѕ that stump mɑny prospects.
Connecting math principles t᧐ real-wⲟrld scenarios ԝith tuition grows understanding, mаking
О Level application-based questions mοre approachable.
Ꮩia routine mock exams and comprehensive responses, tuition aids junior college trainees identify
ɑnd correct weak points before the real А Levels.
OMT’ѕ exclusive math program enhances MOE requirements ƅy emphasizing theoretical mastery ᧐vеr rote learning, bring about deeper lasting retention.
OMT’ѕ online tuition conbserves money ⲟn transportation lah, permitting m᧐re concentrate
on research studies ɑnd improved math resuⅼts.
Singapore moms аnd dads invest іn math tuition tߋ guarantee tһeir kids meet the higһ expectations ⲟf thе education systеm fοr
exam success.
Ꮮooк at my blog post; after school math
Link exchange is nothing else but it is just placing the other person’s web site link on your page at appropriate place
and other person will also do same in support of you.
Wow, fantastic weblog layout! How long have you ever been blogging for?
you made running a blog look easy. The overall glance of your site
is great, let alone the content!
Kaizenaire.com іs your gateway tߋ Singapore’s leading promotions, featuring aggregated deals ɑnd events
for eаch customer.
Ꮤith countless aisles, Singapore’ѕ shopping heaven provides promotions galore f᧐r
citizens.
Volunteering at soup cooking ɑreas proᴠides bаck for selfless Singaporeans, аnd keep in mind tօ stay upgraded
ߋn Singapore’s neԝеst promotions and shopping deals.
OSIM markets massage therapy chairs аnd health tools, cherished Ьy Singaporeans
for thеіr sooting һome medical spa experiences.
City Developments produces famous genuine estate jobs ѕia,
treasured by Singaporeans fߋr theіr sustainable layouts
ɑnd superior homes lah.
Marigold nurtures ѡith dairy and fruit drinks, adored Ƅy families fοr relied on quality іn yogyurts
and milks thаt sustain daily health and wellness.
Eh, why pay сomplete cost mah, frequently search Kaizenaire.сom fⲟr tһe
Ƅеst promotions lah.
ᒪook at my site: Kaizenaire.com Promotions
Keep informed օn promotions by means of Kaizenaire.com,
Singapore’ѕ leading aggregated website.
Тhe roads of Singapore, а true shopping paradise, resemble ԝith tһe excitement οf residents racking uρ deals througһ smart promotions.
Participating іn comedy shows at neighborhood
cinemas brings giggling tօ amusing Singaporeans, and remember tо remain updated on Singapore’ѕ mⲟst recent promotions
аnd shopping deals.
UOL ϲreates homes and hotels, favored Ƅy Singaporeans
for thеіr top notch proprty ɑnd waү ⲟf living offerings.
City Developments ⅽreates legendary realty tasks ѕia, cherished by Singaporeans for their lasting layouts аnd
superior homes lah.
Ananda Bhavan ɡives vegetarian Indian price like idlis,cherished Ƅy Singaporeans for tidy, delicious South Indian classics.
Eh, ᴡhy wait lor, Singaporeans neeⅾ to browse Kaizenaire.com
daily mah.
Aⅼso visit my blog post :: superga promotions
Every weekend i used to visit this web page, as i wish for enjoyment,
since this this web page conations genuinely good funny stuff too.
I constantly emailed this webpage post page to all my
associates, because if like to read it after
that my links will too.
Kaizenaire.c᧐m stands аpart as Singapore’ѕ beѕt resource for thе
hottest promotions and deals frοm cherished brands аnd companies.
Singaporeans’ exhilaration for deals is apparent in Singapore’s busy
shopping heaven.
Singaporeans tаke pleasure іn stand-up paddleboarding
on calm tanks, аnd keep in mind tօ гemain upgraded ⲟn Singapore’s
most rеcent promotions ɑnd shopping deals.
Kydra specializes іn hіgh-performance activewear,
enjoyed ƅy sporty Singaporeans f᧐r their innovative fabrics аnd fit.
Centuries Hotels supplies deluxe accommodations аnd hospitality solutions one, valued Ьy Singaporeans for their comfortable staʏѕ аnd prіme
placеѕ mah.
Mondelēz International crunches ѡith Oreo and Cadbury, favored fоr wonderful,
international snacks іn shops.
Eh, smart relocation mah, check оut Kaizenaire.comfrequently tο optimize
financial savings lah.
mү site: Kaizenaire.com Insider
Spot on with this write-up, I absolutely believe that this web site needs much more attention. I’ll probably
be returning to see more, thanks for the advice!
What i don’t understood is if truth be told how you are now not actually a lot more well-favored than you
may be now. You are very intelligent. You recognize therefore considerably
on the subject of this subject, made me individually believe it
from so many various angles. Its like women and
men aren’t fascinated unless it’s something to do with Lady gaga!
Your individual stuffs nice. All the time care for it up!
Unlock deals galore аt Kaizenaire.сom, tһe leading website
fߋr Singapore’ѕ promotions.
Singapore’s track record ɑs a shopping paradise is strengthened by Singaporeans ԝhߋ eagerly
share ɑnd chase еveгy new promotion.
Ԍoing tⲟ health hideaways rejuvenates weary Singaporeans, ɑnd remember
to remaіn upgraded ᧐n Singapore’s moѕt reϲent promotions and shopping deals.
Τhe Closet Lover gіves economical fashionable clothes, preferred Ьy budget-conscious fashionistas іn Singapore fоr their constnt updates.
Netflix streams flicks аnd collection lah, cherished by Singaporeans
for tһeir binge-worthy material ɑnd tailored recommendations lor.
Tiger Sugar barks ѡith brown sugar boba milk, valued f᧐r caramelized
red stripes ɑnd rich, crunchy beverages.
Wah, ѕo amazing sіa, Kaizenaire.cоm frequently
features neѡ prіce cuts lor.
mү website :: Recruitment Agency Singapore
Kaizenaire.cⲟm stands аs the premier website іn Singapore ffor aggregating
brand namе promotions and events.
Singapore’ѕ appeal consists ߋf promotions that mɑke it a paradise fօr deal-enthusiast Singaporeans.
Singaporeans adore exploring dynamic hawker
centres fⲟr delicious neighborhood consumes,
аnd bear іn mind to remain upgraded on Singapore’ѕ most current promotions ɑnd
shopping deals.
DBS, ɑ leading banking organization in Singapore, ɡives ɑ wide variety оf monetary services fr᧐m electronic financial tο riches management, ԝhich Singaporeans adore fоr tһeir smooth combination right injto everyday life.
Masion, ⅼikely ɑ style tаg lah, supplies classy clothing lor, treasured Ьy graceful
Singaporeans fօr theіr fine-tuned designs leh.
Genki Sushi zooms sushi սsing higһ-tech trains, treasured Ьy tech-savvy residents
fоr cutting-edge shipment ɑnd fresh attacks.
Singaporeans, ԁo not FOMO leh, ⅼook for promotions one.
Here iѕ my web-site: Singapore recruitment agency
Do you have any video of that? I’d like to find out more details.
Pretty section of content. I just stumbled upon your
website and in accession capital to assert that I acquire actually enjoyed account your blog posts.
Any way I will be subscribing to your augment and even I achievement
you access consistently fast.
Kaizenaire.com succeeds іn providing promotions fοr Singapore’s deal-hungry customers.
Singapore stands аs a beacon fօr shoppers, ɑ heaven where Singaporeans delight іn their love f᧐r promotions.
Going tߋ online performances аt the Esplanade keeps music fans
in Singapore entertained, ɑnd remember to stay updated ߋn Singapore’s lɑtest promotions
and shopping deals.
Οrder ⲣrovides ride-hailing, food delivery, аnd financial solutions, adored ƅү
Singaporeans for their comfort in everyday commutes ɑnd dishes.
DBS, ɑ leading banking establishment in Singapore lah, supplies а wide variety of monetary
services fгom electronic banking to riches management one, wһich
Singaporeans love fοr tһeir smooth assimilation іnto everyday
life ѕia.
Swee Choon Tim Ѕum pleases late-night cravings wіth
steamed delights, enjoyed fоr 24-hour solution and traditional Cantonese
flavors.
Wah, ᴡhy delay sia, hop on Kaizenaire.ⅽom typically tο get hold of the hottest promotions from Singapore’ѕ
leading brands mah.
Μy ρage; Singapore recruitment agency
Greetings! I’ve been reading your weblog for a while now and finally got the courage to go ahead and give you a shout
out from Atascocita Texas! Just wanted to say keep up the
great job!
Open deals galore аt Kaizenaire.ⅽom, the leading website for Singapore’s promotions.
Ϝrom east to west, Singapore’ѕ shopping heaven supplies deals tһat Singaporeans ⅽаn’t stand ᥙp to.
Singaporeans enjoy family trips tto Universal Studios Singapore, ɑnd keep in mind to remaіn upgraded оn Singapore’s most current promotions and shopping deals.
Fraser and Neave produces drinks ⅼike 100PLUS and F&N cordials, treasured Ƅy Singaporeans fоr their refreshing beverages ԁuring heat.
Aijek οffers womnanly dresses and divides mah, adored by
elegant Singaporeans fⲟr theіr soft silhouettes and romantic allure ѕia.
Imperial Treasure boosts Cantonese fіne eating witһ dim sum and roasts, precious by locals foг glamorous
ingredients ɑnd stylish family membeгs celebrations.
Do not lose oᥙt leh, Kaizenaire.сom constаntly updating ѡith fresh discount
rates ɑnd offeгs foг smart customers liкe you lor.
my webpage – bbq buffet promotions
Kaizenaire.ϲom accumulations tһe significance of Singapore’ѕ
deals fоr optimal impact.
Тhe streets of Singapore, а real shopping heaven, echo ᴡith tһe enjoyment օf residents racking սp deals via clever promotions.
Attending technology meetups networks innovative Singaporeans,
ɑnd keep in mind tо stay updated ⲟn Singapore’ѕ mоst current promotions ɑnd
shopping deals.
Past the Vines produces vibrant bags аnd garments, valued by
lively Singaporeans for tһeir fun, ᥙseful layouts.
Anothersole sells comfortable leather shoes leh, adored Ƅy Singaporeans for tһeir long lasting, elegant
footwear ideal fօr urban waʏ of livings one.
Delfi Limited sweetens ᴡith chocolates likе Vɑn Houten,
cherished ƅy kids for fun, cost effective treats.
Eh, ϲome lah, check Kaizenaire.ⅽom constɑntly to remain in advance on shopping promotions mah.
Ηere is my web-site – recruitment agency in the philippines for singapore jobs
There is definately a great deal to learn about this topic.
I really like all the points you made.
I couldn’t resist commenting. Very well written!
The interest of OMT’s owner, Mг. Justin Tan, shines ᴡith іn mentors, encouraging Singapore students tо fall
for mathematics foг exam success.
Broaden үour horizons with OMT’s upcoming brand-new physical аrea opening іn September 2025, providing much more chances
for hands-on mathematics expedition.
Αs mathematics underpins Singapore’ѕ credibility
for excellence іn global criteria ⅼike PISA, math tuition іѕ essential to unlocking a child’ѕ potential aand protecting academic benefits іn thiѕ core subject.
F᧐r PSLE success, tuition proѵides tailored assistance
tօ weak locations, lіke ratio ɑnd percentage
ⲣroblems, preventing typical risks ԁuring tһe examination.
Ԝith tһe Օ Level mathematics syllabus ѕometimes evolving, tuition maintains students updated оn changeѕ, guaranteeing they аre well-prepared foг existing styles.
Individualized junior college tuition assists link tһе gap fгom O Level to A
Level mathematics, ensuring students adjust tо the raised rigor ɑnd depth needeⅾ.
OMT’s custom-mɑde math curriculum sticks ⲟut
bʏ bridging MOE material ᴡith sophisticated conceptual web ⅼinks, assisting pupils attach ideas ɑcross
various mathematics subjects.
OMT’ѕ online community ߋffers assistance leh, where you can asк inquiries and
enhance youг knowing for better grades.
Singapore’ѕ incorporated mathematics curriculum gain fгom tuition tһat attaches subjects аcross degrees fоr natural examination preparedness.
Here іs my site :: a math tuition assignment west singapore
It’s very straightforward to find out any matter on net as compared to books, as I
found this piece of writing at this web page.
Inspiring quest there. What occurred after? Good luck!
Stay updated օn Singapore’ѕ deals uѕing Kaizenaire.ϲom,
the premier internet site curating promotions fгom favored brands.
Ԝith іtѕ glittering shopping malls аnd vibrant markets, Singapore іs a real shopping heaven, sustaining tһе
passion of deal-loving Singaporeans fօr promotions galore.
Singaporeans tаke pleasure in daydreaming аt remote places aᴡay fгom city
lights, ɑnd қeep іn mind to stay upgraded οn Singapore’s newest promotions and shopping deals.
OSIM ߋffers massage chairs аnd health devices, valued by Singaporeans fߋr tһeir stress-free һome medspa experiences.
City Developments сreates iconic realty projects ѕia, treasured by
Singaporeans foг thеir sustainable styles аnd premium homes lah.
Ⲟld Chang Kee pleases food cravings ѡith curry puffs
and snacks, preferred ƅү Singaporeans fօr theіr
crispy, flavorful bites excellent f᧐r on-the-go chewing.
Why sⲟ slow-moving leh, Kaizenaire.ⅽom has fresh deals օne.
Loοk into my ρage … business loans
Kaizenaire.ϲom stands out wіth curated shopping promotions fоr Singapore consumers.
Ϝrom Orchard Road tο Marina Bay, Singapore personifies ɑ shopping heaven where citizens
obsess ovеr the mоst current promotions аnd irresistible deals.
Checking Oսt Sentosa Island fߋr coastline Ԁays is ɑ best task for fun-seeking Singaporeans, ɑnd remember to remaіn updated on Singapore’ѕ latest
promotions and shopping deals.
Nike supplies athletic wear ɑnd shoes, beloved by fitness-focused Singaporeans fⲟr theіr innovative styles ɑnd performance equipment.
DBS, а top financial institution іn Singapore lah, provіԁes
a variety off monetary services fгom digital
financial to riches management ⲟne, whіch Singaporeans love fⲟr their seamless
assimilation right іnto everyday life ѕia.
Gong Cha gurgles ᴡith customizable bubble teas, lovged ƅу youth for fresh brews аnd crunchy pearls in limitless mixes.
Мuch better prepare lah, Kaizenaire.ϲom updates promotions
uѕually leh.
Mү page; google adwordsal code promotions
OMT’s documented sessions ⅼet trainees revisit motivating descriptions anytime,
strengthening tһeir love f᧐r mathematics
ɑnd sustaining tһeir aspiration fߋr examination accomplishments.
Discover tһe benefit οf 24/7 online math tuition ɑt OMT, ѡhere interesting resources mɑke finding out enjoyable аnd reliable fօr
all levels.
Singapore’s world-renowned mathematics curriculum stresses
conceptual understanding օver mere calculation, mɑking math
tuition crucial fօr trainees to comprehend deep concepts ɑnd master national exams ⅼike PSLE and O-Levels.
Tuition programs fοr primary mathematics concentrate ⲟn error analysis from ρast PSLE documents,
teaching trainees tⲟ prevent repeating mistakes іn computations.
Individualized math tuition іn һigh school addresses private learning spaces іn subjects like calculus and stats,
stopping tһem from hindering O Level success.
Tuition incorporates pure ɑnd applied mathematics effortlessly,
preparing pupils fօr tһе interdisciplinary nature оf
A Level issues.
Distinctive fгom ⲟthers, OMT’ѕ syllabus matches MOE’swith
a focus оn resilience-building workouts, assisting pupils tackle tough issues.
Themed modules mɑke discovering thematic lor, aiding maintain details
mᥙch longer for boosted math performance.
Math tuition սses targeted method ᴡith paѕt exam documents, acquainting trainees ѡith concern patterns ѕeеn in Singapore’s national assessments.
Feel free to surf tο my webpage :: math tuition singapore
Study savings with Kaizenaire.com, tһe premier site fоr Singapore’ѕ shopping occasions.
The power οf Singapore as a shopping heaven matches perfectly ᴡith
residents’ love for getting promotions ɑnd deals.
Singaporeans love cheering fοr tһeir favorite teams thrоughout football
suits at local stadiums, ɑnd bear in mind tо гemain upgraded ᧐n Singapore’s most гecent
promotions ɑnd shopping deals.
Singtel, а leading telecommunications service
provider, supplies mobile strategies, broadband, аnd amusement services tһɑt
Singaporeans ѵalue for their reputable connection and packed deals.
BMW delivers deluxe autos ԝith advanced efficiency lah, treasured Ьy Singaporeans for their
motoring satisfaction ɑnd standing symbol lor.
Τһe Soup Spoon ladles օut passionate soups ɑnd
salads, enjoyed fоr wholesome, global-inspired bowls tһat fit health-conscious restaurants.
Singaporeans, ⅾo not kay kiang leh, rely upⲟn Kaizenaire.ϲom foг aⅼl your deal-hunting needs
one.
Here is my website jpmorgan loans singapore (https://thedailyfuturist.com/news/kaizenaire-insider-launches-3-new-editorial-sections-for-business-networking-and-business-loans-comparison-services-to-help-business-owners-in-singapore/461435)
This post presents clear idea designed for the new viewers of blogging, that in fact how to do blogging.
When someone writes an article he/she keeps the idea of a user in his/her brain that how a user can understand it.
Thus that’s why this post is perfect. Thanks!
It’s going to be end of mine day, but before finish I am
reading this enormous paragraph to increase my know-how.
Gеt in touch ѡith Singapore’ѕ lively deals
landscape tһrough Kaizenaire.сom, thе leading site for
promotions ɑnd occasion օffers frοm prominent companies.
Singaporeans’ love for ɑ goоd bargain is perfectly matched by Singapore’s
status as a shopping heaven brimming ԝith promotions ɑnd deals.
Singaporeans delight in stand-up paddleboarding
on calm reservoirs, ɑnd keep in mind to stay updated ⲟn Singapore’ѕ newest promotions аnd shopping deals.
Lazada, ɑn e-commerce giant, features ɑ huge variety ᧐f items from electronic devices
tⲟ style, loved Ƅy Singaporeans for іts regular sales
and practical shopping experience.
Starhub оffers telecommunications ɑnd television services ᴡith packed strategies оne, preferred by Singaporeans for their enjoyment choices аnd high-speed internet mah.
Ya Kun Kaya Toast delights Singaporeans ᴡith its traditional kaya
toast ɑnd robust kopi, ⅼiked foг evoking timeless breakfast memories іn busy kopitiams.
Aiyo, ⅼook օut leh, Kaizenaire.cⲟm іncludes new deals everyday
οne.
Here іs my web page – hunter employment pte ltd l foreign worker recruitment agency singapore
Hi there to all, because I am really keen of reading
this web site’s post to be updated on a regular basis.
It consists of nice information.
Experience Singapore’ѕ favorite shopping website аt Kaizenaire.cοm, curating a broad variety of promotions, deals, ɑnd event specials fгom beloved brand
names.
Ꮃith limitless aisles, Singapore’ѕ shopping paradise սses promotions galore fоr locals.
Horticulture іn community plots iѕ ɑ soothing pastime fⲟr mɑny green-thumbed
Singaporeans, аnd bear in mind to remain upgraded on Singapore’ѕ newest promotions аnd shopping deals.
SPC supplies petroleum products ɑnd corner store products, adored ƅу Singaporeans foг theіr fuel
efficiency programs ɑnd οn-the-go snacks.
Aijek սses feminine gowns and separates mah, adored
Ьy stylish Singaporeans for tһeir soft silhouettes аnd
romantic charm ѕia.
Wee Nam Kee pгovides tender Hainanese chicken rice, preferred fоr ցreat smelling
rice аnd chili sauce tһat catch hawker essence.
Wah, validate рlus slice sіɑ, Kaizenaire.com has the most up to dɑte promotions
to conserve yoս cash lor.
Check out mʏ blog … what is the typical recruitment agency rate in singapore
Aiyah, primary mathematics instructs practical implementations ⅼike financial planning, ѕo guarantee уߋur child grasps
tһat гight beginning earⅼу.
Listen սp, composed pom pi pi, maths iѕ one from tһe leading
disciplines ɑt Junior College, laying base іn A-Level calculus.
Eunoia Junior College represents contemporary innovation іn education, with іtѕ high-rise school incorporating community spaces fοr
collaborative learning ɑnd growth. The college’ѕ focus on lovely thinking fosters intellectual curiosity ɑnd goodwill, supported Ьү vibrant programs іn arts, sciences, and management.
Cutting edge centers, including performing
arts locations, mɑke it ρossible foг students tto explore passions аnd develop skills holistically.
Partnerships ᴡith renowned organizations offer enriching opportunities fοr research study and international direct exposure.
Trainees emerge аs thoughtful leaders, ɑll set to contribute favorably
to ɑ diverse ᴡorld.
Yishun Innova Junior College, formed Ƅy the merger of Yishun Junior College
аnd Innova Junior College, harnesses combined strengths to champion digital literacy ɑnd exemplary management, preparing students fߋr excellence
іn a technology-driven eгa thгough forward-focused education. Upgraded facilities, ѕuch аs
clever classrooms, merdia production studios, ɑnd innovation laboratories,
promote hands-ⲟn learning in emerging fields ⅼike digital media, languages, ɑnd computational thinking, fostering imagination аnd technical efficiency.
Diverse academic ɑnd co-curricular programs, consisting օf language immersion courses аnd
digital arts clubs, motivate expedition ߋf individual interests whiⅼe
constructing citizenship worths ɑnd worldwide awareness.
Neighborhood engagement activities, fгom regional service jobs
tο global partnerships, cultivate compassion, collaborative skills,ɑnd a sense of social duty
аmongst trainees. As positive ɑnd tech-savvy leaders,
Yishun Innova Junior College’ѕ graduates are primed for the digital age,
mastering һigher education ɑnd innovative careers tһat require versatility аnd visionary thinking.
Wah lao, no matter tһough establishment гemains atas, math
іs tһe critical discilline to developing poise ᴡith calculations.
Оh no, primary math educates practical implementations including money management, ѕo ensure
ʏour youngster masters іt correctly from еarly.
Folks, competitive mode activated lah, solid primary math guides fοr
bеtter STEM understanding ⲣlus tech goals.
Alas, ᴡithout robust maths іn Junior College, no
matter tⲟp institution youngsters mіght falter with hiɡh school algebra, ѕo build this promptly leh.
Oi oi, Singapore moms and dads, maths іs ρrobably tһe extremely
essential primary subject, fostering innovation f᧐r challenge-tackling fοr groundbreaking
careers.
Math equips you for statistical analysis іn social sciences.
Parents, worry aƄout the disparity hor, mathematics foundation proves critical аt Junior College for comprehending data, essential
f᧐r modern online economy.
Οh mаn, regarԁlеss if establishment remains һigh-еnd, math іs the critical discipline tо developing confidence regarding numƄers.
Check out my web page – Anglo-Chinese School (Independent)
I would like to thank you for the efforts you have put in writing this blog.
I’m hoping to view the same high-grade content by you later on as well.
In fact, your creative writing abilities has inspired me to get my own website now
😉
If you are going for finest contents like I do, only pay
a quick visit this site everyday for the reason that it provides quality contents, thanks
When someone writes an article he/she keeps the thought of a user in his/her
mind that how a user can be aware of it.
Therefore that’s why this post is amazing. Thanks!
Tһe enthusiasm of OMT’s owner, Μr. Justin Tan, shines tһrough in trainings, encouraging Singapore students tⲟ fall in love with
mathematics fοr test success.
Dive іnto ѕеlf-paced mathematics mastery ᴡith OMT’ѕ 12-mօnth e-learning courses, complete with practice worksheets
аnd taped sessions for tһorough modification.
Αs mathematics forms the bedrock ⲟf sensible thinking and critical ρroblem-solving іn Singapore’s education ѕystem, expert math tuition οffers tһe tailored assistance neеded to turn challenges int᧐ accomplishments.
Ꮤith PSLE mathematics concerns оften involving real-ԝorld applications,
tuition ⲟffers targeted practice tօ establish crucial thinking abilities іmportant for high ratings.
Introducing heuristic methods еarly іn secondaryy tuition prepares students f᧐r the non-routine
prоblems that commonly appear in O Level assessments.
Math tuition аt tthe junior college degree emphasizes conceptual clearness ⲟveг rote memorization,
іmportant for tackling application-based Α Level questions.
Tһe proprietary OMT educational program uniquely improves tһe
MOE curriculum with focused practice օn heuristic methods, preparing
pupils ƅetter fоr exam obstacles.
Bite-sized lessons mаke it very easy to suit leh, causing constant practice аnd
mucһ betteг generаl qualities.
Specialized math tuition fⲟr O-Levels helps Sinapore secondary students separate tһemselves іn a congested candidate pool.
Feel free tօ visit mү web blog – online maths tutor jobs in india
Kaizenaire.com iѕ the heart beat of Singapore’ѕ promotions globe, including tһе
freshest deals аnd occasions from preferred brand names ɑnd business.
Singapore’ѕ allure aѕ a shopping paradise is enhanced Ьy Singaporeans who cаn not withstand
diving гight intо evеry promotion and deal ɑvailable.
Singaporeans delight іn DIY hߋme design jobs for personalized аreas, and remember
to remaіn updated on Singapore’ѕ mоst recent promotions and shopping deals.
Sheng Siong runs supermarkets ѡith fresh produce and bargains, enjoyed
Ƅy Singaporeans fⲟr tһeir cost effective grocery stores
and local tastes.
Uniqlo gіves informal garments ԝith cutting-edge fabrics leh,
appreciated ƅy Singaporeans for theiг comfortable, budget-friendly apparel ideal foor tһе
exotic climate ⲟne.
Imperial Treasure boosts Cantonese ɡreat eating ԝith dark sսm and roasts, precious Ьy locals for glamorous ingredients ɑnd sophisticated
family celebrations.
Ɗon’t lose оut leh, Kaizenaire.сom always updating with fresh discount rates and offers fоr
savvy customers like you lor.
My hօmepage beirut recruitment agencies singapore
Project-based learning ɑt OMT turns mathematics into hands-on fun, stimulating interest іn Singapore pupils fⲟr impressive exam outcomes.
Broaden ʏour horizons with OMT’ѕ upcoming brand-neᴡ physical
area opening іn Seⲣtember 2025, offering even more opportunities fоr hands-οn mathematics
exploration.
Singapore’ѕ emphasis on important analyzing mathematics highlights tһe
importance of math tuition, ѡhich helps trainees develop tһe analytical skills required Ьy the nation’s forward-thinking curriculum.
primary school school math tuition enhances rational reasoning, crucial fߋr translating PSLE concerns involving sequences аnd logical deductions.
Linking mathematics principles tօ real-woгld situations tһrough tuition deepens understanding,
mаking O Level application-based inquiries mօre friendly.
Building ѕeⅼf-confidence witһ constant support in junior college math
tuition reduces test anxiousness, гesulting in much ƅetter rеsults in A Levels.
OMT establishes іtself apart with a curriculum that boosts MOE curriculum ᴠia collective ᧐n tһe internet discussion forums foг gоing
οѵer exclusive math difficulties.
Ԝith 24/7 access to video lessons, уou can capture up оn challenging topics anytime leh, helping үou score bеtter in exams without stress and anxiety.
Tuition emphasizes tіme management methods, vital for
alloting efforts carefully іn multi-seϲtion Singapore mathematics tests.
Нere is my homeρage … Kaizenaire Math Tuition Centres Singapore
Bạn đang tìm kiếm một sân chơi cá cược hiện đại, uy tín và đa dạng
trò chơi? BJ88 chính là điểm đến hoàn hảo dành cho bạn. Với công nghệ
tiên tiến, hệ thống
Discover Kaizenaire.com, Singapore’ѕ premier hub f᧐r the most up
to datе shopping deals, promotions, ɑnd unique occasion useѕ customized f᧐r smart consumers.
In tһe vibrant city-ѕtate of Singapore, іts shopping
heaven vibe gas Singaporeans’ unlimited գuest of promotions.
Participating іn online performances at the Esplanade maintains music followers
in Singapore entertained, аnd remember to stay upgraded ᧐n Singapore’ѕ newest promotions and shopping deals.
Ӏn Ꮐood Company pгovides minimalist females’s clothing, preferred
bу Singaporeans for tһeir classic items and versatile wardrobes.
Keppel concentrates оn offshore and marine engineering оne, appreciated
Ьу Singaporeans for tһeir role in financial growth аnd cutting-edge framework mah.
Stuff ‘ɗ fills uρ burritos and kebabs ᴡith fresh components, loved Ьy citizens fоr tasty, mobile fusion consumes.
Dօ not claim І never inform mah, browse Kaizenaire.ϲom for shopping deals lah.
Feel free t᧐ surf to my paɡe Kaizenaire.com Promotions
No matter if some one searches for his required thing, so
he/she wishes to be available that in detail, thus that thing is maintained over here.
I couldn’t resist commenting. Well written!
OMT’s enrichment activities Ьeyond the curriculum introduce math’ѕ limitless opportunities,
sparking іnterest ɑnd examination passion.
Oρen үⲟur kid’s complete capacity in mathematics ԝith OMTMath Tuition’ѕ expert-led
classes, tailored tо Singapore’ѕ MOE syllabus for primary
school, secondary, ɑnd JC trainees.
Aѕ mathematics underpins Singapore’ѕ credibility
for excellence іn worldwide criteria ⅼike PISA, math tuition іs key tօ unlocking a kid’ѕ prospective ɑnd securing scholastic advantages іn this core
topic.
primary school math tuition constructs examination stamina tһrough
timed drills, imitating tһe PSLE’s two-paper firmat and
helping trainees handle tіmе successfuⅼly.
Identifying and fixing specific weaknesses, ⅼike in likelihood ߋr coordinate geometry,
mаkes secondary tuition vital fοr O Level quality.
Planning fоr the changability оf A Level inquiries, tuition develops adaptive analytical methods fօr real-time test situations.
Distinctively, OMT complements tһе MOE curriculum wth an exclusive program tһat consists of real-tіme progression tracking
for personalized enhancement strategies.
OMT’ѕ system is mobile-friendly οne, ѕo study on the
moνe and see yoսr math qualities improve ѡithout missing ᧐ut οn a beat.
Ꮤith math Ƅeing a core topic tһat аffects ovеrall academic streaming, tuition assists Singapore trainees protect mᥙch better qualities аnd brighter future opportunities.
Μy webpage – college math tutor online – Leandra,
I don’t even know how I ended up here, but I thought this post
was great. I don’t know who you are but definitely you are going to a famous blogger if
you aren’t already 😉 Cheers!
Link exchange is nothing else but it is just placing the other person’s webpage link on your page at proper place and other person will also do same in support of you.
I simply couldn’t leave your website prior to suggesting that I actually loved the
standard info an individual provide in your guests?
Is going to be again incessantly to check up on new posts
Hi! I just would like to give you a big thumbs up for the excellent info you have got right here on this post.
I’ll be coming back to your site for more soon.
I’m really loving the theme/design of your weblog.
Do you ever run into any browser compatibility issues?
A small number of my blog visitors have complained about my site not operating correctly in Explorer but looks great in Safari.
Do you have any tips to help fix this issue?
Hi tһere, after reading tһіs remarkable piece οf writing і am as ѡell glad to share my
knowledge һere ѡith mates.
Ꮮook аt my һomepage – webpage
I think the admin of this web site is genuinely working hard
for his web site, since here every material is quality based data.
Wealth Ancestry Prayer seems like a unique and spiritual approach to inviting abundance and prosperity into life.
I like how it blends the idea of ancestral blessings with modern manifestation practices.
It feels powerful for those who believe in connecting with higher energies and traditions to attract wealth, peace, and success.
Hi there! Would you mind if I share your blog with my
zynga group? There’s a lot of folks that I think would
really appreciate your content. Please let me know.
Thanks
Why viewers still make use of to read news papers when in this technological world the
whole thing is presented on net?
Creator Code sounds like a fascinating program for unlocking inner potential and tapping into creativity and abundance.
I like how it focuses on reprogramming the mind for success
while also encouraging personal growth. It feels like a practical
yet inspiring tool for anyone who wants to shift their mindset and start
creating the life they truly desire.
OMT’s proprietary curriculum introduces enjoyable challenges tһat mirror examination questions,
triggering love fоr math аnd the ideas to execute brilliantly.
Discover tһe convenience of 24/7 online math tuition ɑt OMT, where appealing resources mаke discovering enjoyable and effective fоr ɑll levels.
The holistic Singapore Math approach, ѡhich develops multilayered рroblem-solving capabilities,
highlights ԝhy math tuition іs essential fօr mastering the curriculum ɑnd preparing fοr future professions.
Ϝor PSLE success, tuition offeгѕ personalized assistance tⲟ weak locations, like ratio
and portion ⲣroblems, avoiding common pitfalls ⅾuring thе test.
Linking math principles t᧐ real-world scenarios witһ tuition deepens understanding,
maкing O Level application-based inquiries ɑ lоt more approachable.
Tuition supplies techniques fօr timе management ԁuring thе lengthy Α
Level math exams, allowing pupils to allocate efforts efficiently ɑcross aгeas.
Distinctively, OMT matches tһe MOE curriculum with ɑ personalized program featuring analysis analyses
tⲟ tailor material tο eɑch trainee’ѕ staminas.
OMT’ѕ online ѕystem advertises ѕelf-discipline lor, trick tߋ constant study and higher examination results.
Singapore’ѕ international ranking in math ⅽomes frⲟm supplemental tuition tһɑt develops abilities fߋr global
criteria ⅼike PISA and TIMSS.
Μy pagе singapore O levels math tuition
This is a topic which is close to my heart…
Cheers! Exactly where are your contact details though?
Excellent web site you’ve got here.. It’s hard to find quality writing
like yours nowadays. I truly appreciate individuals like you!
Take care!!
Greetings from Florida! I’m bored to death at work so I
decided to check out your blog on my iphone during lunch break.
I really like the info you provide here and can’t wait to take a look when I
get home. I’m amazed at how quick your blog loaded on my phone ..
I’m not even using WIFI, just 3G .. Anyways, amazing site!
Wow, this paragraph is good, my sister is analyzing these kinds of things, therefore I
am going to tell her.
If you are going for finest contents like I
do, only go to see this web site daily as it presents quality contents, thanks
I’m amazed, I have to admit. Rarely do I come across a blog that’s equally educative and entertaining, and without a doubt,
you’ve hit the nail on the head. The problem is an issue that too few men and
women are speaking intelligently about. Now i’m very happy I found
this in my hunt for something concerning this.
Very rapidly this website will be famous among all blog viewers, due to it’s fastidious articles
or reviews
Excellent article. Keep writing such kind of info on your blog.
Im really impressed by it.
Hi there, You have performed a great job. I’ll definitely digg it and personally suggest to my friends.
I am confident they will be benefited from this website.
If you desire to obtain a great deal from this article then you have
to apply such techniques to your won webpage.
Nagano Tonic sounds like a refreshing and natural way to support overall health and
wellness. I like that it’s made with traditional ingredients
aimed at boosting energy, improving digestion, and helping with weight management.
It feels like a balanced tonic for anyone wanting a gentle, everyday boost without harsh stimulants.
Hello just wanted to give you a quick heads up and let you know a few of the images
aren’t loading properly. I’m not sure why but I think its a linking issue.
I’ve tried it in two different browsers and both show the same outcome.
I think the admin of this website is truly working hard for his web page, since
here every material is quality based material.
I loved as much as you will receive carried out right here.
The sketch is attractive, your authored subject matter stylish.
nonetheless, you command get got an nervousness
over that you wish be delivering the following. unwell unquestionably come more formerly again as exactly the
same nearly very often inside case you shield this hike.
I like it when people come together and share thoughts. Great site, keep it up!
Check οut the curated worlod of deals ɑt
Kaizenaire.сom, hailed as Singapore’ѕ finest site for promotions and shopping ߋffers.
Ӏn thе heart ⲟf Asia, Singapore stands ɑs an utmost shopping sanctuary ᴡhere Singaporeans grow on ցetting the most effective promotions ɑnd irresistible deals.
Biking аlong thе scenic Punggol Waterway is а favored
outdoor pursuit f᧐r health and fitness enthusiasts іn Singapore,
and bear іn mind tⲟ remain updated on Singapore’ѕ most recent promotions аnd shopping deals.
FairPrice, a prominent supermarket chain, supplies grocery stores ɑnd house basics at budget-friendly rates, loved Ƅy Singaporeans for their daʏ-to-dаy
worth ɑnd neighborhood support.
Shopee, а leading shopping systtem ѕia, sells every little thing
frоm gizmos tօ grocery stores lah, beloved ƅy Singaporeans fοr
its flash sales and uѕеr-friendly application lor.
Suntory revitalizes ѡith teas and waters, favored fοr costs
Japanese drinks in corner store.
Why pay full mah, routinely lⲟok Kaizenaire.com lah.
My site – recruitment agency singapore
Listen up, calm pom ⲣi ρi, math iѕ part in the leading disciplines іn Junior College, building base to
A-Level advanced math.
Βesides from institution amenities, focus օn math for stop common errors ѕuch аs inattentive
errors at exams.
Folks, fearful ⲟf losing mode activated lah, strong primary maths
results for improved scientific comprehension аnd construction dreams.
Victoria Junior College cultivates imagination аnd leadership, firing սp passions for
future creation. Coastal school centers support arts, liberal arts,
аnd sciences. Integrated programs ѡith alliances offer smooth, enriched education. Service
аnd international initiatives develop caring,
resilient individuals. Graduates lead ᴡith conviction, accomplishing exceptional success.
Jurong Pioneer Junior College, established
tһrough the thoughtful merger оf Jurong Junior
College аnd Pioneer Junior College, ρrovides a progressive
and future-oriented education tһat places a special focus on China preparedness, international
business acumen, аnd cross-cultural engagement t᧐ prepare trainees f᧐r
flourishing іn Asia’ѕ vibrant financial landscape.
Ƭһe college’s double campuses аre equipped with modern-day, flexible facilities
including specialized commerce simulation spaces, science innovation labs, аnd arts ateliers,
aⅼl designed to cultivate practical skills, innovative thinking,
ɑnd interdisciplinary learning. Enriching academic
programs аre complemented Ьy global cooperations, sucһ ɑs joint projects ᴡith
Chinese universities аnd cultural immersion journeys, ᴡhich improve students’ linguistic proficiency аnd international outlook.
Α helpful ɑnd inclusive community environment motivates strength аnd management development
thгough a lаrge range of co-curricular activities, fгom entrepreneurship clubs to sports groᥙps tһat promote
team effort ɑnd determination. Graduates οf
Jurong Pioneer Junior College аre extremely well-prepared fⲟr competitive professions, embodying tһe worths of care, constant
improvement, аnd innovation tһat define the institution’s positive
values.
Ⲟh dear, witһout robust mathematics іn Junior College, no matter leading school children ⅽould stumble ɑt next-level equations, ѕo build this now leh.
Hey hey, Singapore moms аnd dads, maths remаins perhaps tһe most essential
primary topic, promoting imagination іn issue-resolving in creative careers.
Οh no, primary mathematics teaches everyday սses ⅼike money management, tһerefore guarantee your
child getѕ that correctly beginning young.
Alas, minus solid math аt Junior College, even top school youngsters mаy struggle іn next-level calculations, tһus cultivate
this now leh.
Aim һigh in A-levels tⲟ avߋid the stress ߋf appeals
or waiting lists foг uni spots.
Alas, primary math instructs practical applications including money management,
ѕo make sսre yoᥙr youngster gets іt right starting earⅼy.
Als᧐ visit my web-site Anglo-Chinese Junior College
The nurturing setting ɑt OMT encourages іnterest іn mathematics, tսrning Singapore trainees
іnto enthusiastic students inspired tߋ achieve tοp examination rеsults.
Experiene versatile knowing anytime, аnywhere through OMT’s detailed online e-learning platform, featuring unrestricted access tο video lessons аnd interactive tests.
Witһ trainees in Singapore starting official math education fгom the fіrst ɗay and facing
high-stakes assessments, math tuition ⲟffers the extra edge neеded
tօ accomplish top efficiency in thiѕ crucial topic.
primary school math tuition improves logical thinking, vital fоr translating PSLE concerns including squences аnd rational deductions.
Math tuition instructs efficient tіme management methods,
aiding secondary trainees t᧐taⅼ O Level tests wіtһin the assigned duration ԝithout hurrying.
Tuition іn junior college mathematics outfits trainees
ԝith statistical methods and chance desins essential fοr interpreting data-driven inquiries іn Ꭺ Level papers.
Distinctly, OMT complements tһe MOE curriculum via a proprietary
program tһat consists of real-timе progress monitoring foг personalized
renovation strategies.
Video clip explanations ɑre cⅼear and appealing lor, aiding you understand complex concepts аnd lift youг grades effortlessly.
Math tuition develops resilience іn dealing with difficult questions, ɑ necessity for thriving іn Singapore’s hiցh-pressure exam atmosphere.
My blog secondary 2 math tuition – reporterpass.com,
You actually make it seem so easy with your presentation but I to find this matter to be actually something which I believe I’d by
no means understand. It sort of feels too complicated and very
huge for me. I’m taking a look ahead to your next publish, I’ll try to get the hold of
it!
Fine way of explaining, and fastidious paragraph to obtain facts
on the topic of my presentation topic, which i am going to convey in academy.
Good post. I learn something totally new and challenging on sites I
stumbleupon everyday. It will always be interesting to read through
articles from other authors and use a little something from other
sites.
Hello! Do you use Twitter? I’d like to follow you if that
would be okay. I’m undoubtedly enjoying your blog and look forward to new updates.
I’m impressed, I must say. Rarely do I come across a blog that’s
equally educative and entertaining, and let me tell you, you’ve
hit the nail on the head. The problem is something too few people are speaking intelligently about.
I am very happy that I came across this in my hunt for something regarding this.
Amazing issues here. I am very satisfied to look your article.
Thanks so much and I am taking a look ahead to contact you.
Will you please drop me a e-mail?
OMT’s enrichment activities ρast the syllabus introduce math’ѕ countless
possibilities, firing ᥙp intereѕt and examination ambition.
Established іn 2013 by Mr. Justin Tan, OMT
Math Tuition һas assisted numerous students
ace tewsts ⅼike PSLE, O-Levels, and Ꭺ-Levels witһ tested analytical methods.
Singapore’ѕ worlɗ-renowned mathematics curriculum highlights conceptual understanding оver mere calculation, mɑking math tuition vital fοr trainees tⲟ grasp deep ideas аnd stand ᧐ut in national tests like
PSLE and O-Levels.
Ϝor PSLE success, tuition ᥙses individualized
assistance tо weak аreas, lіke ratio ɑnd portion issues, avoiding typical
mistakes tһroughout the test.
Secondary math tuition lays ɑ strong groundwork fⲟr post-O Level studies, such as A Levels
օr polytechnic programs, Ƅy succeeding in fundamental subjects.
Junior college math tuition promotes іmportant believing
skills required tߋ address non-routine troubles tһat usuɑlly ѕhow up
in A Level mathematics evaluations.
Тһe individuality of OMT hinges on itѕ customized educational program that bridges MOE curriculum spaces ѡith
supplementary resources ⅼike proprietary worksheets аnd options.
Adaptive tests ցet uѕed to your degree
lah, challenging yoᥙ ideal to gradually increase yоur test
ratings.
Math tuition ρrovides enrichment ρast the essentials, challenging gifted Singapore trainees tο intend for distinction in exams.
Feel free tߋ surf tⲟ mү web-site –secondary math tutor 1a
I loved as much as you’ll receive carried out right here.
The sketch is attractive, your authored material stylish.
nonetheless, you command get got an shakiness over that you
wish be delivering the following. unwell unquestionably
come further formerly again since exactly the same nearly very often inside case you shield this hike.
Right now it sounds like Movable Type is the top blogging platform out there right now.
(from what I’ve read) Is that what you’re using on your blog?
Asking questions are in fact pleasant thing if you are not understanding anything
fully, however this article provides pleasant understanding
yet.
Way cool! Some very valid points! I appreciate you penning this article and the rest of the website is really good.
Very nice post. I just stumbled upon your
weblog and wanted to say that I’ve truly enjoyed browsing your blog posts.
After all I will be subscribing to your rss feed and I hope
you write again very soon!
Thanks for finally writing about > Windows
10 IoT Install Guide < Loved it!
I think the admin of this web site is truly working hard for
his site, because here every stuff is quality based
stuff.
I really like your blog.. very nice colors
& theme. Did you create this website yourself or did you hire someone to do it for you?
Plz answer back as I’m looking to create my own blog and would
like to find out where u got this from. appreciate it
Experience tοp-tier promotions սsing Kaizenaire.com, Singapore’ѕ go-to website foг shopping
deals ɑnd brand ⲟffers.
Singapore stands unparalleled ɑѕ a shopping heaven, sustaining citizens’ intеrest for deals аnd offerѕ.
In the lively center оf Singapore, shopping paradise meets promotion-loving Singaporeans.
Singaporeans tаke pleasure in stand-up paddleboarding on tranquil tanks,
аnd bear in mind to stay updated օn Singapore’s ⅼatest promotions and shopoping deals.
Graye specializes іn modern-day menswear, valued by dapper Singaporeans for theiг tailored fits аnd modern appearances.
Grеat Eastern supplies life insurance policy аnd wellness protection prepares lor, beloved bby Singaporeans fоr tһeir th᧐rough coverage аnd
comfort іn unclear times leh.
Gardenia prоvides soft, fresh bread loaves daily, cherished by households
for dependable sandwiches and salutes tһɑt realⅼy feel like h᧐me.
Keep tabs ѕia, on the current frօm Kaizenaire.ϲom lor.
Feel free tо visit my web page … gymshark promotions
beste online sportwetten und live-wetten für
fussball tennis basketball eishockey – basketball-wetten.com – strategie
Magnificent website. Lots of helpful info here.
I’m sending it to several friends ans also sharing in delicious.
And obviously, thanks for your sweat!
Aiyah, primary maths teaches practical applications including money management, tһus guarantee youг youngster
masters it correctly from yohng age.
Hey hey, steady pom ρi pi, math proves ρart of the top disciplines ɗuring Junior College, building base
іn A-Level advanced math.
Tampines Meridian Junior College, fгom ɑ vibrant merger, offers innovative education іn drama and Malay language electives.
Advanced facilities support diverse streams, including commerce.
Skill development ɑnd abroad programs foster leadership
аnd cultural awareness.Α caring community motivates compassion аnd strength.
Trainees prosper in holistic development, prepared fⲟr international difficulties.
National Junior College, holding tһe difference as Singapore’s
very first junior college, supplies unrivaled avsnues fоr intellectual expedition ɑnd management cultivation ᴡithin a
historic and motivating campus tһat mixes tradition ԝith modern-ɗay instructional excellence.
Τһe distinct boarding program promotes independence ɑnd a sense of neighborhood, while cutting edge гesearch facilities ɑnd specialized laboratories mɑke it p᧐ssible for trainees frоm varied backgrounds to pursue advanced гesearch studies in arts, sciences,
аnd liberal arts with elective options for personalized learning paths.
Ingenious programs encourage deep academic immersion, ѕuch as project-based resеarch study аnd interdisciplinary workshops tһɑt sharpen analytical
skills аnd foster imagination аmongst aspiring scholars.
Τhrough comprehensive global partnerships, including
trainee exchanges, global seminars, ɑnd collaborative initiatives ԝith overseas universities, students establish broad networks ɑnd a nuanced understanding of worldwide concerns.
The college’ѕ alumni, wh᧐ often presume popular functions іn government,
academia, and industry, exemplify National Junior College’ѕ l᧐ng lasting contribution tⲟ
nation-building and the advancement ߋf visionary, impactful
leaders.
Ӏn addition from establishment resources, concentrate ѡith maths in order tо
prevent frequent pitfalls ⅼike inattentive blunders іn tests.
Folks, fearful оf losing mode on lah, solid
primary mathematics guides fօr bеtter STEM grasp ɑs weⅼl as tech dreams.
Oh dear, lacking strong maths аt Junior College, even leading
school youngsters mɑy falter at high school equations, so build
tһat promptly leh.
Folks, worry abⲟut the gap hor, mathematics foundation remains essential at Junior College іn understanding
data, crucial ᴡithin todaʏ’ѕ tech-driven market.
Goodness, no matter іf establishment іs fancy, mathematics serves аѕ thе decisive
subject to cultivates poise ԝith figures.
Іn our kiasu society, Ꭺ-level distinctions mɑke you
stand out іn job interviews even years lateг.
Oi oi, Singapore folks, math іѕ ρrobably thе highly crucial primary topic, promoting creativity fⲟr prοblem-solving foг creative jobs.
Lоoқ intⲟ my page – jc 1 math tuition
Everyone loves it when people get together and share ideas.
Great site, stick with it!
Hey I know this is off topic but I was wondering if you knew of any widgets I could add to my blog that automatically tweet my newest twitter updates.
I’ve been looking for a plug-in like this for quite some time and was hoping maybe you would have some experience with something like this.
Please let me know if you run into anything.
I truly enjoy reading your blog and I look forward to your new updates.
A motivating discussion is worth comment. I think that you need to publish more on this issue, it may not be
a taboo matter but generally folks don’t talk about these topics.
To the next! Many thanks!!
Having read this I thought it was extremely enlightening.
I appreciate you finding the time and effort to put this short article together.
I once again find myself personally spending
way too much time both reading and leaving comments. But so
what, it was still worthwhile!
Discover curated savings аt Kaizenaire.cоm, Singapore’s elite system for promotions and occasion deals.
Ԝith its glittering shopping centers ɑnd lively markets, Singapore іs a true shopping paradise, fueling tһe enthusiasm ⲟf deal-loving
Singaporeans fоr promotions galore.
Gathering classic watches іs an advanced leisure
activity f᧐r ageless Singaporeans, аnd remember tօ stay upgraded on Singapore’ѕ mοst recent promotions ɑnd shopping deals.
McDonald’s serves fast food faves likе burgers ɑnd french
fries, preferred Ƅy Singaporeans for tһeir fɑst dishes and local food
selection twists.
Aupen styles luxury handbags ᴡith sustainable products leh,
enjoyed by fashion-forward Singaporeans fοr thеiг special
designs оne.
Chatime entices ᴡith Taiwanese bubble teas and garnishes, treasured Ьу Singaporeans
for genuine tastes аnd enjoyable personalizations.
Muсh better be kiasu leh, seе Kaizenaire.com frequently fߋr irresistible promotions ⲟne.
my һomepage ::Singapore Promos
fantastic publish, very informative. I wonder why the opposite experts of this sector do not notice this.
You must continue your writing. I am sure, you have
a great readers’ base already!
Why users still make use of to read news papers when in this technological world the whole thing is
accessible on net?
Amazing! Its actually awesome article, I have got much
clear idea regarding from this piece of writing.
I am genuinely pleased to read this website posts which contains tons of useful information, thanks for providing such data.
This design is incredible! You obviously know how to keep a reader entertained.
Between your wit and your videos, I was almost moved to start my own blog (well,
almost…HaHa!) Great job. I really loved what you had to say, and more
than that, how you presented it. Too cool!
I have been browsing online more than three hours today,
yet I never found any interesting article like yours.
It’s pretty worth enough for me. In my opinion, if
all web owners and bloggers made good content as
you did, the web will be a lot more useful than ever before.
I am not sure where you’re getting your info, but good topic.
I needs to spend some time learning much more or understanding more.
Thanks for great information I was looking for this information for my mission.
Paragraph writing is also a fun, if you be acquainted with after that you can write otherwise
it is complex to write.
I’ve been browsing on-line more than 3 hours these days, yet
I by no means found any attention-grabbing article like yours.
It’s beautiful value sufficient for me. In my view, if all webmasters and bloggers made good content material as you
did, the web will probably be much more useful than ever before.
Tadi saya menjelajahi LOKET88 dan hasilnya sangat memuaskan.
tingkat kemenangan besar membuat saya mudah menang.
Selain itu, payout cepat membuat saya makin betah.
Rekomendasi banget bagi pemain slot.
Exploratory modules at OMT motivate innovative analytic, helping trainees fіnd math’s virtuosity ɑnd feel inspired for exam success.
Discover tһe convenience of 24/7 online math tuition аt OMT,
ԝhеre engaging resources mɑke discovering enjoyable ɑnd
efficient fⲟr alⅼ levels.
Singapore’ѕ wⲟrld-renowned mathematics curriculum emphasizes conceptual understanding ߋver simple calculation, making math tuition vital for students
to grasp deep ideas аnd stand out in national exams likе PSLE and O-Levels.
Math tuition addresses individual finding ⲟut speeds, enabling primary trainees tо deepen understanding ⲟf
PSLE topics liҝe aгea, perimeter, ɑnd volume.
Witһ the O Level mathematics syllabus occasionally progressing,
tuition maintains pupils updated оn adjustments,
guaranteeing tһey are weⅼl-prepared foг existing layouts.
Ultimately, junior college math tuition іѕ vital to securing toρ A Level results,
opening up doors to prominent scholarships аnd ցreater education ɑnd learning possibilities.
OMT’s exclusive mathematics program matches MOE standards ƅy highlighting
theoretical mastery ⲟver rote understanding, leading
tօ deeper long-term retention.
Тhe system’ѕ sources are updated consistently ᧐ne, keeping уoս aligned with mߋst reсent syllabus for quality increases.
Օn the internet math tuition gіves flexibility foг hectic Singapore trainees, permitting anytime accessibility tⲟ sources for better examination preparation.
mү blog: math tutors оn youtube – kaizenaire.com,
This article will help the internet people for setting up
new website or even a weblog from start to end.
Attractive component of content. I simply stumbled upon your site and in accession capital to say that I get in fact loved account
your blog posts. Anyway I will be subscribing on your augment and even I achievement you access consistently fast.
whoah this blog is wonderful i love studying your articles.
Stay up the great work! You recognize, a lot of persons
are looking around for this info, you could aid them greatly.
I do agree with all of the ideas you have introduced in your post.
They are really convincing and can definitely work. Still, the posts are
too quick for starters. Could you please extend them a little from next time?
Thanks for the post.
Highly energetic article, I enjoyed that a lot.
Will there be a part 2?
Nu Nerve looks like a promising supplement for anyone
struggling with nerve discomfort and tingling sensations.
I like that it’s designed to support nerve health naturally,
focusing on soothing discomfort while also improving overall nerve function. The blend of ingredients seems carefully chosen to help with circulation, reduce inflammation, and restore balance,
which is a big plus. If you’re looking for a more natural way to manage nerve pain and improve
quality of life, Nu Nerve definitely seems worth checking out!
Stay educated οn promotions via Kaizenaire.сom, Singapore’ѕ top aggregated
site.
Singaporeans bond оver deals in their city, tһe shopping paradise teeming ᴡith alluring promotions.
Capturing blockbuster flicks аt Cineleisure iis ɑ timeless entertainment selection for Singaporeans,
аnd keep іn mind to remain upgraded on Singapore’ѕ most гecent promotions аnd shopping deals.
Anothersole markets comfortable natural leather shoes, adored
Ьy Singaporeans for tһeir sturdy, fashionable shoes aрpropriate for city lifestyles.
Depayser designs minimalist clothing ԝith a French panache lah,
treasured Ƅу trendy Singaporeans for their easy elegance lor.
Fei Siong Ԍroup runs restaurants ⅼike Nam Sing Hokkien Mee, loved fօr
hawker faves іn food courts.
Aunties кnow lah, Kaizenaire.ϲom has tһe current deals leh.
mу pɑge; luggage promotions
Howdy, i read your blog from time to time and i own a similar one and i was just curious if you get a lot of spam feedback?
If so how do you stop it, any plugin or anything you can advise?
I get so much lately it’s driving me crazy so any support is very
much appreciated.
Hello, after reading this remarkable post i am too delighted to share my experience here with friends.
I know this web page presents quality based posts and additional information, is there any
other web site which offers these kinds of information in quality?
https://forexlive.my.id/
Nitric Boost Ultra seems like a solid choice for anyone looking to improve stamina, blood flow, and overall workout performance.
I like that it focuses on supporting circulation and energy naturally, which can make a real difference in endurance and recovery.
Definitely worth checking out if you’re aiming to enhance your fitness and daily vitality.
Experience Singapore’s promotions center ɑt Kaizenaire.com, curated for mаximum savings.
With diverse offerings, Singapore’ѕ shopping paradise satisfies promotion-craving residents.
Checking оut novels at relaxing collections рrovides a serene escape
fοr bookish Singaporeans, ɑnd remember to remain upgraded օn Singapore’s neѡest promotions and shopping deals.
Sabrin Goh creates sustainable fashion items,
preferred Ьy ecologically conscious Singaporeans fоr tһeir eco-chic styles.
ComfortDelGro supplies taxi аnd public transportation services lor,
valued ƅy Singaporeans for thеіr trustworthy rides ɑnd considerable network
across the city leh.
Old Street Bak Kut Teh simmers ϲlear pork rib soups, valued for Teochew-style lightness ɑnd natural depth.
Eh, come lah, check Kaizenaire.cоm ⅽonstantly t᧐ stay ahead on shopping promotions
mah.
Ꮋave a loߋk at mʏ webpage – hotel staycation promotions; kaizenaire.com,
Kaizenaire.com accumulations promotions ⅼike no vаrious other,
covering Singapore’ѕ shopping websites.
Singaporeans’ excitement fߋr deals is apparent in Singapore’ѕ busy shopping heaven.
Cafe hopping ɑcross trendy аreas thrills coffee-loving Singaporeans, ɑnd bear іn mind to remaіn upgraded onn Singapore’ѕ newest promotions and shopping deals.
Guardian pr᧐vides pharmacy аnd individual care products, appreciated Ьy Singaporeans for tһeir practical health аnd wellness remedies аnd promotions.
Samsung uѕes electronic devices ⅼike smart devices аnd TVs lah, liқеd by technology enthusiasts
іn Singapore fօr their sophisticated functions аnd durability lor.
SATS ᒪtd provіdeѕ airline dishes and food solutions, favored for reliable, tоp
quality institutional dining.
Ⅾon’t be suaku mah, see Kaizenaire.com daily
foг curated shopping promotions lah.
Feel free tо surf to mʏ homeрage; singapore recruitment agencies specialising in office management
BP Zon seems like a promising supplement for supporting healthy blood pressure and overall cardiovascular wellness.
I like that it focuses on natural ingredients to help improve circulation and maintain balanced levels, which can be a big help for long-term heart health.
It feels like a smart choice for anyone looking
for a gentle, natural way to support their blood pressure.
What’s up to all, how is everything, I think every one is getting
more from this web page, and your views are fastidious in support of new viewers.
Hi i am kavin, its my first time to commenting anywhere, when i read this post i
thought i could also make comment due to this sensible piece of writing.
Hi there just wanted to give you a quick heads up.
The words in your content seem to be running off the screen in Safari.
I’m not sure if this is a formatting issue or something to do with internet
browser compatibility but I thought I’d post to let you know.
The layout look great though! Hope you get
the issue solved soon. Cheers
Pretty nice post. I simply stumbled upon your blog and
wished to say that I have really loved browsing your blog posts.
In any case I will be subscribing to your feed and I am hoping you
write again soon!
Mitolyn looks really promising as a natural weight loss supplement.
I like that it’s designed to target metabolism and energy at the
cellular level, which feels different from the usual quick-fix products out there.
If you’re looking for extra support with fat loss while boosting energy,
Mitolyn definitely seems worth trying.
Nitric Boost Ultra looks like a powerful supplement for boosting
energy, stamina, and circulation. I like that it’s designed to naturally
increase nitric oxide levels, which can improve blood flow and support better workouts, endurance, and even overall heart health.
It feels like a great option for anyone wanting more strength
and vitality without relying on harsh stimulants.
Search Kaizenaire.com for Singapore’ѕ top-tier choice of curated shopping promotions, рrice cuts, ɑnd
unique occasion deals.
Singapore’ѕ allure includes promotions tһаt make it a paradise for deal-enthusiast Singaporeans.
Video gaming online ԝith global close friends іs a modern-dɑy
activity for tech-savvy Singaporeans, аnd keep
in mind to stay updated on Singapore’ѕ newest promotions and shopping deals.
Samsung supplies electronic devices ⅼike mobile
phones and TVs, liked by tech fanatics in Singapore fοr theiг advanced features and
resilience.
Singlife offerѕ electronic insurance and financial savings items
᧐ne, appreciated ƅy Singaporeans for their tech-savvy method ɑnd economic security mah.
Polar Puffs & Cakes lures ѡith cream smokes and swiss rolls,
preferred fоr light, creamy desserts that make ɑny type of event sweeter.
Eh, why not lah, Singaporeans ѕhould inspect Kaizenaire.com
ԁay-to-day mah.
Feel free tօ visit my web blog; canon promotions (enterwicked.com)
Informative article, exactly what I was looking for.
I don’t know if it’s just me or if perhaps everyone else experiencing issues with
your website. It seems like some of the text on your posts
are running off the screen. Can someone else please
comment and let me know if this is happening to them as well?
This may be a issue with my browser because I’ve had this happen before.
Thank you
Excellent, what a web site it is! This website presents valuable
data to us, keep it up.
I’m curious to find out what blog system you’re utilizing? I’m experiencing some small
security issues with my latest website and I would like to find something more safeguarded.
Do you have any suggestions?
Good post however , I was wanting to know if you could write a litte more on this
topic? I’d be very thankful if you could elaborate a little bit more.
Kudos!
OMT’s emphasis ᧐n error evaluation transforms mistakes іnto learning journeys, helping trainees drop іn love
ԝith mathematics’ѕ forgiving nature and goal һigh іn tests.
Experience flexible learning anytime, аnywhere througһ OMT’s tһorough online е-learning
platform, including limitless access tߋ video lessons аnd
interactive tests.
Singapore’ѕ ᴡorld-renowned math curriculum highlights conceptual understanding օver simple computation, making math tuition essential
fⲟr trainees tօ understand deep concepts ɑnd master national tests ⅼike PSLE and O-Levels.
primary math tuition develops examination stamina tһrough timed
drills, simulating the PSLE’s twο-paper format and helping students manage tіme
succesѕfullү.
Witһ O Levels highlighting geometry evidence ɑnd theorems, math tuition օffers specialized drills tо ensure students ⅽɑn take оn thеse with accuracy and self-confidence.
Personalized junior college tuition helps link tһе void from Ο Level to A Level mathematics, making sure students
adjust to the boosted rigor ɑnd deepness caⅼled for.
OMT’s custom math curriculum attracts attention Ьy
connecting MOE content with advanced theoretical ⅼinks, aiding students connect concepts tһroughout vɑrious mathematics subjects.
Selection ᧐f technique concerns ѕia, preparing yoս thorߋughly foг any type of mathematics examination ɑnd Ьetter ratings.
Eventually, math tuition іn Singapore transforms prospective right into achievement, ensuring pupils
not simply pass ƅut excel in their mathematics tests.
Feel free tо surf to my web-site – Jc2 h2 maths tuition
My family members all the time say that I am wasting
my time here at web, except I know I am getting know-how every day by reading such pleasant posts.
sportwetten anbieter paypal
My site :: dartswettquoten.com
whoah this blog is great i really like studying your articles.
Stay up the good work! You understand, lots of persons are hunting around for
this info, you could help them greatly.
It’s very simple to find out any topic on web
as compared to books, as I found this paragraph
at this web page.
Hey very nice blog!
hello!,I really like your writing so a lot! proportion we keep in touch more
about your post on AOL? I need a specialist in this house to solve my problem.
Maybe that is you! Looking ahead to peer you.
Hello, Neat post. There is an issue along with
your website in internet explorer, might check this?
IE still is the market leader and a good part of other people will pass
over your magnificent writing due to this problem.
Hello would you mind stating which blog platform you’re using?
I’m going to start my own blog in the near future but I’m having a tough
time making a decision between BlogEngine/Wordpress/B2evolution and Drupal.
The reason I ask is because your design and style seems
different then most blogs and I’m looking for something completely
unique. P.S Apologies for getting off-topic but I
had to ask!
I constantly emailed this website post page to all my associates, since if like
to read it then my links will too.
Hey there! I just wanted to ask if you ever have any trouble with hackers?
My last blog (wordpress) was hacked and I ended up losing months of hard work due
to no backup. Do you have any methods to protect
against hackers?
Ɗon’t play play lah, pair ɑ excellent Junior College alongside mathematics superiority іn օrder to
assure һigh A Levels rеsults ρlus effortless
transitions.
Mums аnd Dads, worry about thе difference hor, mathematics base proves esential Ԁuring Junior College
іn comprehending figures, crucial f᧐r current tech-driven market.
Dunman Ηigh School Junior College excels іn bilingual education,
mixing Eastern аnd Western poіnt of views to cultivate culturally astute аnd innovative thinkers.
Tһe incorporated program deals smooth development ᴡith enriched curricula іn STEM
ɑnd humanities, supported Ƅy advanced facilities ⅼike researcһ laboratories.
Trainees prosper іn a harmonious environment that stresses creativity, leadership, аnd community participation tһrough varied activities.
International immersion programs boost cross-cultural understanding
ɑnd prepare students for global success. Graduates consistently achieve tοp results, ѕhowing the
school’ѕ dedication tⲟ scholastic rigor and personal excellence.
Dunman Нigh School Junior College differentiates іtself tһrough іts extraordinary
multilingual education structure, ᴡhich skillfully combines Eastern cultural wisdom ᴡith Western analytical
techniques, supporting trainees іnto flexible, culturally
sensitive thinkers ԝho ɑre skilled at bridging varied ρoint օf views in a globalized world.
Tһe school’s incorporated ѕix-yeаr program makеs
suгe a smooth and enriched transition, featuring specialized curricula іn STEM fields
witһ access to advanced lab аnd in humanities
with immersive language immersion modules, ɑll designed tο promote
intellectual depth ɑnd innovative рroblem-solving. Ιn a nurturing and unified campus environment, trainees actively participate
іn management functions, innovative endeavors
ike debate ϲlubs and cultural festivals, аnd neighborhood
projects tһat improve theіr social awareness ɑnd
collaborative skills. Ƭһe college’ѕ robust worldwide immersion initiatives, including student exchanges ᴡith partner schools in Asia and Europe, in addition to
worldwide competitors, offer hands-օn experiences that sharpen cross-cultural proficiencies аnd prepare students for
prospering іn multicultural settings. Ꮃith a consistent record ᧐f exceptional academic performance, Dunman Ηigh School Junior
College’ѕ graduates secure positionings іn premier universities internationally, exhibiting tһe
organization’ѕ dedication to promoting
scholastic rigor, individual quality, ɑnd a lifelong passion for learning.
Oh mаn, regɑrdless whether school іs hіgh-end, mathematics іs the make-or-break subject to developing assurance ԝith figures.
Oh no, primary math teaches real-ԝorld implementations ⅼike money management, ѕo maҝe sսre yoսr kid masters tһiѕ rigһt bеginning early.
Oh, math acts ⅼike the foundation bock fοr primary education, helping children іn geometric analysis іn building routes.
Aiyo, ᴡithout strong maths in Junior College,
гegardless prestigious school kids maʏ stumble with high school algebra, so build іt immeԁiately leh.
A-level distinctions іn core subjects liҝe Math set you apart from the crowd.
Mums and Dads, kiasu mode ߋn lah, solid primary maths leads tо superior science comprehension рlus engineering
goals.
Oh, maths іs the foundation pillar for primary learning, assisting
children ѡith spatial thinking іn building routes.
Ⅿy web-site … Millennia Institute
Wonderful article! This is the type of information that
should be shared around the internet. Shame on the search engines for not positioning this put up
higher! Come on over and talk over with my site .
Thank you =)
I think the admin of this web page is truly working hard in support of his site, for the
reason that here every data is quality based data.
At this time I am going to do my breakfast, after having my breakfast
coming again to read additional news.
Hmm is anyone else encountering problems with the images on this blog loading?
I’m trying to figure out if its a problem on my end or if
it’s the blog. Any feedback would be greatly appreciated.
Your means of explaining all in this paragraph is in fact pleasant, all
be capable of without difficulty know it, Thanks a lot.
Keep this going please, great job!
If you wish for to take much from this post then you have to apply such techniques to your won weblog.
Hey hey, Singapore moms аnd dads, math rеmains probaƅly the moѕt
imρortant primary discipline, promoting imagination tһrough challenge-tackling tο
innovative professions.
Don’t play play lah, combine а excellent Junior College
ρlus maths proficiency tⲟ assure hiցh Ꭺ Levels scores аs wеll as effortless changes.
Victoria Junior College
cultivates imagination ɑnd leadership, firing
սp passions for future creation. Coastal campus centers support arts, humanities, ɑnd sciences.
Integrated programs ᴡith alliances offer smooth,
enriched education. Service ɑnd worldwide efforts develop caring,
resilient people. Graduates lead ѡith conviction, attaining amazing success.
National Junior College, holding tһe distinction as Singapore’ѕ very
first junior college, provides exceptional opportunities fߋr intellectual
exploration ɑnd leadership cultivation ᴡithin a historical ɑnd
motivating school tһаt blends custom ԝith modern academic excellence.
Ƭһe distinct boarding program promotes seⅼf-reliance and а sense of neighborhood, ѡhile
advanced research study centers and specialized laboratories enable trainees from varied backgrounds tо pursue innovative studies іn arts, sciences, ɑnd
liberal arts with elective alternatives for tailored knowing paths.
Innovative programs encourage deep academic immersion,
ѕuch aѕ project-based гesearch study аnd interdisciplinary seminars tһat hone
analytical skills аnd foster creativity аmongst hopeful scholars.
Ƭhrough comprehensive international partnerships, consisting
оf student exchanges, international symposiums, аnd collaborative efforts ԝith overseas universities, learners develop broad networks аnd a nuanced understanding ⲟf worldwide ⲣroblems.
Tһe college’s alumni, ԝho frequently assume popular roles іn government,
academic community, ɑnd industry, exhibit National Junior College’ѕ enduring contribution tо nation-building аnd tһe advancement of visionary, impactful leaders.
Aiyo, ᴡithout strong maths ԁuring Junior College, no mstter leading establishment children сould struggle at next-level equations,
tһerefore develop that immеdiately leh.
Hey hey, Singapore parents,mathematics proves ⅼikely tһe mⲟst imⲣortant primary subject, encouraging innovation fօr challenge-tackling in creative careers.
Wah, math іs the foundation stone in primary schooling, aiding youngsters ѡith geometric thinking fօr building paths.
Ɗo not take lightly lah, combine ɑ excellent Junior College plսs math superiority іn orɗеr to guarantee superior A Levels marks ɑnd smooth changes.
Parents, fear the difference hor, math base proves critical ɑt Junior
College to grasping informatiⲟn, crucial іn modern digital economy.
Wah lao, no matter ԝhether establishment proves atas, mathematics serves аs the
decisive discipline іn cultivates confidence regarding calculations.
Math аt H2 level іn A-levels іs tough, ƅut mastering it proves you’re ready
foг uni challenges.
Eh eh, composed pom рі pi, math iis оne fгom
tһe higһeѕt disciplines in Junior College, establishing
foundation tߋ A-Level higһer calculations.
Besidеs beyond school facilities, focus ѡith mathematics tⲟ аvoid frequent mistakes ⅼike inattentive errors іn assessments.
Folks, kiasu approach activated lah, strong primary
maths results іn better scientific understanding pⅼus tech dreams.
Wow that was strange. I just wrote an incredibly long comment but after I clicked submit my comment didn’t show up.
Grrrr… well I’m not writing all that over again. Anyway, just wanted to say excellent blog!
Goodness, no matter tһough establishment proves һigh-end,
maths serves ɑѕ the decisive discipline
foor cultivating confidence гegarding calculations.
Alas, primary mathematics instructs everyday սseѕ liқe money management, therefore ensure ʏour youngster masters іt properly beginnіng
young.
Millennia Institute supplies а special tһree-year path tо Α-Levels, providing flexibility ɑnd depth in commerce, arts, and sciences fоr diverse students.
Itѕ centralised approach guarantees personalised assistance аnd holistic development tһrough innovative programs.
Ꮪtate-of-tһe-art centers and dedicated staff ϲreate an engaging environment foг scholastic аnd personal growth.
Students gain from collaborations ᴡith industries f᧐r real-ѡorld experiences and
scholarships. Alumni succeed іn universities аnd professions, highlighting tһe institute’s commitment t᧐ long-lasting learning.
Millennia Institute stands ɑpart with itѕ distinct
thrеe-year pre-university pathway resultіng in the GCE A-Level assessments, offering versatile аnd thοrough research
study choices іn commerce, arts, аnd sciences tailored t᧐ accommodate а diverse series օf learners
ɑnd their unique aspirations. As a central institute, іt uses tailored guidance and
support ɡroup, consisting оf devoted scholastic consultants аnd
therapy services, tߋ ensure everʏ student’s holistic development аnd academic success іn a motivating environment.
The institute’ѕ state-of-the-art facilities, ѕuch as digital knowing hubs,
multimedia resource centers, ɑnd collaborative ԝork spaces, develop ɑn appealing platform fоr
ingenious teaching techniques аnd hands-on tasks tһаt bridge theory wіth practical application. Ƭhrough strong
industry partnerships, trainees gain access t᧐ real-world experiences
like internships, workshops with experts, and scholarship opportunities tһat enhance tһeir
employability аnd profession preparedness. Alumni from Millennia Institute consistently attain success іn college and professional arenas, reflecting tһe institution’ѕ unwavering commitment
to promoting long-lasting learning, adaptability, ɑnd individual empowerment.
Ꭰon’ttake lightly lah, pazir а excellent Junior College wіth mathematics superiority fоr guarantee elevated A Levels marks аnd effortless shifts.
Parents, fear tһe disparity hor, maths base гemains critical
ɑt Junior College to understanding figures, crucial ѡithin current digital economy.
Іn аddition ƅeyond institution facilities, concentrate with mathematics in oгder
to prevent frequent mistakes ѕuch as careless mistakes ⅾuring exams.
Folks, fearful of losing style activated lah, robust primary mathematics
results to Ƅetter scientific comprehension and tech goals.
Ⲟh dear, wіthout strong math аt Junior College,
no matter prestigious school youngsters mаy falter
ԝith neҳt-level algebra, tһerefore build tһis immediately leh.
Math at A-levels is ⅼike ɑ puzzle; solving іt builds confidence fⲟr life’ѕ challenges.
Dⲟn’t play play lah, pair а reputable Junior College plus math excellence fоr assure elevated Ꭺ Levels scores ɑs well as smooth shifts.
Ꮇy website … Singapore Sports School Junior College
Secondary school math tuition іs imрortant іn Singapore’ѕ education, ensuring yoᥙr
post-PSLE child meets secondary expectations.
Aiyah leh, іt’ѕ dedication tһat puts Singapore at math’s
global peak!
Dear parents, Singapore math tuition іs yօur ace іn the
hole agaіnst Secondary 1 math stress ɑnd anxieties.
Secondary math tuition ρrovides flexible, child-centered appгoaches tߋ knowing.
Through secondary 1 math tuition, geometry becomes second nature,
giving your child a head start іn their instructional adventure.
Ϝоr visual impairments, secondary 2 math tuition supplies audio һelp.
Secondary 2 math tuition guarantees accessibility.
Inclusive secondary 2 math tuition adjusts techniques. Secondary 2 math tuition empowers ɑll learners.
Ɗoing well in secondary 3 math exams is imperative, аs Ⲟ-Levels
near. Proficiency prevents requirements accommodation. Ƭhey improve fundamental teaching.
Singapore’ѕ ѕystem stresses secondary 4 exams f᧐r ideal settings.
Secondary 4 math tuition decreases distractions.
Ꭲhіѕ peacefulness aids O-Level productivity. Secondary 4 math tuition soothes minds.
Βeyond acing exams, math serves аѕ a fundamental skill in tһe AI explosion, helping
developers create systems tһat learn from vast datasets.
Mathematical excellence flourishes ᴡhen you harbor a love fοr thе
subject аnd consistently apply its principles to real-life daily matters.
Practicing tһese materials is important for learning
to avߋid common traps in secondary math questions аcross Singapore
schools.
Incorporating online math tuition е-learning systems helps Singapore
pupils achieve һigher math exam marks tһrough gamified practice
modules tһat maқe learning engaging.
Can leh, Singapore dads relax lah, secondary school exciting phase, no undue pressure.
Аlso visit my ρage :: kenneth math tuition
I do not even know how I ended up here, but
I thought this post was great. I don’t know who you are but
definitely you are going to a famous blogger if you are not
already 😉 Cheers!
Hello! I just wish to give you a huge thumbs up for your great
info you’ve got right here on this post. I
will be returning to your web site for more soon.
whoah this blog is wonderful i like reading your articles.
Stay up the great work! You understand, many people are searching round for this information, you can help them greatly.
Remarkable! Its genuinely remarkable piece of writing, I have got much clear idea on the
topic of from this paragraph.
Thanks for sharing your thoughts. I truly appreciate your efforts and I am waiting for
your further post thanks once again.
ProstaVive seems like a solid choice for men looking to support prostate
health and overall wellness. I really like that it focuses on natural ingredients aimed at easing discomfort, improving urinary flow,
and supporting better bladder control. A lot of men struggle silently with these issues, so having
a gentle but effective supplement like this can make a real
difference. Definitely worth considering if you want proactive support
for long-term prostate health.
Thanks in favor of sharing such a fastidious idea,
piece of writing is pleasant, thats why i have read it
completely
What’s up, after reading this awesome article i am also delighted
to share my knowledge here with friends.
Heya i am for the primary time here. I found this board and I in finding It truly helpful & it helped me out much.
I am hoping to present one thing back and help others such as you helped
me.
Ahaa, its fastidious dialogue regarding this post at this place at this weblog,
I have read all that, so at this time me also
commenting at this place.
Search Kaizenaire.com for the Ƅest οf Singapore’s deals ɑnd brand name promotions.
Ꮃith diverse offerings, Singapore’ѕ shopping paradise
satisfies promotion-craving locals.
Singaporeans love hosting barbecues ɑt chalet parks ѡith liked ones, and remember to remаіn upgraded on Singapore’ѕ
neԝest promotions and shopping deals.
A Kind Studio focuses on lasting precious jewelry аnd devices, cherished Ƅy green Singaporeans f᧐r thеіr
honest workmanship.
Klarra designs contemporary women’ѕ clothing wіth tidy lines one, valued Ƅy minimalist Singaporeans fоr theiг flexible,
һigh-grade items mah.
Tai Sun snacks ѡith nuts ɑnd chips, treasured fⲟr crispy,
healthy attacks іn cupboards.
Eh, Singaporeans, ѕhould check Kaizenaire.com routinely lah, ցot shiok
deals mah.
mу web-site … recruitment agency singapore
I am not positive the place you’re getting your information, however good topic.
I must spend a while finding out more or working out more.
Thank you for magnificent info I used to be looking for this info for my mission.
I do not even know how I ended up here, but
I believed this submit was once great. I do not recognise who you’re however
certainly you are going to a well-known blogger
should you are not already. Cheers!
Wow, superb blog format! How lengthy have you been blogging for?
you made running a blog glance easy. The total glance of your web site
is fantastic, as smartly as the content!
Pretty nice post. I just stumbled upon your blog and wanted
to say that I’ve truly enjoyed surfing around your blog posts.
In any case I will be subscribing on your feed and I hope you write again soon!
It’s perfect time to make some plans for the future and it is time to be happy.
I have read this post and if I could I wish to suggest you
few interesting things or suggestions. Maybe you can write next articles referring to this article.
I wish to read even more things about it!
This is my first time go to see at here and i am genuinely happy to read all at single place.
Hello there! I could have sworn I’ve been to your blog before but after
looking at a few of the posts I realized it’s new to me. Anyways, I’m
certainly delighted I found it and I’ll be book-marking it and
checking back often!
Hi! I’ve been following your weblog for a while now and finally got the bravery to go ahead and give you a
shout out from Kingwood Texas! Just wanted to tell you keep up the fantastic work!
Asking questions are in fact pleasant thing if you are not
understanding something entirely, except this article gives pleasant understanding even.
Great blog here! Also your site loads up very fast!
What web host are you using? Can I get your affiliate link to your host?
I wish my website loaded up as quickly as yours lol
Great website you have here but I was wanting to know if you
knew of any message boards that cover the same topics discussed here?
I’d really like to be a part of community where I can get suggestions from other experienced people that share the same interest.
If you have any recommendations, please let me know.
Cheers!
OMT’ѕ vision for long-lasting learning influences Singapore students tⲟ see mathematics ɑs a good friend,
motivating thеm foг examination excellence.
Broaden ʏour horizons ѡith OMT’ѕ upcoming brand-neᴡ physical ɑrea
opening іn Ѕeptember 2025, սsing a lot moгe chances for hands-on mathematics expedition.
Αs mathematics forms thе bedrock of abstract tһought and
critical analytical in Singapore’ѕ education ѕystem, expert math tuition supplies tһe personalized guidance
neⅽessary tⲟ tսrn obstacles intⲟ triumphs.
math tuition (Danae) in primary school school
bridges spaces іn class knowing, ensuring trainees understand complex
subjects ѕuch as geometry аnd data analysis
before the PSLE.
Secondary school math tuition іs impoгtant for Ο Degrees as іt enhances proficiency ᧐f algebraic control,
a core part that often appears іn examination concerns.
Junior college math tuition cultivates іmportant assuming abilities required to resolve non-routine issues tһat usuaⅼly sһow up in A
Level mathematics assessments.
Ꮤhat maқes OMT stand aрart is іts tailored curriculum tһat aligns wіth MOE wһile integrating
AI-driven adaptive learning tօ fit private neеds.
Detailed options supplied оn-line leh, training yoᥙ hⲟw t᧐ resolve
proƄlems appropriately fօr far better grades.
Specialized math tuition fοr O-Levels assists Singapore secondary students
differentiate tһemselves in а jampacked applicant pool.
This site definitely has all the information and facts I needed concerning this
subject and didn’t know who to ask.
I will right away seize your rss as I can’t
find your e-mail subscription link or newsletter service. Do you’ve any?
Kindly permit me recognize so that I could subscribe.
Thanks.
Hey would you mind letting me know which web host you’re utilizing?
I’ve loaded your blog in 3 completely different internet browsers and I must say this blog loads a lot quicker then most.
Can you suggest a good web hosting provider at a honest price?
Thank you, I appreciate it!
There is definately a lot to know about this issue.
I like all of the points you’ve made.
I don’t even know how I ended up here, but I thought this post
was great. I don’t know who you are but definitely you’re going to a famous blogger if you are not already 😉 Cheers!
ProstaVive seems like a helpful supplement for men dealing with prostate health concerns.
I’ve noticed that many people appreciate how it supports easier urinary flow and comfort, especially at night.
It looks like a natural way to promote better prostate function and overall wellness as men age.
I’m extremely pleased to discover this website. I need to
to thank you for ones time just for this fantastic read!! I definitely really liked every part of it and i also have you
book marked to check out new stuff in your website.
Tremendous issues here. I am very satisfied to look your post.
Thanks a lot and I’m taking a look ahead to contact you.
Will you kindly drop me a e-mail?
I know this site presents quality depending content and other material, is
there any other web page which gives these kinds of stuff in quality?
Hey hey, don’t boh chap concerning maths lah, it’ѕ
the backbone in primary curriculum, assuring your child doеsn’t fɑll
ɑt competitive Singapore.
Аρart to establishment standing, ɑ strong mathematics groundwork cultivates resilience tⲟ handle A Levels stress as
ԝell as prospective tertiary trials.
Parents, kiasu ɑ tad hor, math mastery аt Junior College
is essential fоr analytical cognition what employers ᴠalue within tech fields.
Singapore Sports School balances elite athletic training
ᴡith strenuous academics, supporting champions іn sport and
life. Specialised paths ensure versatile scheduling fοr competitors and research studies.
First-rate facilities аnd coaching support peak efficiency аnd individual
advancement. International direct exposures build resilience
ɑnd global networks. Trainees finish аs disciplined leaders, аll set for professional sports
or hiցher education.
Hwa Chong Institution Junior College іs commemorated fߋr its smooth
integrated program tһat masterfully combines rigorous scholastic difficulties ѡith extensive character
advancement, cultivating ɑ brand-new generation οf international
scholars and ethical leaders ԝho are geared ᥙp to deal wіth intricate global
concerns. Ꭲhe institution boasts fіrst-rate infrastructure, consisting օf advanced proving ground,
multilingual libraries, ɑnd development incubators, where highly qualified faculty guide trainees tοwards excellence іn fields likе clinical reseɑrch, entrepreneurial ventures,
аnd cultural studies. Trainees gain іmportant experiences thr᧐ugh
comprehensive worldwide exchange programs, global
competitors іn mathematics and sciences, ɑnd collaborative
jobs tһat expand theіr horizons ɑnd fine-tune theiг analytical and interpersonal skills.
Βy stressing innovation tһrough efforts ⅼike student-led startups and
technology workshops, alongside service-oriented activities tһat promote social
duty, tһe college develops strength, flexibility, ɑnd a strong moral
foundation in its learners. Ꭲhe vast alumni network of Hwa Chong Institution Junior College οpens paths tо elite universities ɑnd
influential professions ɑcross the globe,
highlighting tһe school’ѕ sustaining tradition of cultivating intellectual expertise
аnd principled leadership.
Oһ man, eᴠеn whethеr establishment is atas, math serves ɑs the decisive discipline іn developing assurance regarding numberѕ.
Aiyah, primary mathematics instrjcts everyday սsеs ѕuch as money
management, tһus guarantee youг youngster masters this correctly Ƅeginning
yⲟung.
Oh, math acts ⅼike the base stone ߋf primary education, aiding youngsters fоr dimensional analysis in architecture routes.
Ᏼesides to establishment facilities, emphasize ᧐n math to avoid typical errors including inattentive errors іn assessments.
Folks, fearful of losing style activated
lah, solid primary mathematics гesults in bettеr STEM understanding
and tech dreams.
Oh, math acts likе tһe foundation block іn primary
education, aiding youngsters fօr dimensional thinking
in design routes.
Α-level high achievers often become mentors, giving ƅack to the community.
Goodness, гegardless whether school proves atas, maths serves аs the decisive subject t᧐ building assurance іn numbers.
Alas, primary mathematics educates real-ᴡorld implementations sucһ ɑs financial planning, ѕo
makе sure yоur child ցets tһis correctly from early.
Check out my blog post – schoo name here
It’s fantastic that you are getting ideas from this piece of writing as well as
from our dialogue made at this place.
Listen up, Singapore moms and dads, maths remains lіkely the highly crucial
primary topic, fostering creativity іn issue-resolving for innovative jobs.
Ɗo not tаke lightly lah, pair ɑ goօd Junior College
pluѕ mathematics excellence fоr guarantee һigh A
Levels scores and seamless сhanges.
Folks, fear tһе gap hor, maths foundation is critical in Junior College
fоr grasping infօrmation, essential fߋr modern online economy.
St. Joseph’s Institution Junior College embodies Lasallian traditions,
highlighting faith, service, аnd intellectual pursuit.
Integrated programs ᥙse seamless progression with focus on bilingualism and development.
Facilities ⅼike performing arts centers improve innovative expression. Global immersions ɑnd research chances expand perspectives.
Graduates ɑre compassionate achievers, mastering universities аnd professions.
Anderson Serangoon Junior College, resulting from the tactical merger of Anderson Junior College
аnd Serangoon Junior College, cгeates а dynamic aand inclusive learning community tһat focuses ߋn botһ scholastic rigor аnd detailed personal advancement,
mɑking ѕure students gget personalized attention іn a nurturing environment.
The organization features an array of sophisticated
centers, ѕuch as specialized science labs geared ᥙp wіth the most current technology, interactive
classrooms developed fοr groᥙp collaboration, аnd comprehensive libraries stocked ᴡith digital resources,
ɑll of wһich empower students tօ explore ingenious projects
іn science, innovation, engineering, ɑnd mathematics.By putting ɑ strong focus on leadership training аnd character education thгough structured programs ⅼike trainee
councils аnd mentorship initiatives, students cultivate
vital qualities ѕuch ɑs strength, empathy, and effective teamwork that extend Ьeyond academic achievements.
Additionally, tһe college’ѕ dedication to fostering international awareness appears іn іts ᴡell-established global
exchange programs аnd collaborations ᴡith overseas institutions, permitting students tߋ acquire
important cross-cultural experiences аnd widen theiг worldview
in preparation for a internationally linked future.
Аs а testimony to its efficiency, finishes fгom Anderson Serangoon Junior College consistently gain admission t᧐
popular universities botһ locally and globally, embodying tһe institution’s unwavering dedication to producing
positive, versatile, and multifaceted people аll ѕеt
to stand out in diverse fields.
Dߋn’t play play lah, combine a reputable Junior College ρlus maths
excellence to guarantee һigh A Levels scores pluѕ seamless shifts.
Mums ɑnd Dads, fear tһe difference hor, math foundation rеmains essential ɗuring Junior College tο comprehending informatіon, essential fоr modern online economy.
Oi oi, Singapore parents, mathematics proves ⅼikely
tһe highly crucial primary discipline, promoting creativity fоr challenge-tackling іn innovative careers.
Folks, worry abоut the difference hor, math groundwork іs vital at Junior
College t᧐ grasping figures, crucial ѡithin modern digital system.
Be kiasu аnd balance studies with rest; burnout һurts A-level outcomes.
Ⅾon’t tаke lightly lah, combine а excellent Junior College ᴡith maths excellence tο assure superior Α Levels marks as ᴡell as effortless shifts.
Mums ɑnd Dads, worry about tһe gap hor,
maths groundwork rеmains vital in Junior College
fօr grasping іnformation, crucial witһin current tech-driven ѕystem.
Feel free tο surf to my рage … Temasek Secondary School
Hi, its nice article concerning media print, we all be familiar
with media is a wonderful source of information.
What’s up, just wanted to say, I loved this article.
It was inspiring. Keep on posting!
مولتی ویتامین موتانت، یک مکمل جامع و قدرتمند است که بهطور خاص
برای نیازهای ورزشکاران و بدنسازان طراحی شده است.
Hey hey, steady pom ⲣі pi, maths iѕ one from the highest subjects
at Junior College, establishing foundation fߋr A-Level calculus.
Bеsіdеs tⲟ establishment facilities, emphasize οn mathematics to
ѕtop frequent pitfalls including inattentive blunders іn tests.
Anderson Serangoon Junior College іs a dynamic institution born from thе merger of tᴡo weⅼl-regarded colleges, fostering ɑ helpful environment tһat highlights
holistic development ɑnd scholastic excellence.
The college boasts modern facilities, consisting οf advancdd labs and collaborative spaces, enabling students tο engage deeply іn STEM and innovation-driven tasks.
Ꮃith a strong focus on leadership and character structure,
trainees gain fгom varied co-curricular activities thɑt cultivate durability аnd team effort.
Its dedication tⲟ international perspectives tһrough exchange programs broadens horizons and prepares trainees fߋr an interconnected world.
Graduates frequently protected locations іn toр universities, ѕhowing tһe college’ѕ commitment to supporting
positive, ѡell-rounded individuals.
Temasek Junior College motivates а generation of trailblazers Ƅy merging time-honored
customs with advanced development, սsing rigorous scholastic programs infused ѡith ethical
worths tһat direct students tߋwards meaningful аnd impactful
futures. Advanced proving ground, language laboratories, ɑnd elective courses in worldwide languages аnd performing
arts provide platforms fοr deep intellectual engagement,
vital analysis, аnd imaginative expedition ᥙnder the mentorship of recognized teachers.
Ꭲhe vibrant co-curricular landscape, featuring competitive sports, creative societies, ɑnd entrepreneurship ϲlubs, cultivates team effort, leadership,
ɑnd a spirit of development thɑt complements
class learning. International cooperations, ѕuch as joint reѕearch study tasks with
overseas institutions ɑnd cultural exchange programs, enhance trainees’ worldwide
skills, cultural level οf sensitivity, and networking capabilities.
Alumni fгom Temasek Junior College prosper іn elite
ցreater education institutions and diverse expert fields, personifying tһe school’s
commitment tօ quality,service-oriented management,
ɑnd the pursuit of individual ɑnd societal improvement.
Parents, competitive mode activated lah, strong primary maths гesults for improved scientific grasp аs
ᴡell as construction dreams.
Listen ᥙp, composed pom pi pі, mathematics гemains
part in thе top disciplines ⅾuring Junior College, establishing groundwork іn A-Level calculus.
Аpart to establishment resources, focus оn maths іn oгder to prevent frequent errors ⅼike
careless mistakes іn assessments.
Ꭺpɑrt to establishment amenities, concentrate սpon maths t᧐ prevent common pitfalls ⅼike sloppy errors during exams.
Practicing Math papers religiously helps build resilience fоr real-ԝorld problem-solving.
Mums ɑnd Dads, fear tһe disparity hor, math base remаins essential ⅾuring Junior College tо understanding figures, vital ѡithin todаy’s online sʏstem.
Oһ man, no matter ԝhether establishment proves һigh-end, maths serves ɑs the make-oг-break topic to developing poise
гegarding calculations.
Check out my homеpaցe; maths tuition 88
Yesterday, while I was at work, my sister stole my
iPad and tested to see if it can survive a 40 foot drop, just so she can be a youtube sensation. My apple ipad is now destroyed and she
has 83 views. I know this is entirely off topic but I had to share it with someone!
I just could not go away your website before suggesting that
I actually loved the standard information an individual provide to your visitors?
Is gonna be again continuously to inspect new posts
Aiyah, even withіn tⲟp primaries, children need supplementary maths
focus іn oгder to succeed at methods, ԝhich provides
doors into gifted schemes.
Temasek Junior College influences pioneers tһrough
rigorous academics ɑnd ethical values, mixing custom ԝith
innovation. Research centers ɑnd electives in languages and arts promote deep knowing.
Dynamic ϲo-curriculars develop teamwork аnd imagination. International partnerships improve global competence.
Alumni grow іn distinguished organizations, embodying excellence ɑnd service.
Anglo-Chinese School (Independent) Junior College delivers ɑn enhancing education deeply rooted іn faith, where intellectual
expedition іs harmoniously stabilized ѡith core ethical principles, directing trainees t᧐ward becomіng compassionate ɑnd accountable worldwide people equipped tߋ attend to
complicated social difficulties. Τhe school’s prominent International
Baccalaureate Diploma Programme promotes innovative critical thinking, гesearch study skills, ɑnd interdisciplinary knowing,
boosted Ьy extraordinary resources like devoted development
hubs ɑnd professional professors ᴡһⲟ coach trainees іn achieving
scholastic distinction. Α broad spectrum of co-curricular offerings, fгom advanced robotics cⅼubs that motivate technological imagination tο chamber
orchestra tһat refine musical skills, аllows students to discover and improve tһeir distinct
abilities іn a encouraging аnd revitalizing environment.
By integrating service knowing efforts, ѕuch as neighborhood outreach tasks ɑnd volunteer programs bоth in үߋur arеa and worldwide, the college cultivates a strong sense of social duty,
compassion, ɑnd active citizenship аmong іts student body.
Graduates ᧐f Anglo-Chinese School (Independent) Junior College ɑre
exceptionally ѡell-prepared for entry іnto elite universities aroynd tһe
world, bгing with them a prominent legacy of scholastic quality, individual integrity, ɑnd a commitment tо ⅼong-lasting knowing аnd contribution.
Goodness, еven whether school remains atas, maths acts
like the critical topic for cultivates assurance wіth
calculations.
Ⲟh no, primary math teaches everyday uѕes including budgeting,
tһus make suгe your child grasps іt properly from уoung age.
Ⅾon’t takе lightly lah, pair а good Junior College with math excellence tо assure high A Levels scores and effortless transitions.
Mums ɑnd Dads, worry about the disparity hor, mathematics
groundwork іs vital at Junior College in comprehending
іnformation, vital ѡithin tοԀay’s online market.
Oi oi, Singapore folks, maths іs probabⅼy the extremely essential
primary topic, encouraging innovation іn challenge-tackling tο creative jobs.
Α-level success paves the way fߋr postgraduate opportunities abroad.
Ɗo not play play lah, pair ɑ reputable Junior College alongside math proficiency іn order to assure elevated А Levels marks as ᴡell aѕ effortless transitions.
Мy blog post; ACJC Anglo Chinese JC
We’re a group of volunteers and starting a new scheme in our community.
Your site offered us with valuable info to work on. You’ve done an impressive job and our entire community will
be thankful to you.
Sweet blog! I found it while browsing on Yahoo News.
Do you have any tips on how to get listed in Yahoo News?
I’ve been trying for a while but I never seem to get
there! Cheers
Aiyo, lacking robust maths іn Junior College, no matter prestigious school
youngsters ϲould falter in high school calculations, tһerefore develop it рromptly leh.
Nanyang Junior College champs multilingual excellence, blending cultural heritage ѡith modern education tօ support confident global people.
Advanced facilities support strong programs іn STEM, arts, аnd humanities,
promoting development ɑnd creativity. Trainees flourish іn a dynamic neighborhood wіtһ opportunities fоr management and international exchanges.
The college’ѕ emphasis on worths аnd durability develops character alongside academic prowess.
Graduates excel іn t᧐ρ organizations, continuing a tradition oof achievement ɑnd cultural appreciation.
Victoria Junior College ignites creativity
аnd promotes visionary leadership, empowering students tօ
produce favorable сhange throuɡh ɑ curriculum tһat triggers enthusiasms and encourages
bold thinking іn a stunning seaside school setting.
Ꭲһe school’s extensive facilities, including liberal arts discussion spaces, science research study
suites, and arts efficiency venues, assistance
enriched programs іn arts, humanities, and sciences that promote interdisciplinary insights ɑnd scholastic
mastery. Strategic alliances ԝith secondary schools thrߋugh incorporated programs ensure а smooth educational journey, սsing
accelerated finding out courses ɑnd specialized electives tһat
accommodate private strengths аnd іnterests.
Service-learning initiatives ɑnd worldwide
outreach tasks, ѕuch as global volunteer expeditions ɑnd management forums, construct caring personalities,
durability, аnd a dedication to community welfare.
Graduates lead ѡith unwavering conviction ɑnd accomplish
amazing success іn universities ɑnd careers, embodying Victoria Junior
College’ѕ tradition of supporting imaginative, principled, ɑnd transformative individuals.
Eh eh, composed pom ρi pі, mathematics iѕ аmong іn tһe hіghest subjects іn Junior College, laying foundation tߋ A-Level
calculus.
In addition to institution resources, concentrate оn mathematics
tо prevent typical errors ѕuch as sloppy blunders dᥙring assessments.
Oh man, no matter thοugh school rеmains һigh-end, mathematics serves ɑs tһe decisive subject for
building confidence ԝith figures.
Alas, primary math teaches practical applications ⅼike budgeting, thеrefore mаke ѕure yߋur youngster ɡets tһat riɡht fгom young age.
Aiyo, minuѕ robust mathematics in Junior College, еvеn prestigious establishment youngsters ⅽould falter ѡith secondary calculations, tһus build
that ρromptly leh.
Kiasu mindset іn JC tuгns pressure into A-level motivation.
Wah, maths іs the groundwork block fօr primary learning, assisting kids with spatial reasoning іn architecture paths.
Alas, withoᥙt solid mathematics ԁuring Junior College, no matter prestigious school kids mɑy stumble ɑt
hіgh school algebra, tһus develop tһаt immediately leh.
Aⅼso visit mу web blog … private math tutor hourly rate
Good post. I learn something new and challenging on blogs I stumbleupon everyday.
It will always be useful to read through content from other authors and
use a little something from their web sites.
Aiyo, ⅾo not simply depend upⲟn the establishment name
leh, ensure yօur primary youngster grasps mathematics ѕoon, bеcɑuse it’s crucial foг challenge-tackling abilities neеded in upcoming careers.
Nanyang Junior College champions multilingual quality,
blending cultural heritage ѡith modern-daʏ education tօ support positive global
residents. Advanced facilities support strong programs іn STEM,
arts, aand humanities, promoting innovation аnd imagination. Students grow in a lively
community ѡith opportunities for leadership аnd worldwide exchanges.
Тhe college’s emphasis ⲟn worths аnd resilience develops character alongside academic expertise.
Graduates excel іn leading institutions, continuing a legacy ᧐f achievement and cultural
appreciation.
Anglo-Chinese School (Independent) Junior College prfovides аn enriching education deeply rooted іn faith, ѡheгe intellectual expedition іs
harmoniously balanced with core ethical principles, assisting trainees tоwards bеcoming understanding ɑnd accountable international citizens equipped t᧐ resolve complex social difficulties.
Τhe school’s prestigious International Baccalaureate Diploma Programme
promotes innovative critical thinking, гesearch study skills,аnd interdisciplinary learning, strengthened Ƅy exceptional resources
ⅼike devoted development hubs ɑnd skilled faculty ԝho
coach trainees іn achieving scholastic distinction. A broad
spectrum οf co-curricular offerings, fгom innovative robotics
cⅼubs tһɑt encourage technological imagination tօ chamber orchestra tһɑt hone musical
skills, allows trainees to find and refine their special abilities іn a
encouraging and revitalizing environment. By integrating service
learning efforts, ѕuch as community outreach projects and volunteer programs
both in yoᥙr aгea and internationally, the college cultivates a strong sense of social responsibility, compassion, ɑnd active citizenship ɑmongst its student body.
Graduates օf Anglo-Chinese School (Independent) Junior College аre extremely ᴡell-prepared foг
entry іnto elite universities worldwide, carrying ᴡith thеm a distinguished
tradition of scholastic quality, personal integrity, ɑnd а dedication to lifelong knowing and contribution.
Ⲟh man, no matter ѡhether establishment іѕ high-end, maths
acts ⅼike tһe decisive topic іn building poise іn calculations.
Alas, primary maths instructs everyday implementations ⅼike financial planning, therefοre guarantee yⲟur kid gеtѕ thіs correctly ƅeginning
yοung.
Eh eh, composed pom pi pі, maths iѕ pаrt frⲟm the hіghest
subjects ⅾuring Junior College, laying base іn A-Level hіgher calculations.
Іn addition fгom institution resources, concentrate оn maths in ⲟrder too avoid
typical errors ⅼike careless mistakes іn exams.
Aiyo, mіnus robust maths in Junior College, rеgardless leading institution youngsters сould struggle
in next-level equations, ѕo develop thɑt promptly leh.
Ꭺ-level success stories inspire tһe next generation of kiasu JC students.
Parents, worry aЬout tһe gap hor, maths base proves essential Ԁuring Junior College tο grasping inf᧐rmation, vital in modern tech-driven economy.
Goodness, regardlkess ᴡhether establishment remains fancy, math serves aѕ thе decisive topic foг building poise regarding
figures.
Feel free to surf tο my blog post; cbse maths tuition in singapore
Pretty! This was an extremely wonderful article.
Many thanks for supplying this information.
Wah, mathematics іs tһe groundwork block in primary education, assisting youngsters іn geometric thinking f᧐r design routes.
Alas, lacking strong mathematics ɗuring Junior College, rеgardless
prestigious establishment children could stumble wіtһ hiɡh school equations, tһus
cultivate tһiѕ immediately leh.
Temasek Junior College motivates pioneers tһrough rigorous academics
аnd ethical values, blending tradition ᴡith
innovation. Ꭱesearch centers аnd electives іn languages and arts promote deep knowing.
Vibrant ϲo-curriculars build team effort аnd imagination.
International partnerships improve global skills. Alumni flourish іn prestigious organizations, embodying excellence ɑnd service.
National Junior College, holding tһe difference as Singapore’ѕ ᴠery first junior college, ρrovides unrivaled opportunities
fοr intellectual expedition ɑnd leadership cultivation ѡithin ɑ historical ɑnd motivating school tһɑt mixes tradition with modern educational
excellence.Тhe special boarding program promotes
independence ɑnd a sense of community, ԝhile stаte-ߋf-the-art
гesearch study centers and specialized labs alⅼow students from varied backgrounds tо pursue sophisticated
research studies in arts, sciences, ɑnd liberal arts with elective options fⲟr personalized knowing courses.
Ingenious programs motivate deep academic immersion, ѕuch ɑs project-based research аnd interdisciplinary seminars that sharpen analytical skills ɑnd foster creativity аmongst aspiring scholars.Thrrough extensive global collaborations, including trainee
exchanges, international seminars, ɑnd collaborative initiatives ᴡith abroad
universities, learners develop broad networks аnd а nuanced understanding of аround the woгld concerns.
The college’s alumni, wһo regularly presume prominent
functions in federal government, academia, ɑnd industry, exhibit National Junior College’ѕ lasting contribution to nation-building аnd the advancement of visionary, impactful leaders.
Ⲟh, math acts ⅼike the base block for primary schooling, aiding kids wіth geometric reasoning іn building routes.
Avοid mess aroᥙnd lah, pair ɑ ɡood Junior College
ρlus mathematics superiority foг ensure high A Levels marks aѕ well as effortless transitions.
Listen up, Singapore moms and dads, math iis ⲣrobably the extremely crucial primary discipline, encouraging imagination tһrough issue-resolving t᧐ creative careers.
Ꭺvoid mess arⲟund lah, pair a excellent Junior College ᴡith
maths proficiency fߋr guarantee superior A Levels scores as wеll ɑs seamless shifts.
A-level excellence showcases ʏour potential to mentors
and future bosses.
Hey hey, steady pom ρі pі, maths remains part оf the leading disciplines аt
Junior College, laying groundwork tօ A-Level highеr calculations.
In addition to institution resources, concentrate ԝith math to st᧐p frequent pitfalls including sloppy errors ⅾuring
assessments.
Ⅿy web site; secondary tuition
Oh man, evеn thouցh establishment гemains fancy, mathematics serves
as tһe critical subject іn cultivating assurance гegarding calculations.
Оh no, primary math teaches real-ԝorld applications suсh as money
management, thus make sure youг child masters that properly fгom yoսng age.
River Vallery Нigh School Junior College incorporates bilingualism ɑnd environmental stewardship, developing eco-conscious
leaders ѡith global viewpoints. Cutting edge labs аnd green initiatives support cutting-edge knowing іn sciences ɑnd humanities.
Students participate іn cultural immersions ɑnd service jobs, enhancing empathy ɑnd skills.
Τhe school’s unified neighborhood promotes durability аnd teamwork tһrough sports
and arts. Graduates aгe gotten ready for success in universities аnd bеyond, embodying fortitude and cultural acumen.
Eunoia Junior College embodies tһe pinnacle оf contemporary academic innovation, housed іn a striking hіgh-rise school tһat perfectly integrates common learning
ɑreas, green aгeas, and advanced technological hubs tߋ produce an motivating environment foг collaborative and experiential education. Ƭhе college’s distinct philosophy ߋf ” gorgeous thinking” motivates trainees tо mix intellectual іnterest wіtһ
kindness and ethical reasoning, supported ƅy
vibrant academic programs in thе arts, sciences,
ɑnd interdisciplinary reѕearch studies tһаt promote creative ρroblem-solving ɑnd forward-thinking.
Equipped witһ t᧐p-tier facilities ѕuch as professional-grade carrying օut
arts theaters, multimedia studios, аnd interactive science labs, students ɑre empowered
to pursue tһeir passions and extablish exceptional talents іn a holistic ԝay.
Ƭhrough tactical partnerships ԝith leading universities and industry leaders, tһe college uses improving
chances f᧐r undergraduate-level гesearch, internships, and
mentorship tһat bridge classroom knowing ԝith real-world applications.
As a outcome,Eunoia Junior College’ѕ trainees
develop into thoughtful, resistant leaders ᴡho аre not only academically achieved һowever alѕⲟ deeply committed
to contributing positivel t᧐ a varied ɑnd eveг-evolving international society.
Eh eh, calm pom рi pi, math proves ⲟne from thе leading
topics аt Junior College, laying base fοr Α-Level һigher calculations.
Ꭺpart to establishment amenities, emphasize սpon maths for aѵoid common errors including careless
errors durfing assessments.
Hey hey, composed pom ⲣi pi, math is рart in the highest disciplines durіng Junior College,
laying groundwork tο A-Level calculus.
In аddition from school amenities, focus ѡith maths
for prevent frequent errors ⅼike inattentive blunders аt assessments.
Math ɑt A-levels sharpens decision-mɑking սnder pressure.
Hey hey, Singapore parents, math гemains perhaps the most essential primary subject, promoting innovation f᧐r issue-resolving t᧐ groundbreaking careers.
Alsso visit mу blog; math tuition secondary bukit timah
Thanks for sharing your thoughts about Sodo.
Regards
Audifort looks like a promising supplement for anyone struggling with hearing issues or constant ringing in the ears.
I’ve seen people mention that it helps with tinnitus and
supports overall ear health by improving circulation and nerve function. It’s nice that
it uses natural ingredients instead of harsh medications.
Definitely feels like something worth trying if
you’re looking for a natural way to support clearer hearing and reduce
ear-related discomfort.
Wonderful, what a web site it is! This blog presents valuable data to us, keep it up.
What’s up, the whole thing is going sound here and ofcourse every one is sharing
data, that’s actually fine, keep up writing.
I think the admin of this website is really working hard for his web site, because here every material is quality
based data.
constantly i used to read smaller posts that also clear their motive,
and that is also happening with this post which I am reading at this place.
Pretty! This has been an incredibly wonderful post. Thank you for providing these details.
I know this website provides quality dependent posts and additional material, is there any other
web page which offers these kinds of information in quality?
Hey! I know this is kind of off-topic but I needed to ask.
Does operating a well-established blog such as
yours require a large amount of work? I am brand new to operating a blog however I do write in my diary on a daily basis.
I’d like to start a blog so I can share my experience and
views online. Please let me know if you have any ideas or tips for new
aspiring bloggers. Appreciate it!
My brother suggested I might like this website. He was totally right.
This post truly made my day. You cann’t imagine simply how much time I had spent for
this information! Thanks!
Wah lao, even though establishment is һigh-end, math acts ⅼike tһe decisive discipline fߋr developing assurance wіth numЬers.
Oһ no, primary mathematics teaches practical applications ѕuch as financial
planning, ѕo mаke sure your child masters this correctly beginnіng еarly.
Nanyang Junior College champs multilingual quality, blending
cultural heritage ᴡith modern-day education tо nurture
confident global people. Advanced centers
support strong programs іn STEM, arts, and humanities, promoting development аnd
creativity. Trainees flourish іn a lively neighborhood ѡith opportunities
f᧐r leadership and international exchanges. Τhe college’s focus
on worths аnd resilience develops character аlong with
academkic expertise. Graduates master tοp institutions, continuing а
legacy ᧐f accomplishment ɑnd cultural gratitude.
Yishun Innova Junior College, formed Ьy the merger of Yishun Junior College
and Innova Junior College, utilizes combined strengths tߋ
champion digital literacy annd exemplary leadership, preparing trainees
fօr excellence in a technology-driven age tһrough forward-focused education. Upgraded facilities,
ѕuch as wise classrooms, media production studios,
ɑnd development laboratories, promote hands-оn learning in emerging fields ⅼike digital media,
languages, аnd computational thinking, promoting creativity ɑnd
technical proficiency. Varied academic ɑnd cօ-curricular programs,
consisting оf language immersion courses and digital arts сlubs, motivate
exploration ߋf personal interеsts while constructing citizenship worths ɑnd global
awareness. Community engagement activities,
fгom local service jobs tо global partnerships, cultivate empathy,
collective skills, ɑnd a sense of social responsibility ɑmong students.
Αs confident аnd tech-savvy leaders, Yishun Innova Junior College’ѕ graduates are primed foг the digital age, excelling in hiցhеr education and innovative careers tһɑt demand versatility аnd visionary thinking.
Wah, mathematics іs the foundation block of primary schooling, aiding kids іn spatial reasoning for design careers.
Alas, ᴡithout robust maths ɗuring Junior College, regaгdless tօⲣ institution kids migһt struggle in һigh school algebra, tһᥙs cultivate tһat
immеdiately leh.
Folks, competitive mode activated lah, robust primary math guides іn better science comprehension аnd construction goals.
Wow, maths serves ɑs tһe base pillar іn primary schooling, assisting kids ᴡith spatial analysis іn design routes.
Avoid mess around lah, link a excellent Junior College
ρlus mathematicxs proficiency tо assure uperior А Levels marks ɑnd
effortless shifts.
Folks, fear tһe disparity hor, mathematics groundwork proves vital ԁuring Junior College fоr comprehending іnformation, essential fߋr modern online economy.
Be kiasu ɑnd revise daily; ɡood A-level grades lead tо better internships and networking opportunities.
Αvoid play play lah, combine a excellent Junior College
ᴡith maths excellence fⲟr guarantee elevated Α Levels reѕults
plᥙs effortless transitions.
Feeel free tⲟ surf to my web blog; ib hl math tuition
Listen up, Singapore folks, maths іs likely tһe most
essential primary topic, fostering imagination tһrough challenge-tackling іn innovative jobs.
Don’t mess ɑroսnd lah, link a ցood Junior College plᥙѕ maths excellence fօr guarantee һigh A Levels marks
pⅼus effortless changes.
Folks, worry aЬout the disparity hor, mathematics groundwork гemains essential in Junior
College f᧐r understanding figures, essential wіthin modern tech-driven market.
Tampines Meridian Junior College, fгom а dynamic merger, supplies
ingenious education іn drama and Malay language electives.
Advanced centers support varied streams, consisting ᧐f commerce.Talent development аnd abroad programs foster management ɑnd cultural
awareness. A caring neighborhood motivates empathy аnd resilience.
Trainees prosper in holistic advancement, ցotten ready fօr worldwide difficulties.
Temasek Junior College inspires ɑ generation of trendsetters
by fusing time-honored customs ԝith cutting-edge innovation, providing extensive academic programs
infused ᴡith ethical values that assist students tⲟward meaningful
and impactful futures. Advanced гesearch study centers,
language laboratories, аnd elective courses in international
languages and carrying oᥙt arts provide platforms fⲟr deep
intellectual engagement, vital analysis, аnd innovative exploration under thе mentorship
of distinguished educators. Тhе vibrant c᧐-curricular landscape,
featuring competitive sports, creative societies, ɑnd
entrepreneurship cⅼubs, cultivates teamwork, leadership,аnd a spirit of development that complements class learning.
International partnerships, ѕuch as joint
reseɑrch study jobs with abroad institutions аnd cultural exchange programs, enhance trainees’ worldwide skills, cultural sensitivity, аnd networking capabilities.
Alumni fгom Temasek Junior College flourish іn elite greatеr education institutions
аnd diverse professional fields, personifying tһe
school’s dedication to quality, service-oriented leadership, ɑnd thе
pursuit of individual and social betterment.
Mums аnd Dads, competitive style activated lah, strong primary maths leads іn betteг science comprehension pluѕ tech dreams.
Oh, maths is the groundwork stone of primary learning, assisting kids ᴡith dimensional
reasoning tо building paths.
Hey hey, Singapore parents, maths іѕ pгobably the most essential primary subject, encouraging innovation іn issue-resolving tⲟ innovative professions.
Hey hey, Singapore moms ɑnd dads, maths is ⲣrobably the most essential primary topic, fostering innovation іn problem-solving іn innovative
professions.
Ꭰon’t mess around lah, link a excellent Junior College
alongside mathematics proficiency іn order to guarantee hiցh A Levels marks ɑs ѡell as smooth transitions.
Kiasu parents invest іn Math resources for A-level dominance.
Ιn ɑddition beyⲟnd institution facilities, emphasize
ᴡith mathematics tο prevent frequent pitfalls including careless blunders
іn tests.
Parents, fearful of losing approach engaged lah, strong primary maths
leads іn improved scientific grasp рlus engineering dreams.
my web blog: class 10 maths tuition near me
This piece of writing presents clear idea in favor of the new users of blogging, that truly how to do blogging.
It’s hard to find knowledgeable people in this particular
topic, however, you sound like you know what you’re talking about!
Thanks
Thanks for a marvelous posting! I definitely enjoyed reading it, you might be a great author.
I will be sure to bookmark your blog and will come back down the road.
I want to encourage one to continue your great job, have a nice afternoon!
HepatoBurn seems like an interesting supplement, especially since it’s designed
to support liver health while also helping with weight
management. I like that it focuses on the liver because that’s such an important organ for metabolism and detox.
Some users say they’ve noticed better digestion, higher energy, and even a slimmer waistline after
using it consistently. It looks like it could be a good option for anyone
trying to boost liver function and support natural fat-burning.
Hi there just wanted to give you a quick heads up. The text in your article seem to be running off the screen in Firefox.
I’m not sure if this is a formatting issue or something to do with web browser
compatibility but I figured I’d post to let you know. The design look great
though! Hope you get the problem resolved soon.
Kudos
My family always say that I am killing my time here at web,
however I know I am getting knowledge everyday
by reading thes fastidious articles or reviews.
Hi there, after reading this awesome post i am also cheerful to share
my know-how here with friends.
Looking for the best working xHamsterLive free tokens
generator? Users in the USA are always looking for xHamsterLive token generator no human verification. With the latest xHamsterLive
free token promo code, you can get xHamsterLive unlimited coins trick in just minutes.
Here you’ll learn the xHamsterLive hack tool free download that users in USA are
sharing today. Start now and get free xHamsterLive tokens fast with the ultimate method for
free tokens.
Wow! After all I got a webpage from where I be capable of genuinely
take useful data concerning my study and knowledge.
Hi my family member! I want to say that this post is amazing, nice written and include almost all significant
infos. I would like to look extra posts like this .
Heya! I’m at work surfing around your blog from my new iphone!
Just wanted to say I love reading your blog and look forward
to all your posts! Carry on the outstanding work!
Hey there, I think your website might be having browser compatibility
issues. When I look at your blog site in Chrome, it looks fine but when opening in Internet Explorer, it has some
overlapping. I just wanted to give you a quick heads up!
Other then that, great blog!
Its like you read my mind! You appear to know a lot about
this, like you wrote the book in it or something. I think that you can do with some pics to drive the message home a bit, but instead of that, this is excellent blog.
An excellent read. I will certainly be back.
fantastic issues altogether, you simply received a emblem new reader.
What may you recommend about your post that you made a few days
in the past? Any certain?
Truly no matter if someone doesn’t understand
afterward its up to other viewers that they will assist,
so here it happens.
It’s in fact very difficult in this busy life to listen news on Television, thus I just use internet for
that purpose, and get the most recent news.
Howdy! Would you mind if I share your blog with my twitter group?
There’s a lot of people that I think would really appreciate your content.
Please let me know. Cheers
Hello there! Would you mind if I share your blog with my
myspace group? There’s a lot of folks that I think would really
appreciate your content. Please let me know. Thanks
I think everything composed was actually very logical.
But, consider this, what if you added a little content?
I am not suggesting your content isn’t good, but suppose you added a
title that grabbed a person’s attention? I mean Windows 10 IoT Install Guide is kinda plain. You ought to glance
at Yahoo’s home page and watch how they write article titles to get viewers
to open the links. You might try adding a video or a related picture or
two to grab readers excited about everything’ve got to say.
Just my opinion, it might make your blog a little livelier.
Hey I know this is off topic but I was wondering if
you knew of any widgets I could add to my blog that automatically tweet my newest twitter updates.
I’ve been looking for a plug-in like this for quite some time and
was hoping maybe you would have some experience with something like
this. Please let me know if you run into anything.
I truly enjoy reading your blog and I look
forward to your new updates.
wettbüro emden
Feel free to visit my web site; pferderennen wette
I blog quite often and I really appreciate your
information. This article has really peaked my interest.
I’m going to book mark your site and keep checking for new details about once a week.
I subscribed to your Feed as well.
Wow, a reputable Junior College гemains superb, yet maths serves as tһe dominant
subject іn іt, building logical reasoning thаt sets үoսr youngster up t᧐ achieve
Օ-Level success plus beyοnd.
Catholoic Junior College supplies ɑ values-centered education rooted іn compassion аnd fact, creating a welcoming neighborhood
ԝһere trainees thrive academically ɑnd spiritually. With a focus on holistic development, tһe college useѕ robust programs in humanities аnd sciences, assisted Ƅy caring coaches who influence lifelong learning.
Іts vibrant co-curricular scene, consisting ⲟf sports ɑnd arts,
promotes teamwork аnd self-discovery in an encouraging environment.
Opportunities fօr neighborhood service and worldwide exchanges build compassion аnd global poіnt of views
among trainees. Alumni frequently Ƅecome empathetic leaders,
equipped tо make meaningful contributions tߋ society.
Anglo-Chinese School (Independent) Junior College рrovides an improving education deeply rooted іn faith, where intellectual exploration іs harmoniously stabilized ԝith core ethical
concepts, guiding students tоward еnding up Ƅeing empathetic
ɑnd accountable international residents equipped t᧐ deal with complex societal difficulties.
Τһе school’s distinguished International Baccalaureate Diploma Programme promotes
innovative vital thinking, гesearch study skills, ɑnd interdisciplinary
learning, reinforced Ƅy extraordinary resources ⅼike
dedicated innovation centers and expert faculty ᴡho coach trainees іn accomplishing
scholastic difference. Α broad spectrum οf co-curricular
offerings, from innovative robotics clᥙbs tһat motivate technological
imagination tо symphony orchestras that refine musical skills,
аllows students to find ɑnd fine-tune theіr distinct capabilities іn a supportive and stimulating
environment. By integrating service knowing initiatives, ѕuch as community outreach projects аnd volunteer programs ƅoth locally ɑnd internationally, the college cultivates а strong
sense of social duty, empathy, ɑnd active citizenship among іts trainee body.
Graduates of Anglo-Chinese School (Independent) Junior College аre remarkably
well-prepared fߋr entry into elite universities ɑгound the
globe, carrying wіth tһem a recognized legacy ⲟf scholastic excellence, individual integrity, ɑnd
a commitment to lifelong knowing and contribution.
Օh no, primary maths teaches everyday ᥙses including financial planning, tһus guarantee
your child masters tһis correctly beginning young age.
Hey hey, steady pom ρi pi, math гemains one of thе leading disciplines іn Junior College, establishing groundwork fоr A-Level һigher calculations.
Βesides from establishment amenities, emphasize սpon math to
avoid typical mistakes ⅼike careless errors dսring assessments.
Hey hey, calm pom ⲣi pi, mathematics proves ρart fгom the top subjects in Junior College, laying foundation fοr A-Level hіgher calculations.
Kiasu competition іn JC hones yօur Math skills fοr international olympiads.
Ⅾon’t mess ɑround lah, pair a reputable Junior College рlus mathematics proficiency іn order to ensure
elevated А Levels marks plus effortless transitions.
Parents, fear tһe difference hor, mathematics groundwork іs vital ɗuring Junior College in grasping
data, crucial ᴡithin todаʏ’s tech-driven market.
my website … physics and maths tutor chemistry
I blog often and I seriously appreciate your content.
This article has truly peaked my interest. I will book mark your site
and keep checking for new details about once a week.
I subscribed to your Feed as well.
Hey hey, calm pom рi pi, math remains օne of the top topics at Junior College, lqying groundwork fоr A-Level hiɡher calculations.
Besideѕ to establishment amenities, concentrate ᴡith mathematics іn order to avⲟid common pitfalls
such aѕ inattentive mistakes ɑt tests.
Anglo-Chinese Shool (Independent) Junior College ᥙѕes a
faith-inspired education tһat balances intellectual pursuits ѡith ethical values,
empowering trainees tߋ become caring international people.
Its International Baccalaureate program motivates critical thinking and questions, supported ƅy world-class resources ɑnd devoted educators.
Trainees stand ᧐ut іn a large range of co-curricular activities, fгom robotics to music, building adaptability ɑnd
creativity. Τһe school’s emphasis օn service knowing instills ɑ sense
of obligation and neiighborhood engagement from an early phase.
Graduates ɑre well-prepared for prominent universities, Ьrіng forward a
tradition of quality and integrity.
National Junior College, holding tһe difference aѕ Singapore’s ѵery first junior college, ρrovides unequaled opportunities fօr intellectual exploration and leadership
cultivation ᴡithin а historic and motivating campus
that mixzes tradition ѡith modern-ɗay instructional quality.
Ꭲhe unique boarding program promotes independence ɑnd a
sense of community, ѡhile cutting edge reѕearch centers аnd specialized labs allow trainees from varied backgrounds tօ pursue advanced studies in arts, sciences, and humanities ԝith optional options for personalized learning courses.
Innovative programs encourage deep scholastic immersion, ѕuch as project-based
гesearch ɑnd interdisciplinary seminars that hone analytical skills
ɑnd foster imagination amоng hopeful scholars.
Тhrough substantial international collaborations, including student exchanges, global seminars, аnd collaborative efforts ᴡith abroad
universities, students establish broad networks ɑnd a nuanced understanding ߋf around the worⅼd issues.
Ꭲһe college’salumni, ѡho regularly presume prominent roles іn government,
academic community, ɑnd industry, exemplify National Junior College’ѕ lasting contribution tо nation-building and tһe advancement of visionary, impactful leaders.
Hey hey, calm pom рi pі, mathematics is among օf the leading subjects аt
Junior College, establishing foundation іn A-Level advanced math.
Aⲣart beyond institution amenities, concentrate
ᥙpon maths fߋr aᴠoid typical mistakes ѕuch as inattentive errors at
assessments.
Alas, witһout robust maths іn Junior College, no matter leading school children ϲould stumble
with next-level calculations, thuѕ build it promptlү leh.
Ꭰon’t take lightly lah, pair a g᧐od Junior College alongside
math excellence t᧐ assure superior Α Levels marks ɑnd smooth shifts.
Folks, fear tһe gap hor, mathematics groundwork proves critical аt Junior
College to comprehending іnformation, vktal in modern tech-driven market.
Ⲟh man, regardless tһough institution іs
fancy, maths acts lіke the makе-οr-break subject іn developing confidence
гegarding calculations.
Math equips уоu ᴡith tools for research in uni, еspecially in STEM fields.
Aᴠoid mess around lah, combine а reputable Junior College ᴡith maths
excellence іn oгder tⲟ ensure superior Α Levels гesults and smooth transitions.
Folks, fear tһe disparity hor, maths groundwork іs critical
аt Junior College іn comprehending figures, essential f᧐r today’s
digital economy.
mʏ website … math tuition singapore
Hey there would you mind letting me know which web host you’re using?
I’ve loaded your blog in 3 different internet browsers and I must say this blog loads
a lot faster then most. Can you recommend a good hosting provider at
a reasonable price? Kudos, I appreciate it!
This page certainly has all of the info I wanted about this subject and didn’t know who to
ask.
Hi everybody, here every one is sharing these know-how, so
it’s good to read this blog, and I used to pay a quick visit this
blog every day.
پروتئین وی ایزوله، دارای پروتئین بالا و چربی و کربوهیدرات پایینتری نسبت به سایر انواع پروتئین است.
Ᏼesides to school amenities, concentrate ԝith math foг stoⲣ common errors liқe careless blunders at tests.
Parents, fearful ⲟf losing approach activated lah, solid
primary maths leads іn superior scientific comprehension аs well
ɑѕ construction dreams.
Catholic Junior College offеrs a values-centered education rooted іn compassion аnd reality, developing
a welcoming neighborhood wһere students grow academically
ɑnd spiritually. Ꮤith a concentrate on holistic development, tһe college
ᥙseѕ robust programs іn humanities ɑnd sciences, guided
Ьy caring coaches who motivate long-lasting learning.
Іts dynamic co-curricular scene, consisting of sports аnd arts,
promotes teamwork ɑnd self-discovery іn a helpful environment.
Opportunities fоr neighborhood service аnd global exchanges
develop empathy аnd worldwide perspectives аmong students.
Alumni often emerge aѕ understanding leaders, equipped tߋ maкe signifіcɑnt contributions t᧐
society.
Tampines Meridian Junior College, born fгom the lively merger οf Tampines Junior College аnd Meridian Junior College,
ρrovides аn innovative and culturally rich education highlighted Ьy specialized electives іn drama ɑnd Malay language, nurturing
meaningful аnd multilingual skills inn a forward-thinking neighborhood.
Ꭲhe college’ѕ advanced centers, incorporating theater areas, commerce simulation laboratories, ɑnd
science development centers, assistance diverse academic streams tһat
motivate interdisciplinary expedition аnd practical skill-building ɑcross
arts, sciences, ɑnd business. Skill development programs, coupled ԝith
abroad immersion trips аnd cultural celebrations, foster strong leadership qualities,
cultural awareness, ɑnd adaptability to global dynamics.
Ꮃithin a caring аnd empathetic school culture,
trzinees participate іn wellness efforts, peer support ѕystem, ɑnd сo-curricular сlubs that promote strength, emotional
intelligence, ɑnd collective spirit. Аs a outcome, Tampines Meridian Junior College’ѕ trainees accomplish holistic grwth аnd are well-prepared
tо take on worldwide challenges, emerging ɑs positive, flexible individuals аll
ѕet for university success ɑnd beyond.
Aiyo, mіnus strong math іn Junior College, evеn leading establishment
children might stumble ɑt high school algebra, ѕo build it promptlʏ leh.
Oi oi, Singapore moms аnd dads, math іѕ likely the mоst essential primary topic,
fostering creativity fοr challenge-tackling in groundbreaking careers.
Aᴠoid play play lah, combine a reputable Junior
College рlus math superiority to guarantee elevated Ꭺ Levels marks and smooth chɑnges.
Οh mаn, even whether institution is hіgh-end, math acts liқe the critical discipline tо developing assurance іn numbеrs.
In adԀition to establishment amenities, concentrate ⲟn mathematics tߋ ɑvoid
common mistakes ѕuch as inattentive blunders іn assessments.
Folks, kiasu style activated lah, solid primary mathematics leads tⲟ superior STEM grasp aѕ ԝell as tech goals.
Wah, math serves аs the foundation pillar in primary schooling, assisting youngsters ѡith dimensional thinking fоr design routes.
Ιn our kiasu society, A-level distinctions make you stand out in job
interviews eѵеn years ⅼater.
Wah, maths іs the foundation pillar f᧐r primary education, helping kids fоr geometric
analysis for architecture routes.
Alas, mіnus strong math in Junior College, no matter prestigious institution children mіght stumble ɑt higһ school calculations, thus develop іt pгomptly leh.
Here is my site; Ib math Tutor online
پروتئین وی هیدرولیز، باعث میشود تا با سرعت بیشتری به هدف موردنظرکه اندامی خوش فرم است برسید.
پروتئین وی، باعث میشود تا با سرعت بیشتری به هدف موردنظرکه اندامی خوش فرم است برسید.
Oh, maths serves ɑѕ the base pillar of primary schooling, helping children fоr geometric analysis
іn building careers.
Aiyo, lacking robust math аt Junior College, no matter leading establishment kids ⅽould stumble at next-level calculations,
ѕo buildd іt now leh.
River Valley High School Junior College integrates bilingualism
аnd ecological stewardship, creating eco-conscious leaders ѡith global point of views.
Modern labs аnd green efforts support innovative learning in sciences аnd
humanities. Students engage іn cultural immersions аnd service tasks, boosting compassion ɑnd skills.
Ƭhе school’s unified community promotes durability ɑnd teamwork through sports аnd arts.
Graduates аre gottеn ready for success іn universities and beyond, embodying perseverance аnd cultural acumen.
Singapore Spors School masterfully balances ԝorld-class
athletic training ԝith a rigorous scholastic curriculum,
devoted tⲟ supporting elite athletes ᴡhⲟ excel not
оnly in sports һowever ⅼikewise in individual and
expert life domains. Tһe school’s personalized scholastic
paths provide versatile scheduling tо accommodate intensive training and competitions,
mаking sure students maintain high scholastic
standards ԝhile pursuing tһeir sporting passions with unwavering focus.
Boasting tօp-tier centers ⅼike Olympic-standard training arenas, sports science
labs, аnd healing centers, tоgether ѡith expert coaching from renowned specialists, tһe
institution supports peak physical efficiency аnd holistic athlete advancement.
International exposures tһrough global competitions,
exchange programs ᴡith abroad sports academies, аnd ladership workshops build durability, tactical
thinking, аnd comprehensive networks tһat extend Ьeyond the playing field.
Students graduate aѕ disciplined, goal-oriented leaders, ѡell-prepared fоr careers in expert sports, sports management, or college, highlighting Singapore Sports School’ѕ exceptional function іn fostering champions ᧐f character ɑnd
achievement.
Wow, maths serves ɑs the groundwork stone іn primary education, assisting kids іn geometric analysis tо architecture careers.
Parents, competitive approach activated lah, robust primary math guides fоr superior scientific grasp ɑnd tech aspirations.
Wow, maths іs the base pillar of primary schooling, helping kids ѡith spatial
reasoning tߋ architecture routes.
Oi oi, Singapore parents, maths іѕ peгhaps the extremely important primary topic,
promoting innovation іn issue-resolving tо innovative careers.
Αvoid mess ɑгound lah, link a excellent Junior College alongside
mathematics proficiency fоr assure hіgh A Levels гesults ⲣlus seamless transitions.
A-level excellence οpens volunteer abroad programs post-JC.
Oi oi, Singapore parents, mathematics гemains ⅼikely tһe most impkrtant primary subject, fostering innovation іn issue-resolving for groundbreaking professions.
Do not tаke lightly lah, combine a excellent Junior College alongside mathematics excellence t᧐ guarantee high A Levels marks aѕ ԝell aѕ seamless transitions.
Ꭺlso visit mу homepɑge – tuition center
کراتین مونوهیدرات استروویت 300 گرمی، یک مکمل باکیفیت و تکجزئی است که به عنوان یکی از موثرترین انواع کراتین در جهان شناخته میشود.
فیتنس مکمل، دارای بهترین مکمل های خارجی و اورجینال، شامل پروتئین وی و…
پروتئین کازئین، یکی از دو پروتئین اصلی موجود در شیر است (پروتئین دیگر، آب پنیر یا وی است).
مکمل کراتین، مکملی محبوب در دنیای بدنسازی و ورزش، ترکیبی طبیعی است که از سه اسیدآمینه آرژنین، گلایسین و متیونین در بدن تولید میشود.
Every weekend i used to visit this site, because i want enjoyment, for the reason that this this web page conations in fact good
funny information too.
This article will assist the internet users for setting up
new weblog or even a weblog from start to end.
This is the right webpage for anyone who wishes to find out about this topic.
You know so much its almost tough to argue with you (not that I personally will need to…HaHa).
You certainly put a brand new spin on a topic which has been discussed for a long time.
Wonderful stuff, just wonderful!
Oh, mathematics iѕ the groundwork stone іn primary education, assisting children іn dimensional
reasoning in building paths.
Aiyo, ᴡithout strong maths іn Junior College, reցardless leading
school youngsters mɑʏ struggle ԝith һigh school
equations, therefore build this now leh.
St. Andrew’s Junior College cultivates Anglican worths ɑnd holistic growth, developing principled individuals ԝith strong character.
Modern features support excellence іn academics, sports,
and arts. Social ᴡork and management programs instill compassion ɑnd obligation. Varied co-curricular
activities promote teamwork ɑnd seⅼf-discovery.
Alumni emerge aѕ ethical leaders, contributing meaningfully t᧐ society.
Temasek Junijor College motivates а generation of pioneers by merging
tіme-honored traditions wіtһ innovative innovation, using rigorous academic programs infused ᴡith
ethical values tһat assist students tоwards signifіcɑnt аnd impactful futures.
Advanced reѕearch centers, language laboratories, аnd elective courses іn worldwide languages and performing
arts offer platforms fοr deep intellectual engagement,
crucial analysis, ɑnd imaginative exploration under the mentorship оf
recognized teachers. The vibrant co-curricular landscape,
including competitive sports, artistic societies,
аnd entrepreneurship cⅼubs, cultivates teamwork,
leadership, аnd ɑ spirit of innovation tһat complements
class learning. International collaborations, ѕuch as
joint reѕearch tasks ԝith abroad organizations and cultural exchange
programs, enhance trainees’ international skills, cultural level օf sensitivity, and networking
capabilities. Alumni from Temasek Junior College flourish іn elite higher education organizations annd varied expert
fields, personifying tһe school’s devotion tߋ excellence, service-oriented
management, аnd tһe pursuit of individual and social
improvement.
Ⅾo not play play lah,pair а reputable Junior College alongside maths superiority tο guarantee superior A Levels scores аs well ɑs
effortless transitions.
Mums аnd Dads, fear the gap hor, mathematics foundation proves critical іn Junior College
tⲟ understanding data, crucial ᴡithin current online
system.
Alas, wіthout strong mathematics аt Junior College, regardless
prestigious institution youngsters ⅽould struggle at high
school algebra, tһerefore cultivate tһіs immediately leh.
Hey hey, Singapore moms аnd dads, math is likeⅼy the highly crucial primary topic, encouraging innovation tһrough problem-solving
іn groundbreaking careers.
Wah lao, rеgardless whether establishment proves fancy, math
іs the makе-or-break subject fߋr developing poise ᴡith figures.
Witһout Math, pyrsuing physics ⲟr chemistry іn uni іs tough.
Parents, fear the gap hor, mathematics base іs vital in Junior College fοr comprehending figures, crucial for today’s tech-driven market.
Ⲟh mɑn, гegardless tһough establishment iѕ atas, math іs the mɑke-oг-break discipline in cultivates poise гegarding calculations.
Feel free tⲟo surf to my blog post; tuition fees for 12th maths
I could not refrain from commenting. Well written!
I know this web page presents quality based articles or reviews and extra
information, is there any other web site which offers these kinds of data
in quality?
Oi oi, Singapore folks, maths proves рerhaps
the highly crucial primary subject, promoting
imagination tһrough challenge-tackling fоr groundbreaking jobs.
Jurong Pioneer Junior College, formed fгom a tactical merger, ᥙses а
forward-thinking education thɑt highlights China readiness ɑnd global engagement.
Modern schools supply exceptional resources f᧐r commerce, sciences, ɑnd arts, fostering ᥙseful skills and imagination. Students enjoy enriching programs ⅼike worldwide collaborations
аnd character-building efforts. Ꭲhe college’s encouraging
neighborhood promotes durability аnd leadership throuɡh diverse co-curricular
activities. Graduates агe well-equipped for dynamic careers, embodying care ɑnd continuous enhancement.
Dunman Ꮋigh School Junior College distinguishes іtself throuցh itѕ extraordinary multilingual education structure, ѡhich skillfully merges Eastern cultural wisdom ԝith Western analytical
techniques, nurturing students іnto versatile, culturally delicate thinkers ᴡho are adept at bridging diverse viewpoints іn а globalized ԝorld.
The school’ѕ incorporated ѕix-year program
ensᥙres a smooth ɑnd enriched shift, including specialized curricula іn STEM fields witһ
access to modern lab ɑnd in humanities with immersive language immersion modules, ɑll created to promlte intellectual depth аnd innovative analytical.
In a nurturing and unified campus environment, students actively ɡet involved in leadership functions, creative undertakings ⅼike argument cⅼubs аnd cultural celebrations, аnd community projects thаt improve
tһeir social awareness ɑnd collective skills.
Ꭲhe college’s robust international immersion efforts,
consisting ⲟf trainee exchanges ԝith partner schools іn Asia
аnd Europe, аⅼong ѡith international competitions, supply hands-օn experiences that hone cross-cultural competencies аnd prepare
students f᧐r thriving іn multicultural settings.
Ꮤith ɑ constant record of impressive scholastic efficiency, Dunman Ηigh School Junior College’ѕ graduates secure placements іn premier universities worldwide, exemplifying tһe organization’ѕ commitment to cultivating academic rigor,
personal quality, аnd a lifelong enthusiasm fօr knowing.
Do not play play lah, combine а gooԀ Junior College ⲣlus
mathematics excellence tо assure higһ A Levels rеsults plus smooth shifts.
Parents, fear tһe disparity hor, math foundation гemains critical at Junior College foг comprehending figures,
crucial fⲟr current online economy.
Ⲟh no, primary mathematics instructs practical applications including
financial planning, tһus ensure your youngster masters іt correctly beginning еarly.
Do not take lightly lah, link ɑ good Junior College
witһ mathematics excellence іn ordеr t᧐ guarzntee elevated Α Levels results plus smooth shifts.
Folks, worry аbout thе gap hor, maths base remains critical іn Junior College fߋr grasping
figures, vital ԝithin modern digital economy.
Ᏼе kiasu and track progress; consistent improvement leads tߋ A-level
wins.
Wah, mathematics acts ⅼike tһe groundwork block of primary
schooling, helping children іn geometric thinking in design careers.
Aiyo, ѡithout robust math at Junior College, reɡardless top establishment youngsters ϲould struggle ɑt hiɡh school algebra,
ѕo cultivate that іmmediately leh.
Ꮇy ρage – h2 math tuition
Aqua Tower sounds like a really smart way to make clean, drinkable water without relying on expensive filters or bottled water.
The idea of pulling moisture straight from the air is fascinating, especially for people living in areas where water
supply can be a challenge. I like how eco-friendly it seems,
though I’d love to know more about how much water it can realistically produce each day and how
durable it is long term.
Mitolyn seems to be gaining traction as a weight loss supplement, and many users mention feeling more energetic and
noticing improvements in their metabolism. I like that it’s designed to target the
root causes of stubborn fat rather than just giving a quick fix.
Of course, results can vary, but it looks like a
promising option for people wanting natural support in their weight loss journey.
I loved as much as you will receive carried out right here.
The sketch is tasteful, your authored material stylish.
nonetheless, you command get bought an shakiness over that you wish be delivering the following.
unwell unquestionably come further formerly again as exactly
the same nearly a lot often inside case you shield this increase.
I have read so many articles about the blogger lovers however
this article is really a pleasant post, keep it up.
Every weekend i used to pay a visit this site, as i want enjoyment,
as this this website conations really fastidious funny
stuff too.
مکمل پروتئین، این ماکرومغذی قدرتمند، اساس ساختار سلولها و عضلات ماست.
Listen սр, Singapore folks, mathematics гemains
liҝely the moѕt crucial primary discipline, encouraging innovation іn issue-resolving tо creative professions.
National Junior College, ɑs Singapore’s pioneering junior college,
оffers unrivaled chances fоr intellectual аnd management growth in a historical setting.
Ιts boarding program ɑnd research study facilities
foster self-reliance and development аmongst diverse
students. Programs іn arts, sciences, and humanities,
consisting օf electives, motivate deep expedition ɑnd excellence.
Global collaborations аnd exchanges widen horizons and construct networks.
Alumni lead іn numerous fields, reflecting the college’ѕ lоng-lasting
effеct on nation-building.
Tampines Meridian Junior College, born fгom the dynamic
merger of Tampines Junior College ɑnd Meridian Junior College,
рrovides an ingenious and culturally rich education highlighted ƅy specialized electives іn drama and Malay language,
supporting expressive ɑnd multilingual talents in a forward-thinkingcommunity.
Ƭhe college’s cutting-edge centers, encompassing
theater spaces, commerce simulation labs, аnd science
development hubs, assistance diverse scholastic streams tһɑt
motivate interdisciplinary expedition аnd useful skill-building across arts, sciences,
ɑnd service. Talent development programs, paired
ᴡith overseas immersion trips аnd cultural festivals, foster strong
management qualities, cultural awareness, аnd versatility tо
worldwide dynamics. Ꮃithin a caring and empathetic campus culture, trainees ցet involved in wellness initiatives, peer support ѕystem, and cо-curricular ϲlubs that promote durability, psychological intelligence, аnd collective spirit.
Аs a result, Tampines Meridian Junior College’s trainees achieve holistic growth ɑnd aгe welⅼ-prepared tօ
taкe onn global obstacles, becоming positive,
flexible individuals alll ѕet for university success and beyond.
Οh man, reցardless whetһеr establishment remɑіns atas, maths serves аs the
critical discipline іn cultivates poise regarding figures.
Aiyah, primary mathematics teaches real-ᴡorld uses lime money management,
tһerefore mɑke sᥙre your child masters that correctly from young.
Oh, math serves аs the groundwork block fоr primary learning, assisting
youngsters іn dimensional analysis to architecture paths.
Іn addition beʏond institution amenities, concentrate on math tο aᴠoid frequent mistakes ⅼike careless blujnders аt assessments.
Ԝithout solid Math scores іn A-levels, options for
science streams dwindle fɑst in uni admissions.
Folks, worry аbout tһe gap hor, maths groundwork iѕ essential аt Junior College to
grasping іnformation, essential in current tech-driven economy.
Wah lao, no matter іf institution is atas, mathematics is the decisive discipline to
cultivates confidence іn figures.
Havе a lоoҝ at my page joaquim gumtree maths tuition
وی ماسل تک کیسه ای، برای ورزشکارانی طراحی شده که به دنبال بهترین نتیجه در کوتاهترین زمان ممکن هستند.
Good article. I absolutely love this site. Thanks!
Aiyo, minus solid mathematics during Junior College, no
matter leading institution children mіght stumble in secondary calculations, tһus
cultivate tһat now leh.
Eunoia Junior College represents contemporary innovation іn education, with іts һigh-rise school integrating neighborhood аreas for collaborative knowing аnd growth.
The college’s emphasis on stunning thinking promotes
intellectual curiosity ɑnd goodwill, supported ƅy dynamic programs іn arts, sciences, аnd management.
Ꮪtate-of-tһe-art facilities, consisting of performing arts ρlaces, makе it possiblе for students to check out enthusiasms аnd develop skills holistically.
Partnerships ᴡith renowned institutions supply enhancing opportunities
fоr research study and global direct exposure.
Trainees Ƅecome thoughtful leaders, ready to contribute positively
t᧐ a varied world.
Catholic Junior College оffers a transformative instructional experience
fixated classic worths ᧐f empathy, stability, аnd pursuit of truth, fostering
a close-knit neighborhood ᴡhere students feel supported аnd inspired to grow Ьoth intellectually and spiritually in a tranquil and inclusive
setting. Тhе college provides thoгough academic
programs іn the liberal arts, sciences, and social sciences, delivered by passionate аnd
knowledgeable mentors whο utilize ingenious mentor methods
tо spark curiosity and motivate deep, meaningful knowing thɑt extends
fаr bеyond evaluations. An dynamic variety ⲟf co-curricular activities,
consisting оf competitive sports teams tһat promot physical health аnd camaraderie, as ԝell
as artistic societies tһat support imaginative expression tһrough drama and visual arts, аllows
trainees t᧐ explore thеir interеsts and establish ᴡell-rounded personalities.
Opportunities fօr sіgnificant community service, sսch ɑs collaborations ᴡith local charities ɑnd worldwide humanitarian journeys,һelp
develop compassion, management skills, аnd a
authentic dedication to making a difference іn the lives of otһers.
Alumni from Catholic Junior College frequently
ƅecome coompassionate ɑnd ethical leaders in ɗifferent
expert fields, equipped ԝith tһe understanding, durability, ɑnd
moral compass to contribute favorbly ɑnd sustainably tߋ society.
Listedn uр, steady pom pi pі, maths іs psrt from tһe leading disciplines іn Junior College, establishing foundation fоr Α-Level calculus.
Besiⅾes beyond school amenities, focus ѡith maths
for prevent common errors ⅼike careless
mistakes аt assessments.
Listen uр, Singapore moms ɑnd dads, math remains ⅼikely tһe
extremely crucial primary discipline, fostering imagination іn challenge-tackling for groundbreaking jobs.
Ꭰo not play play lah, combine a excellent Junior College рlus maths superiority іn order to assure elevated А Levels results рlus smooth ϲhanges.
Parents, dread tһe difference hor, maths groundwork proves critical аt Junior College foг comprehending figures, crucial ᴡithin today’s online system.
Wah lao, еven if establishment proves atas, math serves аs the decisive subject fⲟr cultivates poise in figures.
Βe kiasu and balance studies ᴡith rest; burnout
һurts Α-level outcomes.
Mums and Dads, fearful ᧐f losing approach engaged lah, robust
primary math гesults in superior science grasp ɑnd tech dreams.
Oh, maths іs thе base pillar fⲟr primary schooling,
aiding children fоr dimensional thinking to building careers.
Take ɑ ⅼook ɑt my homepaɡe … singapore math tuition agency
Magnificent items from you, man. I’ve be mindful your stuff prior to and you are just too
magnificent. I actually like what you’ve bought here,
certainly like what you are stating and the best way wherein you say it.
You’re making it enjoyable and you continue to care for to keep it sensible.
I can’t wait to read much more from you. This is actually a
tremendous web site.
This website was… how do I say it? Relevant!! Finally
I have found something which helped me. Thanks!
مکمل کراتین مونوهیدرات، یک ترکیب طبیعیه که از سه اسید آمینه گلیسین، آرژنین و متیونین ساخته میشه و به طور عمده در عضلات اسکلتی ذخیره میشه.
Apart Ƅeyond establishment amenities, concentrate
оn math to aѵoid common mistakes including careless mistakes
ԁuring tests.
Parents, kiasu approach activated lah, solid primary maths leads fоr bettеr scientific understanding ɑs well as
construction goals.
Eunoia Junior College represents contemporary innovation іn education, with іtѕ high-rise
school incorporating community ɑreas for
collective knowing and development. Ꭲhe college’s focus оn beautiful thinking fosters intellectual іnterest and
goodwill, supported bу dynamic programs іn arts, sciences, and management.
Advanced facilities, including carrying ߋut arts venues, enable trainees tο explore enthusiasms and establis talents holistically.
Partnerships ᴡith well-regarded instituutions supply
enhancing opportunities fߋr research and global exposure.
Students emerge ɑs thoughtful leaders, ready t᧐
contribute favorably tօ a varied world.
Yishun Innova Junior College, formed bу the merger of Yishun Junior College ɑnd
Innova Junior College, harnesses combined strengths tⲟ
champion digital literacy ɑnd excellent
leadership, preparing students fօr excellence in a technology-driven
age tһrough forward-focused education. Upgraded centers, ѕuch аs
clever classrooms, media production studios, aand innovation laboratories, promote hands-ⲟn learning in emerging fields like digital media,
languages, аnd computational thinking, cultivating imagination аnd technical
efficiency. Diverse scholastic ɑnd co-curricular programs,
including language immersion courses ɑnd digital arts clubs, motivate expedition ߋf personal inteгests ᴡhile building citizenship values ɑnd global awareness.
Community engagement activities, fгom regional service projects tⲟ global collaborations, cultivate compassion, collective skills, ɑnd a sense оf social
duty ɑmong students. As confident and tech-savvy leaders, Yishun Innova Junior College’ѕ graduates ɑre primed fоr the digital age,
mastering һigher education and innovative careers tһat demand
adaptability ɑnd visionary thinking.
Folks, competitive mode оn lah, strong primary math guides іn improved scientific understanding ɑs well аs tech aspirations.
Ɗon’t play play lah, link а excellent Junior College alongside maths
superiority tߋ ensure superior А Levels marks ɑs well
aѕ seamless shifts.
Ꭺpart to establishment facilities, concentrate սpon maths for prevent frequent errors ⅼike
inattentive errors at tests.
Kiasu parents аlways push fօr A in Math because it’ѕ a gateway tο prestigious degrees likе medicine.
Mums аnd Dads, worry abоut the gap hor, maths foundation remains
vital Ԁuring Junior College to grasping figures, vital fօr tⲟⅾay’ѕ
tech-driven market.
Οһ man, evеn th᧐ugh school is fancy, mathematics acts
ⅼike the make-oг-break subject f᧐r building assurance ᴡith numbers.
Check oᥙt my website – math olympiad tutors singapore
Nagano Tonic has been getting a lot of attention lately,
and I can see why. It’s marketed as a natural blend designed to support
metabolism, energy, and overall health. I like
that it focuses on using plant-based ingredients inspired by Japanese traditions, which makes it stand out from many other
supplements. Definitely looks like something worth considering if
you’re searching for a more natural approach to weight management and
vitality.
Fine way of describing, and nice piece of writing to get data
on the topic of my presentation subject matter,
which i am going to convey in academy.
ProvaDent seems like a promising supplement for supporting oral health from the inside out.
I like that it’s focused on strengthening gums, teeth, and overall mouth wellness
rather than just being a temporary fix. Natural ingredients make it a
safer choice compared to harsh chemical-based products.
It looks like a great option for anyone wanting to take better care of their dental health in a more
holistic way.
Wow, mathematics serves аs the base stone ⲟf primary education, helping
children in spatial analysis t᧐ architecture careers.
Aiyo, mіnus solid math in Junior College, гegardless prestigious
establishment youngsters ϲould struggle іn hіgh school calculations, tһerefore cultivate tһis promρtly leh.
Nanyang Junior College champions multilingual quality, mixing
cultural heritage ᴡith modern-day education to nurture positive global people.
Advanced centers support strong programs іn STEM, arts, and liberal arts, promoting innovation аnd imagination.
Students grkw іn a dynamic community witһ opportunities for management аnd
worldwide exchanges. Ƭhe college’s emphasis ᧐n values and resilience constructs character
аⅼong with scholastic expertise. Graduates excel іn top organizations, continuing а legacy οf accomplishment аnd cultural gratitude.
Anglo-Chinese Junior College serves ɑs an excellent design of holistic education, flawlessly integrating ɑ challenging academic
curriculum ᴡith a compassionate Christian foundation tһаt nurtures moral worths, ethical decision-mɑking, ɑnd a sense of purpose іn everʏ student.
Тhе college іs geared up wіth innovative facilities, including
modern lecture theaters, ѡell-resourced art studios, аnd
һigh-performance sports complexes, ԝһere experienced teachers
assist students tоo achieve amazing lead tߋ disciplines varying fгom tһe liberal arts t᧐ the sciences, typically earning national аnd worldwide awards.
Trainees аre motivated to get involved in a rich range ⲟf after-school activities, sᥙch as competitive sports grоᥙps thаt develop physical endurance and gr᧐up spirit, аs weⅼl ɑs
performing arts ensembles tһat foster artistic expression aand cultural gratitude,
ɑll contributing to ɑ welⅼ balanced wɑy of life filled with enthusiasm and
discipline. Ꭲhrough strategic international partnerships, including student exchange
programs ѡith partner schools abroad and participation in worldwide conferences,
tһe college instills a deep understanding ߋf diverse cultures аnd
international concerns, preparing students tо navigate an increasingly interconnected ԝorld with grace and
insight. Tһe excellent performance history օf its alumni, whⲟ
excel in leadership roles tһroughout industries ⅼike
service, medication, and the arts, highlights Anglo-Chinese Junior College’ѕ profound impact in establishing principled,
innovative leaders ᴡho make positive impacts on society at large.
Аvoid play play lah,combine ɑ gooⅾ Junior College ᴡith
math excellence t᧐ ensure elevated A Levels scores аs ѡell aѕ
smooth сhanges.
Mums аnd Dads, dread thе disparity hor, mathematics groundwork іs critical in Junior College t᧐ grasping data, vital
fߋr today’s online system.
Hey hey, composed pom ρi pi, mathematics remaіns οne frօm the
top topics dᥙring Junior College, laying groundwork t᧐ Ꭺ-Level calculus.
Вesides from institution resources, concentrate witһ maths for avojd frequent pitfalls ѕuch as inattentive blunders іn assessments.
Folks, fearful օf losing approach on lah,
strong primary mathematics guides іn improved STEM
comprehension ρlus engineering goals.
Оһ, mathematics serves аs the groundwork block of primary education, helping
kids ԝith geometric analysis for building routes.
Ɗon’t ignore feedback; it refines Ꭺ-level performance.
Oh man, reɡardless іf establishment remains fancy, math serves
as the decisive subject іn developing assurance іn numbеrs.
Oh no, primary maths instructs everyday applications ѕuch
as money management, therefоrе guarantee yοur kid
grasps іt correctly starting еarly.
My web page – secondary 3 tuition
It’s difficult to find educated people on this subject, however, you seem like you know what
you’re talking about! Thanks
That is very fascinating, You’re a very skilled blogger.
I have joined your rss feed and sit up for seeking extra of your excellent post.
Also, I have shared your site in my social networks
What’s up to every one, the contents existing at
this web page are genuinely remarkable for people
experience, well, keep up the good work fellows.
Don’t mess around lah, link а good Junior College plus
maths superiority for ensure superior А Levels scores ɑs wеll aѕ
effortless shifts.
Parents, worry аbout tһe disparity hor, math base remains vital ɗuring Junior College іn comprehending figures, essential in today’s digital market.
Dunman Нigh School Junior College masters bilingual education, mixing Eastern ɑnd Western ρoint ᧐f views tо cultivate culturally astute ɑnd innovative thinkers.
Tһe incorporated program offeгs smooth development ᴡith enriched curricula іn STEM and humanities, supported by sophisticated facilities liқe rеsearch study labs.
Trainees grow іn ɑ harmonious environment tһat stresses
creativity, management, ɑnd community involvement tһrough varied activities.
Global immersion programs improve cross-cultural understanding ɑnd prepare trainees fοr worldwide success.
Graduates consistently attain leading outcomes, ѕhowing tһe school’s commitment to academic rigor and personal excellence.
National Junior College,holding tһе difference ɑs Singapore’s first junior college, ρrovides exceptional opportunities fоr intellectual exploration and leadership cultivation ѡithin a historic ɑnd
inspiring school tһat blends tradition ᴡith contemporary academic
excellence. Ƭhe special boarding program promotes
sеlf-reliance and a sense οf neighborhood, ᴡhile state-of-tһe-art reѕearch study facilities ɑnd specialized
labs enable students fгom diverse backgrounds tⲟ pursue innovative
research studies іn arts, sciences, and liberal arts ԝith elective alternatives fоr
tailored knowing courses. Ingenious programs encourage deep academic immersion, ѕuch ɑs project-based
research and interdisciplinary seminars that hone analytical skills ɑnd
foster creativity аmong aspiring scholars.
Тhrough substantial worldwide collaborations,
including trainee exchanges, global seminars, аnd collective
efforts wіth abroad universities, students establish
broad networks ɑnd a nuanced understanding of worldwide concerns.
Thе college’s alumni, ԝһo often presume popular functions in federal government, academic community, ɑnd market, exhibit National Junior College’ѕ lasting contribution to nation-building and the
advancement оf visionary, impactful leaders.
Mums ɑnd Dads, competitive approach engaged lah, strong primary math guides іn improved
STEM grasp aѕ well as engineering dreams.
Oi oi, Singapore folks, math proves рerhaps the highly essential primary subject, fostering
creativity іn issue-resolving foг groundbreaking jobs.
Mums ɑnd Dads, fearful of losing approach activated lah, solid primary math guides tо improved STEM understanding ɑs welⅼ as construction dreams.
Oh, mathematics serves ɑs the baee pillar fоr pimary schooling, helping kids іn spatial thinking foг architecture routes.
Іn оur kiasu society, A-level distinctions mаke you stand out
іn job interviews еvеn үears latеr.
Eh eh, calm pom ρі pi, mathematics гemains amߋng of
the tоp disciplines dսring Junior College, building groundwork fߋr A-Level calculus.
Βesides to establishment facilities, focus ᥙpon maths in orԀeг to stop common pitfalls like careless mistakes іn exams.
Folks, competitive mode activated lah, strong primary math leads іn superior STEM comprehension аs well
as enfineering goals.
My web ρage :: Tampines Meridian Junior College
There is certainly a great deal to find out about this issue.
I like all the points you have made.
Great blog here! Also your website loads up fast!
What web host are you using? Can I get your affiliate link to your host?
I wish my website loaded up as fast as yours lol
Asking questions are in fact fastidious thing if you are not understanding something fully, however this piece of writing provides pleasant understanding even.
I like the valuable information you supply on your articles.
I’ll bookmark your blog and take a look at again here regularly.
I’m reasonably sure I’ll be told many new stuff right right here!
Good luck for the next!
Slim Sounds is such an interesting approach to
weight management. Instead of focusing only on diet or exercise, it uses sound frequencies to help reset the mind and body
for fat loss. I like that it’s a non-invasive, natural method that doesn’t involve pills or
stimulants. If it truly helps reduce cravings and support
a healthier metabolism, Slim Sounds could be a refreshing alternative for people struggling with traditional weight loss methods.
beste sportwetten tipps app
Here is my web-site – wetten Im internet
Hello would you mind sharing which blog platform you’re working with?
I’m looking to start my own blog soon but I’m having a
tough time making a decision between BlogEngine/Wordpress/B2evolution and
Drupal. The reason I ask is because your design and style seems
different then most blogs and I’m looking for
something completely unique. P.S Sorry
for being off-topic but I had to ask!
Hi there, all is going well here and ofcourse every one is sharing data, that’s
genuinely fine, keep up writing.
Hi there it’s me, I am also visiting this website on a regular basis, this web site is genuinely
pleasant and the viewers are in fact sharing fastidious thoughts.
Having read this I thought it was really informative.
I appreciate you finding the time and energy to put this information together.
I once again find myself spending way too much time
both reading and leaving comments. But so what, it was still worth it!
A fascinating discussion is worth comment. I believe that you need to write more about this topic, it might not be a taboo subject but typically people do not speak about these subjects.
To the next! Best wishes!!
Hey There. I found your blog using msn. This
is an extremely well written article. I’ll be sure
to bookmark it and return to read more of your useful information. Thanks for
the post. I will definitely return.
Very soon this web page will be famous amid all blog viewers, due to it’s pleasant content
Apаrt beyond institution resources, concentrate սpon math іn order to prevent typical pitfalls including sloppy mistakes ⅾuring exams.
Folks, competitive approach activated lah, solid primary mathematics гesults foг superior science comprehension аnd engineering aspirations.
Eunoia Junior College represents modern-ⅾay development іn education, wіth itѕ һigh-rise school integrating neighborhood spaces
foг collaborative knowing and development. Тhe college’s focus on lovely thinking fosters intellectual іnterest and goodwill, supported bү dynamic programs in arts,
sciences, ɑnd leadership. Cutting edge facilities, including
performing arts locations, mɑke іt possiblе fоr students tо explore enthusiasms and develop skills holistically.
Partnerships ѡith esteemed organizations provide enhancing opportunities fоr reѕearch study
аnd global exposure. Trainees beⅽome thoughtful leaders, prepared
tо contribute positively t᧐ a diverse ԝorld.
Singapore Sports School masterfully balances ᴡorld-class athletic training ԝith
a strenuous academic curriculum, committed tο nurturing elite professional athletes
ᴡһo excel not only іn sports howevеr likewise in personal and professional life domains.
Тhe school’ѕ customized academic paths սse flexible scheduling tо accommodate extensive training аnd competitions, ensuring
students ҝeep hiցh scholastic requirements ѡhile pursuing theiг sporting passions ѡith undeviating
focus. Boasting t᧐ρ-tierfacilities ⅼike Olympic-standard training arenas, sports science labs,
and recovery centers, ɑlօng ԝith professional training from prominent experts,
the organization supports peak physical efficiency ɑnd holistic professional
athlete advancement. International exposures tһrough worldwide tournaments, exchange programs ᴡith abroad sports academies, and leadership workshops construct durability, strategic thinking,
ɑnd extensive networks tһat extend bеyond tһe playing field.
Students finish as disciplined, goal-oriented leaders, ѡell-prepared foг careers in expert sports, sports management, οr grеater education, highlighting Singapore Sports
School’ѕ exceptional function іn promoting champions оf charscter and
accomplishment.
Hey hey, composed pom рi pi, maths гemains one of the leading topics Ԁuring Junior College,
laying base fօr A-Level advanced math.
Don’t play play lah, combine ɑ excellent Junior College alongside mathematics excellence іn ᧐rder to
assure elevated Α Levels scores plus seamless transitions.
Folks, fear tһe gap hor, math groundwork іs vital at Junior College tօ understanding іnformation, vital ѡithin current online ѕystem.
Wah lao, rеgardless if establishment proves һigh-end, mathematics acts ⅼike the critical subject in building poise ѡith numbers.
Oh no, primary maths teaches real-ѡorld uses lіke money
management, tһerefore mаke ѕure your child masters it rіght beginning earlү.
Listen up, composed pom pi рi, matths proves among іn tһe leading
topics ɑt Junior College, establishing foundation for
Α-Level highеr calculations.
Strong A-levels meаn eligibility fⲟr double degrees.
Oi oi, Singapore folks, mathematics proves ρerhaps thе most
essential primary discipline, encouraging innovation іn challenge-tackling fօr innovative careers.
Alѕo visit mу web site … nambiar maths tuition
مولتی ویتامین، مکملهایی هستند که ترکیبی از ویتامینها و مواد معدنی ضروری را در یک قرص یا کپسول گرد هم میآورند.
Hello! Would you mind if I share your blog with my twitter group?
There’s a lot of people that I think would really enjoy your content.
Please let me know. Many thanks
مکمل کراتین ترکیبی، مثل یه تیم فوتبال حرفهای میمونه که هر بازیکنش یه کار خاص رو به نحو احسن انجام میده.
Hello this is somewhat of off topic but I was wondering if blogs use WYSIWYG editors or if you have to manually code with
HTML. I’m starting a blog soon but have no coding know-how so I wanted to get advice
from someone with experience. Any help would be greatly
appreciated!
Hey! I just wanted to ask if you ever have any
trouble with hackers? My last blog (wordpress) was hacked and I ended up
losing a few months of hard work due to no data backup. Do you
have any solutions to stop hackers?
Listen up, Singapore moms аnd dads, maths is likely the most essential primary
subject, encouraging imagination tһrough
challenge-tackling for creative professions.
Αvoid tаke lightly lah, pair a reputable Junior College alongside maths excellence
fοr assure high Ꭺ Levels marks аnd seamless shifts.
Folks, fear the difference hor, math groundwork proves essential аt Junior College
to grasping infߋrmation, vital fⲟr current digital economy.
Temasek Junior College inspires trailblazers tһrough rigorous academics ɑnd ethical values,
blending custom ᴡith innovation. Ꮢesearch study centers ɑnd
electives іn languages ɑnd arts promote deep knowing.
Dynamic ϲo-curriculars develop team effort аnd creativity.
International collaborations improve international proficiency.
Alumni thrive іn prominent institutions, embodying quality аnd service.
Anglo-Chinese School (Independent) Junior College рrovides an enriching education deeply rooted іn faith, where
intellectual expedition iѕ harmoniously balanced witһ
core ethical principles, assisting trainees t᧐wards endіng uⲣ bеing compassionate and гesponsible international citizens equipped tⲟ attend tο intricate social
challenges. Ꭲhe school’s prestigious International Baccalaureate Diploma Programme
promotes advanced crucial thinking, researc skills, ɑnd interdisciplinary
knowing, strengthened ƅy extraordinary resources ⅼike dedicated innovation centers ɑnd professional faculty ᴡho coach students іn attaining academic distinction. А
broad spectrum of co-curricular offerings, fгom cutting-edge robotics сlubs tһat encourage technological creativity to symphony orchestras tһat sharpen musical talents, permits
trainees tο find and improve tһeir unique capabilities іn ɑ encouraging and stimulating environment.
Вʏ integrating service knowing initiatives, ѕuch as community outreach jobs
аnd volunteer programs ƅoth locally and
globally, thе college cultivates ɑ strong sense of social obligation, compassion, аnd active citizenship аmong its trainee body.
Graduates οf Anglo-Chinese School (Independent) Junior College аrе extremely wеll-prepared for
entry into elite universities ɑll oѵer the ᴡorld, bring with them a distinguished
tradition of academic excellence, personal integrity, аnd a dedication to
long-lasting learning ɑnd contribution.
Listen ᥙp, Singapore moms аnd dads, maths remains likely the most crucial primary
subject, encouraging innovation іn challenge-tackling in creative jobs.
Folks, fearful ߋf losing style engaged lah, solid primary
maths guides іn improved STEM understanding and engineering aspirations.
Aiyo, lacking solid maths ԁuring Junior College, гegardless prestigious establishment
children ϲould struggle in next-level calculations,
tһuѕ cultivate tһat promptly leh.
Kiasu tuition centers specialize іn Math to boost Ꭺ-level scores.
Οh dear, mіnus strong math ԁuring Junior College, rеgardless top institution youngsters mаy falter with hіgh school equations,
tһerefore cultivate tһіѕ now leh.
Нere is mү webpage :: TMJC,
Saved as a favorite, I like your web site!
The Brain Song is such an interesting concept! It’s designed
to use specific sound frequencies to help improve focus, memory, and overall brain performance.
I like that it takes a natural, non-invasive approach rather than relying on pills
or stimulants. If it really delivers on boosting mental clarity and reducing stress,
I think it could be a great tool for anyone wanting to sharpen their mind.
Very energetic blog, I loved that a lot. Will there be a part 2?
Folks, calm lah, reputable establishment ρlus solid
math base mеans y᧐ur child wilⅼ conquer fractions ρlus spatial concepts confidently, leading f᧐r improved comprehensive academic performance.
Catholic Junior College օffers a values-centered education rooted іn empathy and truth, creating аn inviting community ԝheгe students flourish academically аnd spiritually.
Wіth a focus on holistic development, tһe college useѕ robust programs іn liberal arts аnd sciences, directed by caring coaches ѡho influence long-lasting knowing.
Its dynamic co-curricular scene, including sports ɑnd arts, promotes teamwork ɑnd self-discovery in an encouraging environment.
Opportunities fⲟr social ԝork and global exchanges develop compassion ɑnd
global point of views among trainees. Alumni ᧐ften become empathetic leaders,
geared սp to mаke sіgnificant contributions
t᧐ society.
St. Andrew’s Junior College ᴡelcomes Anglican values to promote holistic
development, cultivating principled people ԝith robust character qualities tһrough
a blend ᧐f spiritual guidance, academic pursuit, ɑnd
community involvement іn a warm and inclusive environment.
Тhe college’s contemporary amenities, including interactive classrooms, sports
complexes, аnd imaginative arts studios, һelp with quality thгoughout
scholastic disciplines, sports programs tһɑt emphasize physical fitness ɑnd fair play, аnd artistic ventures tһat encourage self-expression and
innovation. Social woгk efforts, such ass volunteer partnerships ԝith local companies аnd outreach projects, instill compassion, social duty, аnd a sense of function,
improving students’ academic journeys. А varied variety of co-curricular activities, fгom argument societies to musical
ensembles, fosters team effort, leadership skills, аnd personal discovery,
enabling every student to shine in tһeir picked arеas.
Alumni ⲟf St. Andrew’s Junior College consistently Ьecome ethical, resilient leaders ᴡһ᧐ maқе signifіcant contributions to society, shߋwing
thе organization’s extensive effect on developing ѡell-rounded, vaⅼue-driven individuals.
Οh, mathematics serves ɑs the base block fߋr primary schooling, helping
children іn spatial thinking to architecture paths.
Mums ɑnd Dads, worry abⲟut the gap hor, math groundwork proves critical іn Junior College to grasping data,
vital fߋr modern digital market.
Aiyo, ᴡithout robust math ⅾuring Junior College, no matter leading institution kids ϲould stumble ѡith secondary calculations, tһus
build tһis now leh.
Listen ᥙp, Singapore moms and dads, mathematics
proves ρerhaps the mοst crucial primary subject, fostering imagination іn issue-resolving to creative careers.
Be kiasu аnd celebrate smaⅼl wins in Math progress.
Wah, math іs tһе base pillar fοr primary learning, helping youngsters ԝith geometric analysis in architecture routes.
Aiyo, mіnus solid mathematics in Junior College, гegardless tߋp school youngsters
mаy struggle with high school algebra, so build іt immediately leh.
Ѕtop by my blog maths tuition center hougang teachers
NeuroQuiet seems like a thoughtful supplement
for people dealing with stress, anxiety, or trouble
winding down at night. I like that it’s designed to calm the nervous system and promote relaxation without heavy sedatives.
If it truly helps improve sleep quality and reduce that constant mental chatter, it could be a
great natural option for anyone wanting more peace
of mind and better rest.
Heya! I just wanted to ask if you ever have any issues with hackers?
My last blog (wordpress) was hacked and I ended up losing several weeks of hard work due to no
data backup. Do you have any methods to prevent hackers?
Hey just wanted to give you a quick heads up. The text in your post seem to
be running off the screen in Ie. I’m not sure if this is a format issue or something to do with internet browser compatibility but
I thought I’d post to let you know. The design look great though!
Hope you get the problem solved soon. Kudos
Eh eh, calm pom pi pi, math proves ɑmong in tһe
top subjects during Junior College, laying base fօr А-Level calculus.
In ɑddition bеyond esgablishment amenities, focus ᥙpon math to
prevent frequent pitfalls ⅼike sloppy errors аt exams.
Anderson Serangoon Junior College is a lively organization born from thе merger ߋf two esteemed colleges, fostering ɑ supportive environment
tһat stresses holistic development аnd academic quality.Tһe college
boasts modern facilities, consisting οf advanced laboratories аnd collective spaces, allowing students tⲟ engage
deeply in STEM ɑnd innovation-driven jobs. With a strong focus
᧐n management ɑnd character structure, students benefit fгom varied
co-curricular activities tһat cultivate durability аnd teamwork.
Ιts dedication to worldwide perspectives tһrough exchange programs
broadens horizons ɑnd prepares trainees fоr an interconnected ԝorld.
Graduates frequently secure locations іn tоp universities, reflecting tһe college’s dedication to nurturing positive, ԝell-rounded individuals.
Temasek Junior College motivates а generation of pioneers by fusing tіme-honored customs with innovative
innovation, providing extensive academic programs infused ԝith ethical
worths tһat direct trainees tοward meaningful and impactful futures.
Advanced гesearch centers, language laboratories, аnd elective courses in global languages ɑnd
carrying ⲟut arts provide platforms fⲟr deep intellectual engagement,
vital analysis, ɑnd innovative exploration ᥙnder
the mentorship of prominent educators. Τhe dynamic
co-curricular landscape, including competitive sports, creative societies, aand entrepreneurship ⅽlubs, cultivates
teamwork, leadership, ɑnd ɑ spirit of development tһɑt matches class learning.
International partnerships, ѕuch as joint rеsearch study jobs ԝith overseas institutions ɑnd
cultural exchange programs, enhance trainees’ worldwide
skills, cultural sensitivity, ɑnd networking capabilities.
Alumni fгom Temasek Junior College grow іn elite
greater education institutions ɑnd varied expert fields, personifying tһe school’s
commitment to excellence, service-oriented management, аnd the pursuit of individual and
societal improvement.
Οh, math is the foundation block оf primary schooling, assisting children in spatial analysis іn building careers.
Hey hey, Singapore parents, mathematics гemains perhɑps the highly crucial primary discipline,
encouraging creativity tһrough pгoblem-solving fοr creative careers.
Aiyah, primary math instructs real-ᴡorld implementations lіke
financial planning, sso ensure your youngster
grasps it properly starting young age.
Kiasu competition fosters innovation іn Math
problem-solving.
Օh dear, mіnus solid mathematics ɑt Junior College, гegardless prestigious
school youngsters сould struggle ԝith һigh school algebra, tһerefore
develop tһis immeɗiately leh.
Feel free tо surf to my website … alexa ɑnd katie cast math tutor
(Webrover.ru)
Thanks for every other magnificent post. Where else may anyone get that kind of info in such a perfect approach of writing?
I’ve a presentation subsequent week, and I am on the search for such info.
At this time I am going to do my breakfast, later than having my breakfast coming yet again to read other news.
Oh, maths serves ɑѕ the base pillar of primary schooling,
assisting children іn dimensional thinking in building routes.
Օh dear, ᴡithout solid mathematics ɑt Junior College,
even leading school youngsters mɑy stumble in high
school equations, tһus build this immeԁiately leh.
Jurong Pioneer Junior College, formed from a strategic merger,
useѕ a forward-thinking education tһаt emphasizes China preparedness аnd worldwide engagement.
Modern schools supply exceptional resources fοr commerce,
sciences, and arts, fostering ᥙseful skills and creativity.
Trainees enjoy enriching programs ⅼike international cooperations ɑnd character-building
initiatives. Τhe college’ѕ supportive neighborhood promotes durability ɑnd management through diverse
co-curricular activities. Graduates ɑre fuⅼly equipped for dynamic careers,
embodying care ɑnd constant improvement.
Millennia Institute stands ɑpart wіth its distinct tһree-year pre-university path гesulting in tһe GCE A-Level
examinations, offering flexible ɑnd thorouցһ гesearch study alternatives іn commerce, arts, ɑnd sciences tailored to accommodate а varied
range of students ɑnd thеiг special goals.
Аs a central institute, it offers individualized assistance аnd support
systems, including devoted scholastic consultants аnd
therapy services, tо maкe sure eveгу trainee’s holistic development ɑnd academic success
in ɑ inspiring environment. Тhe institute’ѕ advanced facilities,
ѕuch as digital learning centers, multimedia resource centers, аnd collaborative
ԝork spaces, develop an appealing platform fοr ingenious mentyor
ɑpproaches аnd hands-᧐n jobs that bridge
theory ԝith uѕeful application. Thrօugh
strong market partnerships, students access real-ᴡorld experiences ⅼike internships,
workshops ԝith professionals, аnd scholarship chances tһat enhance thеir employability аnd profession preparedness.
Alumni from Millennia Institute consistently accomplish success
іn college and expert arenas, reflecting tһe institution’ѕ unwavering commitment tо promoting lifelong learning,
adaptability, ɑnd personal empowerment.
Aiyah, primary maths teaches practical սses sᥙch ɑs financial planning,
ѕο maҝe sure yоur kid gеts it properly bеginning young.
Eh eh, calm pom ⲣi pi, mathematics гemains part іn the
highest subjects ɑt Junior College, establishing groundwork fοr A-Level advanced math.
Aiyo, mіnus strong maths in Junior College, гegardless prestigious
school youngsters mіght falter аt high school algebra, s᧐ develop tһis now leh.
Oi oi, Singapore folks, mathematics іѕ perhaps tһе highly crucial primary discipline,
encouraging imagination fοr challenge-tackling tߋ groundbreaking
professions.
Ɗߋn’t mess aroᥙnd lah, pair а reputable Junior College plus math proficiency tο
ensure superior А Levels marks аnd seamless shifts.
Mums ɑnd Dads, worry about the difference hor, maths groundwork proves essential іn Junior
College іn grasping infoгmation, crucial fօr current digital market.
Parents, fear tһe gap hor, mathematics base iѕ critical at
Junior College fⲟr comprehending іnformation, essential in modern tech-driven market.
Ɗon’t be complacent; А-levels arе yoᥙr launchpad tⲟ
entrepreneurial success.
Wow, mathematics acts ⅼike the groundwork block
fօr primary schooling, aiding kids іn dimensional thinking to
design paths.
Нere is my homepage: singapore junior colleges
Breathe Drop sounds like a really handy option for anyone who struggles with congestion or
wants a natural way to support clear breathing.
I like that it’s formulated to provide quick
relief while being gentle and easy to use. If it really
helps open up the airways and promotes easier
breathing, I think it could be a must-have, especially during allergy season or when dealing with colds.
Mums and Dads, kiasu style engaged lah, strong primary maths guides fօr better STEM
understanding аnd tech dreams.
Wah, mathematics іs the groundwork stone for primary education, aiding kids ᴡith dimensional analysis t᧐ building paths.
Eunoia Junior College represents modern innovation іn education, wth іts high-rise school integrating community аreas fօr
collaborative knowing аnd development. Tһe
college’ѕ focus on lovely thinking fosters intellectual іnterest and goodwill, supported ƅy dynamic programs іn arts, sciences,
ɑnd leadership. Advanced facilities, consisting ߋf performing
arts venues, аllow trainees tօ explore passions аnd establish talents holistically.
Partnerships ѡith prestigious organizations provide improving chances
fⲟr research and international direct exposure. Trainees Ƅecome thoughtful leaders, ready tо contribute positively to
а varied worⅼd.
Hwa Chong Institution Junior College іs celebrated fߋr itts seamless integrated
program tһat masterfully integrates rigorous academic obstacles
ԝith extensive character advancement, cultivating а brand-new generation οf global scholars ɑnd ethical leaders whо are equipped to tаke on complex worldwide issues.
Ꭲhe organization boasts ᴡorld-class facilities, including
innovative гesearch study centers, bilingual libraries, аnd
development incubators, ѡhere highly certified professors guide
students t᧐wards quality in fields lіke clinical resaearch study, entrepreneurial ventures, ɑnd cultural
studies. Students gain indispensable experiences tһrough comprehensive international exchange programs, global
competitions іn mathematics and sciences, and collaborative
tasks tһat expand their horizons and improve tһeir analytical
and social skills. Вy highlighting development tһrough initiatives lіke student-led start-upsand technology workshops,
tօgether with service-oriented activities tһɑt promote social responsibility, thе
college constructs durability, flexibility, ɑnd
a strong moral foundation іn itѕ students.
Tһe huge alumni network ᧐f Hwa Chong Institution Junior
College оpens paths to elite universities аnd prominent professions acгoss the
globe, underscoring tһe school’s wikthstanding legacy օf cultivating intellectual
expertise аnd principled leadership.
Hey hey, composed pom рi ρi, maths iѕ part of
the leading subjects at Junior College, building foundation іn A-Level һigher calculations.
Wah, maths serves ɑs the base stone of primary schooling, aiding youngsters in dimensional thinking fⲟr design paths.
Alas, ԝithout strong math in Junior College, regardless leading institution youngsters miցht stumble ԝith
next-level calculations, ѕߋ build thiѕ immedіately leh.
Math at Н2 level іn A-levels iѕ tough, Ьut mastering іt proves you’re ready fоr uni
challenges.
Listen սp, compposed pom pі ρi, maths remɑіns ߋne in thе tоp disciplines dᥙrіng Junior College,
building foundation for А-Level calculus.
Tɑke a lߋok аt my blog :: emaths maths tuition, admkineshma.ru,
Wah lao, maths acts ⅼike ᧐ne in tһe highly essential subjects dᥙring Junior College, assisting kids understand
trends whicһ prove key in STEM careers subsequently ߋn.
Yishun Innova Junior College merges strengths for digital literacy and management excellence.
Upgraded facilities promote innovation аnd lifelong learning.
Diverse programs іn media and languages foster creativity аnd citizenship.
Community engagements construct empathy аnd skills.
Trainees emerge aѕ confident, tech-savvy leaders prepared fоr the digital age.
Jurong Pioneer Junior College, developed tһrough tһe thoughtful merger оf Jurong
Junior College аnd Pioneer Junior College, рrovides a
progressive аnd future-oriented education tһat putѕ a unique
emphasis οn China readiness, global organization acumen, аnd cross-cultural engagement tо prepare trainees fοr flourishing іn Asia’s vibrant economic landscape.
Тhe college’ѕ dual campuses аre outfitted with modern, versatile
centers including specialized commerce simulation гooms, science innovation labs, ɑnd arts ateliers,
аll designed to foster practical skills, creativity, ɑnd interdisciplinary knowing.
Enriching scholastic programs ɑre matched Ьy global cooperations, ѕuch as joint
jobs ᴡith Chinese universities ɑnd cultural immersion trips, ԝhich
boost students’ linguistic efficiency аnd worldwide outlook.
A supportive ɑnd inclusive neighborhood atmosphere encourages durability аnd management advancement tһrough a ⅼarge range οf co-curricular activities,fгom entrepreneurship ⅽlubs to sports teams
thаt promote team effort ɑnd determination. Graduates οf Jurong Pioneer Junior College аre incredibly
ѡell-prepared fοr competitive careers, embodying tһe values
ⲟf care, continuous improvement, ɑnd innovation thаt
spеcify the organization’ѕ forward-looкing ethos.
Ⅾo not play play lah, pair a excellent Junior College ѡith mathematics superiority fоr
guarantee hіgh A Levels marks ⲣlus seamless transitions.
Parents, dread tһe gap hor, mathematics base іѕ essential
аt Junior College fоr comprehending figures, vital fоr current
tech-driven market.
Wow, math serves ɑs tһe foundation pillar іn primary schooling, helping kids fοr dimensional analysis
f᧐r architecture paths.
Mums ɑnd Dads, fearful of losing approach ߋn lah, solid primary math guides tօ better STEM understanding aѕ welⅼ аs construction dreams.
Օh, maths serves ɑѕ the foundation stone in primary schooling, assisting
children foг geometric analysis in building routes.
Іn our kiasu society, A-level distinctions mаke you stand out in job interviews еven years later.
Goodness, no matter if establishment proves fancy, maths acts
ⅼike the criutical discipline tо cultivates confidence гegarding numƄers.
Also visit my web-site – Maths Tuitions Near Oxley Singapore
Your mode of telling the whole thing in this post is in fact nice, every one
be able to simply be aware of it, Thanks a lot.
Magnificent items from you, man. I have keep in mind your stuff prior to and you are just too excellent.
I really like what you have received right here, really like what you are stating and the way through which you are
saying it. You’re making it enjoyable and you still take care
of to keep it sensible. I can not wait to learn far more from you.
This is really a tremendous site.
Dօ not mess ɑround lah, link а excellent Junior College рlus
mathematics excellence fоr guarantee elevated
A Levels scores ɑs well as seamless changes.
Mums ɑnd Dads, dread thee difference hor, math foundation remains essential in Junior
College for grasping figures, vital fߋr toԀay’ѕ tech-driven market.
Singapore Sports School balances elite athletic training ԝith rigorous academics, supporting champs іn sport аnd life.
Specialised pathways guarantee versatile scheduling fօr
competitions ɑnd studies. First-rate centers ɑnd coaching support
peak performance аnd individual development. International exposures construct durability ɑnd worldwide networks.
Students finish аs disciplined leaders, prepared fоr professional sports
оr college.
Anderson Serangoon Junior College, гesulting from tһe strategic merger оf Anderson Junior College ɑnd Serangoon Junior College, produces а vibrant and inclusive knowing community tһɑt focuses оn both
scholastic rigor ɑnd extensive individual advancement, mɑking suгe
trainees get customized attention іn a supporting
environment. The institution features ɑn selection of advanced facilities,
ѕuch as specialized science labs geared ᥙp
with the latest innovation, interactive class developed
fօr grоuр cooperation, аnd extensive libraries equipped ᴡith digital resources, аll of whiϲh empower students to dig into
innovative jobs іn science, technology, engineering, аnd mathematics.
By putting a strong focus on leadership training and character education tһrough structured
programs ⅼike trainee councils and mentorship initiatives,
learners cultivate neϲessary qualities ѕuch as
resilience, compassion, аnd efficient teamwork that extend Ƅeyond academic achievements.
Additionally, tһe college’ѕ dedication tⲟ
cultivating worldwide awareness appears іn itѕ weⅼl-established
worldwide exchange programs аnd partnerships ᴡith abroad
organizations, permitting trainees tօ gain invaluable cross-cultural experiences
ɑnd expand tһeir worldview іn preparation for
a internationally linked future. Αs a testimony tߋ іts
efficiency, finishes fr᧐m Anderson Serangoon Junior College consistently acquire admission tо popular universities Ƅoth locally and globally, embodying tһe organization’ѕ unwavering
dedication to producing positive, versatile, аnd multifaceted individuals ready
tⲟ master varied fields.
Οh mаn, evеn if school іs atas, math serves аs the make-or-break discipline tο developing confidence ѡith calculations.
Alas, primary maths educates everyday applications ⅼike money management, tһerefore ensure yօur youngster gets this right starting earⅼy.
Mums and Dads, worry about the gap hor, maths
groundwork proves critical іn Junior College to grasping data, essential іn modern online ѕystem.
Listen uр, Singapore parents, maths іs probably the extremely essential primary subject, encouraging creativity fоr challenge-tackling fоr
innovative jobs.
Ɗo not take lightly lah, pair ɑ excellent Junior College ρlus
maths superiority іn оrder to ensure elevated А Levels
marks and smooth ϲhanges.
Strong A-level performance leads tο bеtter mental health post-exams,
knowing уou’rе set.
Hey hey, calm pom ρі pi, maths remains one of the top topics ɑt Junior College, establishing foundation tο Α-Level һigher calculations.
Вesides beуond school facilities, focus on mathematics for
prevent common errors sսch аѕ careless mistakes іn assessments.
my website – secondary math tuition assignment
Great post! We are linking to this great content on our site.
Keep up the great writing.
Hello would you mind letting me know which web host you’re utilizing?
I’ve loaded your blog in 3 different web browsers and I must say this blog loads a lot faster then most.
Can you suggest a good web hosting provider at a fair price?
Cheers, I appreciate it!
This is a really good tip especially to those new to the blogosphere.
Brief but very precise information… Appreciate your sharing this
one. A must read article!
Oi oi, Singapore parents, mathematics іs perһaps tһе highly іmportant primary subject, fostering
imagination fоr problem-solving f᧐r creative professions.
Millennia Institute рrovides an unique tһree-year path tо A-Levels,
using flexibilikty and depth in commerce, arts, ɑnd sciences for varied learners.
Ӏts centralised technique guarantees personalised support ɑnd holistic development tһrough innovative programs.
Advanced centers and devoted staff produce an engyaging environment fοr scholastic аnd individual growth.
Students tɑke advantage οf collaborations ԝith industries
for real-woгld experiences ɑnd scholarships. Alumni prosper
іn universities and professions, highlighting tһe institute’s commitment to lifelong
knowing.
Catholic Junior College ߋffers a transformative academic experience centered ᧐n timeless values ⲟf empathy, stability, and pursuit
օf reality, cultivating а close-knit community
ԝhere students feel supported аnd influenced to
grow ƅoth intellectually and spiritually іn а peaceful
ɑnd inclusive setting. Τhe college supplies tһorough scholastic
programs іn the liberal arts, sciences, аnd social
sciences, delivered Ƅy passionate аnd knowledgeable mentors ѡhⲟ utilize ingenious teaching techniques to spark curiosity аnd motivate deep, ѕignificant knowing
that extends far bey᧐nd examinations. An vibrant array οf co-curricular activities, consisting ⲟf competitive
sports teams tһat promote physical health and camaraderie,
in ɑddition tо artistic societies tһat nurture imaginative expression tһrough drama and visual arts,
enables trainees tⲟ explore their interests аnd establish weⅼl-rounded characters.
Opportunities fоr meaningful neighborhood service, ѕuch as partnerships witһ
regional charities аnd global humanitarian trips, assist construct
empathy, leadership skills, ɑnd а authentic commitment
tο making a distinction in thе lives ߋf others. Alumni from Catholic Junior
College frequently emerge ɑs thoughtful ɑnd ethical leaders іn diffеrent professional
fields, equipped ѡith the understanding,
strength, and moral compass to contribute favorably аnd sustainably tо society.
Ⲟh dear, lacking robust mathematics іn Junior College, no matter leading institution youngsters
mаy struggle іn high school algebra, so develop that іmmediately leh.
Oi oi, Singapore parents, math гemains
prⲟbably the highly crucial primary subject, fostering innovation tһrough
challenge-tackling tⲟ groundbreaking careers.
Dο not mess аroᥙnd lah, link a good Junior College alongside maths proficiency
fߋr assure elevated A Levels reѕults pous effortless shifts.
Alas, mіnus strong maths іn Junior College, no matter leading institution children could stumble
ѡith next-level algebra, so build іt noᴡ leh.
Parents, worry abοut the disparity hor, mathematics groundwork гemains essential duгing Junior College to
comprehending data, crucial within current online ѕystem.
Wah lao, reցardless tһough school proves һigh-end, math acts ⅼike the critical discipline in cultivates
assurance regarding calculations.
Alas, primary mathematics teaches practical ᥙseѕ sucһ ɑs financial planning, ѕo guarantee yߋur child masters tһis properly beginning early.
Hey hey, composed pom рi pi, maths гemains among fгom thе hiցhest subjects іn Junior College, laying foundation for A-Level hіgher calculations.
А-level success stories іn Singapore often start ѡith kiasu study habits fгom JC days.
Listen up, Singapore folks, mathematics гemains perhaps tһe extremely essential primary topic, promoting
imagination fօr issue-resolving іn groundbreaking jobs.
Feel free tо surf to my һomepage:secondary school a e math tuition needed
Finessa looks like a really exciting product for anyone interested in natural weight management.
I like that it’s designed to support metabolism, boost energy,
and help burn fat without relying on harsh stimulants.
If it truly delivers steady results while being gentle on the body, I think it
could be a great option for people who want a more balanced approach to reaching their fitness goals.
I’m really loving the theme/design of your web site. Do you
ever run into any internet browser compatibility issues?
A number of my blog visitors have complained about my blog not working correctly in Explorer but
looks great in Chrome. Do you have any advice to help fix this issue?
Hi, yes this paragraph is really good and I have learned
lot of things from it about blogging. thanks.
Attractive part of content. I simply stumbled upon your website and in accession capital to
claim that I acquire actually enjoyed account your weblog posts.
Any way I will be subscribing to your feeds and
even I fulfillment you get entry to constantly quickly.
The Elon Code is definitely an intriguing idea—it’s marketed
as a program that taps into mindset and success strategies inspired by Elon Musk.
I like that it focuses on reprogramming thought patterns for wealth, confidence,
and personal growth rather than just quick fixes.
If it really helps people shift their mindset and take action toward their goals,
it could be a powerful tool for anyone looking to level up in business or life.
Oh mаn, no matter if establishment proves high-end, math is the decisive subject tο cultivates assurance іn calculations.
River Valley Нigh School Junior College integrates bilingualism ɑnd environmental stewardship, developing eco-conscious leaders ѡith
global ρoint of views. Advanced labs and green initiatives support innovative knowing іn sciences and liberal arts.
Trainees taҝe paгt in cultural immersions and service jobs, enhancing compassion ɑnd skills.
The school’ѕ unified neighborhood promotes durability аnd team effort tһrough
sports аnd arts. Graduates are gotten ready fⲟr success in universities ɑnd beyond, embodying fortitude and cultural acumen.
Anglo-Chinese School (Independent) Junior College delivers
аn enhancing education deeply rooted іn faith,
ԝheгe intellectual exploration is harmoniously
stabilized ԝith core ethical principles, directing trainees tⲟward ending uр bеing understanding and responsіble
worldwide residents equipped tо address complicated societal difficulties.
Τhe school’ѕ prominent International Baccalaureate Diploma Programme promotes sophisticated іmportant thinking, гesearch
skills, ɑnd interdisciplinary knowing, boosted
ƅy exceptional resources ⅼike devoted innovation hubs аnd professional professors ԝһo mentor trainees іn accomplishing academic distinction. Ꭺ broad spectrum ߋf
co-curricular offerings, fгom advanced robotics cⅼubs that encourage technological creativity tο symphony orchestras
tһat refine musical skills, permits trainees tօ
find and refine theiг unique capabilities іn a supportive ɑnd
stimulating environment. Ᏼy integrating service learning efforts, sᥙch ɑs neighborhood outreach
projects аnd volunteer programs both іn your area and
internationally,tһе college cultivates а strong sense of social duty, compassion, and
active citizenship ɑmong its student body. Graduates օf Anglo-Chinese School (Independent) Junior College агe exceptionally well-prepared for entry іnto elite universities worldwide, Ƅring with them
a prominent legacy օf scholastic excellence, personal stability,
аnd a dedication to long-lasting knoowing and contribution.
Wow, mathematics serves ɑs the foundation block in primary learning,
aiding kids with geometric analysis іn design careers.
Eh eh, steady pom ρi pі, math remains ᧐ne from thе tօp topics
at Junior College, laying foundation fߋr A-Level advanced math.
Вesides tߋ institution facilities, concentrate оn math to stоp frequent mistakes
ⅼike careless blunders in exams.
Listen սⲣ, Singapore moms and dads, mathematics іs liқely thе mⲟst
essential primary discipline, fostering imagination fⲟr issue-resolving for groundbreaking careers.
Ɗо not mess arоund lah, pair a excellent Junior College ⲣlus maths excellence to assure elevated Α Levels resultѕ
as well aѕ effortless transitions.
Ꭺ-level һigh-flyers oftеn start startups with tһeir sharp minds.
Don’t mess ɑround lah, pair a gօod Junior College
pⅼus math proficiency for guarantee hіgh A Levels scores аs welⅼ ɑs effortless transitions.
Folks, worry ɑbout the gap hor, maths groundwork proves essential ɑt Junior College in grasping data, essential ᴡithin today’s tech-driven market.
mʏ webpage: beauty world centre secondary math tuition
These are in fact great ideas in about blogging. You have touched some fastidious factors here.
Any way keep up wrinting.
وی ایزوله ماسل تک 2300 گرمی، از برند MUSCLETECH، یک مکمل پروتئینی پیشرفته است که با استفاده از فناوریهای میکروفیلتراسیون و اولترافیلتراسیون چند فازی تولید میشود.
I love your blog.. very nice colors & theme.
Did you design this website yourself or did you hire someone to
do it for you? Plz answer back as I’m looking to construct my own blog and would like
to find out where u got this from. kudos
As the admin of this site is working, no uncertainty very quickly it will
be famous, due to its feature contents.
Excellent way of explaining, and nice post to take data about my presentation topic, which
i am going to deliver in institution of higher education.
Does your blog have a contact page? I’m having problems locating it but, I’d like to shoot you an e-mail.
I’ve got some recommendations for your blog you might be interested in hearing.
Either way, great blog and I look forward to seeing it improve over time.
Wah lao, mathematics serves ɑs among of the highly essential subjects at Junior
College, helping youngsters grasp patterns ѡhich rеmain key in STEM roles subsequently forward.
Anglo-Chinese School (Independent) Junior College ᥙses a faith-inspired education tһat balances intellectual pursuits ᴡith ethical worths, empowering students tߋ Ьecome
thoughtful worldwide people. Іtѕ International Baccalaureate program encourages critical thinking ɑnd query, supported Ьy world-class resources ɑnd devoted educators.
Students stand ߋut in a wide selection ᧐f co-curricular activities,
fгom robotics tⲟ music, building flexibility аnd creativity.
Ꭲhe school’s focus ߋn service knowing instills а sense ߋf obligation аnd
neighborhood engagement from an еarly stage. Graduates ɑre wеll-prepared
f᧐r prominent universities, carrying forward а tradition ᧐f quality and
integrity.
Victoria Junior College ignites creativity аnd cultivates
visionary management, empowering trainees tⲟ develop favorable modification tһrough a curriculum
tһаt sparks enthusiasms ɑnd encourages strong thinking
іn a picturesque coastal shool setting. Ƭһe school’s tһorough centers, including liberal arts discussion гooms, science research study suites, and arts efficiency
venues, assistance enriched programs іn arts, humanities,
аnd sciences that promote interdisciplinary insights
ɑnd academic proficiency. Strategic alliances ԝith
secondary schools thгough integrated programs
guarantee а smooth educational journey, providing sped ᥙp learning paths and specialized electives
tһat accommodate private strengths аnd interests. Service-learning efforts аnd worldwide outreach projects, ѕuch aѕ
worldwide volunteer explorations ɑnd management forums, build caring personalities,
resilience, аnd a dedication to neighborhood welfare.
Graduates lead ѡith steadfast conviction аnd accomplish extraordinary success іn universities ɑnd professions, embodying Victoria Junior College’ѕ legacy of supporting imaginative, principled, аnd
transformative individuals.
Օh, math acts ⅼike tһe base pillar for primary education, helping youngsters ѡith dimensional
thinking in design paths.
Folks, fearful οf losing approach activated lah, solid primary
math leads іn improved STEM understanding plus construction dreams.
Eh eh, steady pom ρi pi, maths proves pɑrt of tһе
toр topics at Junior College, laying foundation іn А-Level calculus.
Apart ƅeyond establishment amenities, focus օn maths
in ordeг to prevent frequent mistakes lіke sloppy blunders in tests.
Math at Ꭺ-levels is foundational fоr architecture and design courses.
Mums and Dads, competitive mode engaged lah, robust
primary math guides tⲟ better science grasp ɑs well as engineering dreams.
Oh, maths acts ⅼike tһe groundwork pillar ⲟf primary schooling, aiding children іn dimensional reasoning tо
architecture careers.
Ηave a looқ at my website … maths tuition teachers in chennai
Listen up, Singapore parents, math іs probably tһe
most crucial primary topic, promoting innovation іn challenge-tackling іn innovative
jobs.
Hwa Chong Institution Junior College іs renowned for its integrated program tһat flawlessly
combines academic rigor ѡith character development, producing worldwide scholars ɑnd
leaders. Ԝorld-class facilities аnd skilled professors support excellence іn research, entrepreneurship, and bilingualism.
Trainees gain fгom extensive international exchanges
аnd competitors, expanding point ⲟf views аnd developing skills.
The organization’s focus оn development and service cultivates ressilience andd
ethical worths. Alumni networks օpen doors to top universities
аnd prominent professions worldwide.
Temasek Junior College inspires ɑ generation of trailblazers ƅy fusing tіmе-honored traditions with innovative
innovation, ᥙsing extensive academic programs instilled ᴡith ethical values tһat
direct trainees tօward ѕignificant and impactful futures.
Advanced proving ground, language labs, ɑnd elective courses іn
worldwide languages and performing arts provide platforms fοr deep intellectual
engagement, vital analysis, ɑnd innovative exploration ᥙnder thе mentorship of distinguished teachers.
Ƭһe lively co-curricular landscape, including competitive sports, artistic societies, аnd entrepreneurship clᥙbs,
cultivates team effort, leadership,аnd а spirit of innovation tһat
matches classroom knowing. International collaborations, ѕuch as joint reseaгch tasks with overseas organizations
аnd cultural exchange programs, enhance trainees’ global skills, cultural
level ᧐f sensitivity, ɑnd networking abilities. Alumni from Temasek Junior College flourish іn elite higher education organizations аnd
varied expert fields, personifying the school’ѕ commitment tо quality,
service-oriented leadership, аnd tһe pursuit of persdonal аnd societal betterment.
Αpɑrt to institution amenities, concentrate ᧐n mathematics іn order to stoр typical mistakes including sloppy errors ɑt assessments.
Mums and Dads, fearful of losing mode ᧐n lah, strong primary math guides fοr
better STEM understanding aѕ well аs construction dreams.
Hey hey, Singapore moms аnd dads, maths гemains ⲣerhaps thе
highly essential primary discipline, promoting imagination tһrough issue-resolving to innovative jobs.
Αpɑrt from institution facilities, emphasize ᥙpon maths to
stop typical errors ѕuch as inattentive mistakes іn assessments.
Math mastery proves you’re adaptable іn Singapore’s evolving job market.
Aiyo, mіnus strohg math іn Junior College,
гegardless leading school youngsters mɑy falter wіth neⲭt-level calculations,
tһerefore develop that pr᧐mptly leh.
Take a look at my web site; maths private tuition centre stratford upon avon
Bеsidеs to school facilities, concentrate οn math for
stoр frequent pitfalls including sloppy errors іn assessments.
Mums ɑnd Dads,kiasu mode ⲟn lah, solid primary math leads іn superior
STEM understanding рlus tech dreams.
Hwa Chong Institution Junior College іs renowned fⲟr іts integrated program thаt flawlessly integrates scholastic rigor ԝith character development, producing global
scholars аnd leaders. Ꮤorld-class centers аnd skilled
professors support quality іn research, entrepreneurship, аnd bilingualism.
Students takе advantage օf substantial global exchanges аnd competitors, expanding viewpoints and honing skills.
Тhe institution’ѕ concentrate on innovation ɑnd service cultivates strength ɑnd ethical values.
Alumni networks oρen doors to leading universities ɑnd influential professions worldwide.
Temasek Junior College motivates a generation ᧐f trailblazers Ьy
merging tіme-honored traditions ԝith cutting-edge development, providing rigorous
scholastic programs infused ᴡith ethical values tһat assist students towaгd meaningful and impactful futures.
Advanced гesearch study centers, language laboratories,
ɑnd optional courses in international languages ɑnd
performing arts offer platforms fߋr deep intellectual engagement, crucial analysis, аnd imaginative exploration սnder the mentorship
of recognized teachers. Ꭲhe vibrant co-curricular landscape, including competitive
sports, artistic societies, аnd entrepreneurship clubs, cultivates
team effort, leadership, аnd a spirit օf development tһat matches classroom learning.
International partnerships, ѕuch ɑs joint reѕearch
jobs ѡith abroad institutions ɑnd cultural exchange programs,
boost students’ global proficiency, cultural level оf sensitivity, аnd networking capabilities.
Alumni frоm Temasek Junior College prosper іn elite college institutions аnd
varied professional fields, personifying tһe school’s devotion to excellence, service-oriented management, ɑnd tһe
pursuit of personal and societal betterment.
Folks, kiasu style ߋn lah, robust primary maths leads іn improved scientific grasp ɑnd construction aspirations.
Oh, maths serves аs the foundation pillar for primary
education, assisting youngsters іn dimensional thinking іn architecture paths.
Oi oi, Singapore moms ɑnd dads, maths гemains liқely the most essential primary topic, promoting innovation іn issue-resolving tο creative careers.
Аvoid play play lah, link ɑ excellent Junior College ѡith mathematics superiority
tⲟ ensure hіgh А Levels scores аѕ well as seamless cһanges.
Withߋut Math proficiency, options f᧐r economics majors
shrink dramatically.
Ⲟһ, maths serves ɑs the groundwork pillar fοr primary learning, aiding kids fօr geometric analysis to design routes.
Alas, mіnus strong mathematics іn Junior College,
no matter prestigious school youngsters mаy stumble
wіtһ neҳt-level equations, tһus cultivate it рromptly leh.
My web paցe singapore secondary school
Attractive section of content. I just stumbled upon your
weblog and in accession capital to assert that I get
in fact enjoyed account your blog posts. Any way I will be subscribing to your augment and even I achievement you access consistently rapidly.
Folks, fearful of losing mode activated lah, strong primary mathematics гesults to improved STEM comprehension аnd construction goals.
Wah, maths іs the foundation pillar of primary education, aiding
kids ᴡith geometric reasoning in architecture careers.
River Valley Ꮋigh School Junior College integrates bilingualism ɑnd ecological
stewardship, producing eco-conscious leaders ᴡith international viewpoints.
Cutting edge laboratories ɑnd green iitiatives support cutting-edge
learning іn sciences and liberal arts. Trainees engage іn cultural immersions and
service tasks, enhancing empathy and skills. The school’ѕ
unified neighborhood promotes durability
ɑnd teamwork through sports and arts. Graduates аre gotten ready for success in universities ɑnd beyond,
embodying fortitude and cultural acumen.
Ⴝt. Joseph’ѕ Institution Junior College
supports valued Lasallian customs оf faith, service, аnd
intellectual іnterest, creating an empowering environment wһere trainees pursue knowledge ԝith
enthusiasm ɑnd commit themselves to uplifting othеrs through caring actions.
The incorporated progyram еnsures а fluid progression frοm secondary tо pre-university levels, ԝith a focus on
multilingual proficiency and innovative curricula supported Ƅy centers lіke modern performing arts centers аnd science гesearch laboratories
tһat influence imaginative аnd analytical quality.
Worldwide immersion experiences, consisting οf global service journeys ɑnd cultural exchange programs,
broaden students’ horizons, enhance linguistic skills, ɑnd
promote а deep gratitude fοr diverse worldviews. Opportunities fօr advanced reѕearch study, leadership roles іn trainee
companies, and mentorship fгom accomplished professors develop self-confidence,
vital thinking, аnd ɑ commitment tо long-lasting knowing.
Graduates arе known fоr tһeir compassion and hiցh achievements, securing ⲣlaces in prestigious universities ɑnd mastering professions that line սp ԝith tһe college’ѕ
values ᧐f service and intellectual rigor.
Parents, fear tһe difference hor, math base іs vital
duгing Junior College for grasping data, vital in modern online economy.
Wah lao, evеn whetheг school remains fancy, maths acts like
the critical topiic іn building poise іn numbers.
Aiyah, primary math teaches practical implementations including budgeting,
tһus maқe sure your child masters іt right fгom young age.
Listen ᥙp, calm pom pi ρi, math is օne in thе
tоⲣ subjects Ԁuring Junior College,building base tօ A-Level advanced
math.
Besіԁes bеyond establishment facilities, emphasize ᥙpon math for aѵoid common pitfalls sᥙch ɑs careless
errors ⅾuring exams.
A-level Math prepares you for coding and AI, hot fields
гight noᴡ.
Oi oi, Singapore folks, math іs prоbably the extremely essential
primary topic, fostering creativkty іn ρroblem-solving to creative jobs.
Feel free t᧐ visit my web-site; singapore tuition
What’s up, I check your blog on a regular basis.
Your humoristic style is witty, keep doing what you’re doing!
I just couldn’t leave your site prior to suggesting that I extremely loved the usual information a person supply on your visitors?
Is gonna be back continuously to inspect new posts
I am really impressed with your writing skills and also
with the layout on your blog. Is this a paid theme
or did you modify it yourself? Anyway keep up the nice quality writing, it’s rare to see a great
blog like this one nowadays.
Wow, this article is pleasant, my sister is analyzing
these things, thus I am going to tell her.
Hi to all, because I am really keen of reading this webpage’s post to be
updated regularly. It includes nice material.
sportwetten ergebnisse live
Feel free to surf to my blog; Wie Am Besten Wetten
مولتی ویتامین الفا من مای ویتامینز 240 عددی، یک مکمل غذایی باکیفیت بالا است که به طور خاص برای نیازهای سلامت آقایان فعال طراحی شده است.
We’re a group of volunteers and starting a new scheme in our community.
Your site offered us with valuable information to work on. You’ve done a formidable job
and our entire community will be thankful to you.
My brother recommended I might like this blog. He was totally right.
This post truly made my day. You can not imagine simply how much time I had spent
for this information! Thanks!
Good day! Do you know if they make any plugins to help with SEO?
I’m trying to get my blog to rank for some targeted keywords
but I’m not seeing very good gains. If you know of any please share.
Many thanks!
Great delivery. Solid arguments. Keep up the good spirit.
I all the time used to read post in news papers but now as I am a user of net thus from now I am using net for content, thanks to web.
Yesterday, while I was at work, my cousin stole my apple ipad and
tested to see if it can survive a thirty foot drop, just so
she can be a youtube sensation. My apple ipad is now destroyed and she has 83 views.
I know this is entirely off topic but I had to
share it with someone!
وی زو زومد لبز، محصولی فوقحرفهای و باکیفیت است که با ترکیبات استثنایی و طعمهای جذاب، انتخابی عالی برای ورزشکاران محسوب میشود.
I think this is among the most significant information for
me. And i am glad reading your article. But should remark on some general things, The website style is great, the articles is really
excellent : D. Good job, cheers
We are a group of volunteers and starting
a new scheme in our community. Your website offered us with valuable info to work on.
You have done an impressive job and our whole community will be grateful to you.
Great delivery. Solid arguments. Keep up the great work.
magnificent points altogether, you simply won a brand new reader.
What could you recommend about your publish that you
simply made some days in the past? Any sure?
I was suggested this web site by my cousin.
I am not sure whether this post is written by him as nobody else know such detailed about my difficulty.
You are amazing! Thanks!
You actually make it appear really easy with your presentation but I find this matter to be really something that I feel
I’d never understand. It seems too complicated and very broad
for me. I’m having a look forward on your next publish,
I’ll attempt to get the dangle of it!
online wetten paypal
Also visit my homepage; beste app Für sportwetten
best online sportwetten
Feel free to surf to my homepage; wettbüro essen
You’ve made some good points there. I looked on the net to
learn more about the issue and found most people will go along with your views on this website.
کراتین مونوهیدرات اسکال لبز 300 گرمی، یعنی کیفیت و خلوص! اسکال لبز (Skull Labs) یک برند لهستانیه که در تولید مکملهای ورزشی با کیفیت بالا شناخته شده.
Wow, awesome blog structure! How long have you ever been blogging
for? you made running a blog look easy. The total glance of your website is great, as well as the content material!
I must thank you for the efforts you’ve put in penning this website.
I’m hoping to view the same high-grade blog posts from you
later on as well. In fact, your creative writing abilities
has motivated me to get my very own site now
😉
Hi there! I’m at work browsing your blog from my new iphone 3gs!
Just wanted to say I love reading through your blog and look forward to all your posts!
Keep up the outstanding work!
After looking over a handful of the articles on your blog, I seriously like
your way of blogging. I book-marked it to my bookmark webpage list and will be checking back
in the near future. Take a look at my website as well and tell me what you think.
کازئین میسلار کوامترکس 900 گرمی، یک پروتئین با جذب بسیار آهسته است که برای تأمین مداوم اسیدهای آمینه به عضلات، به ویژه در طول شب و ساعات طولانی بین وعدههای غذایی، طراحی شده است.
This post will help the internet users for creating
new website or even a weblog from start to
end.
always i used to read smaller articles which also clear their motive,
and that is also happening with this piece of writing which I am reading at this place.
I don’t know whether it’s just me or if everybody else experiencing issues
with your blog. It appears as if some of the written text in your content are running off the screen. Can somebody else please comment and let me know
if this is happening to them as well? This could be a problem with my web browser because
I’ve had this happen before. Kudos
buchmacher gehalt
Here is my web page :: Paysafecard wettanbieter
What’s Taking place i am new to this, I stumbled upon this
I’ve found It positively helpful and it has aided me out loads.
I hope to give a contribution & help other customers like its aided me.
Great job.
Nice weblog right here! Also your web site quite a
bit up very fast! What host are you the use of? Can I am getting your
associate link on your host? I want my website loaded up
as quickly as yours lol
tipp sportwetten online vergleich
Hello, I enjoy reading through your post. I like to write
a little comment to support you.
Do you mind if I quote a couple of your articles
as long as I provide credit and sources back to your site?
My blog is in the exact same niche as yours and my visitors would certainly benefit from some of the
information you provide here. Please let me know if
this okay with you. Cheers!
کراتین استروویت، یک مکمل باکیفیت و تکجزئی است که به عنوان یکی از موثرترین انواع کراتین در جهان شناخته میشود.
کراتین ایوژن، یک مکمل غذایی باکیفیت است که به طور خاص برای بهبود عملکرد ورزشی و حمایت از رشد عضلانی طراحی شده.
مولتی ویتامین سوپر ویت کوامترکس 120 عددی، یک مکمل مولتیویتامین و مولتیمینرال جامع است که توسط برند معتبر کوامترکس تولید میشود.
aussenseiter wetten strategie
my site Lizenz Sportwetten
sichere wetten heute
Here is my web-site: online sportwetten bonus ohne einzahlung
[https://Telegra.ph/bundesliga3pedia-08-30]
What’s up to all, how is everything, I think every one is getting more from this website, and your views are pleasant in favor of new visitors.
Awesome issues here. I’m very happy to look your article.
Thanks a lot and I am having a look forward to contact you.
Will you kindly drop me a mail?
Great post. I was checking continuously this blog and I’m impressed!
Very helpful info specifically the last part 🙂 I care for such info much.
I was looking for this certain information for a very long time.
Thank you and good luck.
You’ve made some decent points there. I checked on the internet to find out more about the issue and found most people will go along with your
views on this site.
ماسل رولز، وی رولز پلاس ماسل رولز ترکیبی از پروتئین وی ایزوله و کنسانتره است.
sportwetten tipps wochenende
Also visit my webpage; Was Sind kombiwetten
It’s fantastic that you are getting ideas from
this piece of writing as well as from our argument made at this time.
Visit arp
Thank you for the good writeup. It in truth used to
be a enjoyment account it. Glance complex to more brought agreeable from you!
However, how can we communicate?
وی گلد استاندارد اپتیموم نوتریشن 900 گرمی، با استفاده از فناوریهای فیلترینگ پیشرفته، عمدتاً از پروتئین وی ایزوله تهیه میشود که چربی، کربوهیدرات و لاکتوز اضافی آن حذف شده است.
sportwetten ohne oasis forum
Here is my page – wetten im Internet
sportwetten online wetten gutschein ohne Einzahlung mit bonus
Hi there very cool website!! Man .. Beautiful .. Wonderful ..
I will bookmark your website and take the feeds
also? I am satisfied to seek out numerous useful information here in the publish,
we want develop more strategies on this regard, thank you
for sharing. . . . . .
I know this web page gives quality based content and additional data, is there any other
web page which gives these information in quality?
First of all I would like to say fantastic blog!
I had a quick question that I’d like to ask if you don’t mind.
I was curious to know how you center yourself and clear your mind before writing.
I have had a hard time clearing my thoughts in getting my ideas out there.
I truly do take pleasure in writing however it just seems like the first 10 to 15 minutes tend to be wasted
simply just trying to figure out how to begin. Any ideas or hints?
Appreciate it!
Howdy would you mind stating which blog platform you’re using?
I’m looking to start my own blog in the near future but I’m
having a tough time making a decision between BlogEngine/Wordpress/B2evolution and
Drupal. The reason I ask is because your design seems different then most blogs and I’m
looking for something completely unique.
P.S Apologies for being off-topic but I had to ask!
fro tph
Your style is very unique compared to other folks I’ve read stuff from.
Thanks for posting when you have the opportunity, Guess I will just bookmark this site.
I like the helpful information you provide in your articles.
I’ll bookmark your weblog and check again here frequently.
I am quite sure I’ll learn a lot of new stuff right here!
Best of luck for the next!
Wonderful article! This is the type of info that should be shared across the web.
Shame on the search engines for now not positioning this put up upper!
Come on over and discuss with my website . Thanks =)
کراتین مای پروتئین یک کیلویی، یکی از محبوبترین و بهترین مکملهای کراتین در جهان است که به دلیل خلوص و کیفیت بالا، سالهاست که در سایت ما رتبه اول را به خود اختصاص داده است.
I’m excited to discover this website. I wanted to thank you for your time for
this fantastic read!! I definitely liked every bit of it and
i also have you book-marked to look at new things on your
website.
Why viewers still use to read news papers when in this technological world the whole thing is existing on net?
وی ایزوله ایوژن، یک پروتئین وی ایزوله با خلوص فوقالعاده بالاست که توسط شرکت معتبر Evogen Nutrition تولید میشود.
What’s Going down i’m new to this, I stumbled upon this I have discovered It positively useful and it has helped
me out loads. I hope to give a contribution & aid other customers like its aided me.
Good job.
profi sportwetten vorhersagen
My page wettanbieter mit Lizenz in Deutschland [https://ezmobilewebsitetools.com/]
کراتین ترکیبی ناترکس 1300 گرمی، یک محصول پیشرفته برای بارگیری گلیکوژن و کراتین است که برای به حداکثر رساندن عملکرد و حجم عضلات طراحی شده.
Saved as a favorite, I really like your website!
nsy kxm
sportwetten gewinnen mit strategie, https://Medium.Com/@edwardrobinstres/bundesliga3Pedia-44a055ca6544, oddset
You actually make it seem really easy along with your presentation but I to find this topic to
be actually one thing which I believe I’d never understand.
It sort of feels too complex and very large for me.
I am taking a look forward in your next publish, I will attempt to get the
hang of it!
Great work! This is the kind of information that are supposed to be shared around the internet.
Disgrace on Google for now not positioning this post higher!
Come on over and consult with my site . Thank you =)
Thanks for some other fantastic article. Where else
could anyone get that kind of information in such an ideal manner of writing?
I’ve a presentation subsequent week, and I’m on the search for such info.
وی اکستریم ناپالم فا، یک پروتئین وی کنسانتره باکیفیت و پیشرفته است که برای به حداکثر رساندن عملکرد و ریکاوری ورزشکاران طراحی شده است.
پروتئین کازئین چیست ؟، نوعی پروتئین از گروه فسفو پروتئینهاست که به طور طبیعی در شیر پستانداران وجود دارد.
chat-s-psykhologom-russia-12.g-u.su wwf
مولتی ویتامین فارماتون 100 عددی، یک مکمل غذایی کامل و جامع است که با هدف افزایش انرژی و کاهش خستگی طراحی شده است.
Hey! I know this is kinda off topic but I was wondering if you knew where I could locate a captcha plugin for my comment form?
I’m using the same blog platform as yours and
I’m having trouble finding one? Thanks a lot!
I’m not sure why but this web site is loading very slow for me.
Is anyone else having this problem or is
it a issue on my end? I’ll check back later on and
see if the problem still exists.
Hello, i think that i saw you visited my weblog so i came to
return the choose?.I am trying to find issues to enhance my web site!I guess
its ok to make use of some of your ideas!!
https://bit.ly/4gDBdOf rot
وی ایزوله ویسلی، پودری با 6 گرم BCAA و 14 گرم EAA در هر سروینگ است که با روش میکروفیلتراسیون جریان متقاطع تولید میشود.
Nice blog here! Also your site loads up very fast!
What host are you using? Can I get your affiliate link to your host?
I wish my web site loaded up as fast as yours lol
مولتی ویتامین اپتی من، یک مولتی ویتامین جامع و قدرتمند است که به طور اختصاصی برای نیازهای تغذیهای آقایان، به ویژه ورزشکاران، طراحی شده است.
We’re a group of volunteers and opening a new scheme in our community.
Your site offered us with valuable information to work
on. You’ve done an impressive job and our entire community will be grateful to you.
https://tinyurl.com/284vgenn nmw
وی ایزوله ایزوفیت ناترکس 1 کیلویی، یک مکمل پروتئینی فوقالعاده باکیفیت است که با فرآیند میکروفیلتراسیون پیشرفته تولید شده است.
Great article.
Hello there, just became alert to your blog through Google, and found that it
is truly informative. I’m going to watch out for brussels.
I will be grateful if you continue this in future. Lots of people will be benefited from your writing.
Cheers!
Milanobet’in güncel giriş adresini sitemizde bulabilirsiniz. Siz de kaliteli bahis heyecanı yaşamak istiyorsanı hemen Milanobet’e üye olun!
کراتین ۶۰۰ گرمی، کراتین مونوهیدرات میکرونایز اپتیموم نوتریشن 600 گرمی یک مکمل باکیفیت و مؤثر برای ورزشکاران است که به افزایش قدرت و حجم عضلات کمک میکند.
Its like you read my mind! You appear to know so much about this,
like you wrote the guide in it or something. I feel that you could do with a few p.c.
to power the message house a bit, but instead of that, this is
wonderful blog. A fantastic read. I will definitely
be back.
کراتین مونوهیدرات اسپرتر 500 گرمی، یک مکمل غذایی است که به صورت پودر عرضه میشود و هدف اصلی آن افزایش ذخایر فسفوکراتین در عضلات است.
Howdy! Do you know if they make any plugins to protect against hackers?
I’m kinda paranoid about losing everything I’ve worked hard on. Any recommendations?
https://bit.ly/4nFvN7s wne
Thanks for any other informative website. The place else
may I am getting that type of info written in such an ideal approach?
I have a mission that I am just now working on, and I have been on the glance out for such information.
Hey would you mind sharing which blog platform you’re using?
I’m planning to start my own blog soon but I’m having a difficult time selecting between BlogEngine/Wordpress/B2evolution and Drupal.
The reason I ask is because your layout seems different then most
blogs and I’m looking for something unique.
P.S Apologies for getting off-topic but I
had to ask!
بهترین مکمل ها برای دوران کات، پروتئین وی و BCAA برای حفظ عضلات، الکارنیتین و CLA برای به حداکثر رساندن چربیسوزی، و کافئین و بتا آلانین و …
وی ویتوبست 100%، یک منبع غنی و طبیعی از اسیدهای آمینه شاخهدار (BCAAs) و ال-گلوتامین به حساب میآید.
I like what you guys tend to be up too. Such clever work and exposure!
Keep up the amazing works guys I’ve added you guys to our blogroll.
بهترین برندهای پروتئین وی خارجی، ماسلتک (Muscletech) گرفته تا استاندارد طلایی بازار یعنی اپتیموم نوتریشن (Optimum Nutrition)، یا خلوص بینظیر رول وان (Rule One)، و …
Link exchange is nothing else except it is
just placing the other person’s website link
on your page at proper place and other person will also do similar in favor of you.
Interesting blog! Is your theme custom made or did you download it from somewhere?
A theme like yours with a few simple tweeks would really make my blog
stand out. Please let me know where you got your theme.
Bless you
Tarabet hakkında merak ettiğiniz tüm konular bizim sitemizde!
Hi there, I enjoy reading all of your post. I wanted to write a little
comment to support you.
مولتی ویتامین بانوان رول وان، یک مکمل تغذیهای فوقالعاده جامع است که به طور اختصاصی برای برآورده کردن نیازهای تغذیهای بانوان فعال و ورزشکار طراحی شده است.
Hello there, I found your site via Google while looking for a related subject, your web site
came up, it appears to be like good. I’ve
bookmarked it in my google bookmarks.
Hi there, just changed into alert to your blog via Google, and located that it
is truly informative. I am gonna be careful
for brussels. I will appreciate in the event you proceed this in future.
A lot of folks might be benefited from your writing. Cheers!
It is actually a great and helpful piece of information. I’m glad that you simply
shared this helpful infro with us. Plase stay us informed like this.
Thanks for sharing.
my web-site – Grave Monument
کراتین مونوهیدرات چیست؟، در هسته اصلی، کراتین مونوهیدرات سادهترین و خالصترین شکل کراتین است که به صورت تجاری در دسترس قرار دارد.
Spot on with this write-up, I honestly think this web site needs far more attention.
I’ll probably be returning to read more, thanks for the information!
وی ایزوله سون نوتریشن، در هستهی خود، یک مکمل پروتئین وی ایزوله بسیار خالص است که با هدف رساندن حداکثر پروتئین و حداقل چربی، کربوهیدرات و لاکتوز به بدن طراحی شده.
This article is truly a fastidious one it assists new internet people,
who are wishing for blogging.
Лучшая книга zvz
وی بلو لب، ترکیبی از وی ایزوله میکروفیلتردار، وی کنسانتره و وی هیدرولیز است که جذب بالایی دارد.
What’s Happening i’m new to this, I stumbled upon this I have found It
positively helpful and it has helped me out loads.
I’m hoping to contribute & assust different users like its helped me.
Geat job.
Feel free to surf to my homepage … Custom-Made Headstone
تفاوت پروتئین وی با وی ایزوله، در میزان خلوص، فرآیند تولید و در نتیجه محتوای ماکروها (پروتئین، چربی، کربوهیدرات و لاکتوز) خلاصه میشه.
کراتین ترکیبی ویتوبست، یکی از پیشرفتهترین مکملهای کراتین موجود در بازار جهانی است که با فرمولاسیونی علمی و جامع برای به حداکثر رساندن عملکرد ورزشکاران طراحی شده است.
Лучшая книга tff
مکمل وی رونی کلمن، با ارائه ۲۵ گرم پروتئین خالص در هر سروینگ، به بدن شما کمک میکند تا بلوکهای سازنده لازم برای ترمیم و ساخت بافتهای عضلانی آسیبدیده در طول تمرینات شدید را داشته باشد.
WOW just what I was searching for. Came here by searching for malaysiahousingloan
پروتئین وی یا گینر، این دو مکمل، با وجود شباهتهایی که در بحث عضلهسازی دارن، از لحاظ ترکیبات و کارایی، مثل شب و روز با هم فرق میکنن.
وی ماسل کور، با داشتن ترکیبی از وی ایزوله و کنسانتره میکروفیلتر شده و هیدرولیزات، سرعت جذب بالایی داره و مواد مغذی رو “مستقیم به هدف” میرسونه.
Spot on with this write-up, I actually believe this site needs much more attention. I’ll probably be
back again to read through more, thanks for the information!
مکمل وی رونی کلمن لیمیتد ادیشن، یک پروتئین وی با کیفیت بالا و ترکیبی از وی ایزوله، هیدرولیزه و کنسانتره است.
وی سیکس استار، ترکیبی از ایزوله و پروتئین وی (کنسانتره) با خلوص بالا است که بهراحتی در بدن جذب میشود.
Thankfulness to my father who told me on the topic of this web site, this weblog is in fact awesome.
ایا مصرف کراتین موجب ریزش مو می شود؟، خیر هیچ ارتباطی بین کراتین و ریزش مو وجود ندارد.
وی بی اس ان، حاوی ۲۴ گرم پروتئین ترکیبی (وی کنسانتره، ایزوله، هیدرولیزه، کازئین و پروتئین شیر) است.
Hi there to all, it’s really a pleasant for me to pay a quick visit
this web site, it consists of valuable Information.
کراتین ترکیبی ایوژن 300 گرمی، مکملی است که فراتر از کراتین مونوهیدرات استاندارد عمل میکند و برای به حداکثر رساندن جذب، پایداری و کارایی در بدن طراحی شده است.
وی سوپریم، حاصل سالها تجربه و دانش یکی از اسطورههای بدنسازی، کوین لورون، است.
وی ناترکس، مکملی با کیفیت بالاست که برای کمک به رشد و ریکاوری عضلات طراحی شده است.
وی اتمیک، یک مکمل پودری است که به راحتی در مایعات حل میشود و به شما کمک میکند تا پروتئین باکیفیت به رژیم غذاییتان اضافه کنید.
If you wish for to grow your familiarity just keep visiting this site
and be updated with the hottest news posted here.
وی انابولیک کوین، یک فرمول پیشرفته پروتئینی است که از ۵ منبع مختلف شامل وی کنسانتره، وی ایزوله، وی هیدرولیزه، کازئین و آلبومین تخممرغ تشکیل شده است.
888 poker deposit united kingdom, usa casino club mobile and no deposit
usa slots 2021, or online gambling canada illegal
my page: can you double down in blackjack (Norine)
وی ماسل رولز پرو، با فرمولاسیونی خاص، مکملی ایدهآل برای تمام افرادی است که به دنبال تأمین پروتئین روزانه خود هستند.
Монтаж демонтаж видеонаблюдения https://vcctv.ru
888 poker deposit united kingdom, free online pokies no
downloads usa and gambling times usa, or best online is the casino queen open (Charlotte) sites for real money canada
It’s impressive that you are getting ideas from this article
as well as from our discussion made here.
وی پرو آنتیوم رونی کلمن، حاوی ۱۳.۵ گرم EAA، ۳.۵ گرم BCAA، ۵ گرم کراتین و ۲.۵ گرم بتائین در هر وعده است که به افزایش قدرت، استقامت و حجم عضلات کمک میکند.
I’m extremely impressed along with your writing talents as smartly as with
the structure on your blog. Is this a paid subject or did you customize it your self?
Either way keep up the excellent quality writing, it’s uncommon to peer a nice weblog
like this one these days..
مولتی ویتامین انیمال یونیورسال پک 30 تایی، یک بسته کامل و جامع حاوی بیش از ۶۰ تا ۸۵ ماده مغذی کلیدی در هر ساشه (بسته) روزانه است!
I every time spent my half an hour to read this weblog’s articles or reviews every day along
with a cup of coffee.
پروتئین وی fa، یک مکمل خوشطعم و باکیفیت است که حاوی ۱۰۰٪ پروتئین وی کنسانتره (Whey Concentrate) میباشد.
Smart crypto trading https://terionbot.com with auto-following and DCA: bots, rebalancing, stop-losses, and take-profits. Portfolio tailored to your risk profile, backtesting, exchange APIs, and cold storage. Transparent analytics and notifications.
وی پرو موتانت، یک مکمل پروتئینی پیشرفته و کامل است که برای حمایت از رشد سریع عضلات، ریکاوری، و سلامت عمومی طراحی شده است.
Nice post. I was checking constantly this blog and I’m impressed!
Extremely helpful info specially the last part 🙂 I care for such info much.
I was seeking this certain info for a very long time. Thank
you and best of luck.
Лучшая книга vuy
پروتئین وی کریتیکال اپلاید، ترکیبی پیشرفته از پروتئین وی کنسانتره، ایزوله و هیدرولیز شده است.
hello there and thank you for your information – I’ve definitely picked up anything new from right here.
I did however expertise several technical points using this website, since I experienced to reload the web site lots of times previous to I could get
it to load properly. I had been wondering if your hosting is OK?
Not that I am complaining, but slow loading instances times will very frequently affect your placement in google and could damage
your quality score if advertising and marketing with Adwords.
Anyway I am adding this RSS to my email and can look out for a lot more
of your respective intriguing content. Make sure you update
this again soon.
وی ایزوله دایماتیز 1400 گرمی، نه تنها پروتئین وی ایزوله (Whey Isolate) است، بلکه از نوع هیدرولیز شده (Hydrolyzed) نیز هست.
Мир гаджетов без воды https://indevices.ru честные обзоры, реальные замеры, фото/видео-примеры. Смартфоны, планшеты, аудио, гейминг, аксессуары. Сравнения моделей, советы по апгрейду, трекер цен и уведомления о скидках. Помогаем выбрать устройство под задачи.
Ваш портал о стройке https://gidfundament.ru и ремонте: материалы, инструменты, сметы и бюджеты. Готовые решения для кухни, ванной, спальни и террасы. Нормы, чертежи, контроль качества, приёмка работ. Подбор подрядчика, прайсы, акции и полезные образцы документов.
Ремонт и стройка https://remontkit.ru без лишних затрат: инструкции, таблицы расхода, сравнение цен, контроль скрытых работ. База подрядчиков, отзывы, чек-листы, калькуляторы. Тренды дизайна, 3D-планировки, лайфхаки по хранению и зонированию. Практика и цифры.
Все про ремонт https://lesnayaskazka74.ru и строительство: от идеи до сдачи. Пошаговые гайды, электрика и инженерия, отделка, фасады и кровля. Подбор подрядчиков, сметы, шаблоны актов и договоров. Дизайн-инспирации, палитры, мебель и свет.
Ремонт и строительство https://nastil69.ru от А до Я: планирование, закупка, логистика, контроль и приёмка. Калькуляторы смет, типовые договора, инструкции по инженерным сетям. Каталог подрядчиков, отзывы, фото-примеры и советы по снижению бюджета проекта.
Нужен аккумулятор? купить аккумулятор с доставкой в наличии: топ-бренды, все размеры, правый/левый токовывод. Бесплатная проверка генератора при установке, trade-in старого АКБ. Гарантия до 3 лет, честные цены, быстрый самовывоз и курьер. Поможем выбрать за 3 минуты.
Хочешь сдать акб? прием аккумуляторов честная цена за кг, моментальная выплата, официальная утилизация. Самовывоз от 1 шт. или приём на пункте, акт/квитанция. Безопасно и законно. Узнайте текущий тариф и ближайший адрес.
Ищешь аккумулятор? акб купить в спб AKB SHOP занимает лидирующие позиции среди интернет-магазинов автомобильных аккумуляторов в Санкт-Петербурге. Наш ассортимент охватывает все категории транспортных средств. Независимо от того, ищете ли вы надёжный аккумулятор для легкового автомобиля, мощного грузовика, комфортного катера, компактного скутера, современного погрузчика или специализированного штабелёра
Нужен надежный акб? аккумулятор автомобильный купить AKB STORE — ведущий интернет-магазин автомобильных аккумуляторов в Санкт-Петербурге! Мы специализируемся на продаже качественных аккумуляторных батарей для самой разнообразной техники. В нашем каталоге вы найдёте идеальные решения для любого транспортного средства: будь то легковой или грузовой автомобиль, катер или лодка, скутер или мопед, погрузчик или штабелер.
With havin so much content do you ever run into any problems of plagorism or copyright infringement?
My site has a lot of exclusive content I’ve either authored myself
or outsourced but it seems a lot of it is popping it up all
over the internet without my agreement. Do
you know any techniques to help stop content from being stolen? I’d
definitely appreciate it.
united statesn gambling news, australia prescott casino Open pokies and all united statesn 10 cent bingo,
or chukchansi gold casino
پروتئین وی الیمپ، با فناوری CFM، نقش مؤثری در عضلهسازی، ریکاوری سریع پس از تمرین و چربیسوزی دارد.
وی ناترند کیسه ای، در واقع یک مکمل پروتئینی باکیفیت و حرفهای است که توسط شرکت معتبر اروپایی Nutrend تولید میشود.
Топ 100 выдающихся мыслителей bnl
وی ویسلی، یک مکمل با کیفیت بر پایه کنسانتره پروتئین وی و پروتئین آبپنیر است.
وی ناترند، مکملی با کیفیت بالا برای رشد عضلات، جلوگیری از تحلیل عضلانی و تأمین پروتئین روزانه ورزشکاران است.
bouka spins no deposit bonus code, top 20 online casinos uk no deposit and grand mondial
best odds at casino craps australia,
or casino cornwall ontario united kingdom
کراتین انابولیک کوین لورون 300 گرمی، یک مکمل غذایی متشکل از کراتین مونوهیدرات خالص با خلوص بالاست.
I do not even know how I ended up right here, however I assumed this
post was great. I do not recognise who you are but certainly you are going to a well-known blogger if
you are not already. Cheers!
Актуальные новости автопрома https://myrexton.ru свежие обзоры, тест-драйвы, новые модели, технологии и тенденции мирового автомобильного рынка. Всё самое важное — в одном месте.
Строительный портал https://stroimsami.online новости, инструкции, идеи и лайфхаки. Всё о строительстве домов, ремонте квартир и выборе качественных материалов.
Новостной портал https://daily-inform.ru с последними событиями дня. Политика, спорт, экономика, наука, технологии — всё, что важно знать прямо сейчас.
وی نیتروتک گلد، ترکیبی از پروتئین وی ایزوله و کنسانتره است. این ترکیب به معنای دریافت پروتئین با سرعت جذب بسیار بالا و کیفیت بینظیر است.
Di era digital saat ini, kemudahan dalam berbelanja jadi salah satu kebutuhan utama masyarakat.
Salah satu dari solusi yang makin terkenal ialah toko bunga online.
toko bunga Semarang 24 jam bunga
online menawarkan bermacam kegampangan dan kelebihan yang tak dapat didapatkan bila kita berbelanja secara tradisional.
Dengan cuma beberapa klik, kita mampu memilah dan memesan bunga pada bermacam
peluang, berawal dari ulang tahun, pernikahan, sampai
ungkapan duka cita.
Tarabet bonus dağıtıyor. Tarabet ile kazanmak için tek yapman gereken Tarabet giriş adresine gelmek ve üye olmak. https://tara-bet.com/
A reliable partner https://terionbot.com in the world of investment. Investing becomes easier with a well-designed education system and access to effective trading tools. This is a confident path from the first steps to lasting financial success.
There’s certainly a great deal to know about this issue.
I love all the points you made.
Magnificent goods from you, man. I’ve keep
in mind your stuff prior to and you’re simply
extremely wonderful. I actually like what you have obtained here, certainly
like what you are stating and the best way during which you are saying
it. You are making it entertaining and you still take care of
to keep it smart. I can’t wait to learn far more from you.
This is really a wonderful site.
Casino oyunları için güvenilir platform arayan kullanıcıların hiçbir şekilde mağdur olmayacakları bir sistem dâhilinde oyunlarımız sunulmaktadır. Bunun için en güvenilir oyun sağlayıcı firmalar ile çalışmaktayız. https://vegabetcasino.com/
This is really interesting, You’re a very skilled blogger.
I have joined your rss feed and look forward to seeking more of your excellent post.
Also, I have shared your web site in my social networks!
Hi there, constantly i used to check blog posts here in the early hours in the daylight, for the reason that i love to gain knowledge of more and
more.
What a stuff of un-ambiguity and preserveness of precious know-how on the topic of unexpected feelings.
Greetings! Very helpful advice within this post! It is the little changes that will make the
largest changes. Many thanks for sharing!
Поисковый seo аудит сайта https://seo-audit-sajta.ru
Need TRON Energy? buy tron energy instantly and save on TRX transaction fees. Rent TRON Energy quickly, securely, and affordably using USDT, TRX, or smart contract transactions. No hidden fees—maximize the efficiency of your blockchain.
Need porn videos or photos? make ai porn videos – create erotic content based on text descriptions. Generate porn images, videos, and animations online using artificial intelligence.
IPTV форум https://vip-tv.org.ua место, где обсуждают интернет-телевидение, делятся рабочими плейлистами, решают проблемы с плеерами и выбирают лучшие IPTV-сервисы. Присоединяйтесь к сообществу интернет-ТВ!
وی ایزوله ماسل اسپرت، مکملی با کیفیت بالا و مناسب برای افزایش توده عضلانی بدون چربی، چربیسوزی و بهبود ریکاوری است.
پروتئین هگزا پرو المکس، یک مکمل پروتئینی پیشرفته و باکیفیت است که برای تغذیه طولانیمدت عضلات ورزشکاران طراحی شده است.
وی استروویت، یک منبع پروتئین و کربوهیدرات پیچیده است که هضم و جذب بسیار سریعی دارد و در معده باقی نمیماند.
I couldn’t refrain from commenting. Well written!
An intelligent AI ChatBot for generating content, posts, images, and website optimization. Easy installation, flexible settings, and full AI support.
Всё о металлообработке http://j-metall.ru и металлах: технологии, оборудование, сплавы и производство. Советы экспертов, статьи и новости отрасли для инженеров и производителей.
Very shortly this website will be famous amid all blogging viewers, due to it’s nice articles
Хочешь сдать металл? прием металлолома стоимость наша компания специализируется на профессиональном приёме металлолома уже на протяжении многих лет. За это время мы отточили процесс работы до совершенства и готовы предложить вам действительно выгодные условия сотрудничества. Мы принимаем практически любые металлические изделия: от небольших профилей до крупных металлоконструкций.
Есть металлолом? скупка металлолома стоимость мы предлагаем полный цикл услуг по приему металлолома в Санкт-Петербурге, включая оперативную транспортировку материалов непосредственно на перерабатывающий завод. Особое внимание мы уделяем удобству наших клиентов. Процесс сдачи металлолома организован максимально комфортно: осуществляем вывоз любых объемов металлических отходов прямо с вашей территории.
Hi there, There’s no doubt that your blog could possibly be having browser compatibility problems.
Whenever I take a look at your blog in Safari, it
looks fine but when opening in IE, it has some overlapping issues.
I just wanted to give you a quick heads up! Besides that, great
site!
Топ 3156 выдающихся мыслителей urr
قیمت وی ایزوله ناترکس، به نسبت کیفیت ان بسیار پایین است و ایزوفیت کم قند، چربی، کربوهیدرات و کالری بوده.
Hi there! This article could not be written any better! Reading through this post reminds me of my previous roommate!
He always kept talking about this. I am going to send
this post to him. Fairly certain he’ll have a great read. I
appreciate you for sharing!
Hello! I know this is kind of off topic but I
was wondering if you knew where I could locate a captcha plugin for my comment form?
I’m using the same blog platform as yours and I’m having trouble finding one?
Thanks a lot!
وی ایزوله استروویت، با تامین سریع و باکیفیت تمام آمینو اسیدهای ضروری، به ویژه آمینو اسیدهای شاخهدار ، به کاهش خستگی مرکزی کمک میکند.
Hello There. I found your blog using msn. This is an extremely well written article.
I’ll make sure to bookmark it and return to read more of your useful information. Thanks for the post.
I will certainly return.
Погрузитесь в мир турецких сериалов https://turkyserial2026.ru ярких эмоций, страстей и неожиданных сюжетных поворотов! Здесь собраны лучшие драмы, мелодрамы и комедии, покорившие сердца зрителей по всему миру. Смотрите онлайн, наслаждайтесь атмосферой восточного колорита и живите историей вместе с героями!
Открой для себя мир китайского аниме https://prokazan.ru/adverting/view/kitajskoe-anime-vzlet-i-razvitie-animacionnoj-industrii захватывающих дунхуа, наполненных магией, древними легендами и невероятной анимацией! ? Смотри лучшие новинки и хиты онлайн, следи за приключениями героев, погружайся в атмосферу Востока и ощути силу настоящего искусства из Китая!
Погрузись в атмосферу китайских дорам https://bryansktoday.ru/article/247115 исторических саг, романтических историй и современных драм! Здесь тебя ждут лучшие сериалы с глубокими сюжетами, красивой картинкой и харизматичными актёрами. Смотри онлайн и окунись в мир восточной любви и вдохновения!
Смотри лучшие турецкие сериалы https://bryansktoday.ru/article/247141 онлайн — истории о любви, предательстве и судьбе, которые не отпускают с первой серии! Погрузись в атмосферу восточного шарма, почувствуй эмоции героев и открой для себя мир, где страсть и честь идут рука об руку. Новые серии каждый день!
Смотри лучшие китайские https://animelist.ru аниме дунхуа онлайн — эпические битвы, древние легенды и захватывающие приключения! ? Яркая анимация, глубокие сюжеты и дух Востока создают уникальную атмосферу. Погрузись в мир магии и героизма, где каждый кадр — произведение искусства!
Путешествуйте по Крыму https://м-драйв.рф на джипах! Ай-Петри, Ялта и другие живописные маршруты. Безопасно, интересно и с профессиональными водителями. Настоящий отдых с приключением!
Смотри лучшие аниме https://animeserial2026.ru онлайн в хорошем качестве — от легендарных хитов до свежих новинок! Погрузись в мир приключений, романтики и фантазии, следи за историями любимых героев и открывай для себя новые миры. Удобный поиск, обновления каждый день и тысячи серий ждут тебя!
Смотри аниме онлайн https://anime2027.store в хорошем качестве — тысячи серий, новые релизы и вечная классика в одном месте! Погрузись в мир приключений, романтики и фантазии, следи за любимыми героями и открывай новые истории. Удобный плеер, обновления каждый день и полное погружение в атмосферу Японии!
Смотри аниме онлайн https://anime2027.ru бесплатно и без регистрации! Лучшие сериалы, фильмы и новинки в хорошем качестве — от классики до свежих релизов. Погрузись в мир ярких эмоций, магии и приключений. Удобный плеер, ежедневные обновления и любимые герои ждут тебя прямо сейчас!
Нужна карта? https://vc.ru/money/2104862-kak-poluchit-kartu-visa-ili-mastercard-v-rossii-v-2025-godu как оформить зарубежную банковскую карту Visa или MasterCard для россиян в 2025 году. Карту иностранного банка можно открыть и получить удаленно онлайн с доставкой в Россию и другие страны. Зарубежные карты Visa и MasterCard подходят для оплаты за границей. Иностранные банковские карты открывают в Киргизии, Казахстане, Таджикистане и ряде других стран СНГ, все подробности смотрите по ссылке.
کراتین اینر آرمور، میتواند به شما در ریکاوری و بهبود عملکرد ورزشی کمک کند.
I know this if off topic but I’m looking into starting my own weblog and was curious what all is required
to get set up? I’m assuming having a blog like yours would cost a pretty penny?
I’m not very internet smart so I’m not 100% certain. Any tips
or advice would be greatly appreciated. Appreciate it
Строительный портал https://repair-house.kiev.ua всё о строительстве, ремонте и архитектуре. Подробные статьи, обзоры материалов, советы экспертов, новости отрасли и современные технологии для профессионалов и домашних мастеров.
Портал о стройке https://mr.org.ua всё о строительстве, ремонте и дизайне. Статьи, советы экспертов, современные технологии и обзоры материалов. Полезная информация для мастеров, инженеров и владельцев домов.
Строительный портал https://intellectronics.com.ua источник актуальной информации о строительстве, ремонте и архитектуре. Обзоры, инструкции, технологии, проекты и советы для профессионалов и новичков.
Актуальный портал https://sinergibumn.com о стройке и ремонте. Современные технологии, материалы, решения для дома и бизнеса. Полезные статьи, инструкции и рекомендации экспертов.
live sportwetten ergebnisse
Here is my web-site … Us wahl wetten deutschland
وی ایزوله ماسل تک 1 کیلویی، در واقع یک پودر پروتئین آب پنیر ایزوله شده است که با تکنولوژیهای پیشرفته میکروفیلتراسیون و اولترافیلتراسیون فرآوری شده.
Онлайн женский портал https://replyua.net.ua секреты красоты, стиль, любовь, карьера и семья. Читайте статьи, гороскопы, рецепты и советы для уверенных, успешных и счастливых женщин.
Современный женский https://novaya.com.ua портал о жизни, моде и гармонии. Уход за собой, отношения, здоровье, рецепты и вдохновение для тех, кто хочет быть красивой и счастливой каждый день.
Женский портал https://prins.kiev.ua всё о красоте, моде, отношениях, здоровье и саморазвитии. Полезные советы, вдохновение, психология и стиль жизни для современных женщин.
Интересный женский https://muz-hoz.com.ua портал о моде, психологии, любви и красоте. Полезные статьи, тренды, рецепты и лайфхаки. Живи ярко, будь собой и вдохновляйся каждый день!
Женский портал https://z-b-r.org ваш источник идей и вдохновения. Советы по красоте, стилю, отношениям, карьере и дому. Всё, что важно знать современной женщине.
Онлайн авто портал https://retell.info всё для автолюбителей! Актуальные новости, обзоры новинок, рейтинги, тест-драйвы и полезные советы по эксплуатации и обслуживанию автомобилей.
Автомобильный портал https://autoguide.kyiv.ua для водителей и поклонников авто. Новости, аналитика, обзоры моделей, сравнения, советы по эксплуатации и ремонту машин разных брендов.
Авто портал https://psncodegeneratormiu.org мир машин в одном месте. Читайте обзоры, следите за новостями, узнавайте о новинках и технологиях. Полезный ресурс для автолюбителей и экспертов.
Авто портал https://bestsport.com.ua всё об автомобилях: новости, обзоры, тест-драйвы, советы по уходу и выбору машины. Узнайте о новинках автопрома, технологиях и трендах автомобильного мира.
Современный авто портал https://necin.com.ua мир автомобилей в одном месте. Тест-драйвы, сравнения, новости автопрома и советы экспертов. Будь в курсе последних тенденций автоиндустрии
Портал про стройку https://dcsms.uzhgorod.ua всё о строительстве, ремонте и дизайне. Полезные советы, статьи, технологии, материалы и оборудование. Узнайте о современных решениях для дома и бизнеса.
Портал про стройку https://keravin.com.ua и ремонт полезные статьи, инструкции, обзоры оборудования и материалов. Всё о строительстве домов, дизайне и инженерных решениях
Строительный портал https://msc.com.ua о ремонте, дизайне и технологиях. Полезные советы мастеров, обзоры материалов, новинки рынка и идеи для дома. Всё о стройке — от фундамента до отделки. Учись, строй и вдохновляйся вместе с нами!
Онлайн-портал про стройку https://donbass.org.ua и ремонт. Новости, проекты, инструкции, обзоры материалов и технологий. Всё, что нужно знать о современном строительстве и архитектуре.
Подоконники из искусственного камня https://luchshie-podokonniki-iz-kamnya.ru в Москве. Рейтинг лучших подоконников – авторское мнение, глубокий анализ производителей.
وی ایزوله اپلاید نوتریشن ایکس پی، یک مکمل پروتئین وی ایزوله ۱۰۰% خالص است که توسط شرکت بریتانیایی تولید میشود.
Советы по строительству https://vodocar.com.ua и ремонту своими руками. Пошаговые инструкции, современные технологии, идеи для дома и участка. Мы поможем сделать ремонт проще, а строительство — надёжнее!
Сайт о строительстве https://valkbolos.com и ремонте домов, квартир и дач. Полезные советы мастеров, подбор материалов, дизайн-идеи, инструкции и обзоры инструментов. Всё, что нужно для качественного ремонта и современного строительства!
Полезный сайт https://stroy-portal.kyiv.ua о строительстве и ремонте: новости отрасли, технологии, материалы, интерьерные решения и лайфхаки от профессионалов. Всё для тех, кто строит, ремонтирует и создаёт уют.
Строительный сайт https://teplo.zt.ua для тех, кто создаёт дом своей мечты. Подробные обзоры, инструкции, подбор инструментов и дизайнерские проекты. Всё о ремонте и строительстве в одном месте.
Информационный портал https://smallbusiness.dp.ua про строительство, ремонт и интерьер. Свежие новости отрасли, обзоры технологий и полезные лайфхаки. Всё, что нужно знать о стройке и благоустройстве жилья в одном месте!
Энциклопедия строительства https://kero.com.ua и ремонта: материалы, технологии, интерьерные решения и практические рекомендации. От фундамента до декора — всё, что нужно знать домовладельцу.
Строим и ремонтируем https://buildingtips.kyiv.ua своими руками! Инструкции, советы, видеоуроки и лайфхаки для дома и дачи. Узнай, как сделать ремонт качественно и сэкономить бюджет.
Пошаговые советы https://tsentralnyi.volyn.ua по строительству и ремонту. Узнай, как выбрать материалы, рассчитать бюджет и избежать ошибок. Простые решения для сложных задач — строим и ремонтируем с уверенностью!
Новостной портал https://kiev-online.com.ua с проверенной информацией. Свежие события, аналитика, репортажи и интервью. Узнавайте новости первыми — достоверно, быстро и без лишнего шума.
Главные новости дня https://sevsovet.com.ua эксклюзивные материалы, горячие темы и аналитика. Мы рассказываем то, что действительно важно. Будь в курсе вместе с нашим новостным порталом!
wett tipps heute vorhersage
Here is my website – bester wettanbieter mit bonus
Строительный портал https://sitetime.kiev.ua для мастеров и подрядчиков. Новые технологии, материалы, стандарты, проектные решения и обзоры оборудования. Всё, что нужно специалистам стройиндустрии.
Строим и ремонтируем https://srk.kiev.ua грамотно! Инструкции, пошаговые советы, видеоуроки и экспертные рекомендации. Узнай, как сделать ремонт качественно и сэкономить без потери результата.
Сайт о стройке https://samozahist.org.ua и ремонте для всех, кто любит уют и порядок. Расскажем, как выбрать материалы, обновить интерьер и избежать ошибок при ремонте. Всё просто, полезно и по делу.
Обустраивайте дом https://stroysam.kyiv.ua со вкусом! Современные идеи для ремонта и строительства, интерьерные тренды и советы по оформлению. Создайте стильное и уютное пространство своими руками.
Как построить https://rus3edin.org.ua и отремонтировать своими руками? Пошаговые инструкции, простые советы и подбор инструментов. Делаем ремонт доступным и понятным для каждого!
Сайт для женщин https://oun-upa.org.ua которые ценят себя и жизнь. Мода, советы по уходу, любовь, семья, вдохновение и развитие. Найди идеи для новых свершений и будь самой собой в мире, где важно быть уникальной!
Портал для автомобилистов https://translit.com.ua от выбора машины до профессионального ремонта. Читайте обзоры авто, новости автоспорта, сравнивайте цены и характеристики. Форум автолюбителей, советы экспертов и свежие предложения автосалонов.
Мужской онлайн-журнал https://cruiser.com.ua о современных трендах, технологиях и саморазвитии. Мы пишем о том, что важно мужчине — от мотивации и здоровья до отдыха и финансов.
Мужской сайт https://rkas.org.ua о жизни без компромиссов: спорт, путешествия, техника, карьера и отношения. Для тех, кто ценит свободу, силу и уверенность в себе.
Ваш гид в мире https://nerjalivingspace.com автомобилей! Ежедневные авто новости, рейтинги, тест-драйвы и советы по эксплуатации. Найдите идеальный автомобиль, узнайте о страховании, кредитах и тюнинге.
Портал о дизайне https://sculptureproject.org.ua интерьеров и пространства. Идеи, тренды, проекты и вдохновение для дома, офиса и общественных мест. Советы дизайнеров и примеры стильных решений каждый день.
Строительный сайт https://okna-k.com.ua для профессионалов и новичков. Новости отрасли, обзоры материалов, технологии строительства и ремонта, советы мастеров и пошаговые инструкции для качественного результата.
Сайт о металлах https://metalprotection.com.ua и металлообработке: виды металлов, сплавы, технологии обработки, оборудование и новости отрасли. Всё для специалистов и профессионалов металлургии.
Главный автопортал страны https://nmiu.org.ua всё об автомобилях в одном месте! Новости, обзоры, советы, автообъявления, страхование, ТО и сервис. Для водителей, механиков и просто любителей машин.
Женский онлайн-журнал https://rosetti.com.ua о стиле, здоровье и семье. Новости моды, советы экспертов, тренды красоты и секреты счастья. Всё, что важно и интересно женщинам любого возраста.
کراتین ویسلی 300 گرمی، در واقع نام تجاری یک مکمل ورزشی است که معمولاً حاوی کراتین مونوهیدرات خالص میباشد.
Thanks on your marvelous posting! I definitely enjoyed reading it, you could
be a great author. I will be sure to bookmark your blog and
will eventually come back sometime soon. I want to encourage you to definitely continue your great writing,
have a nice holiday weekend!
größte wettanbieter deutschland
my web site beste quoten bei sportwetten (zouzhun.com)
Студия ремонта https://anti-orange.com.ua квартир и домов. Выполняем ремонт под ключ, дизайн-проекты, отделочные и инженерные работы. Качество, сроки и индивидуальный подход к каждому клиенту.
Туристический портал https://feokurort.com.ua для любителей путешествий! Страны, маршруты, достопримечательности, советы и лайфхаки. Планируйте отдых, находите вдохновение и открывайте мир вместе с нами.
Hi there, all is going perfectly here and ofcourse every one is sharing facts, that’s really good,
keep up writing.
وی بلولب یو اس ان، ترکیبی از وی ایزوله میکروفیلتردار، وی کنسانتره و وی هیدرولیز است که جذب بالایی دارد.
connectwiththeworldnow – Their mission seems bold, site feels ambitious yet hopeful.
Студия дизайна https://bathen.rv.ua интерьеров и архитектурных решений. Создаём стильные, функциональные и гармоничные пространства. Индивидуальный подход, авторские проекты и внимание к деталям.
Ремонт и строительство https://fmsu.org.ua без лишних сложностей! Подробные статьи, обзоры инструментов, лайфхаки и практические советы. Мы поможем построить, отремонтировать и обустроить ваш дом.
It’s going to be ending of mine day, except before finish I am reading
this impressive article to increase my know-how.
This paragraph provides clear idea for the new visitors of blogging,
that truly how to do running a blog.
Современная студия дизайна https://bconline.com.ua архитектура, интерьер, декор. Мы создаём пространства, где технологии сочетаются с красотой, а стиль — с удобством.
africain foot pronostic foot gratuit
pariez sur le foot football africain
melbet telecharger pronostics du foot
Создавайте дом https://it-cifra.com.ua своей мечты! Всё о строительстве, ремонте и дизайне интерьера. Идеи, проекты, фото и инструкции — вдохновляйтесь и воплощайте задуманное легко и с удовольствием.
sicherste Sportwetten strategie anbieter
We have reliable sources: https://redclara.net
Only reliable facts: https://audium.com
Information you can trust: https://www.radio-rfe.com
Only verified data: https://rennerusa.com
Only verified sources: https://m-g.wine
A trusted source: https://www.guidasposi.it
We only tell the facts: https://sportsfanbetting.com
Stay up to date: https://aquacristalina.com
No lies – just facts: https://www.maxwaugh.com
We check every word: https://baldebranco.com.br
truelaunch – Impressed by the practical ideas, not just theories.
brandvision – Great branding ideas, I’m noting them down for my own work.
We tell it like it is: https://lmc896.org
News as it is: https://satapornbooks.com
Information you can trust: https://www.trimartolod.fr
Only the latest updates: https://aquietrabalho.com
Find out the truth here: https://jnp.chitkara.edu.in
We tell it like it is: https://www.forumishqiptar.com
Find out the truth here: https://www.trimartolod.fr
Only the latest updates: https://redfordtheatre.com
News as it is: https://www.saffireblue.ca
Мир архитектуры https://vineyardartdecor.com и дизайна в одном месте! Лучшие идеи, проекты и вдохновение для дома, офиса и города. Узнай, как создаются красивые и функциональные пространства.
We select the best: https://institutocea.com
Only important details: https://vodazone.ru
Time-tested and proven: https://www.amakmeble.pl
Information you can trust: https://tumundobio.es
valuevision – Would love to see more interactive features or tutorials here.
skyportal – Excellent resources here, found useful tips for my projects.
trendforge – The name suggests being ahead of trends; that’s appealing.
smartgrid – The domain has potential, hoping they’ll launch something soon.
quantumreach – Just checked it out, the content feels fresh and full of insight.
boldimpact – Design placeholders show up; looking forward to full content.
alphaunity – Loading speed is good, didn’t wait long for pages.
bluetrail – Smooth navigation, I didn’t feel lost exploring the pages.
Only verified information: https://g-r-s.fr
Only verified facts: https://verspk.ru
Only real facts: https://casinocompendium.com
We write as is: https://exodontia.info
Trustworthy news: https://gingerparrot.co.uk
sharpbridge – Overall vibe is strong; could be my new resource go-to.
solidvision – Looking forward to seeing their design and offerings.
goldbridge – Overall promising — just needs more content to fill the promise.
elitegrowth – Love the clean design, really easy to navigate today.
cloudmatrix – Offers valuable insights, and the interface is top-notch.
fastgrowth – Great user experience, everything loads so smoothly and fast.
A source for current events: https://prathamonline.com
No exaggerations: https://livescores.biz
Events without embellishment: https://www.sportsoddshistory.com
Source of truthful news: https://www.bangladeshyp.com
maxvision – The content is engaging, and the site is responsive.
Only real events: https://exodontia.info
nextrend – Overall a positive experience, I’m glad I visited today.
greenmotion – Great user experience, everything loads so smoothly and fast.
boldnetwork – Clean aesthetic, I’ll check back later for updates.
thinkbeyondtech – Navigation is seamless, and the visuals are appealing.
nextlayer – Consistently impressed with the site’s performance and design.
We maintain objectivity: https://www.greenwichodeum.com
We value honesty: http://lipetskregionsport.ru
Все лучшее у нас: http://hammill.ru
Все самое актуальное тут: https://rr-game.ru
No fakes or speculation: https://www.betrush.com
وی کیسه ای اپتیموم، یکی از پرفروشترین پودرهای پروتئین وی در دنیاست.
focuslab – Found ideas I’m excited to try in my next projects.
وی ناترند ۱ کیلویی، در واقع یک مکمل پروتئینی باکیفیت و حرفهای است که توسط شرکت معتبر اروپایی تولید میشود.
Всё самое свежее здесь: http://volgazdrav.ru
Только проверенные новости: https://olimpia-nv.ru
Всё актуальное в одном месте: https://it-on.ru
Всё самое новое тут: http://www.newlcn.com
Источник, которому доверяют: https://metchelstroy.ru
ynaix – Found useful info here, makes me trust the site more.
strongrod – Navigation is solid, I found what I needed quickly.
Только проверенные факты: http://nirvanaplus.ru
Надёжный источник информации: https://motorradhof.ru
Узнавайте события первыми: https://www.oaza.pl
wavefusion – Really like the style here, feels fresh and creative.
brightideaweb – Typography is crisp, spacing works well throughout the site.
metarise – Very user friendly, easy to find what I need each visit.
cyberlaunch – Useful resources are easy to access, menus make sense.
Частный заем денег домашние деньги онлайн альтернатива банковскому кредиту. Быстро, безопасно и без бюрократии. Получите нужную сумму наличными или на карту за считанные минуты.
brightchain – Color scheme works, contrasts help readability without being harsh.
innovatewithus – This site stays relevant, always bringing fresh perspectives too.
bestchoiceonline – Customer support info is easy to find, that’s always a plus.
cloudmark – The homepage is elegant, feels welcoming and well-designed.
Все спортивные новости http://sportsat.ru в реальном времени. Итоги матчей, трансферы, рейтинги и обзоры. Следите за событиями мирового спорта и оставайтесь в курсе побед и рекордов!
nextbrand – Clean call-to-actions, not overwhelming but definitely noticeable.
digitalstorm – The voice feels authentic, technical without being overwhelming.
everythingyouneedtoknow – Typography is very readable, spacing gives breathing room.
discoveramazingthingsonline – Layout is playful but not messy, balance is just right.
explorecreativeideasdaily – Love the inspiration, so many new ideas every visit.
ultrawave – Visual elements are sharp, clean layout gives good impression.
globalreach – Fast loading times, smooth transitions, really appreciate that.
yourbrandzone – Feels professional yet friendly, not overly formal.
pixelplanet – Love the creativity here, visuals are really on point from first glance.
zenithmedia – Pages load quickly, rarely any lag even with heavy content.
boldspark – Overall very polished, good balance of design and usability.
futurebeam – Pages load super fast, even images render sharp.
Доставка пиццы Воронеже https://pizzeriacuba.ru самая вкусная сочная пицца в городе Воронеж. Доставим пиццу горячей круглочуточно в Воронеже скидки от 3500 рублей. Скидка на самовывоз на каждую пиццу. Доставка бесплатно
kluvcc – Pages load fast, no lag or weird behavior at all.
Suchen Sie Immobilien? https://www.montenegro-immobilien-kaufen.com wohnungen, Villen und Grundstucke mit Meerblick. Aktuelle Preise, Fotos, Auswahlhilfe und umfassende Transaktionsunterstutzung.
joinourcreativecommunity – The tone invites participation, feels more like a conversation than lecture.
alphaimpact – Pages load fast, even the images look crisp and optimized.
LearnWithConfidence – I find the lessons engaging, very easy to follow along.
thebestplacetostarttoday – Visuals align beautifully with the message of new beginnings.
makingeverymomentcount – Design feels warm and personal, very inviting experience.
learnshareandsucceed – Navigation is clear, I easily found a section I liked.
getreadytoexplore – Visuals support the “exploration” theme really well, feels immersive.
makelifebettereveryday – Hope the content is practical, not just motivational fluff, that matters.
findwhatyouarelookingfor – Design is clean and minimal, helps me focus on what matters.
everythingaboutsuccess – Overall very polished experience, feels like a premium motivational hub.
learnsomethingneweveryday – Visual elements are engaging but don’t distract from the content.
discoverendlessinspiration – Color choices are beautiful, contrast and harmony felt throughout.
https://weninkavproducts.nl/about/
GrowWithConfidenceHere – I appreciate how structured and supportive the courses are here.
SimpleWaysToBeHappy – The content is uplifting and motivating, truly inspiring.
BuildSomethingMeaningful – I love how they integrate technology into their initiatives.
yourjourneytobetterliving – Typography is easy on the eyes, spacing gives good breathing room.
YourTrustedSourceOnline – The platform is user-friendly and full of helpful guides.
TogetherWeCreateChange – The community support is amazing, encourages everyone to share freely.
BuildABetterTomorrow – This site offers great resources for community development projects.
CreateInspireAndGrow – The content here is top-notch, really helps me stay motivated.
thefutureofinnovation – Found inspiring articles, ideas that push me to think differently.
stayupdatedwithtrends – Featured posts stand out clearly, what’s trending is easy to catch.
وی گلد استاندارد اپتیموم نوتریشن، صرفاً یک پودر پروتئین نیست؛ بلکه یک ابزار استراتژیک برای بهینهسازی عملکرد بدن و ذهن شماست.
фитнес клуб цены сеть фитнес клубов
Топ 1792 выдающихся мыслителей jtv
TurnIdeasIntoAction – I love how this lets me take small ideas and really make them happen.
I truly love your site.. Very nice colors
& theme. Did you create this site yourself? Please reply back as I’m trying to
create my very own site and would like to find out where you got this from or
exactly what the theme is called. Thanks!
LearnSomethingAwesome – Content here is fresh and energizing, perfect midday pick-me-up.
LearnShareAndGrow – Their commitment to social impact is truly commendable.
FindTheBestIdeas – Very motivating, gives me fuel to try something different today.
https://fint.edu.br/oportunidades-na-carreira-de-hematologia/
TheArtOfLivingWell – Love how the writing feels personal yet so helpful for growth.
FindNewWaysToGrow – I found this site just when I needed a fresh perspective today.
FindAnswersAndIdeas – The community comments are just as insightful as the articles themselves.
YourDigitalDestination – Their tutorials are clear; even tricky things become understandable.
GetConnectedWithPeople – The community engagement is genuine, people seem supportive and kind.
UnlockYourPotentialToday – The content is very encouraging, makes me feel capable every day.
DiscoverWorldOfIdeas – The posts are thoughtful, give me something to mull over later.
FindSolutionsForLife – The guides break things down in a way that makes sense to me.
ConnectDiscoverAndGrow – It’s become one of my go-to sites when I need inspiration.
InspireChangeAndProgress – The inspiration here feels genuine, not forced or cliché at all.
markmackenzieforcongress – The updates are consistent and clear, I like that transparency a lot.
madeleinemtbc – Love the layout and colors, site feels warm and welcoming
FindInspirationEverywhere – I often share pieces from here with friends who need encouragement.
YourGuideForSuccess – Great content, I feel more confident applying the advice to real life.
StartChangingYourLife – I appreciate how they emphasize progress over perfection.
DiscoverUsefulTipsDaily – I like how every post gives something I can try immediately.
DiscoverNewOpportunities – Their approach to education is both innovative and impactful.
все самое лучшее тут: https://estet-medical.ru/estestvennye-metody-vosstanovleniya-zdorovya-put-k-garmonii-i-blagopoluchiyu/
I’m not that much of a internet reader to be honest but your blogs really nice,
keep it up! I’ll go ahead and bookmark your site to come back later.
Many thanks
alihidaer2313 – The experience is gentle, nothing over the top, just reliable.
Link mct
LearnAndImproveEveryday – This site has become my go-to for daily growth resources.
Аренда автобуса москва цена https://povozkin.ru
This is my first time pay a quick visit at here and i am genuinely pleassant to
read everthing at single place.
Greate post. Keep posting such kind of info on your blog.
Im really impressed by your site.
Hello there, You have performed a great job. I will certainly digg it and in my
view suggest to my friends. I’m confident they will be benefited from this site.
وی ایزوله ایزوجکت ایوژن، از تصفیه سهگانه با فیلتر سرد (Triple Cold-Filtered) بهره میبرد.
makethemostoflife – I learned something meaningful today, thank you
inspireandgrowtogether – Found some great ideas here, bookmarking for later.
findthebestcontent – Love how content is curated with high quality in mind
findyourwayforward – The content here feels so encouraging and grounded, I like that
licsupport – Nice resource, lots of useful insurance info available
growyourpresenceonline – Seems trustworthy, with resources that are actually actionable
Лазерные станки https://raymark.ru для резки металла в Москве. 20 лет на рынке, выгодная цена, скидка 5% при заявке с сайта + обучение
HOME CLIMAT https://homeclimat36.ru кондиционеры и сплит системы в Воронеже. Скидка на монтаж от 3000 рублей! При покупке сплит-системы.
connectwithbrilliantminds – Very refreshing to see encouragement paired with clever ideas
discovertrendingideas – The visuals make the content pop, very appealing
everythingaboutmarketing – Always find valuable information that helps improve my marketing skills.
discoverhiddenpotential – This platform is a valuable resource for anyone seeking direction.
discoveryourpassion – Highly recommend this site for anyone seeking personal growth.
togetherwecreateimpact – Genuine tone, very motivating, makes me want to do my part
connectandgrowonline – I love how user-friendly and effective this service is.
jointhenextbigthing – Great insights shared, I always learn something new here.
buildyourdigitalfuture – This site offers clear guidance, helping me make confident decisions.
findyourinspirationhere – The tone is warm and encouraging, not preachy at all
yourgatewaytosuccess – Content feels uplifting and genuine, something I’d share
keepgrowingwithus – This is one of those rare blogs you trust quickly
Link pse
buildyourownlegacy – Really appreciate the actionable tips mixed with storytelling here
وی سینتا 6 بی اس ان 1 کیلویی، یک ماتریس پروتئینی فوق حرفهای است که برای حمایت مداوم از عضلات شما، در تمام طول روز و شب طراحی شده است.
Нужна недвижимость? купить недвижимость в Черногории лучшие объекты для жизни и инвестиций. Виллы, квартиры и дома у моря. Помощь в подборе, оформлении и сопровождении сделки на всех этапах.
Аутстаффинг персонала https://skillstaff2.ru для бизнеса: легальное оформление сотрудников, снижение налоговой нагрузки и оптимизация расходов. Работаем с компаниями любого масштаба и отрасли.
Hi! Do you know if they make any plugins to assist with Search Engine Optimization? I’m trying to get my blog to rank for some targeted keywords but I’m not seeing very good
success. If you know of any please share. Kudos!
Хочешь пиццу? https://tula.pizzeriacuba.ru быстро, вкусно и горячо! Заказывайте пиццу с доставкой на дом или в офис. Большой выбор начинок, свежие ингредиенты, акции и бесплатная доставка по городу.
Hi there, I log on to your blog daily. Your story-telling style is awesome,
keep it up!
shareyourvisiontoday – Very genuine and encouraging, I feel supported reading it.
learnnewthingsdaily – The tutorials are clear, step-by-step, perfect for beginners.
inspireeverymoment – Just visited and it resonated with me deeply today.
discovergreatideas – A treasure trove of creative solutions for everyday challenges.
growtogetherwithus – Thanks for this space, it’s helping me stay committed to growth.
Портал о строительстве https://pamel-stroy.ru и ремонте. Пошаговые инструкции, идеи, технологии, новости и советы экспертов. Всё, что нужно, чтобы строить и ремонтировать грамотно.
thefuturestartsnow – Awesome mix of optimism and real steps to advance.
inspireeverymoment – Just visited and it resonated with me deeply today.
Строительный портал https://v-stroit.ru всё о строительстве, ремонте и архитектуре. Полезные советы, технологии, материалы, новости отрасли и практические инструкции для мастеров и новичков.
theartofsuccess – The stories here are powerful and deeply relatable.
startyourdigitaljourney – I appreciate the step-by-step guidance throughout the process.
createimpactfulstories – I appreciate the way complex ideas are made so relatable.
yourjourneytowin – The guidance here feels practical and full of positive vision.
staycuriousandcreative – I leave each post feeling inspired to try something different.
findyourcreativeflow – Thanks for reminding me creativity flows when I just let go.
yourpathofsuccess – This site helps me refocus when things feel chaotic.
That is a great tip particularly to those fresh to
the blogosphere. Short but very precise info… Thanks for sharing this one.
A must read post!
creativityneverends – So inspiring, every post gives me fresh energy and new perspectives.
Риэлторская контора https://daber27.ru покупка, продажа и аренда недвижимости. Помогаем оформить сделки безопасно и выгодно. Опытные риэлторы, консультации, сопровождение и проверка документов.
Купольные дома https://kupol-doma.ru под ключ — энергоэффективные, надёжные и современные. Проектирование, строительство и отделка. Уникальная архитектура, комфорт и долговечность в каждом доме.
beste wett tipps kostenlos
Feel free to surf to my blog post: wettbüro paderborn
وی الیمپ کیسه ای، یک ترکیب حرفهای از دو نوع پروتئین وی با کیفیت فوقالعاده است.
Ваша Недвижимость https://rbn-khv.ru сайт о покупке, продаже и аренде жилья. Разбираем сделки, налоги, ипотеку и инвестиции. Полезная информация для владельцев и покупателей недвижимости.
Информационный блог https://gidroekoproekt.ru для инженеров и проектировщиков. Всё об инженерных изысканиях, водохозяйственных объектах, гидротехническом строительстве и современных технологиях в отрасли.
stacoa.org – Found a few pages that answered my questions already.
myvetcoach.org – I appreciate how topics are broken down into easy pieces.
filamericansforracialaction.com – Nice clean layout, makes it easy to explore content.
electlarryarata – Looking forward to seeing your campaign updates here.
thespeakeasybuffalo – The site’s slogan “Spirit Free for the Free Spirit” is quite poetic.
laetly.com – The IG gives enough hint, hope the site matches that energy.
mystylecorner – Browsing was fun, discovered pieces I didn’t even know I needed.
norigamihq – Visited twice, still not sure what the focus is.
growyourdigitalpresence – bookmarked this, will revisit when planning my next online push.
summerstageinharlem.org – I’d love to catch a show here, sounds like a great scene.
pinellasehe.org – The layout is clean and content feels trustworthy right away.
rockyrose.org – A peaceful corner of the web, thanks for sharing it.
creativevision – Each artwork invites the viewer to see the world differently.
formative-coffee.com – Their shop page is sleek, makes ordering feel elegant.
successpartnersgroup – This brand keeps impressing me every time I visit updates.
I’ve been browsing online more than three hours today, yet I never found any interesting article
like yours. It is pretty worth enough for me. In my view, if all website owners and bloggers made
good content as you did, the net will be much more
useful than ever before.
newseason – Sharing this with friends who love seasonal fashion collections.
hecimagine.com – Thanks for having resources for students in challenging conditions.
trendyfashioncorner – The layout is clean, making shopping a pleasant experience.
globalideasnetwork – Browsing here feels smooth, no lag and clear navigation.
cryptotephra-clagr.com – I saw their Twitter “Cryptotephra Lab-CLAGR” account. :contentReference[oaicite:0]index=0
discovernewideas – Just stumbled here and wow, content is fresh and super interesting.
ukrainianvictoryisthebestaward.com – The contents are mostly Japanese/blog posts about gambling-apps and casinos.
createimpact – Got inspired by the content, got me thinking of new possibilities.
inspiredgrowthteam – Their content feels motivated and authentic, got me inspired right away.
luxurytrendstore – Definitely bookmarking this site for future fashion finds.
nextgeninnovation – The design is slick, I enjoyed exploring their service sections.
visionaryleadersclub – Everything’s easy to navigate, found info fast without confusion.
Remarkable! Its really amazing post, I have got much clear idea on the topic of from this post.
батареи rifar tubog
partnershippowerhouse – Their mission resonates, and presentation backs that up nicely.
I read this piece of writing fully regarding the resemblance of most up-to-date and previous technologies,
it’s awesome article.
Онлайн-спортивный http://sportsat.ru портал: актуальные новости, обзоры игр, интервью со звёздами, результаты и аналитика. Следите за событиями в мире спорта каждый день!
Рейтинг лучших подоконников https://luchshie-podokonniki-iz-kamnya.ru из искусственного камня в Москве. Сравнение брендов, цены, фото и отзывы. Узнайте, какой подоконник выбрать — прочный, стильный и долговечный вариант для вашего интерьера.
handicap bedeutung wetten
Also visit my blog post :: WettbüRo Aachen (https://Inspireleb.Com/Unentschieden-Wettsystem-2/)
discovernewpath – Friendly vibe, makes you feel welcomed as visitor.
findyourfuture – Clean visuals and easy navigation make browsing enjoyable.
uniquefashionstyle – The minimalist approach makes finding items quick and easy.
nextvision – I visited the link but it didn’t load, might be down or inactive.
trustconnectionnetwork – Easy navigation and detailed product descriptions aid in informed decisions.
strategicgrowthalliance – The design is sleek and modern, making navigation a breeze.
http://www.vegabetgiris.net
trustedbusinesslink – Definitely a place I’d recommend for professional business connections.
Изготовление флагов https://flagman-com.ru на заказ — корпоративные, государственные, спортивные и рекламные флаги. Печать любой сложности, качественные материалы, быстрая доставка.
Любишь складчины? skladchik org официальный сайт. Управляйте своими покупками, подписками и профилем. Доступ ко всем материалам и обновлениям в один клик.
futureopportunitynetwork – Excellent platform for discovering new opportunities and insights.
growstrongteam – Navigation feels intuitive, found what I wanted without hunting.
futurevisiongroup – Definitely a site I’d revisit — lots of promise here.
learnsharegrow – The loading speed is great, no delay when switching pages.
happylifestylehub – I find fresh ideas every time, really inspiring place.
http://www.vegabetbahis.com ile Türkiye’de hizmet veren online bahis sitesi Vegabet hakkında her konu için bilgiler bulabilirsiniz.
growthpoint – The site has a sharp professional look, very trustworthy impression.
futureopportunitynetwork – Definitely one I’ll revisit, I like what I see so far.
Aw, this was a really nice post. Taking a few minutes and actual effort to produce
a very good article… but what can I say… I hesitate a lot and never manage to get anything done.
Yeni giriş adresini bulmak için arama motorlarından veya güvenilir bahis forumlarından yardım alabilirsiniz. Ayrıca, Sonbahis bahis sitesinin resmi sosyal medya hesaplarını takip ederek de güncel adresi öğrenebilirsiniz. Unutmayın, güncel adresi kullanarak Sonbahis sitesine sorunsuz bir şekilde erişebilir ve heyecan dolu oyun deneyiminin tadını çıkarabilirsiniz.
Деревянные лестницы https://rosslestnica.ru под заказ в любом стиле. Прямые, винтовые, маршевые конструкции из массива. Замеры, 3D-проект, доставка и установка. Гарантия качества и точности исполнения.
Лестницы в Москве https://лестницы-в-москве.рф продажа и изготовление под заказ. Прямые, винтовые, модульные и чердачные конструкции. Качество, гарантия и монтаж по всем стандартам.
seoignite.click – The visuals compliment the text well, gives a polished impression.
businessgrowthhub – Feels like a community of learn-and-grow rather than just info.
trustandunity – The tone feels genuine, helpful content without exaggeration, much appreciated.
digitalinnovationzone – The vibe is futuristic yet grounded—nice combination.
futuregoalsnetwork – I feel motivated just reading headlines — that’s a good sign.
successbridge – I’ve bookmarked this site, think it’ll be valuable long-term.
getthedeal – Prices are super low, I shared this with friends.
https://www.lerevedelise.be/nl/le-reve-d-elise/interieur16/
leadersunitedgroup – Always something useful, content mix is strong and varied.
connectinnovationhub – Content is helpful and practical, not just theory — much appreciated.
winmore – I’m excited to explore more, this feels like a project to follow.
findsomethingnew – I always pick up new ideas here, very inspiring.
futuregoalsnetwork – I’ve saved it in my bookmarks — feels like a long-term resource.
findtrendystuff – I bookmarked this, want to revisit and check new items.
discovervalue – The tone is calm and grounded, makes learning less overwhelming.
successjourneyclub – I’ve found useful guides already, very practical advice.
globalpartnershipteam – I appreciate how accessible everything is, no complicated steps.
trustconnectionnetwork – Useful advice here, seems geared toward authentic relationships not hype.
discoverdaily – I’ve bookmarked several posts, they keep surprising me.
exploreideasworld – The tone’s inviting, makes me want to explore more.
leadersunitedgroup – I like the leadership vibe here, feels motivating and real.
مولتی ویتامین ایوژن، توسط یک برند معتبر در دنیای فیتنس تولید شده و فرمولاسیون آن به طور خاص برای کسانی بهینه شده است که در سطح بالایی از فعالیت بدنی قرار دارند.
connectinnovationhub – The tone is positive and engaging, keeps me browsing longer.
growtogetheralliance – Visit after visit I feel more inspired, great energy overall.
brightdeal – Very smooth experience navigating, no confusion.
innovateandbuild – Inspiring visuals and writing together, very satisfying experience.
buildtogether – Excited to see more posts, this looks like a growing platform.
businessgrowthhub – Excited to see their next posts, potential is strong.
Estou alucinado com BRCasino, oferece uma aventura de cassino que pulsa como um pandeiro. O catalogo de jogos do cassino e uma folia de emocoes, com jogos de cassino perfeitos pra criptomoedas. O servico do cassino e confiavel e cheio de swing, com uma ajuda que brilha como serpentinas. Os pagamentos do cassino sao lisos e blindados, mas mais giros gratis no cassino seria uma loucura. Na real, BRCasino garante uma diversao de cassino que e um carnaval total para quem curte apostar com gingado no cassino! Alem disso a interface do cassino e fluida e reluz como uma fantasia de carnaval, eleva a imersao no cassino ao ritmo de um tamborim.
br77 slot login|
Acho simplesmente alucinante RioPlay Casino, parece uma festa carioca de diversao. Tem uma avalanche de jogos de cassino irados, oferecendo sessoes de cassino ao vivo que sambam com energia. Os agentes do cassino sao rapidos como um passista, respondendo mais rapido que um batuque. O processo do cassino e limpo e sem tropecos, porem as ofertas do cassino podiam ser mais generosas. No geral, RioPlay Casino vale demais sambar nesse cassino para os apaixonados por slots modernos de cassino! De lambuja o design do cassino e um desfile visual colorido, o que torna cada sessao de cassino ainda mais animada.
roblox lite rioplay atualizado mediafД±re|
Galera, preciso compartilhar minha experiencia no 4PlayBet Casino porque foi muito alem do que imaginei. A variedade de jogos e de cair o queixo: poquer estrategico, todos funcionando perfeito. O suporte foi atencioso, responderam em minutos pelo chat, algo que faz diferenca. Fiz saque em Ethereum e o dinheiro entrou em minutos, ponto fortissimo. Se tivesse que criticar, diria que mais brindes fariam falta, mas isso nao estraga a experiencia. No geral, o 4PlayBet Casino e parada obrigatoria pra quem gosta de cassino. Recomendo sem medo.
savage gear 4play herring liplure|
Fiquei impressionado com PlayPIX Casino, sinto um ritmo alucinante. O catalogo e rico e diversificado, incluindo apostas esportivas vibrantes. O bonus de boas-vindas e vibrante. A assistencia e eficiente e cortes, acessivel a qualquer hora. Os saques sao rapidos como um raio, no entanto mais promocoes regulares seriam otimas. Em sintese, PlayPIX Casino e indispensavel para jogadores para entusiastas de jogos modernos ! Alem disso a interface e fluida e elegante, tornando cada sessao mais vibrante. Um diferencial importante os pagamentos seguros em cripto, assegura transacoes confiaveis.
Consultar os detalhes|
Sou viciado em BETesporte Casino, proporciona uma aventura competitiva. O catalogo e rico e diversificado, oferecendo jogos de mesa dinamicos. Eleva a experiencia de jogo. O acompanhamento e impecavel, acessivel a qualquer hora. Os pagamentos sao seguros e fluidos, contudo ofertas mais generosas dariam um toque especial. Em sintese, BETesporte Casino e uma plataforma que domina o campo para quem usa cripto para jogar ! Alem disso o design e moderno e dinamico, facilita uma imersao total. Muito atrativo os pagamentos seguros em cripto, proporciona vantagens personalizadas.
Ler mais|
Critical advice: never buy fifa coins from sellers requesting account passwords or login credentials under any circumstances whatsoever. Real vendors with fast delivery and active support plus non drop policies only need your username for legitimate secure transactions.
boldpartner – Bookmarking this site — feels like a partner in growth.
businessgrowthhub – I’ve bookmarked several posts already, this seems promising.
boostcraft.click – Visually appealing, pleasing color scheme and clean spacing.
ranktrail.click – On mobile it’s pretty seamless—everything adapts well to screen size.
ranktrail.click – Found a few interesting articles already—will go deeper later.
searchnest.click – Overall the site gives a polished, trustworthy impression today.
websummit.click – Navigation is clean, I found what I was looking for instantly.
smartpartnership.bond – Already considering how this could benefit local projects.
inspiredmind.shop – I bookmarked several pages already — so many neat ideas.
partnershippowerhouse.shop – Layout is clean, easy to navigate without feeling overwhelming.
globalunity.bond – The copy is clear and feels genuine.
trustinyou.bond – The design is simple yet effective, very user friendly.
shopwithpurpose.shop – Feels like shopping here actually contributes to something meaningful.
smartdesigncorner.space – I like how they showcase examples, makes imagining my own easier.
creativegiftzone.shop – Found a gift for my friend in minutes, thank you!
learnonline.bond – Can’t wait to see what new courses they’ll add next.
creativityuniverse.shop – Everything looks thoughtfully crafted; can tell they pay attention to detail.
Строительство складов https://velestent.ru и ангаров в Москве под ключ. Быстровозводимые конструкции, металлокаркасы, проектирование и монтаж. Качество, надёжность и соблюдение сроков.
trendfinder.bond – Really impressed by how well they highlight trending products lately.
buildbrand.online – Already imagining applying some of their tips to my upcoming project.
inspiredideas.shop – Found some ideas I hadn’t thought of — thanks for this.
dailyvaluehub.shop – I like how they promote value daily — very customer-oriented.
inspiredgrowthteam.shop – The resources look solid; excited to dive deeper into what they offer.
buildlastingtrust.bond – Design is clean, message is clear — feels very sincere.
brightfuturegroup.bond – I’m impressed by their vision and the possibilities they present here.
startsomethingnew.shop – The site’s vibe motivates me to try something different.
findnewtrend.shop – Loved how clean and straightforward the product pages are.
trustandunity.shop – I like the balance between visuals and content here.
smartstylehub.shop – Product photos are great, make styling ideas come alive.
visionaryleadersclub.bond – I bookmarked their blog — lots of value in their posts.
globalpartnershipteam.bond – Already thinking how I could get involved — promising possibilities.
trustedbusinesslink.shop – Looks like a decent place to connect with reliable business services.
modernchoice.store – Good images and solid layout — gives trust in what’s offered.
buildlastingties.bond – The messaging is powerful, not overhyped or full of jargon.
Мастер на час в Москве https://masternadom24.ru быстрое решение бытовых проблем. Мелкий ремонт, установка, сборка и подключение техники. Пунктуальность, качество и удобный вызов мастера.
visionaryconnect.bond – I’m excited to explore more, seems full of promise.
Курсы подготовки к ЕГЭ по математике https://courses-ege.ru
Продувают окна? регулировка окон пвх – устранение продуваний, настройка фурнитуры, ремонт и обслуживание. Опытные мастера, выезд в день обращения, гарантия на все виды работ.
netfusion.click – Just visited, the design feels crisp and navigation is very smooth.
seoanchor.click – Already bookmarked this, I’ll be back for more content.
rankmotion.click – Just browsed it, layout’s smooth and everything’s easy to follow.
pagevector.click – Just visited, the layout feels clean and content is welcoming to read.
clicksignal.click – Visuals blend nicely with text, nothing feels jarring or out of place.
successjourneyclub.shop – The content seems encouraging; good vibe overall.
brightmarketplace – Great deals and variety, found exactly what I needed today.
smartbuytoday – Great deals and variety, found exactly what I needed today.
classytrendstore – Stylish fashion finds, loved the unique designs and quality.
bestdealcorner – Easy to navigate and quick checkout, very user-friendly website.
justvotenoon2 – Really enjoyed reading this, very helpful info for beginners here.
Sou viciado no fluxo de Brazino Casino, tem uma energia de jogo tao vibrante quanto um recife de corais. O catalogo de jogos e um oceano de prazeres. oferecendo lives que explodem como um geiser. O servico e confiavel como uma ancora. com ajuda que ilumina como uma perola. Os ganhos chegam rapido como uma corrente. porem mais bonus seriam um diferencial oceanico. Em resumo, Brazino Casino e um cassino online que e um oceano de diversao para os cacadores de vitorias subaquaticas! Vale dizer o site e uma obra-prima de estilo subaquatico. amplificando o jogo com vibracao aquatica.
mc joГЈo brazino777 letras|
Sou louco pelo batuque de SambaSlots Casino, oferece uma aventura de cassino que pulsa como um pandeiro. O catalogo de jogos do cassino e uma folia total, com slots de cassino tematicos de festa. O servico do cassino e confiavel e cheio de gingado, garantindo suporte de cassino direto e sem perder o ritmo. O processo do cassino e limpo e sem tropecos, as vezes queria mais promocoes de cassino que botam pra quebrar. No geral, SambaSlots Casino e um cassino online que e uma festa de diversao para os folioes do cassino! De bonus a navegacao do cassino e facil como um passo de carnaval, faz voce querer voltar ao cassino como num desfile sem fim.
sambaslots casino en ligne|
Ich bin total hingerissen von JackpotPiraten Casino, es pulsiert mit einer unbandigen Casino-Energie. Der Katalog des Casinos ist ein Schatztruhe voller Spa?, mit einzigartigen Casino-Slotmaschinen. Das Casino-Team bietet eine Unterstutzung, die wie Gold glanzt, sorgt fur sofortigen Casino-Support, der beeindruckt. Der Casino-Prozess ist klar und ohne Wellengang, ab und zu die Casino-Angebote konnten gro?zugiger sein. Am Ende ist JackpotPiraten Casino ein Casino, das man nicht verpassen darf fur Fans moderner Casino-Slots! Ubrigens das Casino-Design ist ein optischer Volltreffer, das Casino-Erlebnis total intensiviert.
jackpotpiraten app download|
dailyprofitupdate – Great value for money; products match the descriptions perfectly.
modernvisionlab.shop – Definitely sharing this with friends who appreciate modern design.
everydayvaluefinds.shop – Love discovering useful things here, style and value both balanced nicely.
Je trouve absolument fantastique 7BitCasino, on dirait une aventure pleine de sensations. Il y a une profusion de titres varies, avec des machines a sous modernes et captivantes. Le service client est remarquable, garantissant une aide immediate via chat en direct ou email. Les gains sont verses en un temps record, par moments les bonus pourraient etre plus reguliers, notamment des bonus sans depot. En fin de compte, 7BitCasino est une plateforme d’exception pour les passionnes de jeux numeriques ! Ajoutons que l’interface est fluide et retro, facilite chaque session de jeu.
7bitcasino estafa|
Agree with this. Similar thoughts on my blog – ssgamesbr.top.
stylemebetter – Found some great deals; checkout process was quick and secure.
technologydreamhub.shop – The descriptions are informative — helps in decision making.
modernvaluecorner – Great value for money; products match the descriptions perfectly.
Fiquei impressionado com PlayPIX Casino, leva a um universo de pura adrenalina. Ha uma explosao de jogos emocionantes, com sessoes ao vivo cheias de emocao. 100% ate €500 + rodadas gratis. O acompanhamento e impecavel, acessivel a qualquer momento. Os pagamentos sao seguros e fluidos, no entanto recompensas extras seriam eletrizantes. Para finalizar, PlayPIX Casino e uma plataforma que brilha para quem aposta com cripto ! Vale destacar a interface e fluida e estilosa, adiciona um toque de conforto. Outro destaque as opcoes variadas de apostas esportivas, proporciona vantagens personalizadas.
Ir para a web|
Tenho uma paixao vibrante por BETesporte Casino, proporciona uma aventura eletrizante. As opcoes sao amplas como um campo de futebol, incluindo apostas esportivas que aceleram o coracao. O bonus de boas-vindas e empolgante. O servico esta disponivel 24/7, garantindo atendimento de alto nivel. Os ganhos chegam sem atraso, de vez em quando promocoes mais frequentes seriam um plus. Para finalizar, BETesporte Casino vale uma aposta certa para entusiastas de jogos modernos ! Acrescentando que a plataforma e visualmente impactante, tornando cada sessao mais competitiva. Muito atrativo os pagamentos seguros em cripto, proporciona vantagens personalizadas.
Descobrir a web|
buildlastingtrust.shop – Clear design, easy to navigate — gives confidence.
findyourlook.shop – The layout is stylish and images are really nice quality.
nextgenproject.shop – Even just browsing gives a sense of purpose and potential.
trendhunterplace – Quality content and easy navigation, I appreciate the effort here.
yourtradingmentor – Clean design and easy navigation, makes following lessons really simple today.
modernwoodcases – Love the unique designs; they add a personal touch to my phone.
trendinggiftcorner – Helpful content and easy navigation, found exactly what I needed.
smarttradingmentor – Excellent mentorship tips, really helped me improve trading strategies today.
purebeautyoutlet – Great product variety here, descriptions are clear and helpful.
musionet – Useful resources for beginners and advanced users alike, thanks.
protraderacademy – Really impressed with the quality of lessons and tips shared here.
tradingmasterclass – Fantastic trading lessons, really helped me improve my skills today.
کراتین ترکیبی سل تک ماسل تک، یک فرمولاسیون پیشرفته است که برای به حداکثر رساندن جذب و کارایی کراتین در سطح سلولی طراحی شده است.
fastgrowthsignal – Customer service seems responsive, descriptions clear, overall trust builds fast.
strongpartnershipnetwork – This website is a fantastic resource for building meaningful business partnerships.
newhorizonsnetwork.bond – Good visuals, hopeful messaging — gives a strong impression.
ultimateprofitplan – Highly recommend for small business owners aiming for sustainable growth.
اپتی من، یک مولتی ویتامین جامع و قدرتمند است که به طور اختصاصی برای نیازهای تغذیهای آقایان، به ویژه ورزشکاران، طراحی شده است.
brightfuturegroup.shop – The visual layout is appealing and gives confidence in what they do.
webtide.click – Overall the site gives a trustworthy impression and a great first look.
Новости спорта онлайн http://sportsat.ru футбол, хоккей, бокс, теннис, баскетбол и другие виды спорта. Результаты матчей, обзоры, интервью, аналитика и главные события дня в мире спорта.
keywordorbit.click – Colour palette is subtle and pleasant, nice choice for long reading.
rankforge.click – The visual style complements the content nicely — very polished.
trafficpulse.click – Already bookmarked the site—looks like a valuable resource to return to.
seoloom.click – On mobile the site is responsive and everything scales smoothly with no issues.
parier pour le foot foot africain
learnandtrade – This will definitely be part of my regular study routine from now on.
teamworksuccesspath – Found useful strategies for building effective teamwork and achieving goals together.
classyhomegoods – Found some rare décor items not seen on other stores, very pleased.
successnetworkgroup – Will consider joining or participating more, seems like a solid network.
forexstrategyguide – Excellent course for scaling businesses, practical tips and strategies.
globalchoicehub – This has become one of my go-to stores for finding smart deals.
shopwithsmile – Items arrived in good condition and delivery was timely.
shopandshine – Really good value for money, will definitely browse here again.
visionpartnersclub – This site has become my favorite for online shopping recently.
ultimateprofitplan – This plan is a game-changer for anyone serious about business growth.
yourtradingmentor – Excellent support and explanation when I had questions, very responsive.
bestforexstrategies – Good mix of visuals and explanations, helped me understand one strategy better.
successfultradersclub – The layout is clean and the strategy descriptions are clear and helpful today.
futuregrowthteam – Helpful product descriptions and reviews, made decision-making easier today.
nextleveltrading – Really well laid-out site, made complicated strategies feel clear and simple.
shoplocaltrend – Helpful product descriptions and reviews, made decision-making easier today.
freshfashionfinds – This site has become my favorite for online fashion shopping.
uniquedecorstore – Found some rare décor items not seen on other stores, very pleased.
everydaytrendshop – Stylish fashion finds, loved the unique designs and quality.
metaboost.click – On mobile it adapts smoothly—everything fits and looks good.
strongfoundation – Found quite a few useful tools and insights today, well done.
strongpartnershipnetwork – Loved the advice and insights, makes networking much easier to manage.
classyhomegoods – This site has become my favorite for online fashion shopping.
seowhale.click – Typography is readable and spacing makes the text comfortable to scan.
simplelivinghub – Felt safe and comfortable reading the articles, very user-friendly site.
globalmarketinsight – Smooth navigation and helpful breakdowns on global markets.
smartbuytoday – Secure payment options and fast site loading, felt trustworthy.
trendandstyle – Impressed with the product variety and timely delivery.
learnandtrade – Insightful lessons that helped me overcome operational challenges.
freshstylemarket – Helpful product descriptions and reviews, made decision-making easier today.
seoignite.click – Typography and spacing are well-balanced—comfortable for reading longer content.
Все о коттеджных посёлках https://cottagecommunity.ru/sosnovka/ фото, описание, стоимость участков и домов. Всё о покупке, строительстве и жизни за городом в одном месте. Полезная информация для покупателей и инвесторов.
rankseed.click – Found some useful articles here, will be saving them to read later.
کراتین ترکیبی انابولیک کوین لورون، نتیجهی سالها تجربه و علم پشت سر یکی از اسطورههای بزرگ بدنسازی، کوین لورون، هست.
Acho simplesmente fenomenal BR4Bet Casino, tem um ritmo de jogo que acende como uma tocha. A colecao e um facho de diversao. com caca-niqueis que brilham como holofotes. O atendimento e solido como um farol. oferecendo respostas claras como um farol. Os pagamentos sao lisos como uma chama. ocasionalmente queria mais promocoes que brilham como farois. Ao final, BR4Bet Casino garante um jogo que reluz como um farol para quem curte apostar com estilo iluminado! Por sinal a plataforma reluz com um visual brilhante. adicionando um toque de luz ao cassino.
br4bet bГґnus|
Estou pirando com SpeiCasino, parece uma galaxia cheia de diversao estelar. A selecao de titulos do cassino e um buraco negro de emocoes, com jogos de cassino perfeitos pra criptomoedas. O servico do cassino e confiavel e brilha como uma galaxia, garantindo suporte de cassino direto e sem buracos negros. O processo do cassino e limpo e sem turbulencia cosmica, de vez em quando mais giros gratis no cassino seria uma loucura estelar. No fim das contas, SpeiCasino e um cassino online que e uma supernova de diversao para os astronautas do cassino! Alem disso o design do cassino e um espetaculo visual intergalactico, faz voce querer voltar ao cassino como um cometa em orbita.
code spei|
Me ecoei no ritmo de JonBet Casino, e uma onda sonora de diversao que reverbera. As escolhas sao vibrantes como um sino. incluindo jogos de mesa com um toque harmonico. O time do cassino e digno de um maestro. respondendo veloz como uma vibracao. As transacoes sao faceis como um sino. mas mais giros gratis seriam uma loucura sonora. No geral, JonBet Casino e um cassino online que e uma camara de diversao para os viciados em emocoes de cassino! Como extra o layout e vibrante como uma corda. fazendo o cassino ecoar como um sino.
mines jonbet|
musionet – Will bookmark this for future use, seems like a good steady go-to.
Sou louco pela energia de BacanaPlay Casino, e um cassino online que explode como um desfile de carnaval. A gama do cassino e simplesmente um sambodromo de prazeres, com caca-niqueis de cassino modernos e contagiantes. O suporte do cassino ta sempre na ativa 24/7, respondendo mais rapido que um batuque de pandeiro. As transacoes do cassino sao simples como um passo de samba, de vez em quando queria mais promocoes de cassino que botam pra quebrar. No fim das contas, BacanaPlay Casino vale demais sambar nesse cassino para os apaixonados por slots modernos de cassino! E mais a plataforma do cassino brilha com um visual que e puro samba, torna a experiencia de cassino uma festa inesquecivel.
bacanaplay cГіdigo bГіnus|
urbanstylehub – Customer service was responsive when I had a query, appreciated that.
dailytrendstore – Site is clean and easy to browse, checkout was simple.
trendandstyle – Stylish fashion finds, loved the unique designs and quality.
growthnetworkgroup.cfd – Just joined, excited to connect with like-minded professionals here.
winwithus.bond – Great selection of ideas, keeps me coming back often here.
financialgrowthplan – Found helpful resources for budgeting and growth, quite impressed.
justvotenoon2 – Impressive site updates, everything feels current and well maintained.
Fiquei fascinado com PlayPIX Casino, proporciona uma aventura eletrizante. A variedade de titulos e estonteante, com slots de design inovador. Eleva a experiencia de jogo. A assistencia e eficiente e amigavel, garantindo atendimento de alto nivel. As transacoes sao confiaveis, de vez em quando recompensas extras seriam eletrizantes. Resumindo, PlayPIX Casino garante diversao constante para amantes de emocoes fortes ! Acrescentando que a plataforma e visualmente espetacular, instiga a prolongar a experiencia. Igualmente impressionante as opcoes variadas de apostas esportivas, assegura transacoes confiaveis.
Verificar isso|
masterthemarket – I like that they emphasize risk management alongside trade setups — very smart.
imprintregistry – Great resource for artists and galleries wanting strong record keeping.
businesssuccesshub – Very clear and easy-to-follow content for advancing business skills.
tradingmasterclass – I’ll definitely return to the modules for refresher sessions later.
tradeandwin – Good value content, helped me refine my approach to trading.
rasecurities – The blog layout is easy to follow and the topics are varied and engaging.
markettrendalerts – The layout is simple and the alerts are easy to digest quickly.
fitproawardsuk – The vibe of recognition and community feels strong, great for networking.
everydaytrendshop – This site has become my favorite for online fashion shopping.
rankflow.click – Typography and spacing are comfortable—makes reading longer articles enjoyable.
netmatrix.click – On mobile it’s flawless—everything adapts nicely and looks good.
brittanydominguez.shop – Already bookmarked the site—looks like a valuable resource to return to.
nathanjones.shop – The color scheme is subtle and soothing, doesn’t strain the eyes at all.
Experience the best Nuru massage in Bangkok at HisoMassage.com your ultimate destination for authentic erotic massage,
soapy massage, and happy ending massage on Sukhumvit. Our expert Nuru therapists provide a luxurious, sensual experience that defines true
relaxation in the heart of Bangkok.
z9hl4.info – Pages load quickly and everything looks crisp—great user experience.